brake light BMW 328D SEDAN 2015 Owner's Manual
[x] Cancel search | Manufacturer: BMW, Model Year: 2015, Model line: 328D SEDAN, Model: BMW 328D SEDAN 2015Pages: 257, PDF Size: 5.55 MB
Page 129 of 257
Before leaving the vehicle, secure it
against moving on its own.
Before leaving the vehicle with the engine run‐
ning: set the parking brake and ensure that the
Steptronic transmission is in position P. Other‐
wise, the vehicle may begin to move.◀
Overview
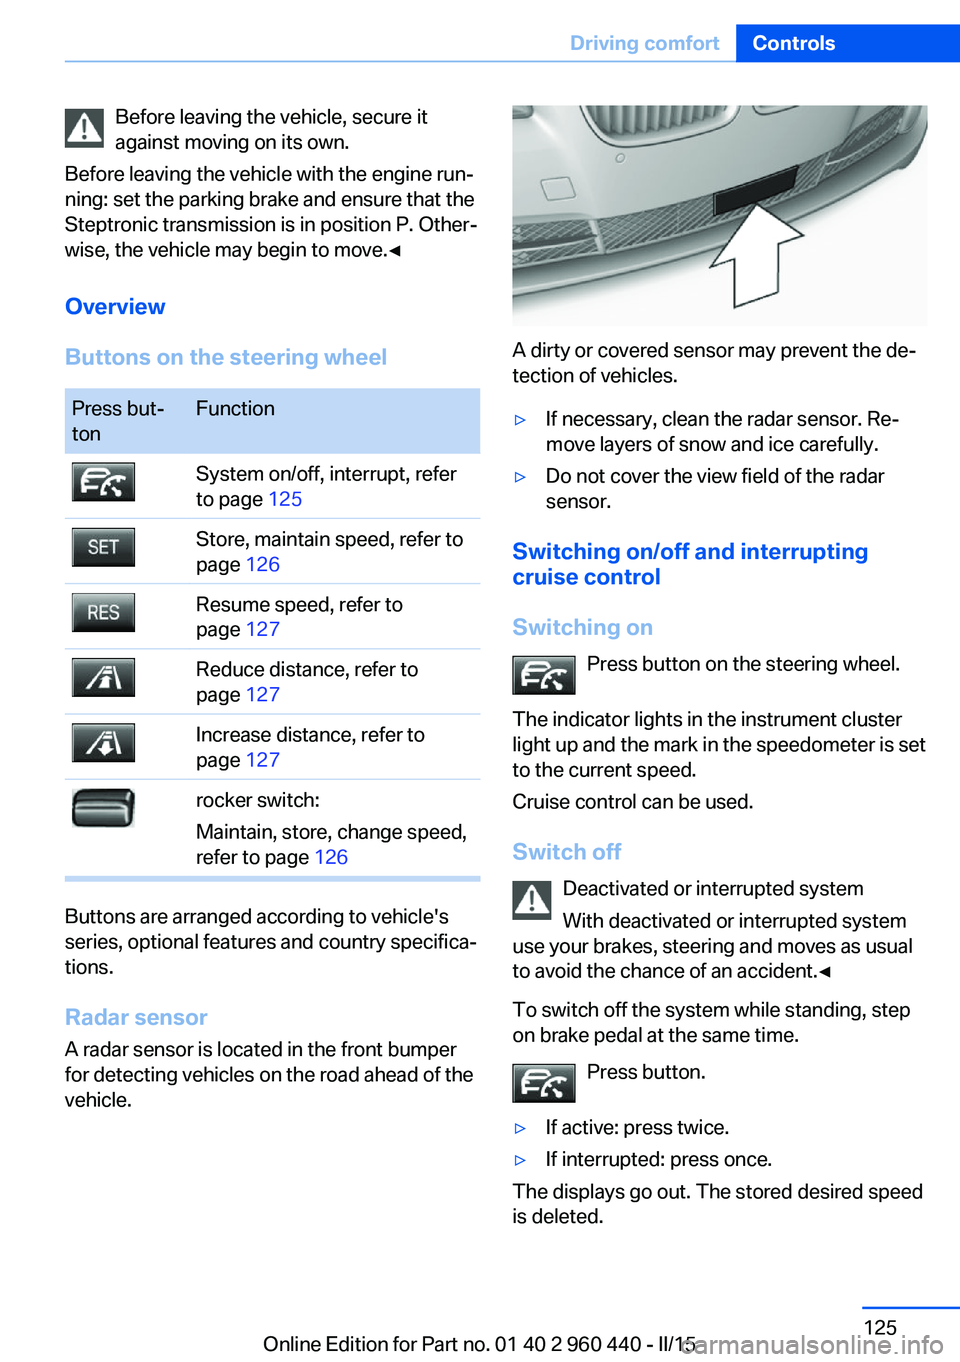
Buttons on the steering wheelPress but‐
tonFunctionSystem on/off, interrupt, refer
to page 125Store, maintain speed, refer to
page 126Resume speed, refer to
page 127Reduce distance, refer to
page 127Increase distance, refer to
page 127rocker switch:
Maintain, store, change speed,
refer to page 126
Buttons are arranged according to vehicle's
series, optional features and country specifica‐
tions.
Radar sensor
A radar sensor is located in the front bumper for detecting vehicles on the road ahead of the
vehicle.
A dirty or covered sensor may prevent the de‐
tection of vehicles.
▷If necessary, clean the radar sensor. Re‐
move layers of snow and ice carefully.▷Do not cover the view field of the radar
sensor.
Switching on/off and interrupting cruise control
Switching on Press button on the steering wheel.
The indicator lights in the instrument cluster
light up and the mark in the speedometer is set
to the current speed.
Cruise control can be used.
Switch off Deactivated or interrupted system
With deactivated or interrupted system
use your brakes, steering and moves as usual
to avoid the chance of an accident.◀
To switch off the system while standing, step
on brake pedal at the same time.
Press button.
▷If active: press twice.▷If interrupted: press once.
The displays go out. The stored desired speed
is deleted.
Seite 125Driving comfortControls125
Online Edition for Part no. 01 40 2 960 440 - II/15
Page 131 of 257
DistanceSelect a distance
Adjust the distance according to the traf‐
fic and weather conditions; otherwise, there is
the risk of an accident. Maintain the prescribed
safety distance.◀
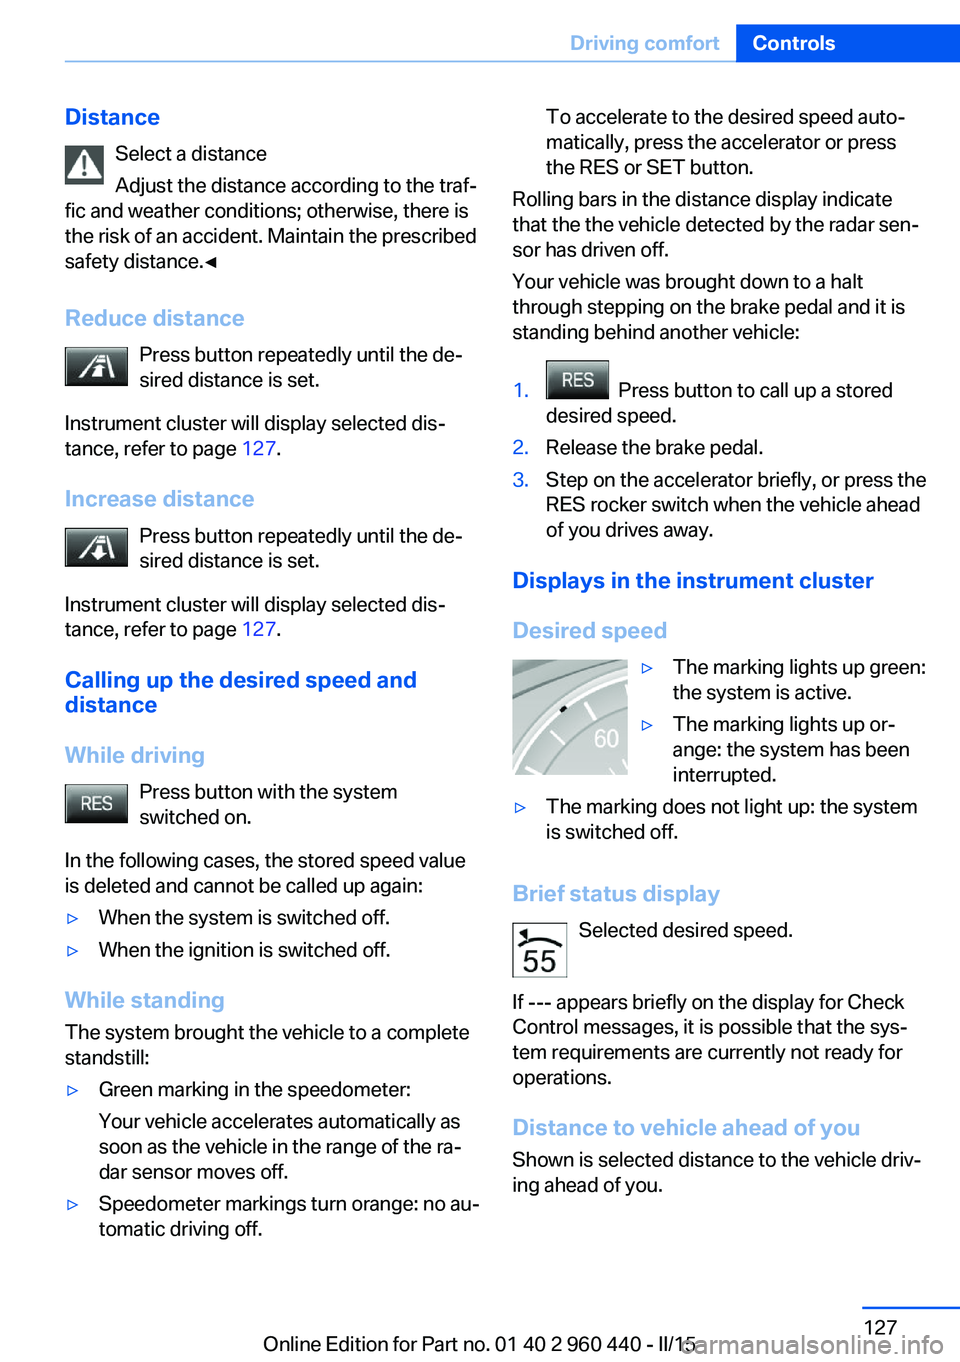
Reduce distance Press button repeatedly until the de‐
sired distance is set.
Instrument cluster will display selected dis‐
tance, refer to page 127.
Increase distance Press button repeatedly until the de‐
sired distance is set.
Instrument cluster will display selected dis‐
tance, refer to page 127.
Calling up the desired speed and
distance
While driving Press button with the system
switched on.
In the following cases, the stored speed value
is deleted and cannot be called up again:▷When the system is switched off.▷When the ignition is switched off.
While standing
The system brought the vehicle to a complete
standstill:
▷Green marking in the speedometer:
Your vehicle accelerates automatically as
soon as the vehicle in the range of the ra‐
dar sensor moves off.▷Speedometer markings turn orange: no au‐
tomatic driving off.To accelerate to the desired speed auto‐
matically, press the accelerator or press
the RES or SET button.
Rolling bars in the distance display indicate
that the the vehicle detected by the radar sen‐
sor has driven off.
Your vehicle was brought down to a halt
through stepping on the brake pedal and it is
standing behind another vehicle:
1. Press button to call up a stored
desired speed.2.Release the brake pedal.3.Step on the accelerator briefly, or press the
RES rocker switch when the vehicle ahead
of you drives away.
Displays in the instrument cluster
Desired speed
▷The marking lights up green:
the system is active.▷The marking lights up or‐
ange: the system has been
interrupted.▷The marking does not light up: the system
is switched off.
Brief status display
Selected desired speed.
If --- appears briefly on the display for Check
Control messages, it is possible that the sys‐
tem requirements are currently not ready for
operations.
Distance to vehicle ahead of you Shown is selected distance to the vehicle driv‐
ing ahead of you.
Seite 127Driving comfortControls127
Online Edition for Part no. 01 40 2 960 440 - II/15
Page 132 of 257
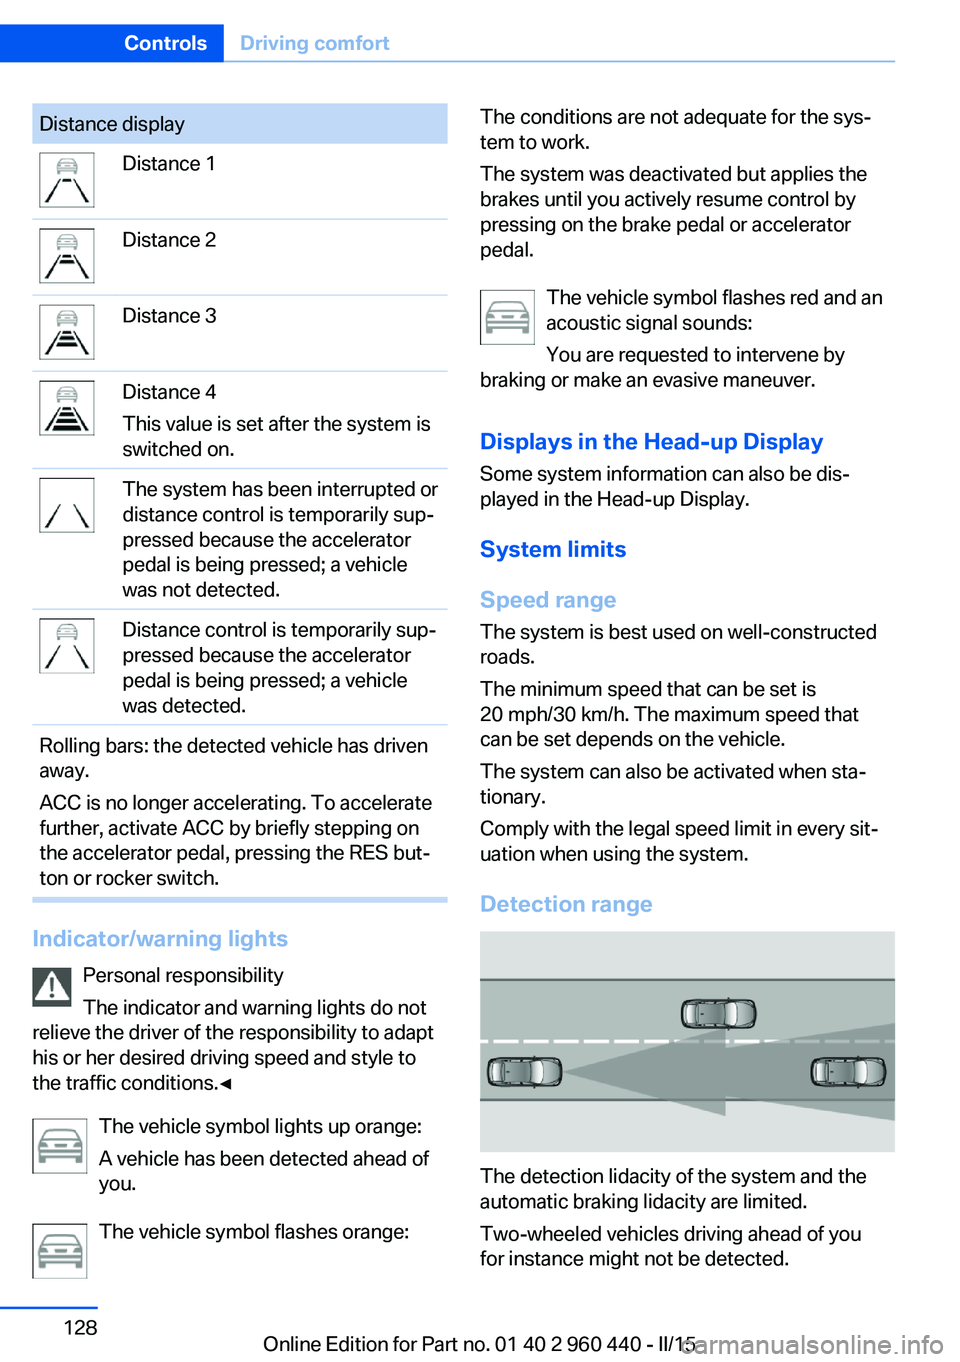
Distance displayDistance 1Distance 2Distance 3Distance 4
This value is set after the system is
switched on.The system has been interrupted or
distance control is temporarily sup‐
pressed because the accelerator
pedal is being pressed; a vehicle
was not detected.Distance control is temporarily sup‐
pressed because the accelerator
pedal is being pressed; a vehicle
was detected.Rolling bars: the detected vehicle has driven
away.
ACC is no longer accelerating. To accelerate
further, activate ACC by briefly stepping on
the accelerator pedal, pressing the RES but‐
ton or rocker switch.
Indicator/warning lights
Personal responsibility
The indicator and warning lights do not
relieve the driver of the responsibility to adapt
his or her desired driving speed and style to
the traffic conditions.◀
The vehicle symbol lights up orange:
A vehicle has been detected ahead of
you.
The vehicle symbol flashes orange:
The conditions are not adequate for the sys‐
tem to work.
The system was deactivated but applies the
brakes until you actively resume control by
pressing on the brake pedal or accelerator
pedal.
The vehicle symbol flashes red and an
acoustic signal sounds:
You are requested to intervene by
braking or make an evasive maneuver.
Displays in the Head-up Display Some system information can also be dis‐
played in the Head-up Display.
System limits
Speed range The system is best used on well-constructed
roads.
The minimum speed that can be set is
20 mph/30 km/h. The maximum speed that
can be set depends on the vehicle.
The system can also be activated when sta‐
tionary.
Comply with the legal speed limit in every sit‐
uation when using the system.
Detection range
The detection lidacity of the system and the
automatic braking lidacity are limited.
Two-wheeled vehicles driving ahead of you
for instance might not be detected.
Seite 128ControlsDriving comfort128
Online Edition for Part no. 01 40 2 960 440 - II/15
Page 171 of 257
▷Close all windows and the glass sunroof.▷Greatly increase the air flow from the vents.▷Drive moderately.
Hot exhaust systemHot exhaust system
High temperatures are generated in the
exhaust system.
Do not remove the heat shields installed and
never apply undercoating to them. Make sure
that flammable materials, e. g. hay, leaves,
grass, etc. do not come in contact with the hot
exhaust system while driving, while in idle po‐
sition mode, or when parked. Such contact
could lead to a fire, resulting in an increased
risk of serious personal injury as well as prop‐
erty damage.
Do not touch hot exhaust pipes; otherwise,
there is a danger of getting burned.◀
Diesel particulate filter The diesel particulate filter collects soot parti‐
cles and burns them periodically at high tem‐
peratures.
During several minutes of cleaning the follow‐
ing may occur:
▷Temporarily, the engine may run less
smoothly.▷Noises and a slight amount of smoke com‐
ing from the exhaust until shortly after the
engine is shut down.▷A somewhat higher engine speed is neces‐
sary to reach usual performance.
Mobile communication devices in the
vehicle
Mobile communication devices in the ve‐
hicle
It is not recommended to use mobile phones,
such as mobile phones, in the vehicle interior
without a direct connection to an external aer‐
ial. Otherwise, the vehicle's electronics and
mobile communication devices can interfere
with each other. In addition, there is no assur‐
ance that the radiation generated during trans‐
mission will be conducted away from the vehi‐
cle interior.◀
Hydroplaning Hydroplaning
When driving on wet or slushy roads, re‐
duce your speed to prevent hydroplaning.◀
On wet or slushy roads, a wedge of water can
form between the tires and road surface.
This phenomenon is referred to as hydroplan‐
ing. It is characterized by a partial or complete
loss of contact between the tires and the road
surface, ultimately undermining your ability to
steer and brake the vehicle.
Driving through water Observe water level and speed
Do not exceed the maximum water level
and maximum speed; otherwise, the vehicle's
engine, the electrical systems and the trans‐
mission may be damaged.◀
Drive though calm water only and only if it is
not deeper than 9.8 inches/25 cm and at this
height, no faster than walking speed, up to 3 mph/5 km/h.
Braking safely
Your vehicle is equipped with ABS as a stand‐
ard feature.
Applying the brakes fully is the most effective
way of braking in situations needed.
Steering is still responsive. You can still avoid
any obstacles with a minimum of steering ef‐
fort.
Pulsation of the brake pedal and sounds from
the hydraulic circuits indicate that ABS is in its
active mode.
In certain braking situations, the perforated
brake discs can cause functional problems.Seite 167Things to remember when drivingDriving tips167
Online Edition for Part no. 01 40 2 960 440 - II/15
Page 172 of 257
However, this has no effect on the perform‐
ance and operational reliability of the brake.
Objects within the range of movement
of the pedals
No objects in the area around the pedals
Keep floor mats, carpets, and any other
objects out of the pedal area; otherwise, the
function of the pedals could be impeded while
driving and create the risk of an accident.
Do not place additional floor mats over existing
mats or other objects.
Only use floor mats that have been approved
for the vehicle and can be properly attached to
floor.
Ensure that the floor mats are securely fas‐
tened again after they were removed for clean‐
ing, e.g.◀
Driving in wet conditions When roads are wet, salted, or in heavy rain,
press brake pedal ever so gently every few
miles.
Ensure that this action does not endanger other traffic.
The heat generated in this process helps dry
the brake discs and pads.
In this way braking efficiency will be available
when you need it.
Hills Avoid stressing the brakes
Avoid placing excessive stress on the
brake system. Light but consistent brake pres‐
sure can lead to high temperatures, brakes
wearing out and possibly even brake failure.◀
Do not drive in neutral
Do not drive in neutral or with the engine
stopped, as doing so disables engine braking.
In addition, steering and brake assist are un‐
available with the engine stopped.◀Drive long or steep downhill gradients in the
gear that requires least braking efforts. Other‐
wise the brakes may overheat and reduce
brake efficiency.
You can increase the engine's braking effect
by shifting down, going all the way to first gear,
if needed.
Brake disc corrosion
Brake disc corrosion and contamination of the
brake pads are favored by:▷Low mileage.▷Extended periods when the vehicle is not
used at all.▷Infrequent use of the brakes.
Corrosion will built up when the maximum
pressure applied to the brake pads during
braking is not reached - thus discs don't get
cleaned.
Corrosion buildup on the brake discs will cause
a pulsating effect on the brakes in their re‐
sponse - generally that cannot be corrected.
Condensation under the parked
vehicle
When using the automatic climate control,
condensation water develops collecting under‐
neath the vehicle.
These traces of water under the vehicle are
normal.
Seite 168Driving tipsThings to remember when driving168
Online Edition for Part no. 01 40 2 960 440 - II/15
Page 222 of 257
Tail lights, bulb replacement
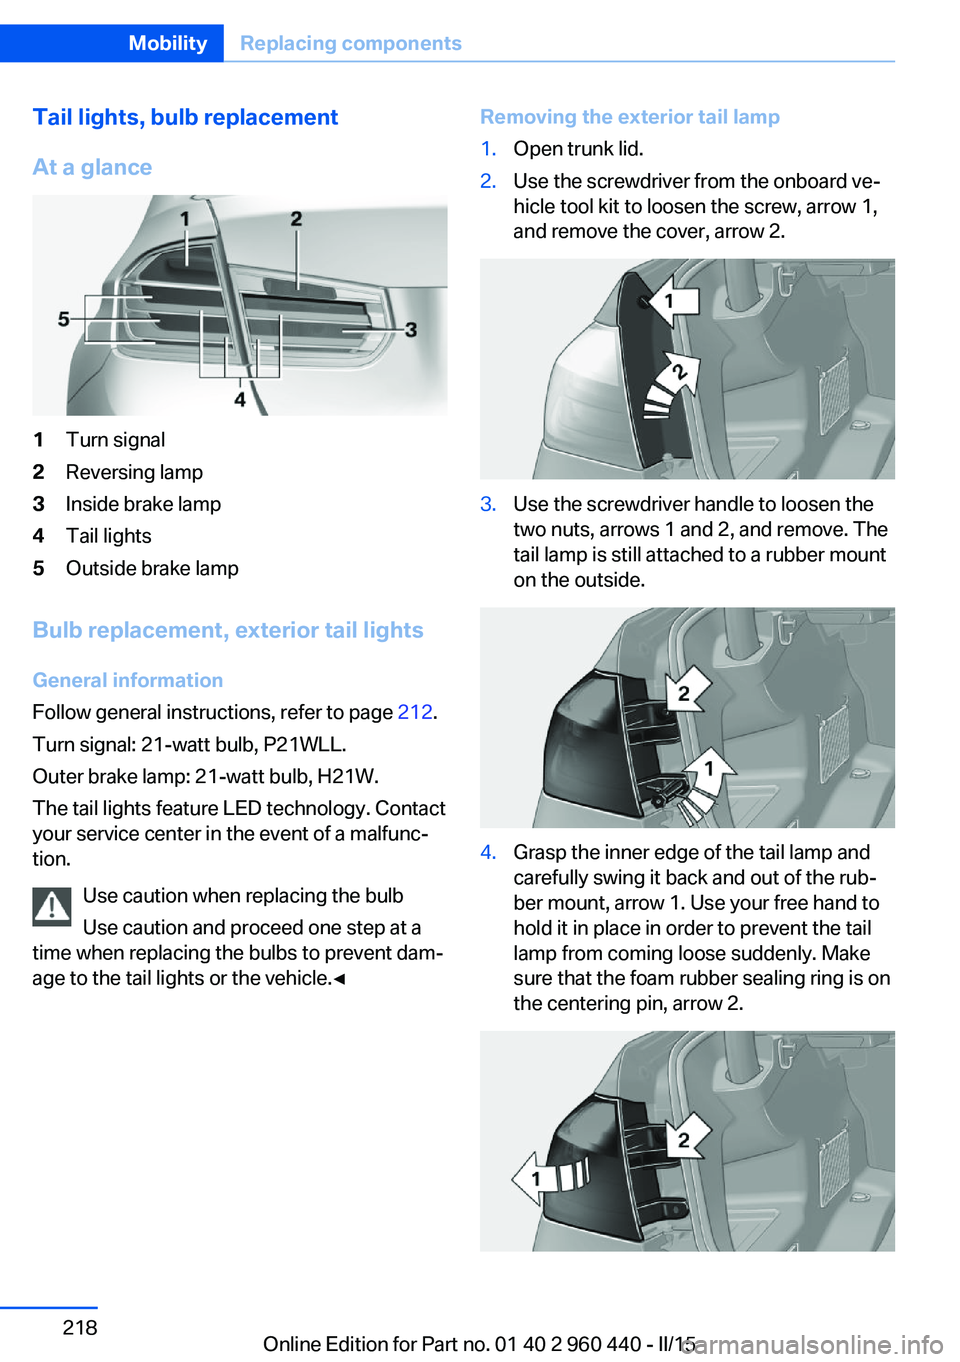
At a glance1Turn signal2Reversing lamp3Inside brake lamp4Tail lights5Outside brake lamp
Bulb replacement, exterior tail lights General information
Follow general instructions, refer to page 212.
Turn signal: 21-watt bulb, P21WLL.
Outer brake lamp: 21-watt bulb, H21W.
The tail lights feature LED technology. Contact
your service center in the event of a malfunc‐
tion.
Use caution when replacing the bulb
Use caution and proceed one step at a
time when replacing the bulbs to prevent dam‐
age to the tail lights or the vehicle.◀
Removing the exterior tail lamp1.Open trunk lid.2.Use the screwdriver from the onboard ve‐
hicle tool kit to loosen the screw, arrow 1,
and remove the cover, arrow 2.3.Use the screwdriver handle to loosen the
two nuts, arrows 1 and 2, and remove. The
tail lamp is still attached to a rubber mount
on the outside.4.Grasp the inner edge of the tail lamp and
carefully swing it back and out of the rub‐
ber mount, arrow 1. Use your free hand to
hold it in place in order to prevent the tail
lamp from coming loose suddenly. Make
sure that the foam rubber sealing ring is on
the centering pin, arrow 2.Seite 218MobilityReplacing components218
Online Edition for Part no. 01 40 2 960 440 - II/15
Page 223 of 257
5.Remove the connecting line from the clip
on the bulb holder.6.Press and hold the catch at the top on the
connector of the connecting line and re‐
move the connector from the bulb holder.
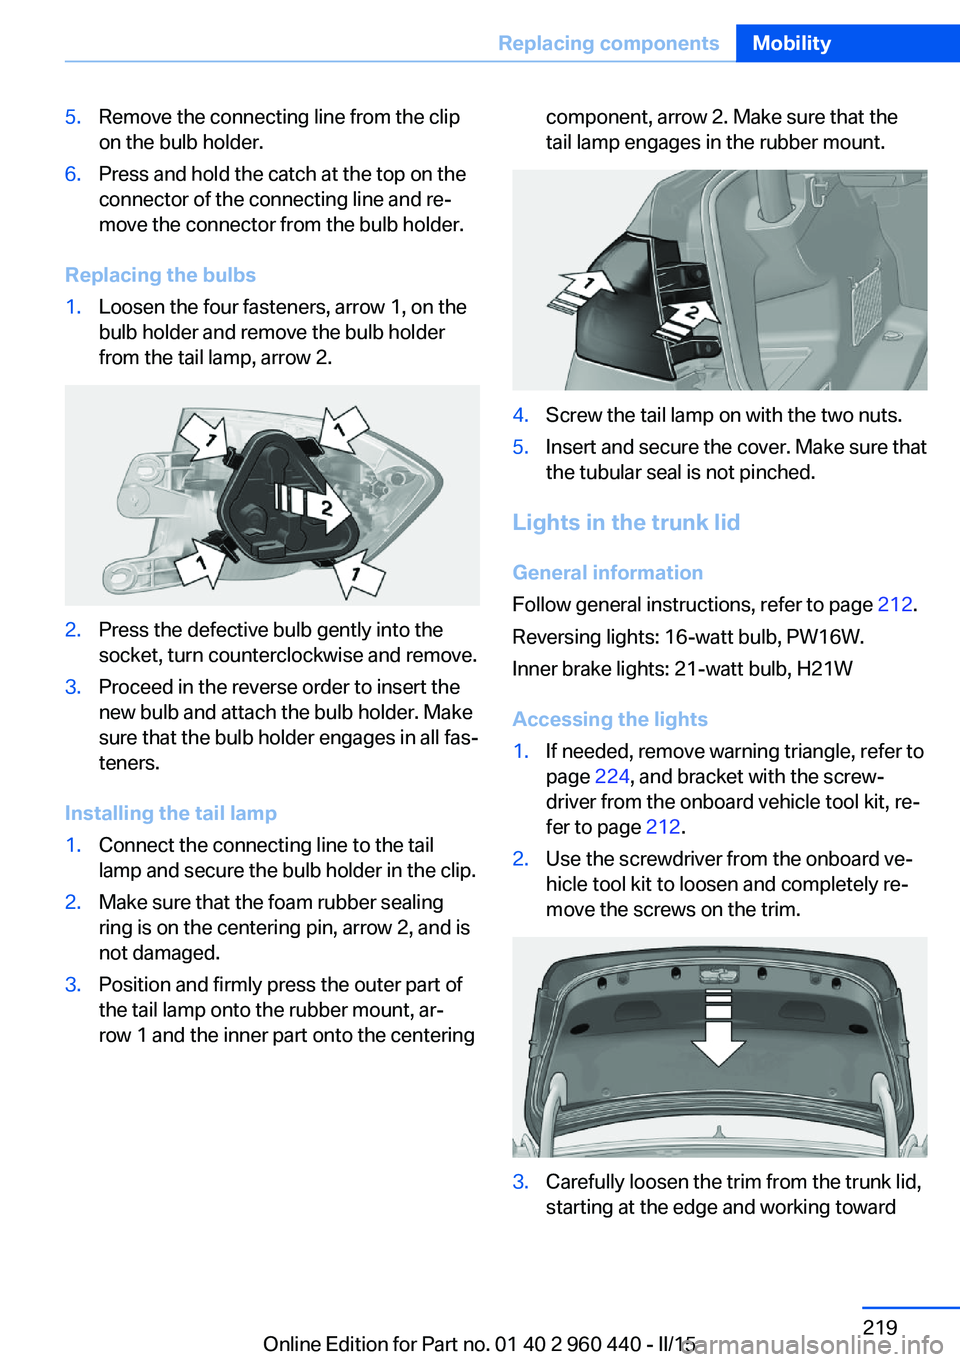
Replacing the bulbs
1.Loosen the four fasteners, arrow 1, on the
bulb holder and remove the bulb holder
from the tail lamp, arrow 2.2.Press the defective bulb gently into the
socket, turn counterclockwise and remove.3.Proceed in the reverse order to insert the
new bulb and attach the bulb holder. Make
sure that the bulb holder engages in all fas‐
teners.
Installing the tail lamp
1.Connect the connecting line to the tail
lamp and secure the bulb holder in the clip.2.Make sure that the foam rubber sealing
ring is on the centering pin, arrow 2, and is
not damaged.3.Position and firmly press the outer part of
the tail lamp onto the rubber mount, ar‐
row 1 and the inner part onto the centeringcomponent, arrow 2. Make sure that the
tail lamp engages in the rubber mount.4.Screw the tail lamp on with the two nuts.5.Insert and secure the cover. Make sure that
the tubular seal is not pinched.
Lights in the trunk lid
General information
Follow general instructions, refer to page 212.
Reversing lights: 16-watt bulb, PW16W.
Inner brake lights: 21-watt bulb, H21W
Accessing the lights
1.If needed, remove warning triangle, refer to
page 224, and bracket with the screw‐
driver from the onboard vehicle tool kit, re‐
fer to page 212.2.Use the screwdriver from the onboard ve‐
hicle tool kit to loosen and completely re‐
move the screws on the trim.3.Carefully loosen the trim from the trunk lid,
starting at the edge and working towardSeite 219Replacing componentsMobility219
Online Edition for Part no. 01 40 2 960 440 - II/15
Page 224 of 257
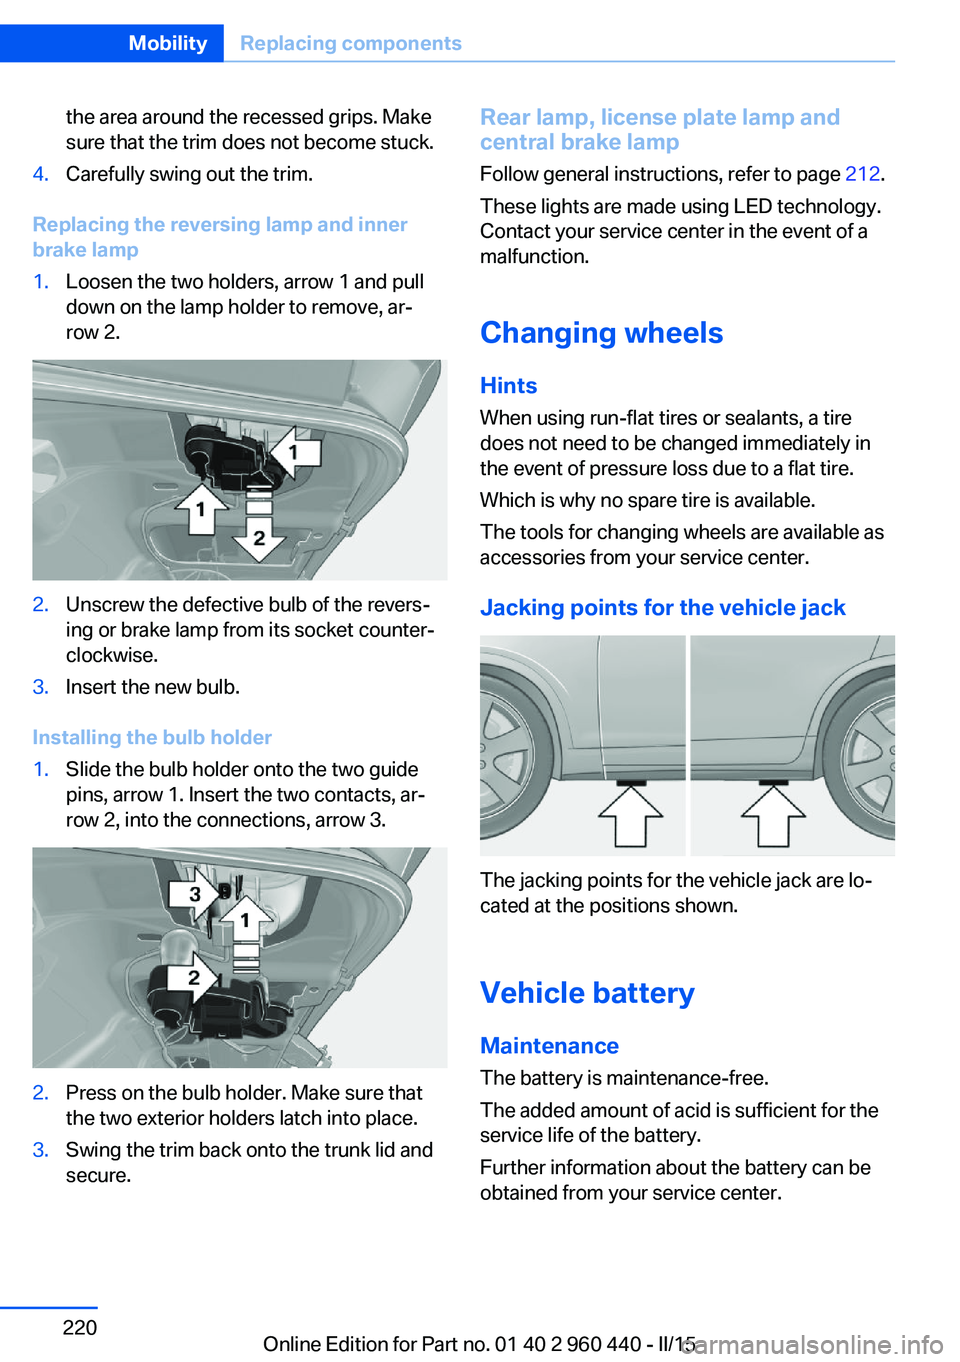
the area around the recessed grips. Make
sure that the trim does not become stuck.4.Carefully swing out the trim.
Replacing the reversing lamp and inner
brake lamp
1.Loosen the two holders, arrow 1 and pull
down on the lamp holder to remove, ar‐
row 2.2.Unscrew the defective bulb of the revers‐
ing or brake lamp from its socket counter‐
clockwise.3.Insert the new bulb.
Installing the bulb holder
1.Slide the bulb holder onto the two guide
pins, arrow 1. Insert the two contacts, ar‐
row 2, into the connections, arrow 3.2.Press on the bulb holder. Make sure that
the two exterior holders latch into place.3.Swing the trim back onto the trunk lid and
secure.Rear lamp, license plate lamp and
central brake lamp
Follow general instructions, refer to page 212.
These lights are made using LED technology.
Contact your service center in the event of a
malfunction.
Changing wheels
Hints When using run-flat tires or sealants, a tire
does not need to be changed immediately in
the event of pressure loss due to a flat tire.
Which is why no spare tire is available.
The tools for changing wheels are available as
accessories from your service center.
Jacking points for the vehicle jack
The jacking points for the vehicle jack are lo‐
cated at the positions shown.
Vehicle battery Maintenance
The battery is maintenance-free.
The added amount of acid is sufficient for the
service life of the battery.
Further information about the battery can be
obtained from your service center.
Seite 220MobilityReplacing components220
Online Edition for Part no. 01 40 2 960 440 - II/15
Page 234 of 257
3.Switch the engine off.4.Switch on the ignition.
Steptronic transmission:
1.Drive into the car wash.2.Engage selector lever position N.3.Switch the engine off.
In this way, the ignition remains switched
on, and a Check-Control message is dis‐
played.
Do not turn off the ignition in the car
wash
Do not turn off the ignition in the car wash;
otherwise, selector lever position P is en‐
gaged and damages can result.◀
The vehicle cannot be locked from the outside
when in selector lever position N. A signal
sounds when an attempt is made to lock the
vehicle.
To start the engine with manual transmission:
1.Press on the clutch pedal.2.Press the Start/Stop button.
To start the engine with Steptronic transmis‐
sion:
1.Depress the brake pedal.2.Press the Start/Stop button.
Pressing the Start/Stop button without step‐
ping on the brake turns the ignition off.
Selector lever positionSelector lever position P is engaged automati‐
cally:
▷When the ignition is switched off.▷After approx. 15 minutes.
Headlights
▷Do not rub dry and do not use abrasive or
acidic cleansers.▷Soak areas that have been dirtied e. g.,
from insects, with shampoo and wash off
with water.▷Thaw ice with de-icing spray; do not use an
ice scraper.
After washing the vehicle
After washing the vehicle, apply the brakes
briefly to dry them; otherwise, braking action
can be reduced and corrosion of the brake
discs can occur.
Completely remove all residues on the win‐
dows, to minimize loss of visibility due to
smearing and to reduce wiper noises and
wiper blade wear.
Vehicle care
Car care products BMW recommends using care and cleaning
products from BMW, since these have been
tested and approved.
Car care and cleaning products
Follow the instructions on the container.
When cleaning the interior, open the doors or
windows.
Only use products intended for cleaning vehi‐
cles.
Cleansers can contain substances that are
dangerous and harmful to your health.◀
Vehicle paint
Regular care contributes to driving safety and
value retention. Environmental influences in
areas with elevated air pollution or natural con‐
taminants, such as tree resin or pollen can af‐
fect the vehicle's paintwork. Tailor the fre‐
quency and extent of your car care to these
influences.
Aggressive substances such as spilled fuel, oil,
grease or bird droppings, must be removed im‐
Seite 230MobilityCare230
Online Edition for Part no. 01 40 2 960 440 - II/15
Page 235 of 257
mediately to prevent the finish from being al‐
tered or discolored.
Leather care Remove dust from the leather often, using a
cloth or vacuum cleaner.
Otherwise, particles of dust and road grime
chafe in pores and folds, and lead to increased
wear and premature degradation of the leather
surface.
To guard against discoloration, such as from
clothing, provide leather care roughly every
two months.
Clean light-colored leather more frequently be‐
cause soiling on such surfaces is substantially
more visible.
Use leather care products; otherwise, dirt and
grease will gradually break down the protective
layer of the leather surface.
Suitable care products are available from the
service center.
Upholstery material care Vacuum regularly with a vacuum cleaner.
If upholstery is very dirty, e.g., with beverage
stains, use a soft sponge or microfiber cloth
with a suitable interior cleaner.
Clean the upholstery down to the seams using
large sweeping motions. Avoid rubbing the
material vigorously.
Damage from Velcro® fasteners
Open Velcro® fasteners on pants or
other articles of clothing can damage the seat
covers. Ensure that any Velcro® fasteners are
closed.◀
Caring for special components
Light-alloy wheels
When cleaning the vehicle, use only neutral
wheel cleaners having a pH value from 5 to 9.
Do not use abrasive cleaning agents or steamjets above 140 ℉/60 ℃. Follow the manufac‐
turer's instructions.
Aggressive, acidic or alkaline cleaning agents
can destroy the protective layer of adjacent
components, such as the brake disk.
Chrome surfaces
Carefully clean components such as the radia‐
tor grille or door handles with an ample supply
of water, possibly with shampoo added, partic‐
ularly when they have been exposed to road
salt.
Rubber components Aside from water, treat only with rubber
cleansers.
When cleaning rubber seals, do not use any
silicon-containing car care products in order to
avoid damage or noises.
Fine wood partsClean fine wood facing and fine wood compo‐
nents only with a moist rag. Then dry with a
soft cloth.
Plastic components
These include:▷Imitation leather surfaces.▷Roofliner.▷Lamp lenses.▷Instrument cluster cover.▷Matt black spray-coated components.▷Painted parts in the interior.
Clean with a microfiber cloth.
Dampen cloth lightly with water.
Do not soak the roofliner.
No cleansers that contain alcohol or sol‐
vents
Do not use cleansers that contain alcohol or
solvents, such as lacquer thinners, heavy-duty
Seite 231CareMobility231
Online Edition for Part no. 01 40 2 960 440 - II/15