fog BMW 328i 1993 E36 Owner's Manual
[x] Cancel search | Manufacturer: BMW, Model Year: 1993, Model line: 328i, Model: BMW 328i 1993 E36Pages: 759
Page 443 of 759
4
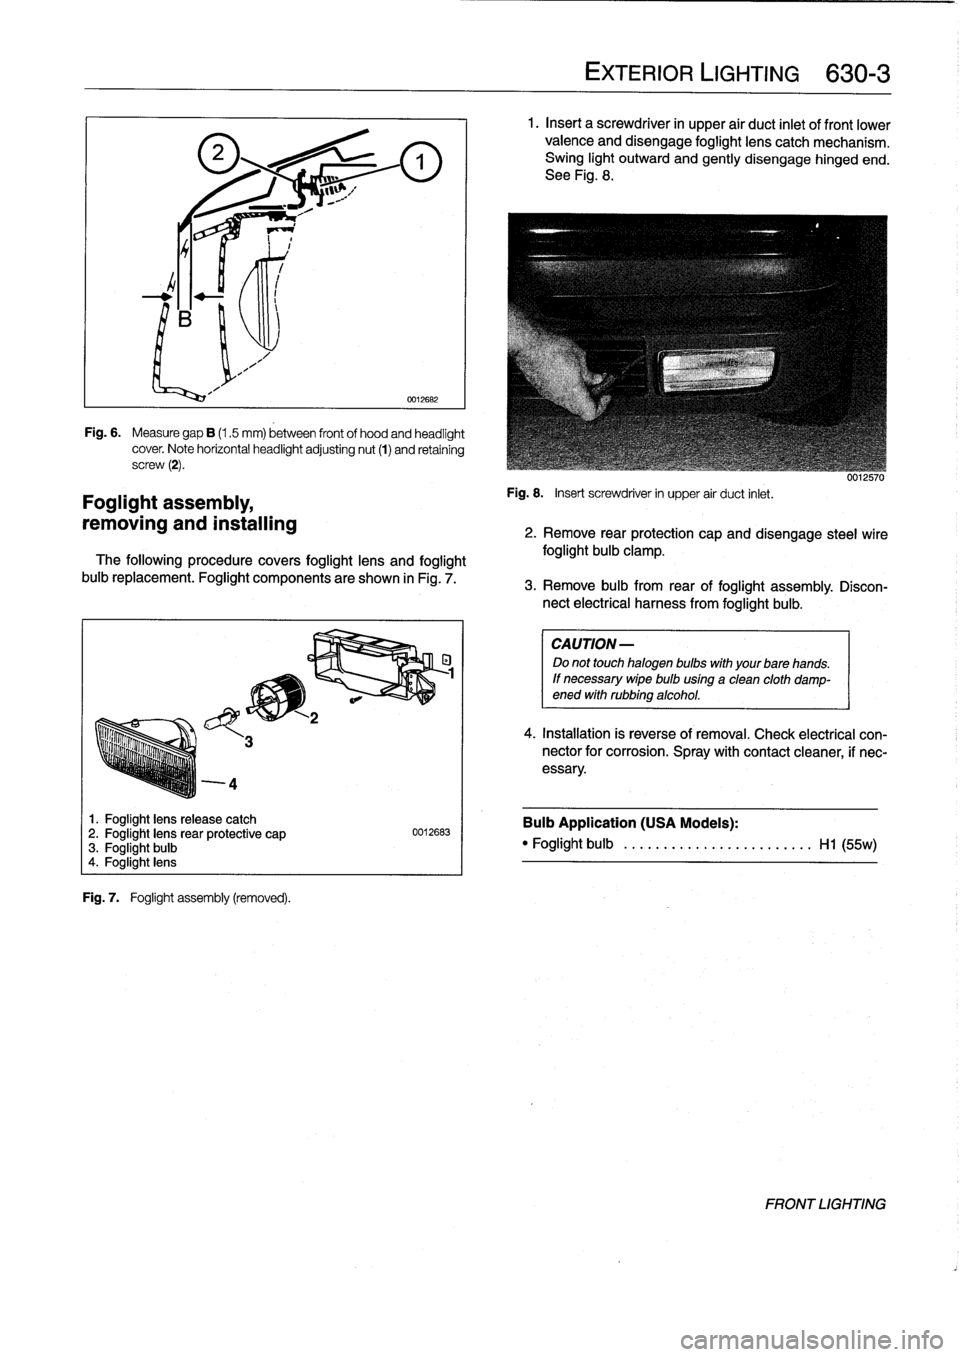
Foglight
assembly,
removing
and
installing
1
.
Foglight
lens
release
catch
2
.
Foglight
lensrear
protective
cap
3
.
Foglight
bulb
4
.
Foglight
lens
Fig
.
7
.
Foglight
assembly
(removed)
.
0012682
Fig
.
6
.
Measure
gap
B
(1.5
mm)
between
front
of
hood
and
headlight
cover
.
Note
horizontal
headlightadjusting
nut
(1)
and
retaining
screw
(2)
.
The
following
procedure
covers
foglight
lens
and
foglight
buib
replacement
.
Foglight
components
are
shown
in
Fig
.
7
.
0012683
EXTERIOR
LIGHTING
630-
3
1
.
Insert
a
screwdriver
in
upper
air
duct
inlet
of
front
lower
valence
and
disengage
foglight
lens
catch
mechanism
.
Swing
light
outward
and
gently
disengage
hinged
end
.
See
Fig
.
8
.
Fig
.
8
.
Insert
screwdriver
in
upper
air
duct
inlet
.
uu¡¿biu
2
.
Remove
rear
protection
capand
disengage
steel
wire
foglight
bulb
clamp
.
3
.
Remove
bulb
from
rear
of
foglight
assembly
.
Discon-
nect
electrical
harness
from
foglight
bulb
.
CAUTION
-
Do
not
touch
halogen
bulbs
with
yourbare
hands
.
If
necessary
wipe
buib
using
a
clean
cloth
damp-ened
withrubbing
alcohol
.
4
.
Installation
is
reverse
of
removal
.
Check
electrical
con-nector
for
corrosion
.
Spray
with
contact
cleaner,
if
nec-
essary
.
Bulb
Application
(USA
Models)
:
"
Foglight
bulb
......
...
..
...
..........
Hl
(55w)
FRONT
LIGHTING
Page 447 of 759
GENERAL
E36
cars
are
equipped
with
integrated
automatic
heating
and
air
conditioning
systems
.
Many
of
the
procedures
given
in
this
repair
group
require
that
the
A/C
refrigerant
charge
be
evacuated
using
specialized
equipment
.
See
A/C
System
Warningsand
Cautions
later
in
this
repair
group
.
HEATER
AND
CONTROLS
Blower
motor,
removing
and
installing
NOTE-
On
6-cylinder
cars,
the
plastic
top
enginecover
and
fuel
rail
covermustbe
removed
.
The
fuel
injectorhamess
re-
taining
screws
must
be
removed
and
the
harness
set
aside
.
The
engine
control
module
(ECM)
cover
must
be
removed,
the
control
unit
connectors
unplugged
and
the
harness
pulled
out
of
the
way
.
See
130
Fuel
Injection
.
1
.
Disconnect
negative
(-)
cable
from
battery
.
2
.
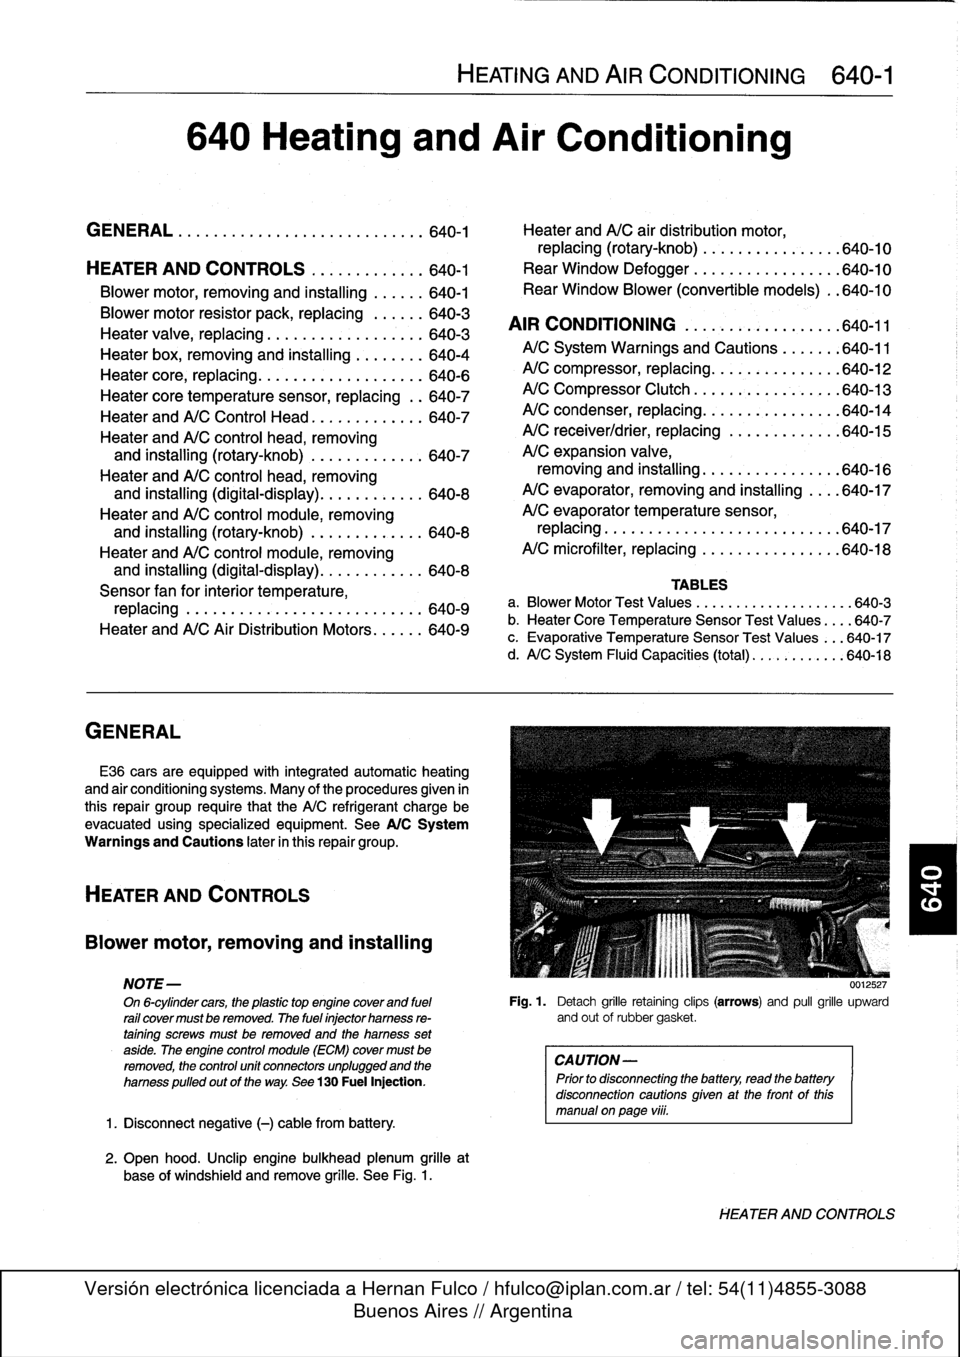
Open
hood
.
Unclip
engine
bulkhead
plenum
grille
at
base
of
windshíeld
and
remove
grille
.
See
Fig
.
1
.
HEATING
AND
AIR
CONDITIONING
640-1
640
Heating
and
Air
Conditioning
GENERAL
.
...
.
....
.
.
.
.
.
.
.
.
.
.......
.
.
.
640-1
Heater
andA/C
air
distribution
motor,
replacing(rotary-knob)
.
.
...
.
.
.
.......
.
640-10
HEATER
AND
CONTROLS
.
.....
.
.
.
.
.
.
.640-1
Rear
Window
Defogger
.
.
.
.
.
.
.
.
.
.
...
.
.
.
640-10
Blower
motor,
removing
and
installing
.
.
.
.
.
.
640-1
Rear
Window
Blower
(convertible
models)
.
.640-10
Blowermotor
resistor
pack,
replacing
.
.
.
.
.
.
640-3
AIR
CONDITIONING
.
.
.
.
.
.
.
.
.
.
.
.
.
.
.
.
.
.
640-11
Heater
valve,
replacing
...........
.
.
.
.
.
.
.
640-3
Heater
box,
removing
and
installing
.
.
.
.
.
.
.
.
640-4
A/CSystem
Warnings
and
Cautions
.
.
.
.
.
.
:640-11
Heater
core,
replacing
.....
.
.
:
....
.
.
.
.
.
.
.
640-6
A/C
compressor,
replacing
.
.
::.
:
:
.
.
.
.
.
.
.
.640-12
Heater
core
temperature
sensor,
replacing
.
.
640-7
A/C
Compressor
Clutch
.
.
.
.
.
.
.
:
.
.
.
.
.
.
.
.
.
640-13
Heater
andA/C
Control
Head
.
.
....
.
.....
.
640-7
A/C
condenser,
replacing
.
.
.
.
.
.
.
.
.
.
.
.
.
.
.
.
640-14
Heater
andA/C
control
head,
removing
A/C
receiver/drier,
replacing
.
.
.
.
.
.
.
.
.
.
.
.
.
640-15
and
installing
(rotary-knob)
.
.
....
.
......
640-7
A/C
expansion
valve,
Heater
andA/C
control
head,
removing
removing
and
installing
...
.
.....
.
.
.
.
.
.
.
640-16
and
installing
(digital-display)
.
.....
.
.....
640-8
A/C
evaporator,
removing
and
installing
.
.
..
640-17
Heater
andA/C
control
module,removing
A/C
evaporator
temperature
sensor,
and
installing
(rotary-knob)
.
.
...
.
.
.
.
.
.
.
.
640-8
replacing
.
.
.
.
.
.
..............
.
.
.
.
.
..
640-17
Heater
andA/C
control
module,removing
A/C
microfilter,
replacing
......
.
....
.
.
.
..
640-18
and
installing
(digital-display)
.
...
.
.
.
.
.
...
640-8
Sensor
fan
for
interior
temperature,
TABLES
replacing
.
.
.
....
.
.
.
.
.
.
.
.
.
.
.
.
.
.
.
.
.
.
.
.
640-9
a
.
Blower
Motor
Test
Values
.........
...
.
.
......
640-3
Heater
andA/C
AirDistribution
Motors
.
.
.
.
.
.
640-9
b
.
Heater
Core
Temperature
Sensor
Test
Values
...
.640-7
c
.
Evaporative
Temperature
Sensor
Test
Values
...
640-17
d
.
A/C
System
Fluid
Capacities
(total)
..
..........
640-18
0012527
Fig
.
1
.
Detach
grille
retaining
clips
(arrows)
and
pull
grille
upward
and
out
of
rubbergasket
.
CAUTION-
Prior
to
disconnectiog
the
battery,
read
the
battery
disconnection
cautionsgiven
at
the
front
of
this
manual
onpage
viii
.
HEATER
AND
CONTROLS
Page 456 of 759
640-10
HEATING
AND
AIR
CONDITIONING
i
El
Radio
Antenna
Rear
.
,
si,-
Left
side
I
d
1
.
Rear
vents
2
.
Fresh
air
3
.
Face-level
vents
4
.
Recirculation
5
.
Footwell
vents
0013017
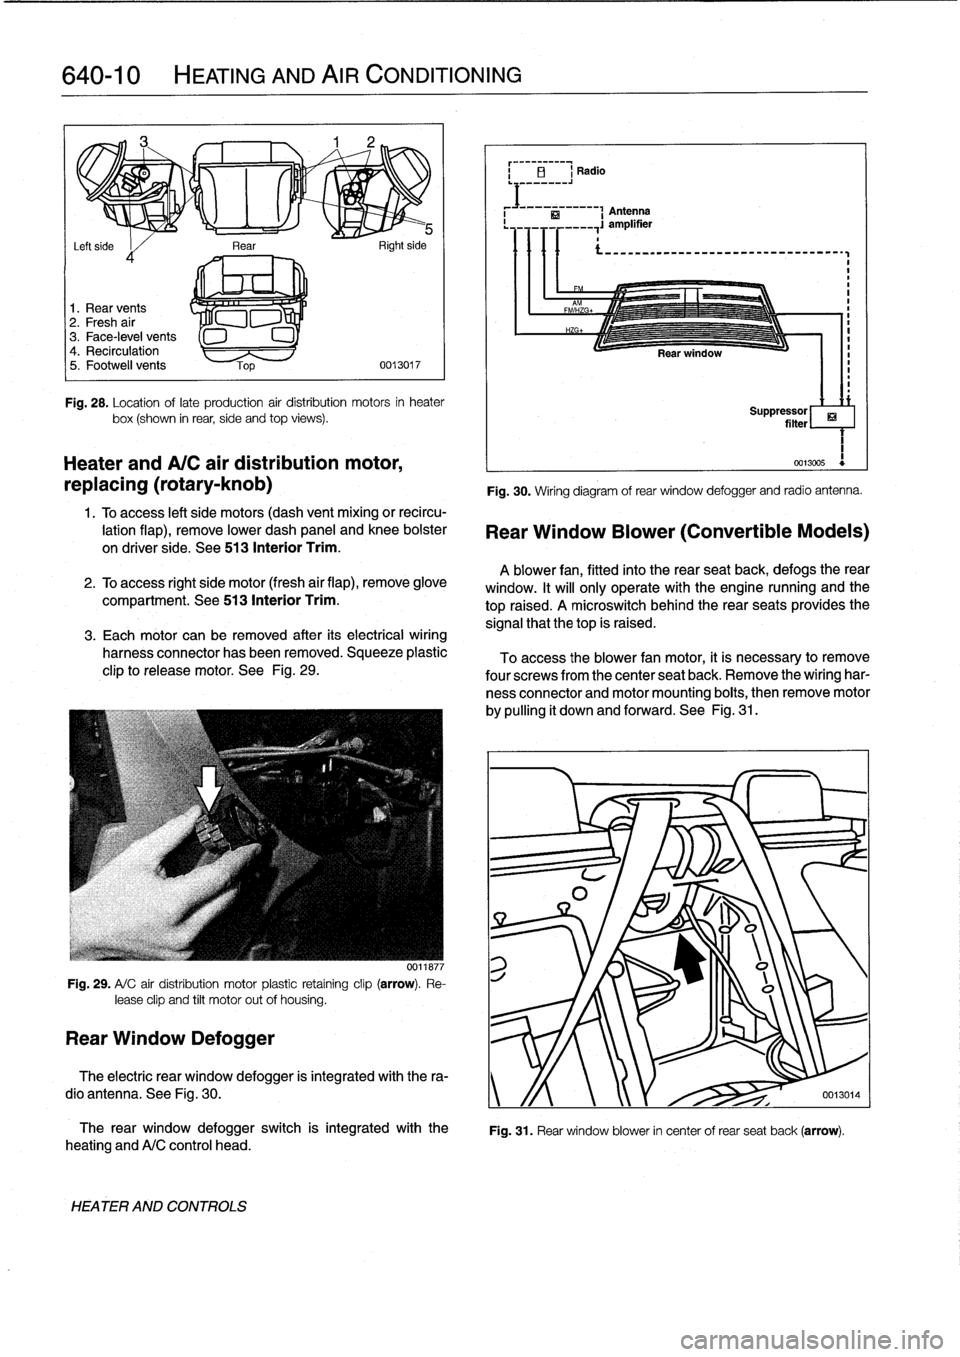
Fig
.
28
.
Location
oflate
production
air
distribution
motors
in
heater
box(shown
in
rear,
side
and
top
views)
.
Heater
andA/C
air
distribution
motor,
replacing
(rotary-knob)
1
.
Toaccess
left
side
motors
(dash
vent
mixing
or
recircu-
lation
flap),
remove
lower
dash
panel
and
knee
bolster
on
driver
side
.
See
513
Interior
Trim
.
2
.
To
access
right
side
motor
(fresh
air
flap),
remove
glove
compartment
.
See513
Interior
Trim
.
3
.
Each
motor
can
be
removed
after
its
electrical
wiring
harness
connector
has
been
removed
.
Squeeze
plastic
clip
to
release
motor
.
See
Fig
.
29
.
Fig
.
29
.
A/
C
air
distribution
motor
plastic
retaíning
clip
(arrow)
.
Re-
lease
clip
and
tilt
motor
out
of
housing
.
Rear
Window
Defogger
0011877
The
rear
window
defogger
switch
is
integrated
with
the
heating
andA/C
control
head
.
HEATER
AND
CONTROLS
Fig
.
30
.
Wiring
diagram
of
rear
window
defogger
and
radio
antenna
.
Rear
Window
Blower
(Convertible
Models)
A
blower
fan,
fitted
into
the
rear
seatback,
defogs
therear
window
.
It
will
only
operate
with
the
engine
nunning
and
the
top
raised
.
A
microswitch
behindthe
rear
seats
provides
the
signal
that
thetop
is
raised
.
To
access
the
blower
fan
motor,
it
is
necessary
to
remove
four
screwsfrom
the
center
seat
back
.
Remove
the
wiring
har-
ness
connector
and
motor
mounting
boits,
then
remove
motor
by
pulling
it
down
and
forward
.
See
Fig
.
31
.
ri
Suppressor
filter
1
0013005
Fig
.
31
.
Rear
window
blower
in
center
of
rear
seat
back
(arrow)
.
The
electric
rear
window
defogger
is
integrated
with
the
ra-
dio
antenna
.
See
Fig
.
30
.
y
/f
0013014
Page 465 of 759
GENERAL
.........
.
.......
.
.
.
.
.
.
.
.
.
..
650-1
Rear
speaker,
removing
and
installing
.
.
.
.
.
.650-5
Door
panel
speaker,
AUDIO
SYSTEM
............
.
.
.
.
.
.
.
.
.
..
650-1
removing
and
installing
.
.
.
.
.....
.
.
.
.
.
.
.
.650-5
Radio
connector
..
.
.
.
.
.
.
.
.
.
.......
.
.
.
.
.
.
650-6
RADIO
AND
SPEAKER
SERVICE
.
.
.
.
.
..
650-2
Radio,
removingand
installing
.
.
.
.
.
.
...
.
..
650-2
Left
footwell
speaker,
removing
and
installing
.
....
.
.
.
.....
.
.
.
650-3
Right
footwell
speaker,
removing
and
installing
.
....
.
.
.
.....
.
..
650-4
GENERAL
AUDIO
SYSTEM
Thissection
coversthe
BMW
factory-installed
sound
sys-
The
BMW
E36
is
equipped
with
a
three
band
radio/cassette
tem,
including
radio
and
speaker
removal,
radio
connectors
player
unit
mounted
in
the
middle
of
thecenter
console
.
In
ad
and
terminal
designations
.
dítion
to
AM
and
FM
bands,
the
radio
will
receive
broadcasts
from
theNational
Weather
Service
.
The
antenna
is
incorporated
into
the
rear
window
defogger
.
650
Radio
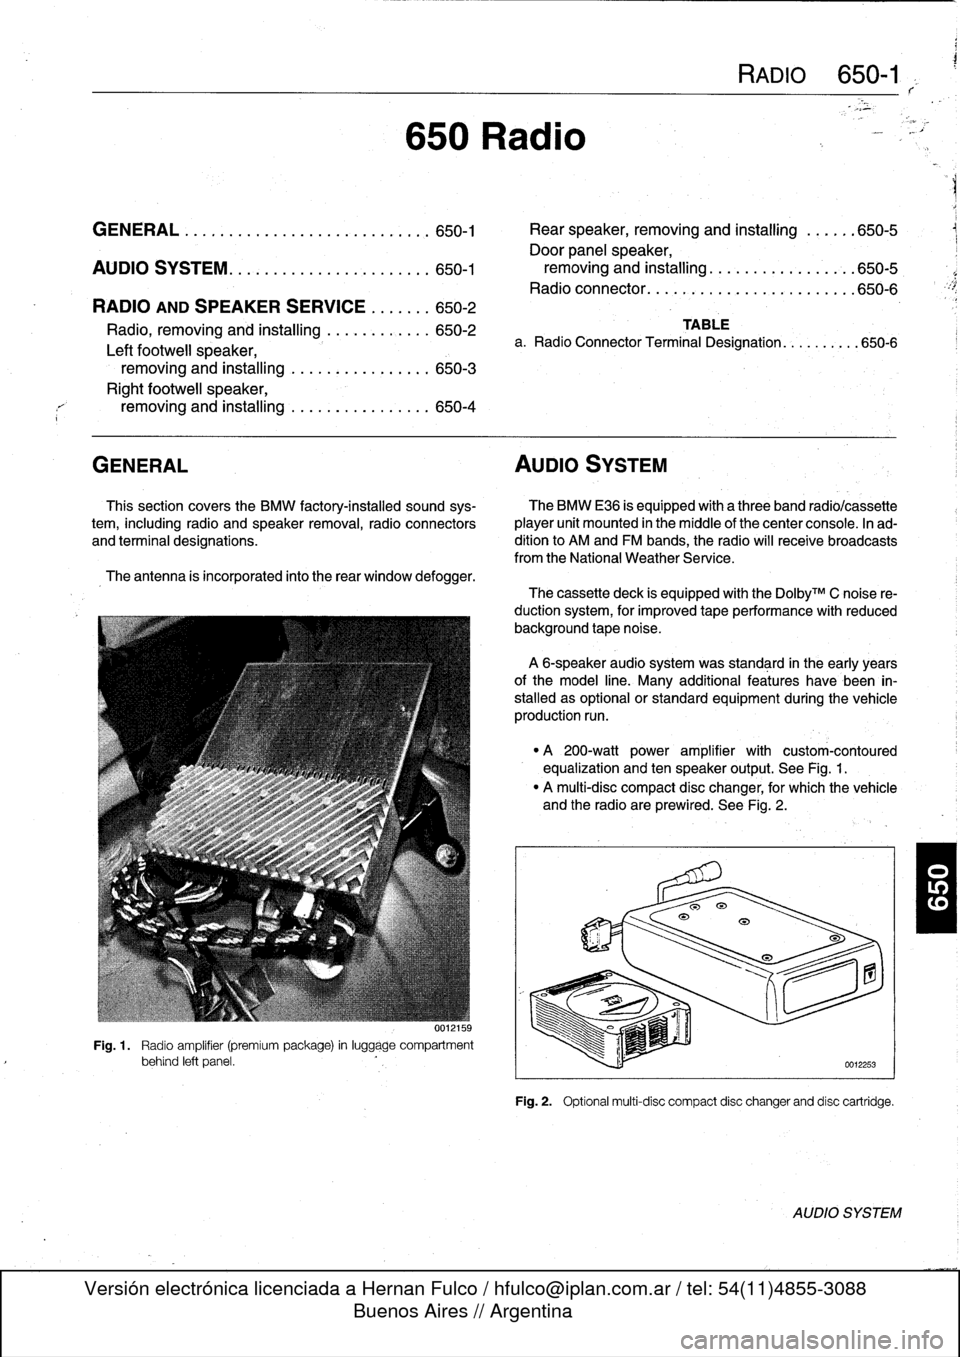
Fig
.
1
.
Radio
amplifier
(premiumpackage)
in
luggage
compartment
behind
left
panel
.
RADIO
650-1
TABLE
a
.
Radio
Connector
Terminal
Designation
...
.
......
650-6
The
cassette
deck
is
equipped
with
the
Do1byTM
C
noise
re-
ductionsystem,
for
improved
tape
performance
with
reduced
background
tape
noise
.
A
6-speaker
audio
system
was
standard
in
the
early
years
ofthe
model
line
.
Many
additional
features
have
been
in-
stalled
as
optional
or
standard
equipment
duringthevehicle
production
run
.
"
A
200-watt
power
amplifier
with
custom-contoured
equalization
and
ten
speaker
output
.
See
Fig
.
1
.
"
A
multi-disc
compact
disc
changer,
for
which
the
vehicle
and
the
radio
are
prewired
.
See
Fig
.
2
.
Fig
.
2
.
Optional
multi-disc
compact
disc
changerand
disc
cartridge
.
AUDIO
SYSTEM
Page 485 of 759
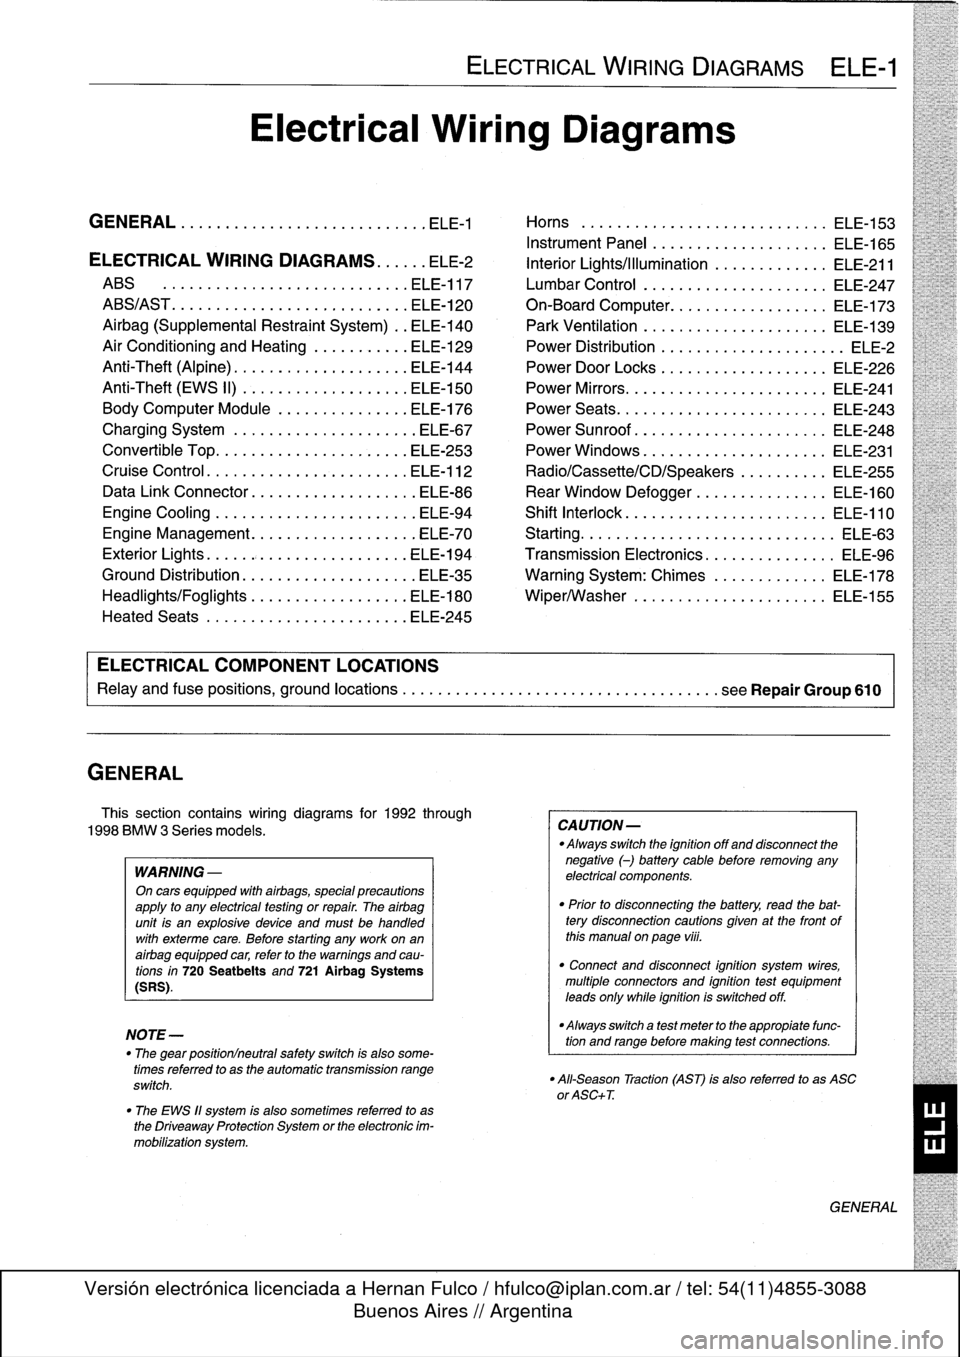
GENERAL
This
section
contains
wiring
diagrams
for
1992
through
1998
BMW
3
Series
models
.
WARNING
-
On
cars
equipped
with
airbags,
special
precautions
apply
to
any
electrical
testing
or
repair
.
The
airbag
unit
is
an
explosive
device
and
must
be
handled
with
exterme
care
.
Before
starting
any
work
onan
airbag
equipped
car,
refer
to
the
warnings
and
cau-
tions
in
720
Seatbelts
and
721
Airbag
Systems
(SRS)
.
NOTE-
The
"
gear
position/neutral
safetyswitch
is
also
some-
timesreferred
to
as
the
automatic
transmission
range
switch
.
"
The
EWS
11
system
is
also
sometimes
referred
to
as
the
Driveaway
Protection
System
or
the
electronic
im-
mobilization
system
.
ELECTRICAL
WIRING
DIAGRAMS
ELE-1
Electrical
Wiring
Diagrams
GENERAL
.
.
.
.
.
.
.
.
.
................
.
.
.
ELE-1
Horns
.....
.
.....
.
.
.
....
.
.
.
.
.
...
.
.
ELE-153
Instrument
Panel
.
.
.
.
.
.
..............
ELE-165
ELECTRICAL
WIRING
DIAGRAMS
...
.
.
.
ELE-2
Interior
Lights/Illumination
.............
ELE-211
ABS
..............
.
.
.
.....
.
.....
ELE-117
Lumbar
Control
.
....................
ELE-247
ABS/AST
.............
.
.
.
...
.
.
.
.....
ELE-120
On-Board
Computer
..................
ELE-173
Airbag
(Supplemental
Restraint
System)
..
ELE-140
Park
Ventilation
.
.
.
...........
.
...
.
..
ELE-139
Air
Conditioning
and
Heating
.
.
.
.
.
.
.....
ELE-129
Power
Distribution
......
.
...
.
.
.
.
.
.
.
...
.
ELE-2
Anti-Theft
(Alpine)
..........
.
.
.
...
.
...
ELE-144
Power
Door
Locks
.
.
......
.
.
.
.
.
.
.
.
.
..
ELE-226
Anti-Theft
(EWS
II)
.
........
.
.
.
...
.
...
ELE-150
Power
Mirrors
...
.
.
.
......
.
.
.
.
.
.
.
.
.
..
ELE-241
Body
Computer
Module
.....
.
.....
.
...
ELE-176
Power
Seats
......
.
......
.
.
.
...
.
.
.
..
ELE-243
Charging
System
.
.
................
.
.
.
ELE-67
Power
Sunroof
.
.
.
.
.
.
.
...............
ELE-248
Convertible
Top
.
.
.
.
................
.
.
ELE-253
Power
Windows
.
.
.
.
.
.
.....
.
.........
ELE-231
Cruise
Control
..
.
.
.
...........
.
....
.
.
ELE-112
Radio/Cassette/CD/Speakers
..........
ELE-255
Data
Link
Connector
................
.
.
.
ELE-86
Rear
Window
Defogger
...............
ELE-160
Engine
Cooling
.......
.
.......
.
....
.
.
.
ELE-94
Shift
Interlock
.
.
.
.
.
.
.
.
...............
ELE-110
Engine
Management
...
.
.......
.
....
.
.
.
ELE-70
Starting
....
.
.
.
.
.
...
.
................
ELE-63
Exterior
Lights
........
.
.
.
.
.
.
.
.
.
......
ELE-194
Transmission
Electronics
.
..............
ELE-96
Ground
Distribution
....
.
.
.
.
.
.
.
.
.
.......
ELE-35
Warning
System
:
Chimes
.............
ELE-178
Headlights/Foglights
...
.
.
.
.
.
.
.
.
.
......
ELE-180
Wiper/Washer
.
.....
.
...............
ELE-155
Heated
Seats
........
.
.
.
.
.
.
.
.
.
......
ELE-245
ELECTRICAL
COMPONENT
LOCATIONS
Relayand
fuse
positions,
ground
locations
...........
.
.
.
.
.
.
.
.
.
................
seeRepair
Group
610
CAUTION-
Always
switchthe
ignition
off
and
disconnect
the
negative
(-)
battery
cablebefore
removing
any
electrical
components
.
"
Prior
to
disconnecting
the
battery,
read
the
bat-tery
disconnection
cautions
given
at
the
front
of
this
manual
on
page
viii
.
"
Connect
and
disconnect
ignition
system
wires,
multiple
connectors
and
ignition
test
equipment
leads
only
while
ignition
is
switched
off
.
-Always
switch
a
test
meter
to
the
appropiate
func-
tion
and
range
before
making
test
connections
.
"
All-Season
Traction
(AST)
is
also
referred
to
as
ASC
or
ASC+T
.
GENERAL
Page 486 of 759
ELE--2
ELECTRICAL
WIRING
DIAGRAMS
FUSE
LINK
64766
I-i
I
-
i
a
1
I
_
ZJ
I
I
I
I
I
I.
4
2
GRN/VIO
I_I
!
___I
I_I
1
D>
6
END
INECONTROL
ENGINECONTROL
TRANSMISSION
CONTROL
DATALINK
MODULE
MODULE
RELAY
MODULE
(EGS)
CONNECTOR
I
I
I
I
5
(F18
--_______________________________________________
O19~
N
RIBUON
BOX
I
FUSE
II
15A
o~___________________________________________________Q~____-aft
TO
FUSE
F5
C
RED
(DIAGRAM
6
OF
7)
FUELPUMP
I
(DIAGRAM60F7)
C'
RED
\
L------r>
(DIAGRAM60F7)
I
LOW
F
I
FRONT
HIGH
BEAM
FOGJ
BEAM
I
I
LIGHT
I
I
LIGHT
I
j
/
I
LIGHT
RELAY
I
RELAY
li
SJ
RELAY
1992
1993W/TRUNK
MOUNTEDBATTERV
1993W/ENGINE
COMPARTMENTMOUNTEDBATTERV
1993W/TRUNK
1993W/ENGINE
1992
1992
WI
ENGINE
W/TRUNK
BATTERY
MOUNTEDBATTERV
¢)
MOUNTED
BATTERY
MOUN
O
TEDBATT
I
ERV
¢I¢I
MOUNTEDBATTERV
TOFUSEF40
<
,.k
RED
(DIAGRAM
6
OF
7)
I
I
(DIAGRAM
3
OF
7)
TO
FUSEF3
E
RED
(DIAGRAMfiOF7)
"
.
1k
I
(DIAGRAM
6OF7)
>I
mJ~CANADA
RED
BNUMPSTART
JUNCTION
POINT
REO
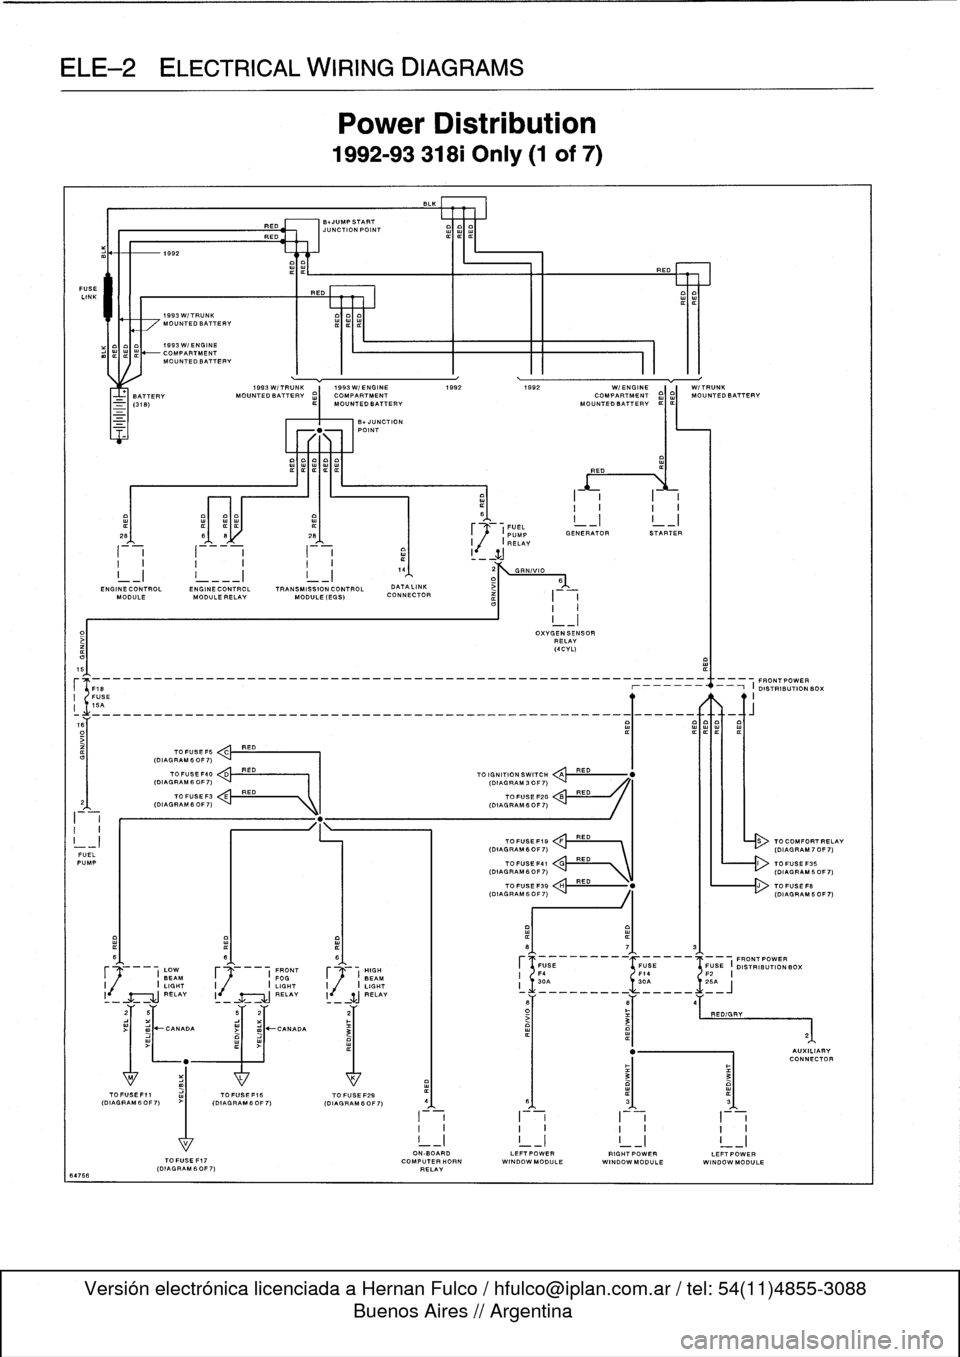
Power
Distribution
1992-93
318i
Only
(1
of
7)
-UNCTION
POINT
TOFUSEF15
TO
FUSE
F29
(DIAGRAM60F7)
(OIAGRAM6OF7)
I
~1
.
FUEL
_I
I
_I
~
(PUMP
GENERATOR
STARTER
I
,(
I
RELAY
TO
IGNITION
SWITCH
QA
TOFUSE
F20
TOFUSEF19
FRED
(DIAGRAM6OF7)
`
I
III
-
(DIAGRAM70F7)
OXVGENSENSOR
RELAY
(4CVL)
RED
RED
RED
ON-BOARD
LEFTPOWERRIGHTPOWERLEFTPOWER
TOFUSEF17
COMPUTERHORN
WINDOWMODULE
WINDOWMODULE
WINDOW
MODULE
(DIAGRAM
60F
7)
RELAY
TO
COMFORTRELAV
Page 487 of 759
ELE
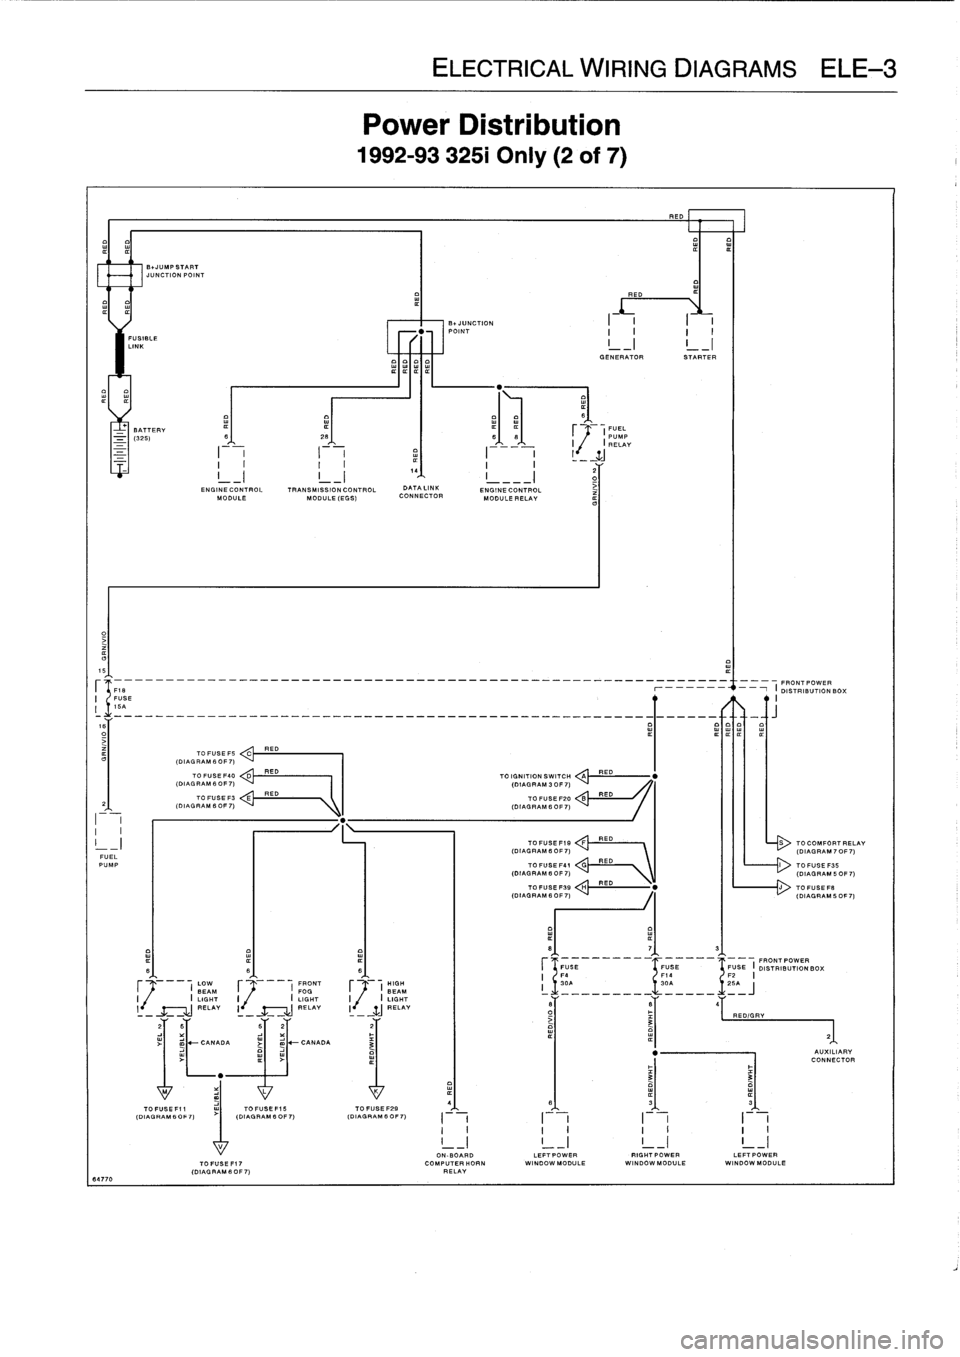
Power
L
1992-9332
RED
E01
IIIII
FUSIBLE
LINK
I
GENERATOR
STARTER
BATTERY
¢
(FUEL
-
(325)
S
26
66
PUMP
I
I
RELAY
2
G
ENGINE
CONTROL
TRANSMISSION
CONTROL
DATA
LINK
ENGINECONTROL
iMODULE
MODULE
(EGG)
CONNECTOR
MODULE
RELAY
15
--
---
-
-
----
--
FRONT
POWER
FUSE
r
-
i
DISTRIBUTIONBO
;
I
16A
R
ITIT
TO
FUSE
FS
ED
C
(DIAL
RAM
6
OF
7)
TO
FUSE
F40
D
RED
TO
IGNITION
SWITCH
A
RED
(DIAGRAM
6
OF
7)
(DIAGRAM
3
OF
7)
TO
FUSE
F3
E
RED
TO
FUSE
F20
B
RED
2
(DIAGRAM6OF7)
(DIAGRAM
6OF7)
I
I
I
I
-
I
TOFUSEF19
:
:!!RED---
RED
S
TOCOMFORTI
(DIAGRAM
6
OF
7)
(DIAGRAM
70
FUEL
PUMP
TO
FUSE
F41
V\
TOFUGEF35
(DIAGRAM
B
OF
7)
\
(DIAGRAM
50
TOFUSEFSB
H
RED
"
J
TOFUSEF
.
(DIAGRAM
6
0F
7)
(DIAGRAM
50
8
7
3
FUGE
FUSE
FUSE
I
FRONT
POWER
B
6
6
DISTRIBUTION
BOX
F4
F14
F2
I
LOW
FRONT
HIGH
I
30A
30A
~
.1
.
25A
BEAM
F
I
FOG
F
(
BEAM
i
_________
_____
J
I
I
LIGHT
I
I
LIGHT
I
.
I
LIGHT
l
RELAY
I
-
RELAY
I
-
WJ
_RELAY
6
B
4
-
-
-
O
RED/GRY
3
21
2
B
62
2
~
-
CANADA
j
m
-CANADA
3
"
AUXILIAI
CONNECT
"
3
3
M
L
K
4(D
IAGAGR
AM60
F7)
(DIAGRAM
IAGRAM
B
OFOF
7)
(DIAGRAM
6
0
6
3
3G
FO
F
~
7)
I
I
I
I
I
II
I
I
I
I
I
I
I
!
_I
!
_I
!
_I
!
_
17
I
ON-BOARD
LEFTPOWER
RIGHTPOWER
LEFT
POWERTOFUSEFI7
COMPUTERHORN
WINDOW
MODULE
WINDOWMODULE
WI
NDOWMODULE
(DIAGRAMS
OF7)
RELAY
64770
Page 489 of 759
EKE
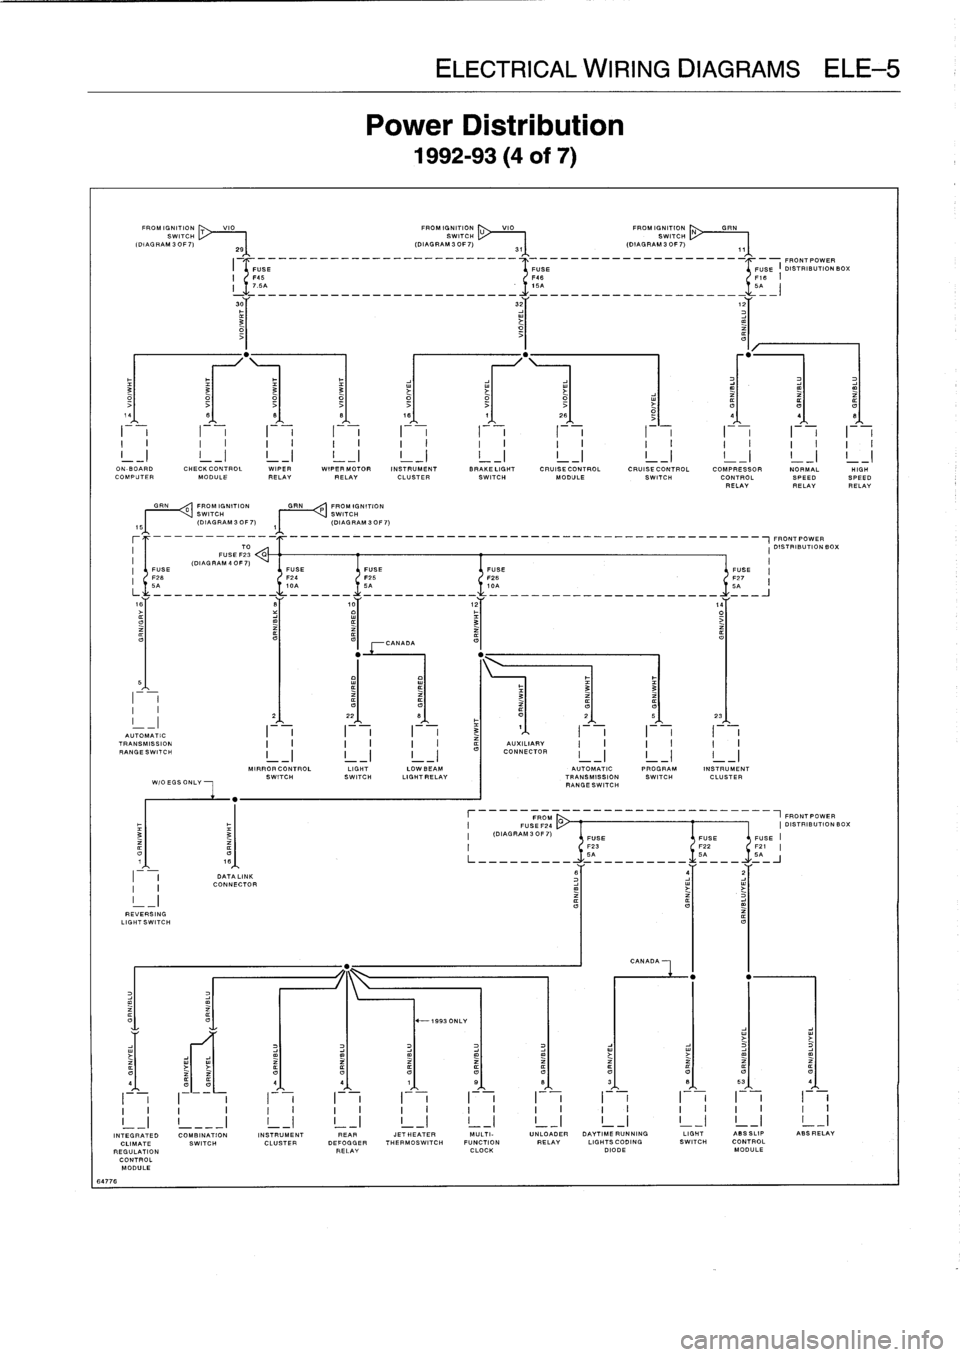
Power
1992-
VIO
FROMIGNITION
U
VIO
FROM
IGNITI
ON
SWITCH
SWITCH
2S
(DIAGRAM3OF7)
31
(DIAGRAM3OF7)
I
-
______________-__________--
4
-_____________________I_-FRONT
POWER
O
3
3
3
3
i
14
8
8
B
18
7
26
-
4
4
I
i
I
I
i
-F-
I
i
I
-
,
I
,
I
I
F-,
ON
-BOARD
CHECKCONTROL
WIPER
WIPER
MOTOR
INSTRUMENT
BRAKELIGHT
CRUISE
CONTROL
CRUISE
CONTROL
COMPRESSOR
NORMALCOMPUTER
MODULE
RELAYRELAY
CLUSTER
SWITCH
MODULE
SWITCH
CONTROL
SPEEDRELAYRELAY
GRN
0
FROM
IGNITION
GRN
P
FROM
IGNITION
~I
I
VSWITCH
SWITCH
(DIAGRAM
30F7)
,~
(DIAGRAM
3OF7)
-------_-_____________________________________________~FRONT
POWER
TO
I
DISTRIBUTIONBOX
FUSE
F23
G
(DIAG
RAM
4
0F
7)
I
FUSE
FUSE
FUSE
FUSE
FUSE
'
F26
F24
F25
F26
-
F27
6A
10A
SA
ICA
5A
is
S
,0
12
,4
o3
>
CANADA
5
I
~
~
~
3
33
-
2
22
B
F
O
2
5
23
AUTOMATIC
I
I
I
3
1
I
TRANSMISSION
AUXILIARY
RANGESWITCH
I
-
I
I
-
I
I
-
I
CONNECTOR
MIRRORCONTROL
LIGHT
LOWBEAM
AUTOMATIC
PROGRAM
INSTRUMENT
SWITCHSWITCH
LIGHTRELAY
TRANSMISSION
SWITCH
CLUSTER
WIOEGSONLY
RANGESWITCH
FROM
___________-----1FRONTPOWER
FUSEF24
CI
DISTRIBUTION
BC
3
(DIAGRAM30F7)
FUSE
FUSEFUSE
F23
F22
F21
O
O
SA
SA
5A
DATA
LINK
6
j
2
I
CONNECTOR
REVERSING
LIGHTSWITCH
CANADA
O
"
-1993
ONLY
O4
4
4
1
S
B
3
B
53
4
I
v
I~
i
I
i
I
v
I
i
I
v
I
i
I
v
I
i
I
i
I
i
v
v
v
v
~
v
v
~
~
v
v
~
v
v
o
n
v
v
v
v
v
v
_I
INTEGRATED
COMBINATION
INSTRUMENT
REAR
JETHEATER
MULTI-
UNLOADER
DAYTIMERUNNING
LIGHT
ASSSLIP
ABSRELAY
CLIMATE
SWITCH
CLUSTER
DEFOGGER
THERMOSWITCH
FUNCTION
RELAY
LIGHTSCODING
SWITCH
CONTROL
REGULATION
RELAY
CLOCK
DIODE
MODULE
CONTROL
MODULE
64776
Page 490 of 759
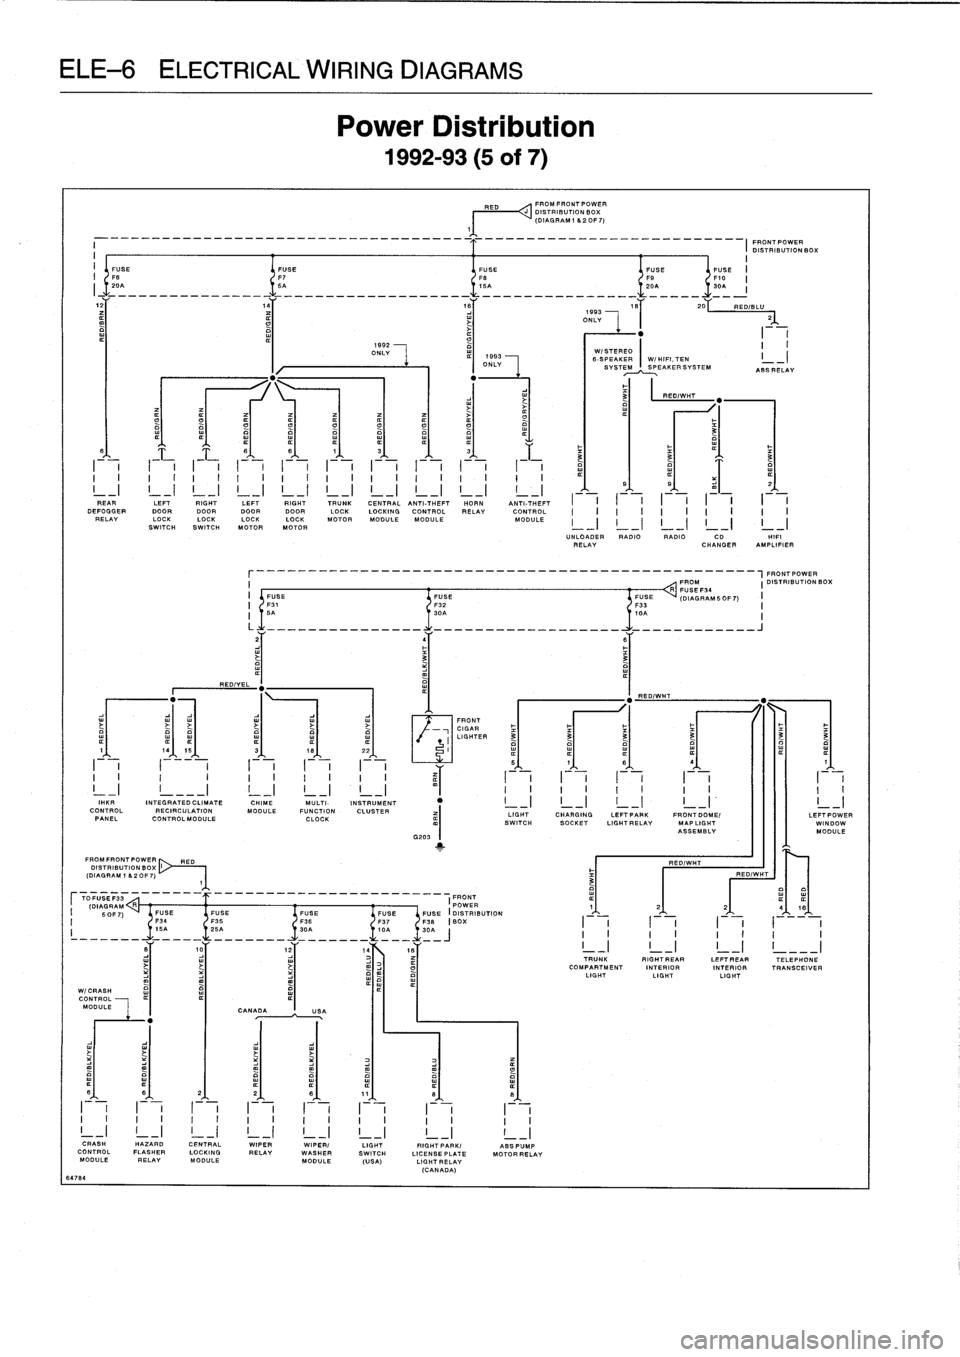
CALWIRING
DIAGF
Power
Di
:
1992-93
RED
FROMFRONTPOWER
DISTRIBUTION
BOX
(DIAGRAM
1
620F7)
1
FRONTPOWER
DISTRIBUTION
BOX
i
I
I
1592
II
ONLY
WI
STEREO
-
I
ONLY
6-
SVS
SPEAKER
I
W/HIFI,TEN
I
TE~~PEAKERSYSTEM
ASSRELAY
3
RED/WHT
O
t7
0
t7
3
6
6
8
1
3
¢
3
F
~
~
3
a
a
o
I
I
I
II
I
I
I
I
I
I
I
I
I
I
I
I
I
i
I
¢
5
s
z
I
REAR
I
I
LEFT
I
I
RIGHT
I
I
LEFT
I
I
RIGHT
I
I
TRUNK
I
CENT
RA
I
L
ANTI-THEFT
I
HORN
I
ANTI-THEFT
I
I
I
I
I
I
I
I
I
I
DEFOGGERDOOR
DOOR
DOORDOOR
LOCK
LOCKING
CONTROL
RELAY
CONTROL
II
I
IIIIIII
RELAY
LOCK
LOCKLOCKLOCK
MOTOR
MODULEMODULE
MODULE
I
_
II
-
II
_
II
-
II
_
I
SWITCHSWITCH
MOTORMOTOR
UNLOADER
RADIO
RADIO
CD
HIF'
RELAY
CHANGER
AMPLIFIER
r________________________________________________-FRONT
POWER
I
FROM
I
DISTRIBUTION
BOXR
FUSE
I
FUSE
FUSE
FUSE
(DIAGRAMSOF7)
I
F31
F32
F33
II
5A
30A
I,0
OA
I
L
-----
______
.......
.
.
.
.
.
.
.
.
.
..
________J
z
4
6
3
3
a
"
"
REDIYEL
RED/WHT
"
FRONT
Y
CIGAR
I
LIGHTED
3
3
3
3
3
3
1
-
19
15
3
-
18
-
22
-
I
_
_I
I
I
iI
(
I
II
5
1
s
s
1
I
I
I
I
II
I
I
II
~
(-
I
I
I
I
-
I
II
IiI
_I
!
___I
!
_I
!
_I
i
-I_
I
I
I
I
I
I
I
I
I
I
I"
KIM
INTEGRATED
CLIMATE
CHIME
MULTI-
INSTRUMENT
"
I
_I
I
-
I
I
~I
I
-I
I
_I
CONTROL
RECIRCULATION
MODULE
FUNCTION
CLUSTER
LIGHT
CHARGING
LEFTPAPK
FRONT
DOME/
LEFT
POW
PANEL
CONTROLMODULE
CLOCK
SWITCH
SOCKET
LIGHTRELAV
MAP
LIGHT
WINDON
ASSEMBLY
MODULE
G203
1
FROMFRONTPOWER
RED
RED/WHT
DISTRIBUTION
BOX
(DIAGRAM
1
82OF7)
RED/WIT
3
TFUSEF33
FRONT
ODAORAM
R
______
__________________-
I
POWER
¢
1
2
2
416
I
SOFT)
FUSE
FUSE
FUSE
FUSE
FUSEFUSE
(DISTRIBUTION
F34
136
F37
F38
BOX
I
I
II
III
I
z'235
A-____
t0A
-
30=~
IIIII11I
10
1z
14Es
TRUNK
RIGHTREAR
LEFTREAR
TELEPHONE
COMPARTMENT
INTERIOR
INTERIOR
TRANSCEIVER
LIGHT
LIGHTLIGHT
P
W1
C
RASH
CONTROL
MODULE
CANADAUSA
fl
6
2
2
8
11
8
0
I
I
I
I
I
I
I
I
I
I
I
I
I
I
I
II
I
I
I
I
I
I
I
I
I
I
I
I
I
I
I
CRASH
HAZARD
CENTRAL
WIPER
WIPER/
LIGHT
RIGHTPARK/
ABSPUMP
CONTROLFLASHER
LOCKING
RELAY
WASHER
SWITCH
LICENSEPLATE
MOTORRELAV
MODULE
RELAY
MODULE
MODULE
(USA)
LIGHTRELAV
(CANADA)
64784
Page 491 of 759
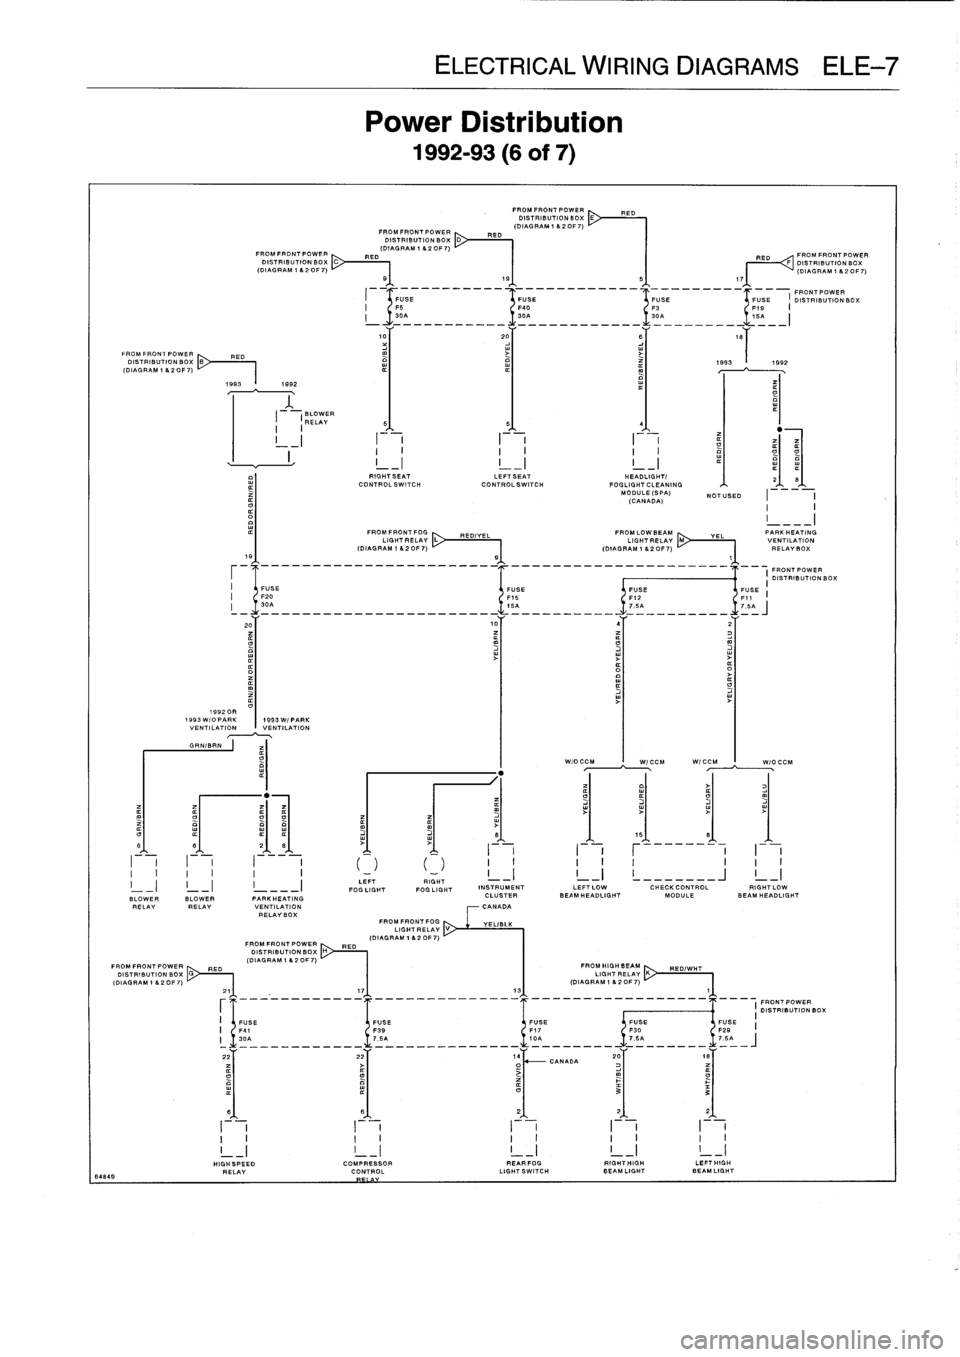
ELE
rower
1992-
FROMFRONTPOWEn
REO
DISTRIBUTION
BOX
E
(DIAGRAM
1
&20F7)
FROM
FRONT
POWER
RED
DISTRIBUTION
BOX
D
F=eNT^nOW~^R~
RED
(DIAGRAM1&20F7)
RED
FROM
FRONT
u
~
nm~n
10
20
6
18I
FROM
FRONT
POWER
PED
DISTRIBUTION
BOX
1993
1992
(DIAGRAM/
&20F7)
1993
1892
BLOWER
RELAY
B
6
4
I
-
I
I
I
I
I
I
II
I
I
I
I
I
RIGHTSEAT
LEFTSEAT
HEADLIGHT/
2S
CoNTROLSWITCH
CONTROLSWITCH
FOOLIGHTCLEANING
No
DULE(SPA)
NOTUSED
I
I
(CANADA)
I
I
D
FROMFRONTFOG
RED/YEL
FROMLOWBEAM
YEL
PARK
HEATINGLIGHTRELAY
L
LIGHTRELAY
M
VENTILATION
--
(DIAGRAM/&20F7)
~
--
-
(DIAGRAM/&20F7)
~
RELAY
BOX
1B
g
1
-
-
-
-
--
I
FRONTPOWER
I
DISTRIBUTION
BOX
FUSE
FUSE
FUSE
FUSE
I
F20
F16
F12
F11
30A
-___________________
16A---__---
7
.5_______
7
.5=~
20
10
_
4
-
_
_
O
O
1992
OR
1993W/O
PARK
1993W/PARK
VENTILATIONVENTILATION
GRNIBRN
WIOCCM
W/C
CM
W/CCM
W/OCCM
O
mY
>
i7
8
16
86
e
1.
Z
M
za
>
I
-
I-
r-___-
I
-
(-)
(_)
II
III
I
I
II
I
I
I
-
G
!____
_J
!
_I
FOGLIGHT
FOG
LIGHT
INSTRUMENT
LEFT
LOW
CHECKCONTROL
RIGHTLOWBLOWER
BLOWER
PARK
HEATING
CLUSTER
BEAM
HEADLIGHT
MODULE
BEAM
HEADLIGHT
RELAYRELAY
VENTILATION
CANADA
RELAY
BOX
FROMFRONTFOG
YELIBLK
LIGHTRELAV
V
(DIAGRAM
l
&2
OF
7)
FROMFRONTP0
ER
REDDISTRIBUTIONBOX
H
(DIAGRAM
1
&2
OF
7)
FROMFRONTPOWER
RED
FROMHIGHBEAM
REDIWHT
DISTRIBUTION
BOX
LIGHTRELAY
K
(DIAGflAMi&20F7)
,
---------
------
_
-_---
--
(DIAGR=M1&20)=7)~
-
21
17
13
1
FRONTPOWER
I
DISTRIBUTIONBOX
I
FUSE
FUSE
FUSE
FUSE
FUSE
I
I
F41
F39
F17
F30
F28
I
7.BA
-_--
_-
_____
10A
-_____
7
.BA-____
7
.0=
------------
-~
2z
2z
1a
zD
1B
>
CANADA
t¢
7
>
3
;
e
Z
F_
6
2
2
2
II
I
I
I
I
II
III
I
I
I
I
I
I
I
I
I
HIGHS
PEED
COMPRESSOR
REARFOG
RIG
THIGH
LEFTHIGH
RELAY
CONTROL
LIGHTSWITCH
BEAM
LIGHT
BEAM
LIGHT64849
RELAY