length BMW 328i 1995 E36 User Guide
[x] Cancel search | Manufacturer: BMW, Model Year: 1995, Model line: 328i, Model: BMW 328i 1995 E36Pages: 759
Page 216 of 759
210-2
CLUTCH
Clutch
hydraulic
system,
bleeding
and
flushing
If
the
clutch/brake
fluid
is
murky
or
muddy,
or
has
not
been
changed
within
the
last
two
years,
the
system
should
be
flushed
.
Flushing
the
old
fluid
from
the
clutch
lines
is
done
us-
ing
a
brake
system
pressure
bleeder
.
1
.
Remove
brake
fluíd
reservoir
cap
.
Usinga
clean
sy-
ringe,
remove
brake
fluid
from
reservoir
.
Refill
reservoir
with
clean
fluid
.
2
.
Attach
pressure
brake
bleeder
to
fluid
reservoír
.
CA
UTION-
Do
not
exceed
2
bar
(29
psi)
pressure
at
the
fluid
reservoir
when
bleeding
or
flushing
the
hydraulic
system
.
3
.
Connect
a
length
of
hose
from
clutch
slave
cylinder
bleeder
valve
lo
a
container
.
See
Fig
.
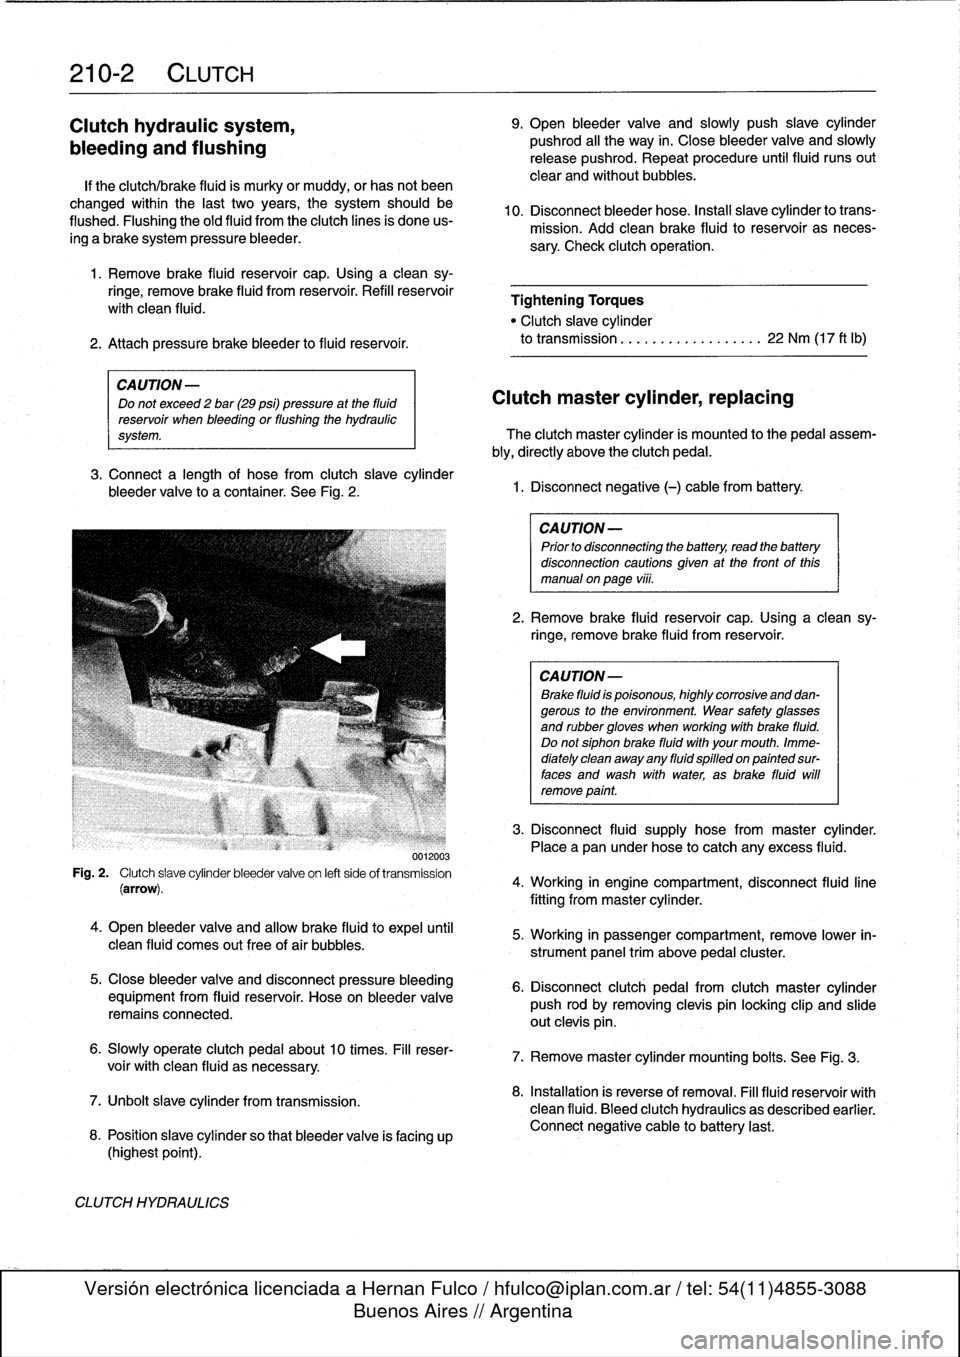
2
.
0012003
Fig
.
2
.
Clutch
slave
cylinder
bleeder
valve
on
left
side
of
transmission
(arrow)
.
4
.
Open
bleeder
valve
and
allow
brake
fluid
to
expel
until
clean
fluid
comes
out
free
of
air
bubbles
.
5
.
Close
bleeder
valve
and
disconnect
pressure
bleeding
equipment
from
fluid
reservoir
.
Hose
on
bleeder
valve
remainsconnected
.
6
.
Slowly
operate
clutch
pedal
about10
times
.
Fill
reser-
voir
with
clean
fluid
asnecessary
.
7
.
Unbolt
slavecylinder
from
transmission
.
8
.
Position
slave
cylinder
so
that
bleeder
valve
is
facing
up
(highest
point)
.
CLUTCH
HYDRAULICS
9
.
Open
bleeder
valve
and
slowly
push
slave
cylinder
pushrod
al¡
the
way
in
.
Close
bleeder
valve
and
slowly
release
pushrod
.
Repeat
procedure
until
fluid
runs
out
clear
and
without
bubbles
.
10
.
Disconnect
bleeder
hose
.
Instan
slavecylinder
lo
trans-
mission
.
Add
cleanbrake
fluid
to
reservoir
as
neces-
sary
.
Check
clutch
operation
.
Tightening
Torques
"
Clutch
slave
cylinder
to
transmission
................
..
22
Nm
(17
ft
lb)
Clutch
master
cylinder,
replacing
The
clutch
master
cylinder
is
mounted
to
the
pedal
assem-
bly,
directly
above
the
clutch
pedal
.
1
.
Disconnect
negative
(-)
cable
from
battery
.
CAUTION-
Prior
to
disconnectiog
the
battery,
read
the
battery
disconnection
cautionsgiven
at
the
front
of
this
manual
on
page
viii
.
2
.
Remove
brake
fluid
reservoir
cap
.
Usinga
clean
sy-
ringe,
remove
brake
fluid
from
reservoir
.
CA
UTION-
Brake
fluid
is
poisonous,
highly
corrosive
and
dan-gerous
to
the
environment
.
Wear
safety
glasses
and
rubbergloves
when
working
with
brake
fluid
.
Do
notsiphonbrake
fluid
with
your
mouth
.
Imme-
diately
clean
away
any
fluid
spilled
on
painted
sur-
faces
and
wash
with
water,
asbrake
fluid
will
remove
point
.
3
.
Disconnect
fluid
supply
hose
from
master
cylinder
.
Placea
pan
under
hose
to
catch
any
excess
fluid
.
4
.
Working
in
engine
compartment,
disconnect
fluid
line
fitting
frommaster
cylinder
.
5
.
Working
in
passenger
compartment,
remove
lower
in-
strument
panel
trim
above
pedal
cluster
.
6
.
Disconnect
clutch
pedal
from
clutch
master
cylinder
push
rod
by
removing
clevis
pin
locking
clip
and
slide
out
clevis
pin
.
7
.
Remove
master
cylinder
mounting
bolts
.
See
Fig
.
3
.
8
.
Installation
is
reverse
of
removal
.
Fill
fluid
reservoir
with
clean
fluid
.
Bleed
clutch
hydraulics
as
described
earlier
.
Connect
negative
cable
to
battery
last
.
Page 225 of 759
11
.
Raise
transmission
and
reinstall
transmission
cross-
member
.
12
.
Install
driveshaft
using
new
nuts
.
See
260
Driveshaft
.
13
.
Check
transmission
oil
leve¡,
topping
up
asnecessary
.
Tightening
Torques
"
Transmission
crossmember
to
chassis
M8
...............
.
...
.
..
22-24
Nm
(16-17
ft-Ib)
M10
..............
.
..
...
..
.
...
42
Nm
(31
ft-Ib)
"
Transmission
outputflange
to
output
shaft
O
001202
2
Z
:Z
ZZZ~
%
_
j
Stage
I.................
..
.
..
190
Nm
(140
ft-Ib)
Stage
II
(after
loosening)
....
.
.
.
..
120
Nm
(89
ft-Ib)
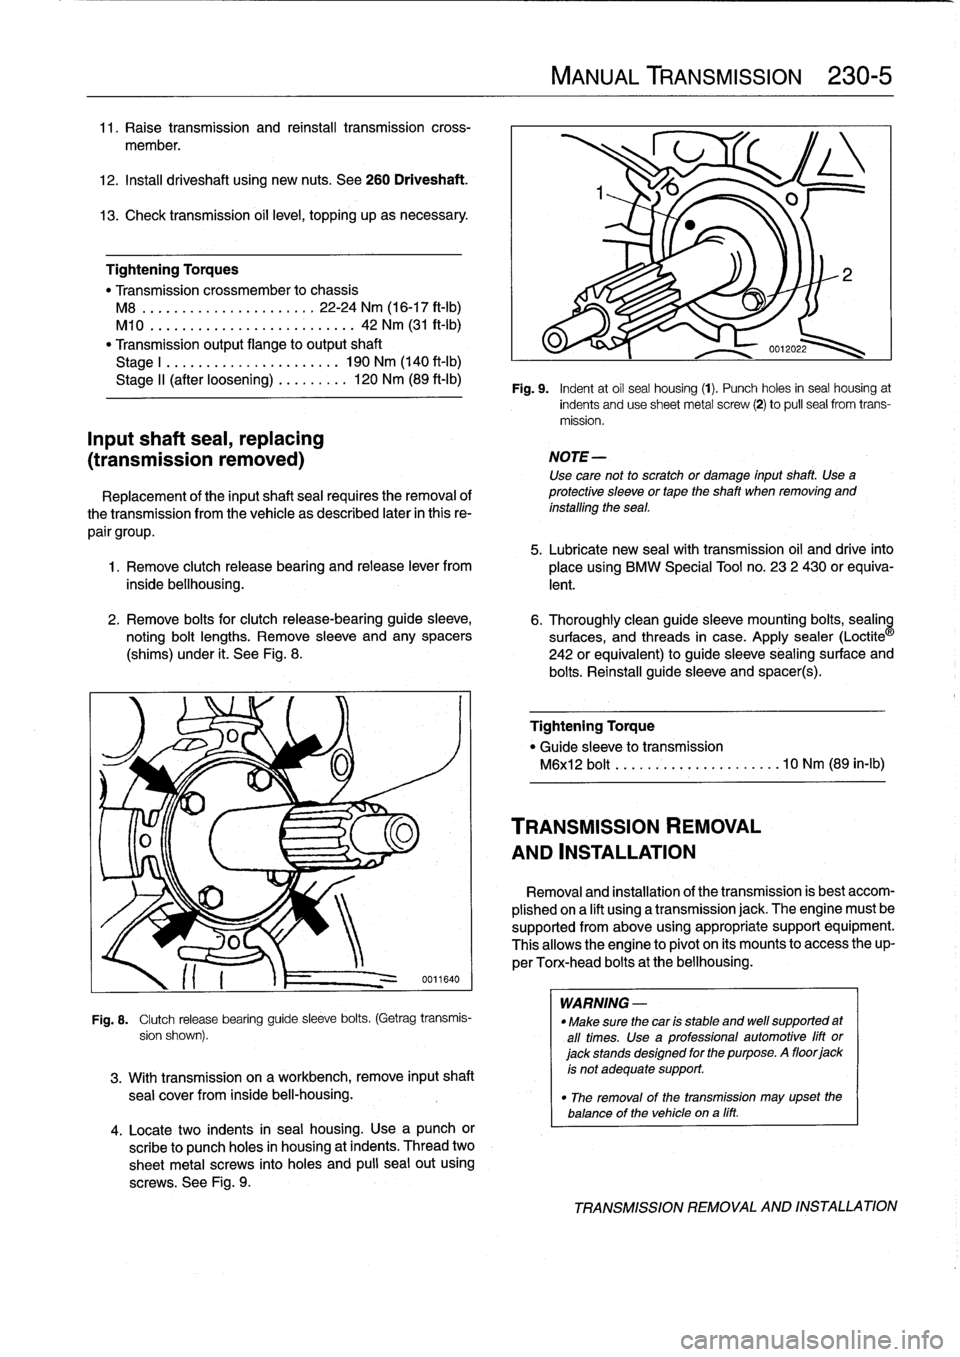
Fi
g
.
9
.
Indent
at
oil
seal
housing
(1)
.
Punch
holes
in
seal
housing
at
Inputshaft
sea¡,
replacing
(transmission
removed)
Replacement
of
the
inputshaft
sea¡
requires
the
removal
of
thetransmission
from
the
vehicle
as
described
later
in
this
re-
pair
group
.
5
.
Lubricate
new
sea¡with
transmission
oil
and
drive
into
1
.
Remove
clutch
release
bearing
and
release
lever
from
placeusing
BMW
Special
Tool
no
.
23
2
430
or
equiva-
inside
bellhousing
.
lent
.
2
.
Remove
bolts
for
clutch
release-bearing
guide
sleeve,
6
.
Thoroughly
cleanguide
sleeve
mounting
bolts,
sealin
noting
bolt
lengths
.
Remove
sleeve
and
any
spacers
surfaces,
and
threads
in
case
.
Apply
sealer
(Loctite
(shims)
under
¡t
.
See
Fig
.
8
.
242
or
equivalent)
to
guide
sleeve
sealingsurface
and
bolts
.
Reinstall
guide
sleeve
and
spacer(s)
.
0011640
Fig
.
8
.
Clutch
release
bearing
guide
sleeve
bolts
.
(Getrag
transmis-
sion
shown)
.
3
.
With
transmission
on
aworkbench,
remove
input
shaft
sea¡
cover
from
inside
bel¡-housing
.
4
.
Locate
two
indents
in
seal
housing
.
Use
a
punch
or
scribe
to
punch
holes
in
housing
at
indents
.
Thread
two
sheetmetal
screws
into
holes
and
pulí
seal
out
using
screws
.
See
Fig
.
9
.
MANUAL
TRANSMISSION
230-
5
indents
anduse
sheetmetal
screw
(2)
to
pul¡
sea¡
from
trans-
mission
.
NOTE-
Use
care
not
to
scratch
or
damage
input
shaft
.
Use
a
protective
sleeve
or
tape
the
shaft
when
removing
and
installing
the
sea¡
.
Tightening
Torque
"
Guide
sleeveto
transmission
M6xl2
bolt
.......
...
.
.
.........
10
Nm
(89
in-lb)
TRANSMISSION
REMOVAL
AND
INSTALLATION
Removal
and
installation
of
the
transmission
is
best
accom-
plished
ona
lift
using
a
transmission
jack
.
The
engine
must
be
supported
from
above
using
appropriate
support
equipment
.
Thisallows
the
engine
to
pivot
on
its
mounts
to
access
theup-
perTorx-head
bolts
at
the
bellhousing
.
WARNING
-
"
Make
sure
thecar
is
stable
and
well
supported
at
all
times
.
Use
a
professional
automotive
lift
or
jack
stands
designed
for
the
purpose
.
A
floor
jack
is
not
adequate
support
.
"
The
removal
of
the
transmission
may
upset
the
balance
of
the
vehicle
ona
líft
.
TRANSMISSION
REMOVAL
AND
INSTALLATION
Page 227 of 759
13
.
Remove
transmission
mounting
bolts
(Torx-head)
.
Note
length
and
location
of
bolts
.
See
Fig
.
13
.
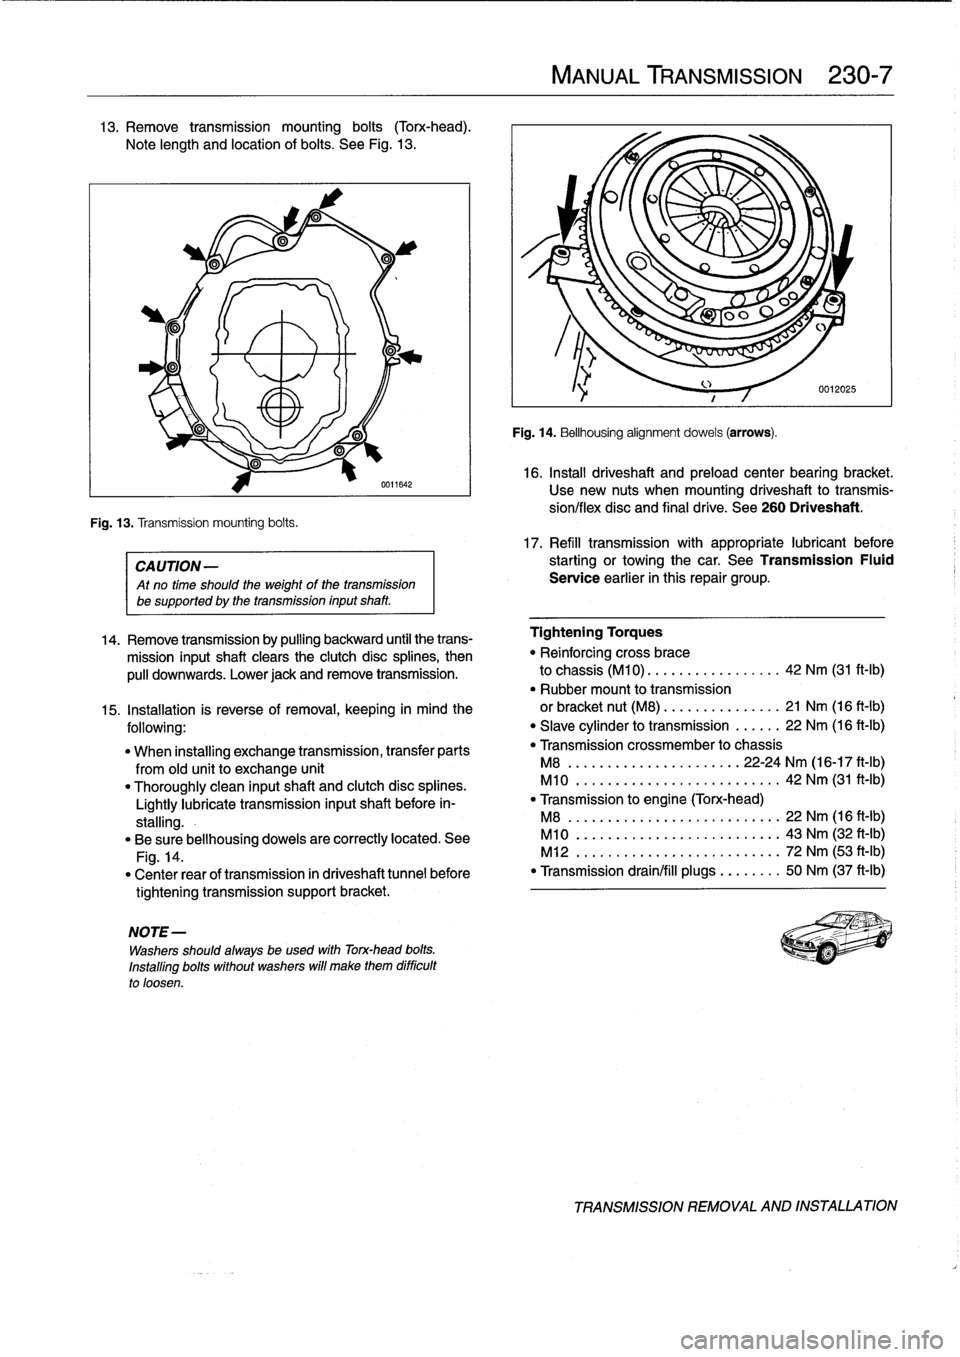
Fig
.
13
.
Transmission
mounting
bolts
.
0611642
CA
UTION-
Atno
time
should
the
weight
of
thetransmission
be
supported
by
the
transmission
inputshaft
.
NOTE
-
Washers
should
always
be
used
with
Torx-head
bolts
.
Installing
bolts
without
washers
will
make
them
difficult
to
loosen
.
MANUAL
TRANSMISSION
230-
7
Fig
.
14
.
Bellhousing
alignment
dowels
(arrows)
.
16
.
Install
driveshaft
and
preload
center
bearing
bracket
.
Usenew
nuts
when
mounting
driveshaft
to
transmis-
síon/flex
disc
and
final
drive
.
See
260
Driveshaft
.
17
.
Refill
transmission
with
appropriate
lubricant
before
starting
or
towingthe
car
.
See
Transmission
Fluid
Service
earlier
in
this
repair
group
.
14
.
Remove
transmission
by
pulling
backward
until
the
trans-
Tightening
Torques
mission
inputshaft
clears
the
clutch
disc
splines,
then
"
Reinforcing
cross
brace
pulí
downwards
.
Lower
jack
andremove
transmission
.
to
chassis
(M10)
.
...
.............
42
Nm
(31
ft-Ib)
"
Rubber
mount
to
transmission
15
.
Installation
is
reverse
of
removal,
keeping
in
mind
the
or
bracket
nut
(M8)
.
...
.
...
.......
21
Nm
(16
ft-Ib)
following
:
"
Slave
cylinder
to
transmission
......
22
Nm
(16
ft-Ib)
"
When
installing
exchange
transmission,
transfer
parts
"
Transmission
crossmember
to
chassis
from
old
unit
to
exchange
unit
M8
...............
.
.
...
..
22-24
Nm
(16-17
ft-Ib)
"
Thoroughly
clean
inputshaft
and
clutch
disc
splines
.
M10
..............
.
..
..
.......
42
Nm
(31
ft-Ib)
Lightly
lubrícate
transmission
inputshaft
before
in-
"
Transmission
to
engine
(Torx-head)
stalling
.-
M8
..
..................
..
.
..
..
22
Nm
(16
ft-Ib)
"
Be
sure
bellhousing
dowels
are
correctly
located
.
See
M10
.
.................
...
.
..
..
43
Nm
(32
ft-Ib)
Fig
.
14
.
M12
.
..................
..
.
..
..
72
Nm
(53
ft-Ib)
"
Center
rear
of
transmission
in
driveshaft
tunnel
before
"
Transmission
drain/fill
plugs
.
..
.
..
..
50
Nm
(37
ft-Ib)
tightening
transmission
support
bracket
.
TRANSMISSION
REMOVAL
AND
INSTALLATION
Page 259 of 759
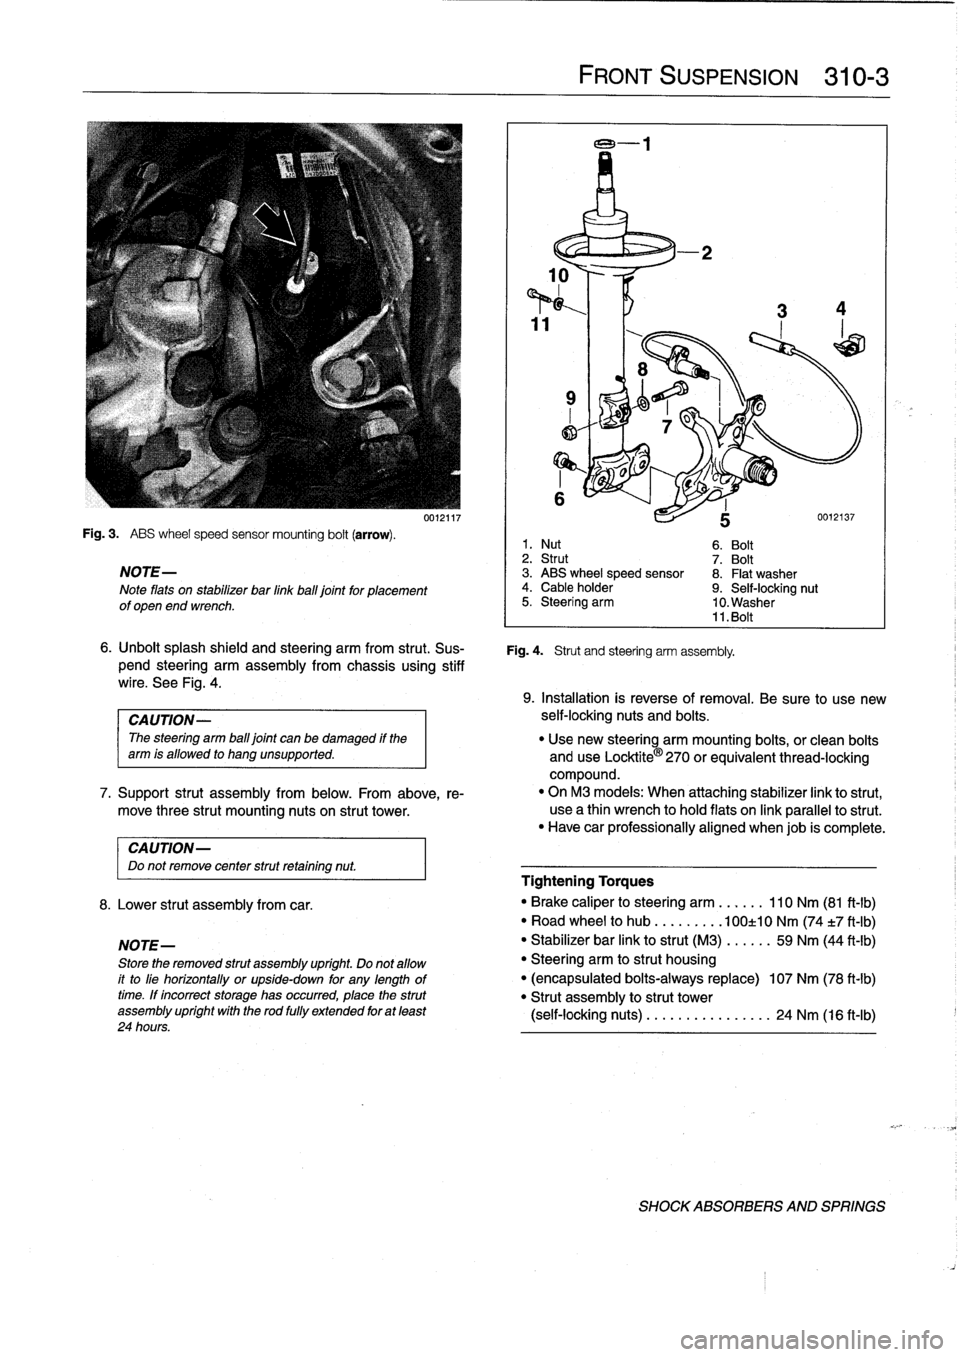
Fig
.
3
.
ABS
wheel
speed
sensor
mounting
bolt
(arrow)
.
NOTE-
Note
flats
on
stabilizer
bar
linkball
joint
for
placement
of
open
end
wrench
.
CAUTION-
Do
not
remove
center
strut
retaining
nut
.
8
.
Lower
strut
assembly
from
car
.
NOTE-
Store
the
removed
strut
assembly
upríght
.
Do
not
allow
it
to
líe
horizontally
or
upside-down
for
any
lengthoftime
.
If
íncorrect
storage
has
occurred,
place
the
strut
assembly
upríght
wíth
the
rod
fully
extended
for
at
least
24
hours
.
0012117
FRONT
SUSPENSION
310-3
6
.
Unbolt
splash
shield
and
steering
arm
from
strut
.
Sus-
Fig
.
4
.
Strut
and
steering
arm
assembly
.
pend
steering
arm
assembly
from
chassis
using
stiff
wire
.
See
Fig
.
4
.
1
.
Nut
6
.
Bolt
2
.
Strut
7
.
Bolt
3
.
ABS
wheel
speed
sensor
8
.
Flat
washer
4
.
Cable
holder
9
.
Self-locking
nut
5
.
Steering
arm
10
.
Washer
11
.
Bolt
9
.
Installation
is
reverse
of
removal
.
Be
sure
to
use
new
CAUTION-
self-locking
nuts
and
bolts
.
The
steering
arm
ball
joint
can
be
damaged
if
the
"
Use
new
steering
arm
mounting
bolts,
or
clean
bolts
arm
is
allowed
to
hang
unsupported
.
and
use
Locktite
®
270
orequivalent
thread-locking
compound
.
7
.
Support
strut
assembly
from
below
.
From
above,
re-
"
On
M3
models
:
When
attaching
stabilizer
link
to
strut,
move
three
strut
mounting
nuts
on
strut
tower
.
use
a
thin
wrench
to
hold
flats
on
link
parallelto
strut
.
"
Have
car
professionally
aligned
When
job
is
complete
.
Tightening
Torques
"
Brake
caliper
to
steering
arm
......
110
Nm
(81
ft-lb)
"
Road
wheel
to
hub
.........
100±10
Nm
(74
t7
ft-Ib)
"
Stabilizer
bar
link
to
strut
(M3)
.....
.
59
Nm
(44
ft-lb)
"
Steering
arm
to
strut
housing
"
(encapsulated
bolts-always
replace)
107
Nm
(78
ft-lb)
"
Strut
assembly
to
strut
tower
(self-locking
nuts)
........
...
..
..
.
24
Nm
(16
ft-Ib)
SHOCK
ABSORBERS
AND
SPRINGS
Page 272 of 759
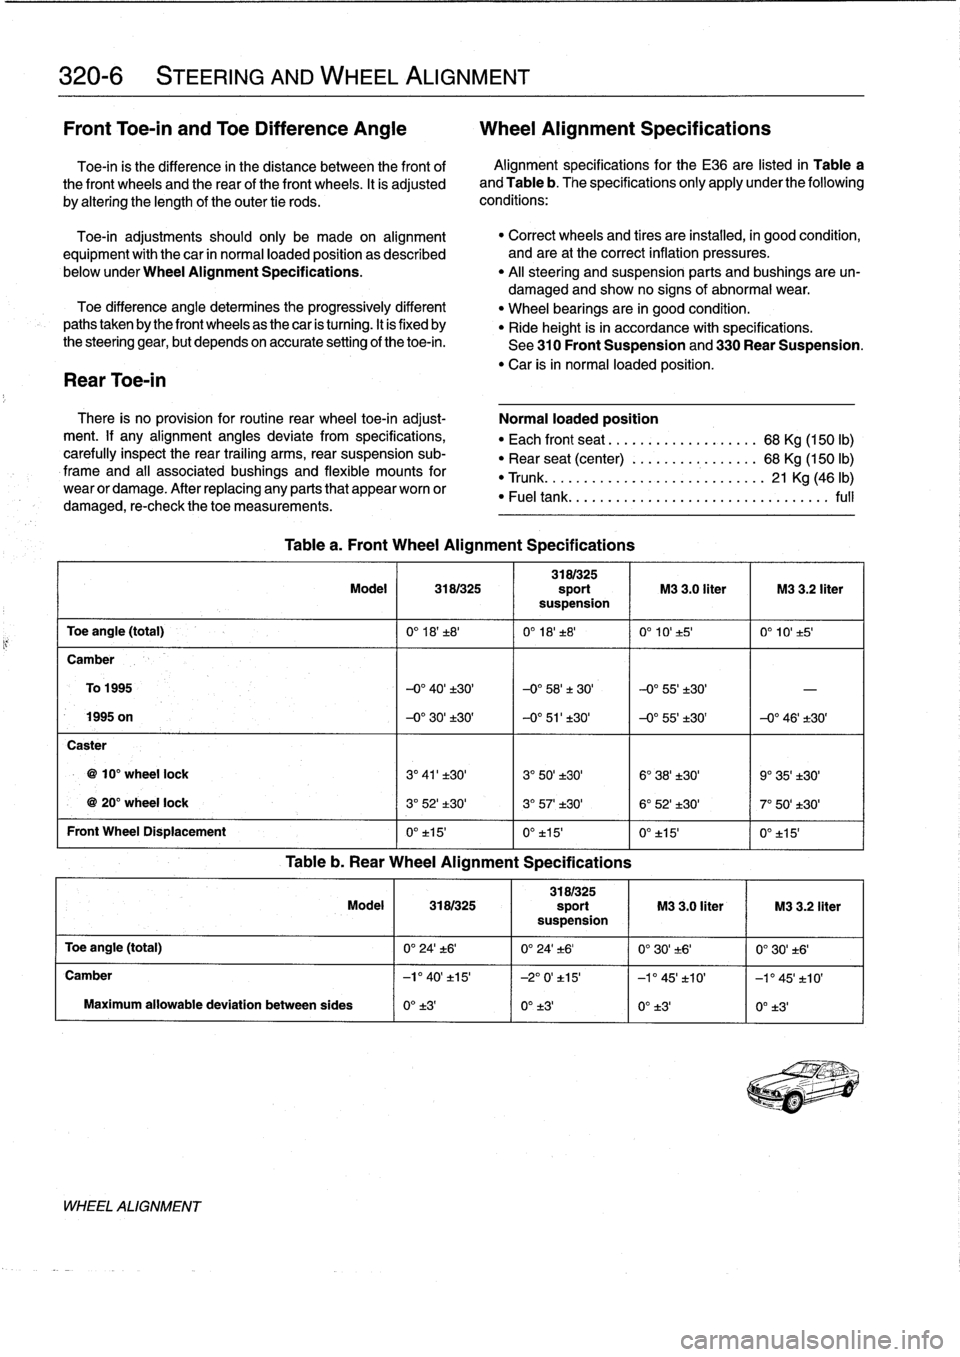
320-
6
STEERING
AND
WHEEL
ALIGNMENT
Front
Toe-in
andToe
Difference
Angle
Wheel
Alignment
Specifications
Toe-in
is
the
difference
in
the
distance
between
the
front
of
Alignment
specificationsfor
the
E36
are
listed
in
Table
a
the
front
wheels
and
the
rear
of
the
front
wheels
.
It
is
adjusted
and
Table
b
.
The
specifications
only
apply
under
the
following
by
altering
the
length
of
the
outer
tie
rods
.
conditions
:
Toe-in
adjustments
should
only
be
made
on
alignment
equipment
with
the
car
in
normalloaded
position
as
described
below
under
Wheel
Alignment
Specifications
.
Toe
difference
angledetermines
the
progressively
different
pathstaken
by
the
front
wheelsas
the
car
is
turning
.
It
is
fixed
by
the
steering
gear,
but
depends
on
accurate
setting
of
the
toe-in
.
Rear
Toe-in
There
is
no
provision
for
routinerear
wheel
toe-in
adjust-
ment
.
If
any
alignment
angles
deviate
from
specifications,
carefully
inspect
the
rear
trailing
arms,
rear
suspension
sub-
frame
and
al¡
associated
bushings
and
flexible
mounts
for
wear
or
damage
.
After
replacing
any
parts
that
appear
worn
or
damaged,
re-check
thetoe
measurements
.
WHEEL
ALIGNMENT
Table
a
.
Front
Wheel
Alignment
Specifications
"
Correct
wheels
and
tires
are
installed,
in
good
condition,
and
are
at
the
correct
inflation
pressures
.
"
Al¡
steering
and
suspension
parts
and
bushings
areun-
damaged
and
show
no
signs
of
abnormal
wear
.
"
Wheel
bearings
are
in
good
condition
.
"
Ride
height
is
in
accordance
with
specifications
.
See
310
Front
Suspension
and330
Rear
suspension
.
"
Car
isin
normal
loaded
position
.
Normal
loaded
position
"
Each
front
seat
.....:.............
68
Kg
(150
lb)
"
Rear
seat
(center)
................
68
Kg
(150
lb)
"
Trunk
.
.
.
..
.......................
21
Kg
(46
lb)
"
Fueltank
.
........................
...
.
..
..
full
3181325
Model
3181325
sport
M3
3
.0
liter
M3
3
.2
liter
suspension
Toe
angle
(total)
0°
18'±8'
0°
18'±8'
0°
10'
±5'
0°
10't5'
Camber
To
1995
-0°
40'±30'
-0°
58'±
30'
-0°55'±30'
-
1995
on
-0°
30'
±30'
-0°
51'±30'
-0°55'±30'
-0°
46'±30'
Caster
10°
wheel
lock
3°
41'±30'
3°
50'±30'
6°
38'±30'
9°
35'±30'
20°
wheel
lock
3°
52'±30'
3°
57'
t30'
6°
52'±30'
7°
50'±30'
Front
Wheel
Displacement
0°
t15'
0°t15'
0°
±15
0°
±15'
Table
b
.
Rear
Wheel
Alignment
Specifications
3181325
Model
3181325
sport
M3
3
.0
liter
M3
3
.2
liter
suspension
Toe
angle
(total)
0°
24't6'
0°
24'±6'
0'30'
.-t6'
0°
30't6'
Camber
-l'
40'
t15'
-2°
0'
t15'
-1
°
45'
t10'
-1'45'±10'
Maximum
allowabledeviation
between
sides
0°
±3'
0°
±3'
0°
t3'
0°
t3'
Page 305 of 759
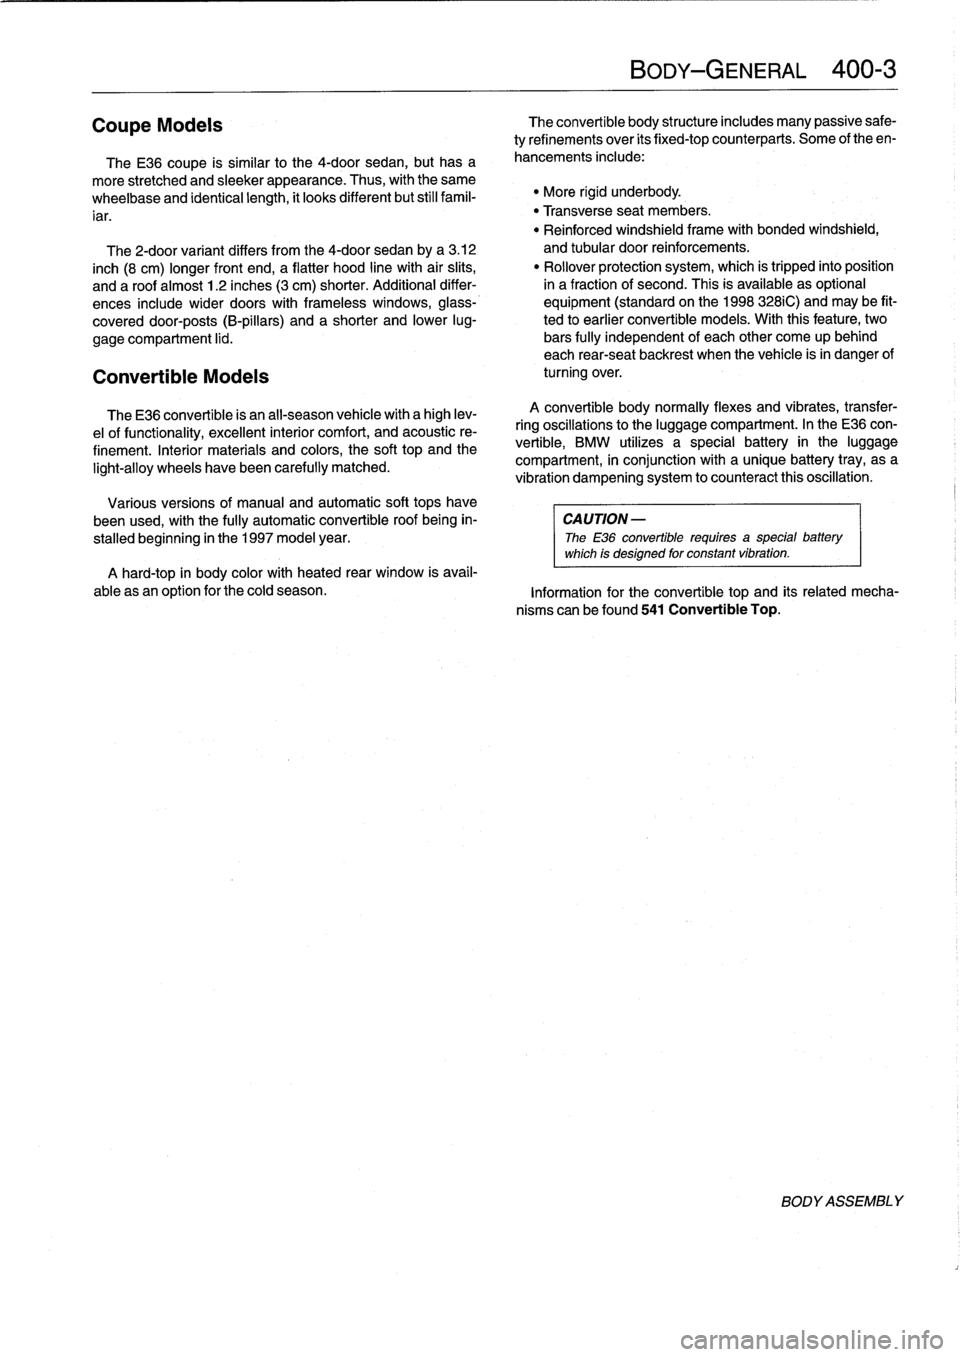
TheE36
convertible
is
an
all-season
vehicle
with
a
high
lev-
e¡offunctionality,
excellent
interior
comfort,
and
acoustic
re-
finement
.
Interior
materials
and
colors,
the
soft
top
and
the
light-alloy
wheelshave
been
carefully
matched
.
Various
versions
of
manual
and
automatic
soft
tops
have
been
used,
with
the
fully
automatic
convertible
roof
being
in-
stalled
beginning
in
the
1997
model
year
.
A
hard-top
in
body
color
with
heated
rear
window
is
avail-
ableas
an
option
for
the
cold
season
.
BODY-GENERAL
400-
3
Coupe
Models
The
convertible
body
structure
includes
many
passive
safe-
ty
refinements
over
its
fixed-top
counterparts
.
Some
of
the
en-
TheE36
coupe
is
similar
to
the4-door
sedan,
but
has
a
hancements
include
:
more
stretched
and
sleeker
appearance
.
Thus,
with
the
same
wheelbase
and
identicallength,
it
looks
different
but
still
famil-
"
More
rígíd
underbody
.
iar
.
"
Transverse
seat
members
.
"
Reinforced
windshield
frame
with
bonded
windshield,
The
2-door
variant
differs
from
the
4-door
sedan
by
a
3
.12
and
tubular
door
reinforcements
.
inch
(8
cm)
longer
front
end,
a
flatter
hood
line
with
air
slits,
"
Rollover
protection
system,
which
is
tripped
into
position
and
a
roof
almost
1
.2
inches
(3
cm)
shorter
.
Additional
differ-
in
a
fraction
of
second
.
This
is
available
as
optional
ences
include
wider
doors
with
frameless
Windows,
glass-
equipment
(standard
on
the
1998
328iC)
and
may
be
fit-
covered
door-posts
(B-pillars)
and
a
shorter
and
lower
lug-
ted
to
earlier
convertible
models
.
With
this
feature,
two
gage
compartment
lid
.
bars
fully
independent
of
each
other
come
up
behind
each
rear-seat
backrest
when
the
vehicle
is
in
danger
of
Convertible
Models
turning
over
.
A
convertible
body
normally
flexes
and
vibrates,
transfer-
ring
oscillations
to
the
luggage
compartment
.
In
the
E36
con-
vertible,
BMW
utilizes
a
special
battery
in
the
luggage
compartment,
in
conjunction
with
a
unique
battery
tray,
asa
vibration
dampening
system
to
counteract
thisoscillation
.
CAUTION
-
The
E36
convertible
requires
a
specialbattery
which
is
designed
for
constant
vibration
.
Information
for
the
convertible
top
and
its
related
mecha-
nisms
can
be
found
541
Convertible
Top
.
BODYASSEMBLY
Page 313 of 759
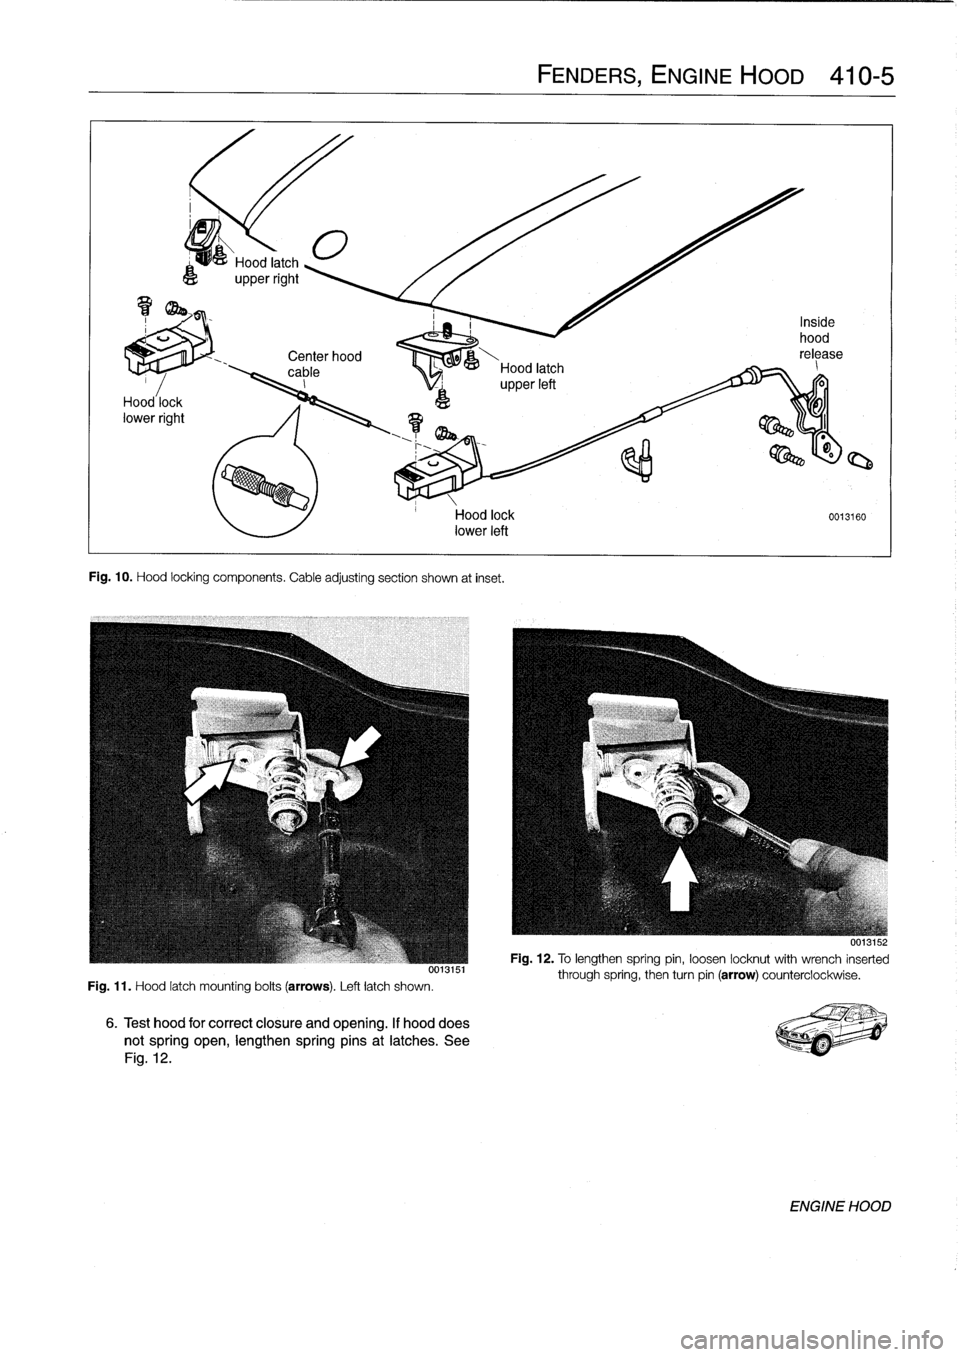
Center
hood
,
00--&---
cable
Hood
latch
_
I
upperleft
Fig
.
10
.
Hood
locking
components
.
Cable
adjusting
section
shown
at
inset
.
Fig
.
11
.
Hood
latch
mounting
bolts
(arrows)
.
Left
latch
shown
.
Hood
lock
0013160
lower
left
6
.
Test
hood
for
correct
closure
and
opening
.
If
hooddoes
notspring
open,
lengthen
springpins
at
latches
.
See
Fig
.
12
.
FENDERS,
ENGINE
HOOD
410-5
001aio
Fig
.
12
.
To
lengthen
spring
pin,
loosen
locknut
with
wrench
inserted
through
spring,
then
turn
pin
(arrow)
counterclockwise
.
ENGINE
HOOD
Page 371 of 759
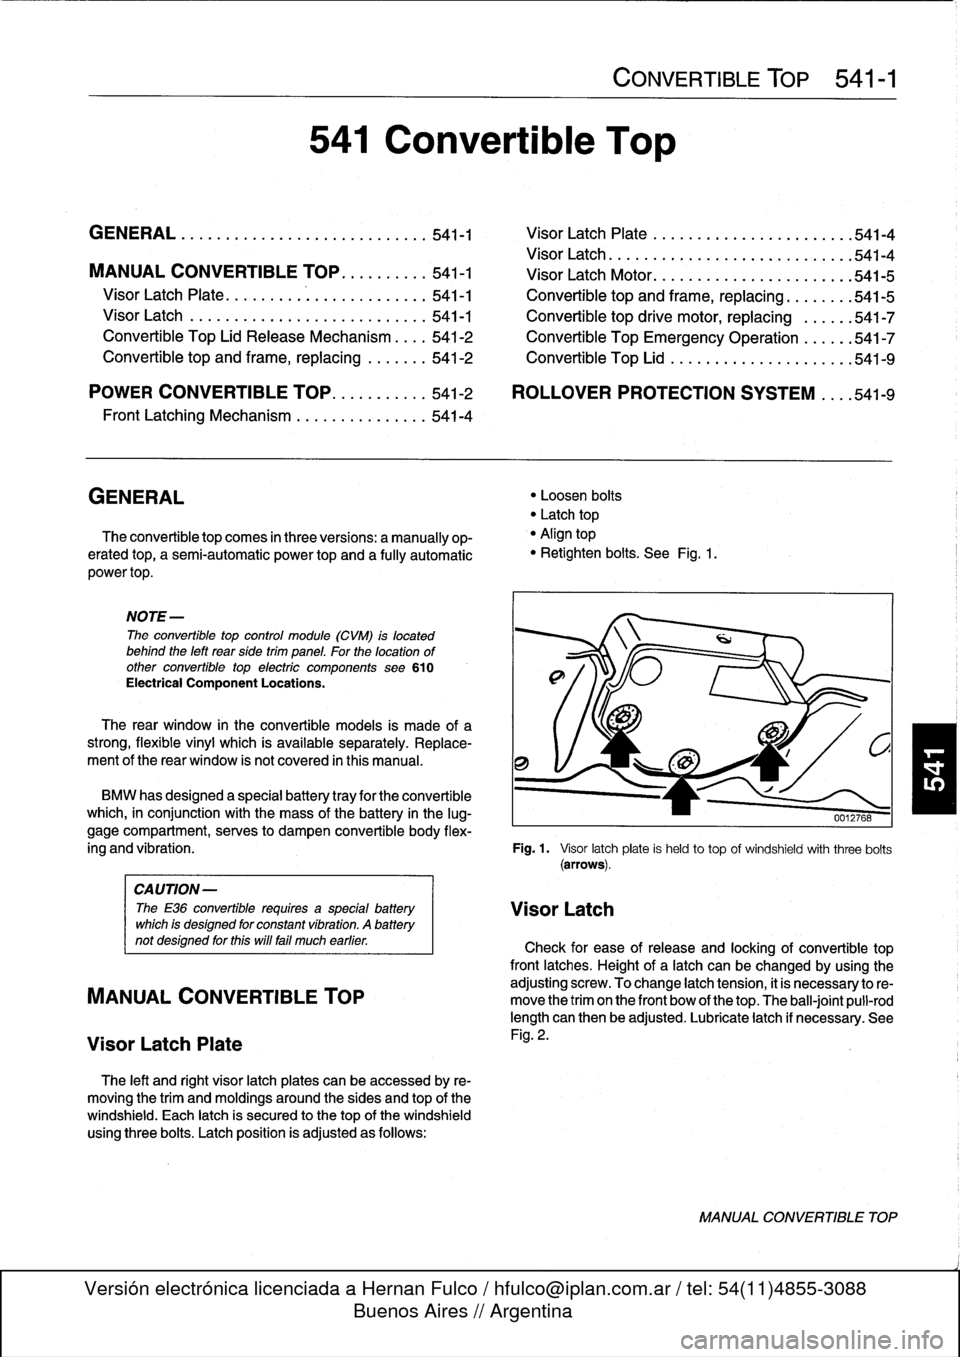
GENERAL
.
...
.
.
.
......
.
.
.
.
.
.
.
.
.
......
541-1
Visor
Latch
Plate
.....
.
....
.
.
.
.
.
...
.
...
.541-4
Visor
Latch
..
.
............
.
.
.
..........
541-4
MANUAL
CONVERTIBLE
TOP
.
.
.
.
...
.
..
541-1
Visor
Latch
Motor
...
.......
.
.
.
..
........
541-5
Visor
Latch
Plate
.
.
......
.
.
.
...
.
.
.
.
.
.
.
..
541-1
Convertible
top
and
frame,
replacing
........
541-5
VisorLatch
.
.
.
.
.
.
.
.
..........
.
.....
.
.
.541-1
Convertible
top
drive
motor,
replacing
......
541-7
Convertible
Top
Lid
Release
Mechanism
.
.
.
.
541-2
Convertible
Top
Emergency
Operation
.....
.541-7
Convertible
top
and
frame,
replacing
....
.
.
.
541-2
Convertible
Top
Lid
.
.
.
.
...........
.
.....
541-9
POWER
CONVERTIBLE
TOP
.
.
.
.
....
.
.
.
541-2
ROLLOVER
PROTECTION
SYSTEM
..
.
.
541-9
FrontLatching
Mechanism
.
.
.
.
.
.
.
.
......
.
541-4
GENERAL
The
convertible
top
comes
in
three
versions
:
a
manually
op-erated
top,
a
semi-automatic
power
top
and
a
fully
automatic
power
top
.
NOTE-
The
convertible
top
control
module
(CVM)
is
located
behind
the
left
rearside
trim
panel
.
For
the
location
of
other
convertible
top
electric
components
see610
Electrical
Component
Locations
.
The
rear
window
in
the
convertible
models
is
made
of
a
strong,
flexible
vínyl
which
is
available
separately
.
Replace-
ment
of
the
rear
window
is
not
covered
in
this
manual
.
The
left
and
right
visor
latch
plates
can
be
accessed
by
re-
moving
the
trim
and
moldings
around
the
sides
and
top
of
the
windshield
.
Each
latch
is
secured
to
thetop
of
the
windshield
usingthree
bolts
.
Latch
position
is
adjusted
as
follows
:
541
Convertible
Top
CONVERTIBLE
TOP
541-1
"
Loosen
bolts
"
Latch
top
"
Align
top
"
Retighten
bolts
.
See
Fig
.
1
.
BMW
has
designed
a
specialbattery
tray
for
the
convertible
which,
in
conjunction
with
the
mass
of
the
battery
in
the
lug-
gage
compartment,
serves
to
dampen
convertible
body
flex
ing
and
vibration
.
Fig
.
1.
Visor
latchplate
is
held
to
top
of
windshieldwith
three
bolts
(arrows)
.
CAUTION-
The
E36
convertible
requires
a
specialbattery
VisorLatch
which
is
designed
for
constant
vibration
.
A
battery
not
designed
forthis
will
fa¡¡
much
earlier
.
Check
for
ease
of
release
and
locking
of
convertible
top
front
latches
.
Height
of
a
latch
can
be
changed
by
using
the
adjusting
screw
.
To
change
latch
tension,
it
is
necessary
to
re-
MANUAL
CONVERTIBLE
TOP
move
the
trim
on
the
front
bow
of
thetop
.
The
ball-joint
pull-rod
length
can
then
be
adjusted
.
Lubricate
latch
if
necessary
.
See
Visor
Latch
Plate
Fig
.
2
.
MANUAL
CONVERTIBLE
TOP
Page 375 of 759
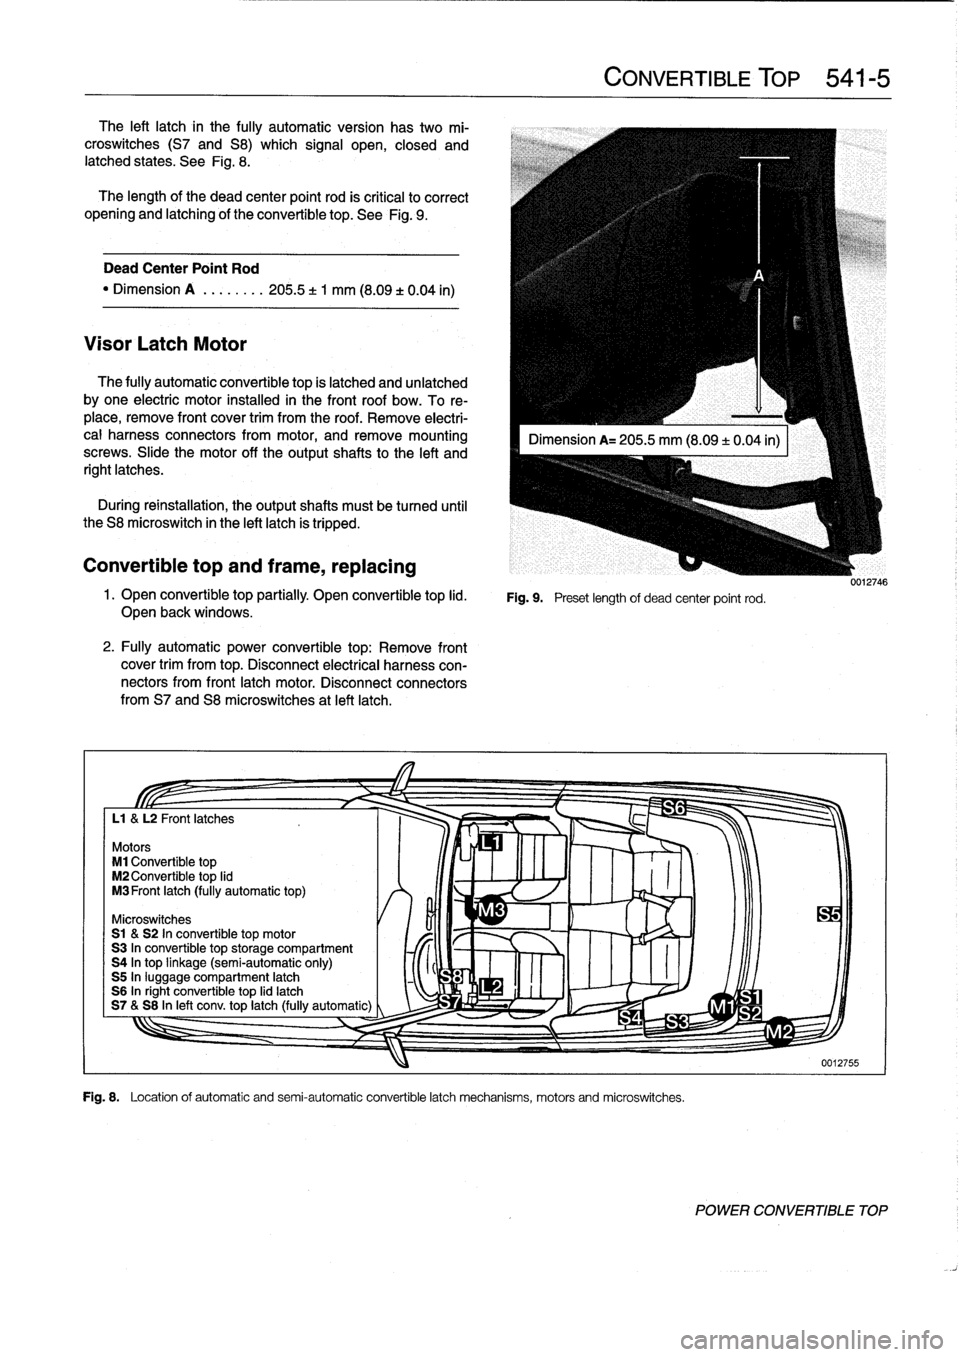
The
left
latch
in
the
fully
automatic
version
hastwo
mi-
croswitches
(S7
and
S8)which
signal
open,
closed
and
latched
states
.
See
Fig
.
8
.
The
length
of
the
dead
center
point
rod
is
critica¡
lo
correct
opening
and
latching
of
the
convertible
top
.
See
Fig
.
9
.
Dead
Center
Point
Rod
"
Dimension
A
........
205
.5
f
1
mm
(8
.09
t0
.04
in)
Visor
Latch
Motor
The
fully
automatic
convertible
top
is
latched
and
unlatched
by
one
electric
motor
installed
in
the
front
roof
bow
.
To
re-
place,
remove
front
cover
trim
from
the
roof
.
Remove
electri-
cal
harness
connectors
from
motor,
andremove
mounting
screws
.
Slide
the
motor
off
the
output
shafts
to
the
left
and
right
latches
.
During
reinstallation,
theoutput
shafts
must
be
tumed
until
the
S8
microswitch
in
the
left
latch
is
tripped
.
Convertible
top
and
frame,
replacing
1
.
Open
convertible
top
partially
.
Open
convertible
top
lid
.
Fig
.
9
.
Preset
lengthof
dead
centerpoint
rod
.
Open
back
windows
.
2
.
Fully
automatic
power
convertible
top
:
Remove
front
cover
trim
from
top
.
Disconnect
electrical
harness
con-
nectors
from
frontlatch
motor
.
Disconnect
connectors
from
S7
and
S8
microswitches
at
left
latch
.
Motors
M1
Convertible
top
M2
Convertible
top
lid
M3Front
latch
(fully
automatic
top)
Microswitches
S1
&S2
In
convertible
top
motor
S3
In
convertible
top
storage
compartment
S4
In
top
linkage
(semi-automatic
only)
S5
In
luggage
compartment
latch
S6
In
right
convertible
top
lid
latch
S7&S8
In
left
conv
.
top
latch
(fully
automatic)
Fig
.
8
.
Locationof
automatic
and
semi-automatic
convertible
latch
mechanisms,
motors
and
microswitches
.
CONVERTIBLE
TOP
541-5
POWER
CONVERTIBLE
TOP