clutch BMW 328i 1995 E36 Owner's Manual
[x] Cancel search | Manufacturer: BMW, Model Year: 1995, Model line: 328i, Model: BMW 328i 1995 E36Pages: 759
Page 219 of 759
Clutch,
inspecting
and
installing
1
.
Inspect
clutch
disc
for
wear,
cracks,
loose
rivets,
con-
tamination
or
excessive
runout
(warping)
.
Replace
if
necessary
.
2
.
Inspect
flywheel
for
scoring,
hot
spots,
cracks
or
loose
or
worn
guide
pins
.
Replace
flywheel
if
any
faults
are
found
.
WARNING
-
If
flywheel
is
removed
from
vehicle,
use
new
bolts
duríng
installation
.
The
old
stretch-typebolts
should
not
be
reused
.
3
.
Inspecttransmission
pilot
bearing
in
end
of
crankshaft
.
The
bearing
should
rotate
smoothly
without
play
.
If
nec-
essary,
replace
as
described
later
.
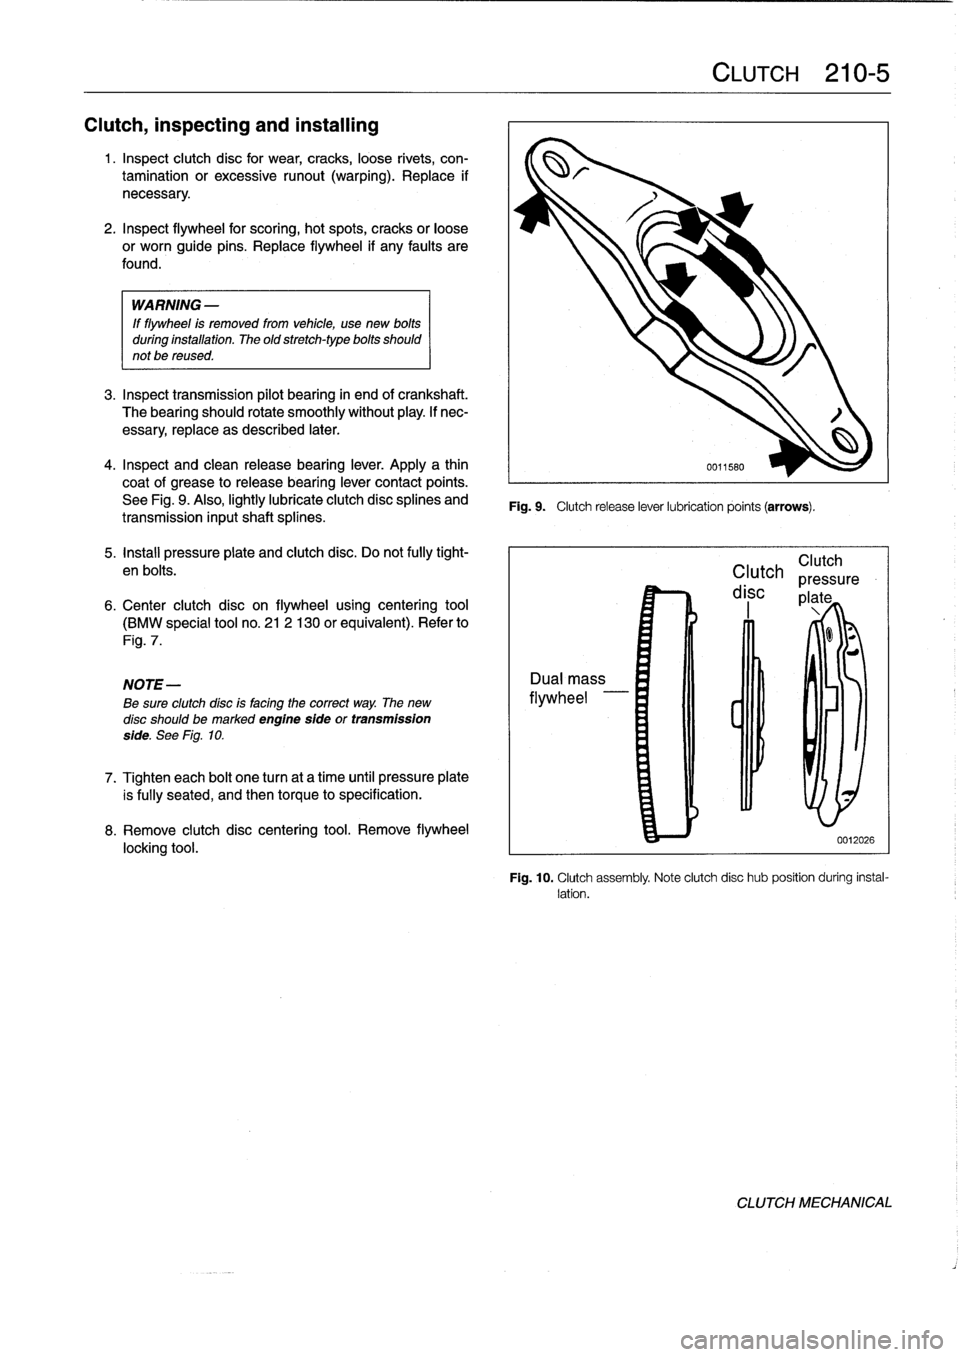
4
.
Inspect
and
clean
releasebearing
lever
.
Apply
a
thin
coat
of
grease
to
releasebearíng
lever
contact
points
.
See
Fig
.
9
.
Also,
lightly
lubricate
clutch
disc
splines
and
transmission
inputshaft
splínes
.
5
.
Install
pressure
plate
and
clutch
disc
.
Do
not
fully
tight-
en
bolts
.
6
.
Center
clutch
disc
on
flywheel
using
centering
tool
(BMW
special
tool
no
.
21
2
130
or
equivalent)
.
Refer
to
Fig
.
7
.
NOTE-
Be
sure
clutchdísc
is
facing
the
correct
way
.
The
new
disc
should
bemarked
engine
sfde
or
transmission
side
.
See
Fig
.
10
.
7
.
Tighten
each
bolt
one
turn
at
a
time
until
pressure
plate
is
fully
seated,
and
then
torque
to
specification
.
8
.
Remove
clutch
disc
centering
tool
.
Remove
flywheel
locking
tool
.
Fig
.
9
.
Clutch
release
lever
lubrication
points
(arrows)
.
CLUTCH
210-
5
Clutch
Clutch
pressure
disc
plate
0012026
Fig
.
10
.
Clutch
assembly
Note
clutch
disc
hub
position
during
instal-
lation
.
CLUTCH
MECHANICAL
Page 220 of 759
210-
6
CLUTCH
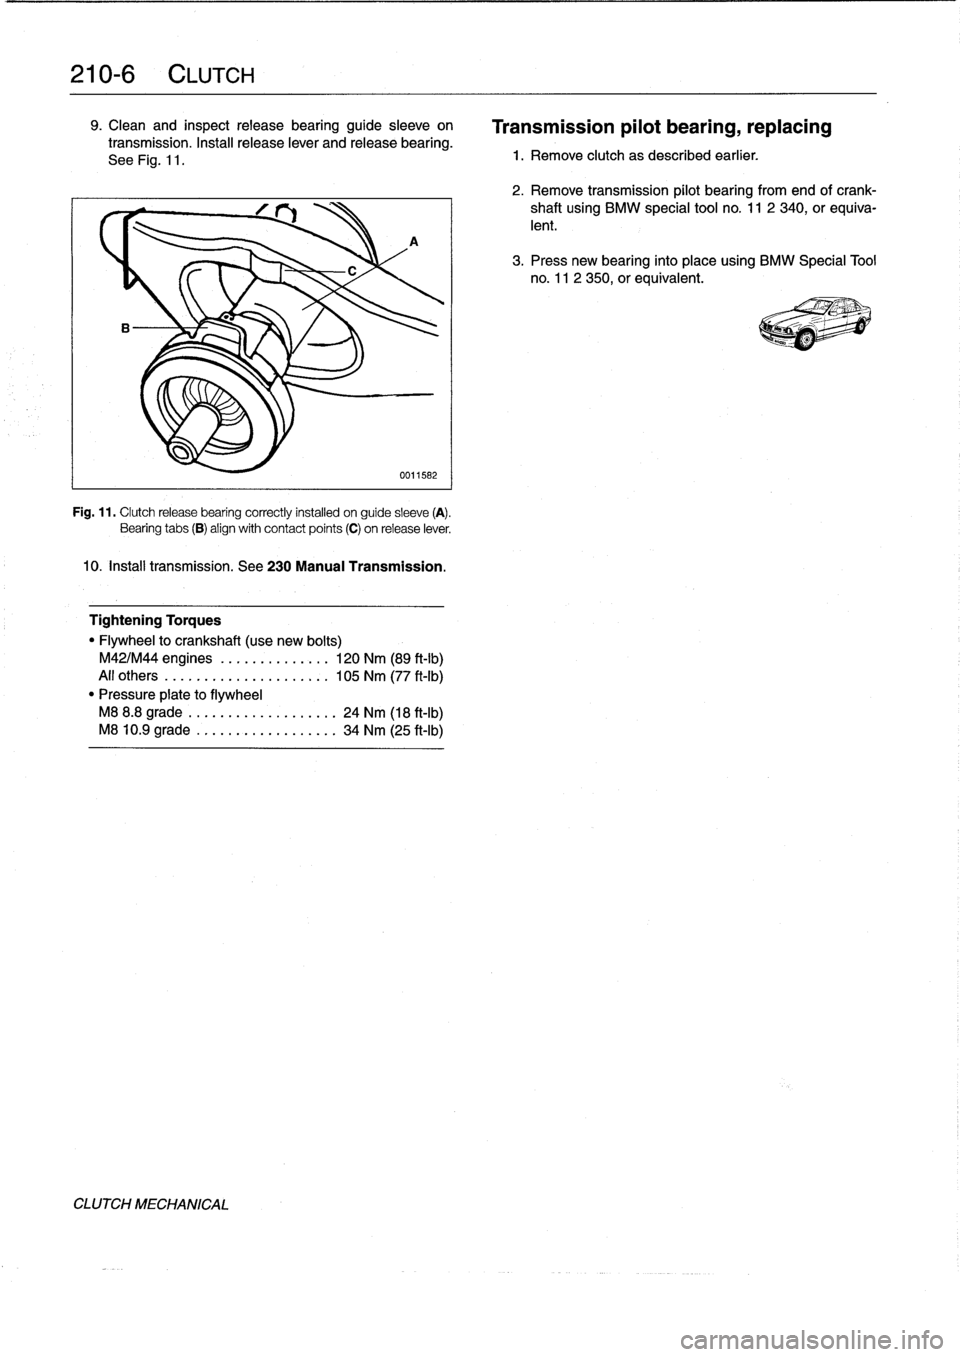
9
.
Clean
and
inspectrelease
bearing
guide
sleeve
on
transmission
.
Install
release
lever
and
release
bearing
.
See
Fig
.
11
.
A
0011582
Fig
.
11
.
Clutchrelease
bearing
correctly
installed
on
guide
sleeve
(A)
.
Bearing
tabs
(B)
align
with
contact
points
(C)
on
release
lever
.
10
.
Insta¡¡
transmission
.
See230
Manual
Transmission
.
Tightening
Torques
"
Flywheel
to
crankshaft
(use
new
bolts)
M42/M44
engines
....
.
..
...
....
120
Nm
(89
ft-Ib)
All
others
..........
..
.
..
......
105
Nm
(77
ft-Ib)
"
Pressure
píate
to
flywheel
M8
8
.8
grade
......
...
.
.
........
24
Nm
(18
ft-Ib)
M8
10
.9
grade
.....
..
..
..
.......
34
Nm
(25
ft-Ib)
CLUTCH
MECHANICAL
Transmission
pilot
bearing,
replacing
1
.
Remove
clutch
as
described
earlier
.
2
.
Remove
transmission
pilot
bearing
from
end
ofcrank-
shaft
using
BMW
special
tool
no
.
11
2
340,
or
equiva-
lent
.
3
.
Press
new
bearing
finto
placeusing
BMW
Specíal
Tool
no
.
11
2
350,or
equivalent
.
Page 225 of 759
11
.
Raise
transmission
and
reinstall
transmission
cross-
member
.
12
.
Install
driveshaft
using
new
nuts
.
See
260
Driveshaft
.
13
.
Check
transmission
oil
leve¡,
topping
up
asnecessary
.
Tightening
Torques
"
Transmission
crossmember
to
chassis
M8
...............
.
...
.
..
22-24
Nm
(16-17
ft-Ib)
M10
..............
.
..
...
..
.
...
42
Nm
(31
ft-Ib)
"
Transmission
outputflange
to
output
shaft
O
001202
2
Z
:Z
ZZZ~
%
_
j
Stage
I.................
..
.
..
190
Nm
(140
ft-Ib)
Stage
II
(after
loosening)
....
.
.
.
..
120
Nm
(89
ft-Ib)
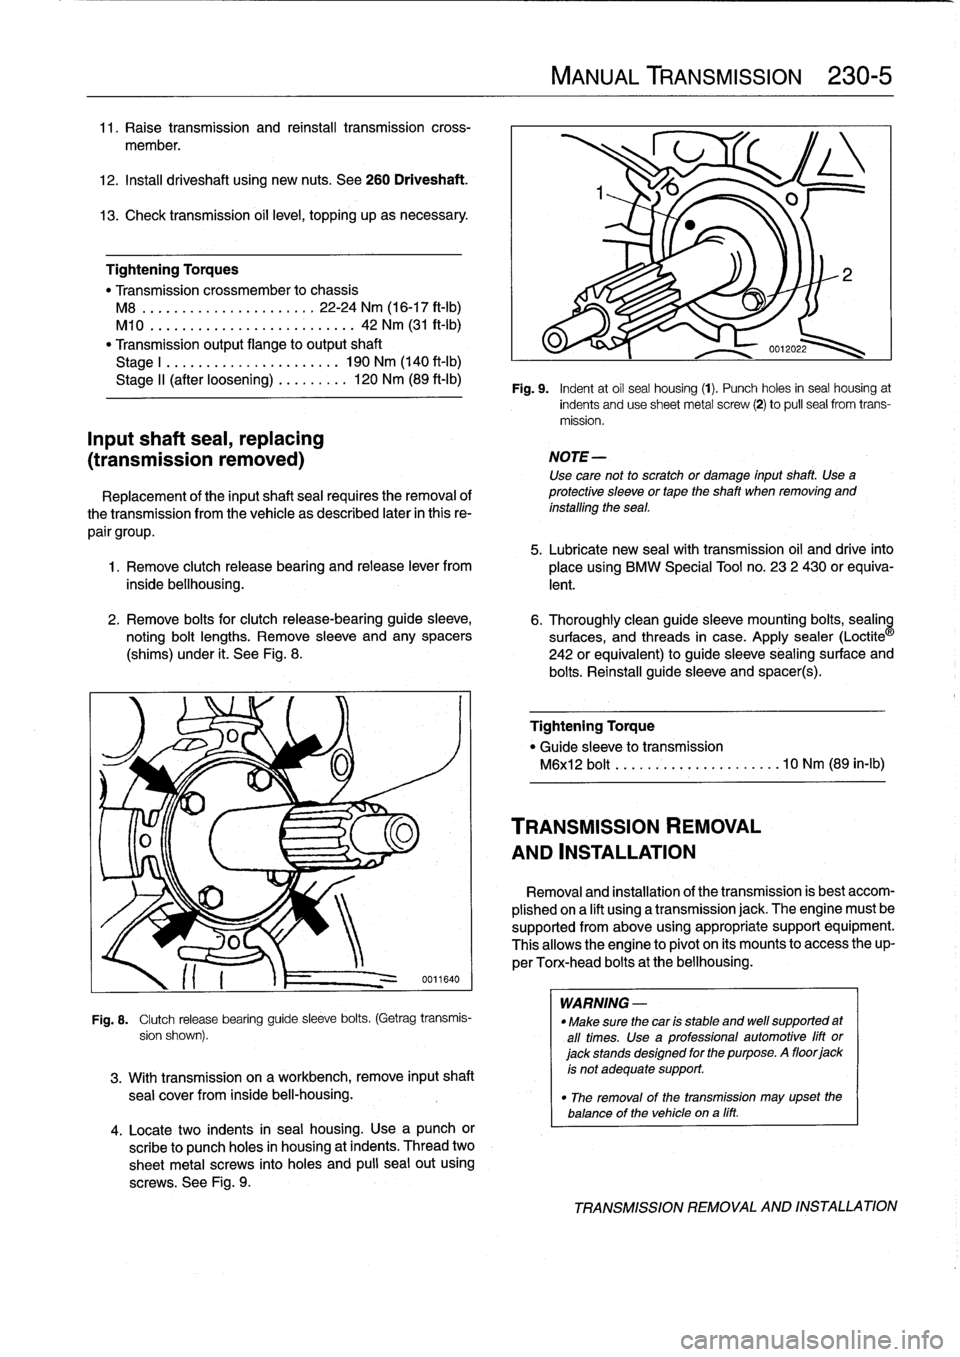
Fi
g
.
9
.
Indent
at
oil
seal
housing
(1)
.
Punch
holes
in
seal
housing
at
Inputshaft
sea¡,
replacing
(transmission
removed)
Replacement
of
the
inputshaft
sea¡
requires
the
removal
of
thetransmission
from
the
vehicle
as
described
later
in
this
re-
pair
group
.
5
.
Lubricate
new
sea¡with
transmission
oil
and
drive
into
1
.
Remove
clutch
release
bearing
and
release
lever
from
placeusing
BMW
Special
Tool
no
.
23
2
430
or
equiva-
inside
bellhousing
.
lent
.
2
.
Remove
bolts
for
clutch
release-bearing
guide
sleeve,
6
.
Thoroughly
cleanguide
sleeve
mounting
bolts,
sealin
noting
bolt
lengths
.
Remove
sleeve
and
any
spacers
surfaces,
and
threads
in
case
.
Apply
sealer
(Loctite
(shims)
under
¡t
.
See
Fig
.
8
.
242
or
equivalent)
to
guide
sleeve
sealingsurface
and
bolts
.
Reinstall
guide
sleeve
and
spacer(s)
.
0011640
Fig
.
8
.
Clutch
release
bearing
guide
sleeve
bolts
.
(Getrag
transmis-
sion
shown)
.
3
.
With
transmission
on
aworkbench,
remove
input
shaft
sea¡
cover
from
inside
bel¡-housing
.
4
.
Locate
two
indents
in
seal
housing
.
Use
a
punch
or
scribe
to
punch
holes
in
housing
at
indents
.
Thread
two
sheetmetal
screws
into
holes
and
pulí
seal
out
using
screws
.
See
Fig
.
9
.
MANUAL
TRANSMISSION
230-
5
indents
anduse
sheetmetal
screw
(2)
to
pul¡
sea¡
from
trans-
mission
.
NOTE-
Use
care
not
to
scratch
or
damage
input
shaft
.
Use
a
protective
sleeve
or
tape
the
shaft
when
removing
and
installing
the
sea¡
.
Tightening
Torque
"
Guide
sleeveto
transmission
M6xl2
bolt
.......
...
.
.
.........
10
Nm
(89
in-lb)
TRANSMISSION
REMOVAL
AND
INSTALLATION
Removal
and
installation
of
the
transmission
is
best
accom-
plished
ona
lift
using
a
transmission
jack
.
The
engine
must
be
supported
from
above
using
appropriate
support
equipment
.
Thisallows
the
engine
to
pivot
on
its
mounts
to
access
theup-
perTorx-head
bolts
at
the
bellhousing
.
WARNING
-
"
Make
sure
thecar
is
stable
and
well
supported
at
all
times
.
Use
a
professional
automotive
lift
or
jack
stands
designed
for
the
purpose
.
A
floor
jack
is
not
adequate
support
.
"
The
removal
of
the
transmission
may
upset
the
balance
of
the
vehicle
ona
líft
.
TRANSMISSION
REMOVAL
AND
INSTALLATION
Page 226 of 759
230-
6
MANUAL
TRANSMISSION
Transmission,
removing
and
installing
1
.
Disconnect
negative
(-)
cable
from
battery
.
CAUTION-
Prior
to
disconnecting
the
battery,
read
the
battery
disconnection
cautions
given
at
the
front
of
this
manual
onpage
viii
.
2
.
Insta¡¡
enginesupportacrossengine
bay
.
Raise
engine
so
that
weight
of
engine
ís
supported
.
See
Fig
.
10
.
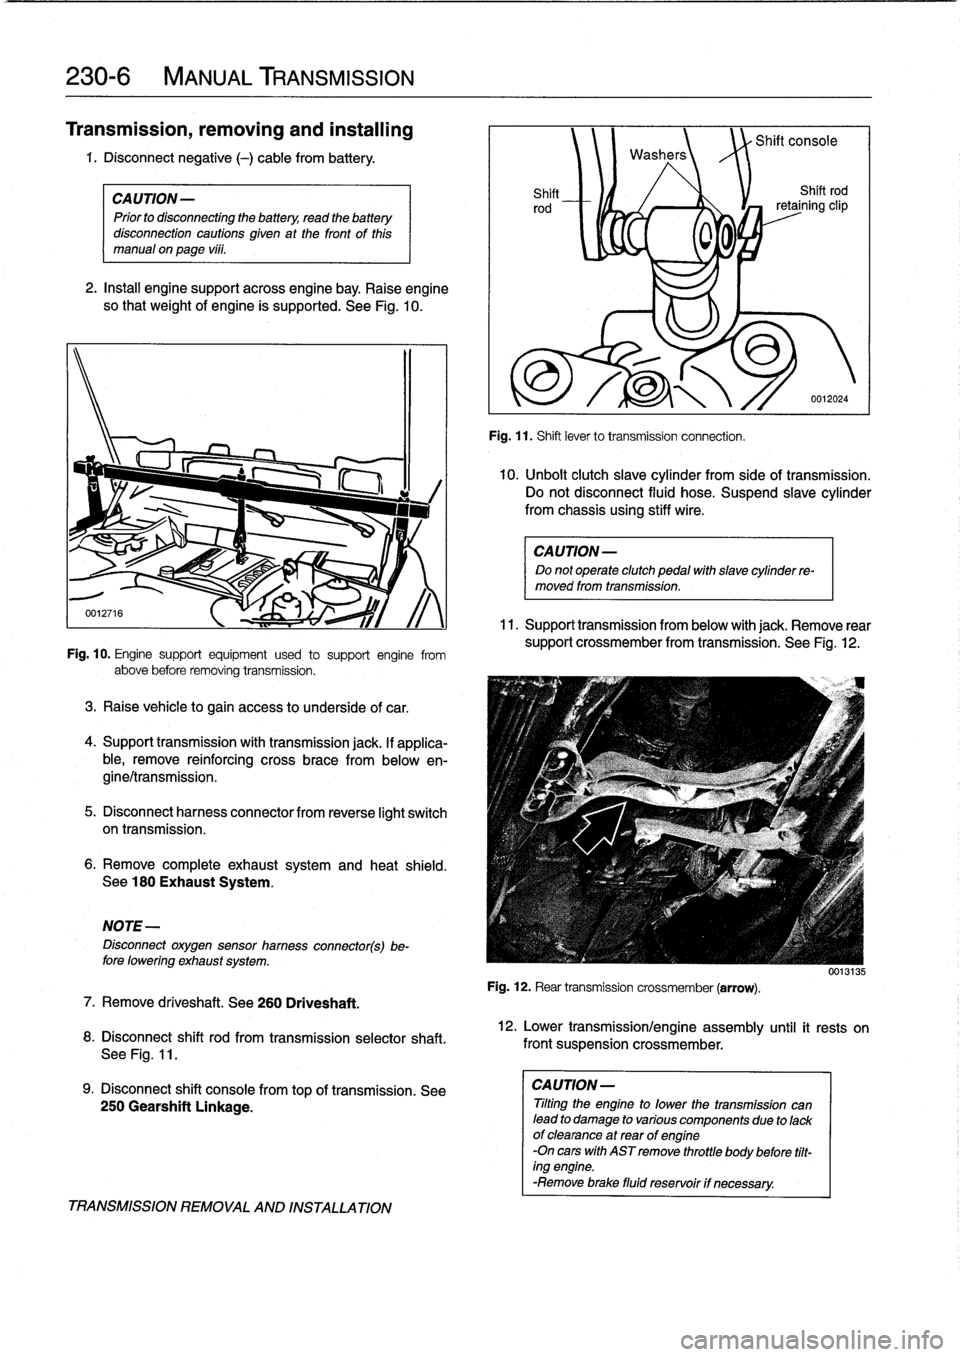
Fig
.
10
.
Engine
support
equipment
used
to
support
engine
from
above
before
removing
transmission
.
3
.
Raise
vehicle
to
gain
access
to
underside
of
car
.
4
.
Support
transmission
with
transmission
jack
.
lf
applica-
ble,
remove
reinforcing
cross
brace
from
belowen-
gine/transmission
.
5
.
Disconnect
harnesscon
nector
from
reverse
light
switch
on
transmission
.
6
.
Remove
completeexhaustsystem
and
heat
shield
.
See
180
Exhaust
System
.
NOTE-
Disconnect
oxygensensor
hamess
connector(s)be-
fore
lowering
exhaust
system
.
7
.
Remove
driveshaft
.
See260
Driveshaft
.
8
.
Disconnect
shift
rod
from
transmission
selectorshaft
.
See
Fig
.
11
.
9
.
Disconnect
shift
console
fromtop
of
transmission
.
See
250
Gearshift
Linkage
.
TRANSMISSION
REMOVAL
AND
INSTALLATION
Washers
Shift
Shift
rod
rod
retaining
clip
0
0
,
Fig
.
11
.
Shift
lever
to
transmission
connection
.
Shift
console
0012024
10
.
Unbolt
clutch
slave
cylinder
from
sideof
transmission
.
Do
not
disconnect
fluid
hose
.
Suspend
slavecylinder
from
chassis
using
stiff
wire
.
CAUTION-
Do
not
operate
clutch
pedal
with
slave
cylinder
re-
moved
from
transmission
.
11
.
Support
transmission
from
below
with
jack
.
Remove
rear
support
crossmember
from
transmission
.
See
Fig
.
12
.
Fig
.
12
.
Rear
transmission
crossmember
(arrow)
.
12
.
Lower
transmission/engine
assembly
until
it
rests
on
front
suspension
crossmember
.
CAUTION-
Tilting
the
engine
to
lower
thetransmission
can
lead
to
damage
to
various
componente
due
to
lackof
clearance
at
rear
of
engine
-On
cars
with
AST
remove
throttle
body
before
tilt-
ing
engine
.
-Remove
brace
fluid
reservoir
if
necessary
.
0013135
Page 227 of 759
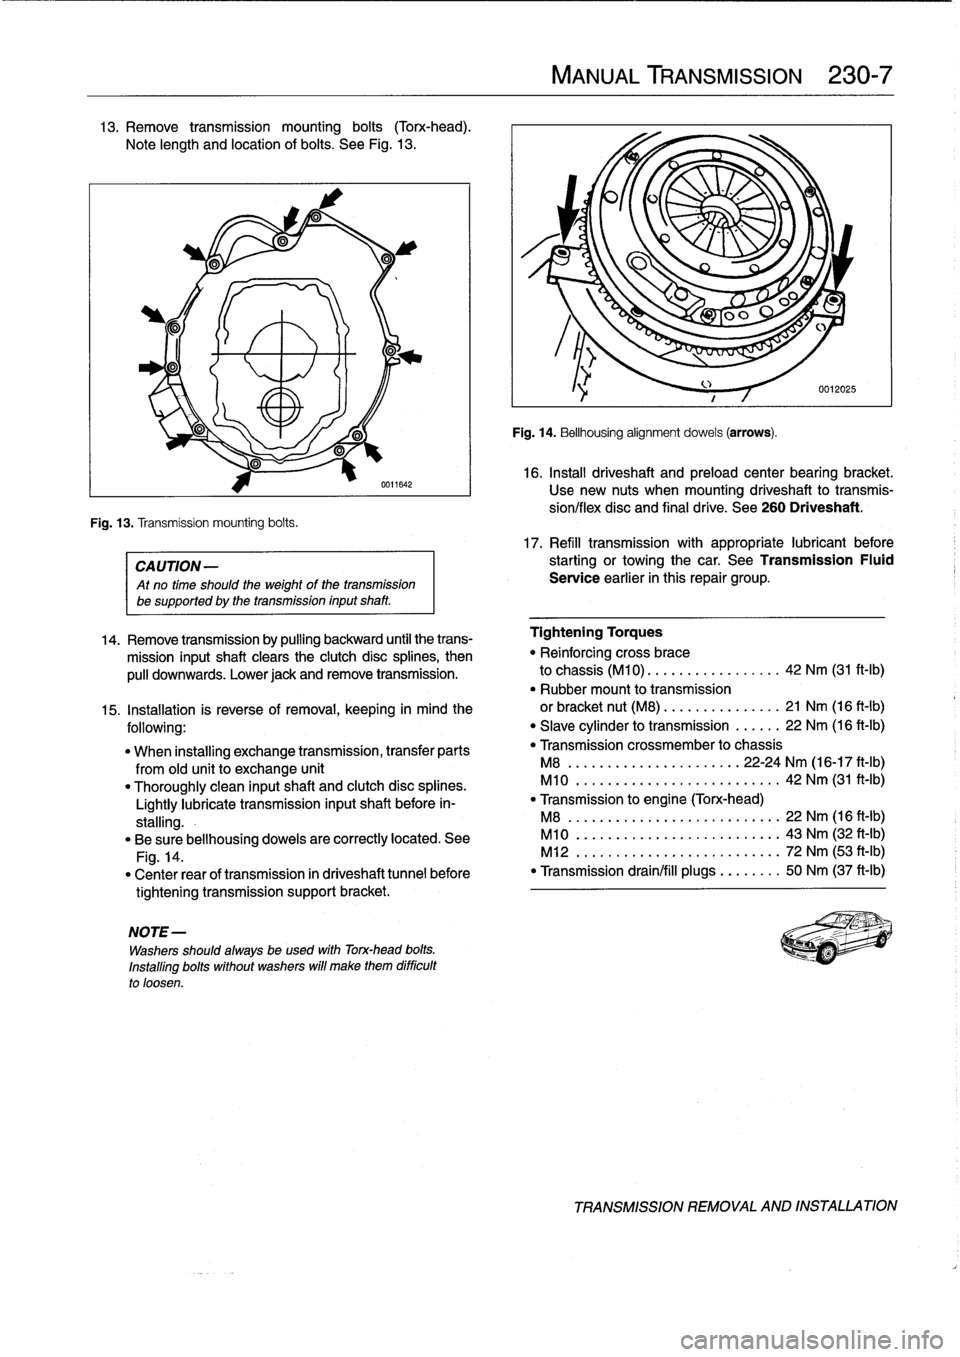
13
.
Remove
transmission
mounting
bolts
(Torx-head)
.
Note
length
and
location
of
bolts
.
See
Fig
.
13
.
Fig
.
13
.
Transmission
mounting
bolts
.
0611642
CA
UTION-
Atno
time
should
the
weight
of
thetransmission
be
supported
by
the
transmission
inputshaft
.
NOTE
-
Washers
should
always
be
used
with
Torx-head
bolts
.
Installing
bolts
without
washers
will
make
them
difficult
to
loosen
.
MANUAL
TRANSMISSION
230-
7
Fig
.
14
.
Bellhousing
alignment
dowels
(arrows)
.
16
.
Install
driveshaft
and
preload
center
bearing
bracket
.
Usenew
nuts
when
mounting
driveshaft
to
transmis-
síon/flex
disc
and
final
drive
.
See
260
Driveshaft
.
17
.
Refill
transmission
with
appropriate
lubricant
before
starting
or
towingthe
car
.
See
Transmission
Fluid
Service
earlier
in
this
repair
group
.
14
.
Remove
transmission
by
pulling
backward
until
the
trans-
Tightening
Torques
mission
inputshaft
clears
the
clutch
disc
splines,
then
"
Reinforcing
cross
brace
pulí
downwards
.
Lower
jack
andremove
transmission
.
to
chassis
(M10)
.
...
.............
42
Nm
(31
ft-Ib)
"
Rubber
mount
to
transmission
15
.
Installation
is
reverse
of
removal,
keeping
in
mind
the
or
bracket
nut
(M8)
.
...
.
...
.......
21
Nm
(16
ft-Ib)
following
:
"
Slave
cylinder
to
transmission
......
22
Nm
(16
ft-Ib)
"
When
installing
exchange
transmission,
transfer
parts
"
Transmission
crossmember
to
chassis
from
old
unit
to
exchange
unit
M8
...............
.
.
...
..
22-24
Nm
(16-17
ft-Ib)
"
Thoroughly
clean
inputshaft
and
clutch
disc
splines
.
M10
..............
.
..
..
.......
42
Nm
(31
ft-Ib)
Lightly
lubrícate
transmission
inputshaft
before
in-
"
Transmission
to
engine
(Torx-head)
stalling
.-
M8
..
..................
..
.
..
..
22
Nm
(16
ft-Ib)
"
Be
sure
bellhousing
dowels
are
correctly
located
.
See
M10
.
.................
...
.
..
..
43
Nm
(32
ft-Ib)
Fig
.
14
.
M12
.
..................
..
.
..
..
72
Nm
(53
ft-Ib)
"
Center
rear
of
transmission
in
driveshaft
tunnel
before
"
Transmission
drain/fill
plugs
.
..
.
..
..
50
Nm
(37
ft-Ib)
tightening
transmission
support
bracket
.
TRANSMISSION
REMOVAL
AND
INSTALLATION
Page 242 of 759
260-2
DRIVESHAFT
Further
inspection
requires
removal
of
the
driveshaft
.
Check
the
front
centering
guide
on
the
transmission
output
flange
for
damage
or
misalignment
.
Also
check
runoutatthe
transmission
outputflange
and
output
shaft,
and
at
the
final
drive
input
flange
.
Check
the
bolt
hole
bores
in
theflange
for
wear
and
elongation
.
Driveshaftflange
runout
(max
.
allowable)
"
Transmission
outputflange
axial
play
...
.
..
...
..
.
.......
0
.10
mm
(0
.004
in
.)
radial
play
.......
...
.
.
.......
0
.07
mm
(0
.003
in
.)
"
Final
driveinput
flange
radial
play
(measured
at
driveshaft
centering
lip)
..
......
0
.07
mm
(0
.003
in
.)
Spinthe
center
bearing
and
check
for
the
smooth
operation
without
play
.
Check
that
thesplines
of
the
sliding
coupling
move
freely
.
Clean
and
lubricate
the
splines
with
molybdenum
disulfide
grease
(Molykote
®
Longterm
2
or
equivalent)
.
Check
the
universal
joints
for
wear
or
binding
.
If
any
joint
isdif-
ficult
to
move
or
binds,
the
driveshaft
section
should
be
replaced
.
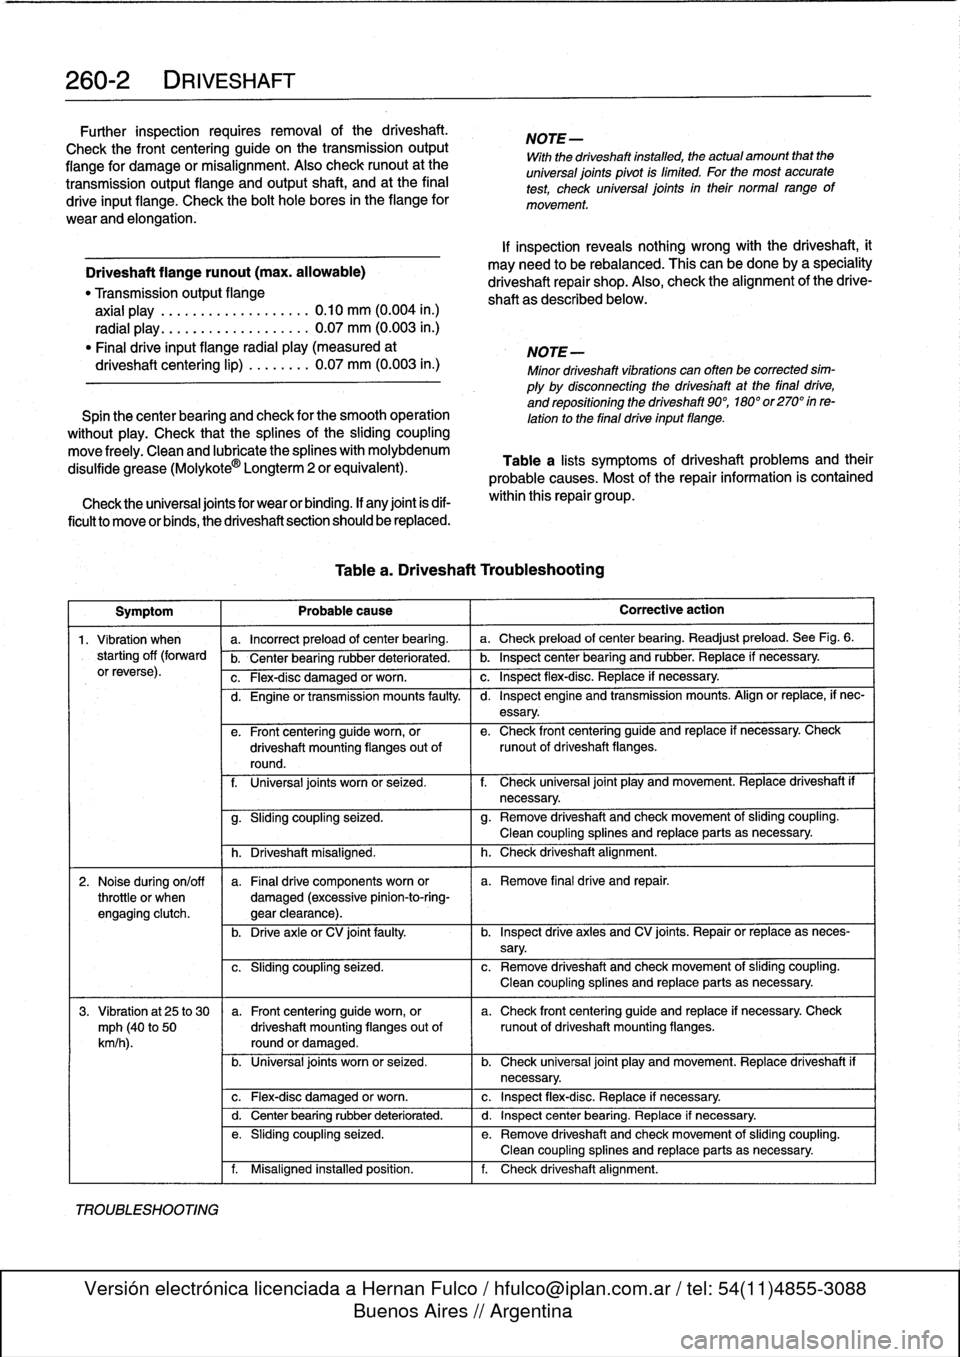
Table
a
.
Driveshaft
Troubleshooting
NOTE-
With
the
driveshaft
installed,
theactual
amount
that
the
universal
joints
pivot
is
limited
.
For
the
most
accurate
test,
check
universal
joints
in
their
normal
range
of
movement
.
If
inspection
revealsnothing
wrong
with
the
driveshaft,
it
may
need
to
be
rebalanced
.
This
can
be
done
by
a
speciality
driveshaft
repair
shop
.
Also,
check
the
alignment
ofthe
drive-
shaft
as
described
below
.
NOTE-
Minor
driveshaftvibrations
can
often
be
correctedsim-
ply
by
disconnecting
the
driveshaftat
the
finaldrive,
and
repositíoning
the
driveshaft
90°,
180°
or270°
inre-
lationto
the
final
drive
input
flange
.
Table
a
lists
symptoms
of
driveshaft
problems
and
their
probable
causes
.
Most
of
the
repair
information
is
contained
within
this
repair
group
.
Symptom
Probable
cause
Corrective
action
1
.
Vibration
when
a
.
Incorrect
preload
of
center
bearing
.
a
.
Check
preload
of
center
bearing
.
Readjust
preload
.
See
Fig
.
6
.
starting
off
(forward
b
.
Center
bearing
rubber
deteriorated
.
b
.
Inspect
center
bearing
and
rubber
.
Replace
if
necessary
.
orreverse)
.
c
.
Flex-disc
damaged
or
worn
.
c
.
Inspect
flex-disc
.
Replace
if
necessary
.
TROUBLESHOOTING
d
.
Engine
or
transmission
mounts
faulty
.
I
d
.
Inspect
engine
and
transmission
mounts
.
Align
or
replace,
if
nec-
essary
.
e
.
Front
centering
guide
worn,
or
e
.
Check
front
centering
guide
and
replace
if
necessary
.
Check
driveshaft
mounting
flanges
out
of
runout
of
driveshaft
flanges
.
round
.
f
.
Universal
joints
worn
or
seized
.
f
.
Check
universal
joint
play
and
movement
.
Replace
driveshaft
if
necessary
.
g
.
Sliding
coupling
seized
.
g
.
Remove
driveshaft
and
check
movement
of
sliding
coupling
.
Clean
coupling
splines
and
replace
parts
asnecessary
.
h
.
Driveshaft
misaligned
.
h
.
Check
driveshaft
alignment
.
2
.
Noise
during
on/off
a
.
Finaldrive
components
worn
or
a
.
Remove
final
drive
and
repair
.
throttle
or
when
damaged
(excessive
pinion-to-ring-
engagíng
clutch
.
gear
clearance)
.
b
.
Drive
axleor
CV
joint
faulty
.
b
.
Inspect
drive
axles
and
CV
joints
.
Repair
or
replace
as
neces-
sary
.
c
.
Sliding
coupling
seized
.
c
.
Remove
driveshaft
and
check
movement
of
sliding
coupling
.
Clean
coupling
splines
and
replace
parts
as
necessary
.
3
.
Vibration
at
25
to
30
a
.
Front
centering
guideworn,
or
a
.
Check
front
centering
guide
and
replace
if
necessary
.
Check
mph
(40
to
50
driveshaft
mounting
flanges
out
of
runout
of
driveshaft
mounting
flanges
.
km/h
).
round
or
damaged
.
b
.
Universal
joints
worn
or
seized
.
b
.
Check
universal
joint
play
and
movement
.
Replace
driveshaft
if
necessary
.
c
.
Flex-disc
damaged
or
worn
.
c
.
Inspect
flex-disc
.
Replace
if
necessary
.
d
.
Center
bearing
rubber
deteriorated
.
d
.
Inspect
center
bearing
.
Replace
if
necessary
.
e
.
Sliding
coupling
seized
.
e
.
Remove
driveshaft
and
check
movement
of
sliding
coupling
.
Clean
coupling
splines
and
replace
parts
asnecessary
.
f
.
Misaligned
installed
position
.
f
.
Check
driveshaft
alignment
.
Page 297 of 759
Brake
rotor,
removing
and
installing
Brake
rotors
shouldalways
be
replaced
in
pairs
.
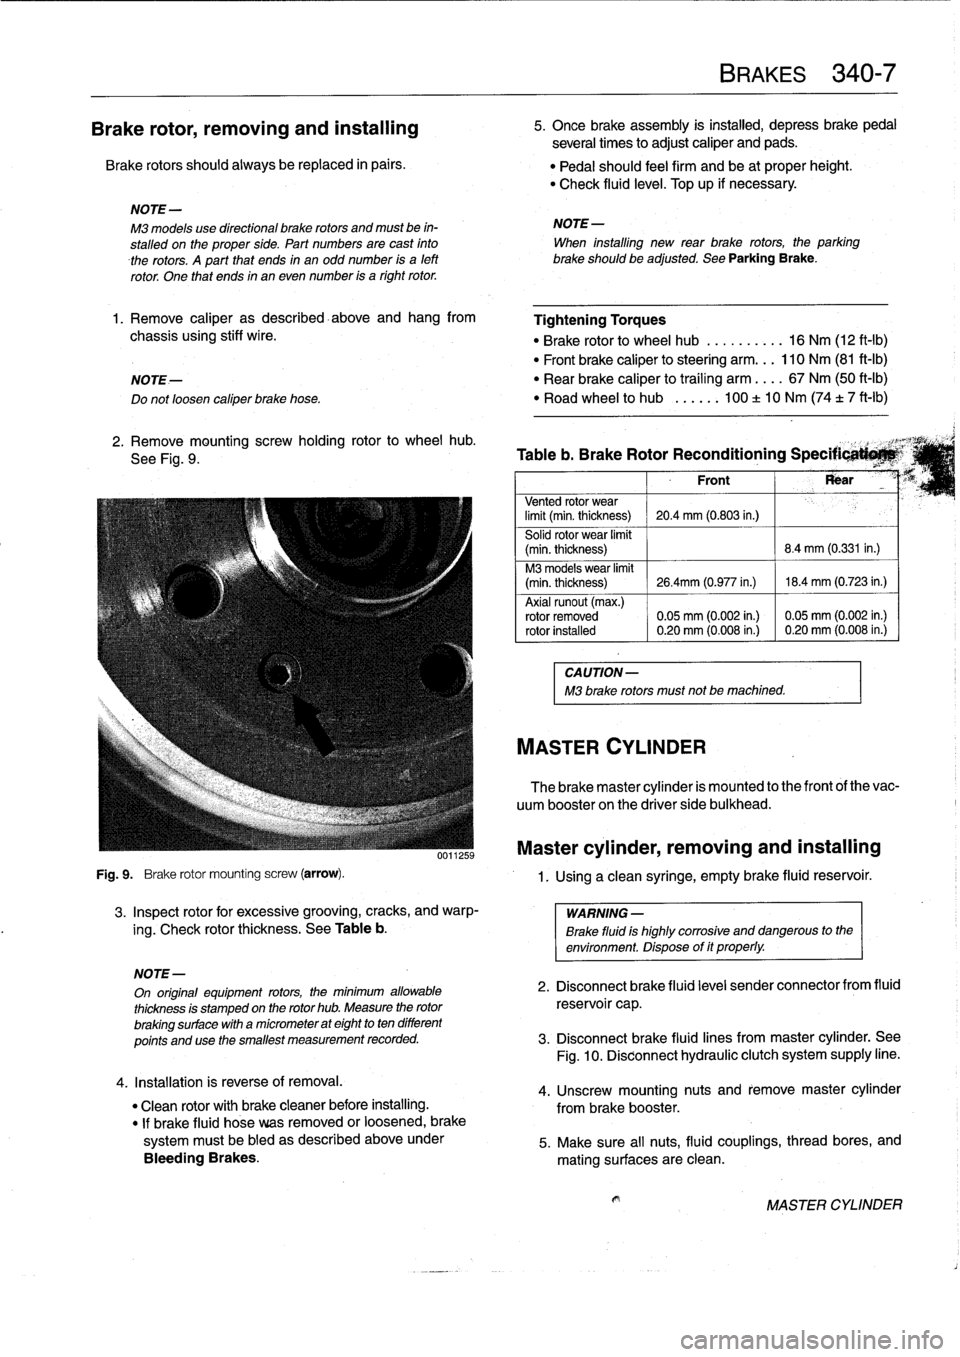
Fig
.
9
.
Brake
rotor
mounting
screw
(arrow)
.
3
.
Inspect
rotor
for
excessive
grooving,
cracks,
and
warp-
ing
.
Check
rotor
thickness
.
See
Table
b
.
4
.
Installation
is
reverse
of
removal
.
"
Clean
rotor
with
brakecleaner
before
installing
.
"
If
brake
fluid
hose
veas
removed
or
loosened,
brake
systemmustbe
bled
as
described
aboveunder
Bleeding
Brakes
.
BRAKES
340-
7
5
.
Once
brake
assembly
is
instalind,
depress
brakepedal
several
times
to
adjust
caliper
and
pads
.
"
Pedal
should
feel
firm
and
be
at
proper
height
.
"
Check
fluid
leve¡
.
Top
up
if
necessary
.
NOTE-
M3
models
use
directional
brake
rotors
and
mustbe
in-
NOTE-
stalled
on
the
proper
side
.
Part
numbes
are
cast
finto
When
installing
new
rear
brake
rotors,
the
parking
therotors
.
A
part
that
ends
in
an
odd
number
is
a
left
brakeshouldbe
adjusted
.
See
Parking
Brake
.
rotor
.
One
that
ends
in
an
even
number
is
a
right
rotor
.
1.
Remove
caliper
as
described-above
and
hang
from
Tightening
Torques
chassis
using
stiff
wire
.
"
Brake
rotor
to
wheel
hub
..........
16
Nm
(12
ft-Ib)
"
Front
brake
caliper
to
steering
arm
...
110
Nm
(81
ft-Ib)
NOTE-
"
Rear
brake
caliper
to
traíling
arm
....
67
Nm
(50
ft-Ib)
Do
notloosen
caliper
brake
hose
.
"
Road
wheel
to
hub
...
..
.
100
±
10
Nm
(74
t
7
ft-Ib)
2
.
Remove
mountingscrew
holding
rotor
to
wheel
hub
.
,
See
Fig
.
9
.
Table
b
.
Brake
Rotor
Reconditioning
Specificati*M`
Front
Rear
Vented
rotor
wear
limit
(min
.
thickness)
20
.4
mm
(0
.803
in.)
Solid
rotor
wear
limit
(min
.
thickness)
8
.4
mm
(0.331
in
.)
M3
models
wear
limit
(min
.
thickness)
26
.4mm
(0
.977
in
.)
18
.4
mm
(0
.723
in
.)
Axial
runout
(max
.)
rotor
removed
0
.05
mm
(0
.002
in
.)
0
.05
mm
(0
.002
in
.)
rotor
installed
0
.20
mm
(0
.008
in
.)
0
.20
mm
(0
.008
in
.)
CAUTION-
M3
brake
rotors
must
not
be
machined
.
MASTER
CYLINDER
The
brake
master
cylinder
is
mounted
to
the
front
of
the
vac-
uum
booster
on
the
driver
side
bulkhead
.
Master
cylinder,
removing
and
installing
1
.
Using
a
clean
syringe,
empty
brake
fluid
reservoir
.
WARNING
-
Brake
fluid
is
highly
corrosive
and
dangerous
to
the
environment
.
Dispose
of
it
properly
.
NOTE-
On
original
equipment
rotors,
the
mínimum
allowable
2
.
Disconnect
brake
fluid
leve¡
sender
connector
from
fluid
thickness
is
stamped
on
the
rotor
hub
.
Measure
the
rotor
reservoi
r
cap
.
brakingsurface
with
a
micrometer
at
eight
to
ten
different
points
and
use
the
smallest
measurement
recorded
.
3
.
Disconnect
brake
fluid
lines
frommaster
cylinder
.
See
Fig
.
10
.
Disconnect
hydraulic
clutch
system
supply
line
.
4
.
Unscrew
mounting
nuts
and
remove
master
cylinder
from
brake
booster
.
5
.
Make
sure
all
nuts,
fluid
couplings,
thread
bores,
and
mating
surfaces
are
clean
.
MASTER
CYLINDER
Page 298 of 759
340-
8
BRAKES
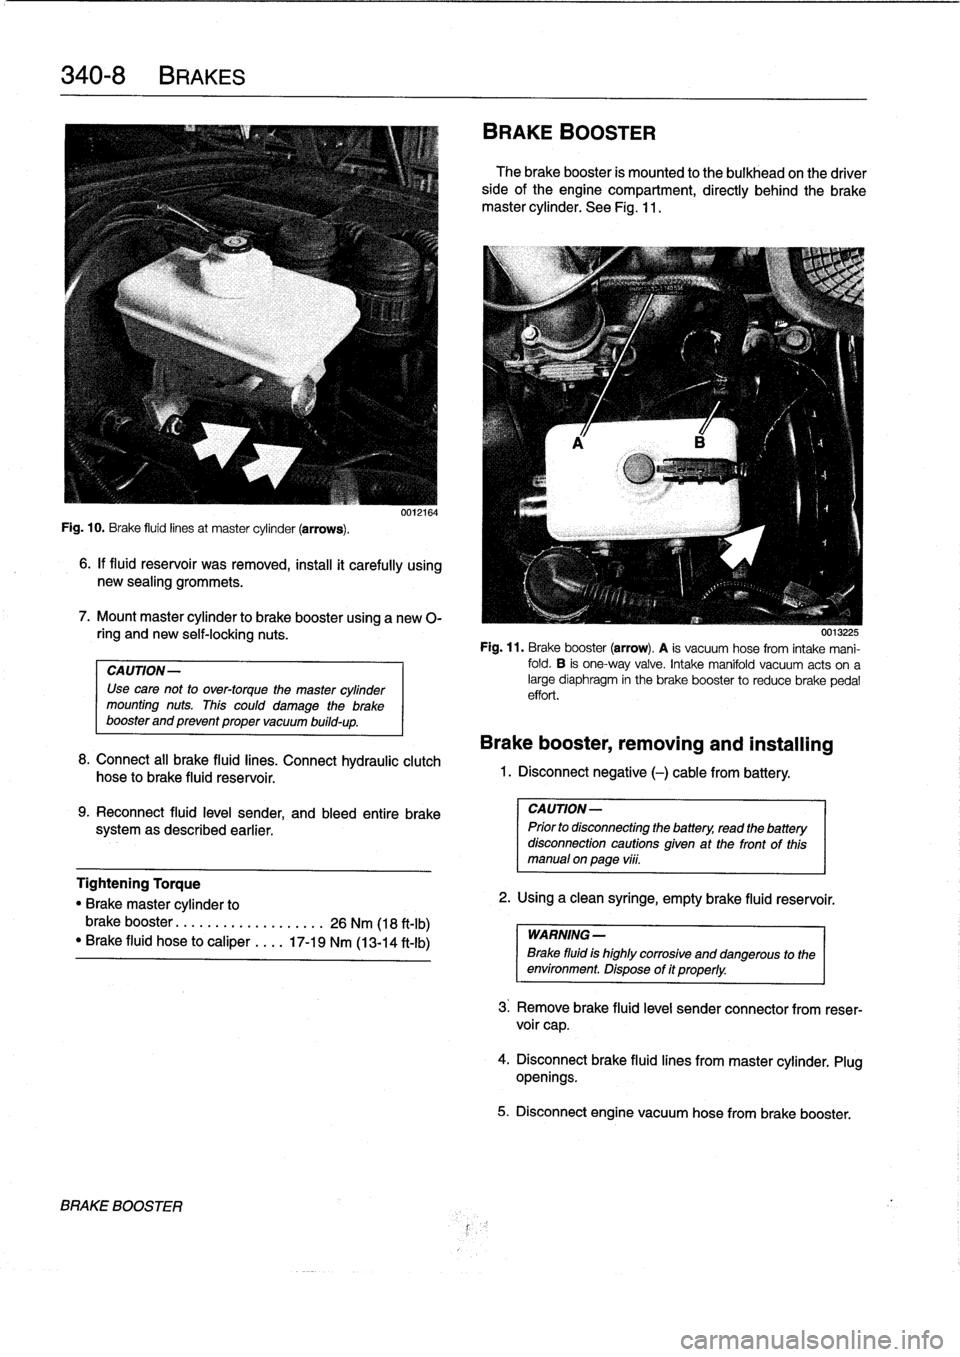
Fig
.
10
.
Brake
fluid
linesat
master
cylinder
(arrows)
.
6
.
If
fluid
reservoir
was
removed,
install
it
carefully
using
new
sealing
grommets
.
7
.
Mount
master
cylinder
to
brake
booster
using
a
new
0-
ring
and
new
self-locking
nuts
.
CAUTION-
Use
cave
not
to
over-torque
the
master
cylinder
mounting
nuts
.
This
could
damage
the
brake
booster
and
prevent
proper
vacuum
build-up
.
0012164
8
.
Connect
all
brake
fluid
lines
.
Connect
hydraulic
clutch
hose
to
brake
fluid
reservoir
.
9
.
Reconnect
fluid
leve¡
sender,
and
bleed
entire
brake
systemas
described
earlier
.
BRAKE
BOOSTER
BRAKE
BOOSTER
The
brake
booster
is
mounted
to
the
bulkhead
on
the
driver
sideofthe
engine
compartment,
directly
behind
the
brake
master
cylinder
.
See
Fig
.
11
.
0015225
Fig
.
11
.
Brake
booster
(arrow)
.
A
is
vacuum
hose
from
intake
mani-
fold
.
B
is
one-way
valve
.
Intake
manifold
vacuum
acts
ona
large
diaphragm
in
the
brake
booster
to
reducebrake
pedal
effort
.
Brake
booster,
removing
and
installing
1
.
Disconnect
negative
(-)
cable
from
battery
.
CAUTION-
Prior
to
disconnecting
the
battery,
read
the
battery
disconnection
cautions
given
at
the
front
of
this
manual
onpage
vi¡¡
.
Tightening
Torque
"
Brake
master
cylinder
to
2
.
Using
a
clean
syringe,
empty
brake
(luid
reservoir
.
brake
booster
.....
..
.
..
.........
26
Nm
(18
ft-Ib)
WARNING-
"
Brake
fluid
hose
to
caliper
....
17-19
Nm
(13-14
ft-Ib)
Brake
fluid
is
highly
corroslve
and
dangerous
to
the
environment
.
Dispose
of
it
properly
.
3
.
Remove
brake
fluid
level
sender
connector
from
reser-
voir
cap
.
4
.
Disconnectbrake
fluid
lines
from
master
cylinder
.
Plug
openings
.
5
.
Disconnect
engine
vacuum
hose
from
brake
booster
.
Page 357 of 759
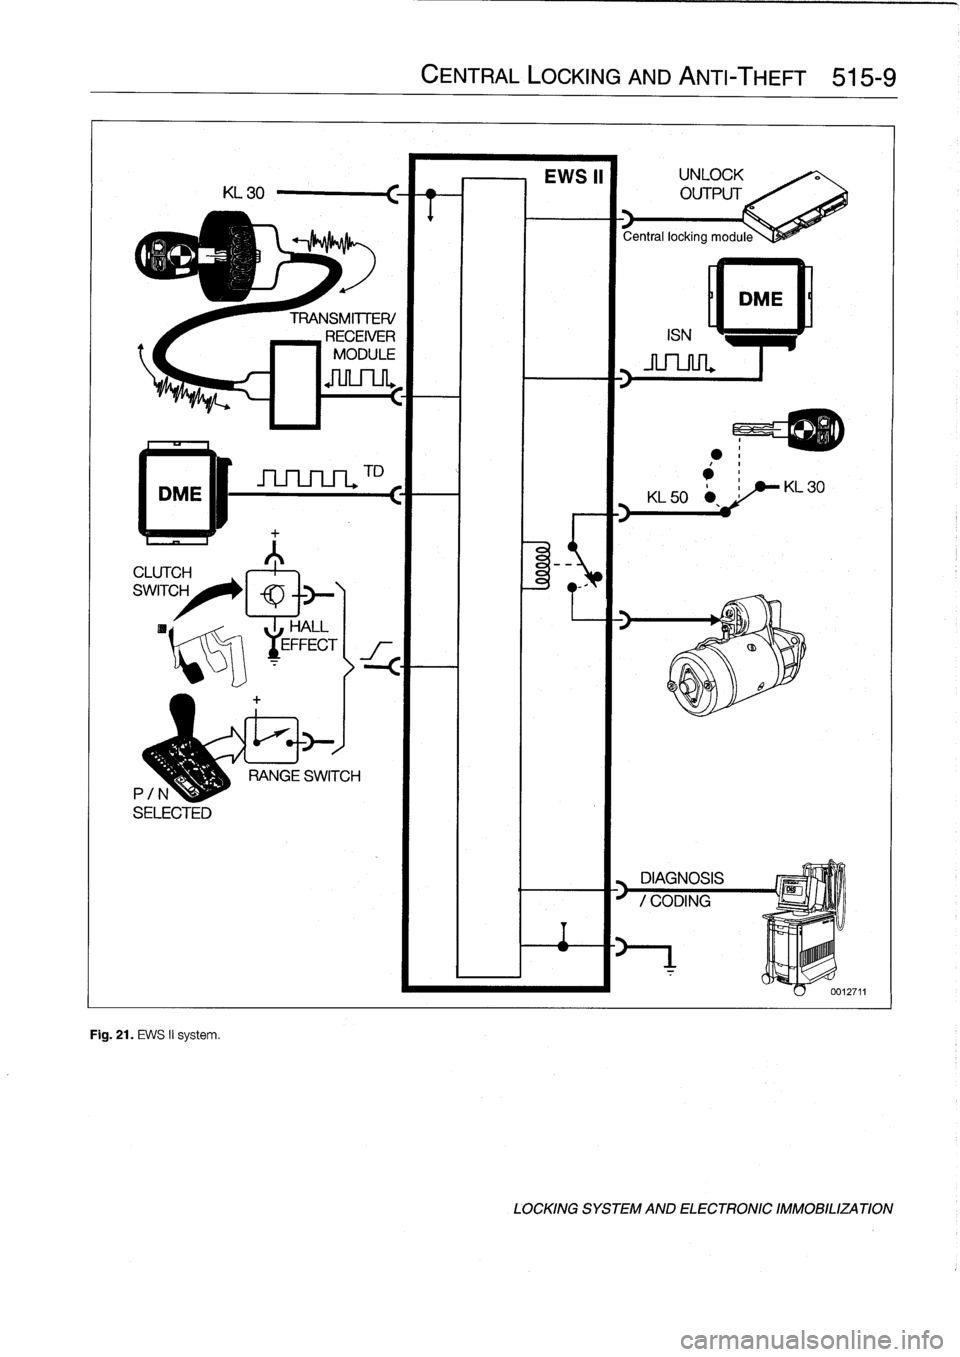
CLUTCH
SWITCH
Fig
.
21
.
EWS
II
system
.
TRANSMITTER/
RECEIVER
`I
MODULE
HALL
y
EFFECT
TD
CENTRAL
LOCKING
AND
ANTI-THEFT
515-9
DME
DIAGNOSIS
"
D
`
mol
111
IIIIIIIII
.r
LOCKING
SYSTEM
AND
ELECTRONIC
IMMOBILIZATION
Page 388 of 759
610-2
ELECTRICAL
COMPONENT
LOCATIONS
Fuses
number47
and
50are
mounted
on
the
left
side
splice
panel
.
Refer
lo
Fig
.
5
.
Fuse48
is
mounted
on
the
auxiliary
relay
panel
.
Refer
to
Fig
.
3
.
Fuse
49
is
mounted
in
the
right
side
of
the
luggage
compart-
ment
behind
the
trim
cover
.
Relay
Positions
Mounted
in
the
left-hand
rear
comer
of
the
engine
compart-
ment,
the
power
distribution
box
contains
46
(uses
and
15
re-
lay
positions
.
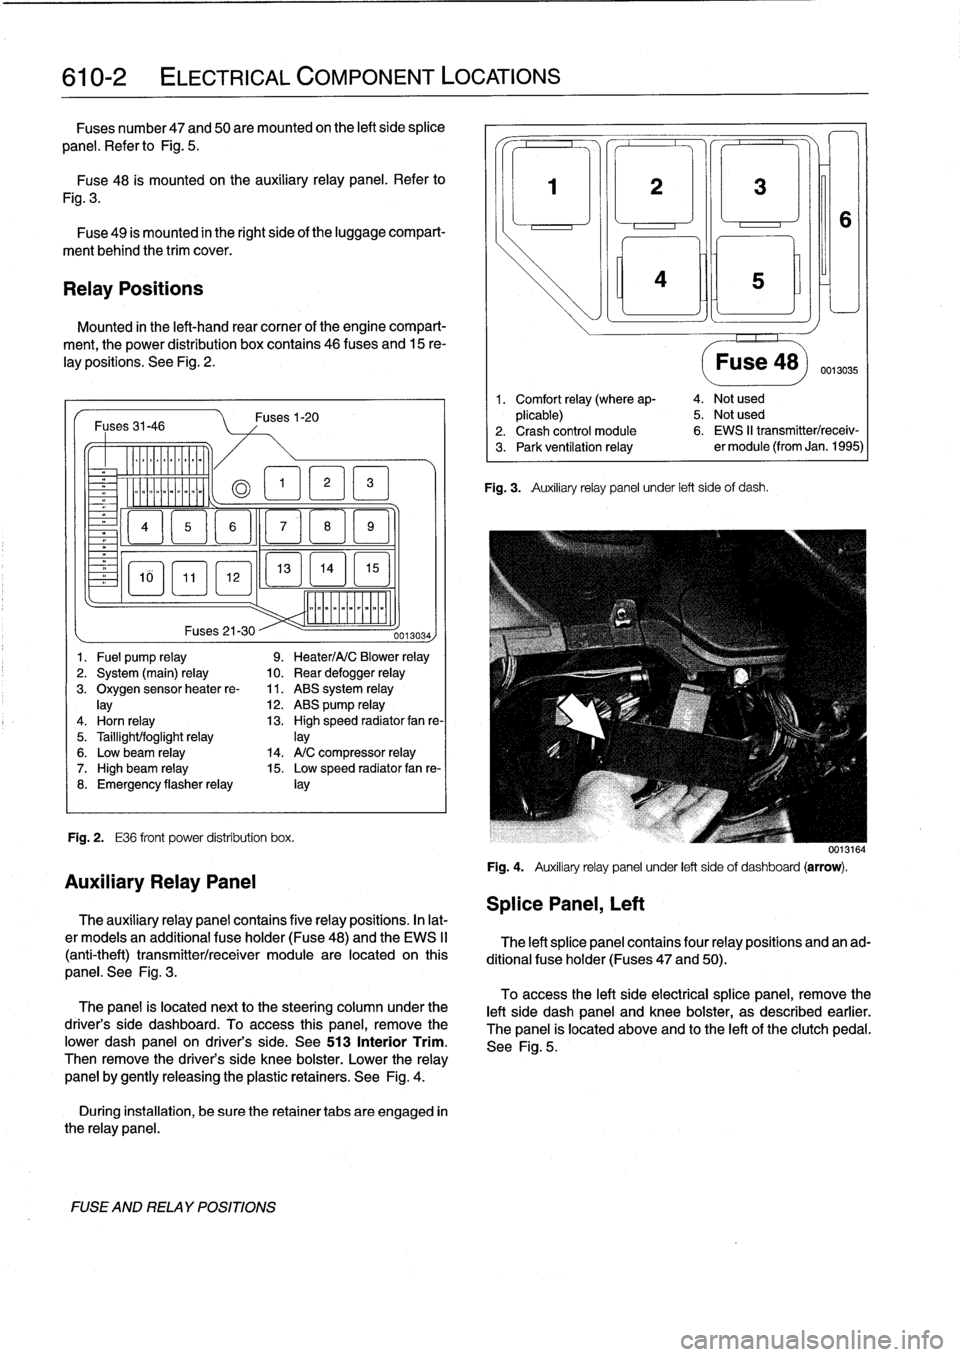
See
Fig
.
2
.
Fuses31-46
-
Er
a
&QT
MM
~
Fig
.
2
.
E36
front
power
distribution
box
.
FUSE
AND
RELAY
POSITIONS
Fuses1-20
13
EL1
5
]
mmmmmmmmmm
Fuses
21-30
--
0013034)
1
.
Fuel
pump
relay
9
.
Heater/A/C
Blower
relay
2
.
System
(main)
relay
10
.
Rear
defogger
relay
3
.
Oxygen
sensorheater
re-
11
.
ABS
system
relay
lay
12
.
ABS
pump
relay
4
.
Horn
relay
13
.
High
speed
radiator
fan
re-
5
.
Taillight/foglight
relay
]ay
6
.
Low
beam
relay
14
.
A/C
compressor
relay
7
.
High
beam
relay
15
.
Low
speed
radiator
fan
re-
8
.
Emergency
flasherrelay
¡ay
Auxiliary
Relay
Panel
The
auxiliary
relay
panel
contains
five
relay
positions
.
In
lat-
er
modeis
an
additional
fuse
holder
(Fuse48)
and
the
EWS
II
(anti-theft)
transmitter/receiver
module
are
located
on
this
panel
.
See
Fig
.
3
.
The
panel
is
located
nextto
the
steering
column
under
the
driver's
side
dashboard
.
To
access
this
panel,
remove
the
pwer
dash
panel
on
driver's
side
.
See513
Interior
Trim
.
Then
remove
the
driver's
side
knee
bolster
.
Lower
the
relay
panel
by
gently
releasing
the
plastic
retainers
.
See
Fig
.
4
.
During
installation,
be
sure
the
retainer
tabs
are
engaged
in
the
relay
panel
.
Splice
Panel,
Left
3
¡ni
Fig
.
3
.
Auxiliary
relay
panel
under
left
side
of
dash
.
Fuse
48)
0013035
1
.
Comfort
relay
(where
ap-
4
.
Not
used
plicable)
5
.
Not
used
2
.
Crash
control
module
6
.
EWS
II
transmitter/receiv-
3
.
Park
ventilation
relay
er
module
(from
Jan
.
1995)
0013164
Fig
.
4
.
Auxiliary
relay
panel
under
left
sideof
dashboard
(arrow)
.
The
left
splice
panel
contains
four
relay
positions
and
an
ad-
ditional
fuse
holder
(Fuses
47
and
50)
.
To
access
the
left
side
electrical
splice
panel,
remove
the
left
side
dash
panel
and
knee
bolster,
as
described
earlier
.
The
panel
is
located
above
and
lo
the
left
of
the
clutch
pedal
.
See
Fig
.
5
.