Power steering fluid BMW 328i 1998 E36 User Guide
[x] Cancel search | Manufacturer: BMW, Model Year: 1998, Model line: 328i, Model: BMW 328i 1998 E36Pages: 759
Page 121 of 759
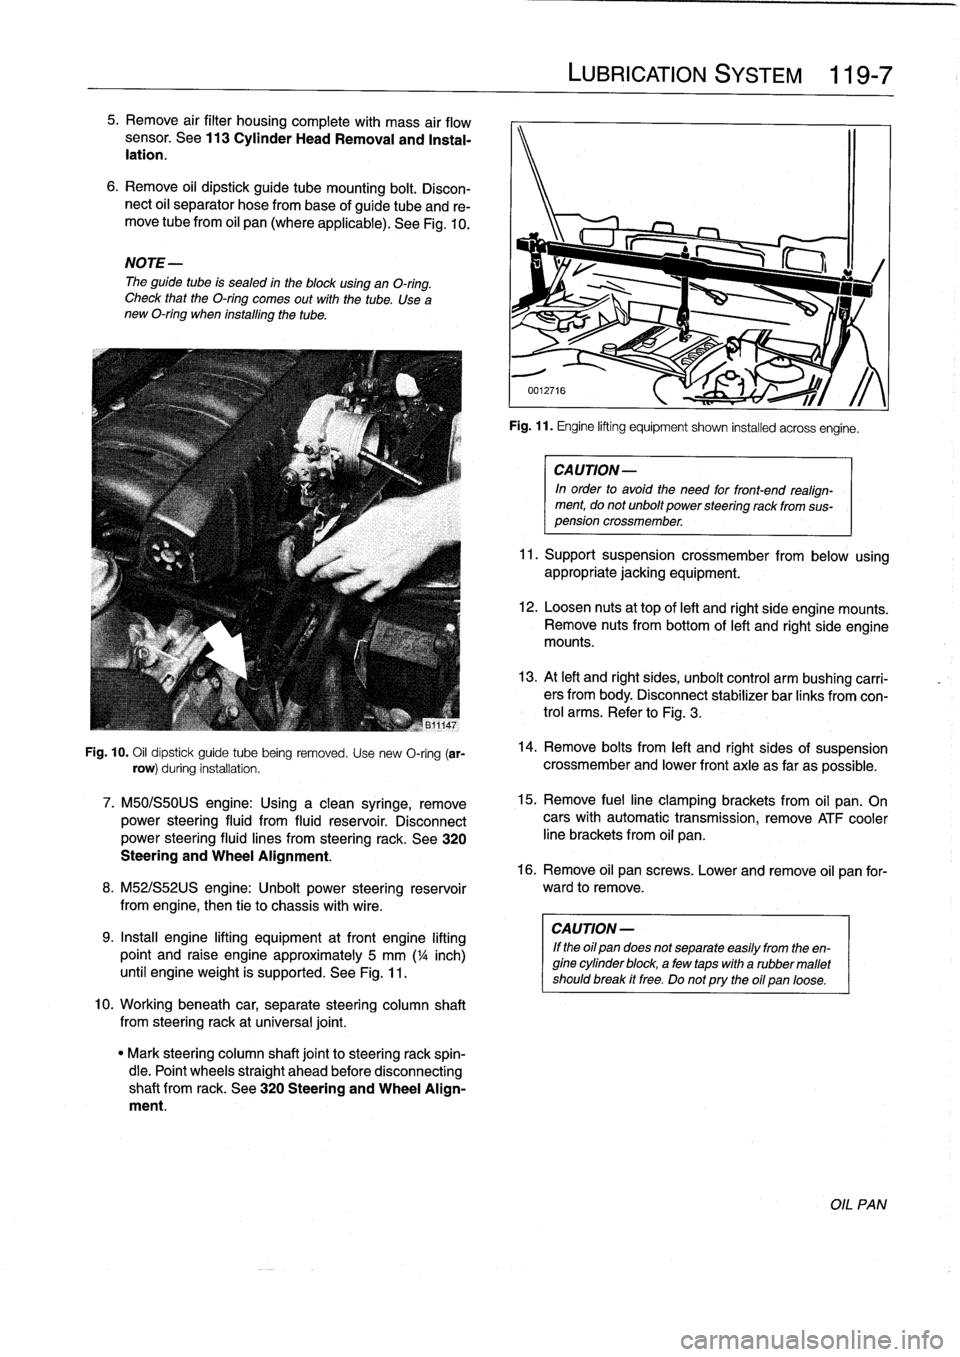
5
.
Remove
air
filter
housingcomplete
with
mass
air
flow
sensor
.
See113
Cylinder
HeadRemoval
and
Instal-
lation
.
6
.
Remove
oil
dipstick
guide
tube
mounting
bolt
.
Discon-
nect
oil
separator
hose
frombase
of
guide
tube
and
re-
move
tubefrom
oil
pan
(where
applicable)
.
See
Fig
.
10
.
NOTE-
The
guide
tube
is
sealed
in
the
blockusing
an
O-ring
.
Check
that
the
O-ring
comes
out
with
the
tube
.
Use
a
new
O-ring
when
installing
the
tube
.
Fig
.
10
.
Oil
dipstick
guide
tube
being
removed
.
Use
new
O-ring
(ar-
row)
during
installation
.
7
.
M50/S50US
engine
:
Using
a
clean
syringe,
remove
power
steering
fluid
from
fluid
reservoir
.
Disconnect
power
steering
fluid
lines
from
steering
rack
.
See
320
Steering
and
Wheel
Alignment
.
8
.
M52/S52US
engine
:
Unbolt
power
steering
reservoir
from
engíne,
then
tie
to
chassis
with
wire
.
9
.
Insta¡¡
engine
lifting
equipment
atfront
engine
lifting
point
and
raise
engine
approximately
5
mm
('/a
inch)
until
engineweight
is
supported
.
See
Fig
.
11
.
10
.
Workingbeneath
car,
separate
steering
column
shaft
from
steeringrack
at
universal
joint
.
"
Mark
steering
column
shaft
jointto
steering
rack
spin-
dle
.
Point
wheels
straight
ahead
before
disconnecting
shaft
from
rack
.
See
320
Steering
and
Wheel
Align-
ment
.
LUBRICATION
SYSTEM
119
Fig
.
11
.
Engine
lifting
equipment
shown
installed
acrossengíne
.
CA
UTION-
In
order
to
avoid
the
need
for
front-end
realign-
ment,
donot
unbolt
power
steering
rack
from
sus-
pension
crossmember
.
11
.
Support
suspension
crossmember
from
below
using
appropriate
jacking
equipment
.
12
.
Loosen
nuts
at
top
of
left
and
right
side
engine
mounts
.
Remove
nuts
from
bottom
of
left
and
right
side
engine
mounts
.
13
.
At
left
and
right
sides,
unbolt
control
arm
bushíng
carri-
ers
from
body
.
Disconnect
stabilizer
bar
links
fromcon-
trol
arms
.
Refer
to
Fig
.
3
.
14
.
Remove
bolts
from
left
and
right
sides
of
suspension
crossmember
and
lower
front
axle
as
far
as
possible
.
15
.
Remove
fuelline
clamping
brackets
from
oil
pan
.
On
cars
with
automatic
transmission,
remove
ATF
cooler
line
brackets
from
oil
pan
.
16
.
Remove
oil
pan
screws
.
Lower
and
remove
oil
pan
for-
ward
to
remove
.
CA
UTION-
If
the
oil
pan
does
not
separate
easily
from
the
en-
gine
cylinder
block,
a
few
taps
with
a
rubber
mallet
shouldbreak
it
free
.
Do
notpry
the
oil
pan
loose
.
OIL
PAN
Page 256 of 759
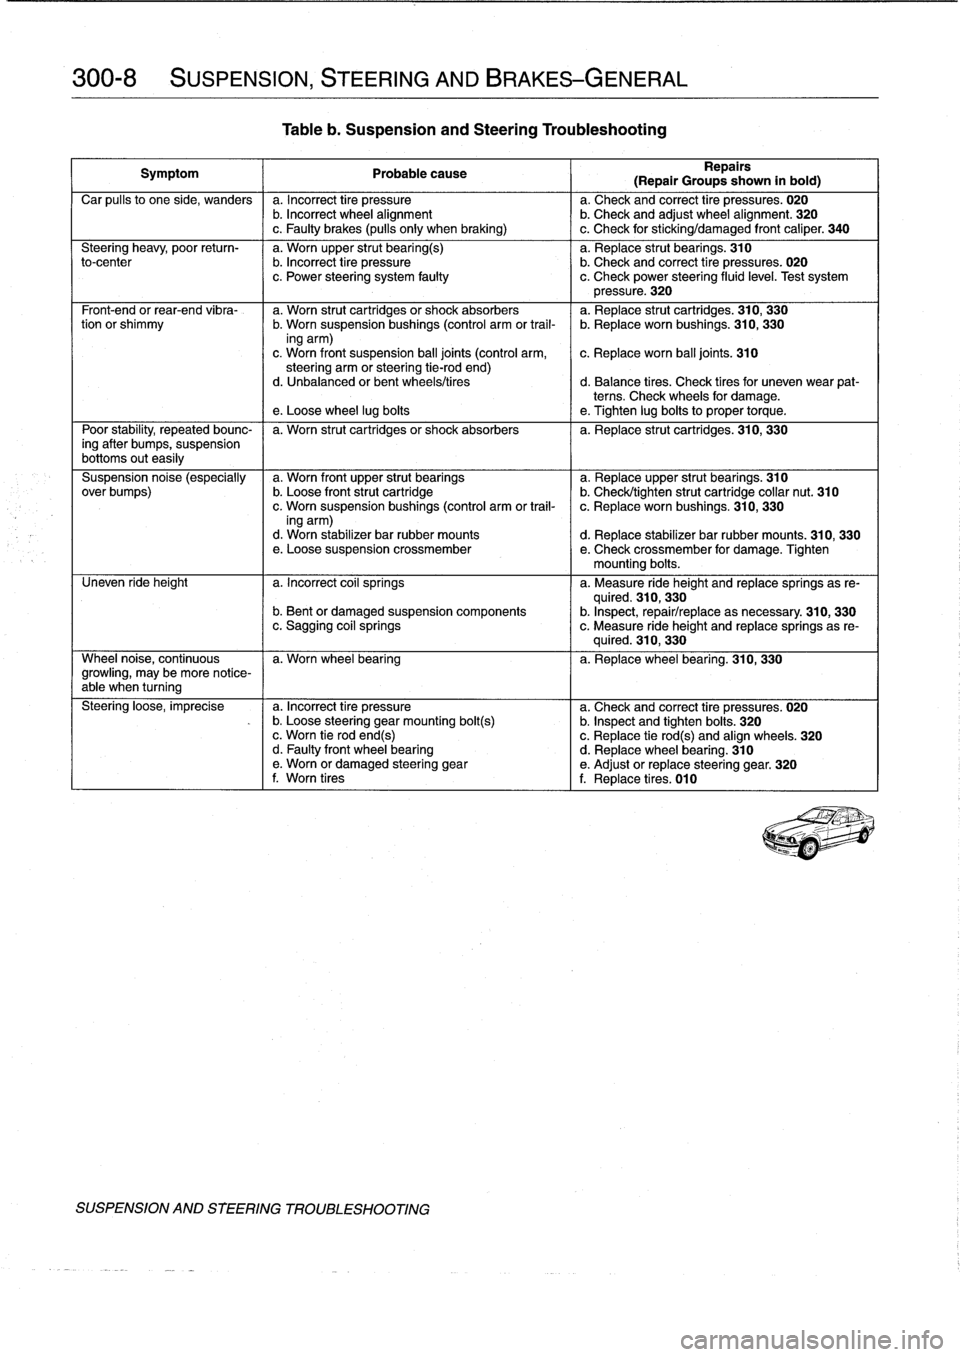
300-8
SUSPENSION,
STEERING
AND
BRAKES-GENERAL
Tableb
.
Suspension
and
Steering
Troubleshooting
Symptom
1
Probable
cause
Repairs
(Repair
Groups
shown
in
bold)
Car
pulís
to
one
side,
wanders
a
.
Incorrect
tire
pressure
a
.
Check
and
correct
tire
pressures
.
020
b
.
Incorrect
wheel
alignment
b
.
Check
and
adjust
wheel
alignment
.
320
c
.
Faulty
brakes
(pulls
only
when
braking)
I
c
.
Check
for
sticking/damaged
front
caliper
.
340
Steering
heavy,
poor
return-
a
.
Worn
upper
strut
bearing(s)
a
.
Replace
strut
bearings
.
310
to-center
b
.
Incorrect
tire
pressure
b
.
Check
and
correct
tire
pressures
.
020
c
.
Power
steering
system
faulty
c
.
Check
power
steering
fluid
level
.
Test
system
pressure
.
320
Front-end
or
rear-end
vibra-
a
.
Worn
strut
cartridgesor
shock
absorbers
a
.
Replace
strut
cartridges
.
310,
330
tion
or
shimmy
b
.
Worn
suspension
bushings
(control
arm
or
trail-
b
.
Replace
worn
bushings
.
310,
330
ing
arm)
c
.
Worn
front
suspension
ball
joints
(control
arm,
c
.
Replace
worn
ball
joints
.
310
steering
arm
orsteering
tie-rod
end)d
.
Unbalanced
or
bent
wheels/tires
d
.
Balance
tires
.
Check
tiresfor
uneven
wear
pat-
terns
.
Check
wheels
for
damage
.
e
.
Loose
wheel
lug
boits
e
.
Tighten
lug
boits
to
proper
torque
.
Poor
stability,
repeated
bounc-
I
a
.
Worn
strut
cartridgesor
shock
absorbers
I
a
.
Replace
strut
cartridges
.
310,
330
ing
after
bumps,
suspension
bottoms
outeasily
Suspension
noise
(especially
a
.
Worn
front
upper
strut
bearings
a
.
Replaceupper
strut
bearings
.
310
over
bumps)
b
.
Loose
front
strut
cartridge
b
.
Check/tighten
strut
cartridge
collar
nut
.
310
c
.
Worn
suspensionbushings
(control
arm
or
trail-
c
.
Replace
worn
bushings
.
310,
330
ing
arm)d
.
Worn
stabilizer
bar
rubber
mounts
d
.
Replace
stabilizer
bar
rubber
mounts
.
310,
330
e
.
Loose
suspension
crossmember
e
.
Check
crossmember
for
damage
.
Tighten
mounting
boits
.
Uneven
ride
height
a
.
Incorrect
coil
springs
a
.
Measure
ride
height
and
replacesprings
as
re-
quired
.
310,
330
b
.
Bent
or
damaged
suspension
components
b
.
Inspect,
repair/replace
asnecessary
.
310,
330
c
.
Sagging
coil
springs
c
.
Measure
ride
height
and
replace
springs
as
re-
quired
.
310,
330
Wheel
noise,
continuous
I
a
.
Worn
wheel
bearing
I
a
.
Replacewheel
bearing
.
310,
330
growling,
may
be
more
notíce-
able
when
turning
Steering
loose,
imprecise
a
.
Incorrect
tire
pressure
a
.
Check
and
correct
tire
pressures
.
020
-
b
.
Loose
steering
gearmounting
bolt(s)
b
.
Inspect
and
tighten
boits
.
320
c
.
Worn
tie
rodend(s)
c
.
Replace
tie
rod(s)
and
align
wheels
.
320
d
.
Faulty
front
wheel
bearing
d
.
Replace
wheel
bearing
.
310
e
.
Worn
or
damaged
steering
gear
e
.
Adjust
or
replace
steering
gear
.
320
f
.
Worn
tires
f
.
Replace
tires
.
010
SUSPENSION
AND
STEERING
TROUBLESHOOTING
Page 257 of 759
GENERAL
310
Front
Suspension
GENERAL
..
.
.
.
.
.
.
.
.
.
.......
.
........
.
310-1
FRONT
WHEEL
BEARINGS
..
.
.
.
.......
310-8
SHOCK
ABSORBERS
AND
SPRINGS
..
.
310-2
Front
wheel
bearing,
replacing
...
.
.
.
.
.
.
.
...
310-8
Strut
assembly,
removing
and
installing
.....
310-2
STABILIZER
BAR
..........
.
.
.
.
.
.
.
.
.
.
.
.
310-9
Strut
assembly,
disassembling
Stabilizerbar,
removing
and
installing
.
.
.
.
...
310-9
and
assembling
.
.
.
...
.
.....
.
.........
310-4
Ride
Height
.
.
.
.
.
.
.
.
.
.
.
.
.....
.
........
.
310-4
SUBFRAME
CROSSMEMBER
.
.
.
.
.
.
.
.
.
.
.
310-9
Subframe
crossmember,
CONTROL
ARMS
.
.
...
.
.
.
.
.
.
.
...
.
.....
310-5
removing
and
installing
.....
.
.
.
.
.
.
.
.
.
...
310-9
Control
arm,
removing
and
installing
....
..
310-5
Outer
control
arm
ball
joint,
replacing
Table
exce
t
M3
models
310-6
a
.
Front
Ride
Height
Specifications
..
.
.....
..
.
..
..
310-5
Control
arm
bushing,
replacing
.
.
.
...
.
.....
310-7
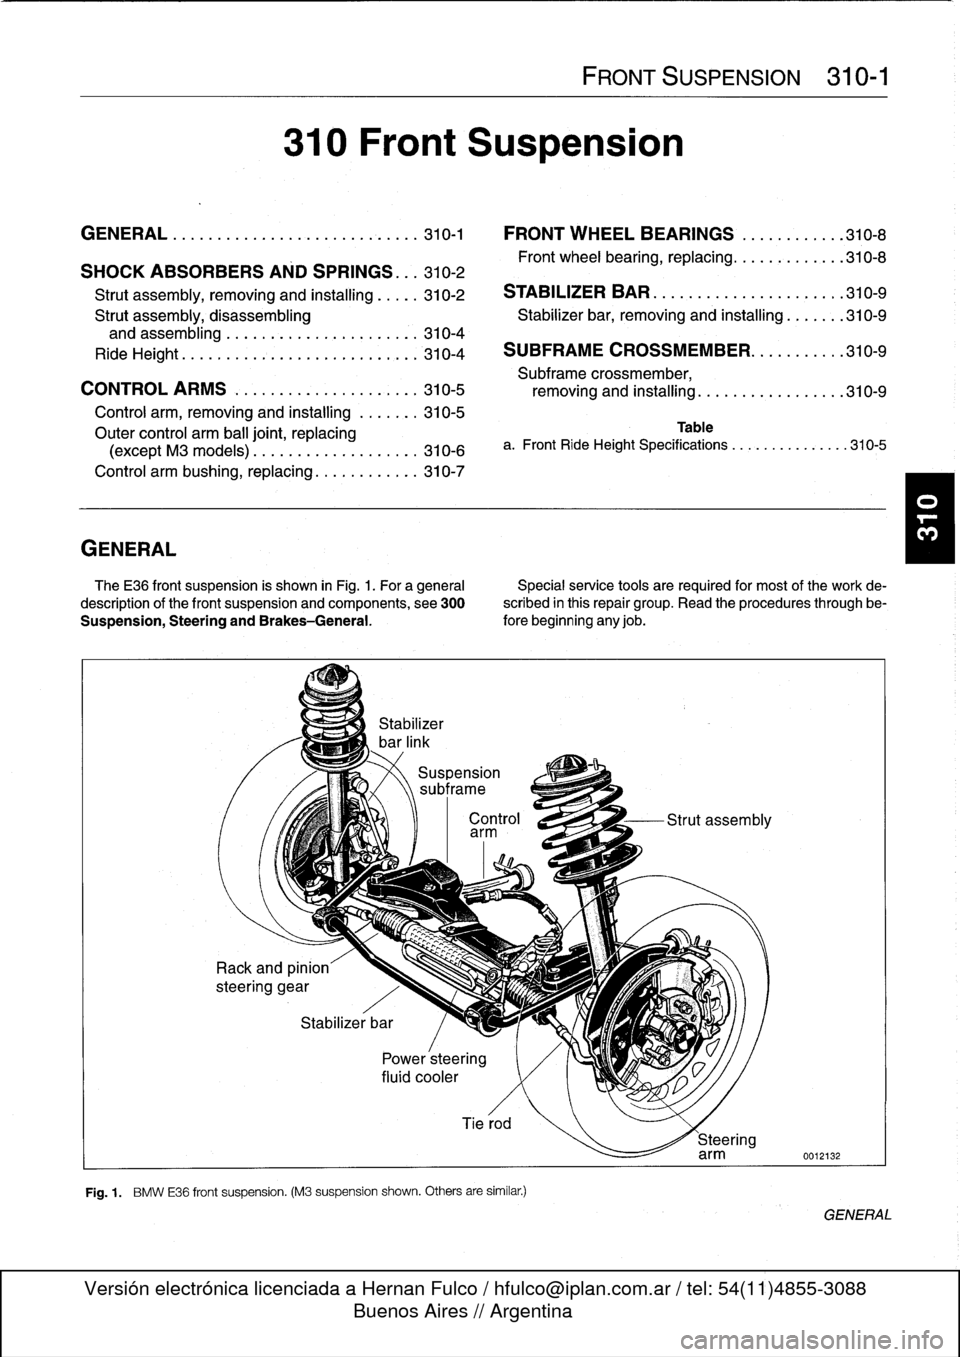
The
E36
front
suspension
is
shown
in
Fig
.
1
.
For
a
general
Specialservice
tools
arerequired
for
most
of
the
work
de-
description
of
the
front
suspension
and
components,
see
300
scribed
in
this
repair
group
.
Read
the
procedures
through
be-
Suspension,
Steering
and
Brakes-General
.
fore
beginning
any
job
.
Stabilizer
bar
Power
steering
fluid
cooler
Control
Strut
assembly
arm
Tierod
Fig
.
1
.
BMW
E36
front
suspension
.
(M3
suspension
shown
.
Others
are
similar
.)
FRONT
SUSPENSION
310-1
Steering
arm
0012132
GENERAL
Page 268 of 759
320-2
STEERING
AND
WHEEL
ALIGNMENT
3
.
Carefully
remove
airbag
from
front
of
steering
wheel
.
See
721
Airbag
System
(SRS)
.
Store
airbag
unit
in
a
safe
place
.
WARNING-
Improper
handling
of
theaírbag
could
cause
seri-
ous
ínjury
.
Store
theaírbag
with
the
horn
pad
facing
up
.
If
stored
facing
down,
accidental
deployment
could
propel
it
vlolently
into
the
air,
causíng
ínjury
.
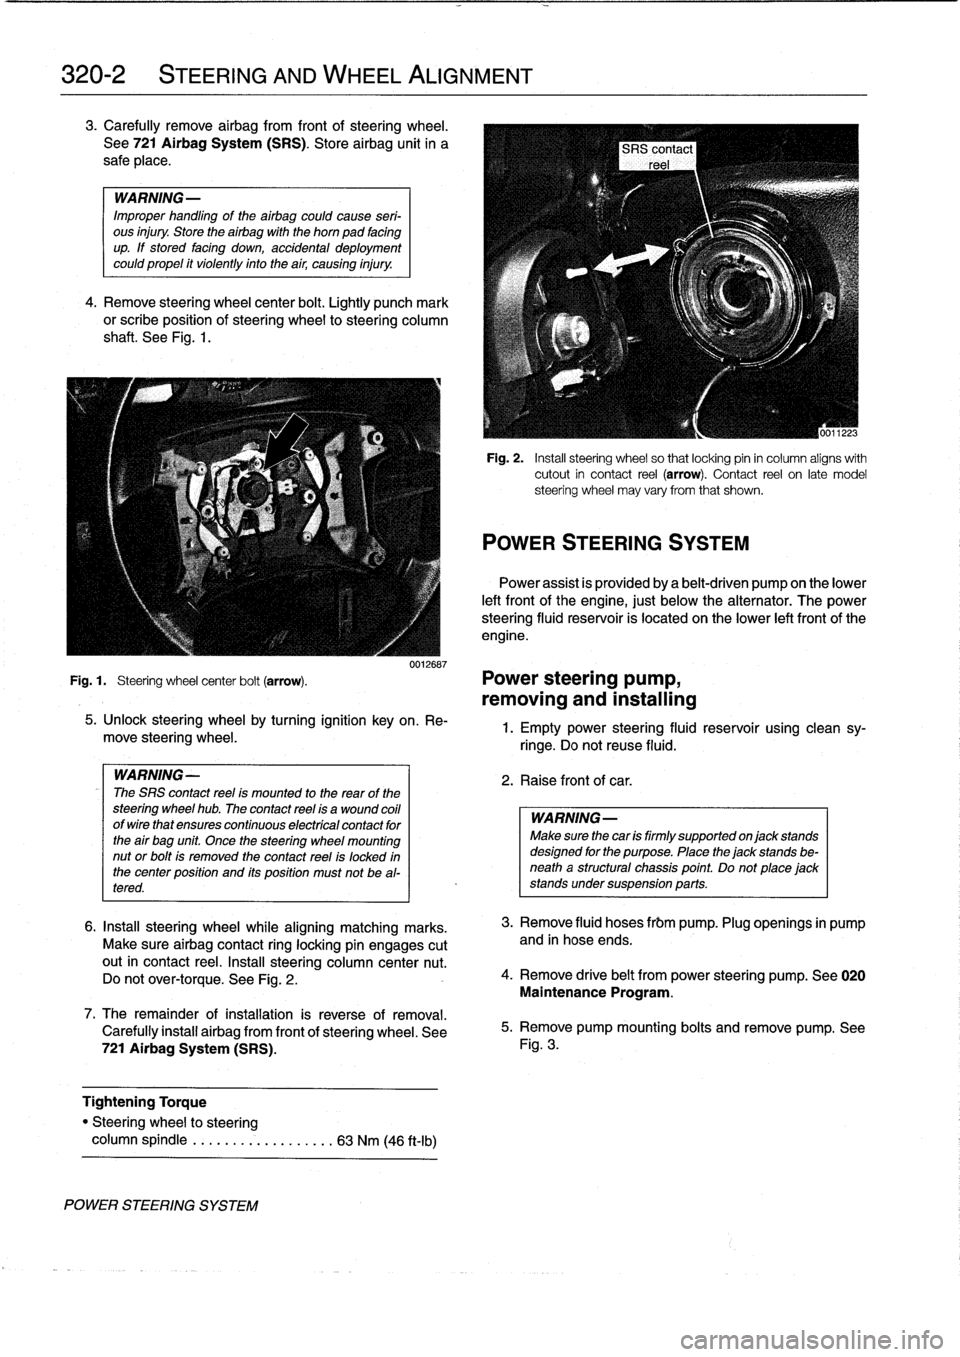
4
.
Remove
steering
wheel
center
bolt
.
Lightly
punch
mark
or
scribe
position
of
steering
wheel
to
steering
column
shaft
.
See
Fig
.
1
.
0012687
Fig
.
1
.
Steering
wheel
center
bolt
(arrow)
.
Power
steering
pump,
removing
and
installing
POWER
STEERING
SYSTEM
5
.
Unlock
steering
wheel
by
turning
ignition
key
on
.
Re-
move
steering
wheel
.
WARNING-
The
SRS
contact
reel
ís
mounted
to
the
rear
of
the
steering
wheel
hub
.
The
contact
reel
ís
a
wound
coil
ofwirethat
ensures
continuous
electrícal
contact
for
the
air
bag
unit
Once
the
steering
wheel
mounting
nut
or
bolt
is
removed
the
contact
reel
is
locked
in
the
center
position
and
its
position
must
not
be
al-
tered
.
6
.
Insta¡¡
steering
wheel
while
aligning
matching
marks
.
Make
sure
airbag
contact
ring
locking
pin
engages
cutout
in
contact
reel
.
Insta¡¡
steering
column
center
nut
.
Do
not
over-torque
.
See
Fig
.
2
.
7
.
The
remainder
ofinstallation
is
reverse
of
removal
.
Carefully
install
airbag
from
front
of
steering
wheel
.
See
721
Airbag
System
(SRS)
.
Tightening
Torque
"
Steering
wheel
to
steering
column
spindle
...
..
..
.
..........
63
Nm
(46
ft-Ib)
Fig
.
2
.
Insta¡¡
steering
wheel
so
that
locking
pin
in
column
aligns
with
cutout
in
contact
reel
(arrow)
.
Contact
reel
on
late
model
steering
wheel
may
vary
from
that
shown
.
POWER
STEERING
SYSTEM
Power
assist
is
províded
by
a
belt-driven
pump
on
the
lower
left
front
of
the
engine,
just
below
the
alternator
.
The
power
steering
fluid
resenroir
is
located
on
the
lower
left
front
of
the
engine
.
1
.
Empty
power
steering
fluid
reservoir
usingclean
sy-
ringe
.
Do
not
reuse
fluid
.
2
.
Raise
front
of
car
.
WARNING
Make
sure
thecar
is
firmly
supportedon
jack
stands
designed
for
the
purpose
.
Place
the
jack
stands
be-
neatha
structural
chassis
point
.
Do
not
place
jack
stands
undersuspension
parts
.
3
.
Remove
fluid
hoses
frbm
pump
.
Plug
openings
in
pump
and
in
hose
ends
.
4
.
Remove
drive
belt
from
power
steering
pump
.
See
020
Maintenance
Program
.
5
.
Remove
pump
mounting
bolts
and
remove
pump
.
See
Fig
.
3
.
Page 269 of 759
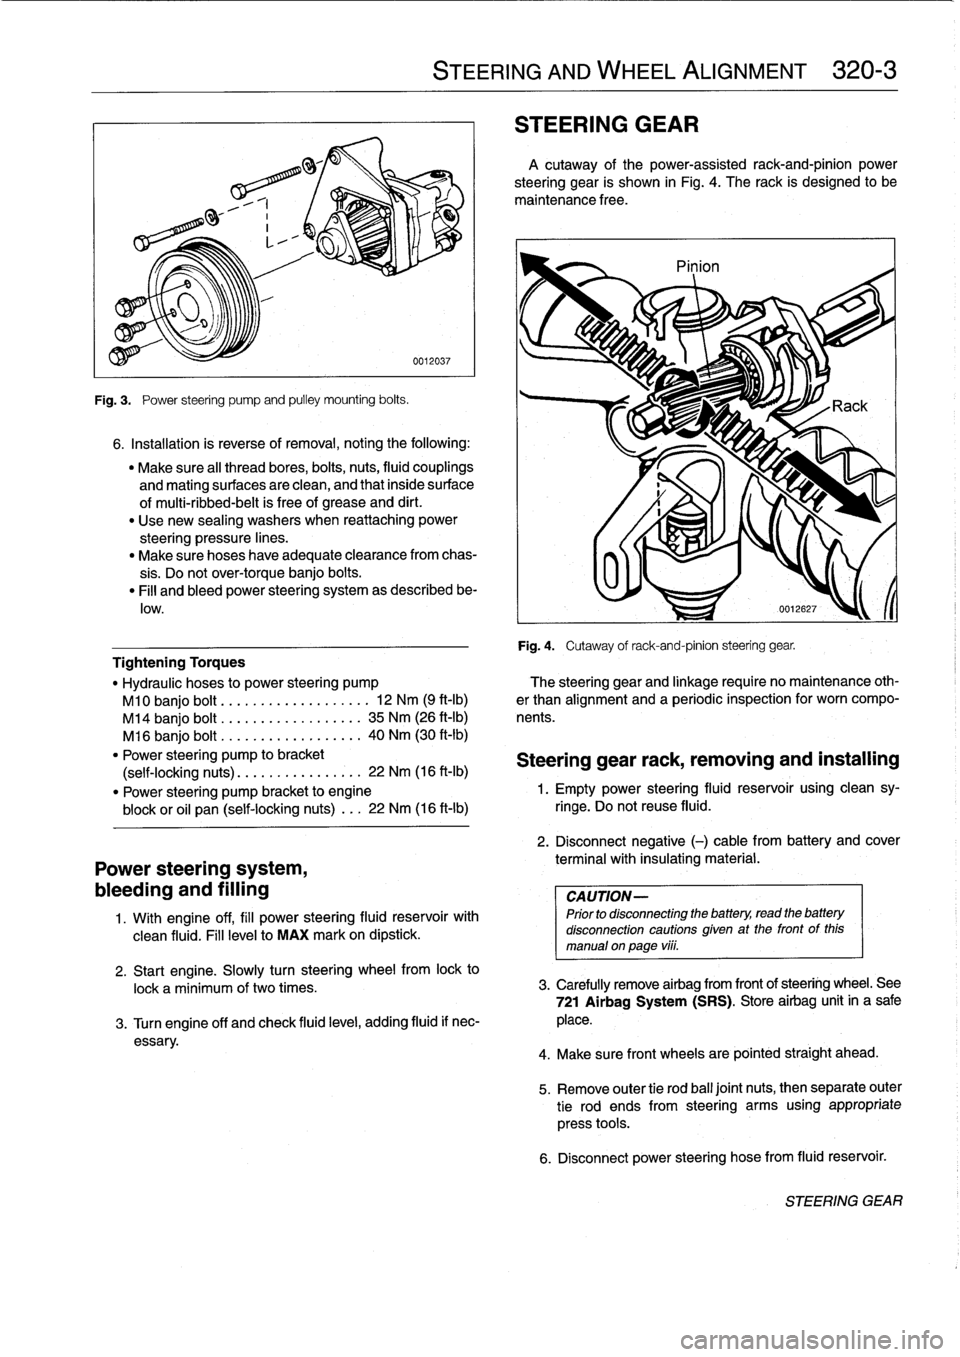
Fig
.
3
.
Power
steering
pump
and
pulley
mounting
bolts
.
6
.
Installation
is
reverse
of
removal,
noting
the
following
:
"
Make
sure
al¡
thread
bores,
bolts,
nuts,
fluid
couplings
and
mating
surfaces
are
clean,
and
that
inside
surface
of
multi-ribbed-belt
is
free
of
grease
and
dirt
.
"
Use
new
sealing
washers
when
reattaching
power
steering
pressure
lines
.
"
Make
sure
hoses
have
adequate
clearance
from
chas-
sis
.
Do
not
over-torque
banjo
bolts
.
"
Fill
and
bleed
power
steering
system
as
described
be-
low
.
Power
steering
system,
bleeding
and
filling
1
.
Wíth
engine
off,
fill
power
steering
fluid
reservoir
with
clean
fluid
.
Fill
levelto
MAX
mark
on
dipstick
.
STEERING
AND
WHEEL
ALIGNMENT
320-
3
STEERING
GEAR
A
cutaway
of
the
power-assisted
rack-and-pinion
power
steering
gear
is
shown
in
Fig
.
4
.
The
rack
is
designed
to
be
maintenance
free
.
Pinion
Fig
.
4
.
Cutaway
of
rack-and-pinion
steering
gear
.
Tightening
Torques
"
Hydraulic
hoses
to
power
steering
pump
?he
steering
gear
and
linkage
require
no
maintenance
oth-
M10
banjo
bolt
.........
..
.
...
...
.
12
Nm
(9
ft-Ib)
er
than
alignment
and
a
periodic
inspection
for
worn
compo
M14
banjo
bolt
..............
..
..
35
Nm
(26
ft-Ib)
nents
.
M16
banjo
bolt
..............
...
.
40
Nm
(30
ft-Ib)
"
Power
steering
pump
to
bracket
Steering
gear
rack,
removing
and
installing
(self-locking
nuts)
.............
..
.
22
Nm
(16
ft-Ib)
"
Power
steering
pump
bracket
to
engine
1
.
Empty
power
steering
fluid
reservoir
using
clean
sy-
block
or
oil
pan
(self-locking
nuts)
...
22
Nm
(16
ft-lb)
ringe
.
Do
not
reuse
fluid
.
2
.
Disconnect
negative
(-)
cable
from
battery
and
cover
terminal
with
insulating
material
.
CAUTION-
Prior
to
disconnectiog
the
battery,
read
the
battery
disconnection
cautions
given
at
the
front
of
this
manual
on
page
viii
.
2
.
Start
engine
.
Slowly
turn
steering
wheelfrom
lock
to
lock
a
minimum
of
two
times
.
3
.
Carefully
remove
airbag
from
frontof
steering
wheel
.
See
721
Airbag
System
(SRS)
.
Store
airbag
unit
in
a
sale
3
.
Turn
engine
off
and
check
fluid
leve¡,
adding
fluid
if
nec-
place
.
essary
.
4
.
Make
sure
front
wheelsare
pointed
straight
ahead
.
5
.
Remove
outer
tie
rod
ball
joínt
nuts,
thenseparate
outer
tie
rod
ends
from
steering
arms
using
appropriate
press
tools
.
6
.
Disconnect
power
steering
hose
from
fluid
reservoir
.
STEERING
GEAR
Page 270 of 759
320-
4
STEERING
AND
WHEEL
ALIGNMENT
7
.
Remove
fluidline
banjo
bolt
from
steering
gear
.
See
9
.
Remove
steering
gearmounting
bolts
.
See
Fig
.
7
.
Re
Fig
.
5
.
move
steering
gear
from
subframe
crossmember
by
pulling
it
forward
.
CAUTION-
Plug
the
openings
in
the
pump
and
hoseends
to
prevent
dirt
from
entering
the
hydraulic
system
.
NOTE-
It
may
be
necessary
to
remove
other
components
to
gain
access
to
the
steering
gear
.
"
Make
sure
al¡
thread
bores,
bolts,
nuts,
splines
and
mating
surfaces
are
clean
.
Use
new
self-locking
nuts
wherever
applicable
.
"
Use
marks
made
during
removal
to
reassemble
steer-
ing
column
universal
jointto
steering
stub
shaft
.
Make
sure
wheels
are
straight
ahead
.
"
Use
a
new
sealing
washer
on
banjo
fitting
.
Do
not
over-
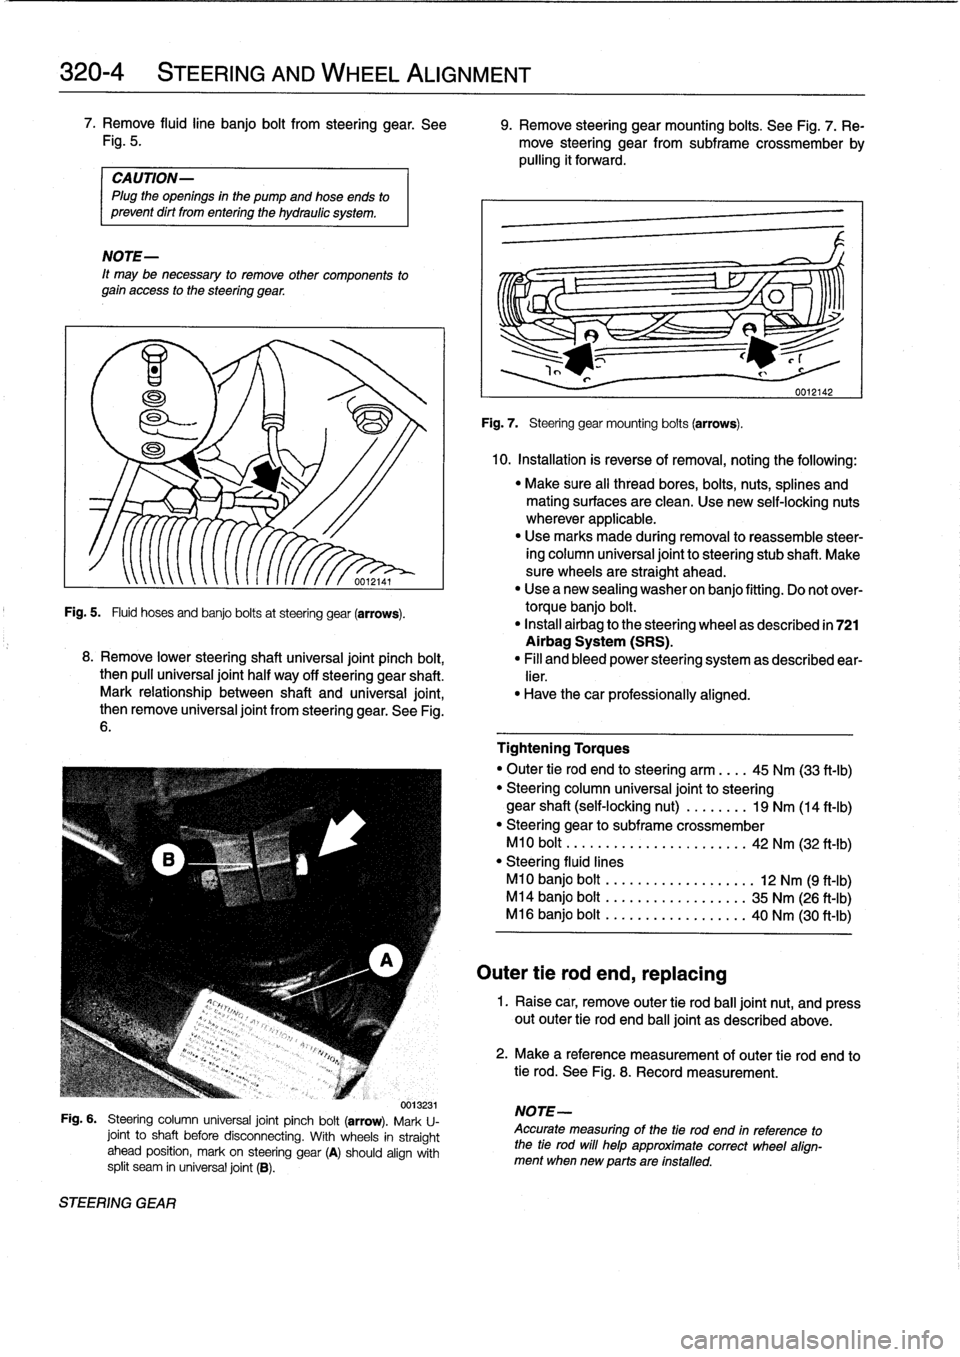
Fig
.
5
.
Fluid
hoses
and
banjo
bolts
at
steering
gear
(arrows)
.
torque
banjo
bolt
.
"
Install
airbag
to
the
steering
wheel
as
described
in
721
Airbag
System
(SRS)
.
8
.
Remove
lower
steeringshaft
universal
joint
pinch
bolt,
"
Fill
and
bleed
power
steering
system
as
described
ear-
then
pull
universal
joint
half
way
off
steering
gear
shaft
.
lier
.
Mark
relationship
between
shaft
and
universal
joint,
"
Have
thecar
professionally
aligned
.
then
remove
universal
joint
from
steering
gear
.
See
Fig
.
6
.
0013231
Fig
.
6
.
Steering
column
universal
joint
pinch
bolt
(arrow)
.
Mark
U-
joint
to
shaft
before
disconnecting
.
With
wheels
in
straight
ahead
position,
mark
on
steering
gear
(A)
should
align
with
split
seam
in
universal
joint
(B)
.
STEERING
GEAR
Fig
.
7
.
Steering
gear
mounting
bolts
(arrows)
.
Outer
tie
rod
end,
replacing
10
.
Installation
is
reverse
of
removal,
noting
the
following
:
Tightening
Torques
"
Outer
tie
rod
end
to
steering
arm
.
.
..
45
Nm
(33
ft-Ib)
"
Steering
column
universal
joint
to
steering
gear
shaft
(self-locking
nut)
....
..
..
19
Nm
(14
ft-Ib)
"
Steering
gear
to
subframe
crossmember
M10
bolt
..............
.
...
.....
42
Nm
(32
ft-Ib)
"
Steering
fluíd
lines
M10
banjo
bolt
..
..
..
........
.....
12
Nm
(9
ft-Ib)
M14
banjo
bolt
..
..
..
...
..
...
....
35
Nm
(26
ft-lb)
M16
banjo
bolt
..
.......
..
..
.....
40
Nm
(30
ft-Ib)
1
.
Raise
car,
remove
outer
tie
rod
ball
joint
nut,
and
press
out
outer
tie
rod
end
ball
joint
as
described
above
.
2
.
Make
a
reference
measurement
of
outer
tie
rod
end
to
tie
rod
.
See
Fig
.
8
.
Record
measurement
.
NOTE-
Accurate
measuring
of
the
tie
rod
end
in
reference
to
the
tie
rod
will
help
approximate
correct
wheel
align-
mentwhen
new
parts
are
installed
.
Page 291 of 759
Brake
rotor,
removing
and
installing
.
.
.
.
.
.
.
.
340-7
MASTER
CYLINDER
............
.
.
.
.
.
.
.340-7
Master
cylinder,
removing
and
installing
.
...
.
340-7
GENERAL
TROUBLESHOOTING
WARNING
-
"
Although
semi-metallic
and
metallic
Brake
friction
materials
in
Brake
pads
or
shoes
no
longer
con-
tain
asbestos,
they
produce
dangerous
dust
.
"
Brake
fluid
is
poisonous,
highly
corrosive
and
dangerous
to
the
environment
Wear
safety
glasses
and
rubber
gloves
when
working
with
Brake
fluid
.
Do
not
siphonBrake
fluid
with
your
mouth
.
Immediately
clean
away
any
fluid
spilled
on
painted
surfaces
and
wash
with
water,
asBrake
fluid
will
remove
paint
.
"
Always
use
new
Brake
fluid
froma
fresh,
un-
opened
container
.
Brake
fluid
will
absorb
mois-
ture
from
the
air
.
This
canlead
to
corrosion
problems
in
the
brakingsystem,
and
will
also
low-
er
the
Brake
fluid's
boiling
point
.
Dispose
of
Brake
fluid
properly
.
"
Do
notreuse
self-locking
nuts,bolts
or
fasteners
.
They
are
designed
to
be
used
only
once
and
may
failif
reused
.
Always
replace
them
with
new
self-
locking
fasteners
.
BMW
E36
models
areequipped
with
vacuum
power-assist-
ed
four-wheel
disc
brakes
with
an
integral
Antilock
Brake
Sys-
tem
(ABS)
.
Single-pistoncalipers
act
on
solid
or
vented
front
rotors
and
solid
rear
rotors
.
A
brake
pad
wear
sensor
for
each
axle
indicates
when
brake
padsneed
replacement
.
The
dual
drum-type
parking
brakesystem
is
integrated
with
the
rear
brake
rotors
.
NOTE-
M3
models
havevented
directional
Brake
rotors
on
the
rearaxle
as
well
ason
the
front
.
340
Brakes
BRAKES
340-1
GENERAL
.
.
.
.
.
.
.........
.
.
.
..........
340-1
BRAKE
BOOSTER
.........
.
.
.
.
.
...
.
.
.
.
340-8
TROUBLESHOOTING
.......
.
......
.
...
340-1
Brake
booster,
removing
and
installing
....
.
.
340-8
PARKING
BRAKE
.
.....
.
...
.
.
.
.....
.
.
.
340-10
BLEEDING
BRAKES
.
.
.
.
.
.
.
.
..........
340-3
Parking
brake,adjusting
.
.
.
.
.
.
.
.
.
.
.....
.
340-10
Pressure
bleeding
brakes
Parking
brake
shoes,
removing
and
installing
.
340-11(except
cars
with
AST)
.
.
.
.
.
.
.
.
.
...
.
.
.
.
.340-3
Parking
Brake
cable,
replacing
.
.
.
.
.
.
.
.
.
.
.
.
340-11
BRAKE
PADS,
CALIPERS,
ANTILOCK
BRAKE
SYSTEM
(ABS)
.
.
.
.340-11
AND
ROTORS
..........
.
.......
.
.
.
.
.
.
.
340-3
ABS
System
Inspection
.
...
.
.......
.
.
.
..
340-12
Brake
pads,
replacing
............
.
.
.
.
.
.
.
340-4
ABS
wheel
speed
sensors,
replacing
.
.
.
.
..
340-12
Brake
caliper,
removing
and
installing
.
..
..
.
340-6
TABLES
a
.
Brake
System
Troubleshooting
.....
...
.
.
.....
.340-2
b
.
Brake
Rotor
Reconditioning
Specifications
.
.....
.340-7
Brakeperformance
is
mainly
affected
by
three
things
:
the
leve¡
and
condition
of
the
brake
fluid,
the
system's
abilíty
to
create
and
maintain
hydraulic
pressure,
and
the
condition
of
the
friction
components
.
Air
in
the
Brake
fluid
will
make
the
Brake
pedal
feel
spongy
during
braking
or
will
increase
the
Brake
pedalforce
required
to
stop
.
Fluid
contaminated
by
moisture
or
dirt
can
corrode
the
system
.
Inspect
the
Brake
fluid
inside
the
reservoir
.
Ifit
is
dirty
or
murky,
or
is
over
a
year
old,
the
fluid
should
be
replaced
.
Visually
check
the
hydraulic
system
startingat
the
master
cylinder
.
To
check
the
function
of
the
master
cylinder
hold
the
brake
pedal
down
hard
with
the
engine
running
.
The
pedal
should
feelsolid
and
stay
solid
.
If
the
pedal
slowly
falls
to
the
floor,
either
the
master
cylinder
is
leaking
internally,
or
fluid
is
leaking
externally
.
If
no
leaks
canbe
found,
the
master
cylin-
der
is
faulty
and
should
be
replaced
.
Check
all
Brake
fluid
lines
and
couplings
for
leaks,
kinks,
chafing
and
corrosion
.
Check
the
Brake
booster
by
pumping
the
Brake
pedal
ap-
proximately
10
times
with
the
engine
off
.
Hold
the
pedal
down
and
start
the
engine
.
The
pedal
should
fa¡¡
slightly
.
If
not,
check
for
any
visiblefaults
before
suspecting
a
faulty
brake
booster
.
Check
for
strong
vacuum
at
the
vacuum
hose
fitting
at
the
booster,
and
check
the
non-retum
valve
for
one-way
flow
.
Worn
or
contaminated
brake
pads
will
cause
poor
braking
performance
.
Oil-contaminated
or
glazed
pads
will
cause
stopping
distances
to
increase
.
Inspect
the
rotors
for
glazing,
discoloration
and
scoring
.
Steering
wheel
vibration
while
braking
at
speed
is
often
caused
by
warped
rotors,
but
can
also
be
caused
byworn
suspension
components
.
TROUBLESHOOTING
Page 397 of 759
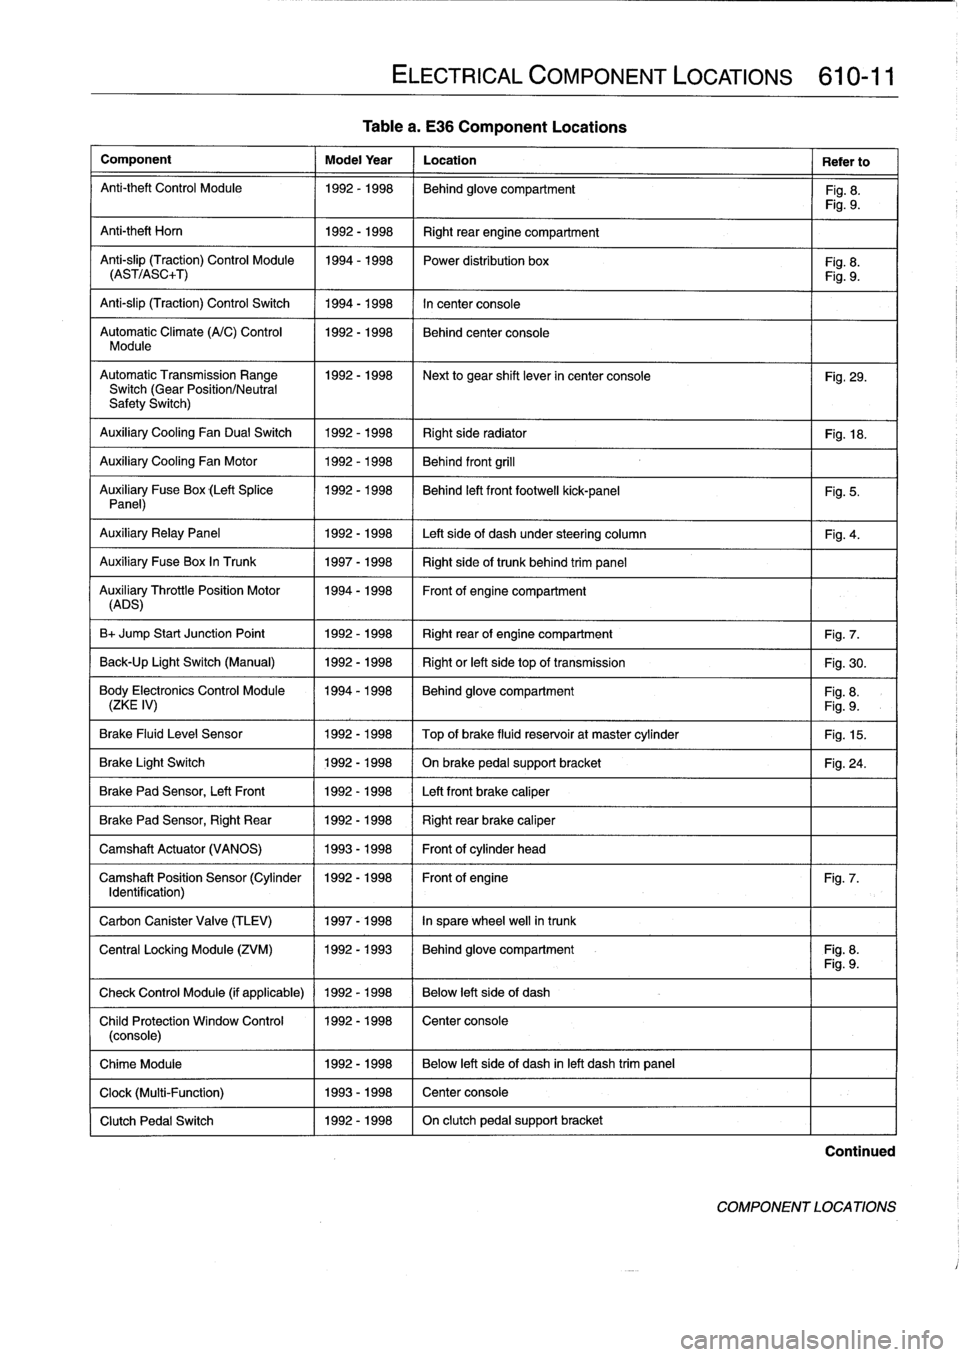
Table
a
.
E36
Component
Locations
Component
Model
Year
Location
Refer
to
Anti-theft
Control
Module
1992-1998
Behind
glove
compartment
Fig
.
8
.
Fig
.
9
.
Anti-theft
Horn
1
1992-1998
1
Right
rear
engine
compartment
Anti-slip
(Traction)
Control
Module
1994-1998
Power
distribution
box
Fig
.
8
.
(AST/ASC+T)
Fig
.
9
.
Anti-slip
(Traction)
Control
Switch
1994-1998
In
center
console
Automatic
Climate
(A/C)
Control
1992-1998
Behind
center
console
Module
AutomaticTransmission
Range
1992-1998
~
Next
to
gear
shift
lever
in
center
console
Fig
.
29
.
Switch
(Gear
Position/Neutral
Safety
Switch)
Auxiliary
Cooling
Fan
Dual
Switch
1992-1998
Right
side
radiator
1
Fig
.
18
.
Auxiliary
Cooling
Fan
Motor
1992-1998
Behind
front
grill
Auxiliary
Fuse
Box
(Left
Splice
1992-1998
I
Behind
left
front
footwell
kick-panel
Panel)
Auxiliary
RelayPanel
1
1992-1998
1
Left
side
of
dash
under
steering
column
Auxiliary
Fuse
Box
In
Trunk
1
1997-1998
1
Right
sideof
trunk
behind
trim
panel
AuADSry
ThrottlePosition
Motor
11994-1998
Front
of
engine
compartment
B+
Jump
Start
Junction
Point
1992-1998
Right
rear
of
engine
compartment
Fig
.
7
.
Back-Up
Light
Switch
(Manual)
1992-1998
Right
or
left
side
top
of
transmission
Fig
.
30
.
Body
Electronics
Control
Module
1994-1998
Behindglove
compartment
Fig
.
8
.
(ZKE
IV)
Fig
.
9
.
Brake
Fluid
Level
Sensor
1992-1998
Top
of
brake
fluid
reservoir
at
master
cylinder
Fig
.
15
.
Brake
Light
Switch
1
1992-1998
1
On
brake
pedal
supportbracket
Brake
Pad
Sensor,
Left
Front
1
1992-1998
1
Left
front
brake
caliper
Brake
Pad
Sensor,
Right
Rear
1992-1998
Right
rear
brake
caliper
Camshaft
Actuator
(VANOS)
1993-1998
Front
of
cylinder
head
Camshaft
Position
Sensor
(Cylinder
1992-1998
Front
of
engine
Identification)
Carbon
Canister
Valve
(TLEV)
1
1997-1998
1
In
sparewheel
well
in
trunk
ELECTRICAL
COMPONENT
LOCATIONS
610-11
Fig
.
5
.
Fig
.
4
.
Fig
.
24
.
Fig
.
7
.
Central
Locking
Module
(ZVM)
11992-1993
1
Behindglove
compartment
I
Fig
.
8
.
Fig
.
9
.
Check
Control
Module
(if
applicable)
1
1992
-
1998
1
Below
left
side
of
dash
Child
Protection
Window
Control
1992-1998
Center
console
(console)
Chime
Module
1992-1998
Below
left
side
of
dash
inleft
dash
trim
panel
Clock
(Multi-Function)
1993-1998
Center
console
Clutch
Pedal
Switch
1992-1998
On
clutch
pedal
support
bracket
Continued
COMPONENT
LOCATIONS
Page 751 of 759
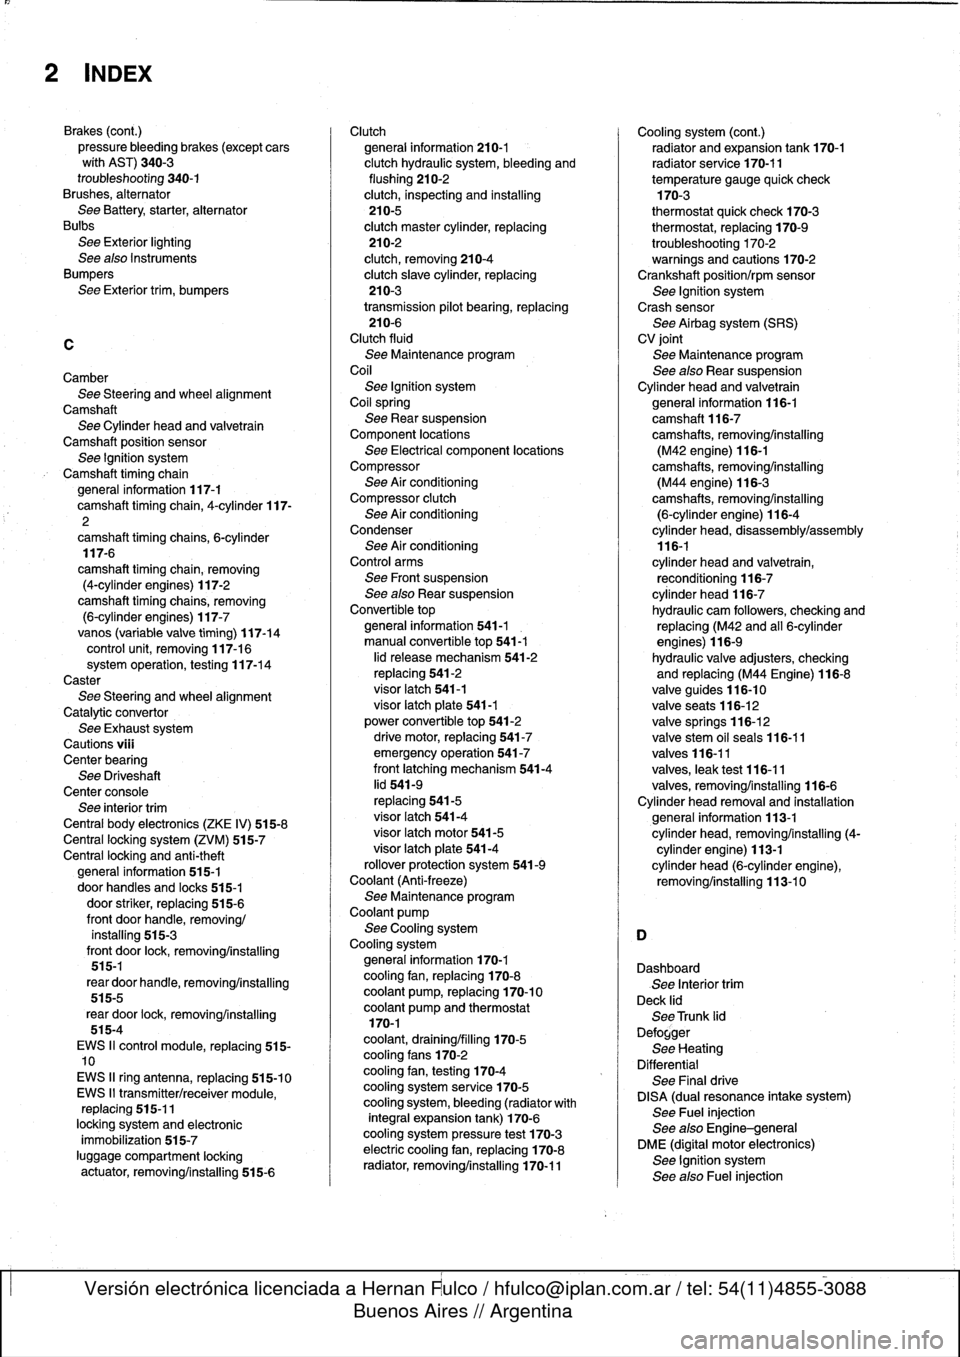
2
INDEX
Brakes
(cont
.)
pressure
bleeding
brakes
(except
cars
wíth
AST)
340-3
troubleshooting
340-1
Brushes,
alternator
See
Battery,
starter,
alternator
Bulbs
See
Exterior
lighting
See
also
Instruments
Bumpers
See
Exterior
trim,
bumpers
C
CamberSee
Steering
and
wheel
alignment
Camshaft
See
Cylinder
head
and
valvetrain
Camshaft
position
sensor
See
Ignition
system
Camshaft
timing
chain
general
information
117-1
camshaft
timingchain,
4-cylinder
117-
2
camshaft
timing
chains,6-cylinder
117-6
camshaft
timing
chain,
removing
(4-cylinder
engines)
117-2
camshaft
timing
chains,
removing
(6-cylinder
engines)
117-7vanos
(variable
valve
timing)
117-14
control
unit,
removing
117-16system
operation,
testing
117-14
Caster
See
Steering
andwheel
alignment
Catalytic
convertor
See
Exhaustsystem
Cautions
viü
Center
bearing
See
Driveshaft
Center
console
See
interior
trim
Central
body
electronics
(ZKE
IV)
515-8
Central
locking
system
(ZVM)
515-7
Centrallocking
and
anti-theft
general
information
515-1
door
handles
and
Iocks
515-1
door
striker,
replacing
515-6
front
door
handle,
removing/
installing
515-3
front
door
lock,
removing/installing
515-1
rear
door
handle,
removing/installing
515-5
rear
door
lock,
removing/installing
515-4
EWS
II
control
module,
replacing
515-10
EWS
II
ring
antenna,
replacing
515-10
EWS
II
transmitter/receiver
module,
replacing
515-11
locking
system
and
electronic
immobilization
515-7
luggage
compartment
locking
actuator,
removing/installing
515-6
Clutch
general
information210-1
clutch
hydraulic
system,
bleeding
and
flushing
210-2
clutch,
inspecting
and
installing
210-5
clutch
master
cylinder,
replacing
210-2
clutch,
removing
210-4
clutch
slave
cylinder,
replacing
210-3
transmission
pilot
bearing,
replacing
210-6
Clutch
fluid
See
Maintenance
program
Coil
See
Ignition
system
Coilspring
See
Rear
suspension
Component
locations
See
Electrical
component
locations
Compressor
See
Air
conditioning
Compressor
clutch
See
Air
conditioning
Condenser
See
Air
conditioningControl
arms
See
Front
suspension
See
also
Rear
suspension
Convertible
top
general
information
541-1
manual
convertible
top
541-1
lid
release
mechanism
541-2
replacing
541-2
visor
latch
541-1
visor
latch
píate
541-1
power
convertible
top
541-2
drive
motor,
replacing
541-7
emergency
operation
541-7
front
latching
mechanism
541-4
lid
541-9
replacing
541-5
visor
latch
541-4
visor
latch
motor541-5
visor
latch
plate
541-4
rollover
protection
system
541-9
Coolant
(Anti-freeze)
See
Maintenance
program
Coolant
pump
See
Cooling
system
Cooling
system
general
information
170-1
cooling
fan,
replacing
170-8
coolant
pump,
replacing
170-10
coolant
pump
and
thermostat170-1
coolant,
draining/filling
170-5
cooling
fans
170-2
cooling
fan,
testing
170-4
cooling
system
service
170-5
cooling
system,
bleeding
(radiator
with
integral
expansion
tank)
170-6
cooling
system
pressure
test
170-3
electric
cooling
fan,
replacing
170-8
radiator,
removing/installing
170-11
Cooling
system
(cont
.)
radiator
and
expansion
tank
170-1
radiator
service
170-11
temperature
gauge
quick
check170-3
thermostat
quick
check
170-3
thermostat,
replacing
170-9
troubleshooting
170-2
warnings
and
cautions
170-2Crankshaft
position/rpm
sensor
See
Ignition
system
Crash
sensor
See
Airbag
system
(SRS)
CV
joint
See
Maintenance
program
See
also
Rear
suspension
Cylinder
head
and
valvetrain
general
information
116-1
camshaft116-7
camshafts,
removing/installing
(M42
engine)
116-1camshafts,
removing/installing
(M44
engine)
116-3
camshafts,
removing/installing
(6-cylinder
engine)
116-4
cylinder
head,
disassembly/assembly
116-1
cylinder
head
and
valvetrain,
reconditioning
116-7
cylinder
head
116-7
hydraulic
cam
followers,
checking
and
replacing
(M42
and
al]
6-cylinder
engines)
116-9
hydraulic
valve
adjusters,
checking
and
replacing
(M44
Engine)
116-8
valve
guides
116-10
valveseats
116-12
valve
springs
116-12
valve
stem
oil
seals
116-11
valves
116-11
valves,
leak
test
116-11
valves,removing/installing
116-6
Cylinder
head
removal
and
installation
general
information
113-1
cylinder
head,
removing/installing
(4-
cylinder
engine)
113-1
cylinder
head
(6-cylinder
engine),
removing/installing
113-10
Dashboard
See
Interior
trim
Deck
lid
See
Trunk
lid
Defogger
See
Heating
Differential
See
Final
drive
DISA
(dual
resonance
intake
system)
See
Fuel
injection
See
also
Engine-general
DME
(digital
motor
electronics)
See
Ignition
system
See
alsoFuel
injection
Page 755 of 759
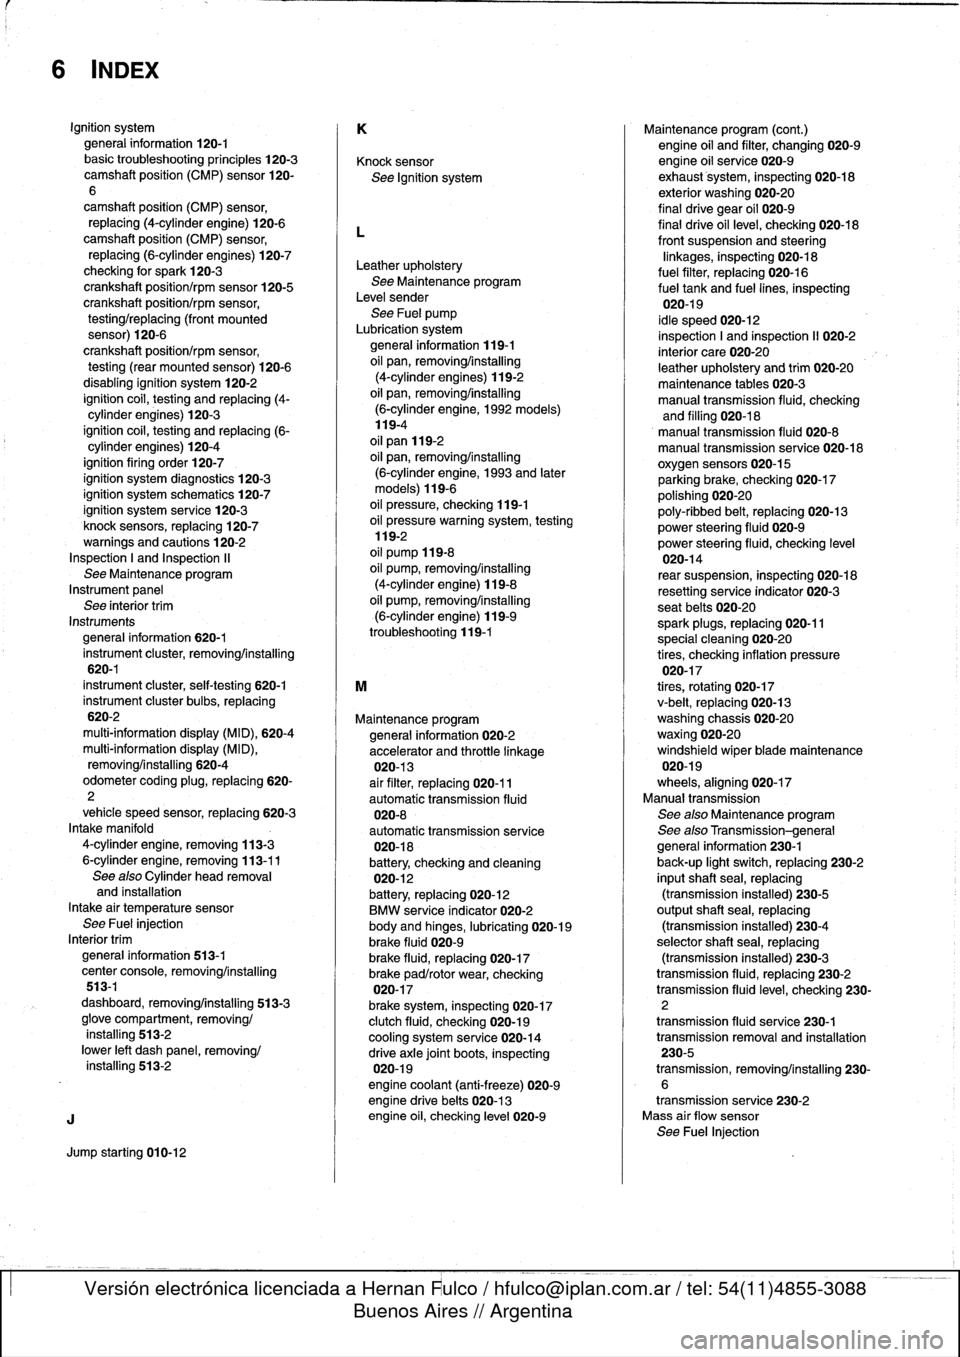
6
INDEX
Ignition
system
general
information
120-1basictroubleshooting
principies
120-3camshaft
position
(CMP)
sensor
120-
6
camshaft
positíon
(CMP)
sensor,
replacing
(4-cylinder
engine)
120-6camshaft
position
(CMP)
sensor,
replacing
(6-cylinder
engines)
120-7
checking
for
spark
120-3
crankshaftposition/rpm
sensor
120-5
crankshaft
position/rpm
sensor,
testing/replacing
(front
mounted
sensor)
120-6
crankshaft
positíon/rpm
sensor,
testing
(rear
mounted
sensor)
120-6
disabling
ignition
system120-2
ignition
coil,
testing
and
replacing
(4-
cylinder
engines)
120-3
ignition
coil,
testing
and
replacing
(6-
cylinder
engines)
120-4
ignítion
firing
order
120-7
ignition
system
diagnostics
120-3
ignition
system
schematics
120-7
ignition
system
service
120-3knock
sensors,
replacing
120-7warnings
and
cautions
120-2
Inspectíon
I
and
Inspection
II
See
Maintenanceprogram
Instrumentpanel
See
interior
trim
Instruments
general
information
620-1
instrument
cluster,
removinglinstalling
620-1
instrument
cluster,
self-testing
620-1
instrument
cluster
bulbs,
replacing
620-2
multi-information
display
(MID),
620-4
multi-information
display
(MID),
removing/installing
620-4
odometer
coding
plug,
replacing
620-
2
vehicle
speed
sensor,
replacing
620-3
Intake
manifold
4-cylinder
engíne,
removing
113-3
6-cylinder
engine,
removing
113-11
See
alsoCylinder
head
removal
and
installation
Intake
air
temperaturesensor
See
Fuel
injection
Interior
trim
general
information
513-1
center
console,
removing/installing
513-1
dashboard,
removing/installing
513-3
glove
compartment,
removing/
installing
513-2
lower
left
dash
panel,
removing/
installing
513-2
J
Jump
startíng
010-12
K
Knock
sensor
See
Ignition
system
L
Leather
upholstery
See
Maíntenance
program
Leve¡
sender
See
Fuel
pump
Lubrication
system
general
information
119-1
oil
pan,
removing/installing
(4-cylinder
engines)
119-2
oil
pan,
removing/installing
(6-cylinder
engine,
1992models)119-4
oil
pan
119-2
oil
pan,
removing/installing
(6-cylinder
engine,
1993
and
later
models)
119-6
oil
pressure,
checking
119-1
oil
pressure
warningsystem,
testing
119-2
oil
pump
119-8
oil
pump,
removing/installing
(4-cylinder
engine)
119-8
oil
pump,
removing/installing
(6-cylinder
engine)
119-9
troubleshooting
119-1
M
Maíntenance
program
general
information
020-2
accelerator
and
throttle
linkage
020-13
air
filter,
replacing
020-11
automatic
transmission
fluid
020-8
automatic
transmission
service
020-18
battery,
checking
and
cleaning
020-12
battery,
replacing
020-12
BMW
service
indicator
020-2
body
and
hinges,
lubricating
020-19
brake
fluid
020-9
brake
fluid,
replacing
020-17
brake
pad/rotor
wear,
checking
020-17
brake
system,
inspecting
020-17
clutch
fluid,
checking
020-19
cooling
system
service
020-14
drive
axle
joint
boots,
inspecting
020-19
engine
coolant
(anti-freeze)
020-9
engine
drive
belts
020-13
engine
oil,
checking
leve¡
020-9
Maintenance
program
(cont
.)
engine
oil
and
filter,
changing020-9engine
oil
service
020-9
exhaust
system,
inspecting
020-18
exterior
washing020-20
final
drive
gear
oil
020-9
final
drive
oil
level,
checking
020-18
front
suspension
and
steering
linkages,
inspecting
020-18
fuel
filter,
replacing
020-16
fuel
tank
and
fuel
lines,
inspecting
020-19
¡dle
speed
020-12
inspection
I
and
inspection
11
020-2
interior
care020-20
leather
upholstery
and
trim
020-20
maintenance
tables
020-3
manual
transmission
fluid,
checking
and
filling
020-18manual
transmission
fluid
020-8
manual
transmission
service
020-18oxygensensors
020-15
parking
brake,
checking
020-17
polishing
020-20
poly-ribbed
belt,
replacing
020-13
power
steering
fluid
020-9
power
steering
fluid,
checking
leve¡
020-14
rear
suspension,
inspecting
020-18
resetting
service
indicator
020-3
seat
belts
020-20
spark
plugs,
replacing
020-11
special
cleaning
020-20
tires,
checking
inflation
pressure
020-17
tires,
rotating
020-17
v-belt,
replacing
020-13
washing
chassis
020-20waxing020-20
windshield
wiperblade
maintenance
020-19
wheels,
aligníng
020-17
Manual
transmission
See
also
Maintenance
program
See
also
Transmission-general
general
information
230-1
back-up
light
switch,
replacing
230-2
inputshaft
sea¡,
replacing
(transmission
installed)
230-5
output
shaftsea¡,
replacing
(transmission
installed)
230-4
selector
shaft
sea¡,
replacing
(transmission
installed)
230-3
transmission
fluid,
replacing
230-2
transmission
fluidlevel,
checking
230-2
transmission
fluid
service
230-1
transmission
removal
and
installation
230-5
transmission,
removing/installing
230-
6
transmission
service
230-2
Mass
air
flow
sensor
See
Fuel
Injection