rear axle BMW 328i 1998 E36 Workshop Manual
[x] Cancel search | Manufacturer: BMW, Model Year: 1998, Model line: 328i, Model: BMW 328i 1998 E36Pages: 759
Page 23 of 759
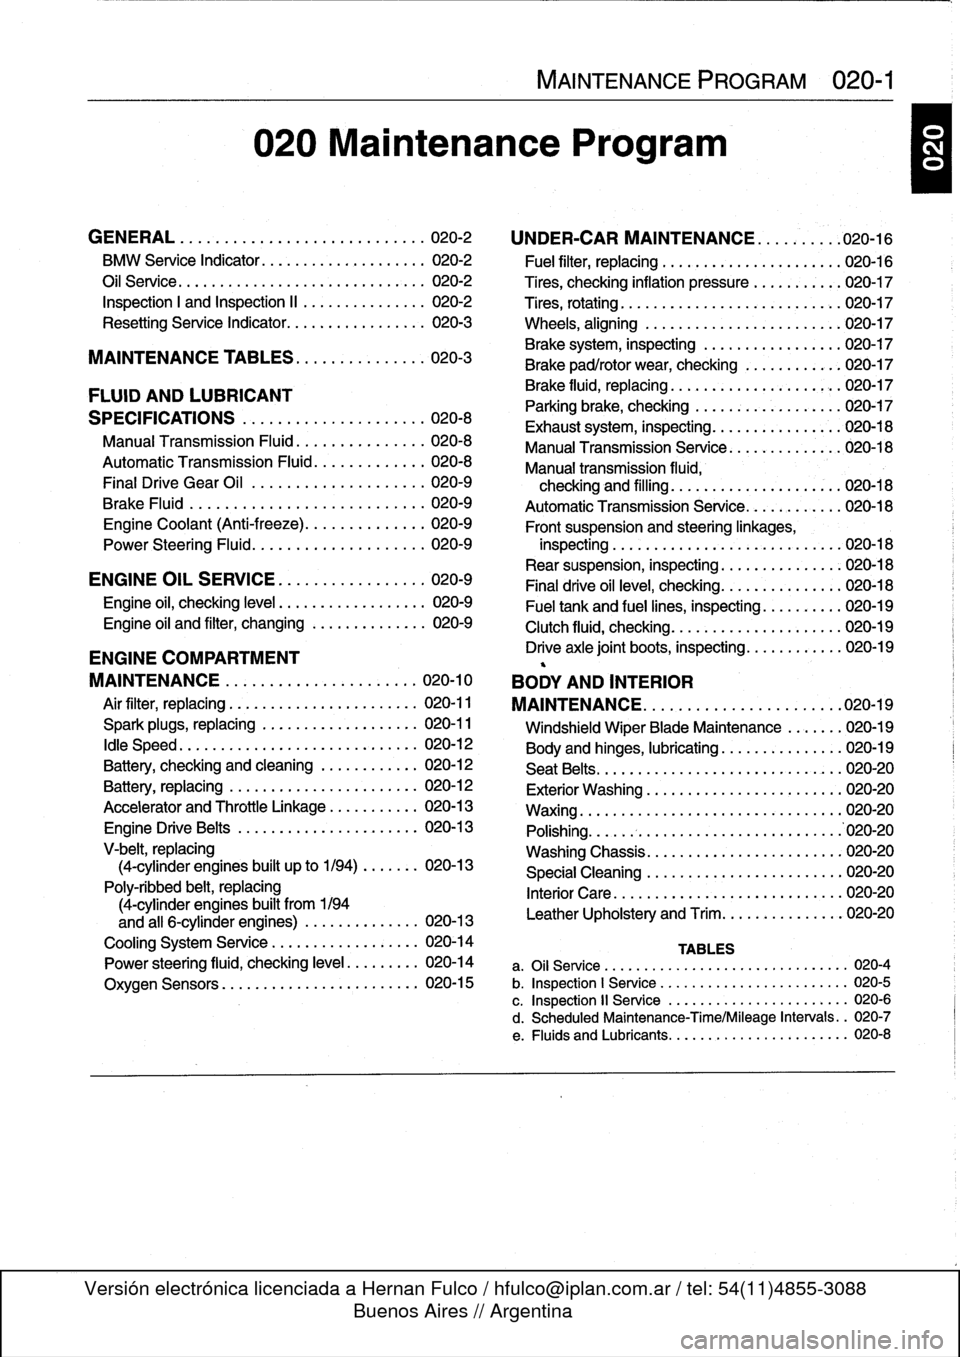
020
Maintenance
Program
GENERAL
.
.
...
.
.
.
...
.
.
.
.
.
.
.
.
.
.
.
...
.
..
020-2
BMW
Service
Indicator
......
..
....
..
...
..
.
020-2
Oil
Service
.....
.
..........
..
...
...
...
..
.
020-2
Inspection
I
and
Inspection
II
.
..
....
..
...
..
.
020-2
Resetting
Service
Indicator
....
.
....
..
...
..
.
020-3
MAINTENANCE
TABLES
..
.
.
.
.
.
........
020-3
FLUID
AND
LUBRICANT
SPECIFICATIONS
.
.
.
.
.
.
.
...
.
.
.
....
.
...
020-8
Manual
Transmission
Fluid
..
.
.
.
.
.
....
.
.
.
.
020-8
Automatic
Transmission
Fluid
.
.
.
.
.
....
.
.
.
.
020-8
Final
Drive
Gear
Oil
................
.
.
.
.
020-9
Brake
Fluid
.
.
.
.
.
................
.
.
.
.
020-9
Engine
Coolant
(Anti-freeze)
.
.
...
.
....
.
.
.
.
020-9
Power
Steering
Fluid
........
..
......
.
.
.
.
020-9
ENGINE
OIL
SERVICE
.
.
...
.
.
.
...
.
.
.
.
.
.
020-9
Engine
oil,
checking
leve¡
..
...
...
..
........
020-9
Engine
oil
and
filter,
changing
....
.
......
.
..
020-9
ENGINE
COMPARTMENT
MAINTENANCE
...
.
.
.
.
.
.
.
.
.
.
.
.
.
......
020-10
Air
filter,
replacing
.
...
...
.
.....
.
.....
.
...
020-11
Spark
plugs,
replacing
...
.
......
.
...
..
...
020-11
¡dle
Speed
.
..
...
...
....
.
......
.
...
..
...
020-12
Battery,
checking
and
cleaning
.......
..
...
020-12
Battery,
replacing
.
.....
.
.....
.
.....
..
...
020-12
Accelerator
and
Throttle
Linkage
.
.....
..
...
020-13
Engine
DriveBelts
.....
.
....
..
...
...
...
.
020-13
V-belt,
replacing
(4-cylinder
engines
built
up
to
1/94)
..
....
.
020-13
Poly-ribbed
belt,
replacing
(4-cylinder
engines
built
from
1194
and
all
6-cylinder
engines)
.
.
....
..
......
020-13
Cooling
System
Service
.
...
..
....
..
....
..
020-14
Power
steering
fluid,
checking
leve¡
.
..
....
.
.
020-14
Oxygen
Sensors
....
...
..
..
....
.
.....
.
.
020-15
MAINTENANCE
PROGRAM
020-1
UNDER-CAR
MAINTENANCE
.
..
.
...
.
.
.020-16
'
Fuel
filter,
replacing
...
.
.....
..
.....
..
..
.020-16
Tires,
checking
inflation
pressure
.
.....
.
....
020-17
Tires,
rotating
...
..
.....
..
....
..
....
.
....
020-17
Wheels,
aligning
..
.....
.
...........
.
....
'020-17
Brake
system,
inspecting
.
.
....
.
.....
..
...
020-17
Brake
pad/rotor
wear,checking
.
......
.
....
020-17
Brake
fluid,
replacing
.........
..
.
..
..
.
020-17
Parking
brake,
checking
......
.
.....
..
....
020-17
Exhaust
system,
inspecting
....
..
.....
.
...
.020-18
Manual
Transmission
Senrice
..
..
.....
.
....
020-18
Manual
transmission
fluida
checking
and
filling
..
.
....
..
.
.
..
..
....
020-18
AutomaticTransmission
Service
.
....
...
....
020-18
Front
suspension
and
steeringlinkages,
inspecting
..
.
:.....
.
....
..
.....
..
...
.
.020-18
Rear
suspension,
inspecting
.
..
...
...
....
..
020-18
Final
drive
oil
leve¡,
checking
.
.
.
...
....
...
..
020-18
Fuel
tank
and
fuel
lines,
inspecting
.
.....
....
020-19
Clutch
fluid,
checking
...
...
...
...
....
.....
020-19
Drive
axle
joint
boots,
inspecting
...
..
.....
..
020-19
BODY
AND
INTERIOR
MAINTENANCE
.
.
.
.
.
.
.
.
.
.
.
.
.
.
.
.
.
.
...
.
.020-19
Windshield
Wiper
Blade
Maintenance
....
.
.
020-19
Body
and
hinges,
lubricating
.
.....
..
......
.
020-19
Seat
Belts
...
..
...
...
...
..
.....
..
.....
.
.
020-20
Exterior
Washing
..
...
...
..
.
.
...
..
......
.020-20
Waxing
.....
..
...
...
...
..
.....
..
.......
020-20
Polishing
..
...
...
...
....
..
..........
..
.
.'020-20
Washing
Chassis
.
...
....
.
....
..
.....
.
...
020-20
Special
Cleaning
.
.
.....
..
...
.
.....
..
..
.020-20
Interior
Care
.
....
..
....
..
..
.
.
......
.
...
020-20
Leather
Upholstery
and
Trim
...
..
....
...
...
020-20
TABLES
a
.
Oil
Service
......
...
.
..
.............
...
---
020-4
b
.
Inspection
1
Service
..
.
.
.............
....
...
020-5
c
.
Inspection
11
Service
.
.
...
...........
..
.
..
..
020-6
d
.
Scheduled
Maintenance-Time/Mileage
Intervals
..
020-7
e
.
Fluids
and
Lubricants
..
...
...........
.....
..
020-8
Page 28 of 759
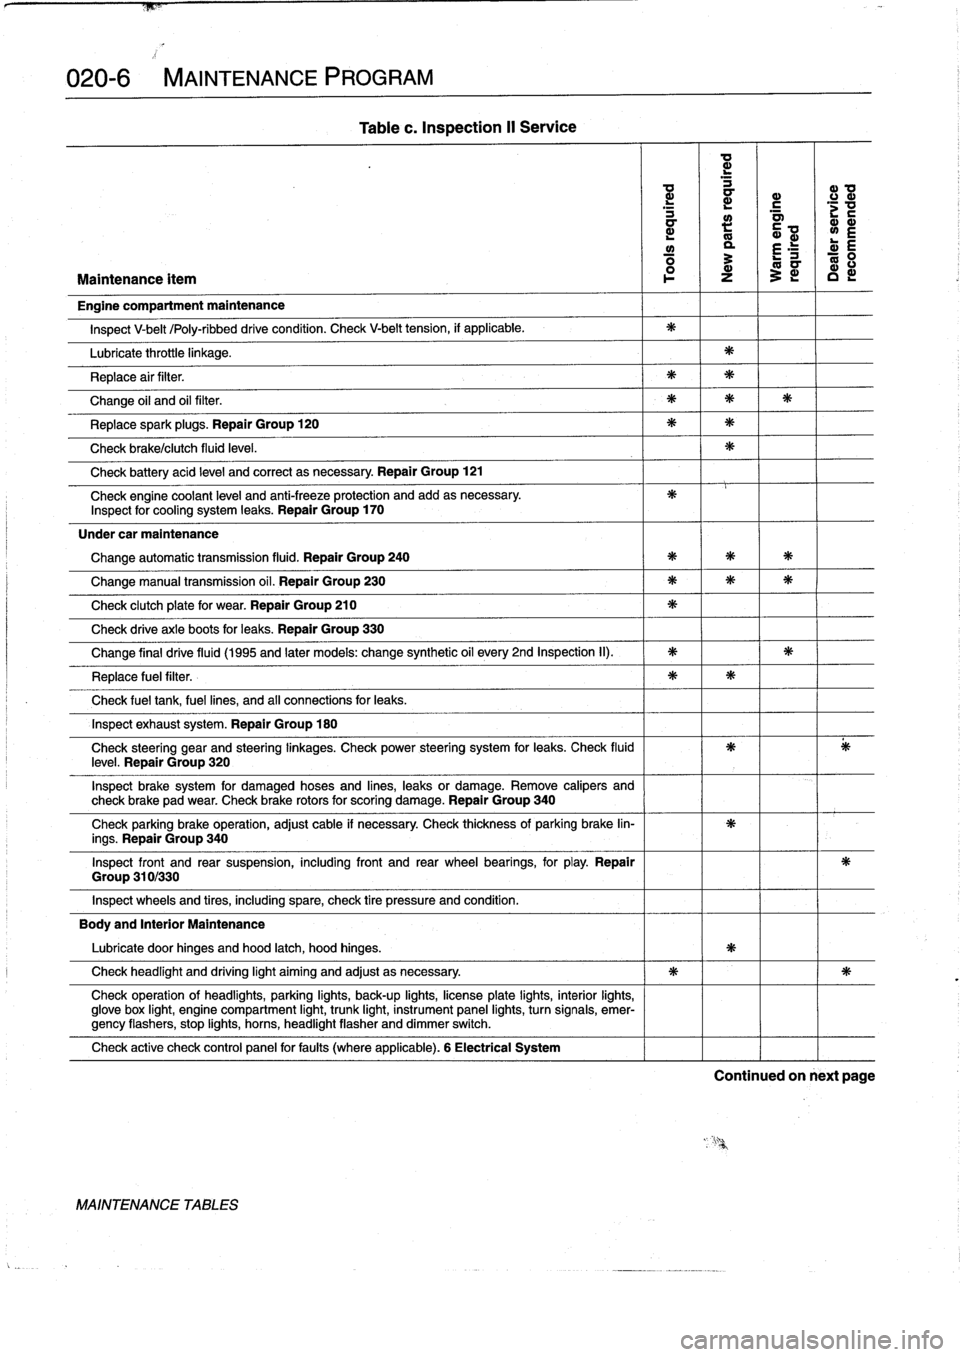
020-6
MAINTENANCE
PROGRAM
Group
310/330
Table
c
.
Inspection
II
Service
a
d
d
a
a>
0
d
a
r
.c
mm
L
m
y
L
E
ó
3
E
ó
Maintenance
ítem
l
o-
z
~
c
Engine
compartment
maintenance
Inspect
V-belt
/Poly-ribbeddrive
condition
.
Check
V-belt
tension,
if
applicable
.
Lubricate
throttle
linkage
.
Replace
air
filter
.
Change
oil
and
oil
filter
.
Replacespark
plugs
.
Repair
Group
120
Check
brake/clutch
fluid
leve¡
.
Check
battery
acid
leve¡
and
correct
asnecessary
.
Repair
Group
121
Check
engine
coolant
leve¡
and
anti-freeze
protection
and
add
asnecessary
.
Inspect
for
cooling
system
leaks
.
Repair
Group
170
Under
car
maintenance
Change
automatic
transmission
fluid
.
Repair
Group
240
Change
manual
transmission
oil
.
Repair
Group
230
Check
clutch
plate
for
wear
.
Repair
Group
210
Check
drive
axle
boots
for
leaks
.
Repair
Group
330
Change
final
drive
fluid
(1995
and
later
models
:
change
synthetic
oil
every
2nd
Inspection
II)
.
Replace
fuel
filter
.
Check
fuel
tank,
fuel
lines,
and
af
connections
for
leaks
.
Inspect
exhaust
system
.
Repair
Group
180
Check
steering
gear
and
steering
¡inkages
.
Check
power
steering
system
for
leaks
.
Check
fluidleve¡
.
Repair
Group
320
Inspect
brake
system
for
damaged
hoses
and
lines,
leaks
or
damage
.
Remove
calipers
and
check
brake
pad
wear
.
Check
brake
rotors
for
scoring
damage
.
Repair
Group
340
Check
parking
brake
operation,
adjust
cable
if
necessary
.
Check
thickness
of
parking
brake
lin-
ings
.
Repair
Group
340
Inspect
front
and
rear
suspension,
including
front
and
rear
wheel
bearings,
for
play
.
Repair
Inspect
wheels
and
tires,
including
spare,
check
tire
pressure
and
condition
.
Body
and
Interior
Maintenance
Lubricate
door
hinges
and
hood
latch,
hood
hinges
.
Check
headlight
and
driving
light
aiming
and
adjust
asnecessary
.
Check
operation
of
headlights,
parking
lights,
back-up
lights,
licenseplate
lights,
interior
lights,
glove
box
light,
engine
compartment
light,
trunk
light,
instrument
panel
lights,
turn
signals,
emer-gency
flashers,
stop
lights,
horns,
headlight
flasher
anddimmer
switch
.
Check
active
check
control
panel
forfauits
(where
applicable)
.
6
Electrical
System
MAINTENANCE
TABLES
Continued
on
next
page
Page 39 of 759
Tires,
checking
inflation
pressure
Brake
pad/rotor
wear,
checking
Correct
tire
pressuresare
important
to
handling
and
stability,
Al¡
E36
cars
are
fitted
withdisc
brakes
at
al¡
four
wheels
.
See
fuel
economy,
and
tire
wear
.
Tire
pressures
change
with
temper-
Fig
.
24
.
Although
thebrakesare
equipped
with
a
brake
pad
ature
.
Pressures
should
be
checked
often
during
seasonal
tem-
warning
system,
the
system
only
monitors
one
wheel
per
axle
.
perature
changes
.
Correct
inflation
pressures
canbe
found
on
It
is
recommended
that
pad
thickness
should
be
checked
the
driver's
door
pillar
and
in
the
owner's
manual
.
Note
that
tire
whenever
the
wheels
are
off
or
brakework
is
beggg
done
.
pressuresshould
be
higher
when
thecar
is
more
heavily
loaded
.
WARNING
-
Do
not
inflate
any
tire
to
a
higher
pressure
than
the
tiress
maximum
ínflation
pressure
listed
on
the
side-
wall
.
Use
cara
when
addlng
air
to
warm
tires
.
Warm
tire
pressures
can
increase
as
much
as4
psi
(0.3
bar)
over
their
cold
pressures
.
Tires,
rotating
BMW
does
not
recommend
tire
rotation
.
Due
to
the
cars
sus-
pension
design,
the
fronttires
begin
to
wear
first
at
the
outer
shoulder
and
the
rear
tires
begin
to
wear
first
at
themiddle
of
the
tread
or
inner
shoulder
.
Rotating
the
tires
may
adversely
af-
fect
roadhandling
and
tire
grip
.
NOTE-
The
main
purpose
of
tire
rotation
isto
promote
even
wear
and
maximum
tire
life
.
Tire
life
may
be
decreased
slightly
if
the
tires
are
not
rotated
.
Wheels,
aligning
Routine
maintenance
of
the
brake
system
includes
maintain-
ing
the
brake
fluid
in
the
reservoir,
checking
brakepads
for
wear,
checking
hand
brake
functíon,
and
inspecting
the
system
for
fluid
leaks
or
other
damage
.
Check
that
brake
hoses
are
correctly
routed
to
avoidchafing
or
kinkíng
.
Inspect
unions
and
brake
calipers
for
signs
of
fluid
leaks
.
Inspect
rigid
fines
for
corrosion,
dents,
or
other
damage
.
Inspect
flexible
hoses
for
cracking
.
Replace
faulty
hoses
or
lines
as
described
in
340Brakes
.
WARNING
-
Incorrect
installation
or
overtightening
hoses,
fines,
and
unions
may
cause
chafing
or
leakage
.
This
can
lead
to
partíal
or
completebrake
system
failure
.
MAINTENANCE
PROGRAM
020-
1
7
B323
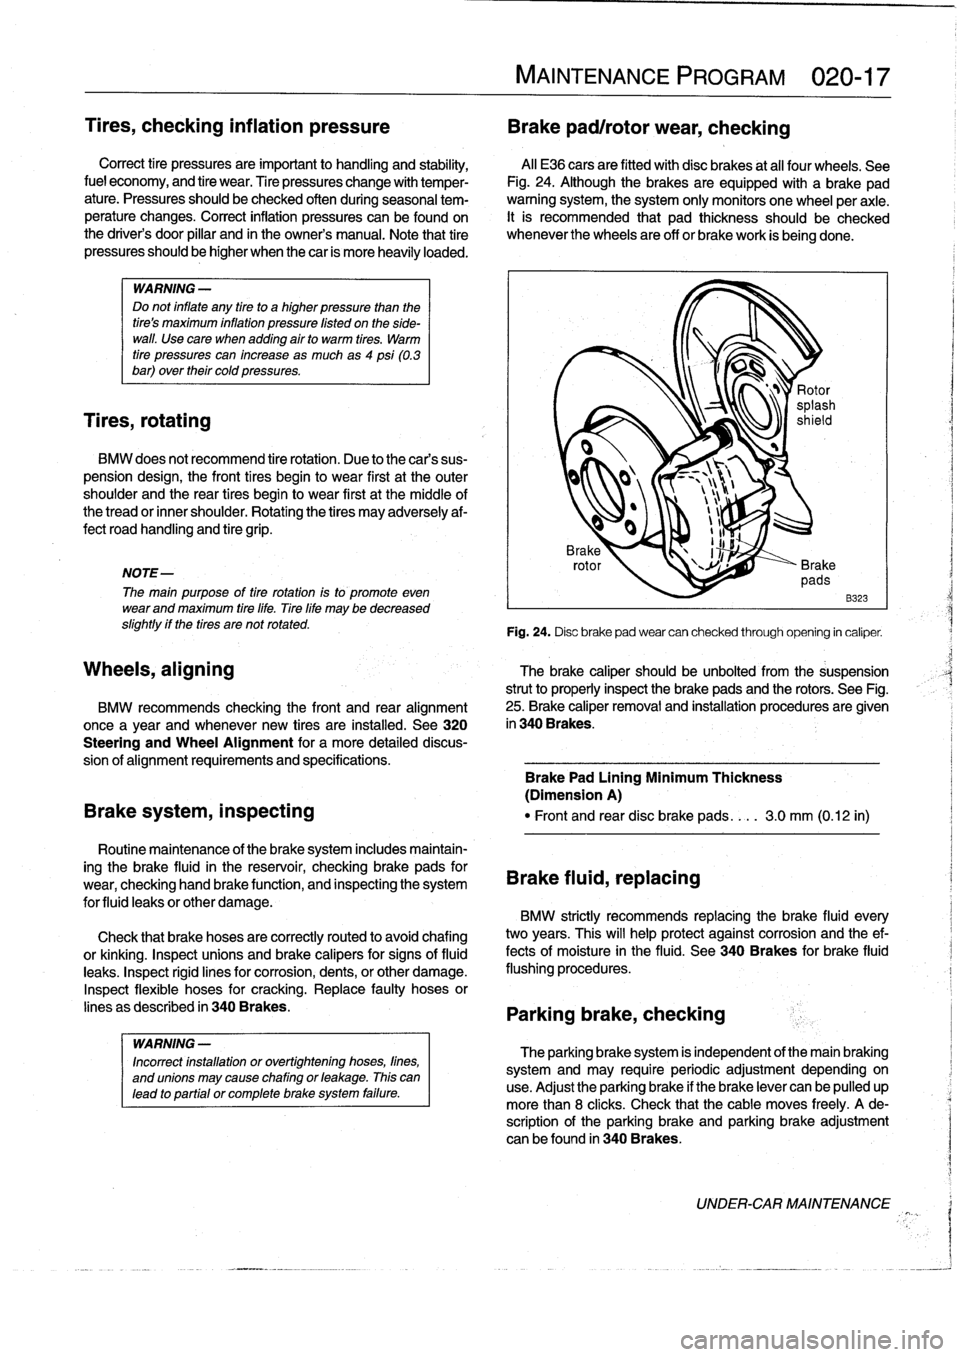
Fig
.
24
.
Disc
brake
pad
wear
can
checked
through
opening
in
caliper
.
The
brake
caliper
should
be
unbolted
from
the
suspension
strut
to
properly
inspect
the
brake
pads
and
the
rotors
.
See
Fig
.
25
.
Brake
caliper
removal
and
installation
procedures
are
given
in
340
Brakes
.
BMW
recommends
checking
the
front
and
rear
alignment
once
a
year
and
whenever
new
tires
are
installed
.
See320
Steering
and
Wheel
Alignment
for
a
more
detailed
discus-
sion
of
alignment
requirements
and
specifications
.
Brake
Pad
Lining
Minimum
Thickness
(Dimension
A)
Brake
system,
inspecting
"
Front
and
reardisc
brake
pads
....
3
.0
mm
(0
.12
in)
Brake
fluid,
replacing
BMW
strictly
recommends
replacing
the
brake
fluid
every
two
years
.
This
will
help
protect
against
corrosion
and
the
ef-
fects
of
moisture
in
the
(luid
.
See340
Brakes
for
brake
fluid
flushing
procedures
.
Parking
brake,
checking
The
parking
brakesystem
is
independent
of
the
main
braking
system
and
may
requireperiodic
adjustment
dependingon
use
.
Adjust
the
parking
brake
if
the
brake
lever
can
be
pulled
up
more
than
8
clicks
.
Check
that
the
cable
moves
freely
.
A
de-
scription
of
the
parking
brake
and
parking
brake
adjustment
can
be
found
in
340Brakes
.
UNDER-CARMAINTENANCE
Page 40 of 759
020-
1
8
MAINTENANCE
PROGRAM
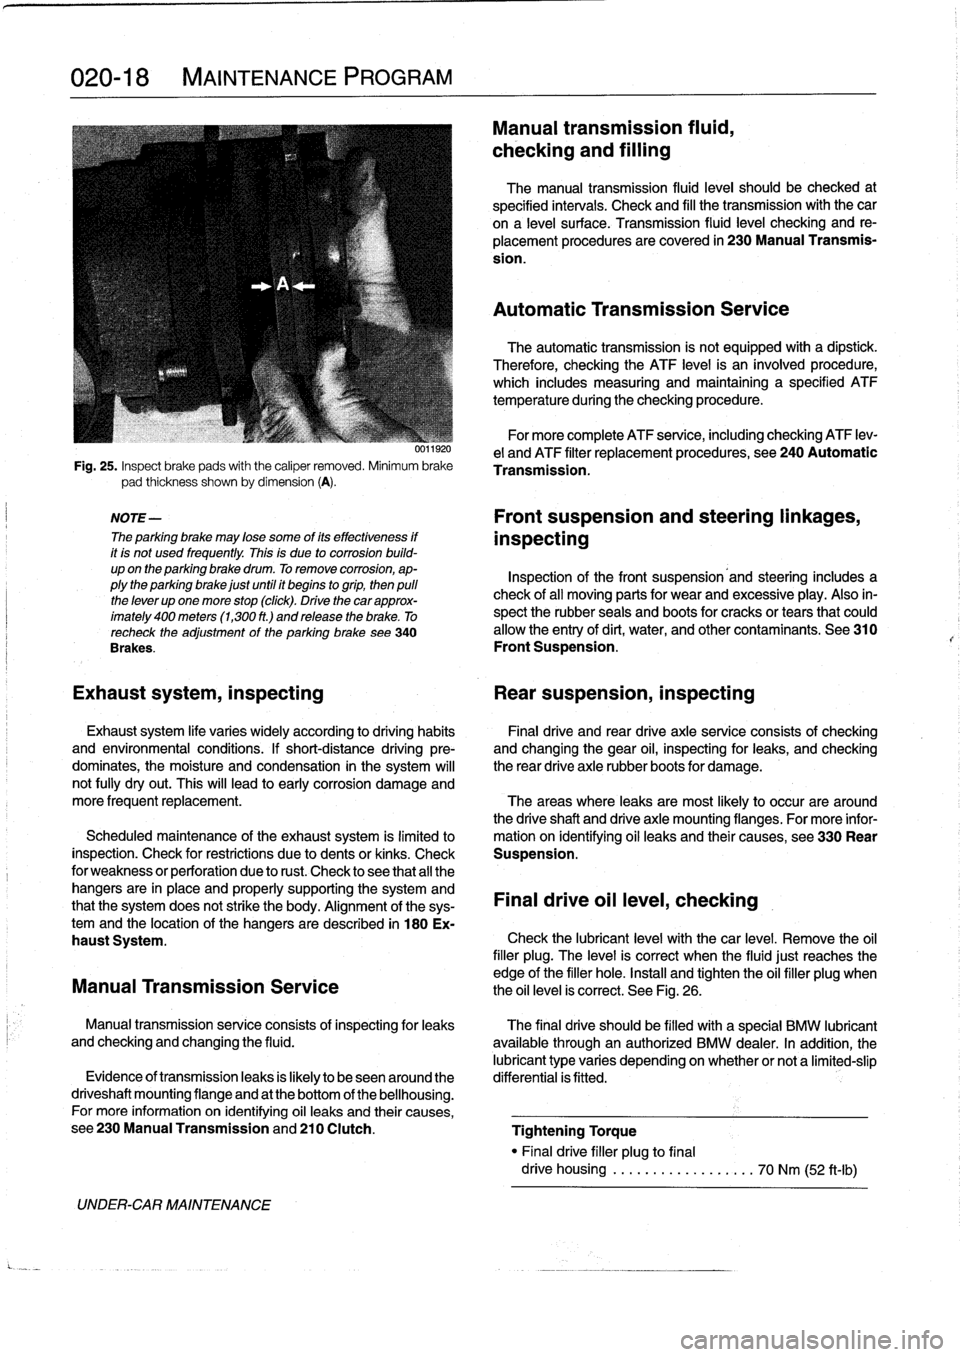
Fig
.
25
.
Inspect
brake
pads
with
the
caliper
removed
.
Minimum
brake
pad
thickness
shown
by
dimension
(A)
.
NOTE-
The
parking
brake
may
lose
some
of
its
effectiveness
if
it
is
not
used
frequently
.
This
is
due
to
corrosion
build-
up
on
the
parking
brake
drum
.
To
remove
corrosion,
ap-
plythe
parking
brake
just
until
it
begins
togrip,
then
pulí
the
lever
up
one
more
stop
(click)
.
Drive
thecar
approx-
imately
400
meters
(1,300
ft
.)
and
release
the
brake
.
To
recheck
the
adjustment
of
the
parking
brake
see340
Brakes
.
UNDER-CAR
MAINTENANCE
0011920
Manual
transmission
fluid,
checking
and
filling
The
manual
transmission
fluid
leve¡
should
be
checked
at
specified
intervals
.
Check
and
fill
the
transmission
with
the
car
ona
leve¡
surface
.
Transmission
(luid
leve¡
checking
and
re-
placement
procedures
are
covered
in
230
Manual
Transmis-
sion
.
Automatic
Transmission
Service
The
automatic
transmission
is
not
equipped
with
a
dipstíck
.
Therefore,
checking
the
ATF
level
is
an
ínvolved
procedure,
which
includes
measuring
and
maintaining
a
specified
ATF
temperature
during
the
checking
procedure
.
For
more
complete
ATF
service,
including
checking
ATF
lev-
e¡
and
ATF
filter
replacement
procedures,
see
240
Automatic
Transmission
.
Front
suspension
and
steering
linkages,
inspecting
Inspection
of
the
front
suspension'and
steering
includes
a
check
of
all
moving
parts
for
wear
and
excessive
play
.
Also
in-
spect
the
rubber
seals
and
boots
for
cracks
or
tears
that
could
allow
the
entry
of
dirt,
water,
and
other
contaminants
.
See
310
Front
Suspension
.
Exhaust
system,
inspecting
Rear
suspension,
inspecting
Exhaust
system
life
varies
widely
according
to
driving
habits
Final
drive
and
rear
drive
axle
service
consists
of
checking
and
environmental
conditions
.
If
short-distance
driving
pre-
and
changing
the
gear
oil,
inspecting
for
leaks,
and
checking
dominates,
the
moisture
and
condensation
in
the
system
will
the
rear
drive
axle
rubber
boots
for
damage
.
not
fully
dryout
.
This
will
lead
to
early
corrosion
damage
and
more
frequent
replacement
.
The
areas
where
leaks
are
most
likely
to
occur
are
around
the
driveshaft
and
drive
axle
mounting
flanges
.
For
more
infor
Scheduled
maintenance
of
the
exhaust
system
is
limitedlo
mation
on
ídentifying
oil
leaks
and
their
causes,
see330
Rear
inspection
.
Check
for
restrictions
due
to
dents
or
kinks
.
Check
Suspension
.
for
weakness
or
perforation
due
to
rust
.
Check
lo
see
that
all
the
hangers
are
in
place
and
properly
supporting
the
system
and
that
the
system
does
not
strike
the
body
.
Alignment
of
the
sys-
Final
drive
oil
leve¡,
checking
temand
the
location
of
the
hangers
aredescribed
in
180
Ex-
haust
System
.
Check
the
lubricant
leve¡
with
thecar
level
.
Remove
the
oil
filler
plug
.
The
leve¡
is
correct
when
the
fluidjust
reaches
the
edge
of
the
filler
hole
.
Install
and
tighten
the
oil
filler
plug
when
Manual
Transmission
Service
the
oil
level
is
correct
.
See
Fig
.
26
.
Manual
transmissionservice
consists
of
inspectingfor
leaks
The
final
drive
should
be
filled
with
a
special
BMW
lubricant
and
checking
and
changing
the
fluid
.
available
through
an
authorized
BMW
dealer
.
In
addition,
the
lubricant
type
varies
depending
onwhether
or
nota
limited-slip
Evidence
of
transmissionleaks
is
fkely
to
beseenaround
the
differential
is
fitted
.
driveshaft
mounting
flange
and
at
the
bottom
of
the
bellhousing
.
For
more
information
on
identifying
oil
leaks
and
their
causes,
see230ManualTransmissionand210
Clutch
.
Tightening
Torque
"
Finaldrive
filler
plug
to
final
drive
housing
..................
70
Nm
(52
ft-Ib)
Page 41 of 759
NOTE-
Use
a14
mm
or17
mm
alíen
bit
socket
to
remove
the
drain
plug
.
"
If
thecar
is
raised
in
the
air,
it
shouldbe
leve¡
.
Fuel
tank
and
fuel
fines,
inspecting
0012474
Inspect
the
fuel
tank,
fuel
lines,
and
fuel
system
for
damage
or
leaks
.
Check
for
fuel
leaks
in
the
engine
compartment
or
fuel
odors
in
the
passenger
compartment
.
Check
for
faultyfuel
lines
bybending
them
.
If
any
leaks
are
present,
fuel
should
be
expelled
.
Check
for
any
evaporative
emissions
hoses
that
may
have
become
disconnected,
checking
carefully
at
the
charcoal
canister
and
evaporative
emissionspurge
system
.
See130
Fuel
Injection
and
160
Fuel
Tank
and
Fuel
Pump
for
component
locations
and
additional
information
.
WARNING
-
When
checking
for
fuel
leaks,
the
engine
must
be
cold
.
A
hot
exhaust
manifold
or
exhaust
system
could
cause
the
fuel
to
ignite
or
explode
causing
se-
rious
personal
injury
.
Uentilate
the
workarea
and
clean
up
spilled
fuel
immediately
.
Clutch
fluid,
checking
The
hydraulic
clutch
and
the
brake
system
share
the
same
reservoir
and
the
same
brake
fluid
.
Clutch
fluid
leve¡
and
brake
fluid
level
are
checked
at
the
same
time
.
See340
Brakes
for
more
information
.
See210
Clutch
for
information
on
the
clutch
and
the
hydraulic
clutch
operating
system
.
MAINTENANCE
PROGRAM
020-19
Drive
axie
joint
boots,
inspecting
100
Engine-General
The
protective
boots
must
be
closely
inspected
for
cracks
andany
other
damage
that
will
allow
contaminants
to
get
ínto
the
joint
.
If
the
rubber
boots
faf
,
the
water
and
dirt
that
enter
the
joint
will
quickly
damage
¡t
.
Replacement
of
the
drive
axle
joint
boots
and
inspection
of
the
joints
are
described
in
330
Rear
Suspension
.
BODY
AND
INTERIOR
MAINTENANCE
Windshield
Wiper
Biade
Maintenance
Common
problems
with
the
windshield
wipers
include
streaking
or
sheeting,
water
drops
after
wiping,
and
blade
chat-
ter
.
Streaking
is
usually
caused
when
wiper
blades
are
coated
with
road
film
or
car
wash
wax
.
Clean
the
blades
using
soapy
water
.
If
cleaning
theblades
does
not
cure
the
problem
then
they
should
be
replaced
.
BMW
recommends
replacing
the
wip-
er
blades
twice
a
year,
before
and
after
the
cold
season
.
Onold-
er
cars,
check
the
tension
spring
that
holds
the
wiper
to
the
glass
.
Replace
the
wiper
arm
if
the
springs
are
weak
.
Drops
that
remainbehind
after
wipingare
caused
by
oil,
road
film,
or
diesel
exhaust
coating
the
windshield
.
Use
an
alcohol
or
ammonia
solution,
or
a
non-abrasive
cleanser
to
clean
the
windshield
.
Wiper
blade
chatter
may
be
caused
by
dirty
or
worn
blades,
bya
dirty
windshield,
or
by
bentor
twisted
wiper
arms
.
Clean
the
blades
and
windshield
as
described
above
.
Adjust
the
wiper
arm
so
that
there
is
even
pressure
along
the
blade,
and
so
that
the
blade
is
perpendicular
to
the
windshield
atrest
.
Lubricate
the
wiper
linkage
with
a
light
oil
.
The
linkage
is
located
under
the
hood
on
the
drivers
side
.
If
the
problem
persists,
theblades
are
excessively
aged
or
worn
and
should
be
replaced
.
See
611
Wipers
and
Washers
.
Body
and
hinges,
lubricating
The
door
locks
and
lock
cylinders
canbe
lubricated
with
an
oil
that
contains
graphite
.
The
body
and
door
hinges,
the
hood
latch,
and
the
door
check
rods
should
be
lubricated
with
SAE
30
or
SAE
40
engine
oil
.
Lubricate
the
seat
runners
with
multipurpose
grease
.
Do
not
apply
any
oil
to
rubber
parts
.
If
door
weatherstrips
are
sticking,
lubricate
them
with
silicone
spray
or
talcum
powder
.
The
hood
release
cable
should
be
lubricated
as
well
.
The
use
of
winter
lock
de-icer
spraysshould
be
kept
to
an
ab-
solute
minimum,
as
the
alcohol
in
the
de-icer
will
wash
the
grease
out
of
the
lock
assemblies,
and
may
cause
the
locks
to
corrode
internally,
or
become
difficult
to
operate
.
ENGINE-GENERAL
100-1
Page 213 of 759
GENERAL
..
.
......
.
.
.
.....
.
...
.
.
.
.
.
.
.
.
200-1
Manual
Transmission
.
.
.....
.
.
.
.'
.
.
.
.
.
.
.
.
200-1
Automatic
Transmission
.........
.
.
.
.
.
.
.
.
200-1
Transmission
ID
Codes
..........
.
.
.
.
.
.
.
.
200-2
GENERAL
E36
models
areequipped
with
a
longitudinal
drivetrain
.
The
transmission
is
bolted
directly
to
the
rear
of
the
engine
.
A
driveshaft
connects
the
output
shaft
of
thetransmission
to
the
final
drive
.
The
final
drive
is
mounted
lo
the
rear
suspension
and
the
body
.
Individual
drive
axles
with
integrated
constant
velocity
joints
transfer
rotational
power
to
the
rear
wheels
.
Manual
Transmission
Due
to
different
power
characteristics
and
performance
re-
quirements,
four
different
manual
transmissions
are
used
in
the
models
coveredby
this
manual
.
Manual
transmission
ap-
plications
are
given
in
Table
a
.
TRANSMISSION-GENERAL
200-1
200
Transmission-General
TABLES
a
.
Manual
Transmission
Applications
..
...........
200-1
b
.
Automatic
Transmission
Applications
...........
200-1
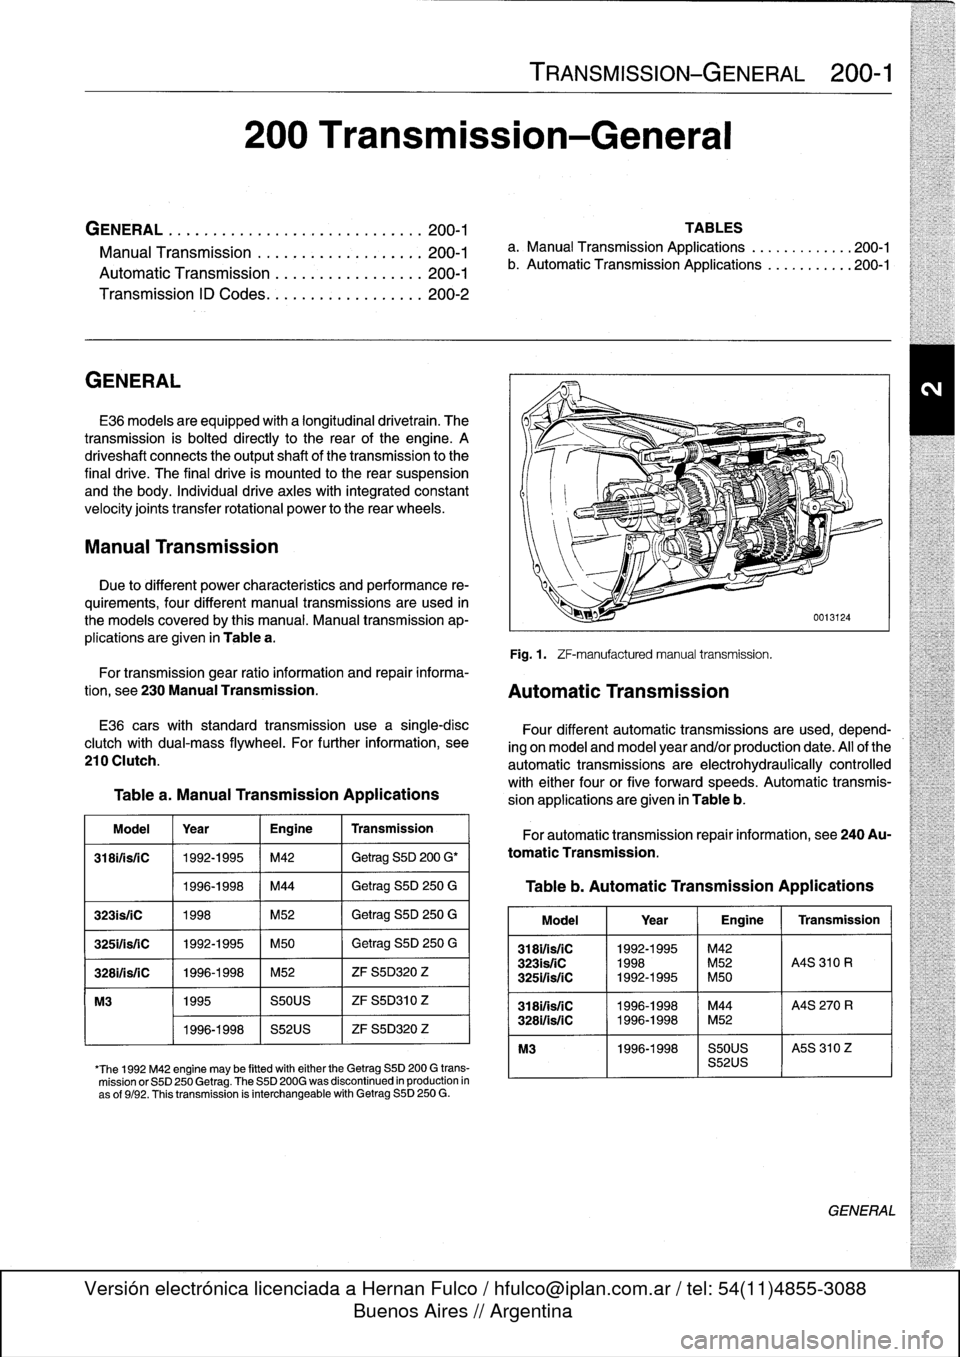
Fig
.
1
.
ZF-manufacturedmanual
transmission
.
For
transmission
gear
ratio
information
and
repair
informa-
tion,
see
230
Manual
Transmission
.
Automatic
Transmission
E36
carswith
standard
transmission
use
a
single-disc
clutch
with
dual-mass
flywheel
.
For
further
information,
see
210
Clutch
.
Table
a
.
Manual
Transmission
Applications
Model
Year
Engine
Transmission
318ifisfC
1992-1995
M42
Getrag
S5D
200
G'
1996-1998
M44
Getrag
S5D
250
G
323is/iC
1998
M52
Getrag
S5D
250
G
325ifsriC
1992-1995
M50
Getrag
S5D
250
G
3281/isfC
1996-1998
M52
ZF
S5D320
Z
M3
1995
S50US
ZF
S5D310
Z
1996-1998
S52US
ZF
S5D320
Z
'The
1992
M42
engine
may
be
fitted
witheither
the
Getrag
SSD
200
G
trans-
mission
or
S5D
250
Getrag
.
The
S5D
200G
was
discontinued
in
production
in
as
of
9/92
.
Thistransmission
is
interchangeable
with
Getrag
S5D
250
G
.
Four
different
automatic
transmissions
are
used,
depend-
ing
on
model
and
model
year
and/or
production
date
.
All
of
the
automatic
transmissions
are
electrohydraulically
controlled
with
either
four
or
five
forward
speeds
.
Automatic
transmis-
sion
applications
are
given
in
Table
b
.
For
automatic
transmission
repair
information,
see
240Au-
tomatic
Transmission
.
Table
b
.
Automatic
Transmission
Applications
Model
1
Year
1
Engine
1
Transmission
318i1is/1C
1992-1995
~
M42
323isfiC
1998
M52
A4S
310
R
3251/is/1C
1992-1995
M50
3181/isfC
11996-1998
M44
A4S
270
R
328i/is/1C
1996-1998
M52
M3
1996-1998
S50US
I
A5S
310
Z
S52US
GENERAL
Page 241 of 759
DRIVESHAFT
SERVICE
.
...
.
.
.
...
.
..
.
.
.260-3
Driveshaft,
aligning
...............
.
...
.
.
260-3
Driveshaft,
removing
..............
.
.
.
.
.
.
260-4
260
Driveshaft
DRIVESHAFT
260-1
GENERAL
.
.
.
.
.
.
.
.....
.
.
.
........
.
...
.
260-1
Driveshaft,
installing
.
....
.
..
.
............
260-4
Flex-disc,
replacing
.....
.
.
.
.............
260-5
TROUBLESHOOTING
..
.
.
.
...
.
.........
260-1
Center
bearing
assembly,
replacing
.
......
.260-6
Frontcentering
guide,
replacing
..
.
.......
.
260-7
TABLE
a
.
Driveshaft
Troubleshooting
.
.
...
......
.
....
..
.
.
260-2
GENERAL
NOTE-
For
rear
drive
axlerepair
information,
see330
Rear
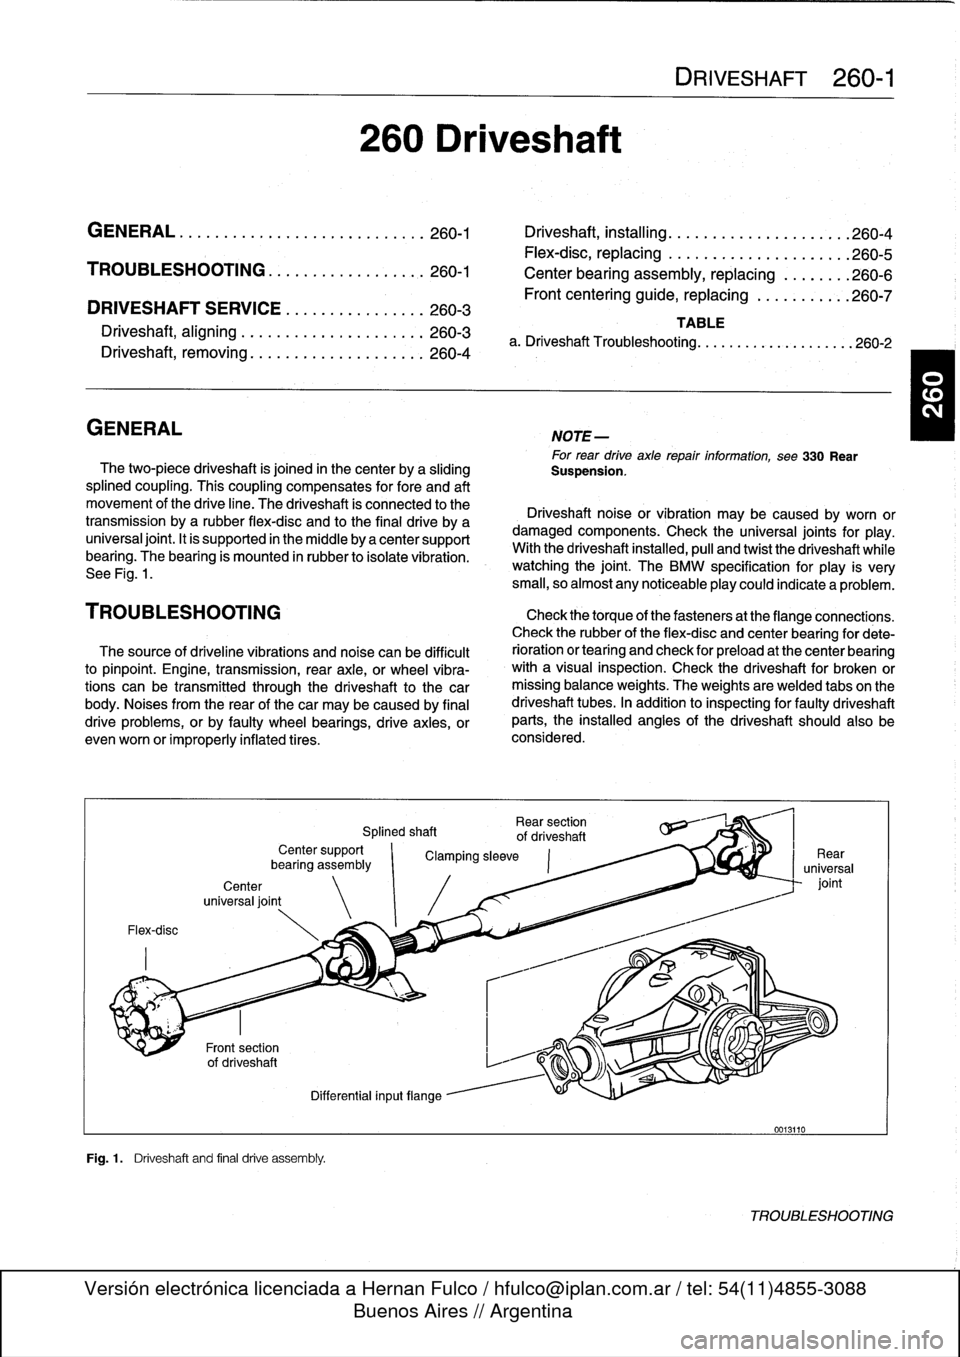
The
two-piece
driveshaft
is
joined
in
thecenter
by
a
sliding
Suspension
.
splined
coupling
.
This
coupling
compensates
for
fore
and
aft
movement
of
the
drive
line
.
The
driveshaft
ís
connected
to
the
Driveshaft
noise
or
vibration
may
be
caused
by
worn
or
transmission
bya
rubber
flex-disc
and
to
the
final
drive
by
a
damaged
components
.
Check
the
universal
joints
for
play
.
universal
joint
.
It
is
supported
in
the
micidle
by
a
center
support
With
the
driveshaft
installed,
pull
and
twist
the
driveshaft
while
bearing
.
The
bearing
is
mounted
in
rubber
to
isolate
vibration
.
watching
the
joint
.
The
BMW
specificationfor
play
is
very
See
Fig
.
1
.
small,
so
almost
any
noticeableplay
could
indicate
a
problem
.
TROU
BLESHOOTING
Check
thetorque
of
thefasteners
at
the
flange
connections
.
Check
therubber
of
the
flex-disc
and
center
bearing
for
dete
The
source
of
driveline
vibrations
and
noise
can
be
difficult
rioration
or
tearíng
and
check
for
preload
at
the
center
bearing
to
pinpoint
.
Engine,
transmission,
rear
axle,
or
wheel
vibra-
with
a
visual
inspection
.
Check
the
driveshaft
for
broken
or
tions
can
be
transmitted
through
the
driveshaft
to
the
car
missing
balance
weights
.
The
weights
are
welded
tabs
on
the
body
.
Noises
from
the
rear
of
thecar
may
be
caused
by
final
driveshaft
tubes
.
In
addition
to
inspecting
for
faulty
driveshaft
drive
problems,
orby
faulty
wheel
bearings,
drive
axies,
or
parts,
the
installed
angles
of
the
driveshaft
should
also
be
evenworn
or
improperly
inflatedtires
.
considered
.
Flex-disc
Center
universal
joint
Fig
.1
.
Driveshaft
and
final
drive
assembly
.
Rear
section
Splined
shaft
of
driveshaft
Center
support
`
Clamping
sleeve
bearíng
assembly
Differential
inputflange
0013110
TROUBLESHOOTING
Page 249 of 759
SUSPENSION,
STEERING
ANDBRAKES-GENERAL
300-1
300
Suspension,
Steering
and
Brakes-General
GENERAL
.....
.
....
.
.....
.
.
.
........
.300-1
M3
SUSPENSION
AND
BRAKES
.......
.
...
300-7
Front
Suspension
..........
.
.
.
...
.
.....
300-1
Steering
...
.
.
.
.
.
....
.
.
.
...
.
.
.
...
.
...
.
.
300-2
SUSPENSION
AND
STEERING
Rear
Suspension
....
.
.
.
...
.
.
.
...
.
.....
300-2
TROUBLESHOOTING
..
.
.
.
.............
300-7
Brakes
.
.
.
.
.
.
.
.
....
.
...........
.
.
.
.
.
.
300-2
Tires
and
wheeis
.
................
.
.
.
.
.
.
300-2
TABLE
a
.
AST
Indicator
Lamp
Function
..
..
.
..
.
.........
300-5
INTEGRATED
SYSTEMS
.........
.
.
.
.
.
.
300-2
b
.
Suspension
and
Steering
Troubleshooting
......
.300-8
Antilock
Brake
System
(ABS)
.......
.
.
.
.
.
.
300-2
Al¡
Season
Traction
(AST)
.........
.
.
.
.
.
.
300-4
GENERAL
Front
Suspension
This
section
covers
general
information
for
front
and
rear
The
lower
control
arms
connect
the
front
suspension
struts
suspension,
the
steering
system,
and
the
brakíng
and
traction
to
mounting
points
on
the
subframe
crossmember
and
the
control
systems
.
body
.
See
Fig
.
2
.
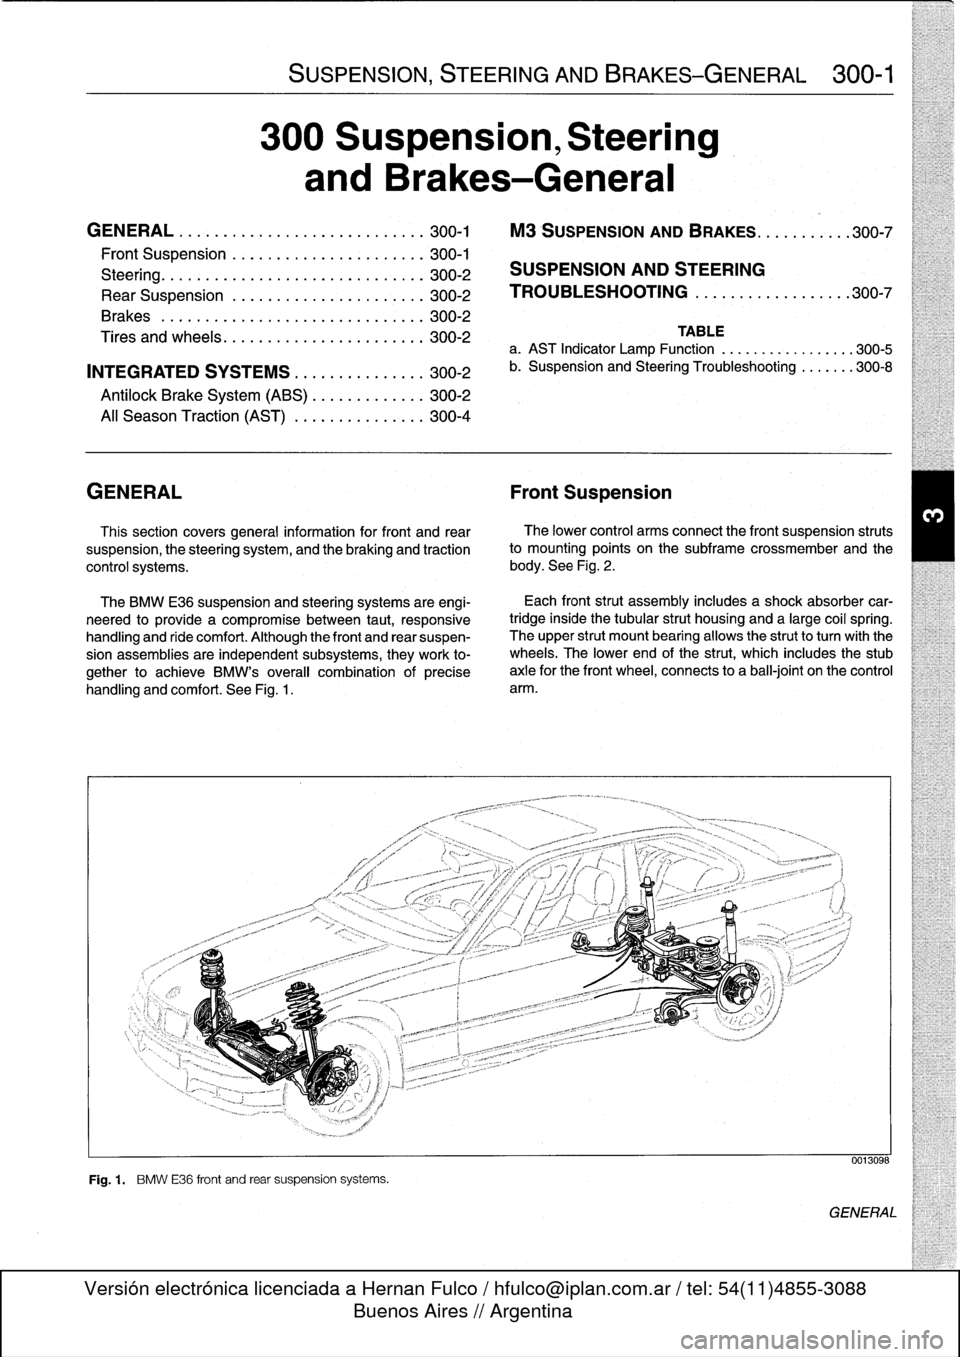
The
BMW
E36
suspension
and
steering
systems
are
engi-
neered
to
provide
a
compromise
between
taut,
responsive
handling
and
ride
comfort
.
Although
the
front
and
rear
suspen-
sion
assemblies
are
independent
subsystems,
they
work
to-
gether
to
achieve
BMW's
overall
combination
of
precise
handling
and
comfort
.
See
Fig
.
1
.
Fig
.
1
.
BMW
E36
front
and
rear
suspension
systems
.
Each
front
strut
assembly
includes
a
shock
absorber
car-
tridgeinside
the
tubular
strut
housing
and
a
large
coil
spring
.
The
upper
strut
mount
bearing
allows
the
strutto
turnwith
the
wheels
.
The
lower
end
of
the
strut,
which
includes
the
stub
axle
for
the
front
wheel,
connects
to
a
ball-joint
on
the
control
arm
.
0013098
GENERAL
Page 250 of 759
300-2
SUSPENSION,
STEERING
AND
BRAKES-GENERAL
Steering
INTEGRATED
SYSTEMS
The
steering
linkage
connects
the
rack-and-pinion
unit
through
tie
rodsto
the
steering
arms
.
The
tie
rod
ends
allow
the
wheels
to
pivot
and
react
to
suspension
travel
.
Rear
Suspension
The
rear
axle
carrier
is
the
main
mounting
point
for
the
final
drive
housing
and
the
rear
suspension
components
.
Trailing
arms
locatethe
rear
wheels
and
anchorthe
springs,
shocks
and
stabilizer
bar
.
Driveaxies
with
constant-velocity
(CV)
joints
at
both
ends
transfer
power
from
the
differential
to
the
road
wheels
.
The
differential
is
mounted
to
the
rearaxle
carrier
through
rubber
mountsand
bushings
to
hele
isolate
drivetrain
noise
and
vibration
.
Brakes
E36
cars
areequipped
with
power
disc
brakes
with
an
inte-
gral
antilock
brakes
(ABS)
.
The
parking
brake
is
a
dual-drum
system
integrated
with
the
rear
brake
rotors
.
See
Fig
.
3
.
Power
assist
is
provided
by
a
vacuum
booster
when
the
en-
gine
is
running
.
The
brakepedal
pushrod
is
connected
directly
to
the
master
cylinder,
so
failure
of
the
vacuum
booster
does
not
normally
result
in
total
brake
failure
.
0012124
Each
disc
brakeuses
a
caliper
with
a
single
hydraulic
cylin-
Fig
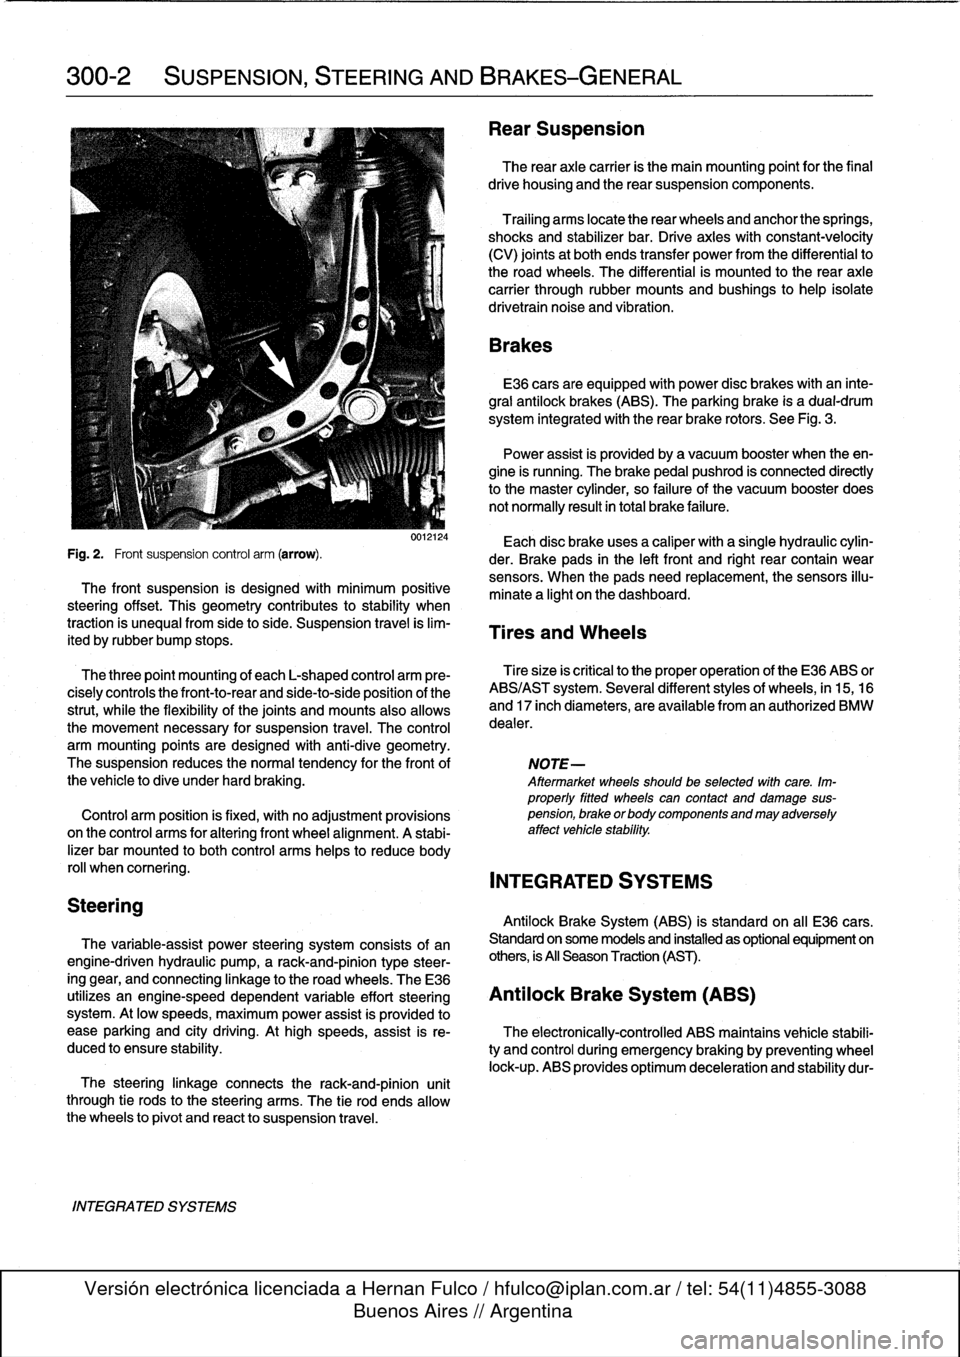
.
2
.
Front
suspension
control
arm
(arrow)
.
der
.
Brake
pads
in
the
left
front
and
right
rear
contain
wear
sensors
.
When
the
padsneed
replacement,the
sensors
illu-
The
front
suspension
is
designed
with
minimum
positive
minate
a
light
on
the
dashboard
.
steering
offset
.
This
geometry
contributes
to
stability
when
traction
is
unequalfrom
side
to
side
.
Suspension
travel
is
lim-
Tires
and
Wheels
ited
by
rubber
bump
stops
.
The
three
point
mounting
of
each
L-shaped
control
arm
ere-
Tiresize
is
critica¡
to
the
proper
operatíon
of
the
E36
ABS
or
cisely
controls
the
front-to-rear
and
side-to-side
position
of
the
ABS/AST
system
.
Severa¡
different
styles
of
wheels,
in
15,16
strut,
while
the
flexibility
of
the
joints
and
mounts
alsoallows
and
17
inch
diameters,
are
available
from
an
authorized
BMW
the
movement
necessary
for
suspension
travel
.
The
control
dealer
.
arm
mounting
points
are
designed
with
anti-dive
geometry
.
The
suspension
reduces
the
normaltendency
for
the
front
of
NOTE-
the
vehicle
to
dive
under
hard
braking
.
Aftermarket
wheelsshould
be
selected
wlth
care
.
Im-
properly
fitted
wheels
can
contact
anddamage
sus
Control
arm
position
is
fixed,
with
no
adjustment
provisions
pension,
brakeorbodycomponentsandmayadversely
on
the
control
arms
for
alter¡ng
front
wheel
al
ignment
.
A
stabi-
affect
vehicle
stability
.
lizer
bar
mounted
to
both
control
arms
heles
to
reduce
body
rol¡
whencomering
.
INTEGRATED
SYSTEMS
Antilock
Brake
System
(ABS)
is
standard
on
all
E36
cars
.
The
variable-assist
power
steering
system
consists
of
an
Standard
on
some
models
and
installed
as
optional
equipment
on
engine-driven
hydraulic
pump,
a
rack-and-pinion
type
steer-
others,
is
All
Season
Traction
(AST)
.
ing
gear,
and
connecting
linkage
to
the
road
wheels
.
TheE36
utilizes
an
engine-speed
dependent
variable
effort
steering
Antilock
Brake
System
(ABS)
system
.
At
low
speeds,
maximum
power
assist
is
provided
to
ease
parking
and
city
driving
.
Athigh
speeds,
assist
is
re-
The
electronically-controlled
ABS
maintains
vehícle
stabili
duced
to
ensure
stability
.
ty
and
control
during
emergency
braking
by
preventing
wheel
lock-up
.
ABS
provides
optimum
deceleration
and
stability
dur-
Page 255 of 759
increased
power
output
and
road-handling
demands
.
The
steering
geometry
is
modified
by
changing
the
cast-
er/camber
angles
slightly
.
This
is
accomplishedby
reposition-
ing
the
upper
strut
mounting
holes
in
the
frontstrut
towers
and
through
different
front
and
rear
control
arms
.
M3
Brake
System
Improvements
"
Vented
directionalfront
rotors
:
315
mm
dia
.
x
28
mm
thick
.
"
Vented
directional
rear
rotors
:
312
mm
dia
.
x20
mm
thick
.
"
Larger
brake
pads
and
calipers
.
"
Modified
Teves
ABS
system
.
SUSPENSION,
STEERING
AND
BRAKES-GENERAL
300-
7
M3
SUSPENSION
AND
BRAKES
NOTE-
M3
brake
rotors
are
directional,
having
a
different
part
TheE36
M3
was
introduced
in
late
1994
as
a
1995
model
.
number
for
each
side
.
Rotors
with
an
odd
part
number
The
design
of
the
M3
suspension,
steering
and
brakes
is
a
go
on
the
left
while
rotors
with
en
even
part
numbergo
modification
of
existing
E36
systems
which
accommodates
on
the
right
.
M3
Front
SuspensionImprovements
"
Reinforced
spring
plates,control
arms,
control
arm
bush-
ings,
steering
arms
.
"
Recalibrated
struts,
firmer
springs
.
"
Stiffer
stabilizerbar,
larger
stabilizer
bar
bushings
.
"
Front
stabilizer
linked
to
struts
.
M3
Wheels/Tires
"
Front
wheels
1992-1998
:.....
7
.5J
x
17
in
.
light
alloy
"
Rear
wheel
1992-1997
.......
7
.5J
x17
in
.
light
alloy
"
Rear
wheel
(option)
........
.8
.5
Jx17
in
.
light
alloy
"
Front
and
rear
tire
1992-1997
.............
.
.
.
...
...
235/40
x
17
in
.
"
Front
tire
1998
only
......
...
.
.
.
...
225/45
x
17
in
.
"
Rear
tire
1998
only
.......
.
.
.
...
...
245/40
x
17
in
.
CAUTION-
In
en
emergency,
an
M3
front
wheel/tire
assembly
may
be
mounted
on
the
rearaxle
.
However
a
rear
wheel/tire
assemblymust
not
be
mounted
on
the
front
axle
.
M3
RearSuspensionImprovements
"
Reinforced
trailing
arms
.
"
Recalibrated
shock
absorbers,
firmer
springs
.
SUSPENSION
AND
STEERING
TROUBLESHOOTING
Stable
handling
and
ride
comfort
both
depend
on
the
integ-
rity
of
the
suspension
and
steering
components
.
Any
symp-
tom
of
instability
or
imprecise
road
feel
may
be
caused
by
worn
or
damaged
suspension
components
.
When
troubleshooting
suspension
and
steering
problems,
also
consider
the
condition
of
tires,
wheels,
and
their
align-
ment
.
Tire
wear
and
incorrect
inflation
pressures
can
dramati-
cally
affect
handling
.
Subtie
irregularities
in
wheel
alignment
angles
also
affect
stabílity
.
Mixing
different
types
or
sizes
of
tires,
particularly
on
the
same
axle,
can
affect
alignment
and
may
unbalancea
car's
handling
.
Table
b
lists
the
symptoms
of
common
suspension
and
steering
problems
and
their
probable
causes,
and
suggests
corrective
actions
.
Bold
type
indicates
the
repair
groups
where
applicable
test
and
repair
procedures
can
befound
.
SUSPENSION
AND
STEERING
TROUBLESHOOTING