height BMW 328I 2007 Owners Manual
[x] Cancel search | Manufacturer: BMW, Model Year: 2007, Model line: 328I, Model: BMW 328I 2007Pages: 268, PDF Size: 8.8 MB
Page 47 of 268
Controls
45Reference
At a glance
Driving tips
Communications
Navigation
Entertainment
Mobility
Seats
Note before adjusting
Never attempt to adjust your seat while
the vehicle is moving. The seat could
respond with unexpected movement, and the
ensuing loss of vehicle control could lead to an
accident.
On the front passenger seat as well, do not
incline the backrest too far to the rear while the
vehicle is being driven, otherwise there is a dan-
ger in the event of an accident of sliding under
the safety belt, eliminating the protection nor-
mally provided by the belt.<
Comply with the instructions on head restraint
height on page46, and on damaged safety
belts on page50.
Manual adjustment
Observe the adjustment instructions on
page45 to ensure the best possible per-
sonal protection.<
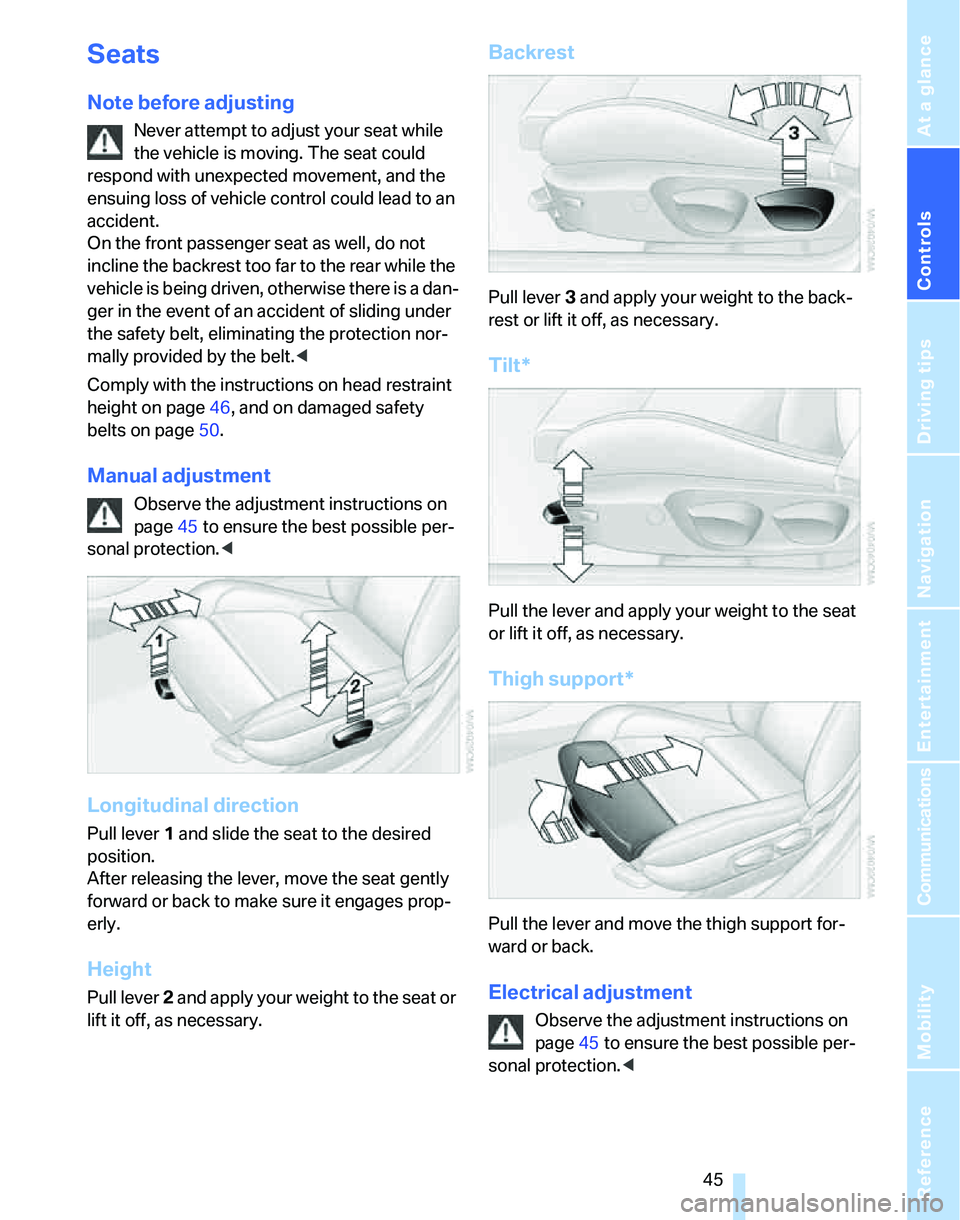
Longitudinal direction
Pull lever 1 and slide the seat to the desired
position.
After releasing the lever, move the seat gently
forward or back to make sure it engages prop-
erly.
Height
Pull lever 2 and apply your weight to the seat or
lift it off, as necessary.
Backrest
Pull lever 3 and apply your weight to the back-
rest or lift it off, as necessary.
Tilt*
Pull the lever and apply your weight to the seat
or lift it off, as necessary.
Thigh support*
Pull the lever and move the thigh support for-
ward or back.
Electrical adjustment
Observe the adjustment instructions on
page45 to ensure the best possible per-
sonal protection.<
Page 48 of 268
Adjustments
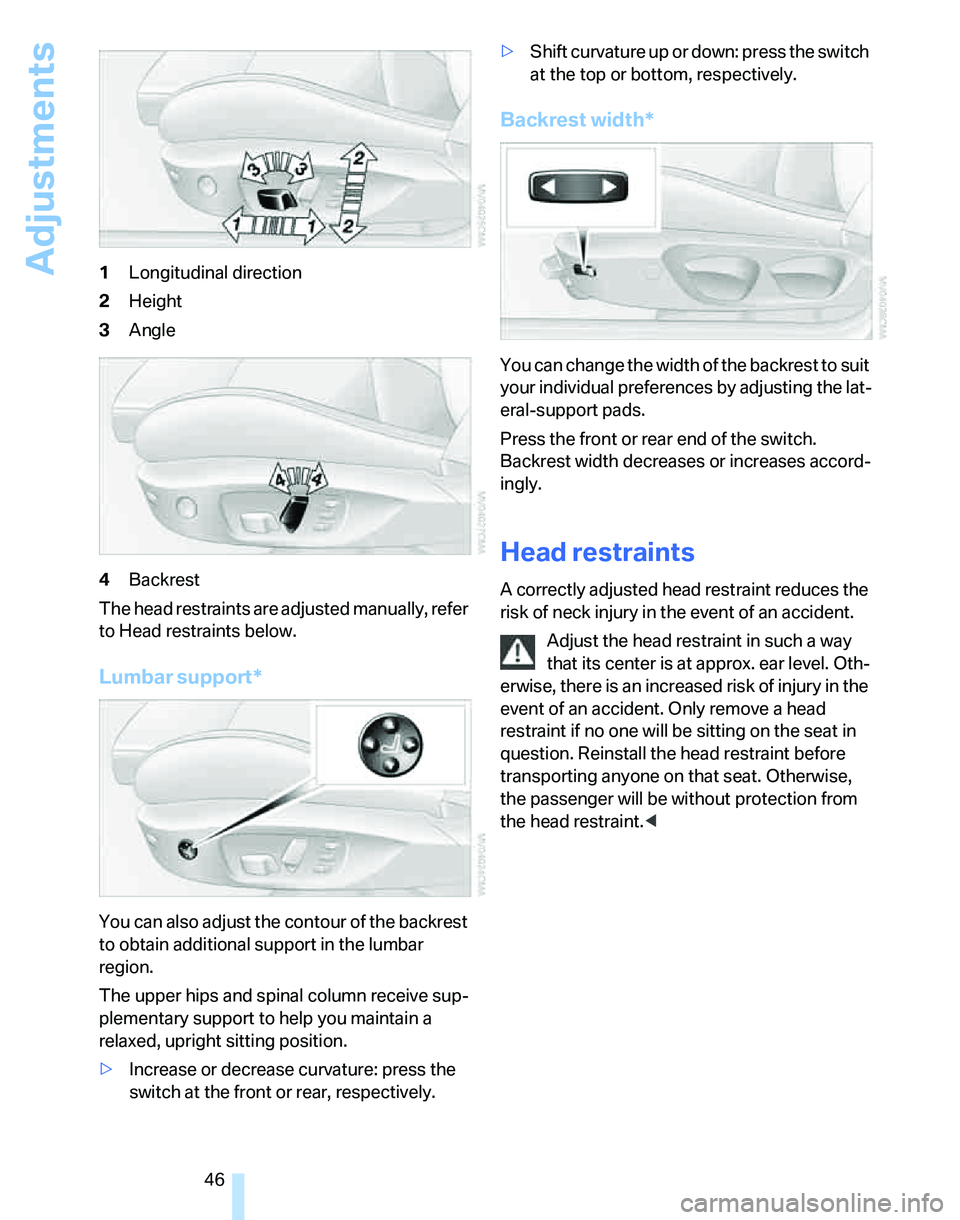
46 1Longitudinal direction
2Height
3Angle
4Backrest
The head restraints are adjusted manually, refer
to Head restraints below.
Lumbar support*
You can also adjust the contour of the backrest
to obtain additional support in the lumbar
region.
The upper hips and spinal column receive sup-
plementary support to help you maintain a
relaxed, upright sitting position.
>Increase or decrease curvature: press the
switch at the front or rear, respectively.>Shift curvature up or down: press the switch
at the top or bottom, respectively.
Backrest width*
You can change the width of the backrest to suit
your individual preferences by adjusting the lat-
eral-support pads.
Press the front or rear end of the switch.
Backrest width decreases or increases accord-
ingly.
Head restraints
A correctly adjusted head restraint reduces the
risk of neck injury in the event of an accident.
Adjust the head restraint in such a way
that its center is at approx. ear level. Oth-
erwise, there is an increased risk of injury in the
event of an accident. Only remove a head
restraint if no one will be sitting on the seat in
question. Reinstall the head restraint before
transporting anyone on that seat. Otherwise,
the passenger will be without protection from
the head restraint.<
Page 49 of 268
Controls
47Reference
At a glance
Driving tips
Communications
Navigation
Entertainment
Mobility
Front seats
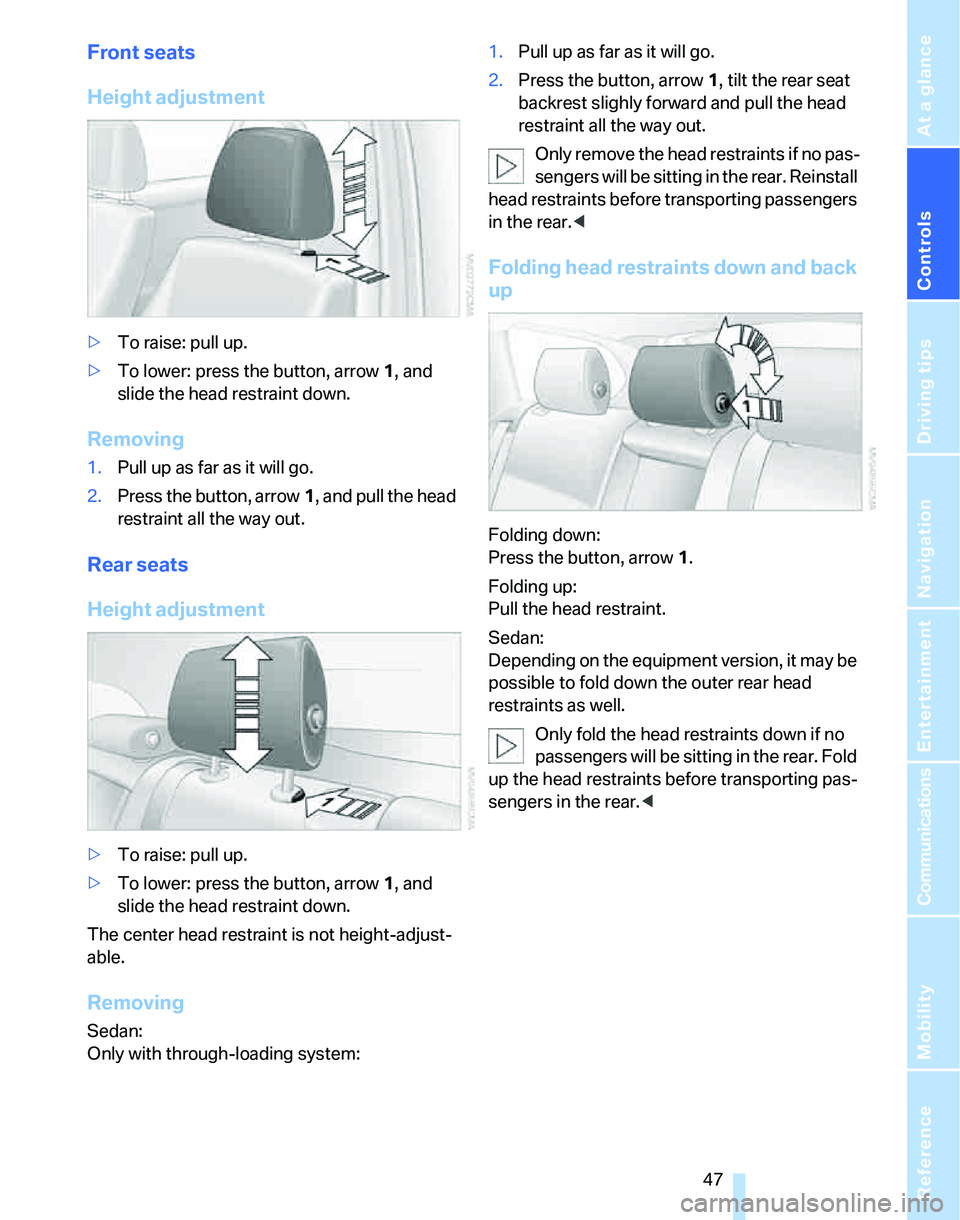
Height adjustment
>To raise: pull up.
>To lower: press the button, arrow1, and
slide the head restraint down.
Removing
1.Pull up as far as it will go.
2.Press the button, arrow1, and pull the head
restraint all the way out.
Rear seats
Height adjustment
>To raise: pull up.
>To lower: press the button, arrow1, and
slide the head restraint down.
The center head restraint is not height-adjust-
able.
Removing
Sedan:
Only with through-loading system:1.Pull up as far as it will go.
2.Press the button, arrow 1, tilt the rear seat
backrest slighly forward and pull the head
restraint all the way out.
Only remove the head restraints if no pas-
sengers will be sitting in the rear. Reinstall
head restraints before transporting passengers
in the rear.<
Folding head restraints down and back
up
Folding down:
Press the button, arrow1.
Folding up:
Pull the head restraint.
Sedan:
Depending on the equipment version, it may be
possible to fold down the outer rear head
restraints as well.
Only fold the head restraints down if no
passengers will be sitting in the rear. Fold
up the head restraints before transporting pas-
sengers in the rear.<
Page 53 of 268
Controls
51Reference
At a glance
Driving tips
Communications
Navigation
Entertainment
Mobility
Deactivating
Push the switch to the position for the passen-
ger-side mirror, arrow 2.
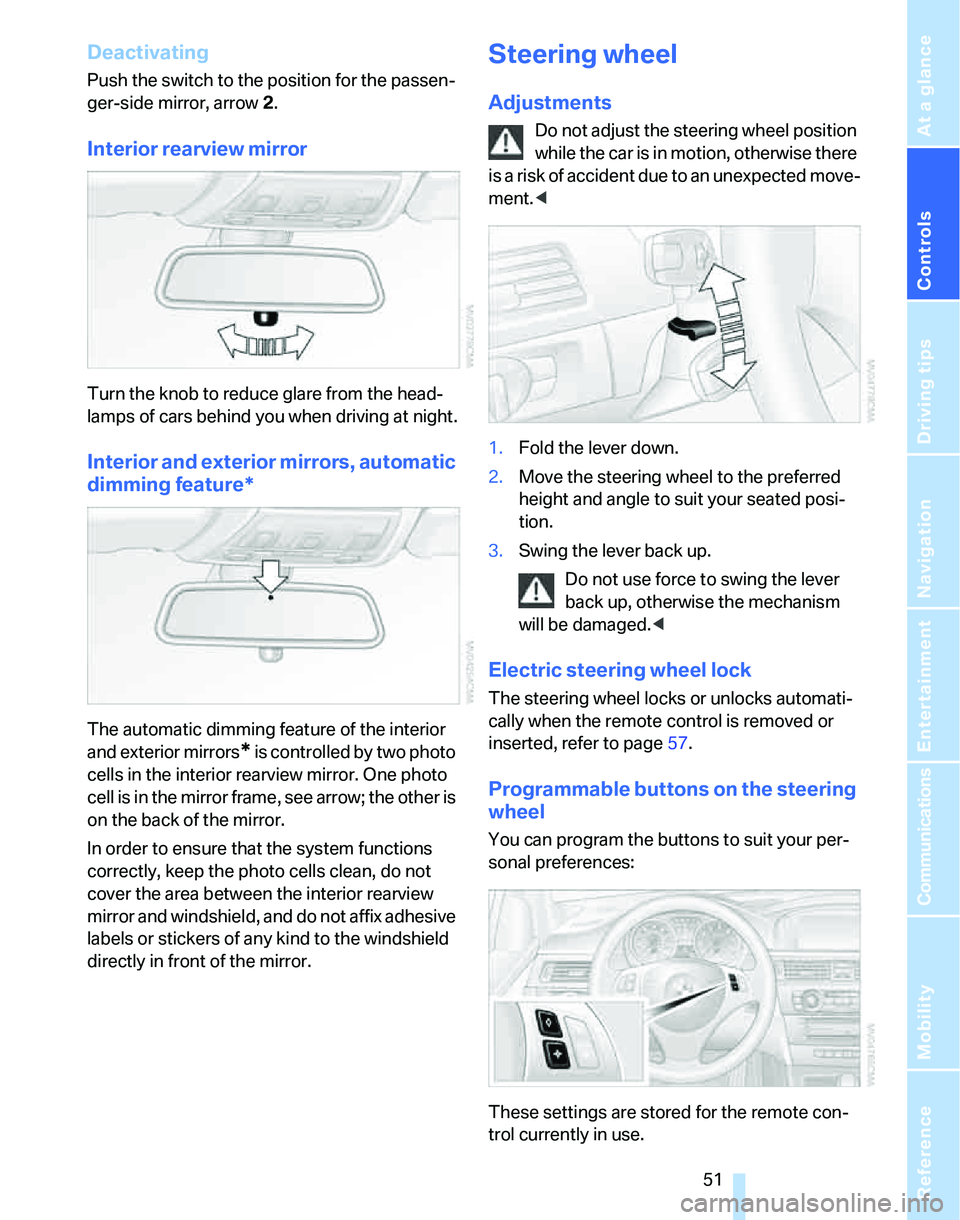
Interior rearview mirror
Turn the knob to reduce glare from the head-
lamps of cars behind you when driving at night.
Interior and exterior mirrors, automatic
dimming feature*
The automatic dimming feature of the interior
and exterior mirrors
* is controlled by two photo
cells in the interior rearview mirror. One photo
cell is in the mirror frame, see arrow; the other is
on the back of the mirror.
In order to ensure that the system functions
correctly, keep the photo cells clean, do not
cover the area between the interior rearview
mirror and windshield, and do not affix adhesive
labels or stickers of any kind to the windshield
directly in front of the mirror.
Steering wheel
Adjustments
Do not adjust the steering wheel position
while the car is in motion, otherwise there
i s a ri s k o f a c c id e n t du e t o a n un e x p e ct e d m o v e -
ment.<
1.Fold the lever down.
2.Move the steering wheel to the preferred
height and angle to suit your seated posi-
tion.
3.Swing the lever back up.
Do not use force to swing the lever
back up, otherwise the mechanism
will be damaged.<
Electric steering wheel lock
The steering wheel locks or unlocks automati-
cally when the remote control is removed or
inserted, refer to page57.
Programmable buttons on the steering
wheel
You can program the buttons to suit your per-
sonal preferences:
These settings are stored for the remote con-
trol currently in use.
Page 72 of 268
Driving
70 a warning to you. Also, be aware that every
decrease in the distance setting allows your
vehicle to come closer to a vehicle in front of
you and requires a heightened amount of alert-
ness.<
Active cruise control is not and must not
be used as a collision avoidance/warning
system.<
If while your vehicle is actively following a vehi-
cle in front of you and the vehicle ahead speeds
up or the lane ahead becomes clear, then your
vehicle will accelerate to the speed you have
selected. Be aware that changing to a clear,
unobstructed lane will also result in your vehicle
accelerating.
Be certain to deactivate the system when
you pull into an exit lane for a highway off-
ramp.<
Also, vehicles traveling in a staggered manner
on a highway may cause a delay in the system's
reaction to a vehicle in front of you or may cause
the system to react to a vehicle actually in the
lane next to you. Always be ready to take action
or apply the brakes if necessary.
While active cruise control is capable of
braking your vehicle automatically when
you approach a slower vehicle ahead, it is
important to be aware that the ability of the sys-
tem to apply the brakes is also limited, e.g.
when you reduce your desired speed sharply.
The system cannot stop your vehicle. It uses
only a portion of braking system capacity and
does not utilize the full capacity of the vehicle
braking system. Therefore, the system cannot
decrease your speed for large differences in
speed between your vehicle and the vehicle
ahead. Examples: when you approach a vehicle
traveling at a much lower speed than your own
speed such as approaching a toll booth or when
a much slower vehicle cuts in front of you at
close range.<
Active cruise control can only decelerate the
vehicle to approx. 20 mph or 30 km/h.
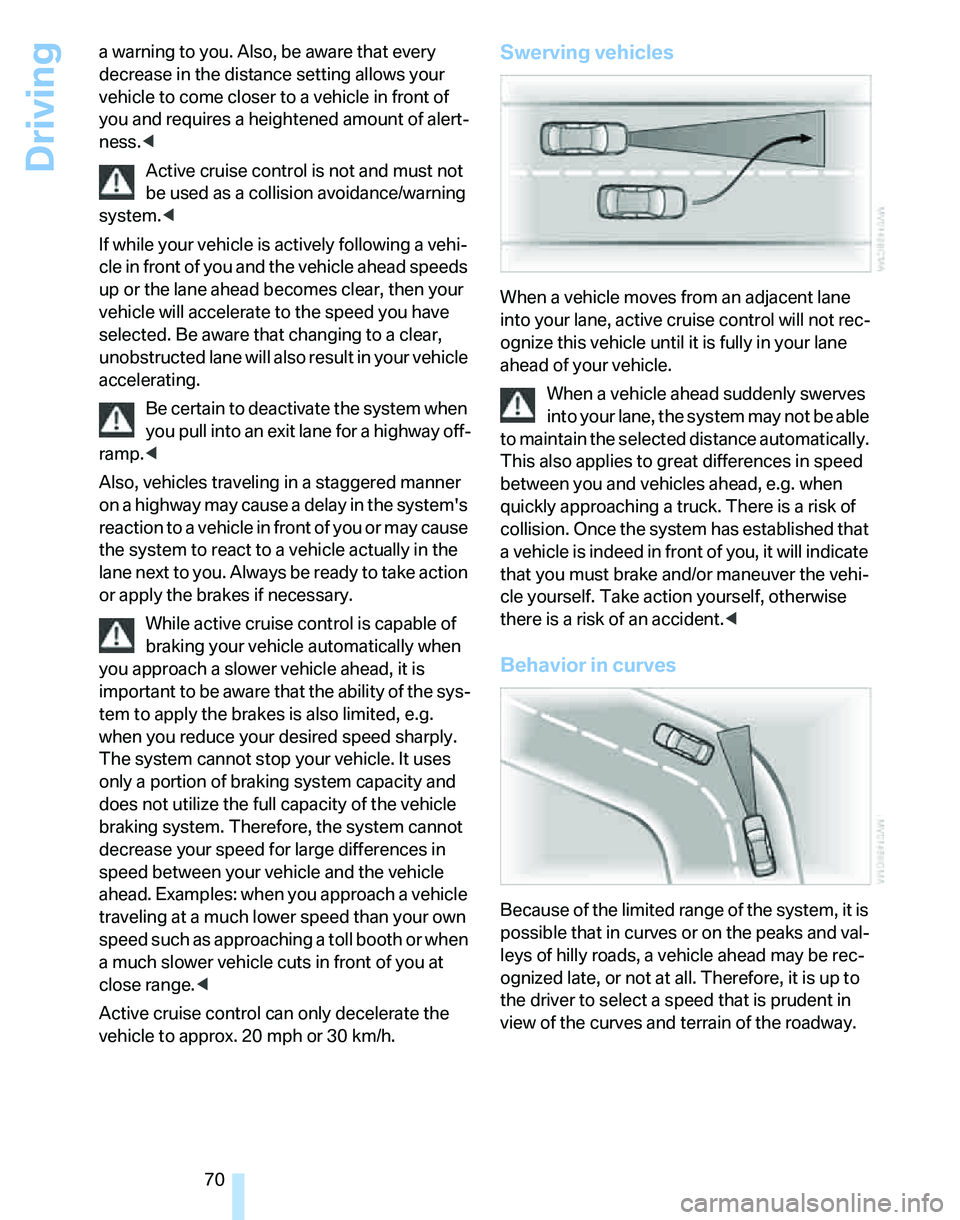
Swerving vehicles
When a vehicle moves from an adjacent lane
into your lane, active cruise control will not rec-
ognize this vehicle until it is fully in your lane
ahead of your vehicle.
When a vehicle ahead suddenly swerves
into your lane, the system may not be able
to maintain the selected distance automatically.
This also applies to great differences in speed
between you and vehicles ahead, e.g. when
quickly approaching a truck. There is a risk of
collision. Once the system has established that
a vehicle is indeed in front of you, it will indicate
that you must brake and/or maneuver the vehi-
cle yourself. Take action yourself, otherwise
there is a risk of an accident.<
Behavior in curves
Because of the limited range of the system, it is
possible that in curves or on the peaks and val-
leys of hilly roads, a vehicle ahead may be rec-
ognized late, or not at all. Therefore, it is up to
the driver to select a speed that is prudent in
view of the curves and terrain of the roadway.
Page 216 of 268
Under the hood
214
Under the hood
Do not work on the car unless you pos-
sess the necessary technical knowledge.
If you are unfamiliar with the statutory guide-
lines, have any work on the vehicle performed
only by a BMW center or by a workshop that
work according to BMW repair procedures with
correspondingly trained personnel. If this work
is not carried out properly, there is a danger of
subsequent damage and related safety haz-
ards.<
Hood
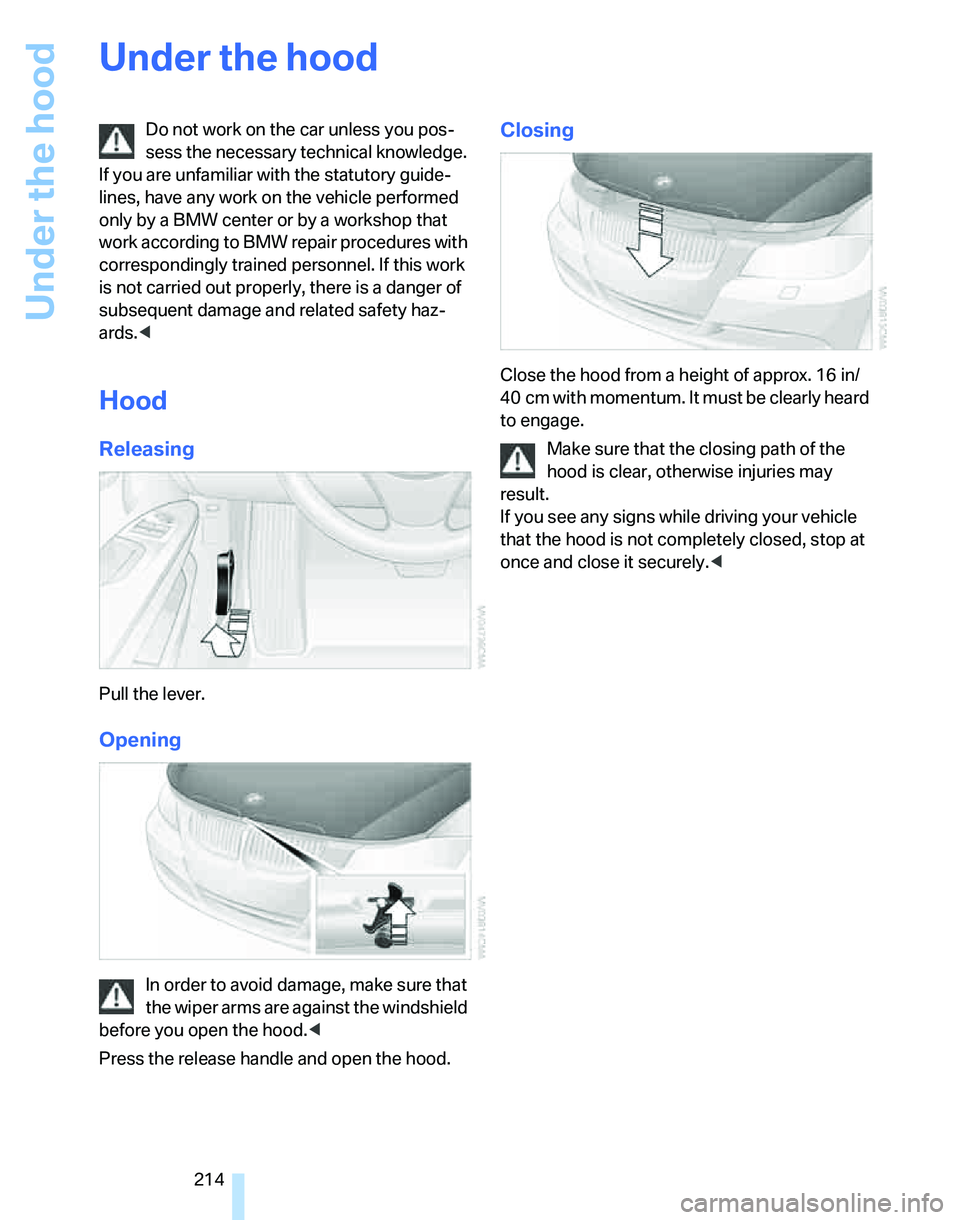
Releasing
Pull the lever.
Opening
In order to avoid damage, make sure that
the wiper arms are against the windshield
before you open the hood.<
Press the release handle and open the hood.
Closing
Close the hood from a height of approx. 16 in/
40 cm with momentum. It must be clearly heard
to engage.
Make sure that the closing path of the
hood is clear, otherwise injuries may
result.
If you see any signs while driving your vehicle
that the hood is not completely closed, stop at
once and close it securely.<
Page 255 of 268
Reference 253
At a glance
Controls
Driving tips
Communications
Navigation
Entertainment
Mobility
General driving notes122
Glass sunroof, electric39
– closing after electrical
malfunction40
– convenient operation30,31
– initializing40
– opening, closing40
– operation with convenient
access37
– pinch protection system40
– power failure40
– raising39
– remote control30
Glove compartment110
– rechargeable flashlight110
GPS navigation, refer to
Navigation system130
Grills101
Gross vehicle weight, refer to
Weights239
H
Halogen lamps
– replacing bulbs222
Handbrake, refer to Parking
brake59
Hand lamp, refer to
Rechargeable flashlight110
Hands-free system14
Hazard warning flashers14
HDC Hill Descent Control88
Head airbags95
Headlamp control,
automatic97
Headlamp cover222
Headlamp flasher61
– indicator lamp11,13
Headlamps
– care, refer to Caring for your
vehicle brochure
– replacing bulbs222
Head restraints46
– front, removing47
– rear, removing47
– sitting safely44Heated
– mirrors50
– rear window104
– seats48
Heating
– mirrors50
– rear window104
– residual heat104
– seats48
Heating and ventilation, refer
to Climate101
Heating while at a standstill,
refer to Using residual
heat104
Heavy loads, refer to Stowing
cargo125
Height, refer to
Dimensions237
Height adjustment
– seats45
– steering wheel51
High beams99
– headlamp flasher99
– indicator lamp13
– replacing bulbs222
High water, refer to Driving
through water123
Highways, refer to Route
criteria141
Hill Descent Control HDC88
Hills123
Holders for cups111
Home address140
"Home address" in
navigation141
Homepage BMW4
Hood214
Hooks for shopping bags116
Horn10,11
Hotel function34
Hot exhaust system122
"Hour memo"81
"House number" in
destination entry134
Hydraulic brake assist, refer to
Dynamic Brake Control
DBC87
Hydroplaning123
I
Ice warning, refer to Outside
temperature
warning72
ID3 tag, refer to Information
about the track168
Identification marks
– Run-Flat Tires212
– tire coding210
iDrive16
– adjusting brightness85
– assistance window20
– automatic climate
control102
– changing language85
– changing units of measure
and display format77
– confirming selection or
entry19
– controls16
– displays, menus17
– menu guidance17
– operating principle16
– overview16
– selecting a menu item19
– setting the date and time80
– start menu17
– status information20
– switching menu pages19
– symbols18
iDrive operating principle16
Ignition57
– switched off57
– switched on57
Ignition key, refer to Remote
control with integrated
key28
Ignition key position 1, refer to
Radio readiness57
Ignition key position 2, refer to
Ignition on57
Ignition lock57
i menu18
Indicator and warning
lamps13
– Tire Pressure Monitor
TPM93
Individual air distribution102
Page 260 of 268
Everything from A - Z
258 Rear turn signals
– replacing bulbs225
Rear ventilation105
Rearview mirror, refer to
Mirrors50
Rear window
– cleaning63
– opening35
Rear window blind, refer to
Roller sun blinds110
Rear window defroster104
Rear window safety switch39
Rear window wiper63
– changing rear wiper
blade222
"Received calls"182
Receiving level of mobile
phone, refer to Status
information20
Rechargeable flashlight110
Recirculated-air mode103
Recirculation of air, refer to
Recirculated-air mode103
Reclining seat, refer to
Backrest45
Recording times, refer to
Stopwatch84
"Redial" on the mobile
phone182
Refueling200
Releasing
– hood214
Remaining distance, refer to
Cruising range74
Remote control28
– battery renewal38
– convenient access36
– garage door opener107
– luggage compartment lid30
– malfunction31,38
– removing from the ignition
lock57
– service data219
– tailgate30
"Repeat directory" for audio
mode169
"Repeat" for audio mode169
"Repeat track" for audio
mode169Replacement remote
control28
Replacing bulbs, refer to
Lamps and bulbs222
Replacing tires212
Replacing tires, refer to New
wheels and tires212
Reporting safety defects6
Reserve warning, refer to Fuel
gauge73
"Reset"90,92
Reset, refer to Resetting tone
settings159
"Reset" for stopwatch85
"Reset" for tone settings159
Residual heat104
Restraint systems
– for children53
– refer to Safety belts49
Reverse
– CD changer170
– CD player170
Reverse gear
– automatic transmission with
Steptronic60
– manual transmission59
Road map145
"Roadside Assistance"191
Roadside
Assistance191,229
Roadside parking lamps99
– replacing bulbs223
Roadworthiness test, refer to
Service requirements77
Roller blind
– sun blinds110
Roof load capacity239
Roof-mounted luggage
rack126
Rope, refer to Tow-starting,
towing away232
Rotary/pushbutton, refer to
iDrive16Route141
– changing147
– display144
– displaying arrow view144
– displaying maps145
– displaying streets and
towns/cities146
– displaying town146
– list146
– selecting141
– selecting criteria141
RSC Runflat System
Component, refer to Run-
Flat Tires212
Rubber parts, refer to Caring
for your vehicle brochure
Runflat System Component
RSC, refer to Run-Flat
Tires212
Run-Flat Tires212
– continuing driving with a
damaged tire91
– flat tire91
– Flat Tire Monitor91
– new tires212
– replacing212
– tire inflation pressure202
– winter tires213
S
Safety-belt height
adjustment49
Safety belts49
– damage50
– indicator/warning lamp49
– reminder49
– sitting safely44
Safety belts, care, refer to
Caring for your vehicle
brochure