high beam BMW 328I 2009 Owners Manual
[x] Cancel search | Manufacturer: BMW, Model Year: 2009, Model line: 328I, Model: BMW 328I 2009Pages: 268, PDF Size: 11.52 MB
Page 13 of 268
At a glance
11Reference
Controls
Driving tips
Communications
Navigation
Entertainment
Mobility
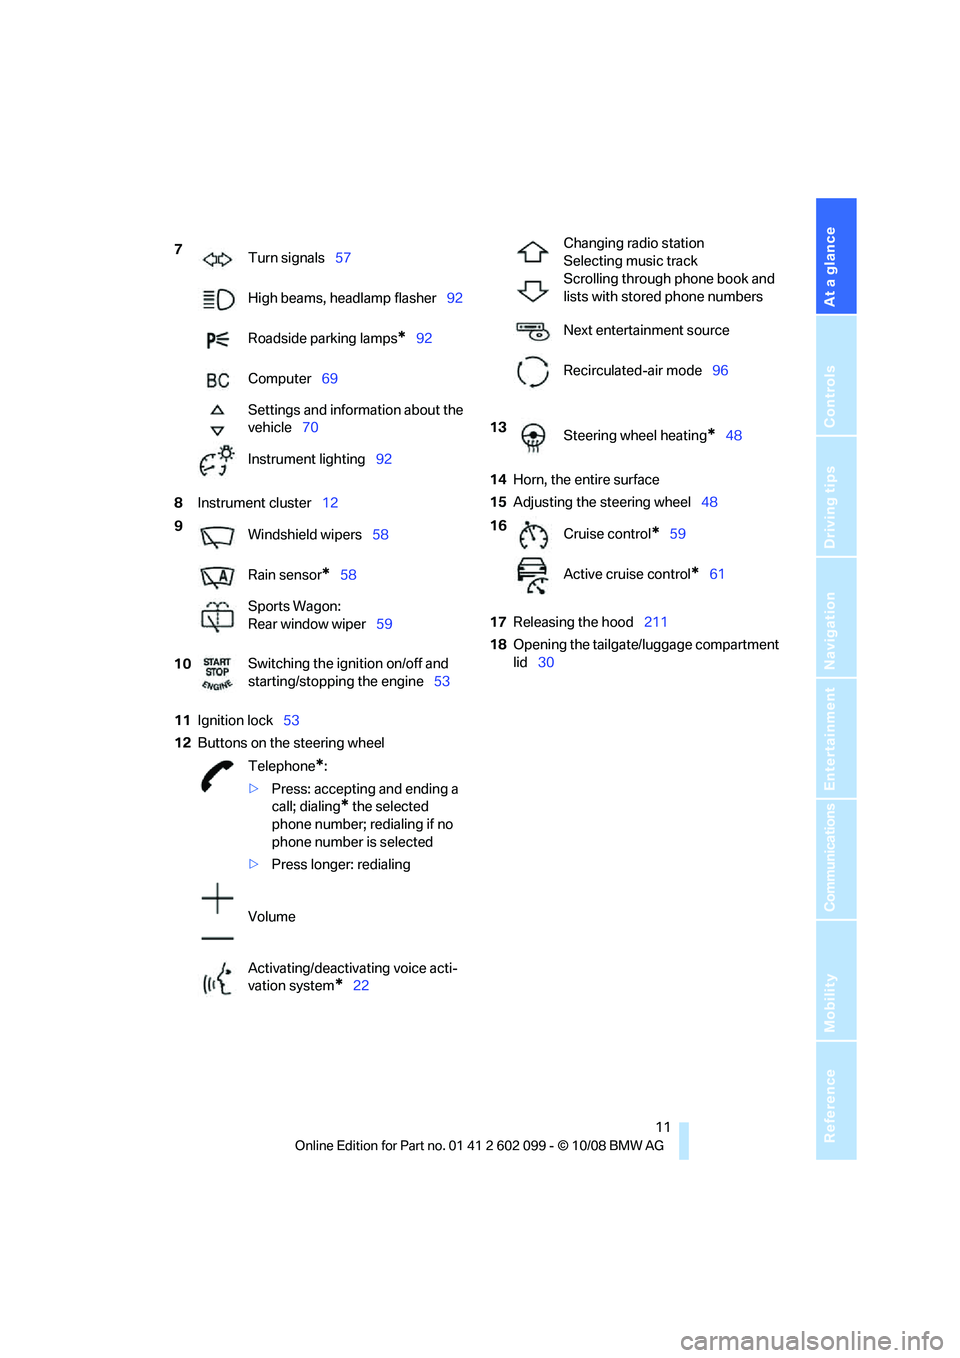
8Instrument cluster 12
11 Ignition lock 53
12 Buttons on the steering wheel 14
Horn, the entire surface
15 Adjusting the steering wheel 48
17 Releasing the hood 211
18 Opening the tailgate/luggage compartment
lid 30
7
Turn signals 57
High beams, headlamp flasher 92
Roadside parking lamps
*92
Computer 69
Settings and information about the
vehicle 70
Instrument lighting 92
9 Windshield wipers 58
Rain sensor
*58
Sports Wagon:
Rear window wiper 59
10 Switching the ignition on/off and
starting/stopping the engine
53
Telephone
*:
> Press: accepting and ending a
call; dialing
* the selected
phone number; redialing if no
phone number is selected
> Press longer: redialing
Volume
Activating/deactivating voice acti-
vation system
*22
Changing radio station
Selecting music track
Scrolling through phone book and
lists with stored phone numbers
Next entertainment source
Recirculated-air mode 96
13 Steering wheel heating
*48
16 Cruise control
*59
Active cruise control
*61
ba8_E9091_cic.book Seite 11 Mittwoch, 29. Oktober 2008 2:59 14
Page 15 of 268
At a glance
13Reference
Controls
Driving tips
Communications
Navigation
Entertainment
Mobility
Indicator and warning lamps
The concept
Indicator and warning lamps can light up in a
variety of combinations and colors.
Some lamps are checked for proper functioning
and thus come on briefly when the engine is
started or the ignition is switched on.
Explanatory text messages
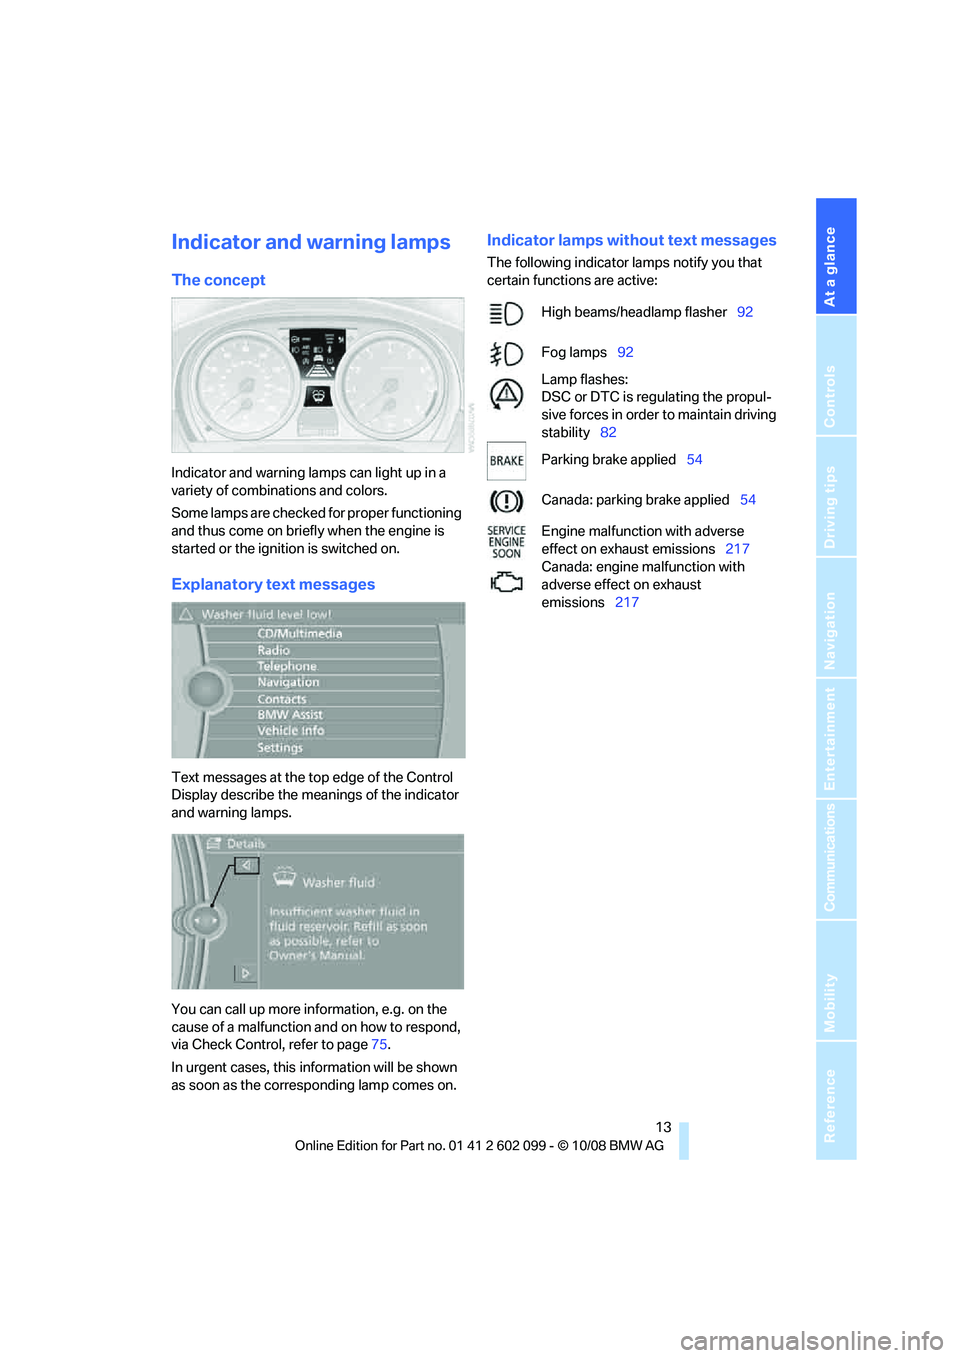
Text messages at the top edge of the Control
Display describe the meanings of the indicator
and warning lamps.
You can call up more information, e.g. on the
cause of a malfunction and on how to respond,
via Check Control, refer to page 75.
In urgent cases, this information will be shown
as soon as the corresponding lamp comes on.
Indicator lamps without text messages
The following indicator lamps notify you that
certain functions are active:
High beams/headlamp flasher 92
Fog lamps 92
Lamp flashes:
DSC or DTC is regulating the propul-
sive forces in order to maintain driving
stability 82
Parking brake applied 54
Canada: parking brake applied 54
Engine malfunction with adverse
effect on exhaust emissions 217
Canada: engine malfunction with
adverse effect on exhaust
emissions 217
ba8_E9091_cic.book Seite 13 Mittwoch, 29. Oktober 2008 2:59 14
Page 35 of 268

Controls
33Reference
At a glance
Driving tips
Communications
Navigation
Entertainment
Mobility
Press the window shut to close it.Make sure that the corners of any pointed
or sharp-edged cargo are padded if they
could bump against the rear window while the
vehicle is in motion, otherwise the heating ele-
ments of the rear window could be damaged. <
Alarm system*
The concept
The vehicle alarm system responds:
>When a door, the hood or the luggage com-
partment lid/tailgate is opened
> To movements inside the vehicle: Interior
motion sensor, refer to page 33
> When the car's inclination changes, for
instance if an attempt is made to jack it up
and steal the wheels or to raise it prior to
towing away
> When there is an interruption in the power
supply from the battery
The alarm system signals unauthorized entry
attempts for a short time by means of:
> An acoustic alarm
> Switching on the haza rd warning flashers
> Flashing the high beams
Arming and disarming
When you lock or unlock the vehicle, either with
the remote control or at the door lock, the alarm
system is armed or disarmed at the same time.
You can open the luggage compartment lid/tail-
gate even when the alarm system is armed, by
pressing the button on the remote control,
refer to page 28. The lid is locked and moni-
tored again as soon as you close it.
Panic mode*
You can trigger the alarm system if you find
yourself in a dangerous situation:
Press the button for at least three seconds.
To switch off the alarm: press any button.
Switching off an alarm
> Unlock the car with the remote control, refer
to page 27.
> Insert the remote control all the way into the
ignition lock.
Indicator lamp displays
>The indicator lamp un der the inside rear-
view mirror flashes continuously: the sys-
tem is armed.
> The indicator lamp flashes after locking:
doors, hood, luggage compartment lid/tail-
gate or rear window are not properly closed.
Even if you do not close the alerted area, the
system begins to monitor the remaining
areas, and the indicator lamp flashes con-
tinuously after approx. 10 seconds. The
interior motion sensor and the tilt alarm
sensor are not activated.
> The indicator lamp goes out after unlocking:
your vehicle has not been disturbed while
you were away.
> If the indicator lamp flashes after unlocking
until the remote control is inserted in the
ignition, but for no longer than approx.
5 minutes: your vehicle has been disturbed
while you were away.
Tilt alarm sensor
The tilt of the vehicle is monitored. The alarm
system reacts, e.g. to attempts to steal a wheel
or tow the vehicle.
Interior motion sensor
In order for the interior motion sensor to func-
tion properly, the windows and glass roof must
be completely closed
*.
ba8_E9091_cic.book Seite 33 Mittwoch, 29. Oktober 2008 2:59 14
Page 59 of 268
Controls
57Reference
At a glance
Driving tips
Communications
Navigation
Entertainment
Mobility
>When you use the shift paddles on the
steering wheel to shif t gears in automatic
mode, the transmission switches to manual
mode.
> If you do not accelerate or shift gears using
the shift paddles for a certain amount of
time, the transmission switches back to
automatic mode.
If the selector lever is in the M/S gear
plane, manual mode remains active. <
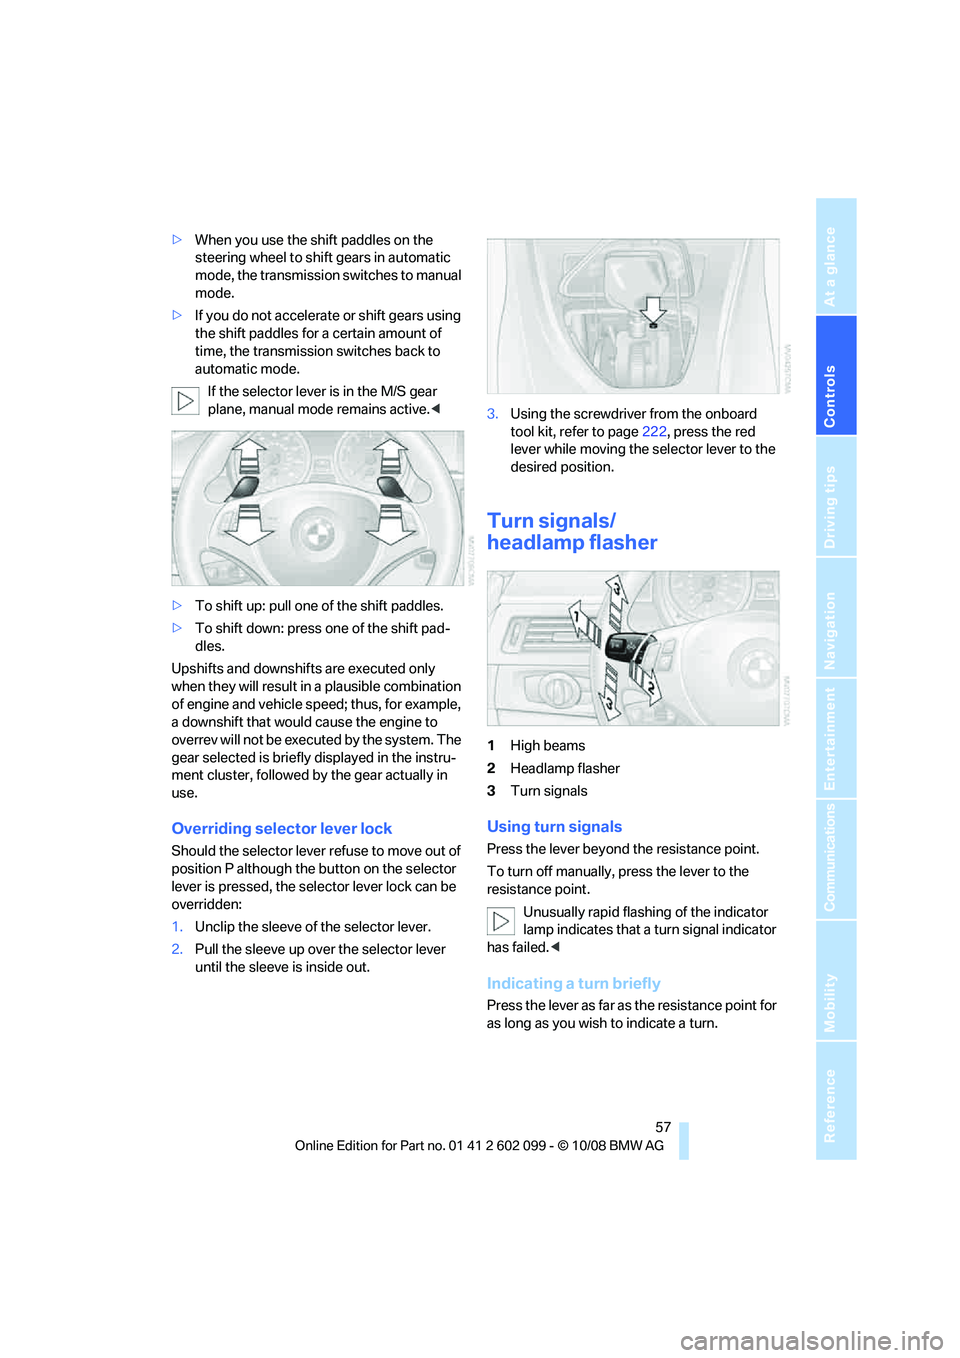
> To shift up: pull one of the shift paddles.
> To shift down: press one of the shift pad-
dles.
Upshifts and downshifts are executed only
when they will result in a plausible combination
of engine and vehicle speed; thus, for example,
a downshift that would cause the engine to
overrev will not be executed by the system. The
gear selected is briefly displayed in the instru-
ment cluster, followed by the gear actually in
use.
Overriding selector lever lock
Should the selector lever refuse to move out of
position P although the button on the selector
lever is pressed, the sele ctor lever lock can be
overridden:
1. Unclip the sleeve of the selector lever.
2. Pull the sleeve up over the selector lever
until the sleeve is inside out. 3.
Using the screwdriver from the onboard
tool kit, refer to page 222, press the red
lever while moving the selector lever to the
desired position.
Turn signals/
headlamp flasher
1 High beams
2 Headlamp flasher
3 Turn signals
Using turn signals
Press the lever beyond the resistance point.
To turn off manually, press the lever to the
resistance point.
Unusually rapid flashi ng of the indicator
lamp indicates that a turn signal indicator
has failed. <
Indicating a turn briefly
Press the lever as far as the resistance point for
as long as you wish to indicate a turn.
ba8_E9091_cic.book Seite 57 Mittwoch, 29. Oktober 2008 2:59 14
Page 94 of 268
Lamps
92
High beams/roadside parking
lamps
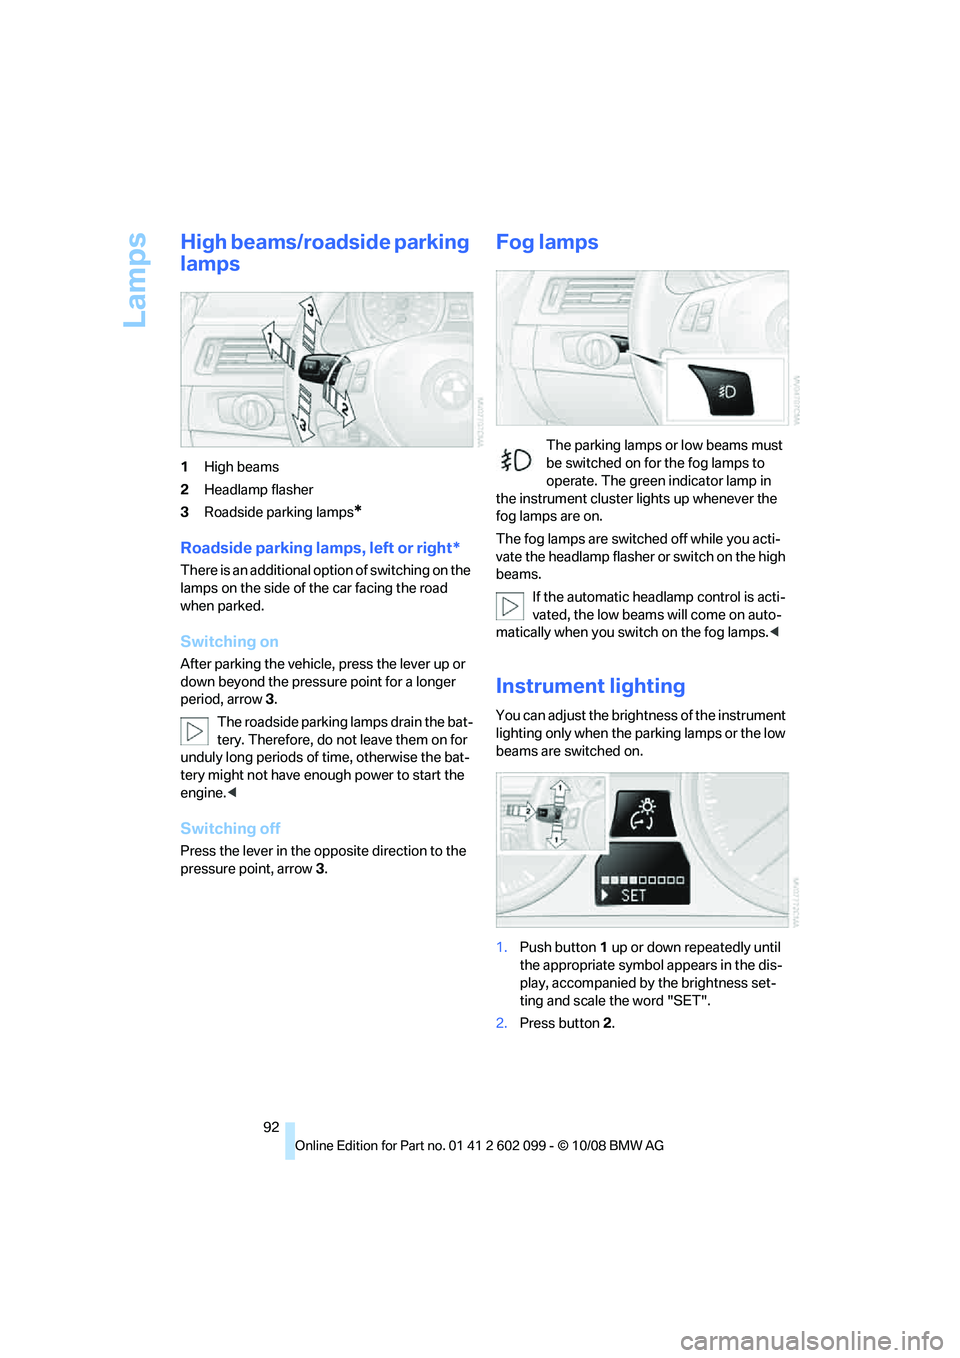
1High beams
2 Headlamp flasher
3 Roadside parking lamps
*
Roadside parking lamps, left or right*
There is an additional option of switching on the
lamps on the side of the car facing the road
when parked.
Switching on
After parking the vehicle, press the lever up or
down beyond the pressu re point for a longer
period, arrow 3.
The roadside parking lamps drain the bat-
tery. Therefore, do not leave them on for
unduly long periods of time, otherwise the bat-
tery might not have enou gh power to start the
engine. <
Switching off
Press the lever in the opposite direction to the
pressure point, arrow 3.
Fog lamps
The parking lamps or low beams must
be switched on for the fog lamps to
operate. The green indicator lamp in
the instrument cluster lights up whenever the
fog lamps are on.
The fog lamps are switched off while you acti-
vate the headlamp flasher or switch on the high
beams.
If the automatic headlamp control is acti-
vated, the low beams will come on auto-
matically when you switch on the fog lamps. <
Instrument lighting
You can adjust the brightness of the instrument
lighting only when the parking lamps or the low
beams are switched on.
1. Push button 1 up or down repeatedly until
the appropriate symbol appears in the dis-
play, accompanied by the brightness set-
ting and scale the word "SET".
2. Press button 2.
ba8_E9091_cic.book Seite 92 Mittwoch, 29. Oktober 2008 2:59 14
Page 226 of 268
Replacing components
224
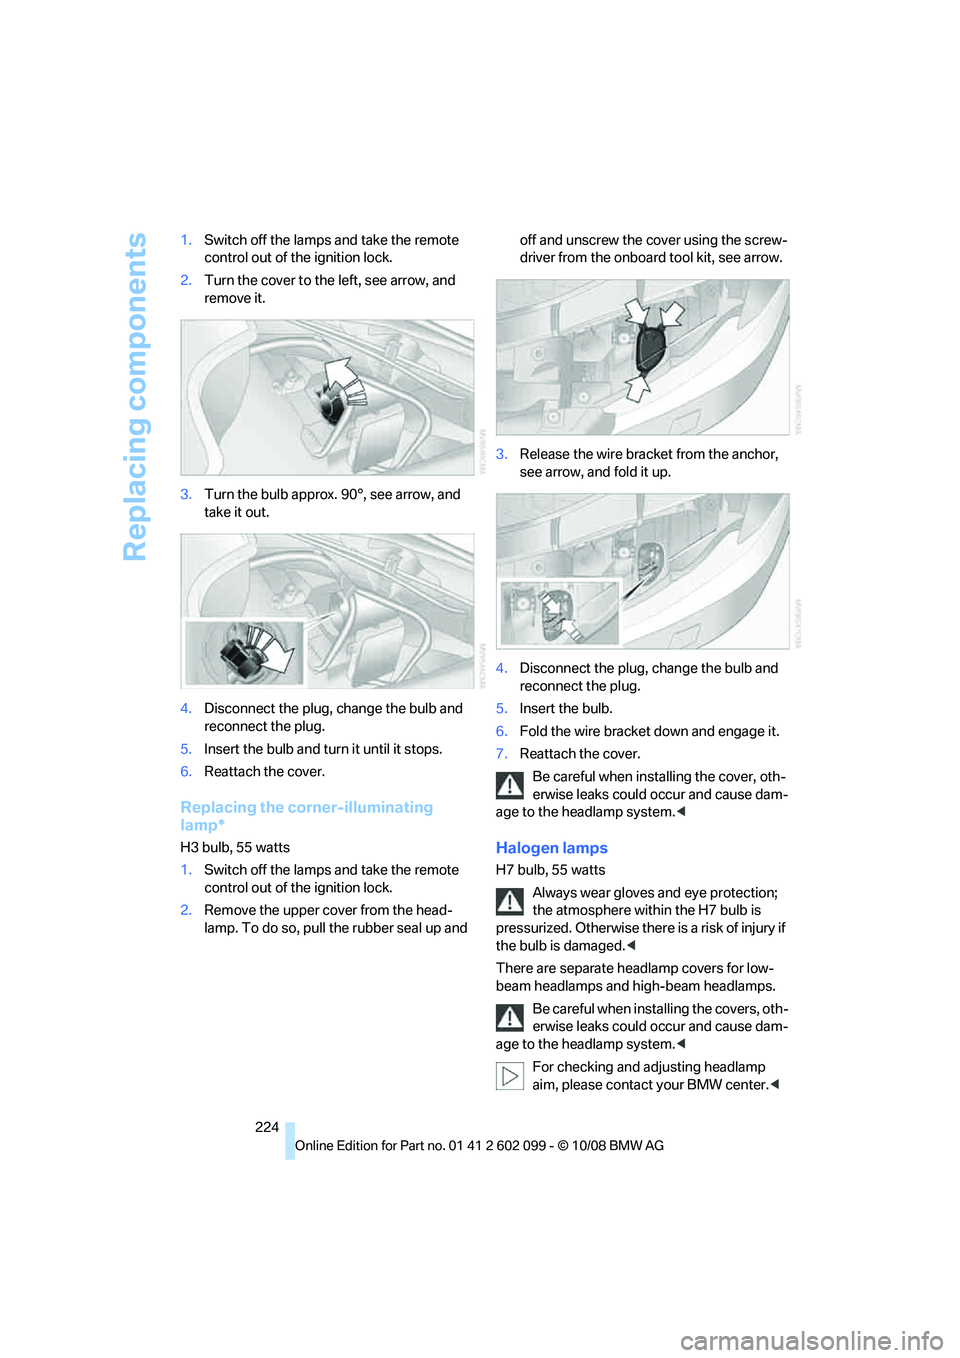
1.
Switch off the lamps and take the remote
control out of the ignition lock.
2. Turn the cover to the left, see arrow, and
remove it.
3. Turn the bulb approx. 90°, see arrow, and
take it out.
4. Disconnect the plug, change the bulb and
reconnect the plug.
5. Insert the bulb and turn it until it stops.
6. Reattach the cover.
Replacing the corner-illuminating
lamp*
H3 bulb, 55 watts
1.Switch off the lamps and take the remote
control out of the ignition lock.
2. Remove the upper cover from the head-
lamp. To do so, pull the rubber seal up and off and unscrew the cover using the screw-
driver from the onboar
d tool kit, see arrow.
3. Release the wire bracket from the anchor,
see arrow, and fold it up.
4. Disconnect the plug, change the bulb and
reconnect the plug.
5. Insert the bulb.
6. Fold the wire bracket down and engage it.
7. Reattach the cover.
Be careful when installing the cover, oth-
erwise leaks could occur and cause dam-
age to the headlamp system.
Always wear gloves and eye protection;
the atmosphere within the H7 bulb is
pressurized. Otherwise there is a risk of injury if
the bulb is damaged. <
There are separate headlamp covers for low-
beam headlamps and high-beam headlamps.
Be careful when inst alling the covers, oth-
erwise leaks could occur and cause dam-
age to the headlamp system. <
For checking and adjusting headlamp
aim, please contact your BMW center. <
ba8_E9091_cic.book Seite 224 Mittwoch, 29. Oktober 2008 2:59 14
Page 227 of 268

Mobility
225Reference
At a glance
Controls
Driving tips
Communications
Navigation
Entertainment
Access to the bulbs
The high-beam bulb can be accessed from the
engine compartment, whereas the low-beam
bulb can be accessed through a flap in the wheel
well.
1Cover for high-beam headlamp
2 Cover for low-beam headlamp
3 Turn signal bulb socket
To remove the covers:
1. Fold the respective wire bracket to the side,
see arrows.
2. Flip open the cover and take it out of the
guide.
Follow the same steps in reverse order to reat-
tach the covers.
Access through the wheel well
Only for low-beam head lamps and turn signals:
1. Turn the wheel inwards.
2. Open the flap in the wheel well. To do so,
turn the fastener counterclockwise using a
coin, for example.
Changing low-beam and high-beam
bulbs
1.Remove the relevant cover for the head-
lamp.
2. Disconnect the plug from the bulb.
3. Push the wire bracket to the side out of the
mounting, arrow 1, and fold it down, arrow 2.
4. Remove the bulb.
5. Insert new bulb as show n in the detail of the
illustration above.
6. Fold up the wire bracket and engage it.
7. Connect the plug.
8. Reattach the cover.
Parking lamps, roadside parking lamps
5-watt bulb, W5W
1.Remove the cover for the high-beam head-
lamp.
2. Pull out the bulb socket, see arrow.
3. Remove and replace the bulb.
4. Insert bulb socket.
5. Reattach the cover.
ba8_E9091_cic.book Seite 225 Mittwoch, 29. Oktober 2008 2:59 14
Page 258 of 268
Everything from A - Z
256
H
Halogen lamps
– replacing bulbs224
Handbrake, refer to Parking
brake 54
Hands-free system 14
Hazard warning flashers 14
HDC Hill Descent Control 82
HD radio, refer to High Definition Radio 146
Head airbags 88
Headlamp control,
automatic 90
Headlamp cover 224
Headlamp flasher 57
– indicator lamp 11,13
Headlamps
– replacing bulbs 224
Head restraints 43
– rear, removing 44
– sitting safely 41
Heated
– mirrors 47
– rear window 97
– seats 45
Heating
– mirrors 47
– rear window 97
– residual heat 96
– seats 45
– steering wheel 48
Heating and ventilation, refer to Climate 94
Heating while at a standstill, refer to Using residual
heat 96
Heavy loads, refer to Stowing cargo 118
Height, refer to
Dimensions 239
Height adjustment
– seats 42
– steering wheel 48
High beams 92
– headlamp flasher 92
– indicator lamp 13
– replacing bulbs 224
High Definition Radio 146High-pressure
washer 218,219
High water, refer to Driving through water 116
Highways, refer to Route
criteria 133
Hill Descent Control HDC 82
Hills 116
Holders for cups 104
Homepage BMW 4
Hood 211
Hooks for shopping bags 108
Ho
rn 10, 11
Hotel function, refer to Locking or unlocking
separately 32
Hot exhaust system 115
Hydraulic brake assist, refer to Dynamic Brake Control
DBC 81
Hydroplaning 116
I
IBOC, refer to High Definition
Radio 146
Ice warning, refer to Outside temperature
warning 67
ID3 tag, refer to Information about the track 151
Identification marks
– Run-Flat Tires 209
– tire coding 207
iDrive 16
– adjusting brightness 78
– changing language 78
– changing settings 78
– changing units of measure and display format 71
– controls 16
– menu guidance 17
– operating principle 16
– overview 16
– setting the date and time 74
– start menu 17
– status information 19
iDrive operating principle 16Ignition
53
– switched off 53
– switched on 53
Ignition key, refer to Remote control with integrated
key 26
Ignition key position 1, refer to Radio readiness 53
Ignition key position 2, refer to Ignition on 53
Ignition lock 53
Imprint 2
Indicator and warning
lamps 13
– Tire Pressure Monitor TPM 86
Inflation pressure, refer to Tire inflation pressure 195
Inflation pressure monitoring,
refer to Tire Pressure
Monitor TPM 84
Initializing
– after power failure 229
– compass, refer to Calibrating 101
– Flat Tire Monitor FTM 83
– glass roof 37
– panorama glass roof 39
– radio, refer to Station, storing 145
– refer to Setting the time and
date 74
Installation location
– CD changer 154
– navigation DVD drive 122
– telephone 103
Instructions for navigation
system, refer to Voice
instr
uctions 134
Instrument cluster 12
Instrument lighting 92
Instrument panel, refer to Cockpit 10
Integrated key 26
Integrated universal remote control 99
Interior lamps 93
– remote control 28
Interior motion sensor 33
ba8_E9091_cic.book Seite 256 Mittwoch, 29. Oktober 2008 2:59 14
Page 261 of 268
Reference 259
At a glance
Controls
Driving tips
Communications
Navigation
Entertainment
Mobility
Opening and closing
– convenient access34
– from inside 30
– from outside 27
– using the door lock 29
– via the remote control 27
Options, selecting for navigation 133
Orientation menu, refer to Start menu 17
Outlets
– refer to Ventilation 97
Output, refer to Engine
data 238
Outside-air mode
– automatic climate control 96
Outside-temperature display 67
– changing units of
measure 71
– in computer 71
Outside temperature
warning 67
Overheated engine, refer to Coolant temperature 68
Overriding selector lever lock 57
Overview
– radio control 142
P
Paintwork care 219
Panorama glass roof 38
– closing after electrical malfunction 39
– comfort position 39
– convenient operation 28
– initializing 39
– opening, closing 38
– pinch protection system 39
– power failure 39
– raising 38
– remote control 28
Park assistant, refer to Park Distance Control 80
Park Distance Control PDC 80Parked car ventilation
97
– preselecting switch-on
times 98
– switching on and off directly 98
Parking
– vehicle 54
Parking aid, refer to Park
Distance Control PDC 80
Parking brake 54
– indicator lamp 54
Parking lamps 90
– replacing bulbs 223,225
Parking lamps/low beams 90
Particulate filter, refer to Diesel particulate filter 115
Partition net 107
Passenger-side mirror tilt function 47
Pathway lighting 91
Personal Profile 26
Phone book 171
Phone numbers
– dialing 172
Pinch protection system
– glass roof, electric 37
– panorama glass roof 39
– windows 36
Placing a call, refer to telephone owner's manual
Polish 220
Pollen
– refer to Microfilter/activated- charcoal filter for automatic
climate control 97
Position, refer to Current position, displaying 139
Postal code, entering for navigation 124
Power failure 229
Power windows 36
– safety switch 36
Power windows, refer to
Windows 36
Preheating, refer to Vehicles
with diesel engine 54
Pressure, tires 195
Pressure monitoring, tires 83
– Flat Tire Monitor 83Pressure monitoring of tires,
refer to Tire Pressure
Monitor TPM 84
Programmable buttons on the steering wheel 11
Protection function, refer to Pinch protection system
– glass roof, electric 37
– panorama glass roof 39
– windows 36
Providing medical assistance,
refer to First add pouch 231
Puncture
– Flat Tire Monitor 83
R
Radio
– controls142
– High Definition Radio 146
– satellite radio 148
– selecting a waveband 145
– storing stations 145
– switching on/off 142
– tone control 142
– volume 142
– Weather Band, refer to Weather information 148
Radio position, refer to Radio readiness 53
Radio readiness 53
– switched off 53
– switched on 53
Radio-remote key, refer to
Remote control with
integrated key 26
Rain sensor 58
Rapeseed-oil methyl ester RME 191
Reading lamps 93
Rear lamps, refer to Tail lamps 226
Rear seat backrest,
folding 107
ba8_E9091_cic.book Seite 259 Mittwoch, 29. Oktober 2008 2:59 14