buttons BMW 328I 2012 User Guide
[x] Cancel search | Manufacturer: BMW, Model Year: 2012, Model line: 328I, Model: BMW 328I 2012Pages: 268, PDF Size: 8.8 MB
Page 110 of 268
Practical interior accessories
108 The corresponding memory button 1 is now
programmed with the signal of the original
hand-held transmitter.
You can operate the device while the ignition is
switched off.
If the device fails to function even after
repeated programming, check whether
the original hand-held transmitter uses an alter-
nating-code system. To do so, either read the
instructions for the original hand-held transmit-
ter or hold down the programmed memory
button1 of the integrated universal remote
control. If the LED2 on the integrated universal
remote control flashes rapidly for a short while
and then remains lit for about two seconds, the
original hand-held transmitter uses an alternat-
ing-code system. If it uses an alternating-code
system, program the memory buttons1 as
described under Alternating-code hand-held
transmitters.<
Alternating-code hand-held
transmitters
To program the integrated universal remote
control, consult the operating instructions for
the device to be set. You will find information
there on the possibilities for synchronization.
When programming hand-held transmitters
that employ an alternating code, please observe
the following supplementary instructions:Programming will be easier with the aid of
a second person.<
1.Park your vehicle within the range of the
remote-controlled device.
2.Program the integrated universal remote
control as described above in the section
Fixed-code hand-held transmitters.
3.Locate the button on the receiver of the
device to be set, e.g. on the drive unit.
4.Press the button on the receiver of the
device to be set. After step 4, you have
approx. 30 seconds for step 5.
5.Press the programmed memory button1 of
the integrated universal remote control
three times.
The corresponding memory button 1 is now
programmed with the signal of the original
hand-held transmitter.
If you have any questions, please contact
your BMW center.
20 seconds until the LED2 flashes: all memory
buttons are cleared.
It is not possible to clear individual memory but-
tons.
Digital compass*
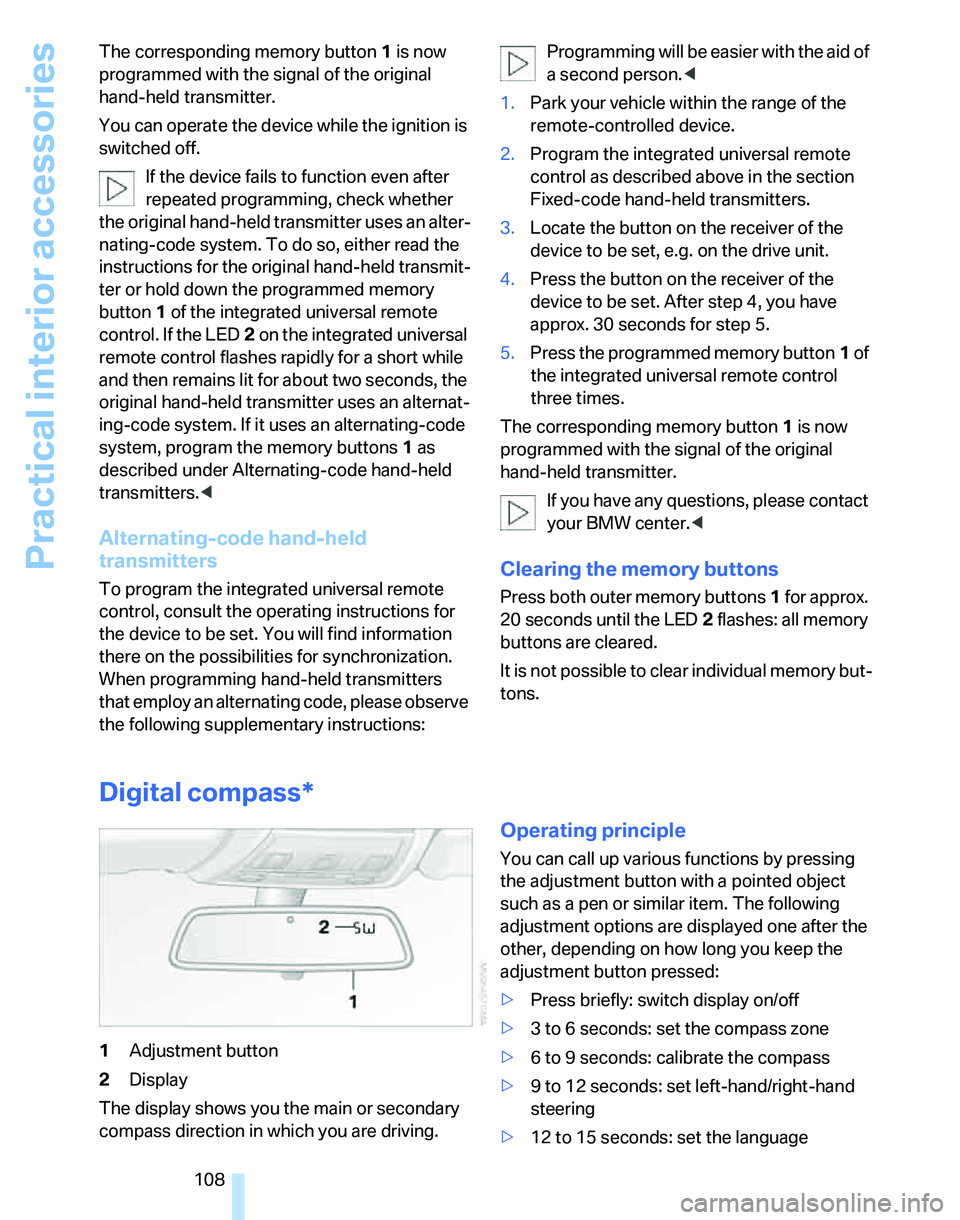
1Adjustment button
2Display
The display shows you the main or secondary
compass direction in which you are driving.
Operating principle
You can call up various functions by pressing
the adjustment button with a pointed object
such as a pen or similar item. The following
adjustment options are displayed one after the
other, depending on how long you keep the
adjustment button pressed:
>Press briefly: switch display on/off
>3 to 6 seconds: set the compass zone
>6 to 9 seconds: calibrate the compass
>9 to 12 seconds: set left-hand/right-hand
steering
>12 to 15 seconds: set the language
Page 117 of 268
Controls
115Reference
At a glance
Driving tips
Communications
Navigation
Entertainment
Mobility
Expanding the cargo bay
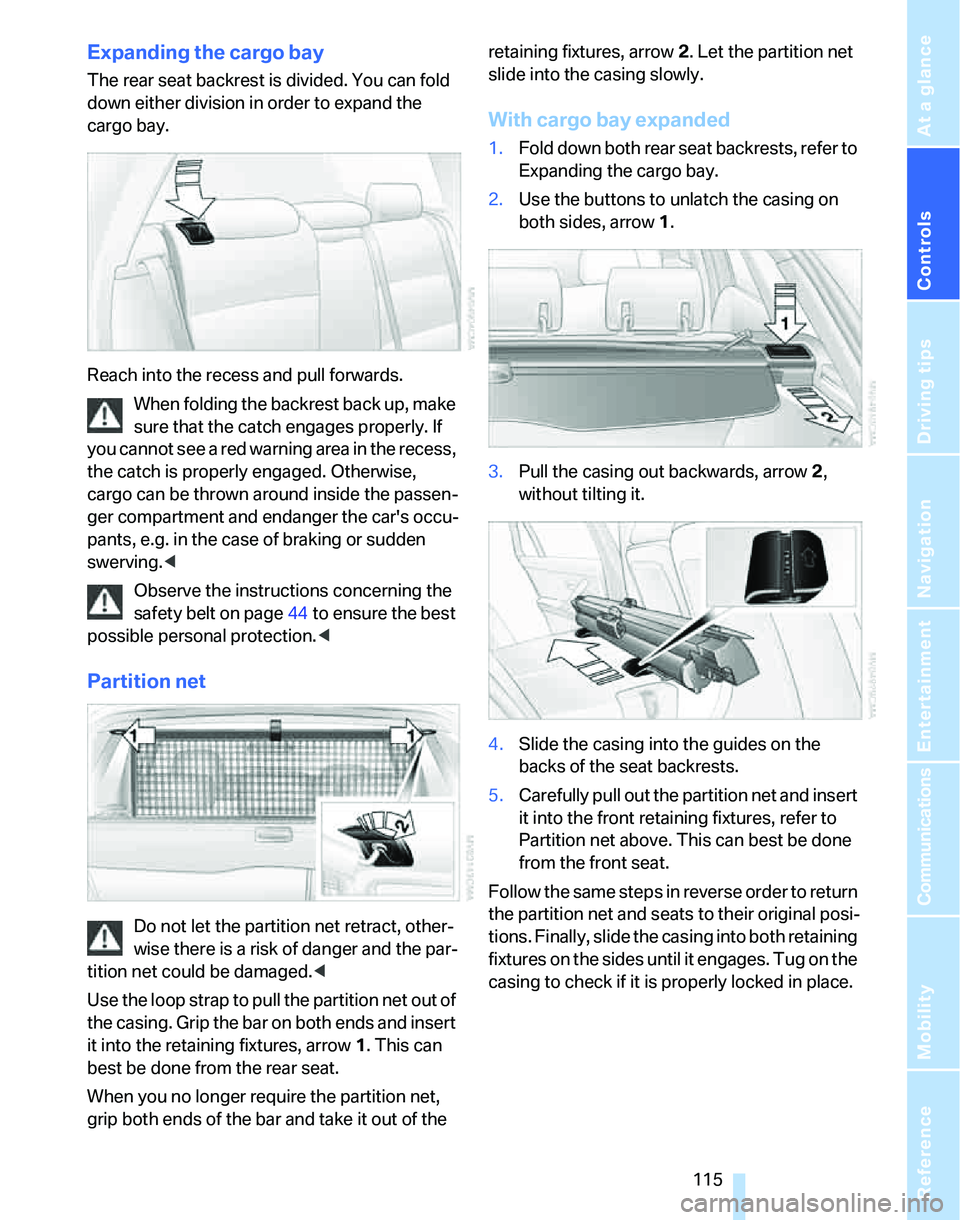
The rear seat backrest is divided. You can fold
down either division in order to expand the
cargo bay.
Reach into the recess and pull forwards.
When folding the backrest back up, make
sure that the catch engages properly. If
you cannot see a red warning area in the recess,
the catch is properly engaged. Otherwise,
cargo can be thrown around inside the passen-
ger compartment and endanger the car's occu-
pants, e.g. in the case of braking or sudden
swerving.<
Observe the instructions concerning the
safety belt on page44 to ensure the best
possible personal protection.<
Partition net
Do not let the partition net retract, other-
wise there is a risk of danger and the par-
tition net could be damaged.<
Use the loop strap to pull the partition net out of
the casing. Grip the bar on both ends and insert
it into the retaining fixtures, arrow 1. This can
best be done from the rear seat.
When you no longer require the partition net,
grip both ends of the bar and take it out of the retaining fixtures, arrow 2. Let the partition net
slide into the casing slowly.
With cargo bay expanded
1.Fold down both rear seat backrests, refer to
Expanding the cargo bay.
2.Use the buttons to unlatch the casing on
both sides, arrow 1.
3.Pull the casing out backwards, arrow 2,
without tilting it.
4.Slide the casing into the guides on the
backs of the seat backrests.
5.Carefully pull out the partition net and insert
it into the front retaining fixtures, refer to
Partition net above. This can best be done
from the front seat.
Follow the same steps in reverse order to return
the partition net and seats to their original posi-
tions. Finally, slide the casing into both retaining
fixtures on the sides until it engages. Tug on the
casing to check if it is properly locked in place.
Page 148 of 268
Destination guidance
146
Displaying towns/cities and streets
along the route
You can have the roads and towns along the
route displayed during destination guidance.
The distances remaining to be traveled within
each section of the route are also displayed.
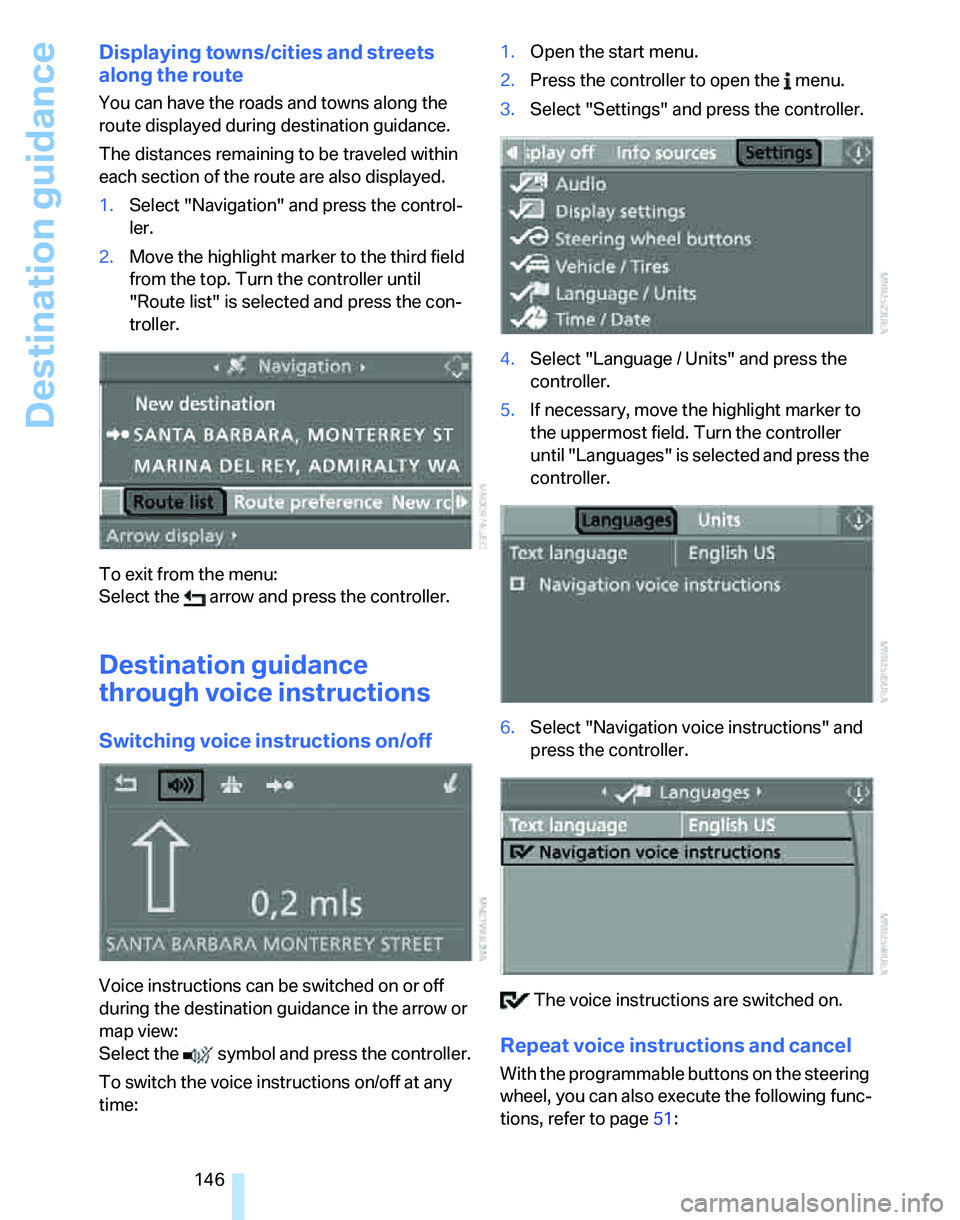
1.Select "Navigation" and press the control-
ler.
2.Move the highlight marker to the third field
from the top. Turn the controller until
"Route list" is selected and press the con-
troller.
To exit from the menu:
Select the arrow and press the controller.
Destination guidance
through voice instructions
Switching voice instructions on/off
Voice instructions can be switched on or off
during the destination guidance in the arrow or
map view:
Select the symbol and press the controller.
To switch the voice instructions on/off at any
time:1.Open the start menu.
2.Press the controller to open the menu.
3.Select "Settings" and press the controller.
4.Select "Language / Units" and press the
controller.
5.If necessary, move the highlight marker to
the uppermost field. Turn the controller
until "Languages" is selected and press the
controller.
6.Select "Navigation voice instructions" and
press the controller.
The voice instructions are switched on.
Repeat voice instructions and cancel
With the programmable buttons on the steering
wheel, you can also execute the following func-
tions, refer to page51:
Page 158 of 268
On/off and settings
156
On/off and settings
The following audio sources have shared con-
trols and setting options:
>Radio
>CD player
>CD changer
*
Controls
The audio sources can be operated using:
>Buttons near the CD player
>iDrive
>Buttons
on the steering wheel, refer to
page11
Buttons on the CD player
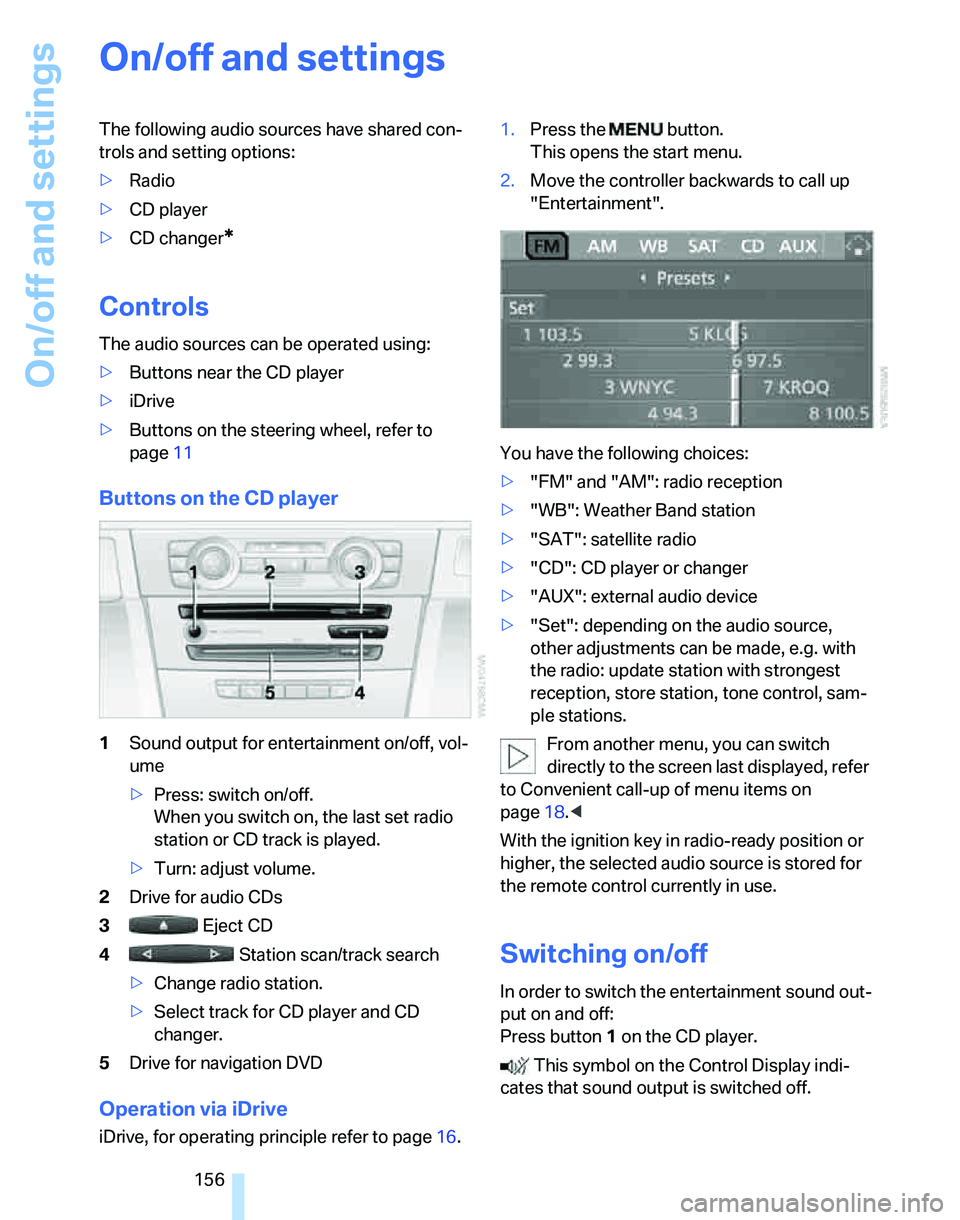
1Sound output for entertainment on/off, vol-
ume
>Press: switch on/off.
When you switch on, the last set radio
station or CD track is played.
>Turn: adjust volume.
2Drive for audio CDs
3 Eject CD
4 Station scan/track search
>Change radio station.
>Select track for CD player and CD
changer.
5Drive for navigation DVD
Operation via iDrive
iDrive, for operating principle refer to page16.1.Press the button.
This opens the start menu.
2.Move the controller backwards to call up
"Entertainment".
You have the following choices:
>"FM" and "AM": radio reception
>"WB": Weather Band station
>"SAT": satellite radio
>"CD": CD player or changer
>"AUX": external audio device
>"Set": depending on the audio source,
other adjustments can be made, e.g. with
the radio: update station with strongest
reception, store station, tone control, sam-
ple stations.
From another menu, you can switch
directly to the screen last displayed, refer
to Convenient call-up of menu items on
page18.<
With the ignition key in radio-ready position or
higher, the selected audio source is stored for
the remote control currently in use.
Switching on/off
In order to switch the entertainment sound out-
put on and off:
Press button1 on the CD player.
This symbol on the Control Display indi-
cates that sound output is switched off.
Page 159 of 268
Navigation
Entertainment
Driving tips
157Reference
At a glance
Controls
Communications
Mobility
Adjusting volume
Turn knob1 on the CD player until the desired
volume is obtained.
You can also adjust the volume with buttons on
the steering wheel, refer to page11.
With the ignition key in radio-ready position or
higher, the setting is stored for the remote con-
trol currently in use.
Tone control
You can alter various tone settings, e.g. treble
and bass or the speed-dependent volume
increase.
The tone settings are applied to all audio
sources.
With the ignition key in radio-ready position or
higher, the settings are stored for the remote
control currently in use.
Changing tone settings
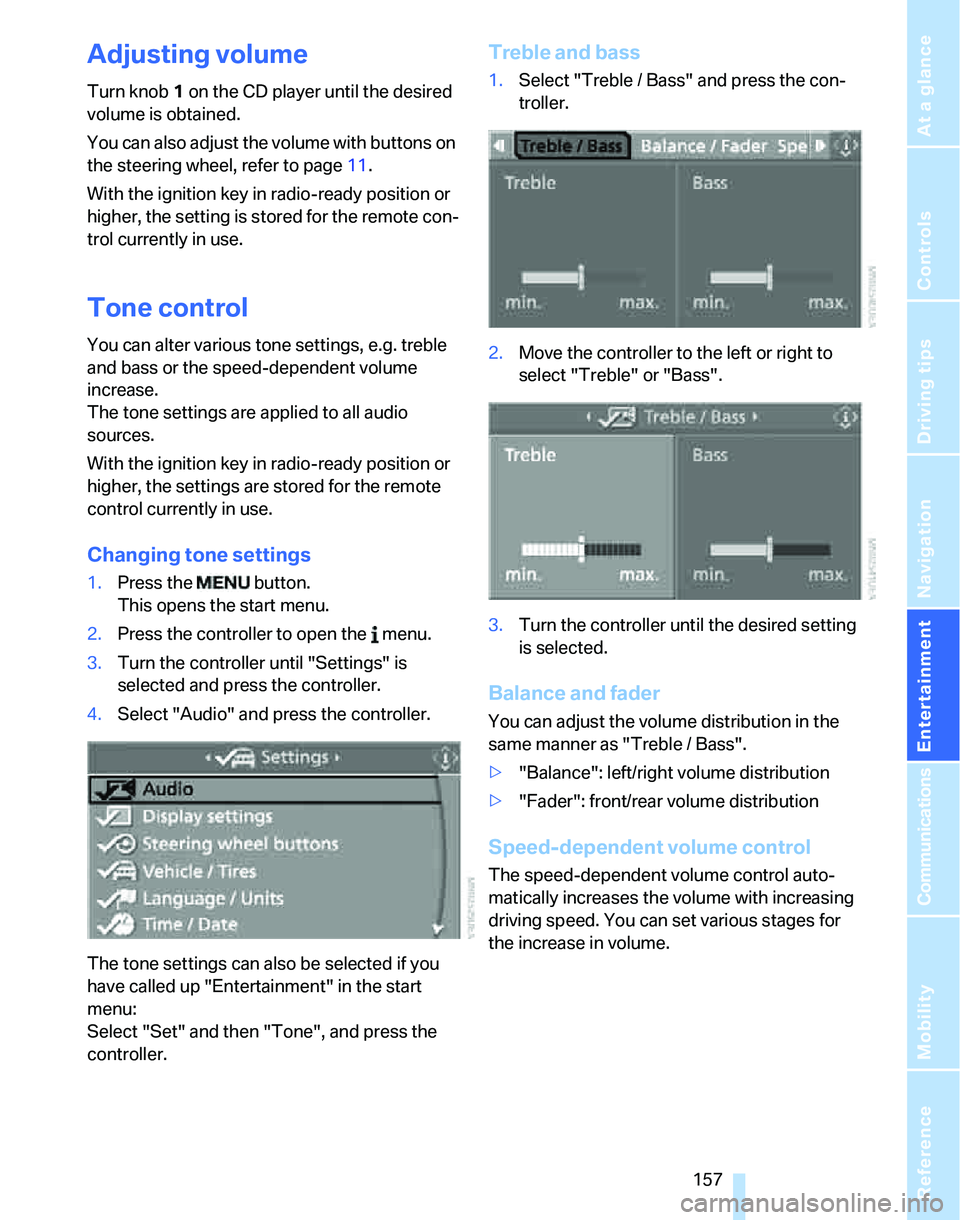
1.Press the button.
This opens the start menu.
2.Press the controller to open the menu.
3.Turn the controller until "Settings" is
selected and press the controller.
4.Select "Audio" and press the controller.
The tone settings can also be selected if you
have called up "Entertainment" in the start
menu:
Select "Set" and then "Tone", and press the
controller.
Treble and bass
1.Select "Treble / Bass" and press the con-
troller.
2.Move the controller to the left or right to
select "Treble" or "Bass".
3.Turn the controller until the desired setting
is selected.
Balance and fader
You can adjust the volume distribution in the
same manner as "Treble / Bass".
>"Balance": left/right volume distribution
>"Fader": front/rear volume distribution
Speed-dependent volume control
The speed-dependent volume control auto-
matically increases the volume with increasing
driving speed. You can set various stages for
the increase in volume.
Page 162 of 268
Radio
160
Radio
Your radio provides reception of the FM and AM
wavebands:
Listening to the radio
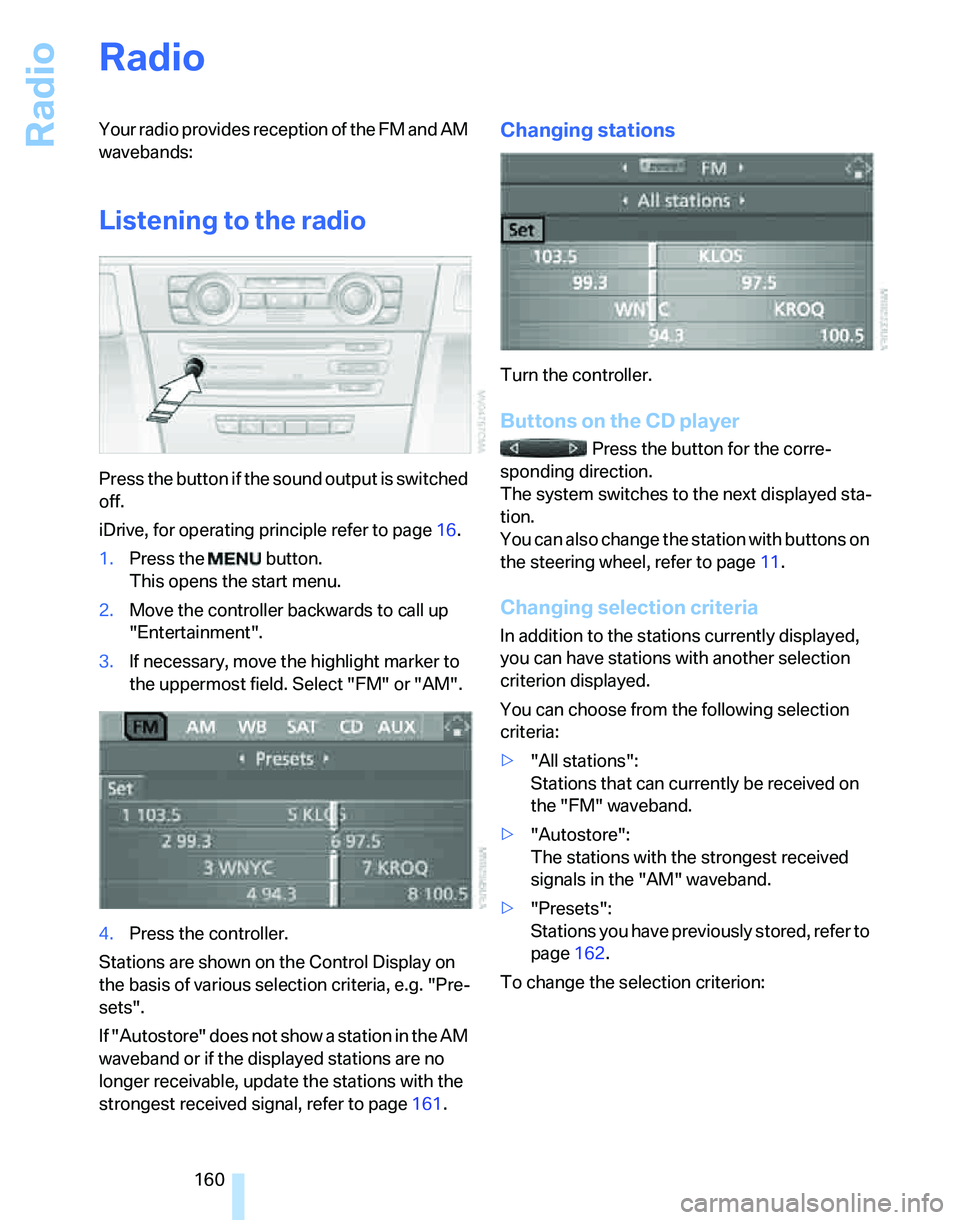
Press the button if the sound output is switched
off.
iDrive, for operating principle refer to page16.
1.Press the button.
This opens the start menu.
2.Move the controller backwards to call up
"Entertainment".
3.If necessary, move the highlight marker to
the uppermost field. Select "FM" or "AM".
4.Press the controller.
Stations are shown on the Control Display on
the basis of various selection criteria, e.g. "Pre-
sets".
If "Autostore" does not show a station in the AM
waveband or if the displayed stations are no
longer receivable, update the stations with the
strongest received signal, refer to page161.
Changing stations
Turn the controller.
Buttons on the CD player
Press the button for the corre-
sponding direction.
The system switches to the next displayed sta-
tion.
You can also change the station with buttons on
the steering wheel, refer to page11.
Changing selection criteria
In addition to the stations currently displayed,
you can have stations with another selection
criterion displayed.
You can choose from the following selection
criteria:
>"All stations":
Stations that can currently be received on
the "FM" waveband.
>"Autostore":
The stations with the strongest received
signals in the "AM" waveband.
>"Presets":
Stations you have previously stored, refer to
page162.
To change the selection criterion:
Page 163 of 268
Navigation
Entertainment
Driving tips
161Reference
At a glance
Controls
Communications
Mobility
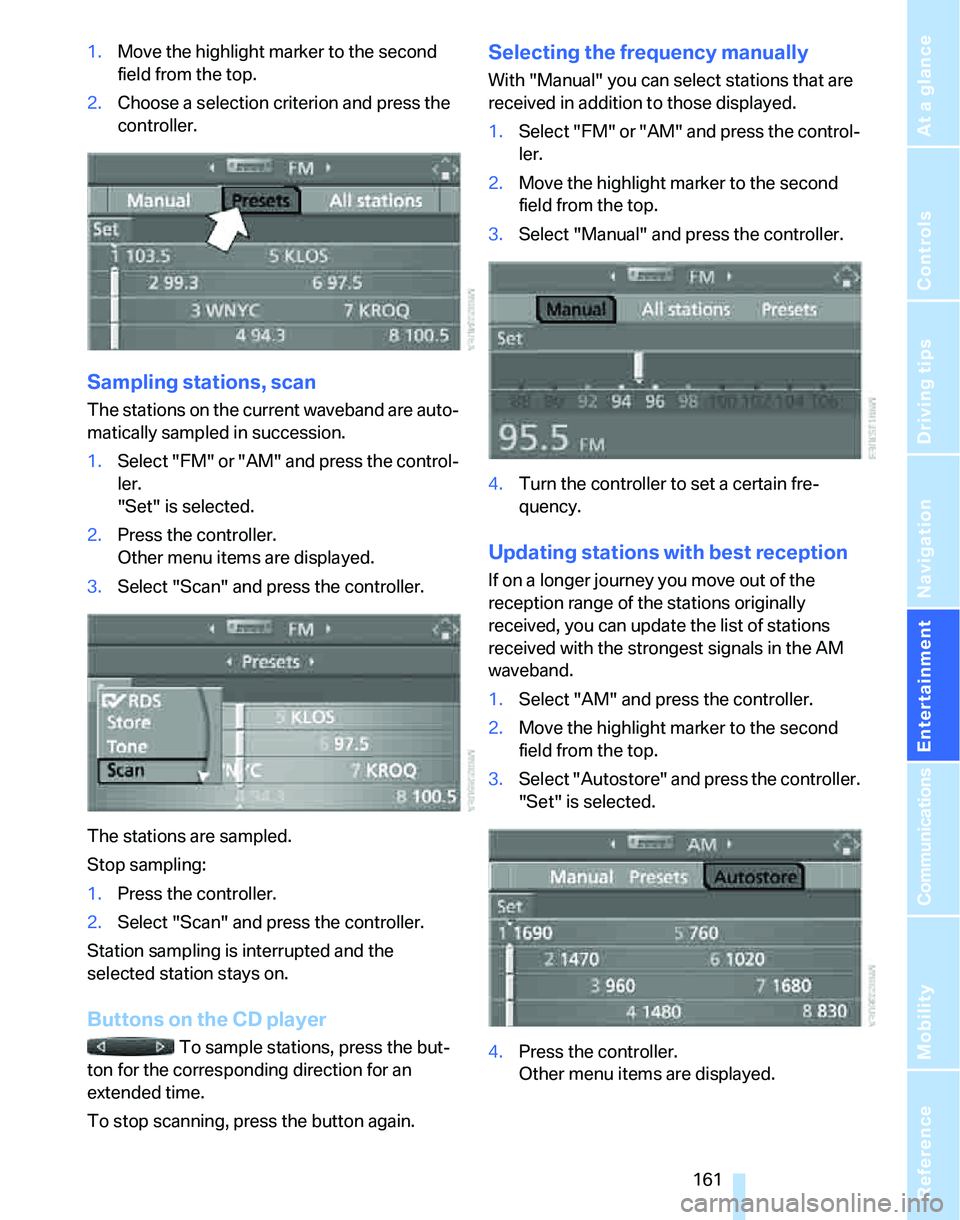
1.Move the highlight marker to the second
field from the top.
2.Choose a selection criterion and press the
controller.
Sampling stations, scan
The stations on the current waveband are auto-
matically sampled in succession.
1.Select "FM" or "AM" and press the control-
ler.
"Set" is selected.
2.Press the controller.
Other menu items are displayed.
3.Select "Scan" and press the controller.
The stations are sampled.
Stop sampling:
1.Press the controller.
2.Select "Scan" and press the controller.
Station sampling is interrupted and the
selected station stays on.
Buttons on the CD player
To sample stations, press the but-
ton for the corresponding direction for an
extended time.
To stop scanning, press the button again.
Selecting the frequency manually
With "Manual" you can select stations that are
received in addition to those displayed.
1.Select "FM" or "AM" and press the control-
ler.
2.Move the highlight marker to the second
field from the top.
3.Select "Manual" and press the controller.
4.Turn the controller to set a certain fre-
quency.
Updating stations with best reception
If on a longer journey you move out of the
reception range of the stations originally
received, you can update the list of stations
received with the strongest signals in the AM
waveband.
1.Select "AM" and press the controller.
2.Move the highlight marker to the second
field from the top.
3.Select "Autostore" and press the controller.
"Set" is selected.
4.Press the controller.
Other menu items are displayed.
Page 167 of 268
Navigation
Entertainment
Driving tips
165Reference
At a glance
Controls
Communications
Mobility
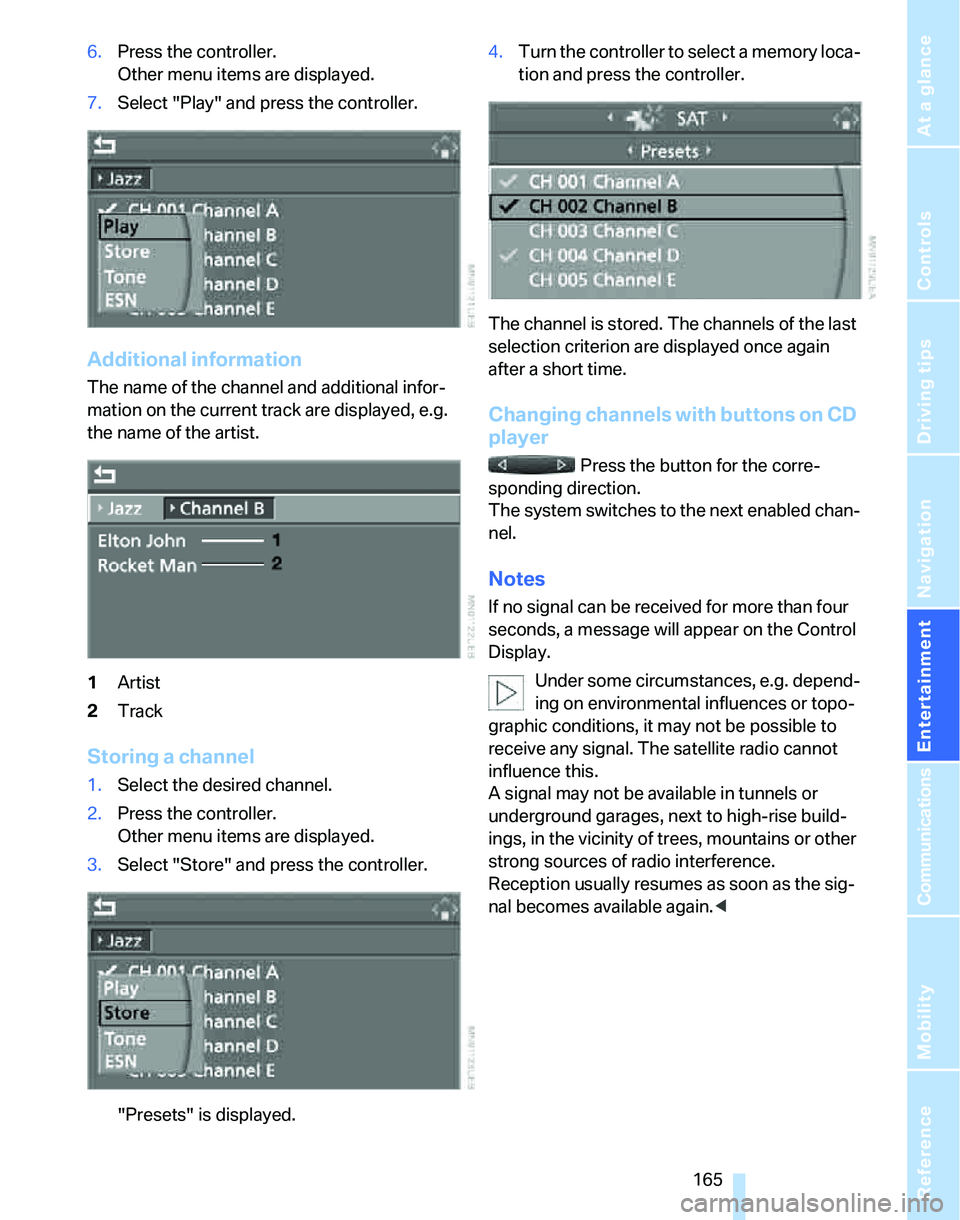
6.Press the controller.
Other menu items are displayed.
7.Select "Play" and press the controller.
Additional information
The name of the channel and additional infor-
mation on the current track are displayed, e.g.
the name of the artist.
1Artist
2Track
Storing a channel
1.Select the desired channel.
2.Press the controller.
Other menu items are displayed.
3.Select "Store" and press the controller.
"Presets" is displayed.4.Turn the controller to select a memory loca-
tion and press the controller.
The channel is stored. The channels of the last
selection criterion are displayed once again
after a short time.
Changing channels with buttons on CD
player
Press the button for the corre-
sponding direction.
The system switches to the next enabled chan-
nel.
Notes
If no signal can be received for more than four
seconds, a message will appear on the Control
Display.
Under some circumstances, e.g. depend-
ing on environmental influences or topo-
graphic conditions, it may not be possible to
receive any signal. The satellite radio cannot
influence this.
A signal may not be available in tunnels or
underground garages, next to high-rise build-
ings, in the vicinity of trees, mountains or other
strong sources of radio interference.
Reception usually resumes as soon as the sig-
nal becomes available again.<
Page 169 of 268
Navigation
Entertainment
Driving tips
167Reference
At a glance
Controls
Communications
Mobility
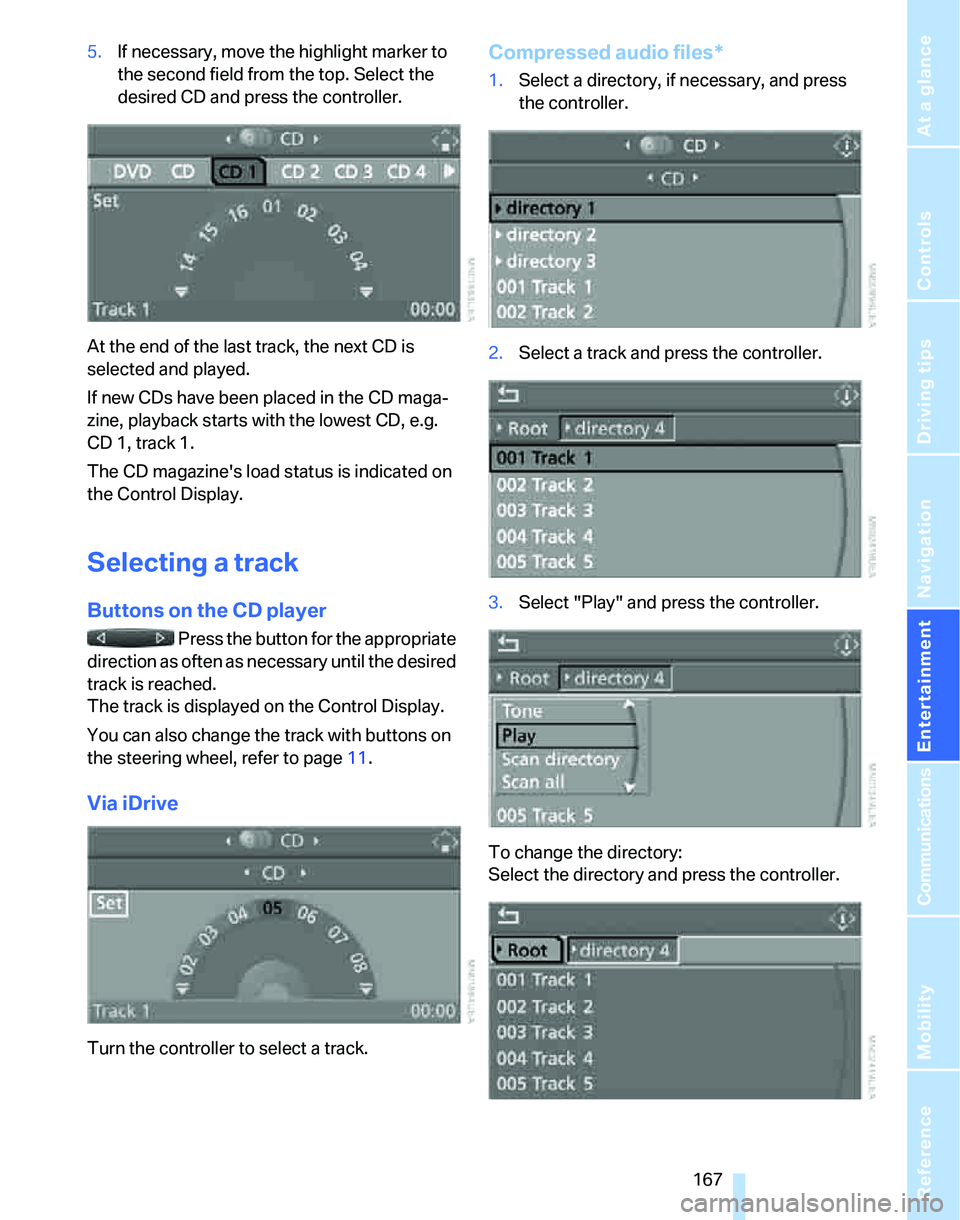
5.If necessary, move the highlight marker to
the second field from the top. Select the
desired CD and press the controller.
At the end of the last track, the next CD is
selected and played.
If new CDs have been placed in the CD maga-
zine, playback starts with the lowest CD, e.g.
CD 1, track 1.
The CD magazine's load status is indicated on
the Control Display.
Selecting a track
Buttons on the CD player
Press the button for the appropriate
direction as often as necessary until the desired
track is reached.
The track is displayed on the Control Display.
You can also change the track with buttons on
the steering wheel, refer to page11.
Via iDrive
Turn the controller to select a track.
Compressed audio files*
1.Select a directory, if necessary, and press
the controller.
2.Select a track and press the controller.
3.Select "Play" and press the controller.
To change the directory:
Select the directory and press the controller.
Page 172 of 268
CD player and CD changer
170
Compressed audio files*
1.Select the current track and press the con-
troller.
2.Select the desired menu item:
>To play all the tracks in the current direc-
tory in random order, select "Random
directory" and press the controller.
>To play all the tracks on the CD in ran-
dom order, select "Random all" and
press the controller.
Stop random function:
1.Press the controller
2.Select "Random directory" or "Random all"
and press the controller.
Fast forward/reverse
Buttons on the CD player:
Press and hold the button for the
corresponding direction.
The tracks can be heard, but reproduction is
distorted.
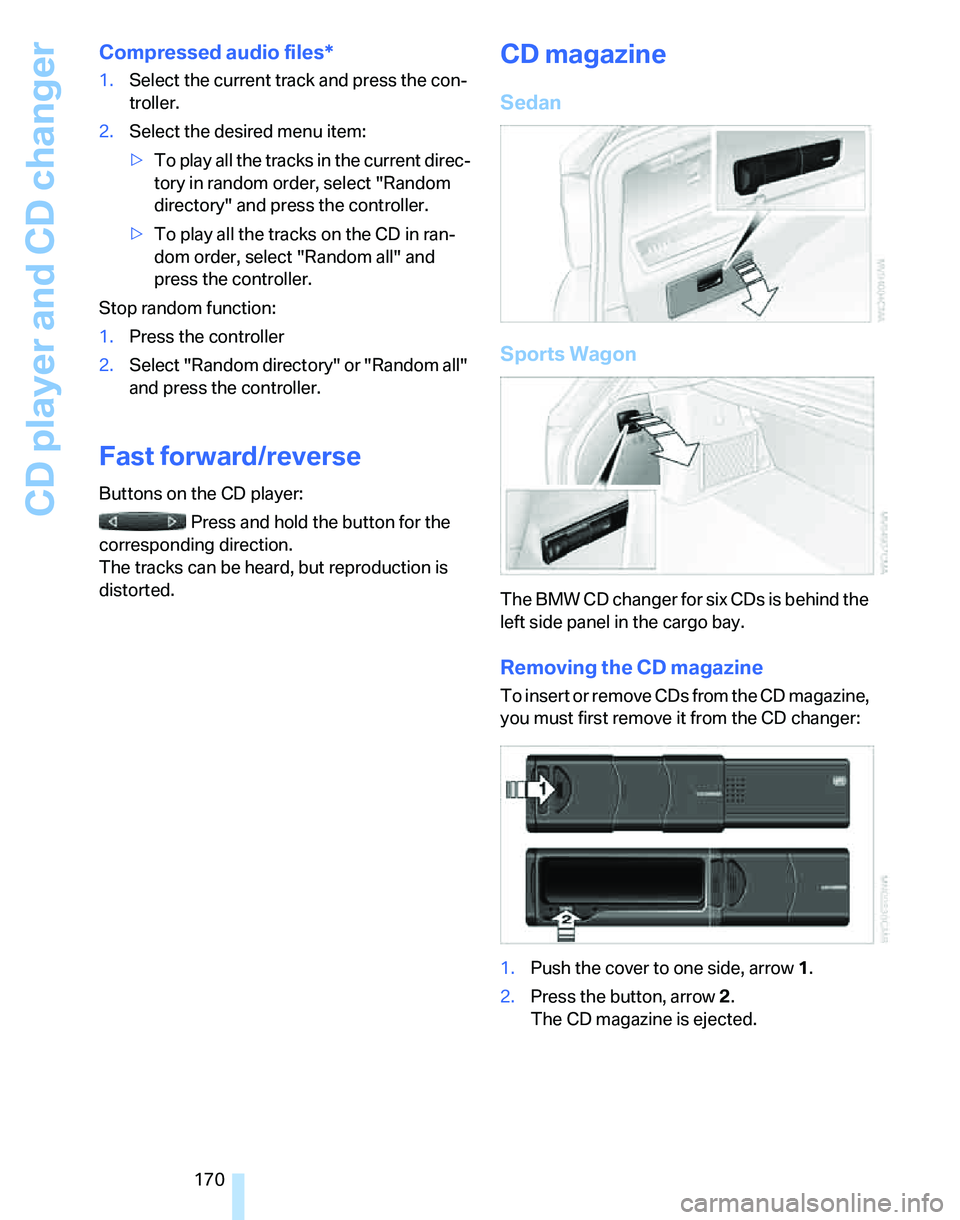
CD magazine
Sedan
Sports Wagon
The BMW CD changer for six CDs is behind the
left side panel in the cargo bay.
Removing the CD magazine
To insert or remove CDs from the CD magazine,
you must first remove it from the CD changer:
1.Push the cover to one side, arrow 1.
2.Press the button, arrow 2.
The CD magazine is ejected.