convertible roof BMW 328I CONVERTIBLE 2010 E93 Owner's Manual
[x] Cancel search | Manufacturer: BMW, Model Year: 2010, Model line: 328I CONVERTIBLE, Model: BMW 328I CONVERTIBLE 2010 E93Pages: 266, PDF Size: 8.6 MB
Page 17 of 266
At a glance
15Reference
Controls
Driving tips
Communications
Navigation
Entertainment
Mobility
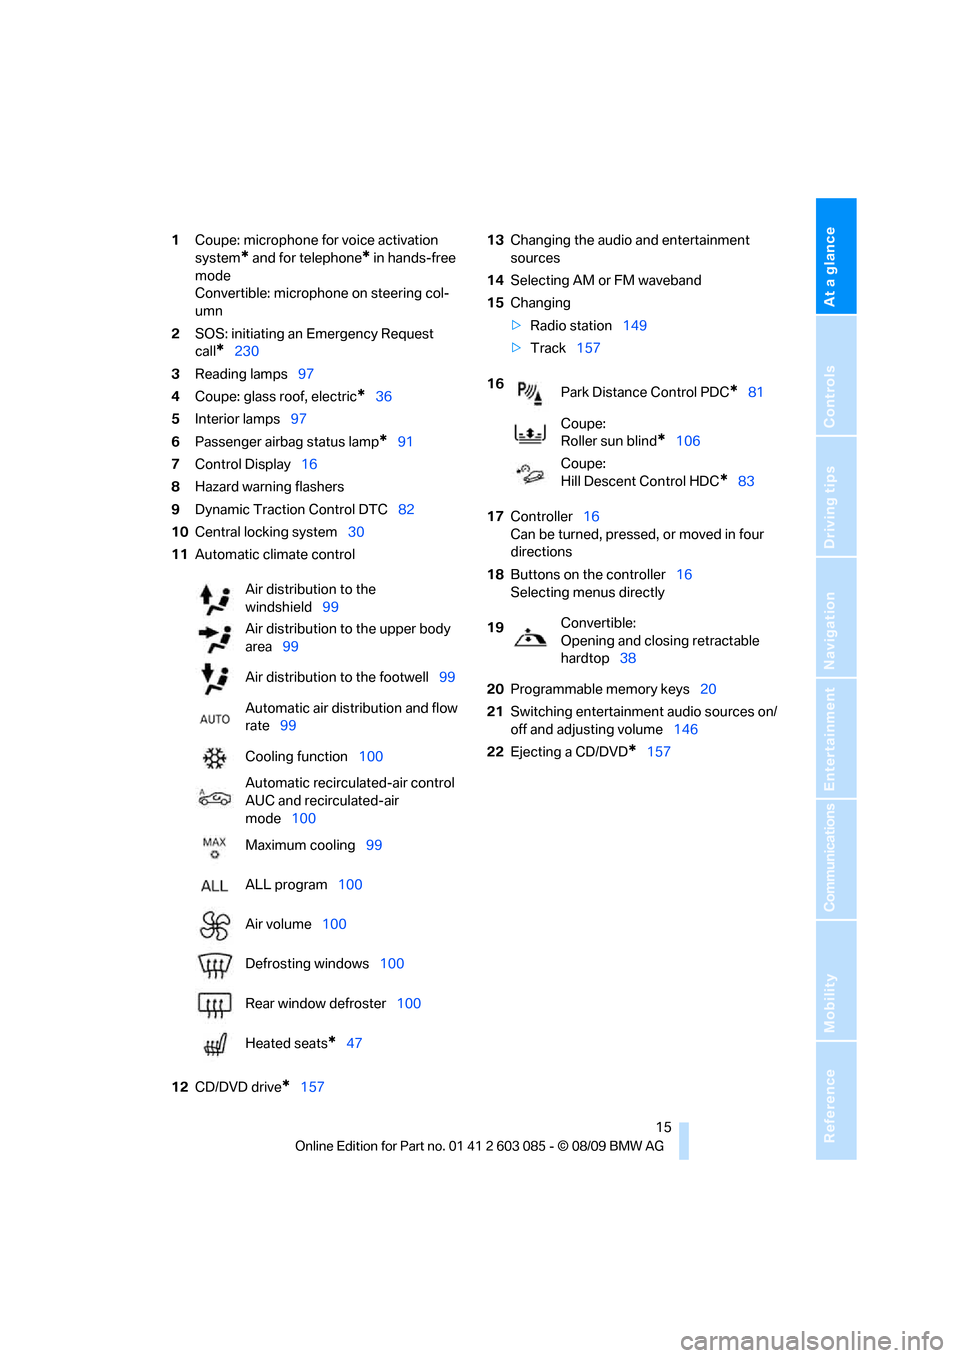
1Coupe: microphone for voice activation
system
* and for telephone* in hands-free
mode
Convertible: microphone on steering col-
umn
2SOS: initiating an Emergency Request
call
*230
3Reading lamps97
4Coupe: glass roof, electric
*36
5Interior lamps97
6Passenger airbag status lamp
*91
7Control Display16
8Hazard warning flashers
9Dynamic Traction Control DTC82
10Central locking system30
11Automatic climate control
12CD/DVD drive
*15713Changing the audio and entertainment
sources
14Selecting AM or FM waveband
15Changing
>Radio station149
>Track157
17Controller16
Can be turned, pressed, or moved in four
directions
18Buttons on the controller16
Selecting menus directly
20Programmable memory keys20
21Switching entertainment audio sources on/
off and adjusting volume146
22Ejecting a CD/DVD
*157 Air distribution to the
windshield99
Air distribution to the upper body
area99
Air distribution to the footwell99
Automatic air distribution and flow
rate99
Cooling function100
Automatic recirculated-air control
AUC and recirculated-air
mode100
Maximum cooling99
ALL program100
Air volume100
Defrosting windows100
Rear window defroster100
Heated seats
*47
16
Park Distance Control PDC*81
Coupe:
Roller sun blind
*106
Coupe:
Hill Descent Control HDC
*83
19Convertible:
Opening and closing retractable
hardtop38
Page 30 of 266
Opening and closing
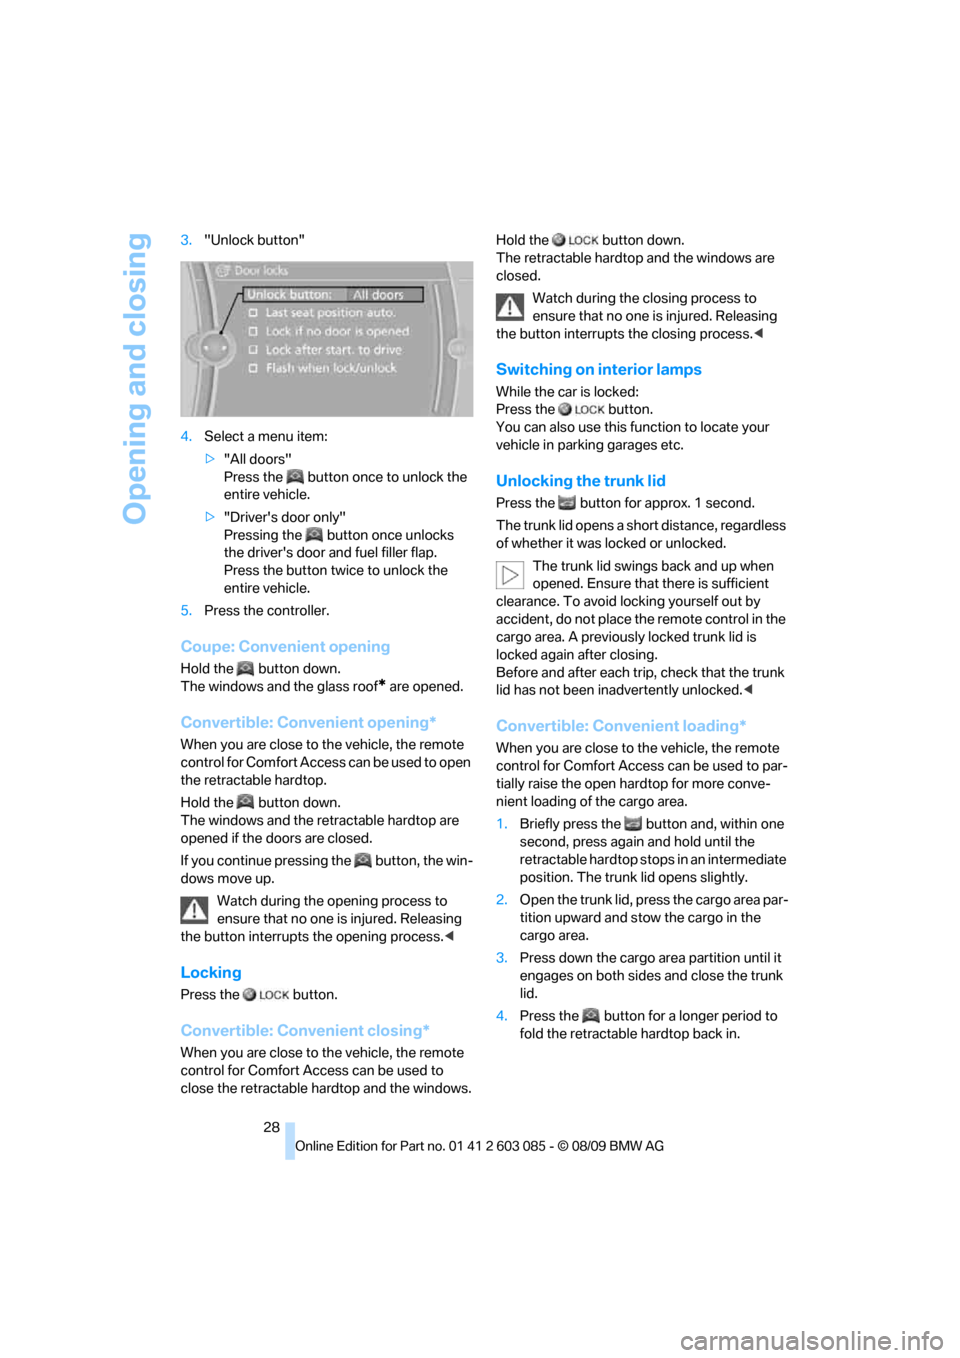
28 3."Unlock button"
4.Select a menu item:
>"All doors"
Press the button once to unlock the
entire vehicle.
>"Driver's door only"
Pressing the button once unlocks
the driver's door and fuel filler flap.
Press the button twice to unlock the
entire vehicle.
5.Press the controller.
Coupe: Convenient opening
Hold the button down.
The windows and the glass roof
* are opened.
Convertible: Convenient opening*
When you are close to the vehicle, the remote
control for Comfort Access can be used to open
the retractable hardtop.
Hold the button down.
The windows and the retractable hardtop are
opened if the doors are closed.
If you continue pressing the button, the win-
dows move up.
Watch during the opening process to
ensure that no one is injured. Releasing
the button interrupts the opening process.<
Locking
Press the button.
Convertible: Convenient closing*
When you are close to the vehicle, the remote
control for Comfort Access can be used to
close the retractable hardtop and the windows.Hold the button down.
The retractable hardtop and the windows are
closed.
Watch during the closing process to
ensure that no one is injured. Releasing
the button interrupts the closing process.<
Switching on interior lamps
While the car is locked:
Press the button.
You can also use this function to locate your
vehicle in parking garages etc.
Unlocking the trunk lid
Press the button for approx. 1 second.
The trunk lid opens a short distance, regardless
of whether it was locked or unlocked.
The trunk lid swings back and up when
opened. Ensure that there is sufficient
clearance. To avoid locking yourself out by
accident, do not place the remote control in the
cargo area. A previously locked trunk lid is
locked again after closing.
Before and after each trip, check that the trunk
lid has not been inadvertently unlocked.<
Convertible: Convenient loading*
When you are close to the vehicle, the remote
control for Comfort Access can be used to par-
tially raise the open hardtop for more conve-
nient loading of the cargo area.
1.Briefly press the button and, within one
second, press again and hold until the
retractable hardtop stops in an intermediate
position. The trunk lid opens slightly.
2.Open the trunk lid, press the cargo area par-
tition upward and stow the cargo in the
cargo area.
3.Press down the cargo area partition until it
engages on both sides and close the trunk
lid.
4.Press the button for a longer period to
fold the retractable hardtop back in.
Page 32 of 266
Opening and closing
30 3.Lock the vehicle.
>Lock the driver's door using the inte-
grated key in the door lock, or
>press down the lock button of the front
passenger door and close the door from
the outside.
Convenient operation
Coupe: if the vehicle is equipped with an alarm
system
* or Comfort Access*, you can also
operate the windows and the glass roof
* via the
door lock.
Convertible: you can operate the windows and
the retractable hardtop via the door lock.
Hold the key in the position for unlocking or
locking.
During each closing procedure, and when
opening the retractable hardtop, watch
the process and ensure that no one becomes
trapped. Releasing the key stops the opera-
tion.<
Manual operation
In the event of an electrical malfunction, you can
lock and unlock the driver's door by turning the
integrated key to the corresponding limit posi-
tions in the door lock.
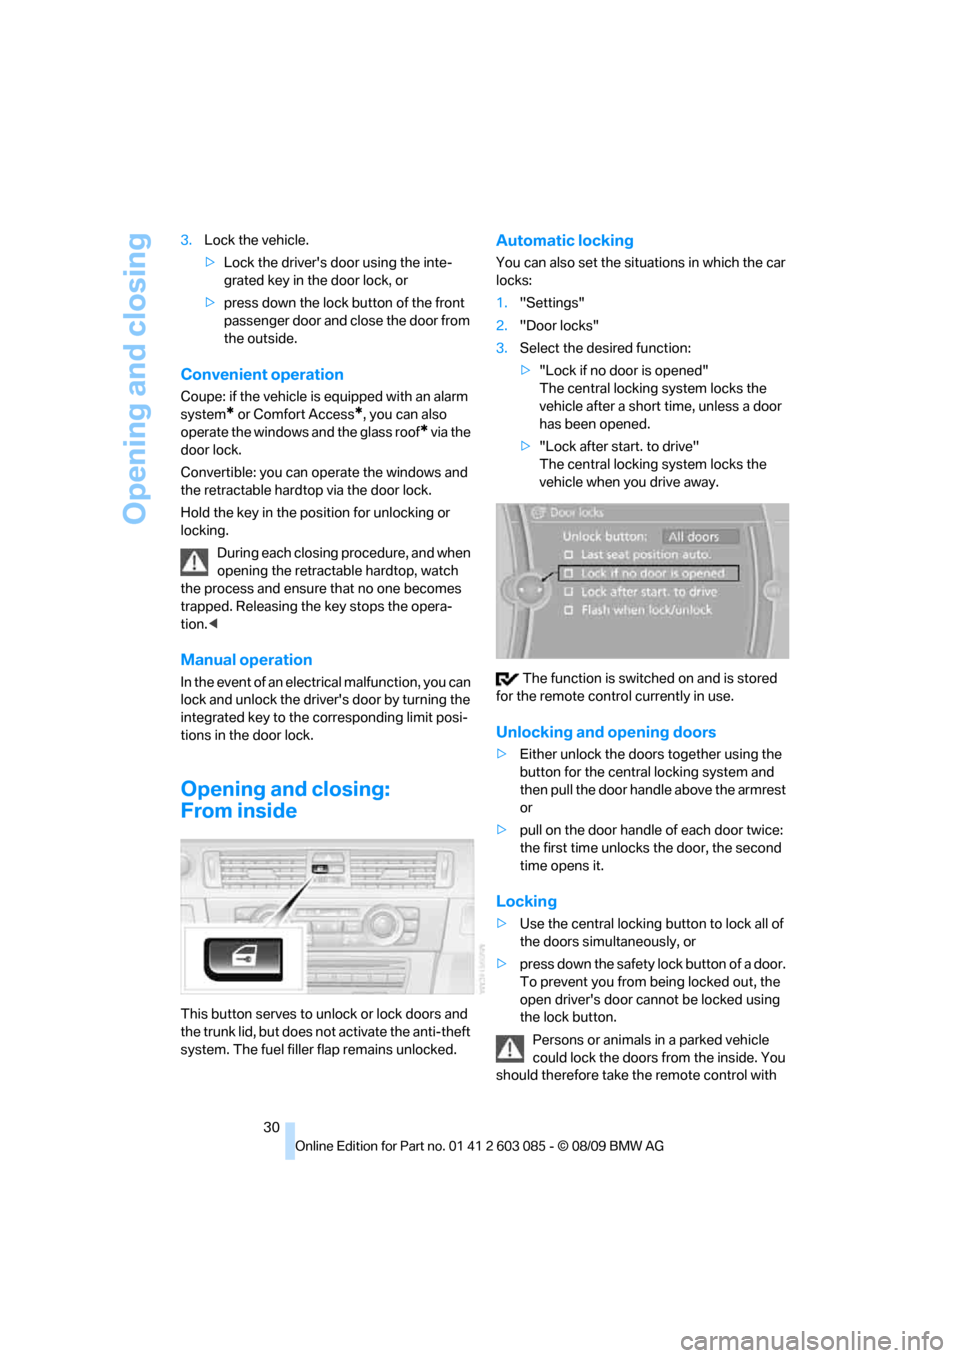
Opening and closing:
From inside
This button serves to unlock or lock doors and
the trunk lid, but does not activate the anti-theft
system. The fuel filler flap remains unlocked.
Automatic locking
You can also set the situations in which the car
locks:
1."Settings"
2."Door locks"
3.Select the desired function:
>"Lock if no door is opened"
The central locking system locks the
vehicle after a short time, unless a door
has been opened.
>"Lock after start. to drive"
The central locking system locks the
vehicle when you drive away.
The function is switched on and is stored
for the remote control currently in use.
Unlocking and opening doors
>Either unlock the doors together using the
button for the central locking system and
then pull the door handle above the armrest
or
>pull on the door handle of each door twice:
the first time unlocks the door, the second
time opens it.
Locking
>Use the central locking button to lock all of
the doors simultaneously, or
>press down the safety lock button of a door.
To prevent you from being locked out, the
open driver's door cannot be locked using
the lock button.
Persons or animals in a parked vehicle
could lock the doors from the inside. You
should therefore take the remote control with
Page 35 of 266
Controls
33Reference
At a glance
Driving tips
Communications
Navigation
Entertainment
Mobility
10 seconds. The interior motion sensor and
the tilt alarm sensor are not activated.
>The indicator lamp goes out after unlocking:
your vehicle has not been disturbed while
you were away.
>If the indicator lamp flashes after unlocking
until the remote control is inserted in the
ignition, but for no longer than approx.
5 minutes: your vehicle has been disturbed
while you were away.
Tilt alarm sensor
The tilt of the vehicle is monitored. The alarm
system reacts, e.g. to attempts to steal a wheel
or tow the vehicle.
Interior motion sensor
Coupe
In order for the interior motion sensor to func-
tion properly, the windows and glass roof must
be completely closed
*.
Convertible
The interior of the car is monitored up to the
height of the seat cushions. Thus the alarm sys-
tem is activated together with the interior
motion sensor even if the hardtop is open. The
alarm can be triggered unintentionally by falling
objects such as leaves, refer to Avoiding unin-
tentional alarms.
Avoiding unintentional alarms
The tilt alarm sensor and interior motion sensor
may be switched off at the same time. This pre-
vents unintentional alarms, e.g. in the following
situations:
>In duplex garages
>During transport on car-carrying trains,
boats/ships or on a trailer
>When animals are to remain in the vehicle
Switching off tilt alarm sensor and
interior motion sensor
Press the button on the remote control
again as soon as the vehicle is locked.The indicator lamp lights up briefly and then
flashes continuously. The tilt alarm sensor and
the interior motion sensor are switched off until
the next time the vehicle is unlocked and subse-
quently locked again.
Comfort Access*
Comfort Access enables you to enter your vehi-
cle without needing to hold the remote control
in your hand. All you need to do is wear the
remote control close to your body, e.g. in your
jacket pocket. The vehicle detects the corre-
sponding remote control within the immediate
vicinity or in the passenger compartment.
Comfort Access supports the following func-
tions:
>Unlocking/locking the vehicle
>Unlocking the trunk lid separately
>Engine starting
>Convenient closing
Functional requirement
>The vehicle or the trunk lid can only be
locked when the vehicle detects that the
remote control currently in use is outside of
the vehicle.
>The vehicle cannot be locked or unlocked
again until after approx. 2 seconds.
>The engine can only be started when the
vehicle detects that the remote control cur-
rently in use is inside the vehicle.
Comparison to the standard remote
control
In general, there is no difference between using
Comfort Access or pressing the buttons on the
remote control to carry out the functions men-
tioned above. You should therefore first famil-
iarize yourself with the instructions on opening
and closing starting on page26.
Special features regarding the use of Comfort
Access are described below.
If you notice a brief delay while opening or
closing windows, the glass roof or retract-
Page 38 of 266
Opening and closing
36
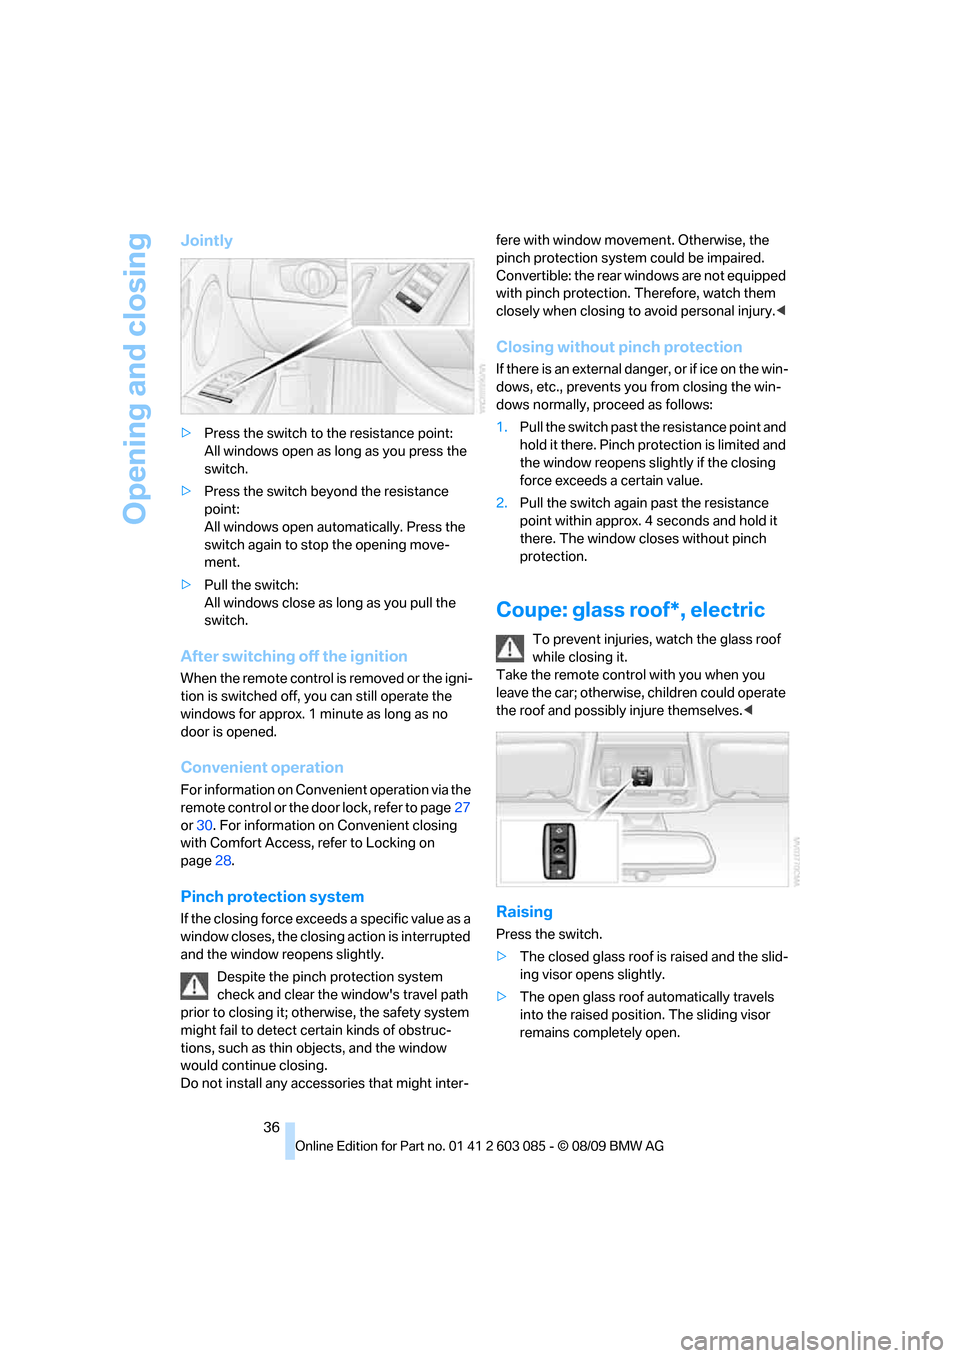
Jointly
>Press the switch to the resistance point:
All windows open as long as you press the
switch.
>Press the switch beyond the resistance
point:
All windows open automatically. Press the
switch again to stop the opening move-
ment.
>Pull the switch:
All windows close as long as you pull the
switch.
After switching off the ignition
When the remote control is removed or the igni-
tion is switched off, you can still operate the
windows for approx. 1 minute as long as no
door is opened.
Convenient operation
For information on Convenient operation via the
remote control or the door lock, refer to page27
or30. For information on Convenient closing
with Comfort Access, refer to Locking on
page28.
Pinch protection system
If the closing force exceeds a specific value as a
window closes, the closing action is interrupted
and the window reopens slightly.
Despite the pinch protection system
check and clear the window's travel path
prior to closing it; otherwise, the safety system
might fail to detect certain kinds of obstruc-
tions, such as thin objects, and the window
would continue closing.
Do not install any accessories that might inter-fere with window movement. Otherwise, the
pinch protection system could be impaired.
Convertible: the rear windows are not equipped
with pinch protection. Therefore, watch them
closely when closing to avoid personal injury.<
Closing without pinch protection
If there is an external danger, or if ice on the win-
dows, etc., prevents you from closing the win-
dows normally, proceed as follows:
1.Pull the switch past the resistance point and
hold it there. Pinch protection is limited and
the window reopens slightly if the closing
force exceeds a certain value.
2.Pull the switch again past the resistance
point within approx. 4 seconds and hold it
there. The window closes without pinch
protection.
Coupe: glass roof*, electric
To prevent injuries, watch the glass roof
while closing it.
Take the remote control with you when you
leave the car; otherwise, children could operate
the roof and possibly injure themselves.<
Raising
Press the switch.
>The closed glass roof is raised and the slid-
ing visor opens slightly.
>The open glass roof automatically travels
into the raised position. The sliding visor
remains completely open.
Page 40 of 266
Opening and closing
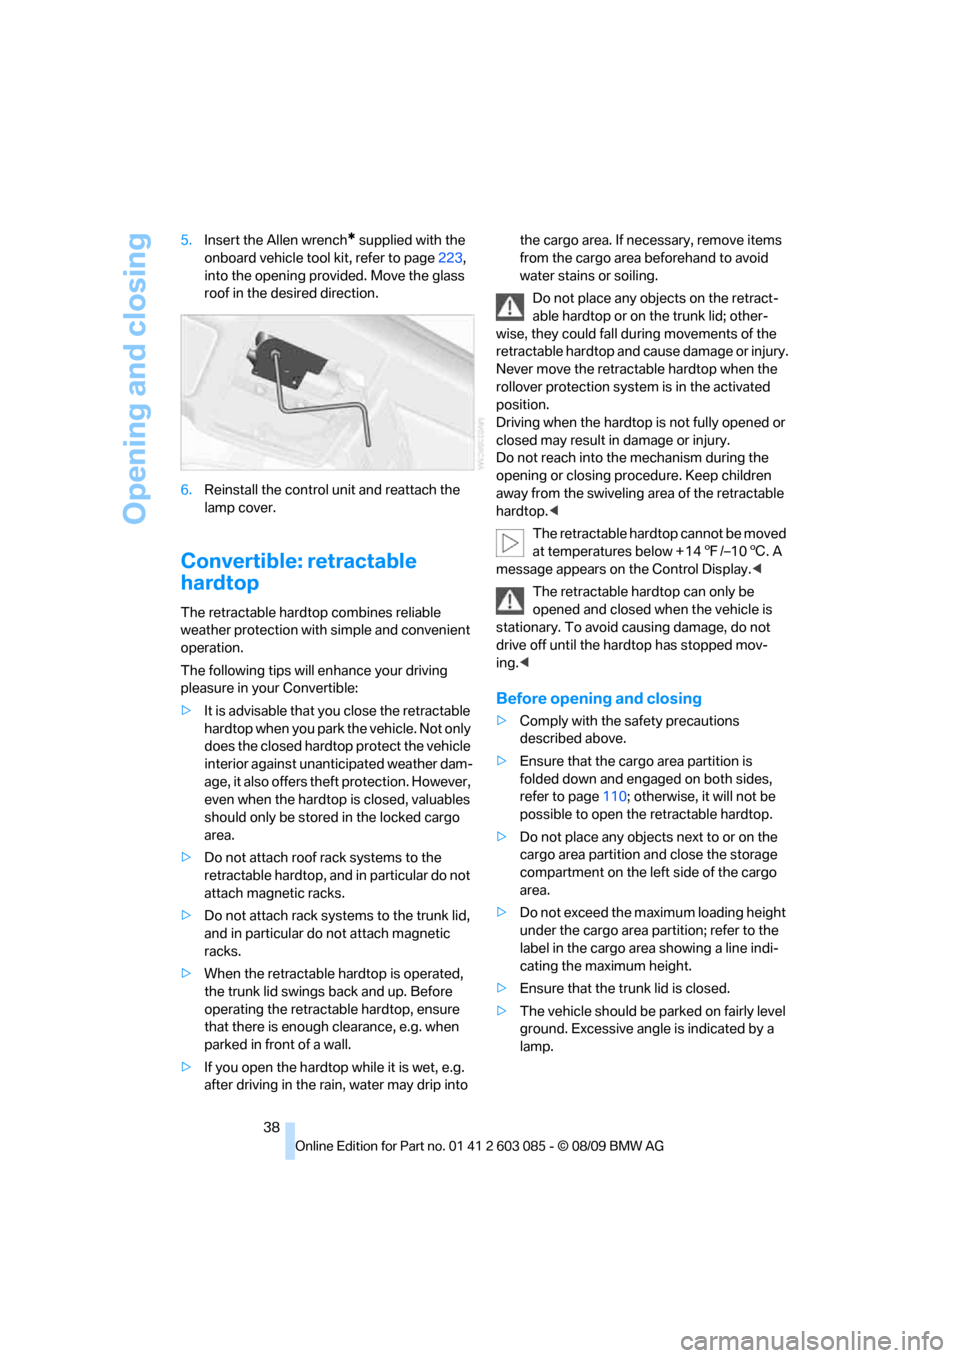
38 5.Insert the Allen wrench
* supplied with the
onboard vehicle tool kit, refer to page223,
into the opening provided. Move the glass
roof in the desired direction.
6.Reinstall the control unit and reattach the
lamp cover.
Convertible: retractable
hardtop
The retractable hardtop combines reliable
weather protection with simple and convenient
operation.
The following tips will enhance your driving
pleasure in your Convertible:
>It is advisable that you close the retractable
hardtop when you park the vehicle. Not only
does the closed hardtop protect the vehicle
interior against unanticipated weather dam-
age, it also offers theft protection. However,
even when the hardtop is closed, valuables
should only be stored in the locked cargo
area.
>Do not attach roof rack systems to the
retractable hardtop, and in particular do not
attach magnetic racks.
>Do not attach rack systems to the trunk lid,
and in particular do not attach magnetic
racks.
>When the retractable hardtop is operated,
the trunk lid swings back and up. Before
operating the retractable hardtop, ensure
that there is enough clearance, e.g. when
parked in front of a wall.
>If you open the hardtop while it is wet, e.g.
after driving in the rain, water may drip into the cargo area. If necessary, remove items
from the cargo area beforehand to avoid
water stains or soiling.
Do not place any objects on the retract-
able hardtop or on the trunk lid; other-
wise, they could fall during movements of the
retractable hardtop and cause damage or injury.
Never move the retractable hardtop when the
rollover protection system is in the activated
position.
Driving when the hardtop is not fully opened or
closed may result in damage or injury.
Do not reach into the mechanism during the
opening or closing procedure. Keep children
away from the swiveling area of the retractable
hardtop.<
The retractable hardtop cannot be moved
at temperatures below + 147/–106. A
message appears on the Control Display.<
The retractable hardtop can only be
opened and closed when the vehicle is
stationary. To avoid causing damage, do not
drive off until the hardtop has stopped mov-
ing.<
Before opening and closing
>Comply with the safety precautions
described above.
>Ensure that the cargo area partition is
folded down and engaged on both sides,
refer to page110; otherwise, it will not be
possible to open the retractable hardtop.
>Do not place any objects next to or on the
cargo area partition and close the storage
compartment on the left side of the cargo
area.
>Do not exceed the maximum loading height
under the cargo area partition; refer to the
label in the cargo area showing a line indi-
cating the maximum height.
>Ensure that the trunk lid is closed.
>The vehicle should be parked on fairly level
ground. Excessive angle is indicated by a
lamp.
Page 92 of 266
Technology for driving comfort and safety
90
Airbags
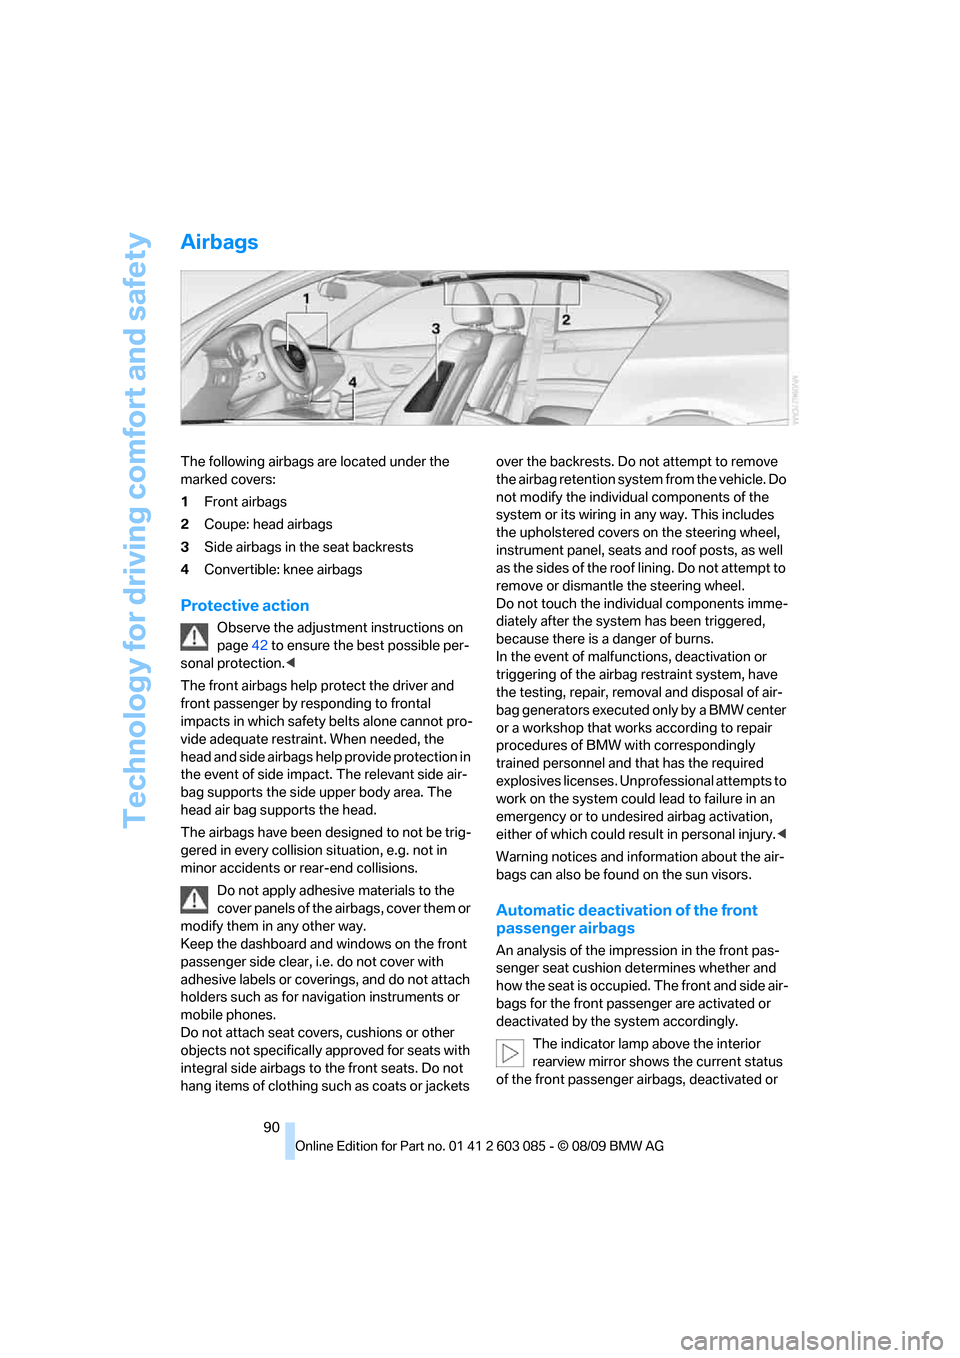
The following airbags are located under the
marked covers:
1Front airbags
2Coupe: head airbags
3Side airbags in the seat backrests
4Convertible: knee airbags
Protective action
Observe the adjustment instructions on
page42 to ensure the best possible per-
sonal protection.<
The front airbags help protect the driver and
front passenger by responding to frontal
impacts in which safety belts alone cannot pro-
vide adequate restraint. When needed, the
head and side airbags help provide protection in
the event of side impact. The relevant side air-
bag supports the side upper body area. The
head air bag supports the head.
The airbags have been designed to not be trig-
gered in every collision situation, e.g. not in
minor accidents or rear-end collisions.
Do not apply adhesive materials to the
cover panels of the airbags, cover them or
modify them in any other way.
Keep the dashboard and windows on the front
passenger side clear, i.e. do not cover with
adhesive labels or coverings, and do not attach
holders such as for navigation instruments or
mobile phones.
Do not attach seat covers, cushions or other
objects not specifically approved for seats with
integral side airbags to the front seats. Do not
hang items of clothing such as coats or jackets over the backrests. Do not attempt to remove
the airbag retention system from the vehicle. Do
not modify the individual components of the
system or its wiring in any way. This includes
the upholstered covers on the steering wheel,
instrument panel, seats and roof posts, as well
as the sides of the roof lining. Do not attempt to
remove or dismantle the steering wheel.
Do not touch the individual components imme-
diately after the system has been triggered,
because there is a danger of burns.
In the event of malfunctions, deactivation or
triggering of the airbag restraint system, have
the testing, repair, removal and disposal of air-
bag generators executed only by a BMW center
or a workshop that works according to repair
procedures of BMW with correspondingly
trained personnel and that has the required
explosives licenses. Unprofessional attempts to
work on the system could lead to failure in an
emergency or to undesired airbag activation,
either of which could result in personal injury.<
Warning notices and information about the air-
bags can also be found on the sun visors.
Automatic deactivation of the front
passenger airbags
An analysis of the impression in the front pas-
senger seat cushion determines whether and
how the seat is occupied. The front and side air-
bags for the front passenger are activated or
deactivated by the system accordingly.
The indicator lamp above the interior
rearview mirror shows the current status
of the front passenger airbags, deactivated or
Page 110 of 266
Practical interior accessories
108 >Storage tray
>Storage compartment with cover
>Cupholders
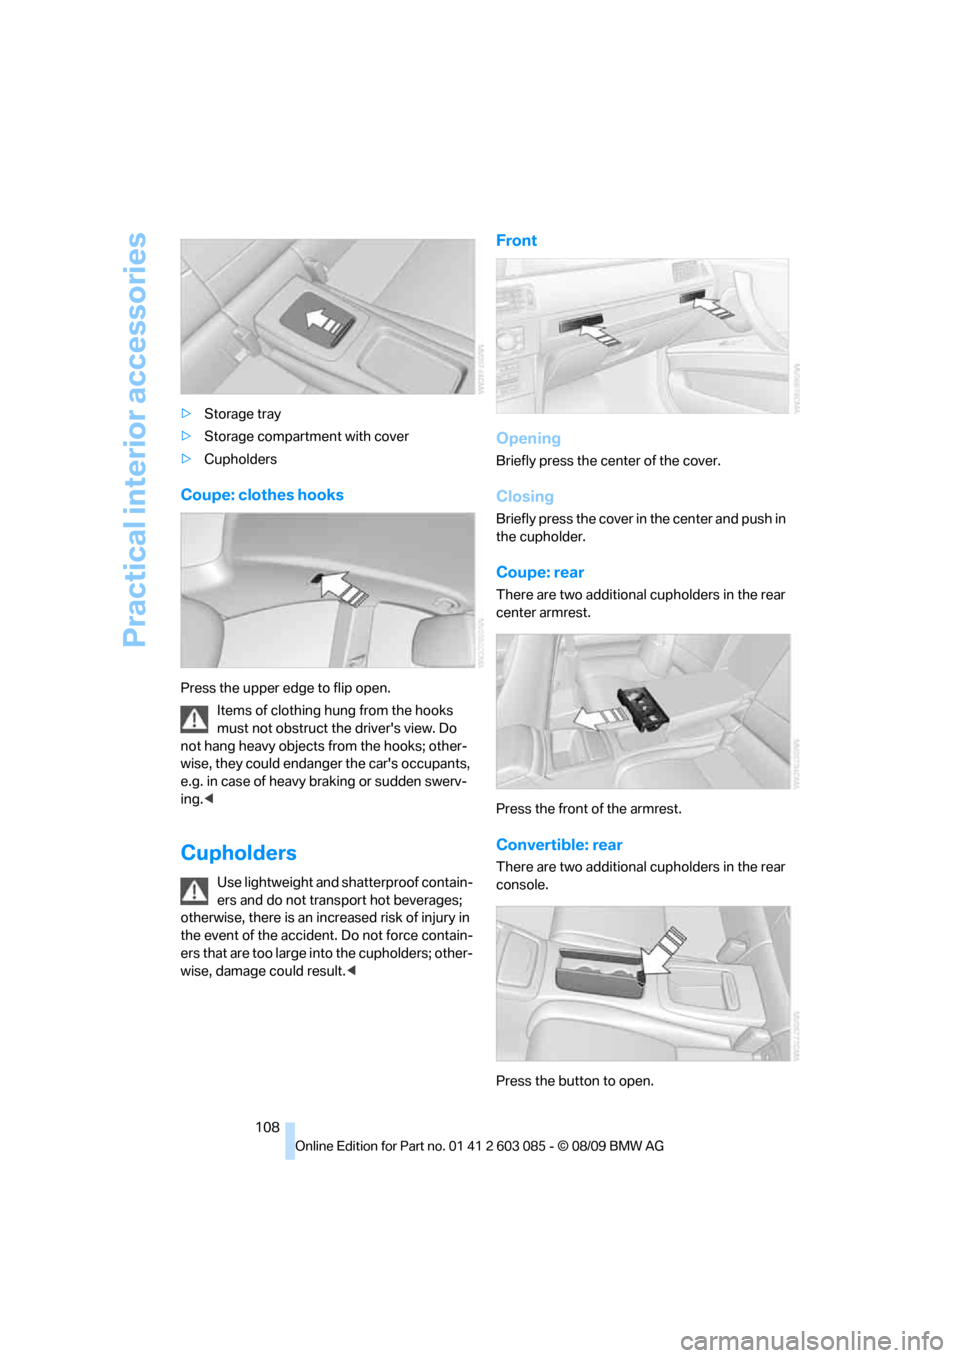
Coupe: clothes hooks
Press the upper edge to flip open.
Items of clothing hung from the hooks
must not obstruct the driver's view. Do
not hang heavy objects from the hooks; other-
wise, they could endanger the car's occupants,
e.g. in case of heavy braking or sudden swerv-
ing.<
Cupholders
Use lightweight and shatterproof contain-
ers and do not transport hot beverages;
otherwise, there is an increased risk of injury in
the event of the accident. Do not force contain-
ers that are too large into the cupholders; other-
wise, damage could result.<
Front
Opening
Briefly press the center of the cover.
Closing
Briefly press the cover in the center and push in
the cupholder.
Coupe: rear
There are two additional cupholders in the rear
center armrest.
Press the front of the armrest.
Convertible: rear
There are two additional cupholders in the rear
console.
Press the button to open.
Page 124 of 266
Things to remember when driving
122
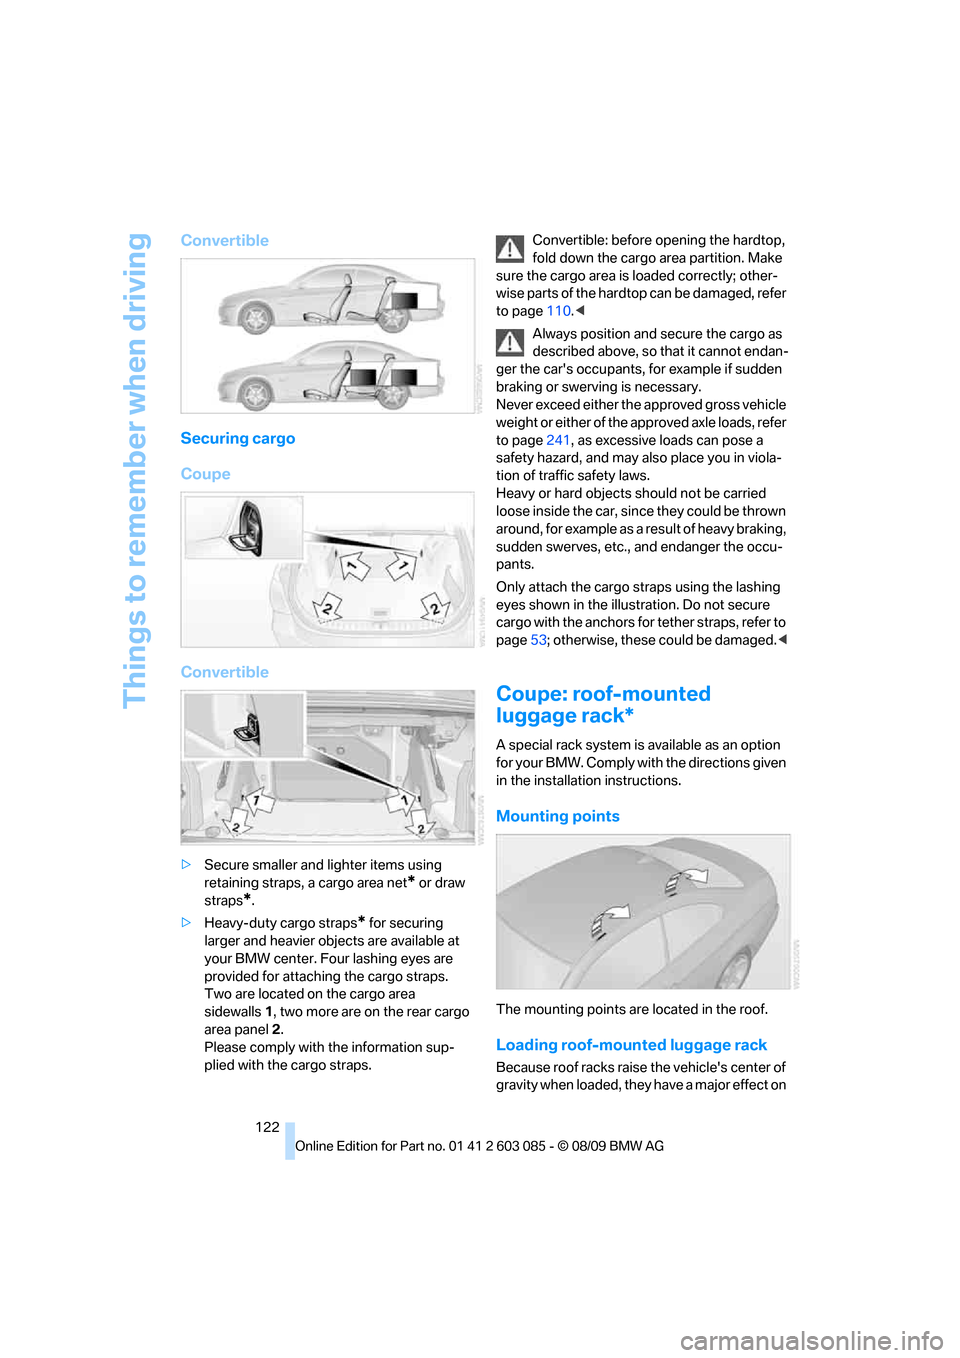
Convertible
Securing cargo
Coupe
Convertible
>Secure smaller and lighter items using
retaining straps, a cargo area net
* or draw
straps
*.
>Heavy-duty cargo straps
* for securing
larger and heavier objects are available at
your BMW center. Four lashing eyes are
provided for attaching the cargo straps.
Two are located on the cargo area
sidewalls1, two more are on the rear cargo
area panel2.
Please comply with the information sup-
plied with the cargo straps.Convertible: before opening the hardtop,
fold down the cargo area partition. Make
sure the cargo area is loaded correctly; other-
wise parts of the hardtop can be damaged, refer
to page110.<
Always position and secure the cargo as
described above, so that it cannot endan-
ger the car's occupants, for example if sudden
braking or swerving is necessary.
Never exceed either the approved gross vehicle
weight or either of the approved axle loads, refer
to page241, as excessive loads can pose a
safety hazard, and may also place you in viola-
tion of traffic safety laws.
Heavy or hard objects should not be carried
loose inside the car, since they could be thrown
around, for example as a result of heavy braking,
sudden swerves, etc., and endanger the occu-
pants.
Only attach the cargo straps using the lashing
eyes shown in the illustration. Do not secure
cargo with the anchors for tether straps, refer to
page53; otherwise, these could be damaged.<
Coupe: roof-mounted
luggage rack*
A special rack system is available as an option
f o r y o u r B M W . C o m p l y w i t h t h e d i r e c t i o n s g i v e n
in the installation instructions.
Mounting points
The mounting points are located in the roof.
Loading roof-mounted luggage rack
Because roof racks raise the vehicle's center of
gravity when loaded, they have a major effect on
Page 188 of 266
Telephone
186
Selecting an entry
The connection to the phone number of the
selected entry is established.
Notes
Notes on Emergency Requests
Do not use the voice activation system to ini-
tiate an Emergency Request. In stressful situa-
tions, the voice and vocal pitch can change.
This can unnecessarily delay the establishment
of a telephone connection. Use the SOS but-
ton
* instead, refer to page230.
Important for voice commands
For voice commands, bear in mind the follow-
ing:
>Say the commands, numbers and letters
smoothly and with normal volume, empha-
sis and speed.
>Always say commands in the language of
the voice activation system.
>Keep the doors, windows, glass roof
* or
convertible top
* closed to prevent interfer-
ence from outside noise.
>Avoid ambient noise in the vehicle while
speaking.
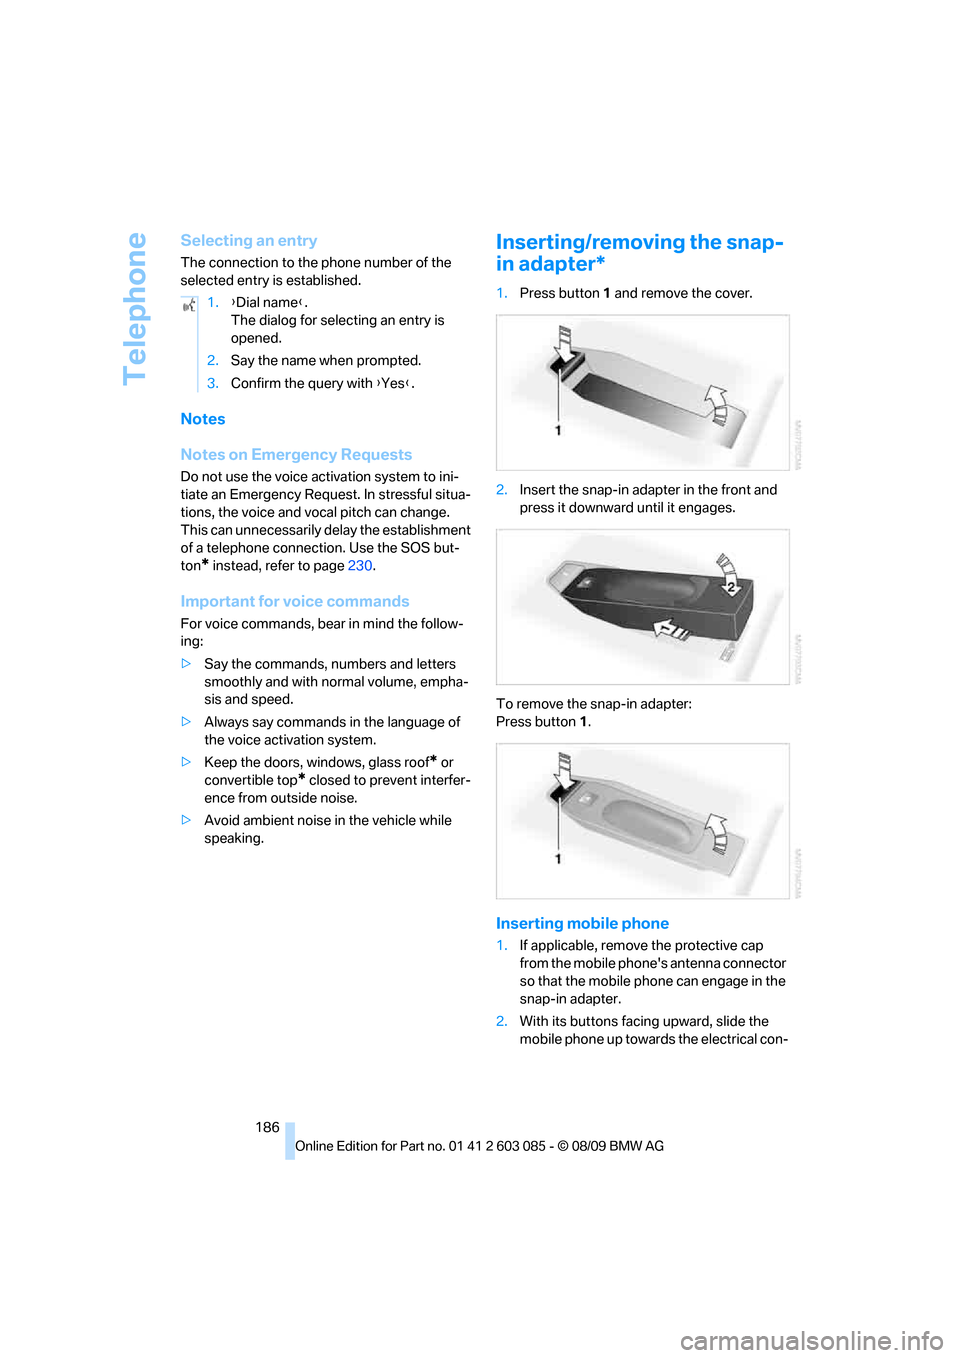
Inserting/removing the snap-
in adapter*
1.Press button1 and remove the cover.
2.Insert the snap-in adapter in the front and
press it downward until it engages.
To remove the snap-in adapter:
Press button 1.
Inserting mobile phone
1.If applicable, remove the protective cap
from the mobile phone's antenna connector
so that the mobile phone can engage in the
snap-in adapter.
2.With its buttons facing upward, slide the
mobile phone up towards the electrical con- 1.{Dial name}.
The dialog for selecting an entry is
opened.
2.Say the name when prompted.
3.Confirm the query with {Yes}.