change time BMW 328I TOURING 2011 E91 User Guide
[x] Cancel search | Manufacturer: BMW, Model Year: 2011, Model line: 328I TOURING, Model: BMW 328I TOURING 2011 E91Pages: 286, PDF Size: 8.25 MB
Page 138 of 286
Destination entry
136
Destination entry via BMW Assist*
A connection is established to the BMW Con-
cierge service, refer to page196.
1."Navigation"
2."Enter address"
3.Open "Options".
4."BMW Assist dest. entry"
Entering special destinations by name
1."Navigation"
2."Points of Interest"
3."Name, A-Z search"
4.Enter the letters.
Depending on the distance, the search may
take some time. The list can contain a max-
imum of 100 entries.
5.Change to the list of special destinations.
6.Highlight a special destination: the destina-
tion is displayed in the preview map.
7.Select the special destination.
8.Select the symbol.
9."Start guidance" or "Add as another dest.".
Displaying special destinations in the
map
To display symbols of the special destinations
in the map:
1."Navigation"
2."Map"
3.Open "Options".
4."Display Points of Interest"
5.Select the settings.
Entering the destination
via the map
If you only know the location of the town or
street, you can enter the destination using the
map.
Opening the map
1."Navigation"
2."Map"
A map section is displayed on the Control Dis-
play. The map shows the current position of the
vehicle.
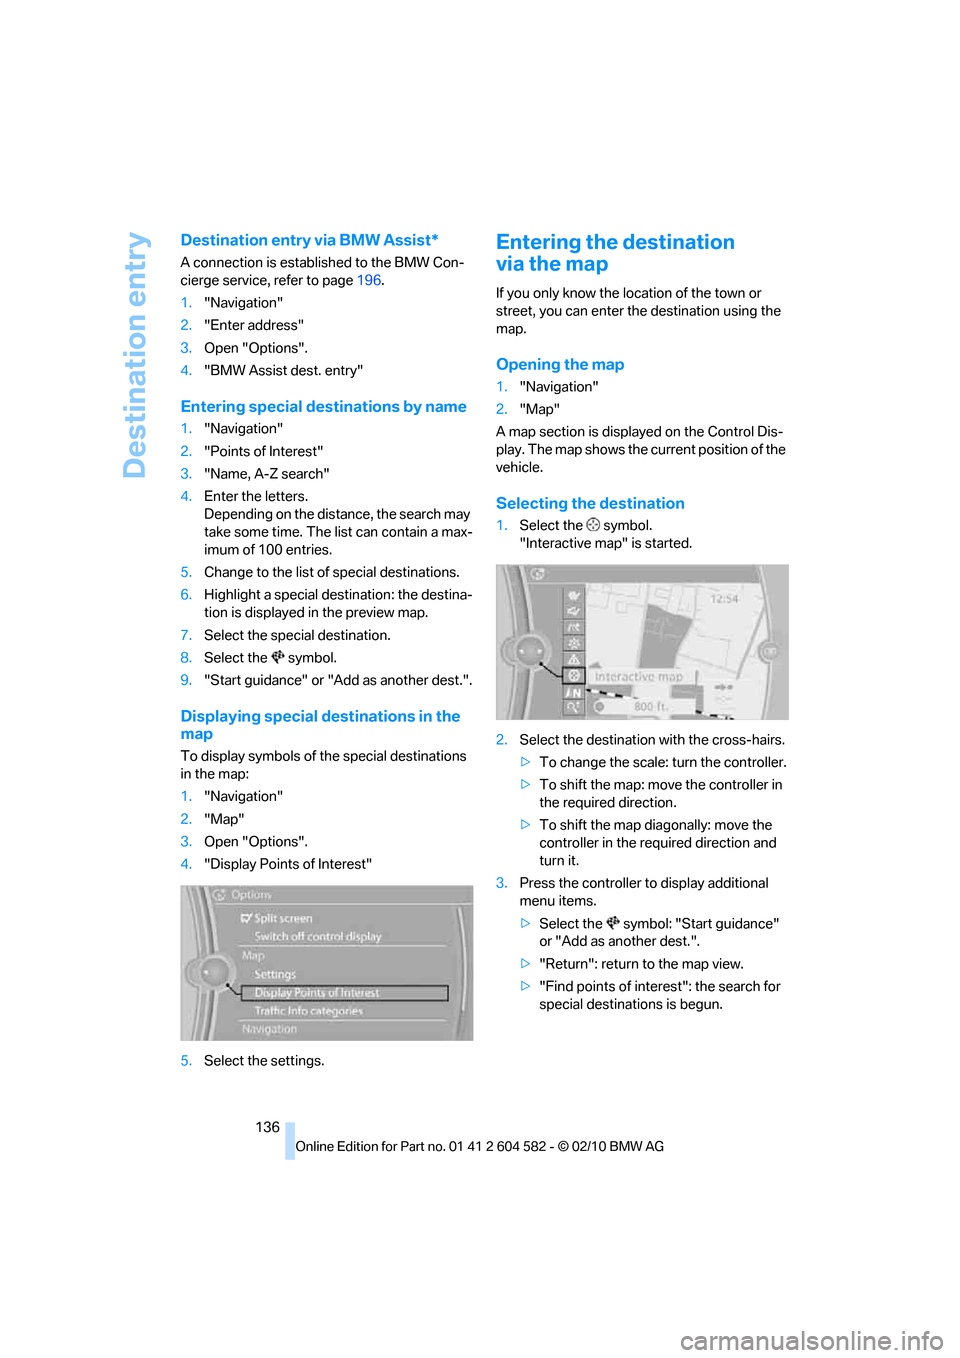
Selecting the destination
1.Select the symbol.
"Interactive map" is started.
2.Select the destination with the cross-hairs.
>To change the scale: turn the controller.
>To shift the map: move the controller in
the required direction.
>To shift the map diagonally: move the
controller in the required direction and
turn it.
3.Press the controller to display additional
menu items.
>Select the symbol: "Start guidance"
or "Add as another dest.".
>"Return": return to the map view.
>"Find points of interest": the search for
special destinations is begun.
Page 142 of 286
Destination guidance
140
Destination guidance
Starting destination
guidance
1."Navigation"
2."Enter address"
3.Select the destination.
4."Accept destination"
5."Start guidance"
The route is displayed on the Control Display
after it is calculated.
In the map view, the distance from the destina-
tion/intermediate destination and the estimated
arrival time are displayed.
Terminating destination
guidance
1."Navigation"
2."Map"
3.Select the symbol.
4."Stop guidance"
Continuing destination
guidance
If the destination was not reached during the
last trip, destination guidance can be resumed.
"Resume guidance"
Route criteria
General information
You can influence the calculated route by
choosing certain route criteria. You can change
the route criteria as often as you like during des-
tination entry or during destination guidance.
The route is planned according to fixed rules.
The type of road is taken into account, e.g.
whether it is a highway or a winding road. As a
result, the routes recommended by the naviga-
tion system may not always be the same ones
that you would choose based on personal expe-
rience.
The settings are stored for the remote control
currently in use.
Changing route criteria
1."Navigation"
2."Map"
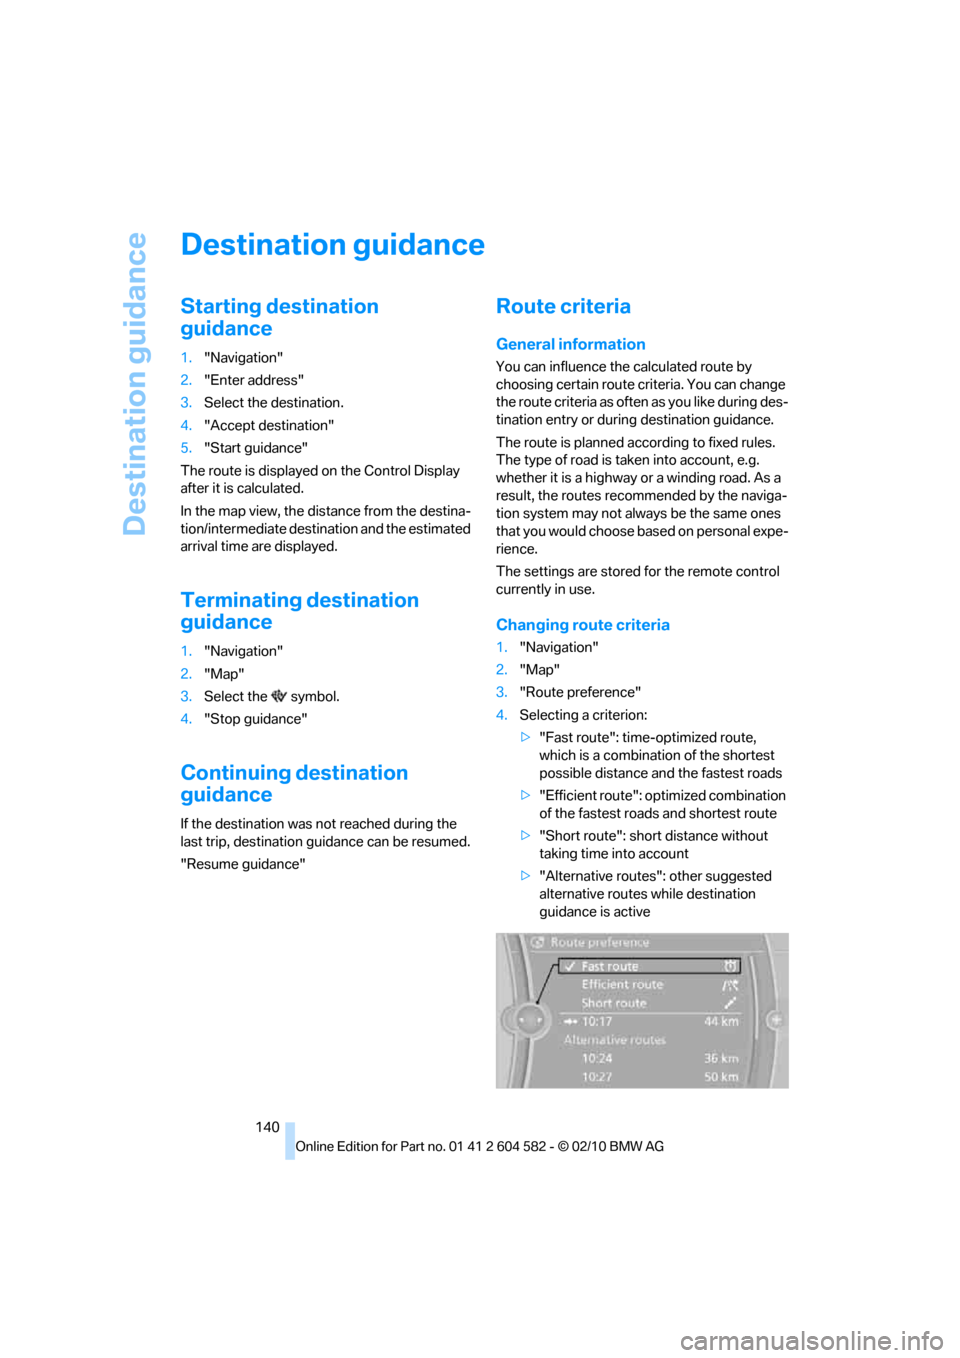
3."Route preference"
4.Selecting a criterion:
>"Fast route": time-optimized route,
which is a combination of the shortest
possible distance and the fastest roads
>"Efficient route": optimized combination
of the fastest roads and shortest route
>"Short route": short distance without
taking time into account
>"Alternative routes": other suggested
alternative routes while destination
guidance is active
Page 152 of 286
On/off and tone
150
On/off and tone
The following audio and video sources share
the same control elements and adjustments:
>Radio
>CD/DVD player
>CD changer
*
>Video*
>External devices, e.g. MP3 player
Controls
The audio and video sources can be controlled
using the:
>Buttons near the CD/DVD player
>iDrive
>Buttons on the steering wheel, refer to
page10
>Programmable memory keys, refer to
page20
>Voice activation system
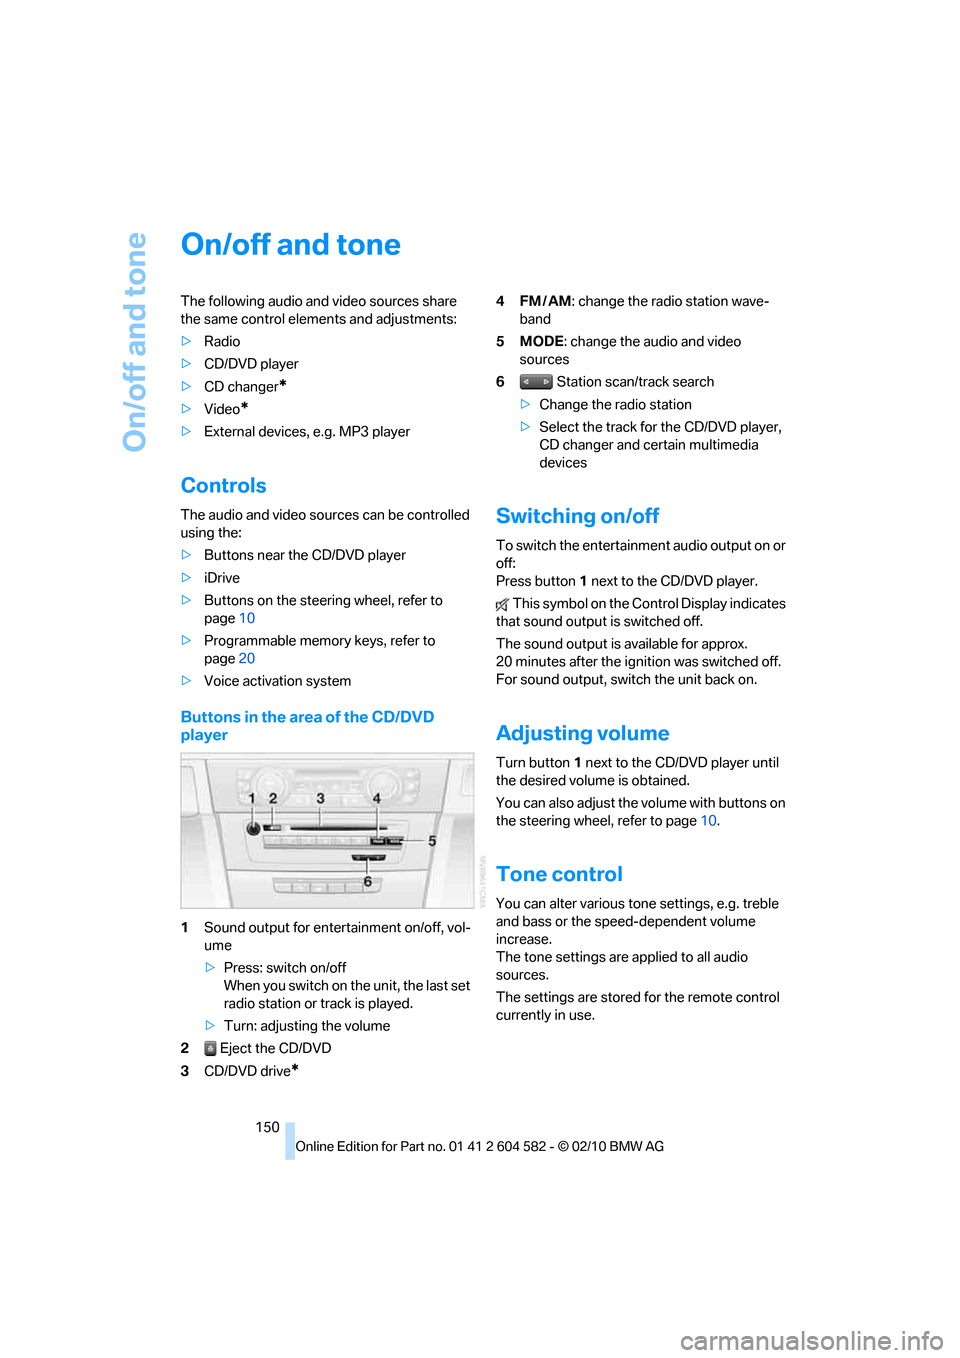
Buttons in the area of the CD/DVD
player
1Sound output for entertainment on/off, vol-
ume
>Press: switch on/off
When you switch on the unit, the last set
radio station or track is played.
>Turn: adjusting the volume
2 Eject the CD/DVD
3CD/DVD drive
*
4FM/AM: change the radio station wave-
band
5MODE: change the audio and video
sources
6 Station scan/track search
>Change the radio station
>Select the track for the CD/DVD player,
CD changer and certain multimedia
devices
Switching on/off
To switch the entertainment audio output on or
off:
Press button1 next to the CD/DVD player.
This symbol on the Control Display indicates
that sound output is switched off.
The sound output is available for approx.
20 minutes after the ignition was switched off.
For sound output, switch the unit back on.
Adjusting volume
Turn button1 next to the CD/DVD player until
the desired volume is obtained.
You can also adjust the volume with buttons on
the steering wheel, refer to page10.
Tone control
You can alter various tone settings, e.g. treble
and bass or the speed-dependent volume
increase.
The tone settings are applied to all audio
sources.
The settings are stored for the remote control
currently in use.
Page 160 of 286
Satellite radio
158
Changing the list view
The list view changes every time the first sym-
bol on the navigation bar is pressed.
Information on the channel is displayed.
Selecting a category
1."Radio"
2."Satellite radio"
3."Category"
4.Select the desired category.
Timeshift
Approx. one hour of the program being broad-
cast on the channel currently being listened to
is stored in a buffer. Prerequisite: the signal
must be available.
The stored audio track can be played with a
delay following the live broadcast. When the
buffer is full, the older tracks are overwritten.
The buffer is cleared when a new channel is
selected.
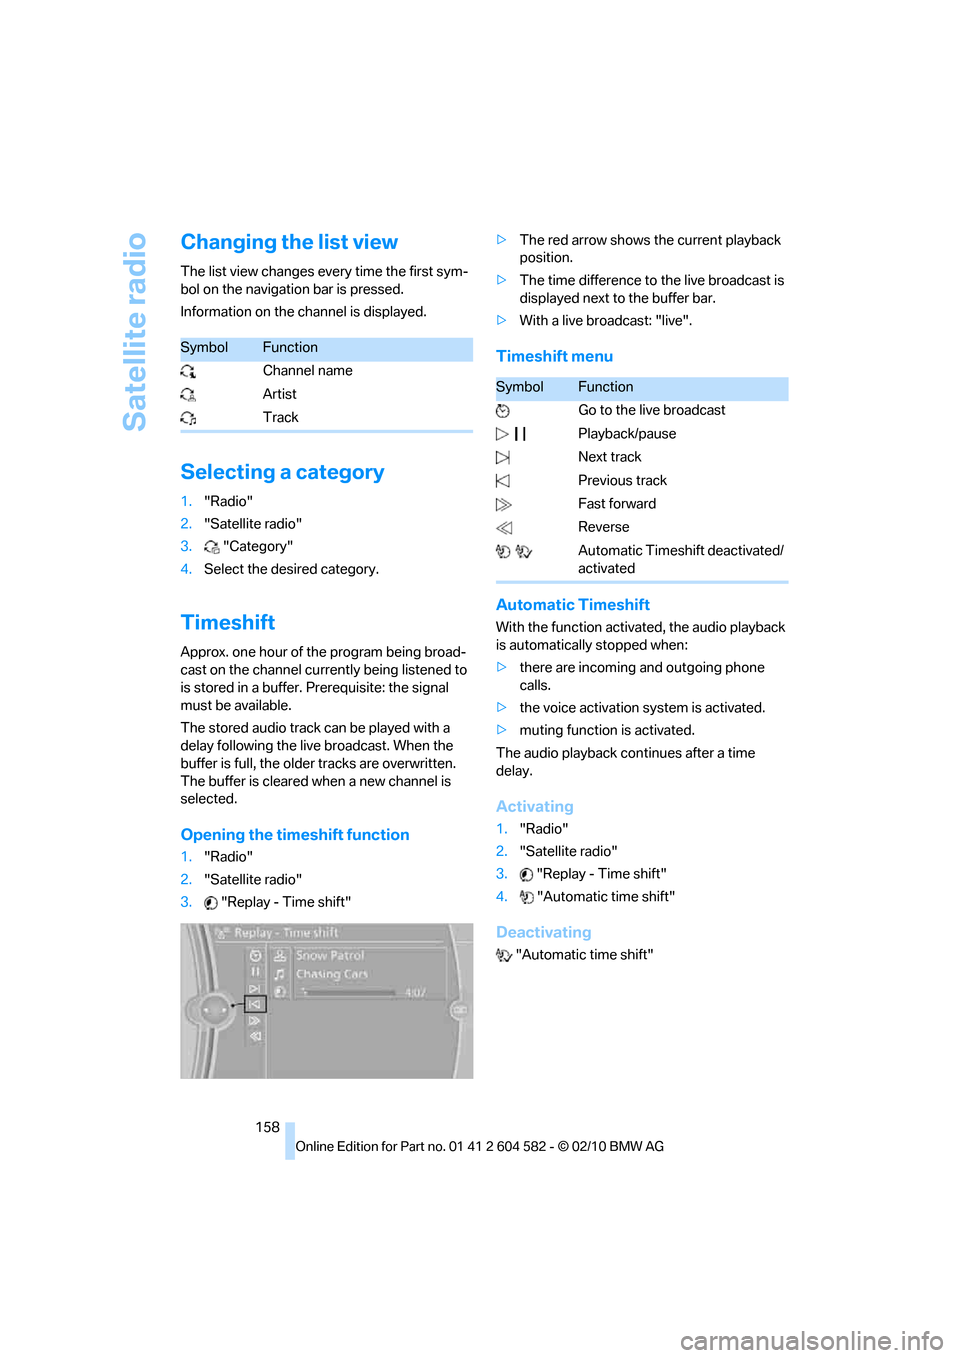
Opening the timeshift function
1."Radio"
2."Satellite radio"
3."Replay - Time shift">The red arrow shows the current playback
position.
>The time difference to the live broadcast is
displayed next to the buffer bar.
>With a live broadcast: "live".
Timeshift menu
Automatic Timeshift
With the function activated, the audio playback
is automatically stopped when:
>there are incoming and outgoing phone
calls.
>the voice activation system is activated.
>muting function is activated.
The audio playback continues after a time
delay.
Activating
1."Radio"
2."Satellite radio"
3."Replay - Time shift"
4."Automatic time shift"
Deactivating
"Automatic time shift"
SymbolFunction
Channel name
Artist
Track
SymbolFunction
Go to the live broadcast
Playback/pause
Next track
Previous track
Fast forward
Reverse
Automatic Timeshift deactivated/
activated
Page 163 of 286
Navigation
Entertainment
Driving tips
161Reference
At a glance
Controls
Communications
Mobility
CD/DVD player and CD changer
CD/DVD playback
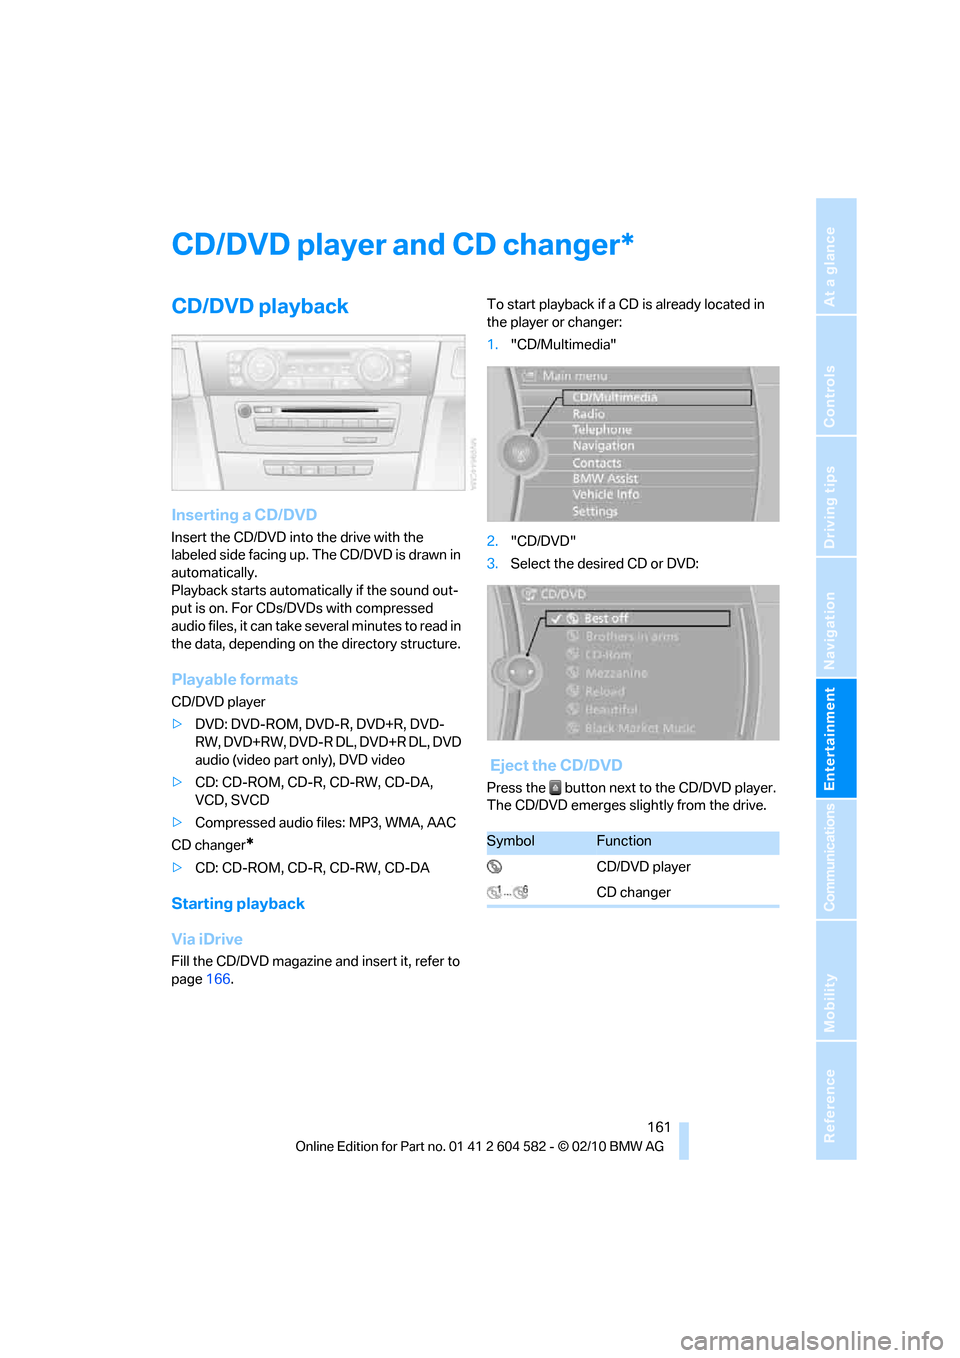
Inserting a CD/DVD
Insert the CD/DVD into the drive with the
labeled side facing up. The CD/DVD is drawn in
automatically.
Playback starts automatically if the sound out-
put is on. For CDs/DVDs with compressed
audio files, it can take several minutes to read in
the data, depending on the directory structure.
Playable formats
CD/DVD player
>DVD: DVD-ROM, DVD-R, DVD+R, DVD-
RW, DVD+RW, DVD-R DL, DVD+R DL, DVD
audio (video part only), DVD video
>CD: CD-ROM, CD-R, CD-RW, CD-DA,
VCD, SVCD
>Compressed audio files: MP3, WMA, AAC
CD changer
*
>CD: CD-ROM, CD-R, CD-RW, CD-DA
Starting playback
Via iDrive
Fill the CD/DVD magazine and insert it, refer to
page166.To start playback if a CD is already located in
the player or changer:
1."CD/Multimedia"
2."CD/DVD"
3.Select the desired CD or DVD:
Eject the CD/DVD
Press the button next to the CD/DVD player.
The CD/DVD emerges slightly from the drive.
*
SymbolFunction
CD/DVD player
CD changer
Page 164 of 286
CD/DVD player and CD changer
162
Audio playback
Selecting a track using the button
Press the button for the appropriate
direction as often as necessary until the desired
track is reached.
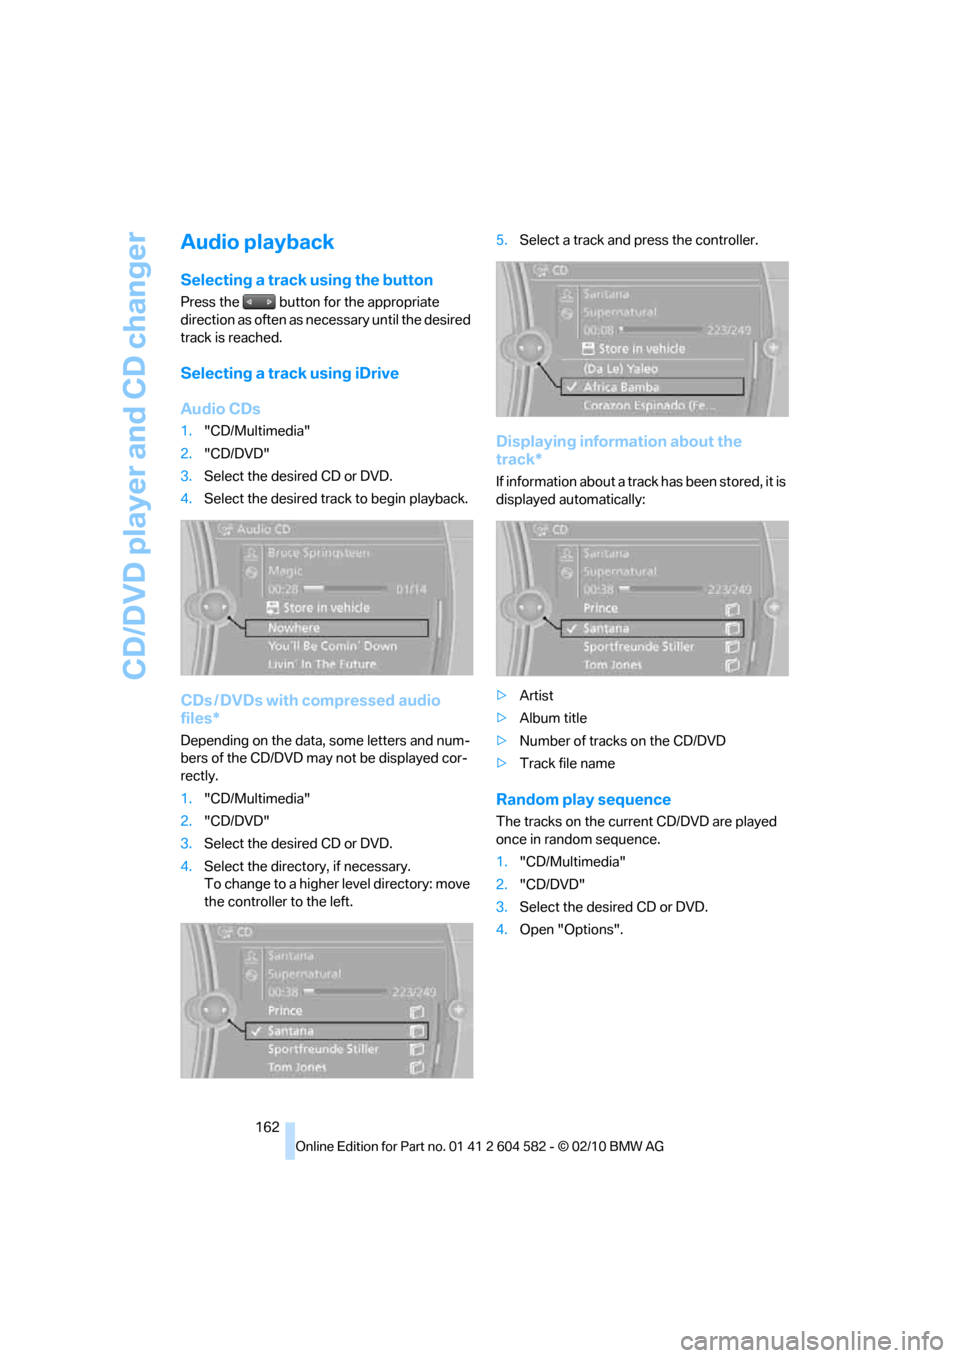
Selecting a track using iDrive
Audio CDs
1."CD/Multimedia"
2."CD/DVD"
3.Select the desired CD or DVD.
4.Select the desired track to begin playback.
CDs / DVDs with compressed audio
files*
Depending on the data, some letters and num-
bers of the CD/DVD may not be displayed cor-
rectly.
1."CD/Multimedia"
2."CD/DVD"
3.Select the desired CD or DVD.
4.Select the directory, if necessary.
To change to a higher level directory: move
the controller to the left.5.Select a track and press the controller.
Displaying information about the
track*
If information about a track has been stored, it is
displayed automatically:
>Artist
>Album title
>Number of tracks on the CD/DVD
>Track file name
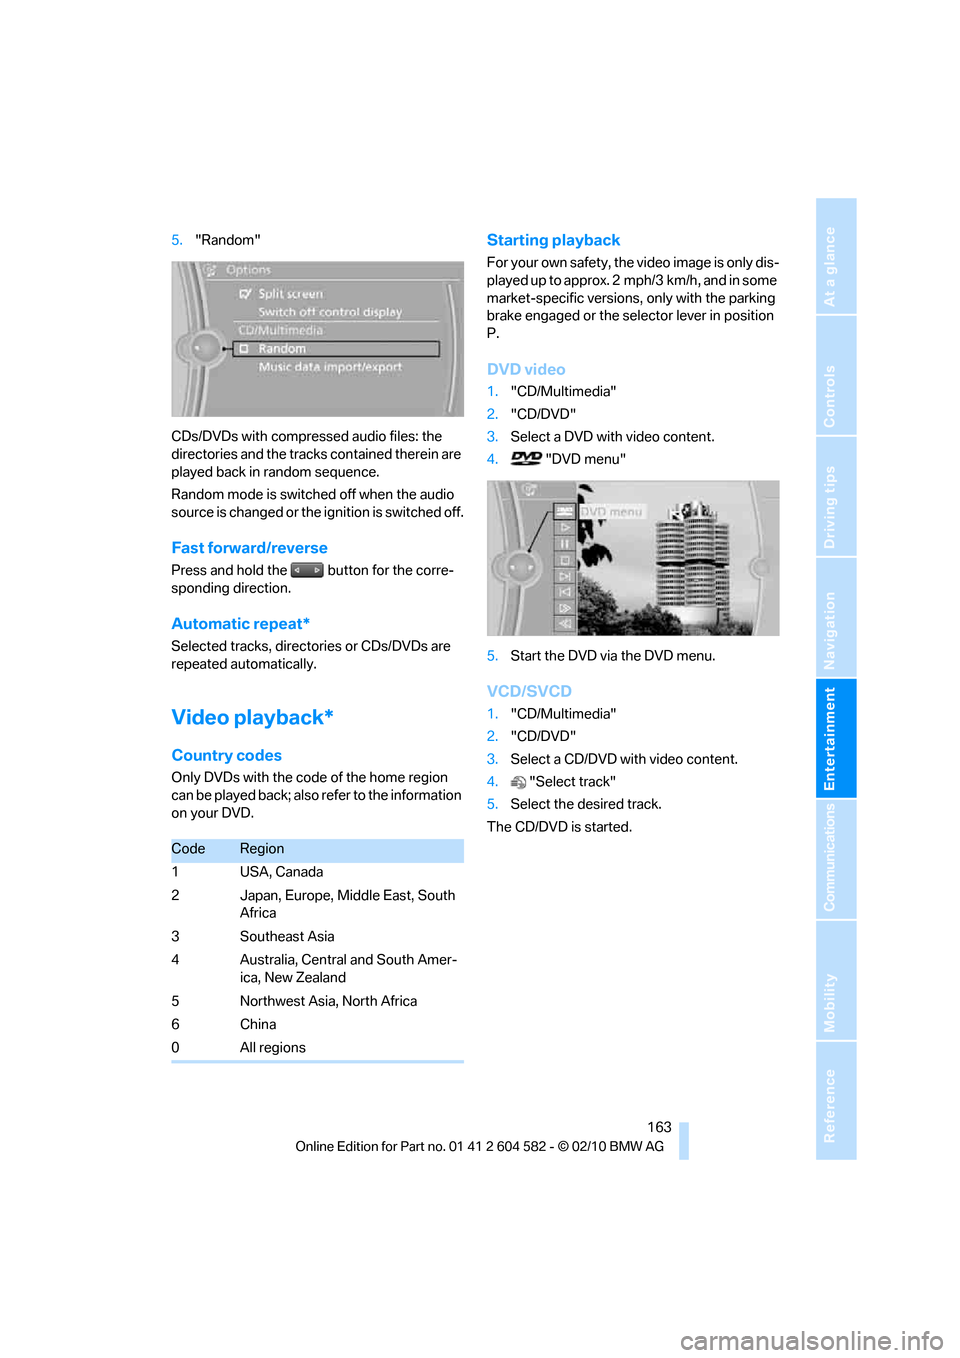
Random play sequence
The tracks on the current CD/DVD are played
once in random sequence.
1."CD/Multimedia"
2."CD/DVD"
3.Select the desired CD or DVD.
4.Open "Options".
Page 165 of 286
Navigation
Entertainment
Driving tips
163Reference
At a glance
Controls
Communications
Mobility
5."Random"
CDs/DVDs with compressed audio files: the
directories and the tracks contained therein are
played back in random sequence.
Random mode is switched off when the audio
source is changed or the ignition is switched off.
Fast forward/reverse
Press and hold the button for the corre-
sponding direction.
Automatic repeat*
Selected tracks, directories or CDs/DVDs are
repeated automatically.
Video playback*
Country codes
Only DVDs with the code of the home region
can be played back; also refer to the information
on your DVD.
Starting playback
For your own safety, the video image is only dis-
played up to approx. 2 mph/3 km/h, and in some
market-specific versions, only with the parking
brake engaged or the selector lever in position
P.
DVD video
1."CD/Multimedia"
2."CD/DVD"
3.Select a DVD with video content.
4. "DVD menu"
5.Start the DVD via the DVD menu.
VCD/SVCD
1."CD/Multimedia"
2."CD/DVD"
3.Select a CD/DVD with video content.
4."Select track"
5.Select the desired track.
The CD/DVD is started.
CodeRegion
1USA, Canada
2 Japan, Europe, Middle East, South
Africa
3 Southeast Asia
4 Australia, Central and South Amer-
ica, New Zealand
5 Northwest Asia, North Africa
6China
0 All regions
Page 166 of 286
CD/DVD player and CD changer
164
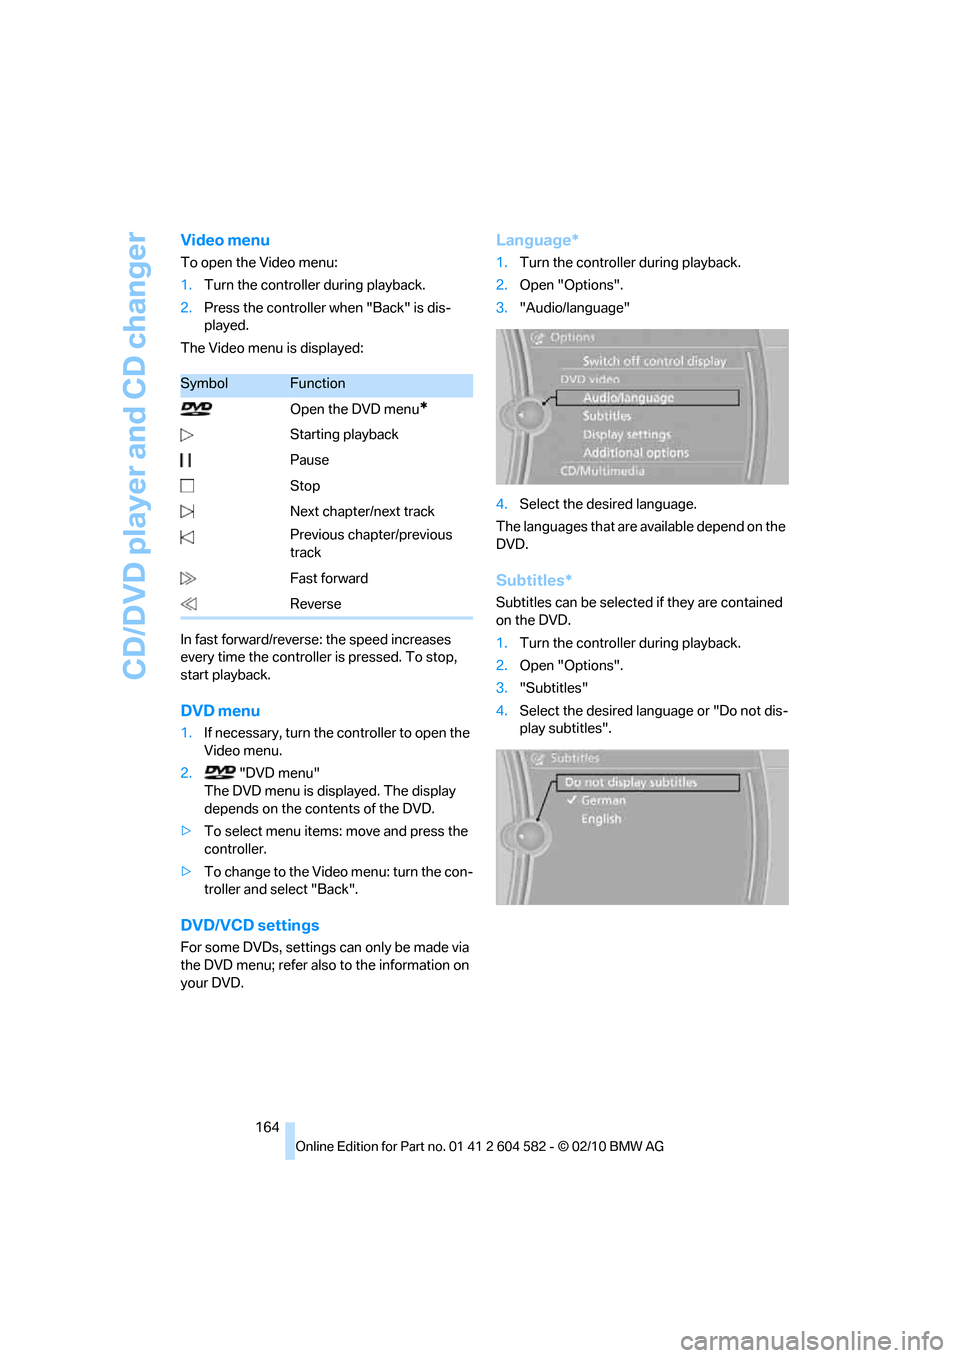
Video menu
To open the Video menu:
1.Turn the controller during playback.
2.Press the controller when "Back" is dis-
played.
The Video menu is displayed:
In fast forward/reverse: the speed increases
every time the controller is pressed. To stop,
start playback.
DVD menu
1.If necessary, turn the controller to open the
Video menu.
2. "DVD menu"
The DVD menu is displayed. The display
depends on the contents of the DVD.
>To select menu items: move and press the
controller.
>To change to the Video menu: turn the con-
troller and select "Back".
DVD/VCD settings
For some DVDs, settings can only be made via
the DVD menu; refer also to the information on
your DVD.
Language*
1.Turn the controller during playback.
2.Open "Options".
3."Audio/language"
4.Select the desired language.
The languages that are available depend on the
DVD.
Subtitles*
Subtitles can be selected if they are contained
on the DVD.
1.Turn the controller during playback.
2.Open "Options".
3."Subtitles"
4.Select the desired language or "Do not dis-
play subtitles".
SymbolFunction
Open the DVD menu
*
Starting playback
Pause
Stop
Next chapter/next track
Previous chapter/previous
track
Fast forward
Reverse
Page 173 of 286
Navigation
Entertainment
Driving tips
171Reference
At a glance
Controls
Communications
Mobility
Depending on the album, the tracks or the
subdirectories of the album are displayed.
The first track is played automatically, if
possible.
4.To select tracks, change directories if
needed. To go up one level in the directory,
move the controller to the left.
Random play sequence
All tracks of the selection are played back in
random order.
1."CD/Multimedia"
2."Music collection"
3.Open "Options".
4."Random"
Managing music
Albums
Renaming an album
The name of the album, if available, is automat-
ically entered when the album is stored. If the
name is unknown, it can be changed later.
An album cannot be renamed while a track from
that album is being played.
1."CD/Multimedia"
2."Music collection"
3.Highlight the desired album.
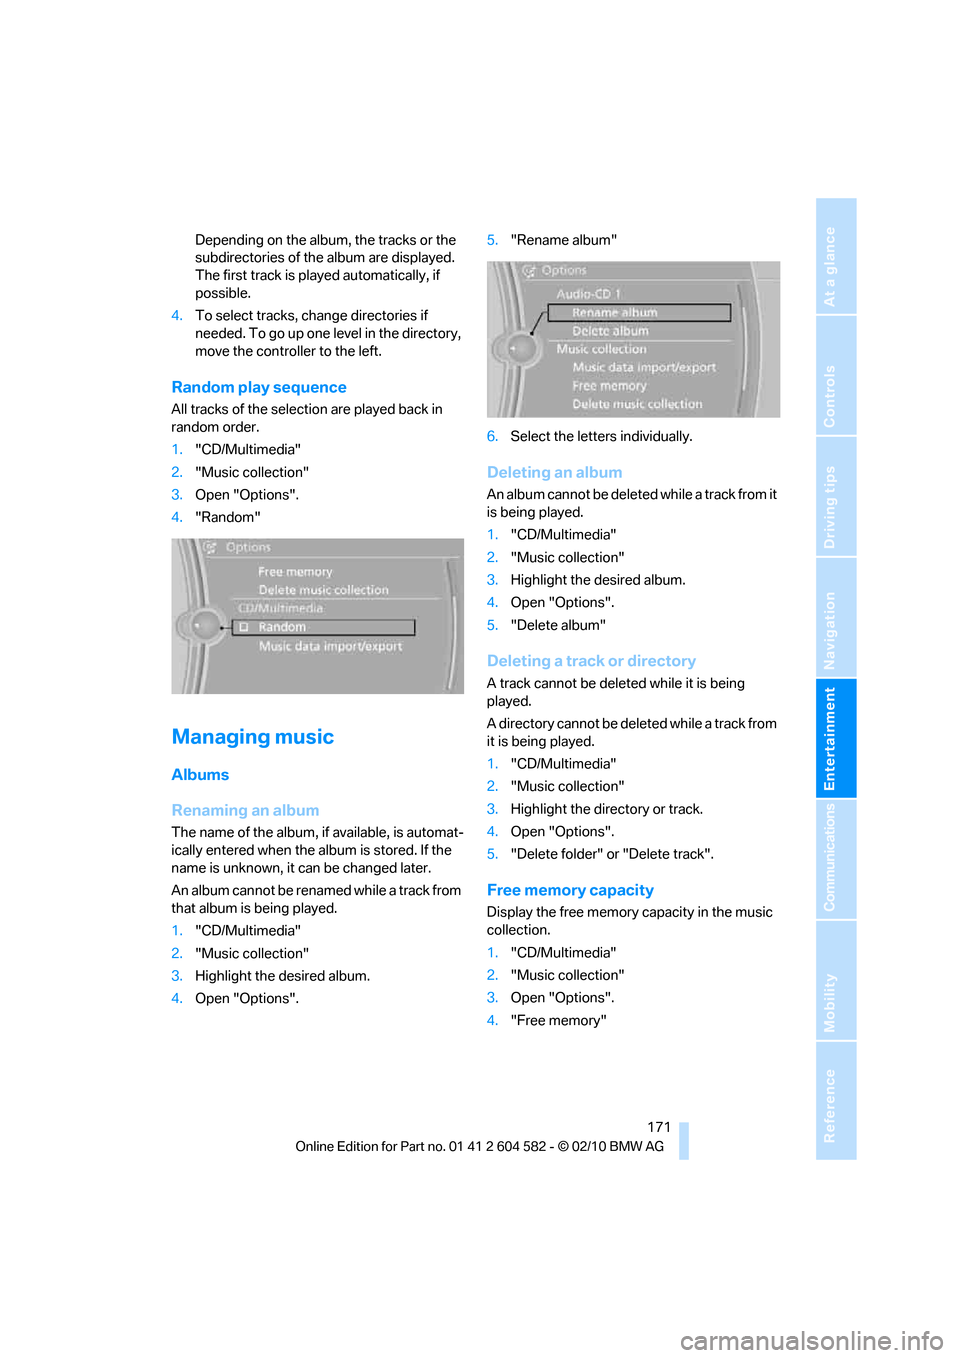
4.Open "Options".5."Rename album"
6.Select the letters individually.
Deleting an album
An album cannot be deleted while a track from it
is being played.
1."CD/Multimedia"
2."Music collection"
3.Highlight the desired album.
4.Open "Options".
5."Delete album"
Deleting a track or directory
A track cannot be deleted while it is being
played.
A directory cannot be deleted while a track from
it is being played.
1."CD/Multimedia"
2."Music collection"
3.Highlight the directory or track.
4.Open "Options".
5."Delete folder" or "Delete track".
Free memory capacity
Display the free memory capacity in the music
collection.
1."CD/Multimedia"
2."Music collection"
3.Open "Options".
4."Free memory"
Page 240 of 286
Replacing components
238
Lamps and bulbs
Lamps and bulbs make an essential contribu-
tion to vehicle safety. They should, therefore,
be handled carefully. BMW recommends hav-
ing your BMW center perform any work that you
do not feel competent to perform yourself or
that is not described here.
Never touch the glass of new bulbs with
your bare fingers, as even minute
amounts of contamination will burn into the
bulb's surface and reduce its service life. Use a
clean tissue, cloth or something similar, or hold
the bulb by its base.<
You can obtain a selection of replacement bulbs
at your BMW center.
Only change bulbs while they are cool to
the touch; otherwise, you could suffer
burns.<
When working on electrical systems,
always begin by switching off the con-
sumer in question; otherwise, short-circuits
could result. To avoid possible injury or equip-
ment damage when replacing bulbs, observe
any instructions provided by the bulb manufac-
turer.<
For care of the headlamps, please follow the
instructions in the chapter entitled 'Care'.
If the routine for changing a particular
bulb is not described here, please contact
your BMW center or a workshop that works
according to BMW repair procedures with cor-
respondingly trained personnel.<
Light-emitting diodes LED
Light-emitting diodes installed behind translu-
cent lenses serve as the light source for many of
the controls, displays, and equipment in your
vehicle. These light-emitting diodes, which
operate using a concept similar to that applied
in conventional lasers, are officially designated
as Class 1 light-emitting diodes.
Do not remove the covers or expose the
eyes directly to the unfiltered light source
for several hours; otherwise, this could cause
irritation of the retina.<
Headlight lenses
In cool or humid weather, condensation may
form on the interior of outside lamps. When the
light is switched on, the condensation will dis-
appear after a short time. The headlight lenses
do not need to be replaced.
At high humidities, e.g. water droplets may form
in the lights; have these checked by your BMW
center.,
Xenon lamps*
These bulbs have a very long service life and are
highly unlikely to fail. If a xenon lamp fails never-
theless, switch on the fog lamps and continue
the journey with great care, provided that local
legislation does not prohibit this.
Have any work on the xenon lamp system,
including bulb replacements, performed
only by a BMW center or a workshop that works
according to BMW repair procedures with cor-
respondingly trained personnel. Otherwise, if
such work is carried out improperly, the high
voltage in the system presents the danger of
fatal injuries.<
Replacing parking lamps, roadside
parking lamps, and daytime running
lights
H8 bulb, 35 watts
1.Switch off the lamps and take the remote
control out of the ignition lock.
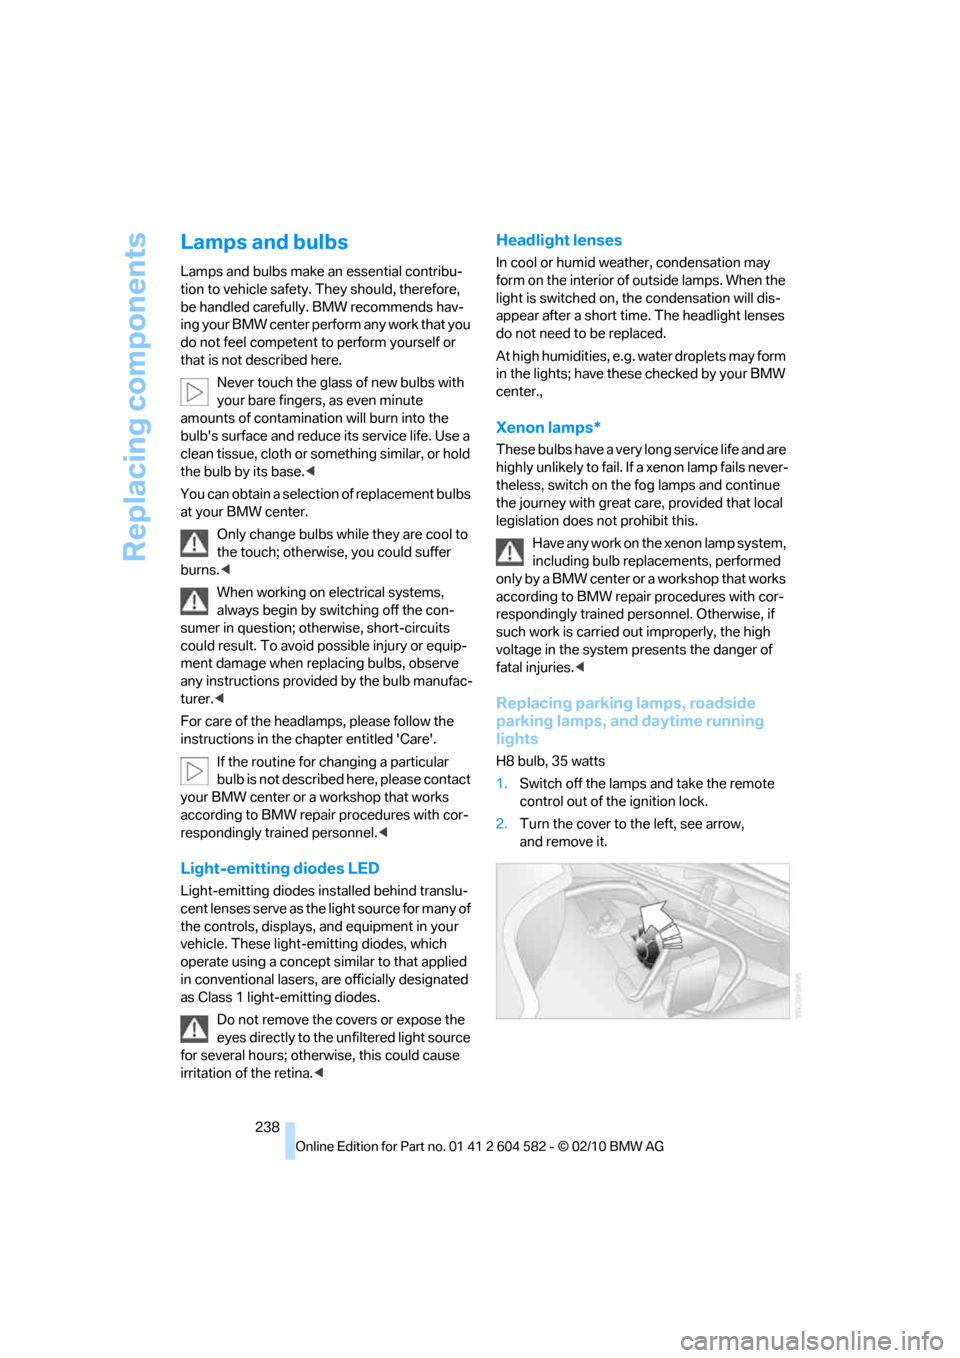
2.Turn the cover to the left, see arrow,
and remove it.