check engine light BMW 328I XDRIVE CONVERTIBLE 2011 E94 Owner's Manual
[x] Cancel search | Manufacturer: BMW, Model Year: 2011, Model line: 328I XDRIVE CONVERTIBLE, Model: BMW 328I XDRIVE CONVERTIBLE 2011 E94Pages: 278, PDF Size: 8.23 MB
Page 15 of 278
At a glance
13Reference
Controls
Driving tips
Communications
Navigation
Entertainment
Mobility
Indicator and warning lamps
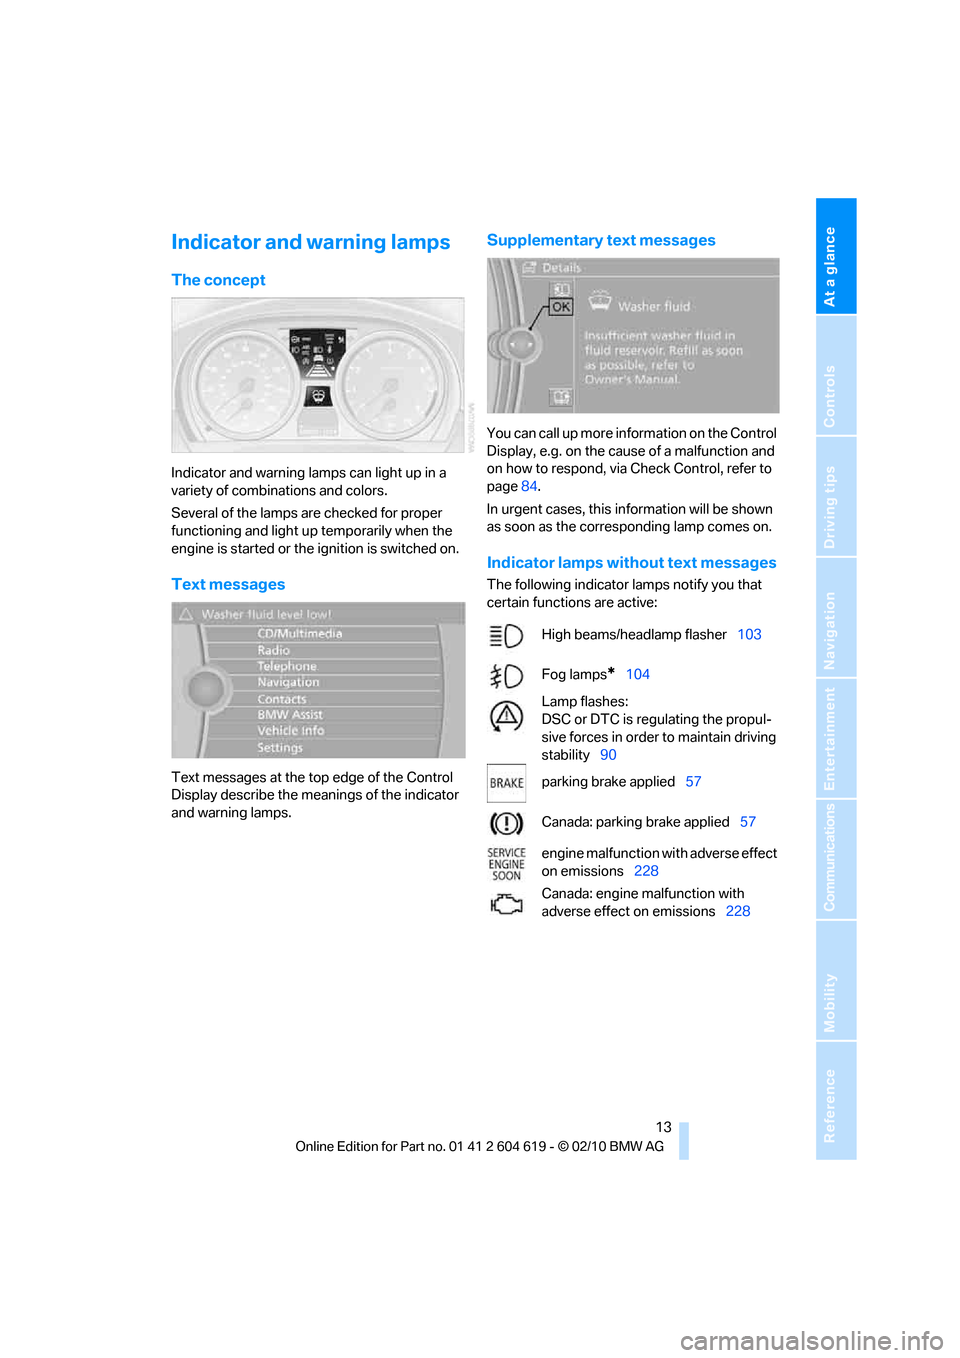
The concept
Indicator and warning lamps can light up in a
variety of combinations and colors.
Several of the lamps are checked for proper
functioning and light up temporarily when the
engine is started or the ignition is switched on.
Text messages
Text messages at the top edge of the Control
Display describe the meanings of the indicator
and warning lamps.
Supplementary text messages
You can call up more information on the Control
Display, e.g. on the cause of a malfunction and
on how to respond, via Check Control, refer to
page84.
In urgent cases, this information will be shown
as soon as the corresponding lamp comes on.
Indicator lamps without text messages
The following indicator lamps notify you that
certain functions are active:
High beams/headlamp flasher103
Fog lamps
*104
Lamp flashes:
DSC or DTC is regulating the propul-
sive forces in order to maintain driving
stability90
parking brake applied57
Canada: parking brake applied57
engine malfunction with adverse effect
on emissions228
Canada: engine malfunction with
adverse effect on emissions228
Page 37 of 278
Controls
35Reference
At a glance
Driving tips
Communications
Navigation
Entertainment
Mobility
Switching off the engine in cars with
automatic transmission
The engine can only be switched off when the
selector lever is in position P, refer to page57.
To switch the engine off when the selector lever
is in position N, the remote control must be in
the ignition lock.
Malfunction
Comfort Access may malfunction due to local
radio waves. If this happens, open or close the
vehicle via the buttons on the remote control or
using the integrated key. To start the engine
afterward, insert the remote control into the
ignition lock.
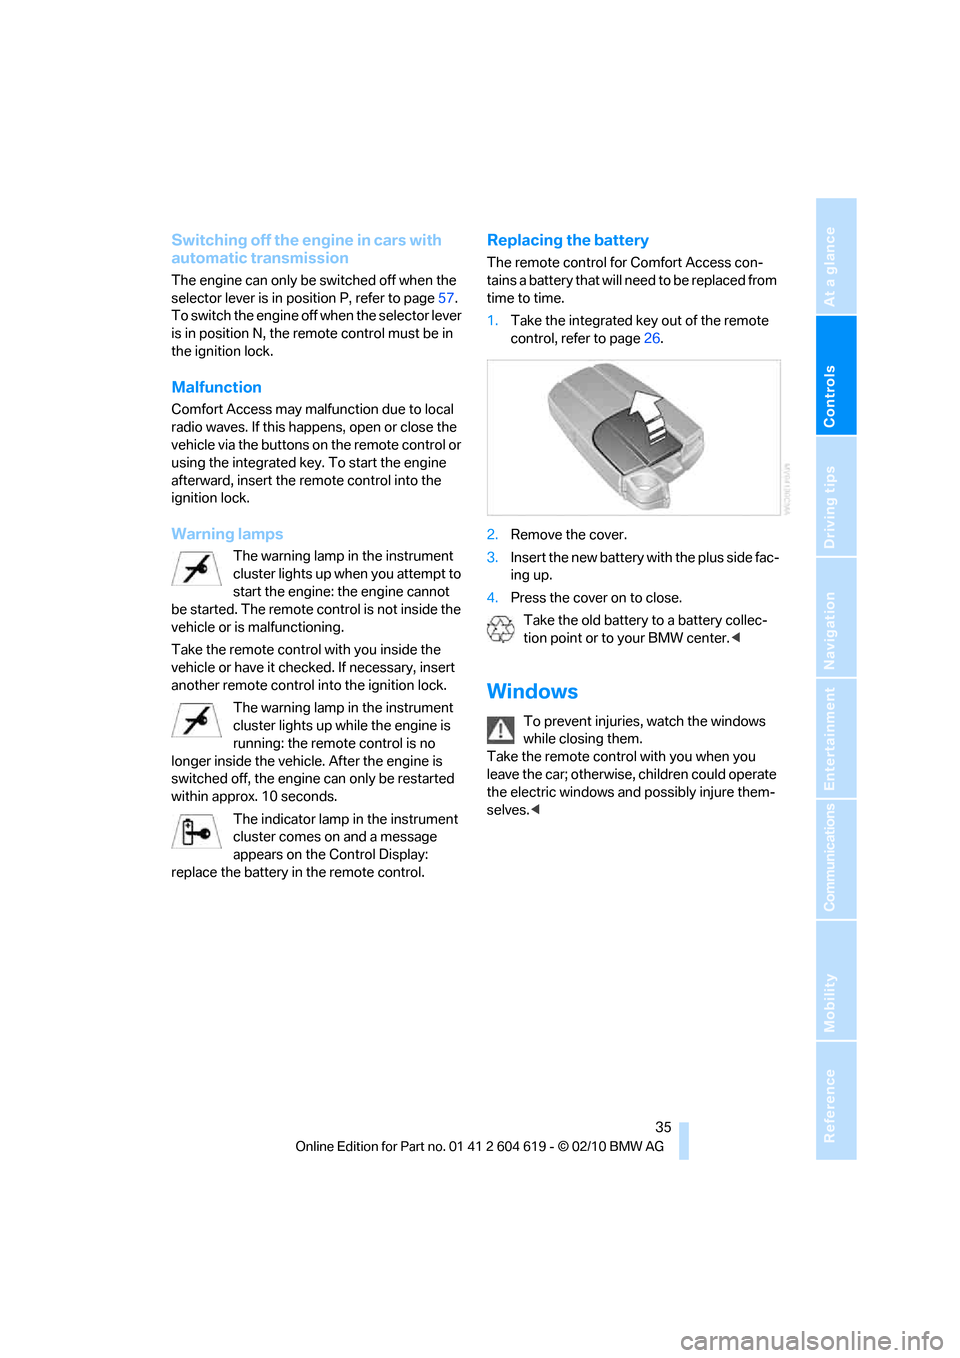
Warning lamps
The warning lamp in the instrument
cluster lights up when you attempt to
start the engine: the engine cannot
be started. The remote control is not inside the
vehicle or is malfunctioning.
Take the remote control with you inside the
vehicle or have it checked. If necessary, insert
another remote control into the ignition lock.
The warning lamp in the instrument
cluster lights up while the engine is
running: the remote control is no
longer inside the vehicle. After the engine is
switched off, the engine can only be restarted
within approx. 10 seconds.
The indicator lamp in the instrument
cluster comes on and a message
appears on the Control Display:
replace the battery in the remote control.
Replacing the battery
The remote control for Comfort Access con-
tains a battery that will need to be replaced from
time to time.
1.Take the integrated key out of the remote
control, refer to page26.
2.Remove the cover.
3.Insert the new battery with the plus side fac-
ing up.
4.Press the cover on to close.
Take the old battery to a battery collec-
tion point or to your BMW center.<
Windows
To prevent injuries, watch the windows
while closing them.
Take the remote control with you when you
leave the car; otherwise, children could operate
the electric windows and possibly injure them-
selves.<
Page 52 of 278
Adjustments
50
Pinch protection system
If the belt hand-over encounters resistance on
moving in or out, it moves back slightly in the
opposite direction and stops in this position. To
reactivate the belt hand-over: open and close
the door or switch the ignition off and on.
Although there is a pinch protection sys-
tem, always check that the maneuvering
area of the belt hand-over is clear. Otherwise it
cannot be ensured that the system will stop
moving in certain extreme situations.<
Mirrors
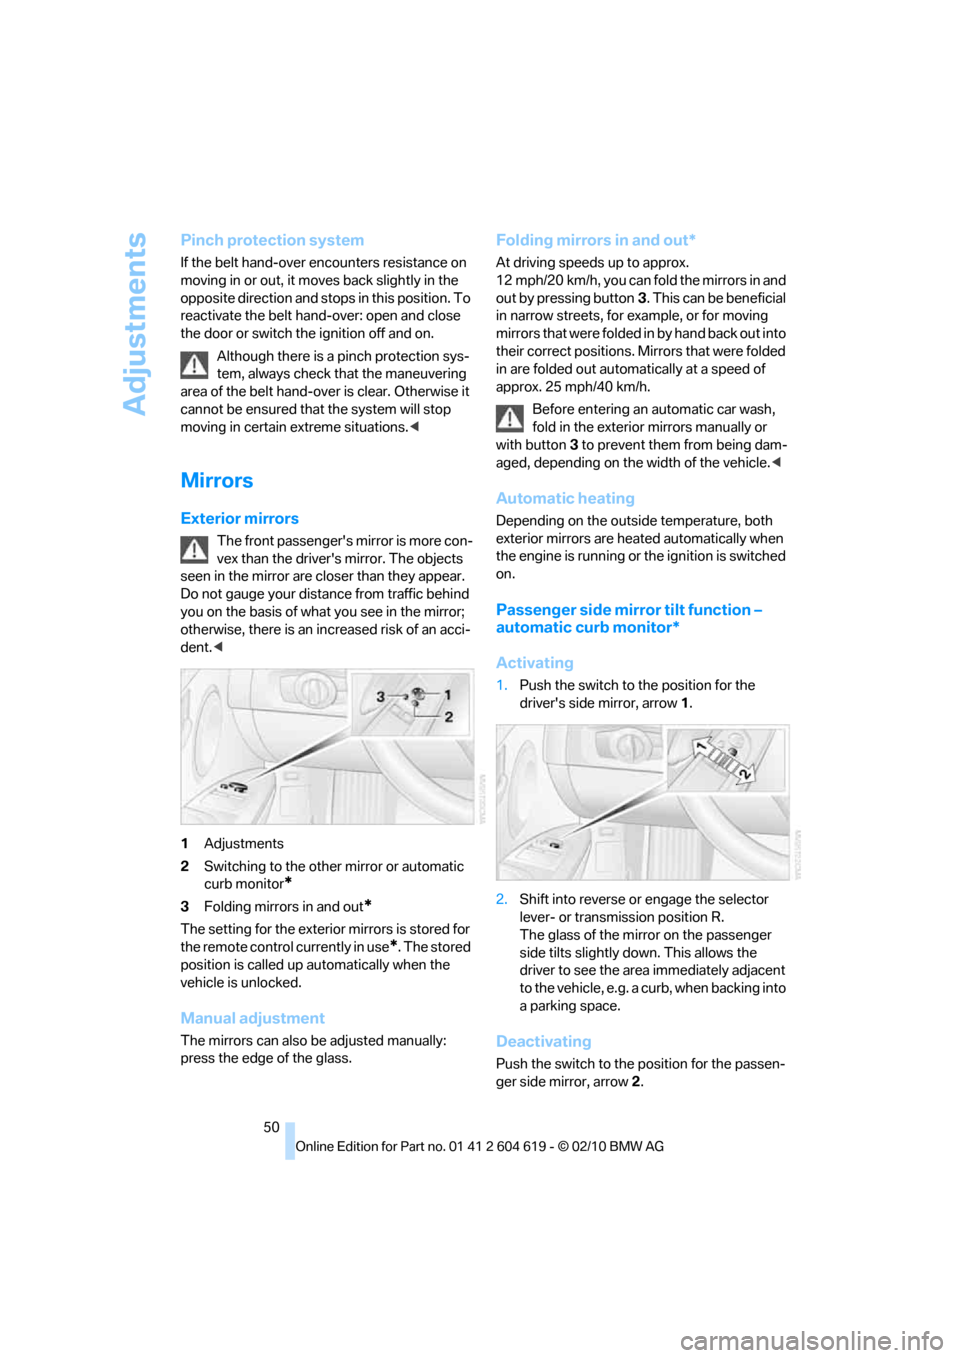
Exterior mirrors
The front passenger's mirror is more con-
vex than the driver's mirror. The objects
seen in the mirror are closer than they appear.
Do not gauge your distance from traffic behind
you on the basis of what you see in the mirror;
otherwise, there is an increased risk of an acci-
dent.<
1Adjustments
2Switching to the other mirror or automatic
curb monitor
*
3Folding mirrors in and out*
The setting for the exterior mirrors is stored for
the remote control currently in use
*. The stored
position is called up automatically when the
vehicle is unlocked.
Manual adjustment
The mirrors can also be adjusted manually:
press the edge of the glass.
Folding mirrors in and out*
At driving speeds up to approx.
12 mph/20 km/h, you can fold the mirrors in and
out by pressing button3. This can be beneficial
in narrow streets, for example, or for moving
mirrors that were folded in by hand back out into
their correct positions. Mirrors that were folded
in are folded out automatically at a speed of
approx. 25 mph/40 km/h.
Before entering an automatic car wash,
fold in the exterior mirrors manually or
with button3 to prevent them from being dam-
aged, depending on the width of the vehicle.<
Automatic heating
Depending on the outside temperature, both
exterior mirrors are heated automatically when
the engine is running or the ignition is switched
on.
Passenger side mirror tilt function –
automatic curb monitor*
Activating
1.Push the switch to the position for the
driver's side mirror, arrow 1.
2.Shift into reverse or engage the selector
lever- or transmission position R.
The glass of the mirror on the passenger
side tilts slightly down. This allows the
driver to see the area immediately adjacent
to the vehicle, e.g. a curb, when backing into
a parking space.
Deactivating
Push the switch to the position for the passen-
ger side mirror, arrow 2.
Page 78 of 278
Controls overview
76
Coolant temperature
A warning lamp will come on if the coolant,
and therefore the engine, becomes too hot.
In addition, a message will appear on the
Control Display.
Check coolant level, refer to page226.
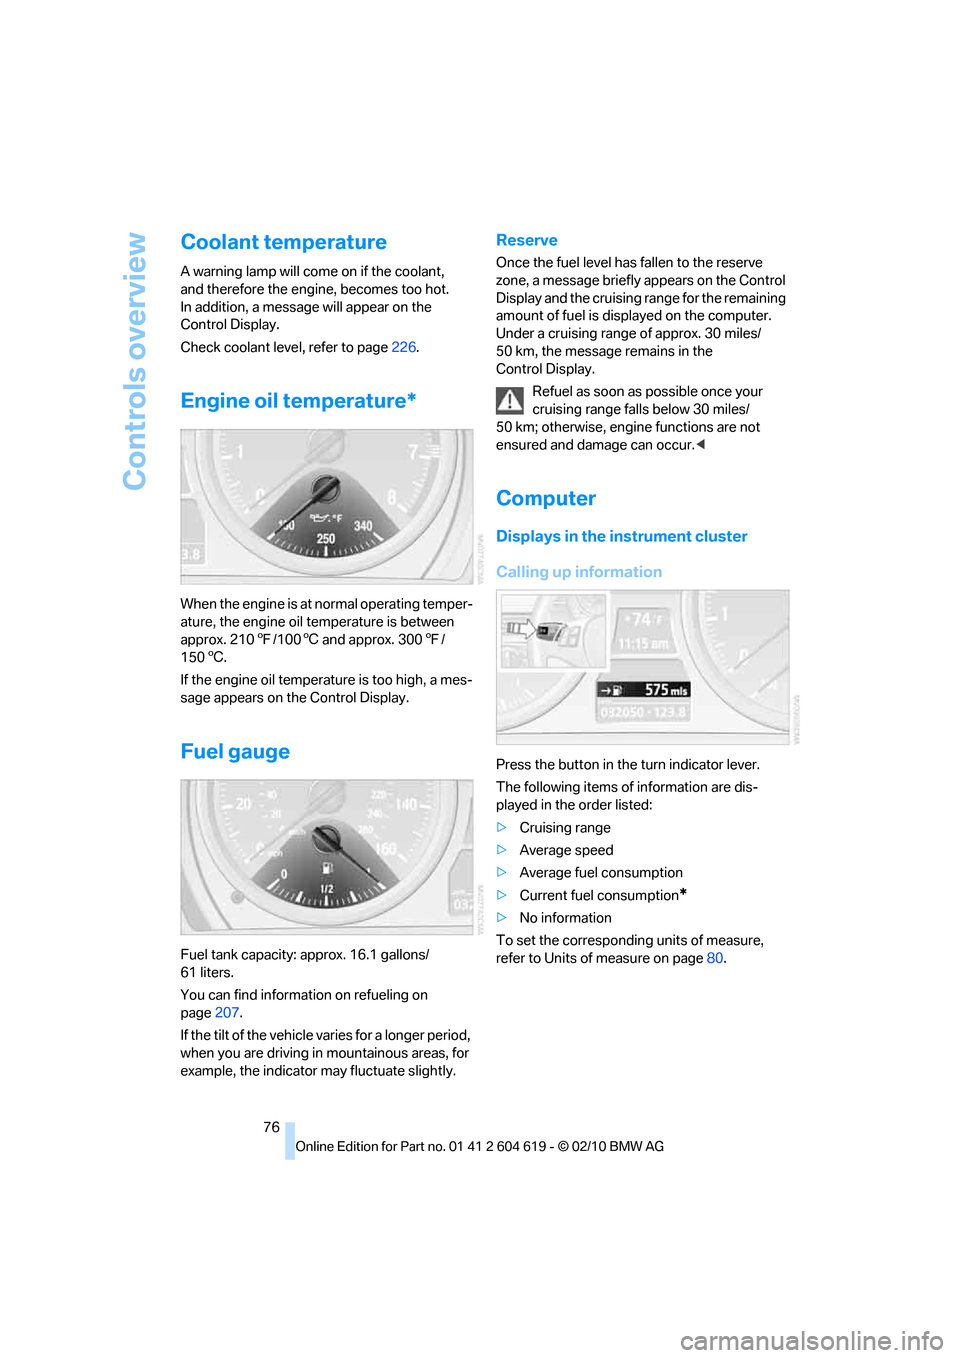
Engine oil temperature*
When the engine is at normal operating temper-
ature, the engine oil temperature is between
approx. 2107/1006 and approx. 3007/
1506.
If the engine oil temperature is too high, a mes-
sage appears on the Control Display.
Fuel gauge
Fuel tank capacity: approx. 16.1 gallons/
61 liters.
You can find information on refueling on
page207.
If the tilt of the vehicle varies for a longer period,
when you are driving in mountainous areas, for
example, the indicator may fluctuate slightly.
Reserve
Once the fuel level has fallen to the reserve
zone, a message briefly appears on the Control
Display and the cruising range for the remaining
amount of fuel is displayed on the computer.
Under a cruising range of approx. 30 miles/
50 km, the message remains in the
Control Display.
Refuel as soon as possible once your
cruising range falls below 30 miles/
50 km; otherwise, engine functions are not
ensured and damage can occur.<
Computer
Displays in the instrument cluster
Calling up information
Press the button in the turn indicator lever.
The following items of information are dis-
played in the order listed:
>Cruising range
>Average speed
>Average fuel consumption
>Current fuel consumption
*
>No information
To set the corresponding units of measure,
refer to Units of measure on page80.
Page 81 of 278
Controls
79Reference
At a glance
Driving tips
Communications
Navigation
Entertainment
Mobility
Settings and information
Operating principle
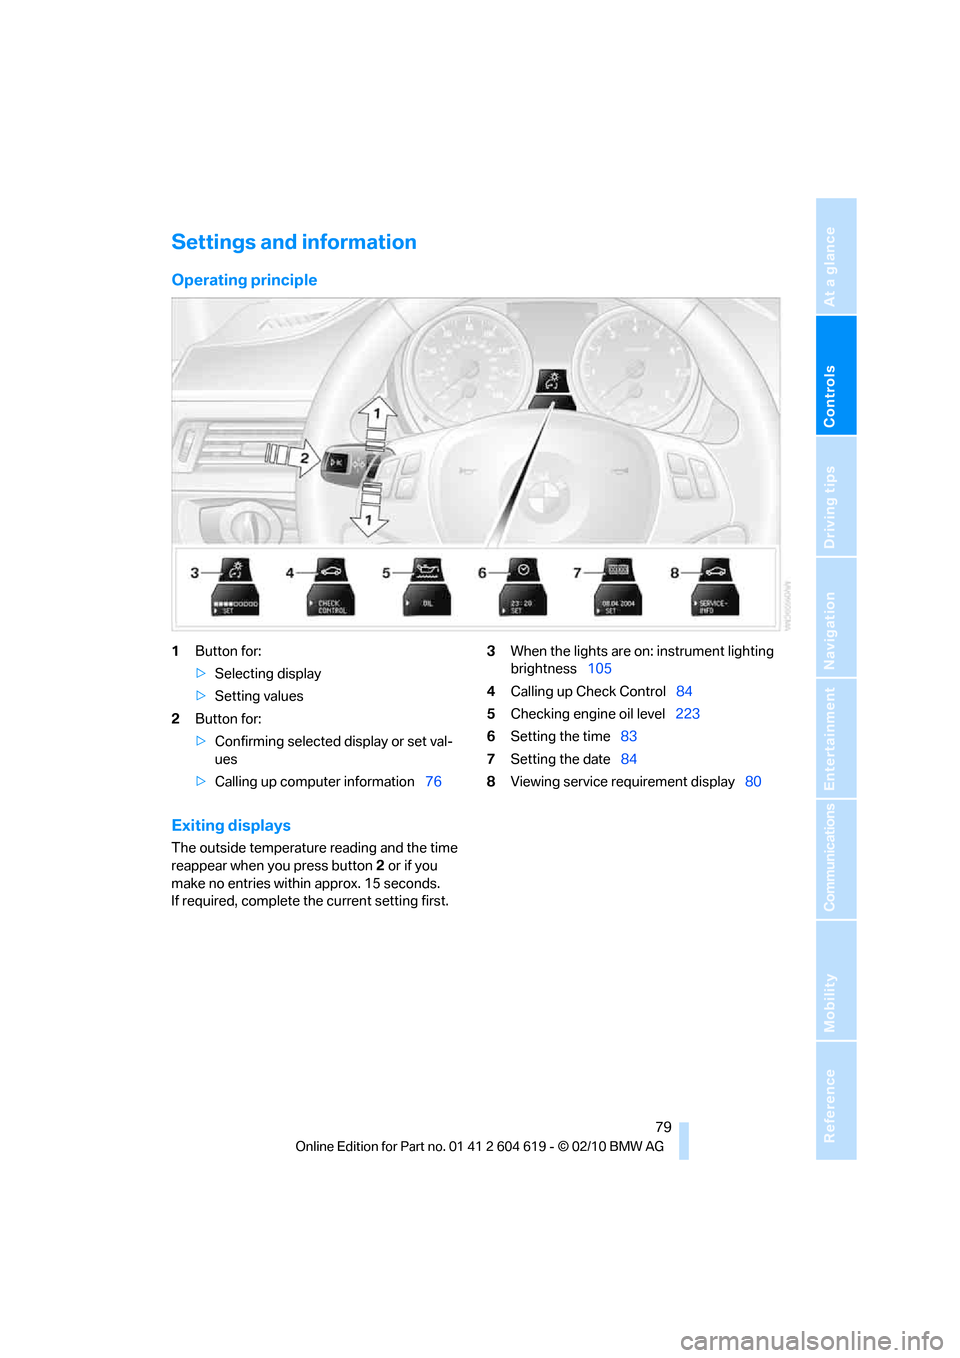
1Button for:
>Selecting display
>Setting values
2Button for:
>Confirming selected display or set val-
ues
>Calling up computer information763When the lights are on: instrument lighting
brightness105
4Calling up Check Control84
5Checking engine oil level223
6Setting the time83
7Setting the date84
8Viewing service requirement display80
Exiting displays
The outside temperature reading and the time
reappear when you press button2 or if you
make no entries within approx. 15 seconds.
If required, complete the current setting first.
Page 86 of 278
Controls overview
84
Date
The settings are stored for the remote control
currently in use, refer also to Personal Profile on
page26.
Setting the date
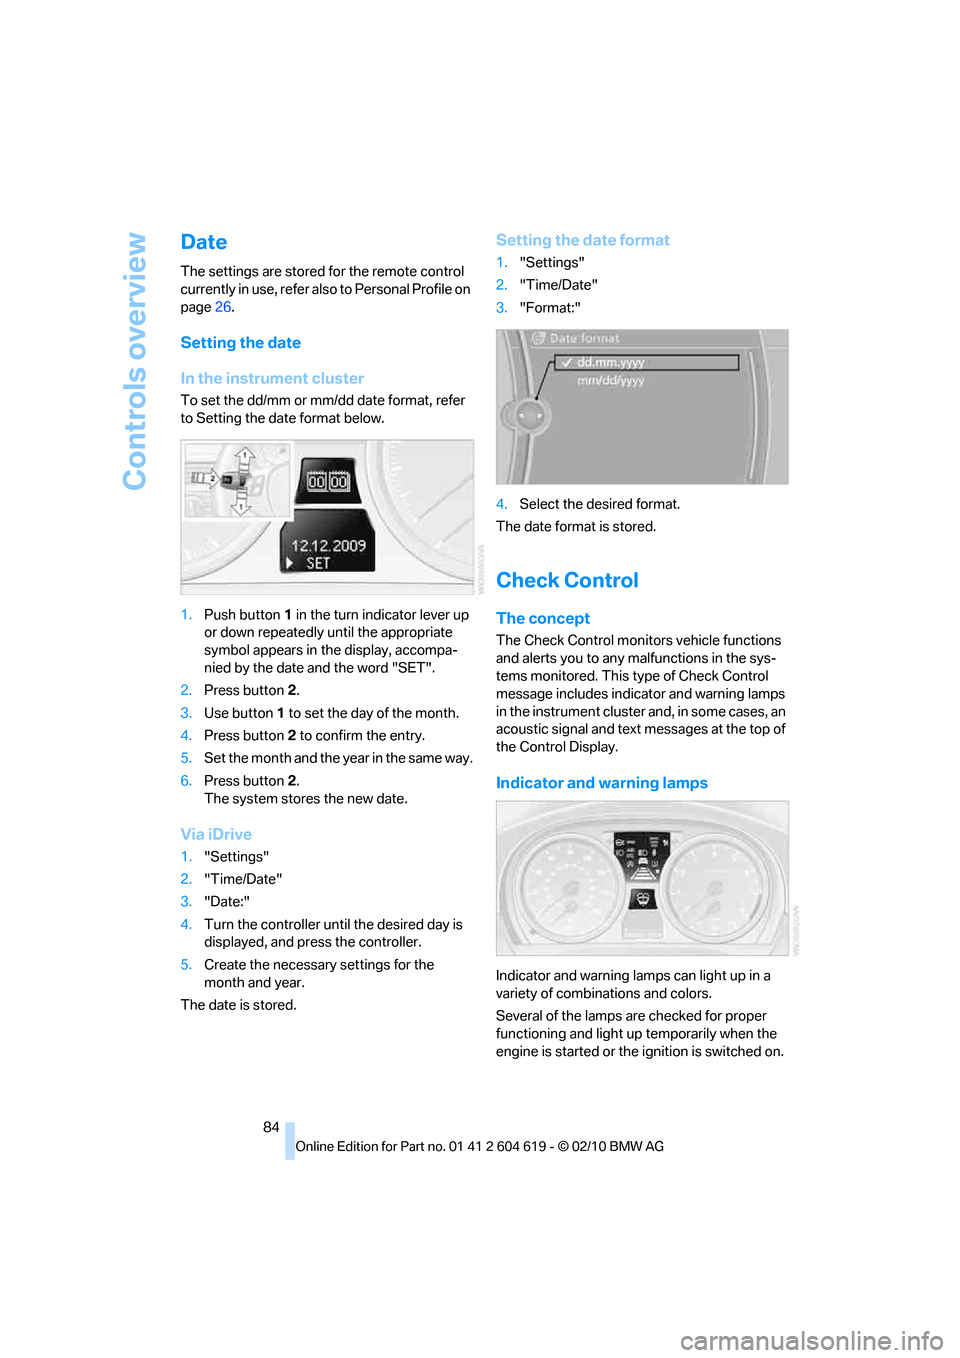
In the instrument cluster
To set the dd/mm or mm/dd date format, refer
to Setting the date format below.
1.Push button 1 in the turn indicator lever up
or down repeatedly until the appropriate
symbol appears in the display, accompa-
nied by the date and the word "SET".
2.Press button 2.
3.Use button 1 to set the day of the month.
4.Press button 2 to confirm the entry.
5.Set the month and the yea r i n t he s a m e w a y .
6.Press button 2.
The system stores the new date.
Via iDrive
1."Settings"
2."Time/Date"
3."Date:"
4.Turn the controller until the desired day is
displayed, and press the controller.
5.Create the necessary settings for the
month and year.
The date is stored.
Setting the date format
1."Settings"
2."Time/Date"
3."Format:"
4.Select the desired format.
The date format is stored.
Check Control
The concept
The Check Control monitors vehicle functions
and alerts you to any malfunctions in the sys-
tems monitored. This type of Check Control
message includes indicator and warning lamps
in the instrument cluster and, in some cases, an
acoustic signal and text messages at the top of
the Control Display.
Indicator and warning lamps
Indicator and warning lamps can light up in a
variety of combinations and colors.
Several of the lamps are checked for proper
functioning and light up temporarily when the
engine is started or the ignition is switched on.
Page 95 of 278
Controls
93Reference
At a glance
Driving tips
Communications
Navigation
Entertainment
Mobility
Initialization
In the initialization, the set inflation pressures
are adopted as reference values for the detec-
tion of a flat tire. The initialization is begun by
confirmation of the inflation pressures.
Do not initialize the system while snow chains
are attached.
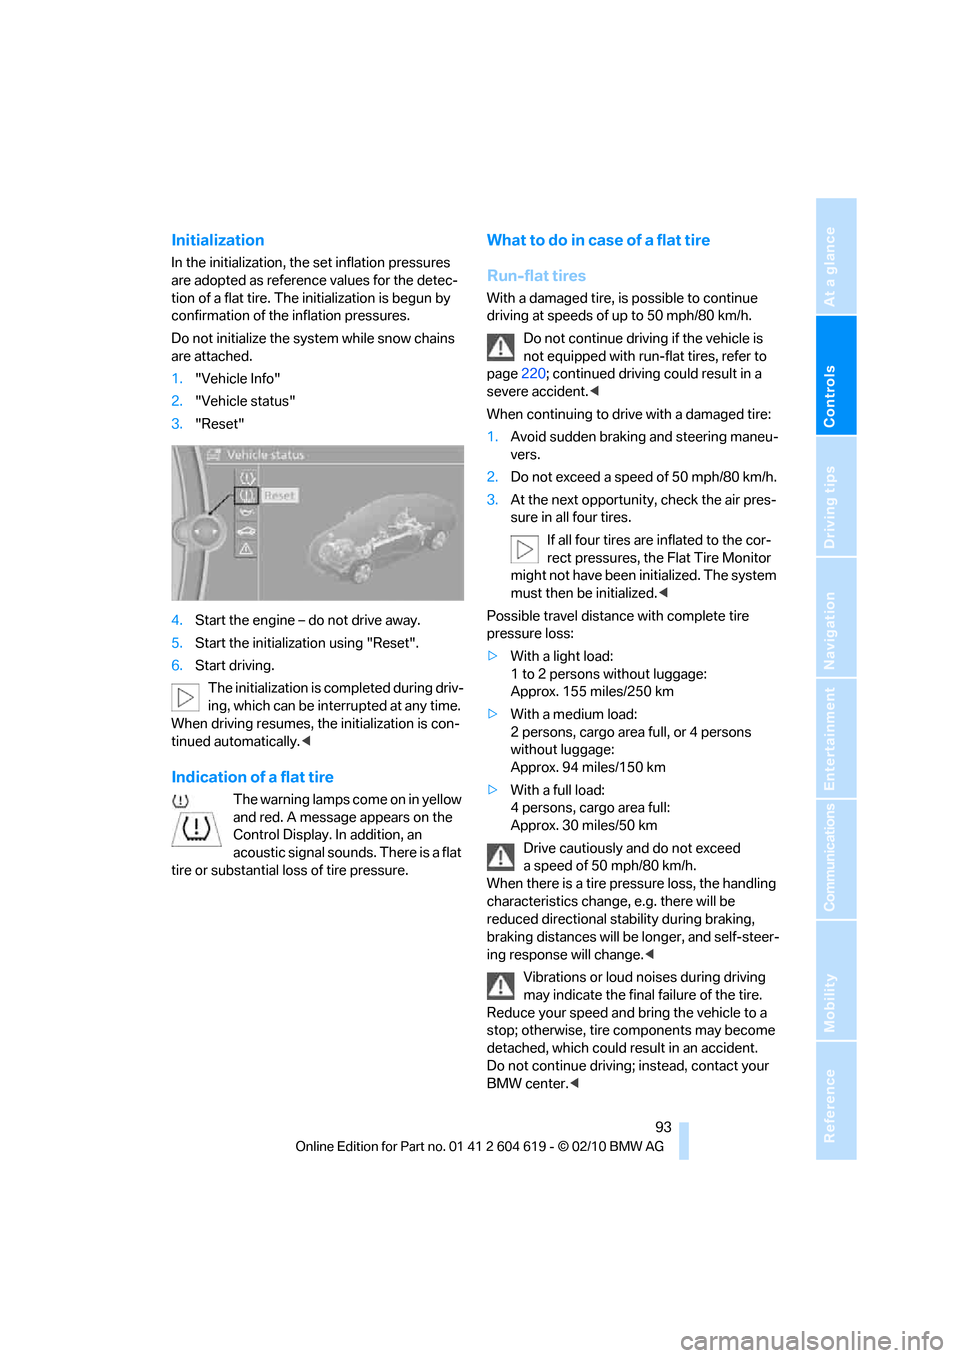
1."Vehicle Info"
2."Vehicle status"
3."Reset"
4.Start the engine – do not drive away.
5.Start the initialization using "Reset".
6.Start driving.
The initialization is completed during driv-
ing, which can be interrupted at any time.
When driving resumes, the initialization is con-
tinued automatically.<
Indication of a flat tire
The warning lamps come on in yellow
and red. A message appears on the
Control Display. In addition, an
acoustic signal sounds. There is a flat
tire or substantial loss of tire pressure.
What to do in case of a flat tire
Run-flat tires
With a damaged tire, is possible to continue
driving at speeds of up to 50 mph/80 km/h.
Do not continue driving if the vehicle is
not equipped with run-flat tires, refer to
page220; continued driving could result in a
severe accident.<
When continuing to drive with a damaged tire:
1.Avoid sudden braking and steering maneu-
vers.
2.Do not exceed a speed of 50 mph/80 km/h.
3.At the next opportunity, check the air pres-
sure in all four tires.
If all four tires are inflated to the cor-
rect pressures, the Flat Tire Monitor
might not have been initialized. The system
must then be initialized.<
Possible travel distance with complete tire
pressure loss:
>With a light load:
1 to 2 persons without luggage:
Approx. 155 miles/250 km
>With a medium load:
2 persons, cargo area full, or 4 persons
without luggage:
Approx. 94 miles/150 km
>With a full load:
4 persons, cargo area full:
Approx. 30 miles/50 km
Drive cautiously and do not exceed
a speed of 50 mph/80 km/h.
When there is a tire pressure loss, the handling
characteristics change, e.g. there will be
reduced directional stability during braking,
braking distances will be longer, and self-steer-
ing response will change.<
Vibrations or loud noises during driving
may indicate the final failure of the tire.
Reduce your speed and bring the vehicle to a
stop; otherwise, tire components may become
detached, which could result in an accident.
Do not continue driving; instead, contact your
BMW center.<
Page 105 of 278
Controls
103Reference
At a glance
Driving tips
Communications
Navigation
Entertainment
Mobility
Malfunction
The LED next to the symbol for automatic head-
lamp control flashes. Adaptive light control is
malfunctioning or has failed. Have the system
checked as soon as possible.
High beams/roadside parking
lamps
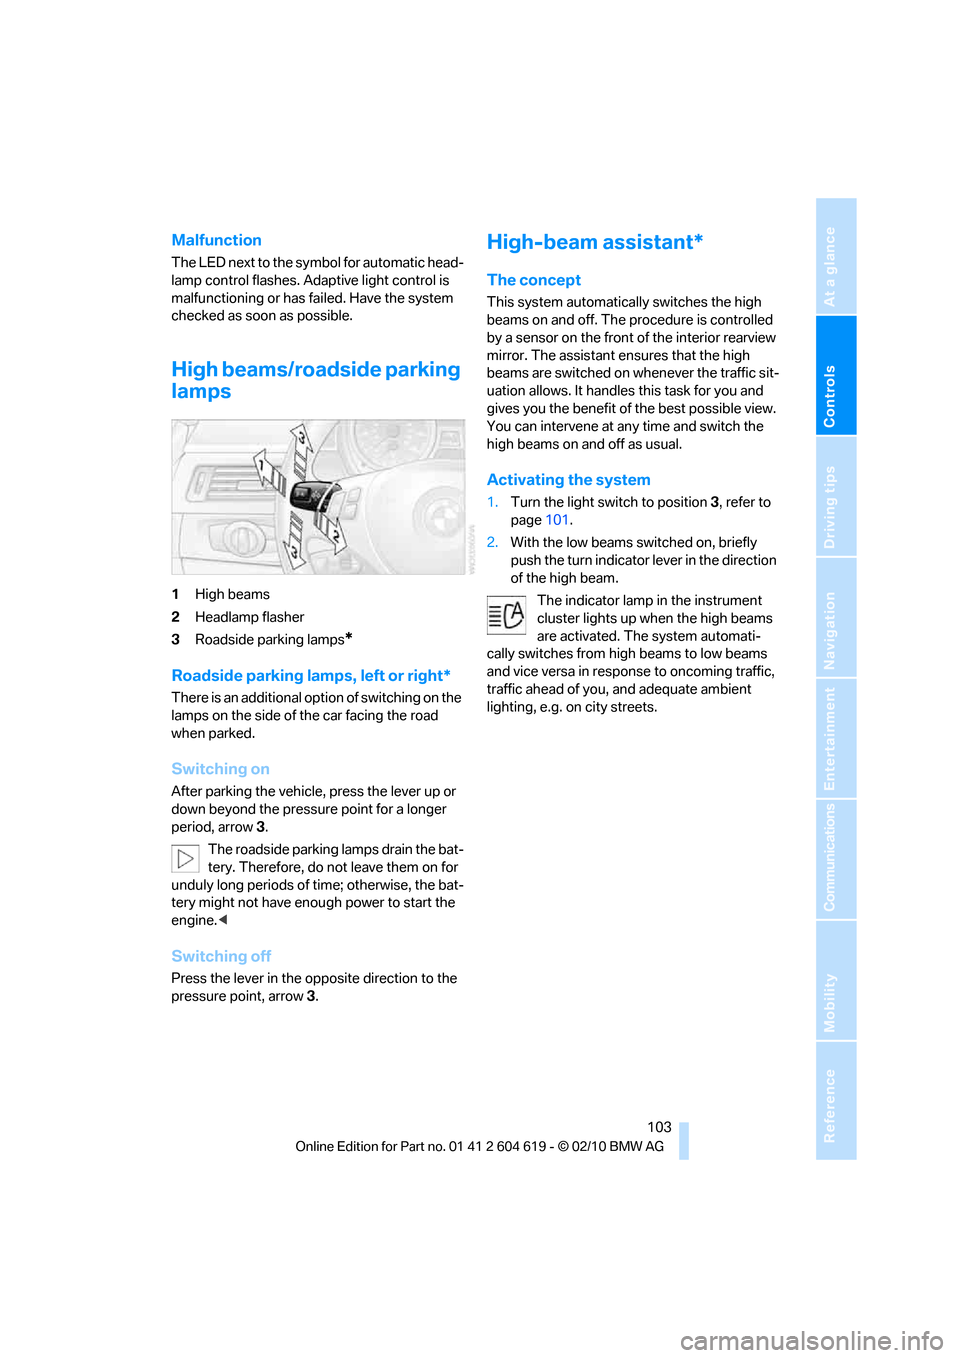
1High beams
2Headlamp flasher
3Roadside parking lamps
*
Roadside parking lamps, left or right*
There is an additional option of switching on the
lamps on the side of the car facing the road
when parked.
Switching on
After parking the vehicle, press the lever up or
down beyond the pressure point for a longer
period, arrow 3.
The roadside parking lamps drain the bat-
tery. Therefore, do not leave them on for
unduly long periods of time; otherwise, the bat-
tery might not have enough power to start the
engine.<
Switching off
Press the lever in the opposite direction to the
pressure point, arrow 3.
High-beam assistant*
The concept
This system automatically switches the high
beams on and off. The procedure is controlled
by a sensor on the front of the interior rearview
mirror. The assistant ensures that the high
beams are switched on whenever the traffic sit-
uation allows. It handles this task for you and
gives you the benefit of the best possible view.
You can intervene at any time and switch the
high beams on and off as usual.
Activating the system
1.Turn the light switch to position3, refer to
page101.
2.With the low beams switched on, briefly
push the turn indicator lever in the direction
of the high beam.
The indicator lamp in the instrument
cluster lights up when the high beams
are activated. The system automati-
cally switches from high beams to low beams
and vice versa in response to oncoming traffic,
traffic ahead of you, and adequate ambient
lighting, e.g. on city streets.
Page 188 of 278
Telephone
186
Following the initial pairing
>The mobile phone is detected/connected in
the vehicle within a short time if the engine
is running or the ignition is switched on.
>As soon as a mobile phone is detected by
the vehicle, the phone book entries stored
on the SIM card or on your mobile phone are
transmitted to the vehicle. This transmis-
sion is dependent on your mobile phone,
refer to the operating instructions of the
mobile phone if necessary, and can take
several minutes.
>Four mobile phones can be paired.
>Specific settings may be necessary in some
mobile phones, e.g. authorization or a
secure connection, refer to the mobile
phone operating instructions.
If not all phone book entries are displayed:
>Transfer all phone book entries from the
SIM card to the mobile phone, if necessary.
>Phone book entries with special characters
may not be displayed.
Checks to perform if pairing is
unsuccessful
>Is the mobile phone supported by the
mobile phone preparation package? You
can obtain information on the Internet at:
www.bmw.com/bluetooth
>Do the Bluetooth passkeys on the mobile
phone and vehicle match? The same Blue-
tooth passkey must be entered on the
mobile phone's display and via iDrive.
>Did it take you more than 30 seconds to
enter the Bluetooth passkey? Then repeat
the pairing procedure.
>Are too many Bluetooth devices connected
to the mobile phone? If so, delete the con-
nections with other devices on the mobile
phone.
>Is the mobile phone no longer responding?
Switch the mobile phone off and on or
briefly disconnect the power supply.
>Repeat the pairing procedure.>If all items on the list have been checked
and the mobile phone still cannot be paired,
please contact Customer Relations.
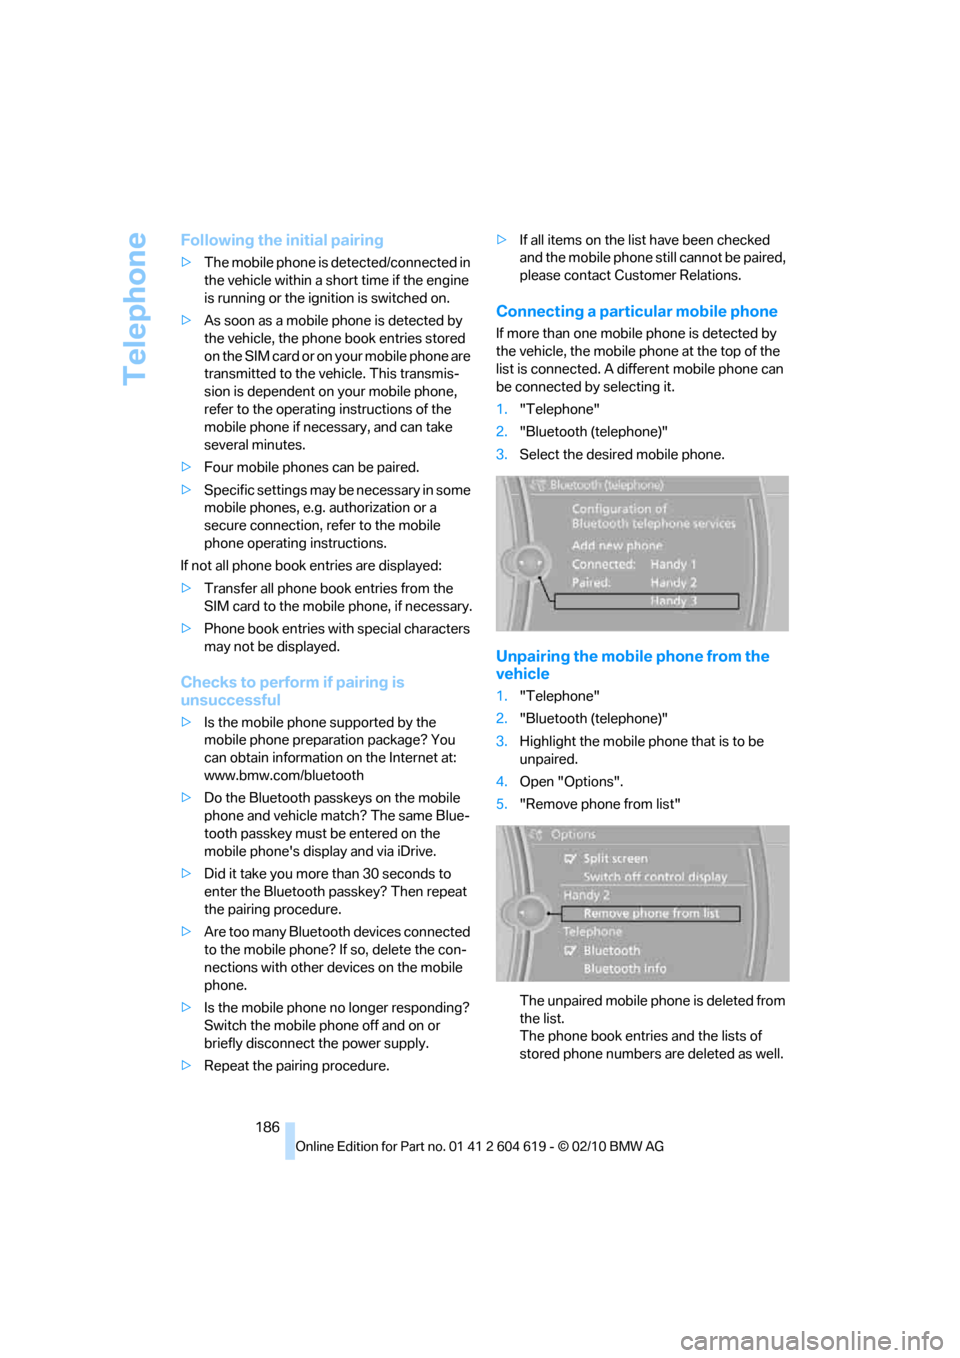
Connecting a particular mobile phone
If more than one mobile phone is detected by
the vehicle, the mobile phone at the top of the
list is connected. A different mobile phone can
be connected by selecting it.
1."Telephone"
2."Bluetooth (telephone)"
3.Select the desired mobile phone.
Unpairing the mobile phone from the
vehicle
1."Telephone"
2."Bluetooth (telephone)"
3.Highlight the mobile phone that is to be
unpaired.
4.Open "Options".
5."Remove phone from list"
The unpaired mobile phone is deleted from
the list.
The phone book entries and the lists of
stored phone numbers are deleted as well.
Page 230 of 278
Maintenance
228
Socket for Onboard
Diagnosis OBD
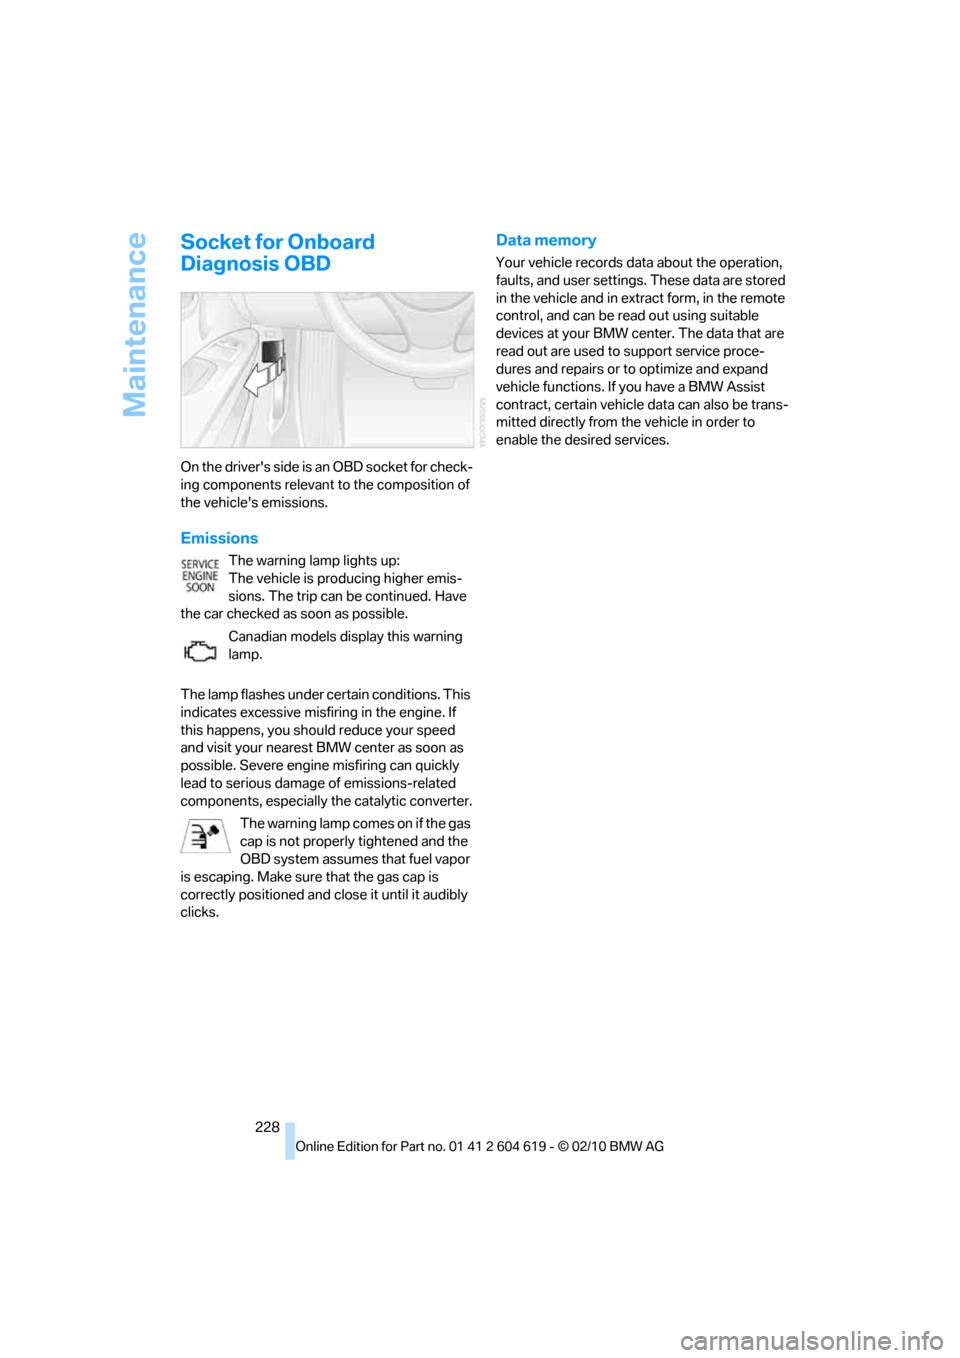
On the driver's side is an OBD socket for check-
ing components relevant to the composition of
the vehicle's emissions.
Emissions
The warning lamp lights up:
The vehicle is producing higher emis-
sions. The trip can be continued. Have
the car checked as soon as possible.
Canadian models display this warning
lamp.
The lamp flashes under certain conditions. This
indicates excessive misfiring in the engine. If
this happens, you should reduce your speed
and visit your nearest BMW center as soon as
possible. Severe engine misfiring can quickly
lead to serious damage of emissions-related
components, especially the catalytic converter.
The warning lamp comes on if the gas
cap is not properly tightened and the
OBD system assumes that fuel vapor
is escaping. Make sure that the gas cap is
correctly positioned and close it until it audibly
clicks.
Data memory
Your vehicle records data about the operation,
faults, and user settings. These data are stored
in the vehicle and in extract form, in the remote
control, and can be read out using suitable
devices at your BMW center. The data that are
read out are used to support service proce-
dures and repairs or to optimize and expand
vehicle functions. If you have a BMW Assist
contract, certain vehicle data can also be trans-
mitted directly from the vehicle in order to
enable the desired services.