rear entertainment BMW 328XI SEDAN 2008 E90 User Guide
[x] Cancel search | Manufacturer: BMW, Model Year: 2008, Model line: 328XI SEDAN, Model: BMW 328XI SEDAN 2008 E90Pages: 274, PDF Size: 8.88 MB
Page 57 of 274
Controls
55Reference
At a glance
Driving tips
Communications
Navigation
Entertainment
Mobility
3.Use the hook to clip the retaining strap to
the anchor.
4.Push the head restraint into its lowermost
position.
5.Pull the retaining strap taut.
On journeys
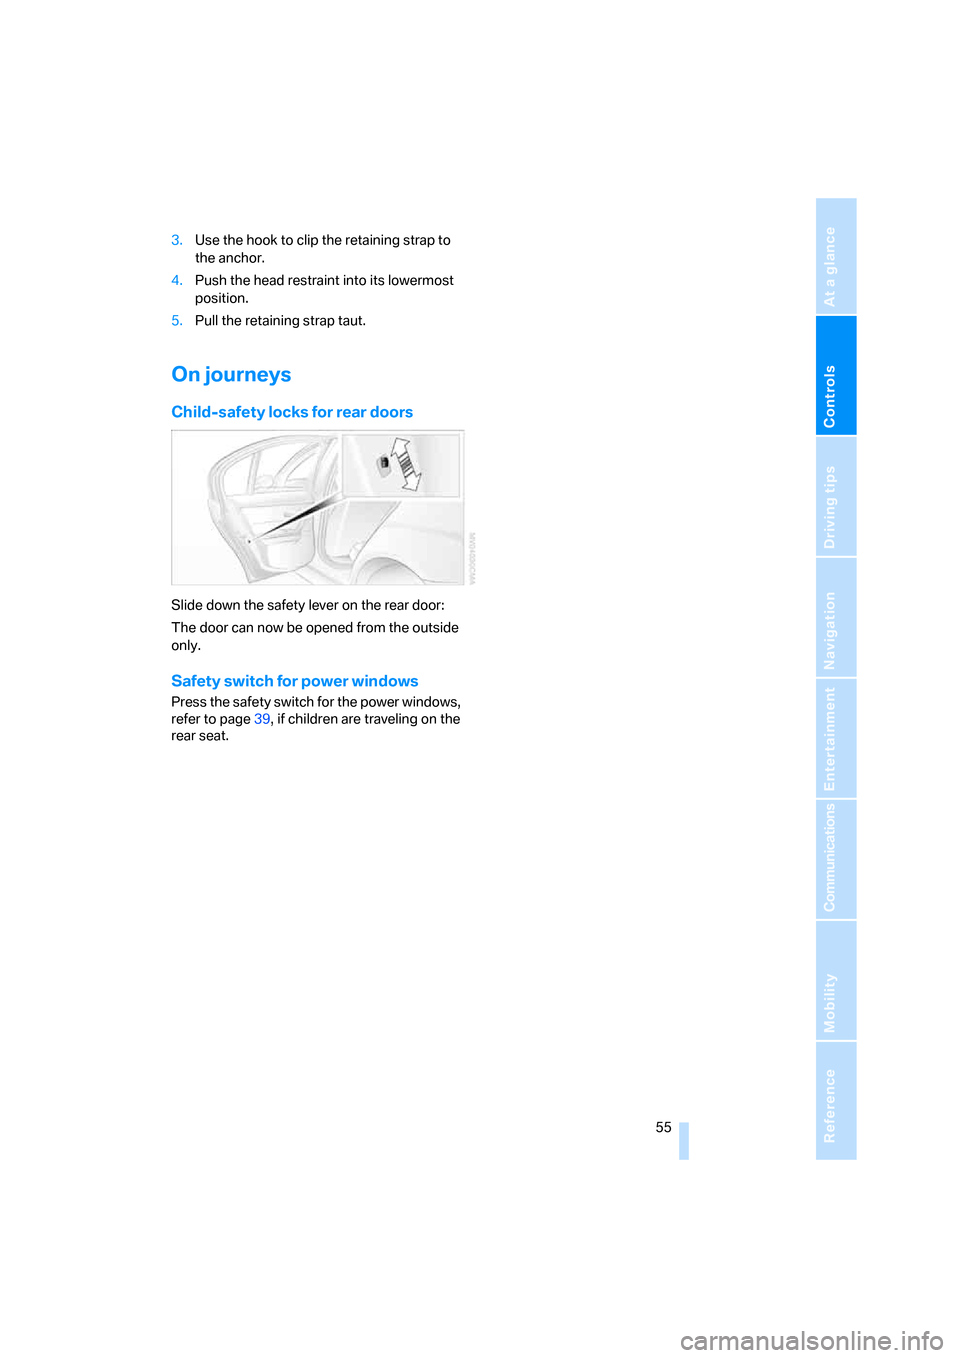
Child-safety locks for rear doors
Slide down the safety lever on the rear door:
The door can now be opened from the outside
only.
Safety switch for power windows
Press the safety switch for the power windows,
refer to page39, if children are traveling on the
rear seat.
Page 59 of 274
Controls
57Reference
At a glance
Driving tips
Communications
Navigation
Entertainment
Mobility
Starting the engine
Do not run the engine in closed rooms,
otherwise the inhalation of toxic exhaust
gases can cause unconsciousness and death.
The exhaust gases contain carbon monoxide,
an odorless and colorless, but highly toxic gas.
Never leave an unattended vehicle with the
engine running, otherwise such a vehicle repre-
sents a potential safety hazard.
Before leaving the car with the engine running,
place the transmission in idle or move the
selector lever to position P and forcefully apply
the parking brake to prevent the car from mov-
ing.<
Avoid frequent starting in quick succes-
sion as well as repeated start attempts in
which the engine does not start. Otherwise, the
fuel is not burned or incompletely burned and
there is a danger of overheating and damaging
the catalytic converter.<
Do not wait for the engine to warm up while the
vehicle remains stationary. Start driving right
away, but at moderate engine speeds.
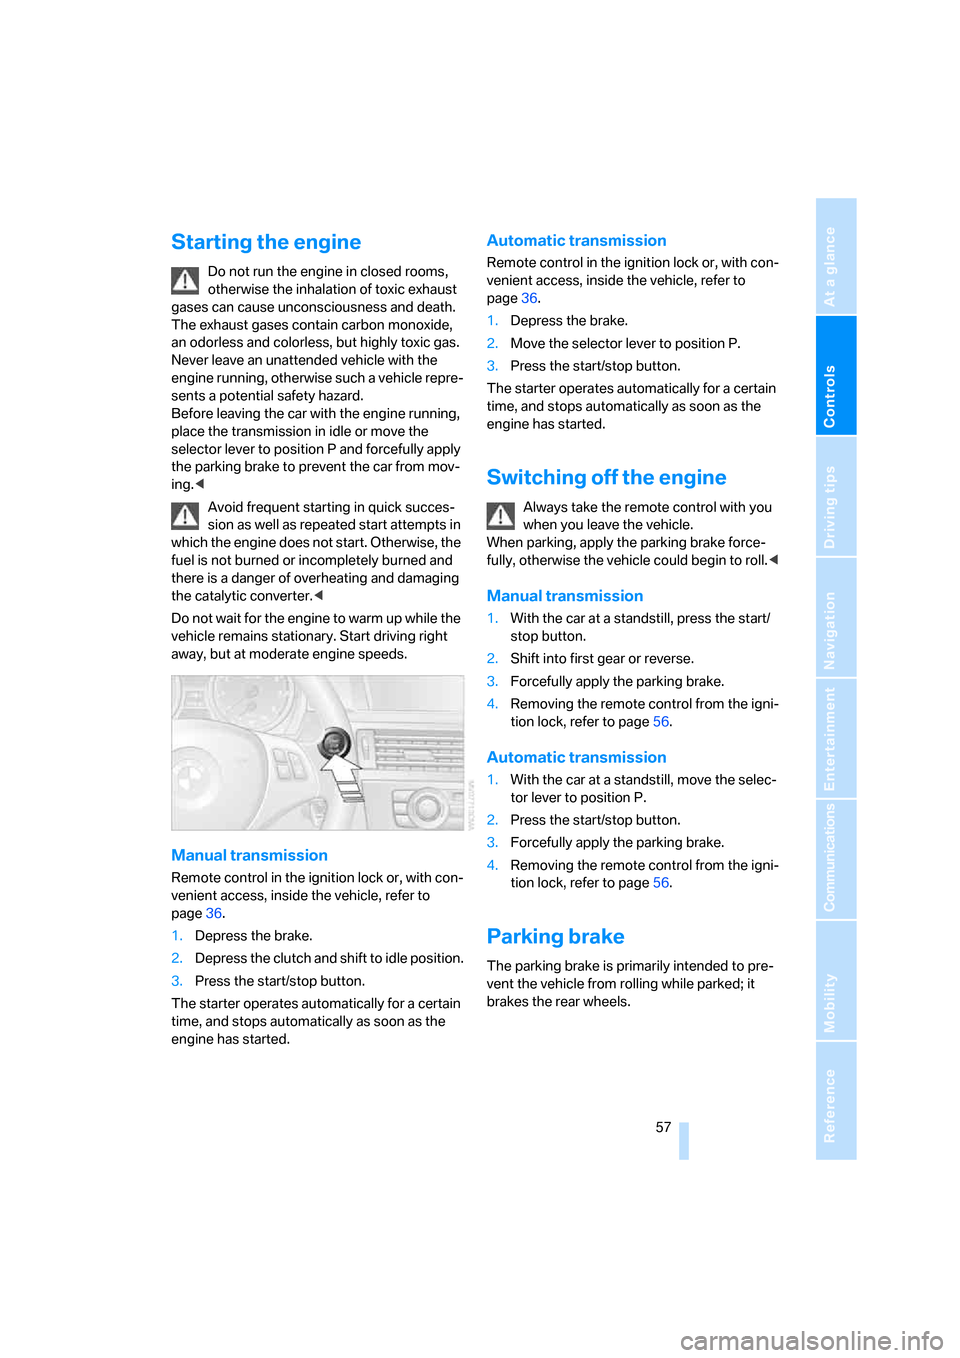
Manual transmission
Remote control in the ignition lock or, with con-
venient access, inside the vehicle, refer to
page36.
1.Depress the brake.
2.Depress the clutch and shift to idle position.
3.Press the start/stop button.
The starter operates automatically for a certain
time, and stops automatically as soon as the
engine has started.
Automatic transmission
Remote control in the ignition lock or, with con-
venient access, inside the vehicle, refer to
page36.
1.Depress the brake.
2.Move the selector lever to position P.
3.Press the start/stop button.
The starter operates automatically for a certain
time, and stops automatically as soon as the
engine has started.
Switching off the engine
Always take the remote control with you
when you leave the vehicle.
When parking, apply the parking brake force-
fully, otherwise the vehicle could begin to roll.<
Manual transmission
1.With the car at a standstill, press the start/
stop button.
2.Shift into first gear or reverse.
3.Forcefully apply the parking brake.
4.Removing the remote control from the igni-
tion lock, refer to page56.
Automatic transmission
1.With the car at a standstill, move the selec-
tor lever to position P.
2.Press the start/stop button.
3.Forcefully apply the parking brake.
4.Removing the remote control from the igni-
tion lock, refer to page56.
Parking brake
The parking brake is primarily intended to pre-
vent the vehicle from rolling while parked; it
brakes the rear wheels.
Page 61 of 274
Controls
59Reference
At a glance
Driving tips
Communications
Navigation
Entertainment
Mobility
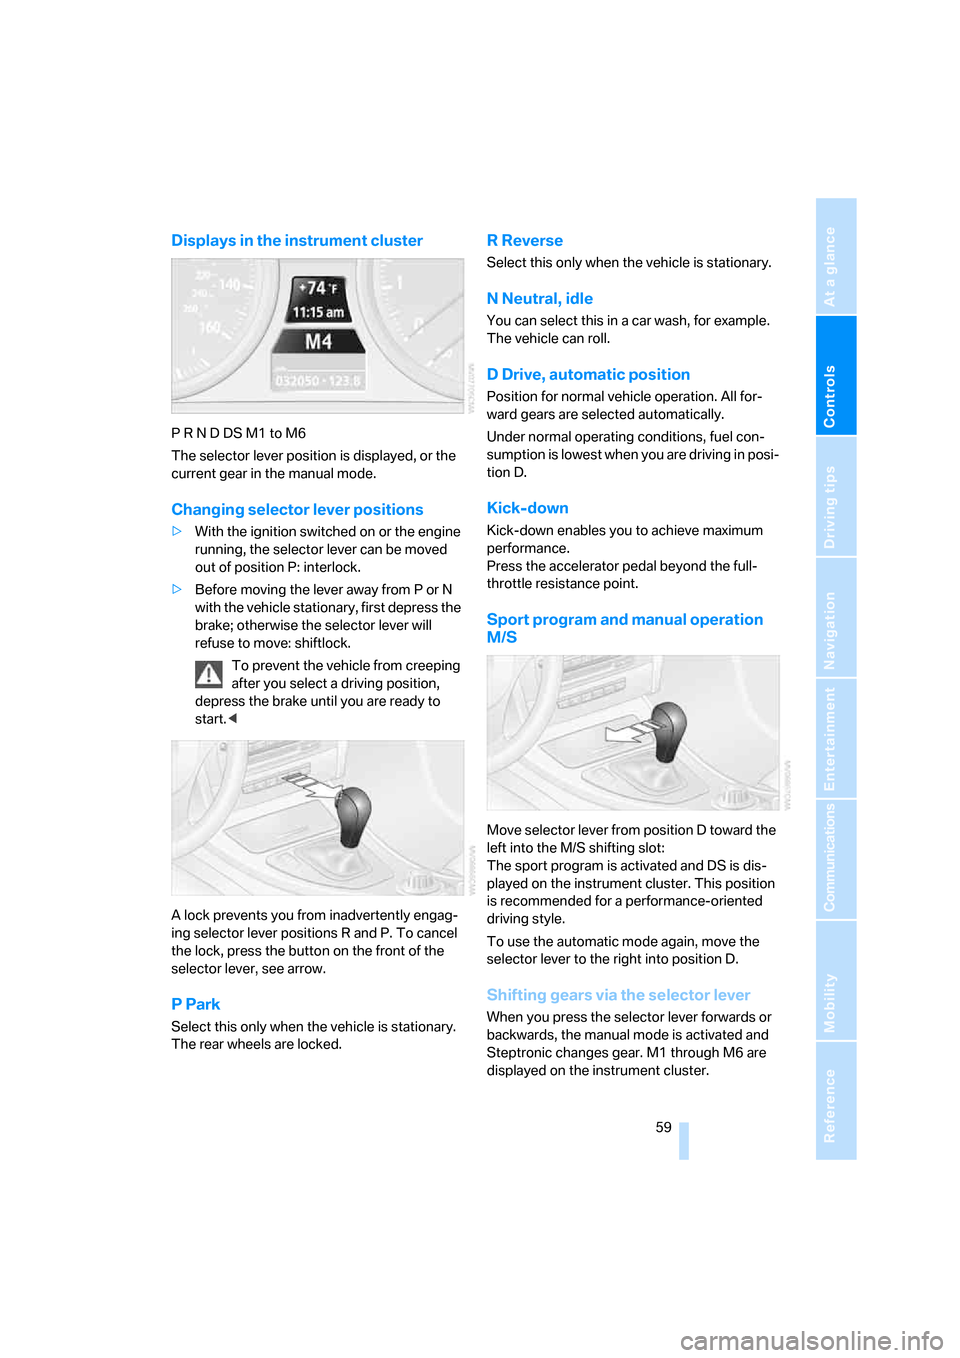
Displays in the instrument cluster
P R N D DS M1 to M6
The selector lever position is displayed, or the
current gear in the manual mode.
Changing selector lever positions
>With the ignition switched on or the engine
running, the selector lever can be moved
out of position P: interlock.
>Before moving the lever away from P or N
with the vehicle stationary, first depress the
brake; otherwise the selector lever will
refuse to move: shiftlock.
To prevent the vehicle from creeping
after you select a driving position,
depress the brake until you are ready to
start.<
A lock prevents you from inadvertently engag-
ing selector lever positions R and P. To cancel
the lock, press the button on the front of the
selector lever, see arrow.
P Park
Select this only when the vehicle is stationary.
The rear wheels are locked.
R Reverse
Select this only when the vehicle is stationary.
N Neutral, idle
You can select this in a car wash, for example.
The vehicle can roll.
D Drive, automatic position
Position for normal vehicle operation. All for-
ward gears are selected automatically.
Under normal operating conditions, fuel con-
sumption is lowest when you are driving in posi-
tion D.
Kick-down
Kick-down enables you to achieve maximum
performance.
Press the accelerator pedal beyond the full-
throttle resistance point.
Sport program and manual operation
M/S
Move selector lever from position D toward the
left into the M/S shifting slot:
The sport program is activated and DS is dis-
played on the instrument cluster. This position
is recommended for a performance-oriented
driving style.
To use the automatic mode again, move the
selector lever to the right into position D.
Shifting gears via the selector lever
When you press the selector lever forwards or
backwards, the manual mode is activated and
Steptronic changes gear. M1 through M6 are
displayed on the instrument cluster.
Page 63 of 274
Controls
61Reference
At a glance
Driving tips
Communications
Navigation
Entertainment
Mobility
Unusually rapid flashing of the indicator
lamp indicates that a turn signal indicator
has failed.<
Indicating a turn briefly
Press the lever as far as the resistance point for
as long as you wish to indicate a turn.
Triple turn signal activation
Press the lever as far as the resistance point.
The turn signals flash three times.
You can activate or deactivate this function.
iDrive, for operating principle refer to page16.
1.Open the start menu.
2.Press the controller to open the menu.
3.Select "Settings" and press the controller.
4.Select "Vehicle / Tires" and press the con-
troller.
5.If necessary, move the highlight marker to
the uppermost field. Turn the controller
until "Lighting" is selected and press the
controller.
6.Select "Triple turn signal" and press the
controller.
Triple turn signaling is activated.
The setting is stored for the remote control cur-
rently in use.
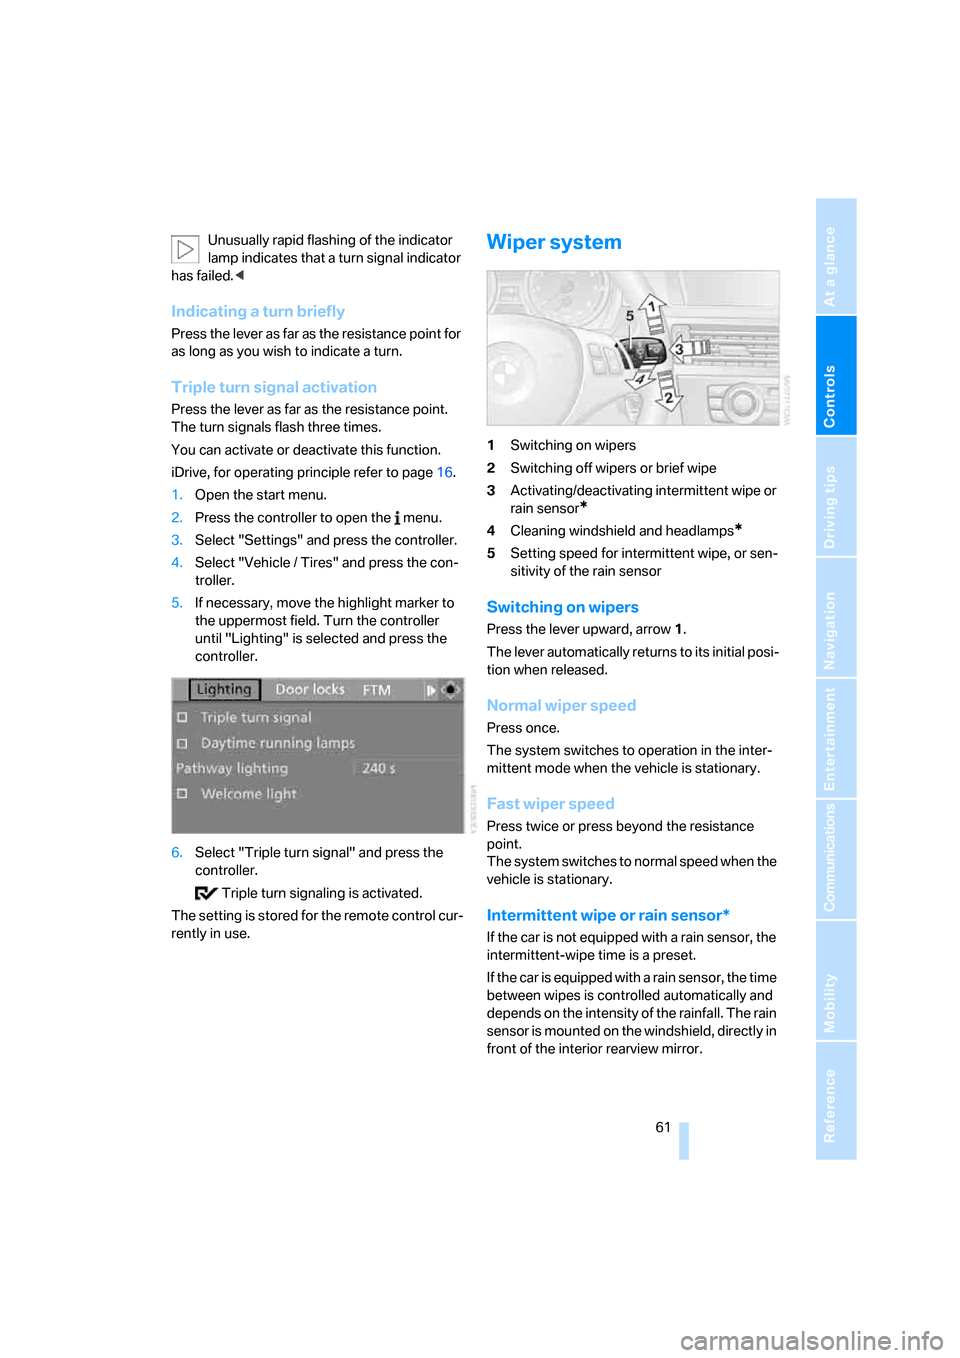
Wiper system
1Switching on wipers
2Switching off wipers or brief wipe
3Activating/deactivating intermittent wipe or
rain sensor
*
4Cleaning windshield and headlamps*
5Setting speed for intermittent wipe, or sen-
sitivity of the rain sensor
Switching on wipers
Press the lever upward, arrow 1.
The lever automatically returns to its initial posi-
tion when released.
Normal wiper speed
Press once.
The system switches to operation in the inter-
mittent mode when the vehicle is stationary.
Fast wiper speed
Press twice or press beyond the resistance
point.
The system switches to normal speed when the
vehicle is stationary.
Intermittent wipe or rain sensor*
If the car is not equipped with a rain sensor, the
intermittent-wipe time is a preset.
If the car is equipped with a rain sensor, the time
between wipes is controlled automatically and
depends on the intensity of the rainfall. The rain
sensor is mounted on the windshield, directly in
front of the interior rearview mirror.
Page 79 of 274
Controls
77Reference
At a glance
Driving tips
Communications
Navigation
Entertainment
Mobility
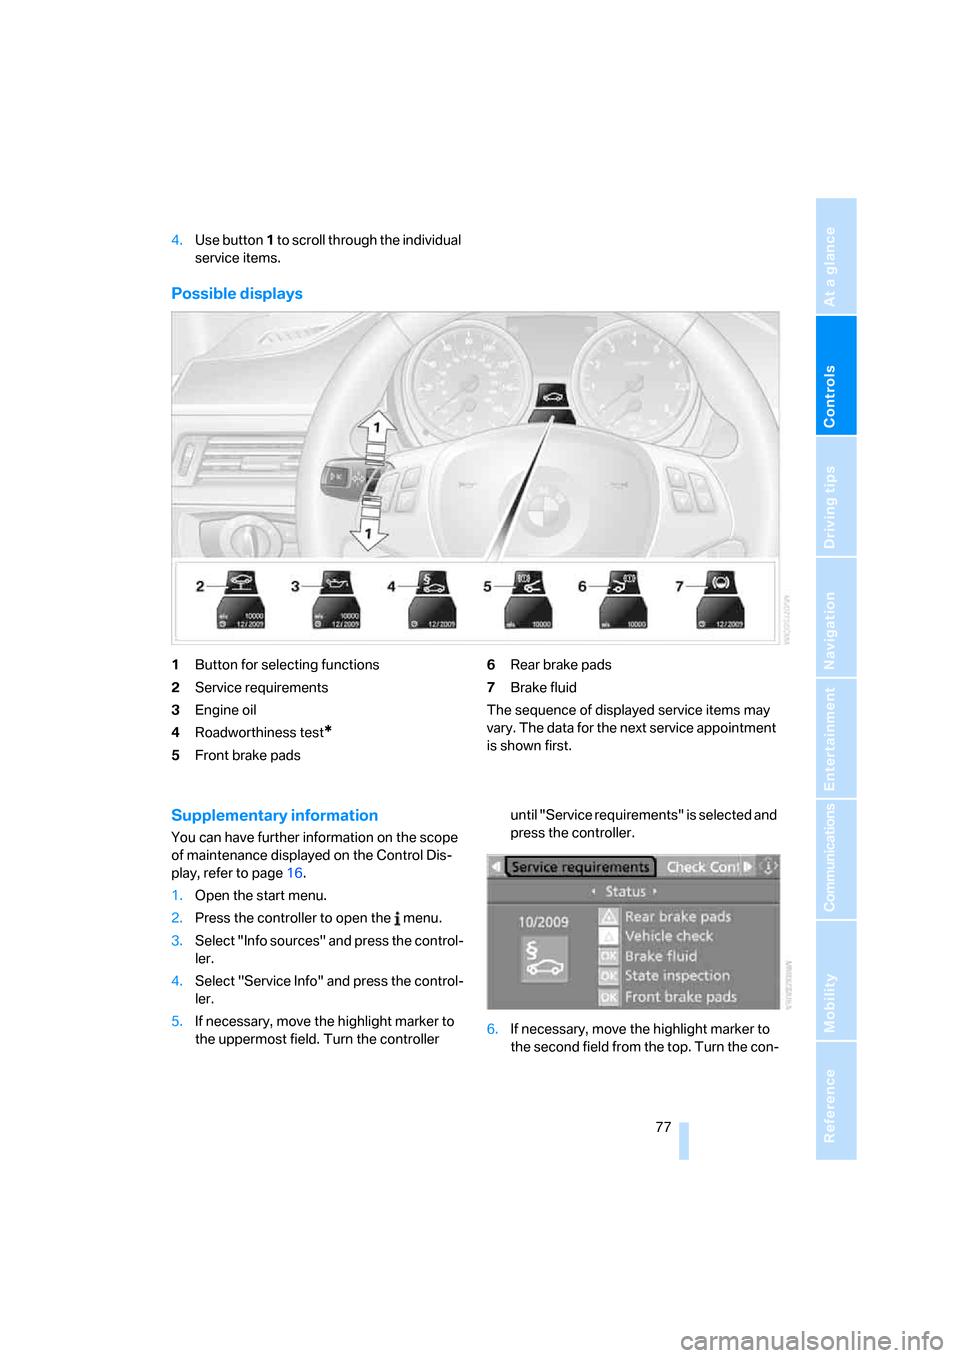
4.Use button 1 to scroll through the individual
service items.
Possible displays
1Button for selecting functions
2Service requirements
3Engine oil
4Roadworthiness test
*
5Front brake pads6Rear brake pads
7Brake fluid
The sequence of displayed service items may
vary. The data for the next service appointment
is shown first.
Supplementary information
You can have further information on the scope
of maintenance displayed on the Control Dis-
play, refer to page16.
1.Open the start menu.
2.Press the controller to open the menu.
3.Select "Info sources" and press the control-
ler.
4.Select "Service Info" and press the control-
ler.
5.If necessary, move the highlight marker to
the uppermost field. Turn the controller until "Service requirements" is selected and
press the controller.
6.If necessary, move the highlight marker to
the second field from the top. Turn the con-
Page 89 of 274
Controls
87Reference
At a glance
Driving tips
Communications
Navigation
Entertainment
Mobility
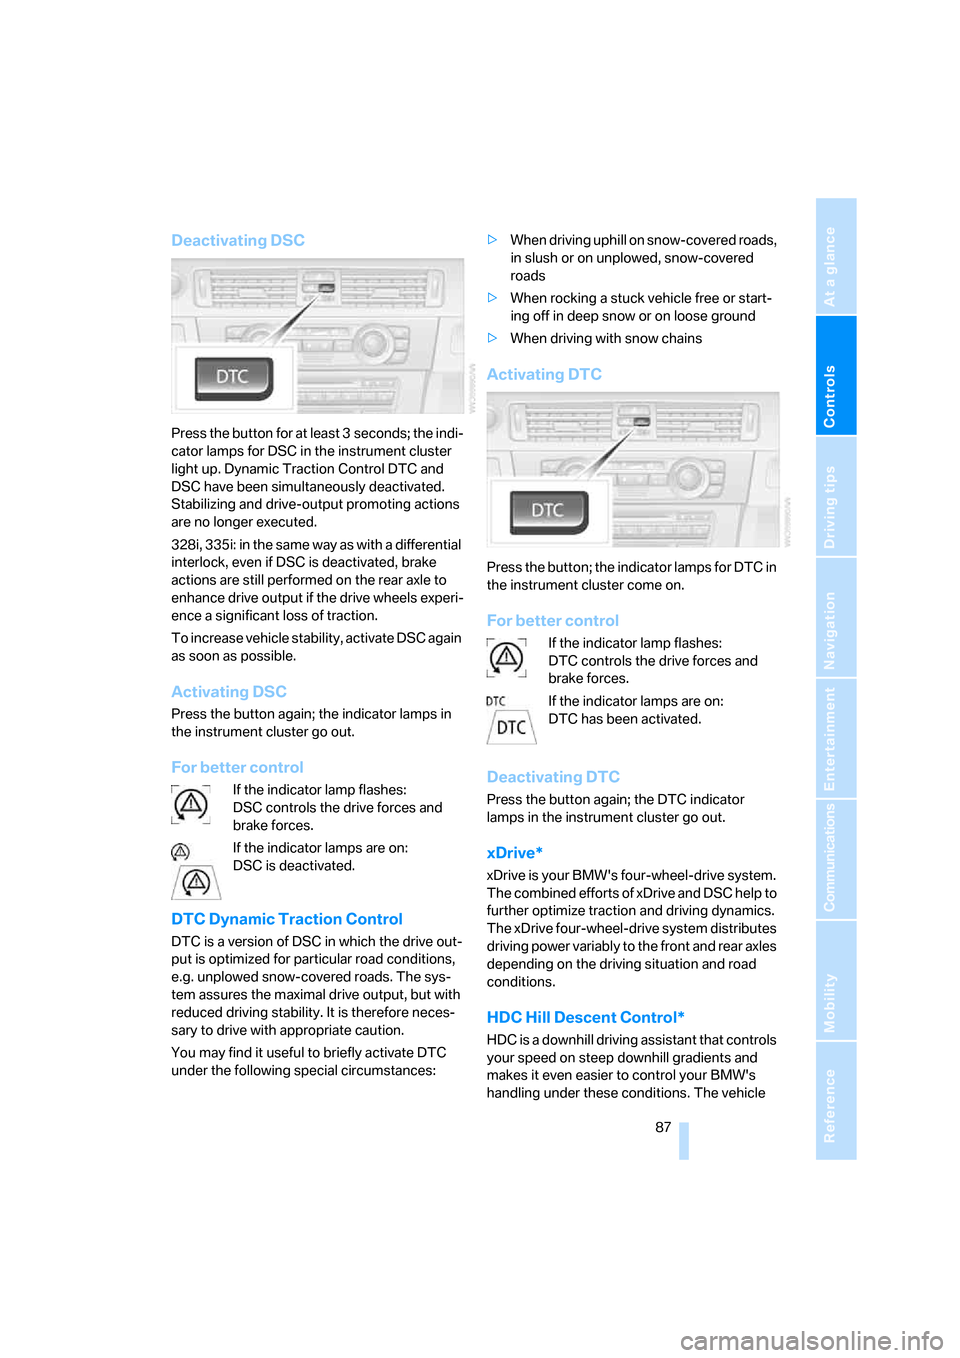
Deactivating DSC
Press the button for at least 3 seconds; the indi-
cator lamps for DSC in the instrument cluster
light up. Dynamic Traction Control DTC and
DSC have been simultaneously deactivated.
Stabilizing and drive-output promoting actions
are no longer executed.
328i, 335i: in the same way as with a differential
interlock, even if DSC is deactivated, brake
actions are still performed on the rear axle to
enhance drive output if the drive wheels experi-
ence a significant loss of traction.
To increase vehicle stability, activate DSC again
as soon as possible.
Activating DSC
Press the button again; the indicator lamps in
the instrument cluster go out.
For better control
If the indicator lamp flashes:
DSC controls the drive forces and
brake forces.
If the indicator lamps are on:
DSC is deactivated.
DTC Dynamic Traction Control
DTC is a version of DSC in which the drive out-
put is optimized for particular road conditions,
e.g. unplowed snow-covered roads. The sys-
tem assures the maximal drive output, but with
reduced driving stability. It is therefore neces-
sary to drive with appropriate caution.
You may find it useful to briefly activate DTC
under the following special circumstances:>When driving uphill on snow-covered roads,
in slush or on unplowed, snow-covered
roads
>When rocking a stuck vehicle free or start-
ing off in deep snow or on loose ground
>When driving with snow chains
Activating DTC
Press the button; the indicator lamps for DTC in
the instrument cluster come on.
For better control
If the indicator lamp flashes:
DTC controls the drive forces and
brake forces.
If the indicator lamps are on:
DTC has been activated.
Deactivating DTC
Press the button again; the DTC indicator
lamps in the instrument cluster go out.
xDrive*
xDrive is your BMW's four-wheel-drive system.
The combined efforts of xDrive and DSC help to
further optimize traction and driving dynamics.
The xDrive four-wheel-drive system distributes
driving power variably to the front and rear axles
depending on the driving situation and road
conditions.
HDC Hill Descent Control*
HDC is a downhill driving assistant that controls
your speed on steep downhill gradients and
makes it even easier to control your BMW's
handling under these conditions. The vehicle
Page 97 of 274
Controls
95Reference
At a glance
Driving tips
Communications
Navigation
Entertainment
Mobility
The front and side airbags can also be deacti-
vated by adolescents and adults sitting in cer-
tain positions; the indicator lamp for the front
passenger airbags comes on. In such cases, the
passenger should change his or her sitting
position so that the front passenger airbags are
activated and the indicator lamp goes out. If the
desired airbag status cannot be achieved by
changing the sitting position, transport the rele-
vant passenger on a rear seat. Do not attach
seat covers, seat cushion padding, ball mats or
other items to the front passenger seat unless
they are specifically recommended by BMW.
Do not place any items under the seat which
could press against the seat from below. Other-
wise a correct analysis of the seat cushion is not
ensured.<
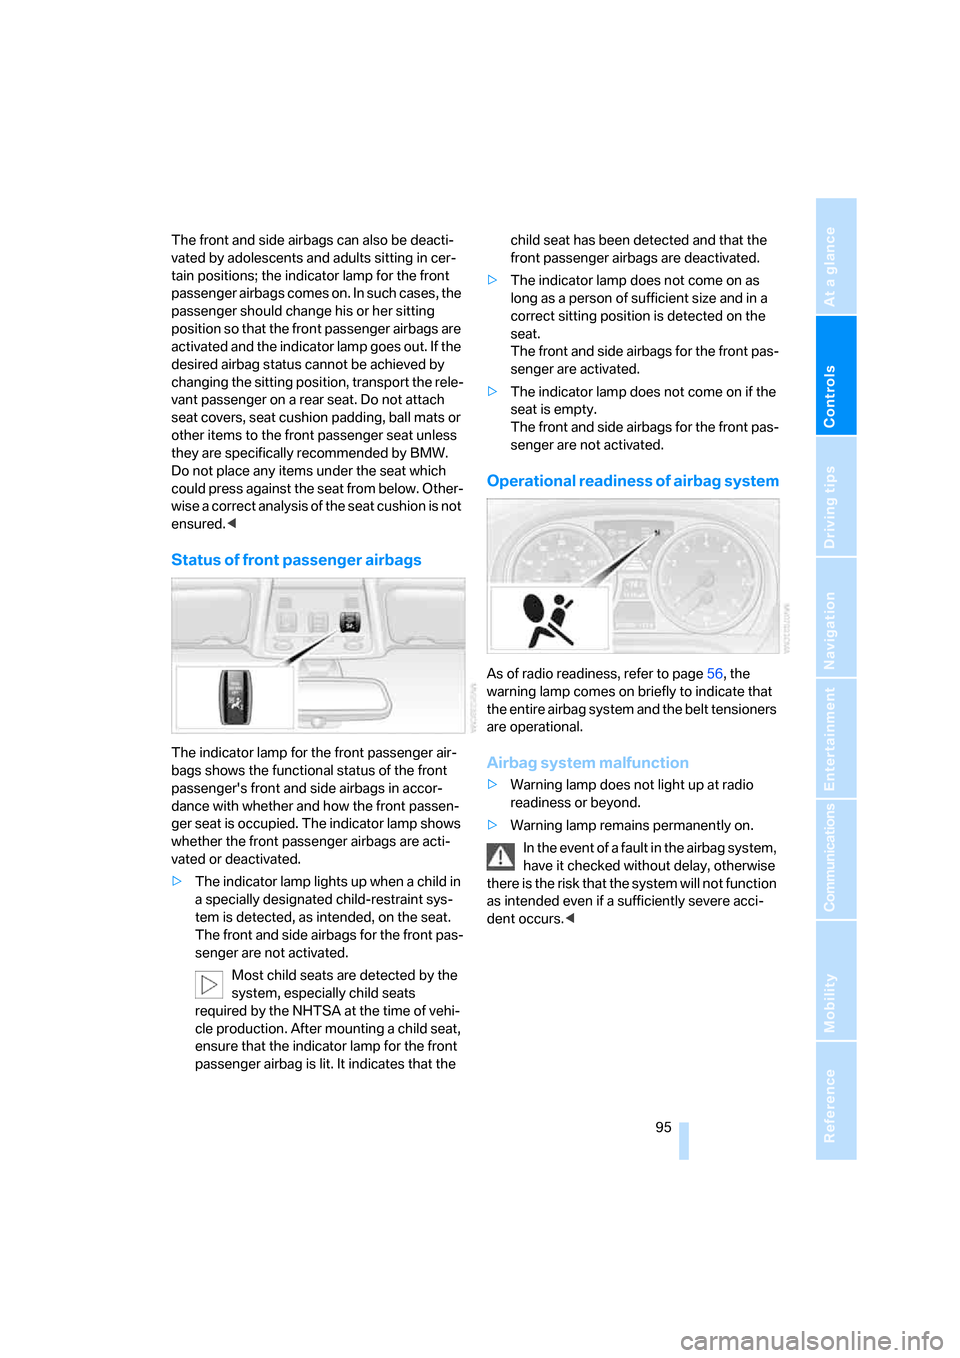
Status of front passenger airbags
The indicator lamp for the front passenger air-
bags shows the functional status of the front
passenger's front and side airbags in accor-
dance with whether and how the front passen-
ger seat is occupied. The indicator lamp shows
whether the front passenger airbags are acti-
vated or deactivated.
>The indicator lamp lights up when a child in
a specially designated child-restraint sys-
tem is detected, as intended, on the seat.
The front and side airbags for the front pas-
senger are not activated.
Most child seats are detected by the
system, especially child seats
required by the NHTSA at the time of vehi-
cle production. After mounting a child seat,
ensure that the indicator lamp for the front
passenger airbag is lit. It indicates that the child seat has been detected and that the
front passenger airbags are deactivated.
>The indicator lamp does not come on as
long as a person of sufficient size and in a
correct sitting position is detected on the
seat.
The front and side airbags for the front pas-
senger are activated.
>The indicator lamp does not come on if the
seat is empty.
The front and side airbags for the front pas-
senger are not activated.
Operational readiness of airbag system
As of radio readiness, refer to page56, the
warning lamp comes on briefly to indicate that
the entire airbag system and the belt tensioners
are operational.
Airbag system malfunction
>Warning lamp does not light up at radio
readiness or beyond.
>Warning lamp remains permanently on.
In the event of a fault in the airbag system,
have it checked without delay, otherwise
there is the risk that the system will not function
as intended even if a sufficiently severe acci-
dent occurs.<
Page 101 of 274
Controls
99Reference
At a glance
Driving tips
Communications
Navigation
Entertainment
Mobility
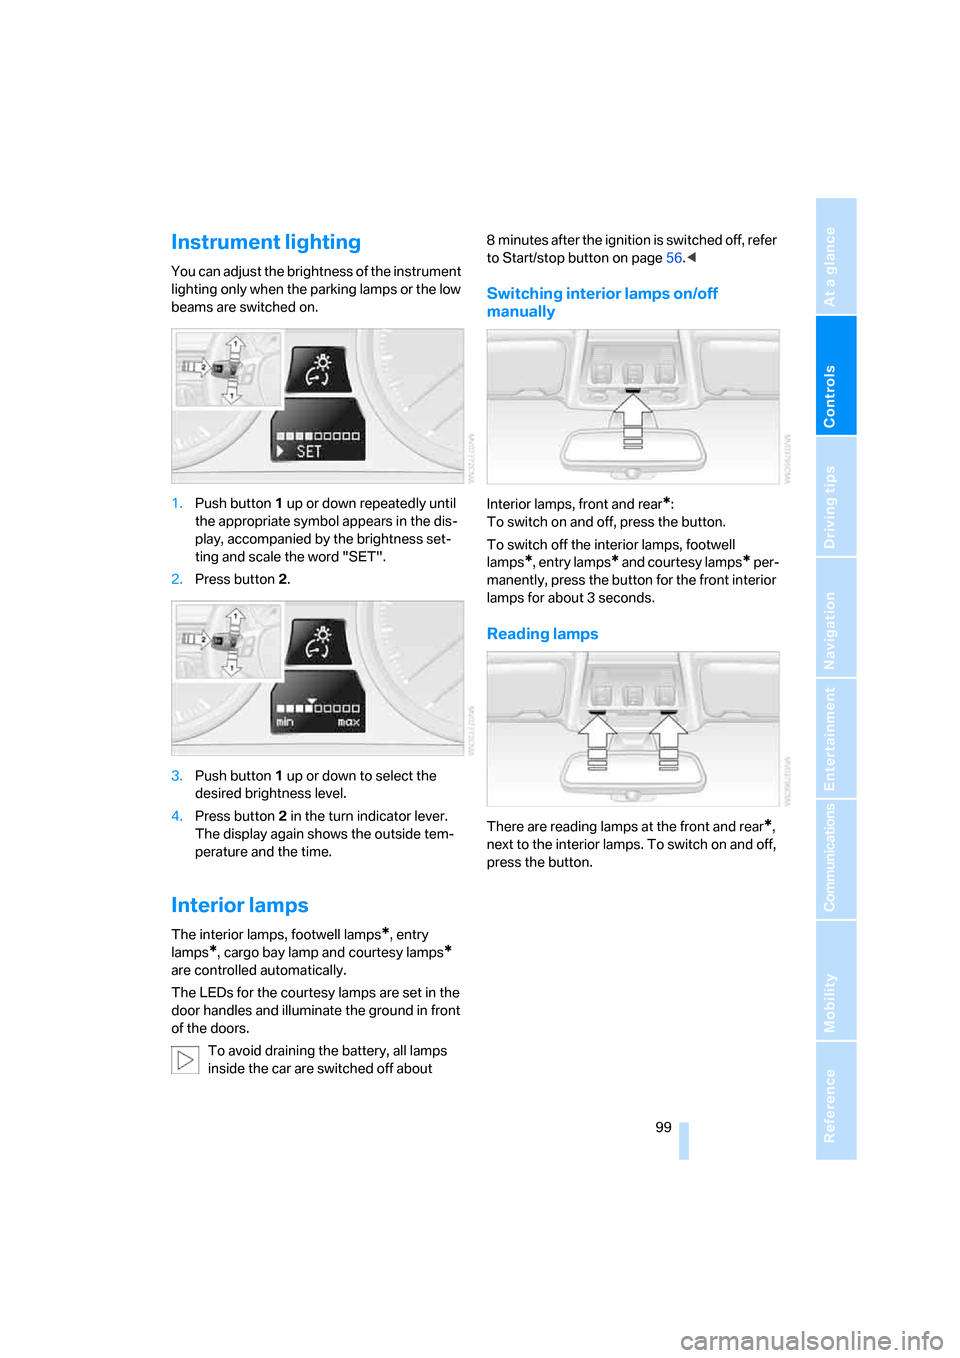
Instrument lighting
You can adjust the brightness of the instrument
lighting only when the parking lamps or the low
beams are switched on.
1.Push button 1 up or down repeatedly until
the appropriate symbol appears in the dis-
play, accompanied by the brightness set-
ting and scale the word "SET".
2.Press button 2.
3.Push button 1 up or down to select the
desired brightness level.
4.Press button 2 in the turn indicator lever.
The display again shows the outside tem-
perature and the time.
Interior lamps
The interior lamps, footwell lamps*, entry
lamps
*, cargo bay lamp and courtesy lamps*
are controlled automatically.
The LEDs for the courtesy lamps
are set in the
door handles and illuminate the ground in front
of the doors.
To avoid draining the battery, all lamps
inside the car are switched off about 8 minutes after the ignition is switched off, refer
to Start/stop button on page56.<
Switching interior lamps on/off
manually
Interior lamps, front and rear*:
To switch on and off, press the button.
To switch off the interior lamps, footwell
lamps
*, entry lamps* and courtesy lamps* per-
manently, press the button for the front interior
lamps for about 3 seconds.
Reading lamps
There are reading lamps at the front and rear*,
next to the interior lamps. To switch on and off,
press the button.
Page 105 of 274
Controls
103Reference
At a glance
Driving tips
Communications
Navigation
Entertainment
Mobility
it off while also increasing the air flow rate as
required.
The recirculated-air mode should not be used
over an extended period of time, otherwise the
air quality inside the car will deteriorate contin-
uously.<
Via the button* on the steering wheel
You can switch quickly between the recircu-
lated-air mode and the previous mode using an
individually programmable button
on the steer-
ing wheel, refer to page11.
Residual heat
The heat stored in the engine is
used to heat the passenger com-
partment, e.g. while stopped at a
school to pick up a child.
The function can be switched on when the fol-
lowing conditions are met:
>Up to 15 minutes after the engine has been
switched off
>While the engine is at operating tempera-
ture
>As long as battery voltage is sufficient
>At an outside temperature below 777/
256
The LED is lit when the function is on.
As of radio readiness, you can set the interior
temperature, the air flow rate and the air distri-
bution.
Defrosting windows and removing
condensation
Quickly removes ice and conden-
sation from the windshield and
front side windows.
Switch on the cooling function as well.
Switching cooling function on/off
The cooling function cools and
dehumidifies the incoming air
before reheating it as required,
according to the temperature setting. This
function is only available while the engine is
running.The cooling function helps prevent condensa-
tion on the windows or removes it quickly.
Depending on the weather, the windshield may
fog over briefly when the engine is started.
The cooling function is automatically switched
on along with the AUTO program.
Rear window defroster
The defroster is switched off auto-
matically after a certain time.
Depending on your vehicle's
equipment, the upper wires serve as an antenna
and are not part of the rear window defroster.
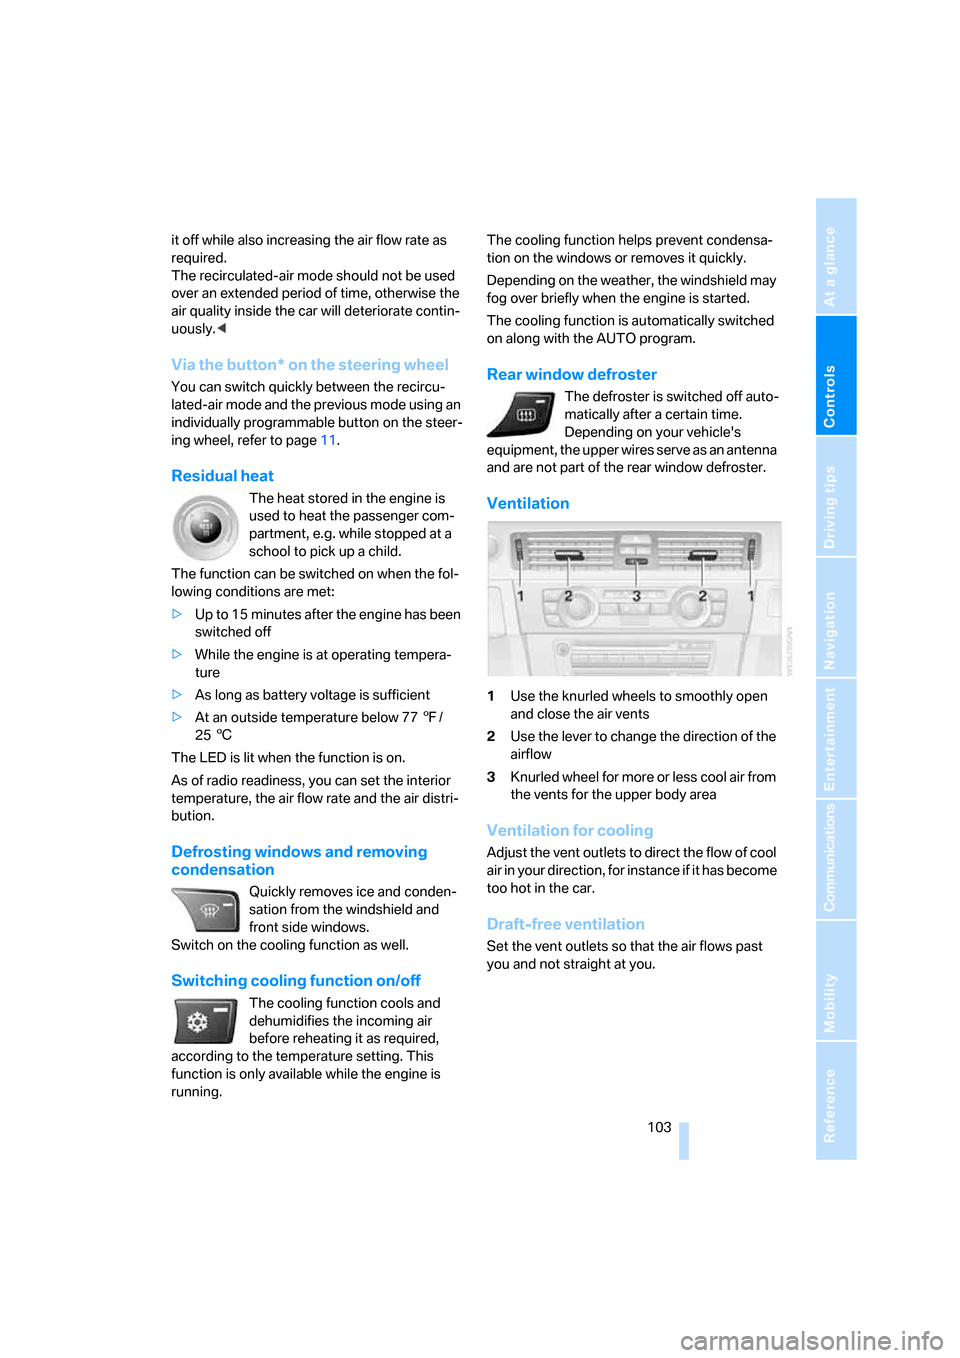
Ventilation
1Use the knurled wheels to smoothly open
and close the air vents
2Use the lever to change the direction of the
airflow
3Knurled wheel for more or less cool air from
the vents for the upper body area
Ventilation for cooling
Adjust the vent outlets to direct the flow of cool
air in your direction, for instance if it has become
too hot in the car.
Draft-free ventilation
Set the vent outlets so that the air flows past
you and not straight at you.
Page 111 of 274
Controls
109Reference
At a glance
Driving tips
Communications
Navigation
Entertainment
Mobility
>The compass direction shown does not
change although the direction of travel
does.
>Not all compass directions are shown.
Procedure
1.Make sure that no large metal objects or
overhead power lines are in the vicinity of
your vehicle and that you have enough
space to drive in a circle.
2.Set the currently valid compass zone.
3.Press the adjustment button for approx.
6-7 seconds to call up C. Then drive in at
least one full circle at a speed of no more
than 4 mph or 7 km/h.
If calibration is successful, the display
changes from C to a compass direction.
Setting right-hand/left-hand steering
Your digital compass is factory-set to right-
hand or left-hand steering, in accordance with
your vehicle.
Setting the language
You can set the language of the display:
Press the adjustment button for approx.
12-13 seconds. Briefly press the adjustment
button again to switch between English, "E",
and German, "O".
The setting is automatically saved after approx.
10 seconds.
Roller sun blinds*
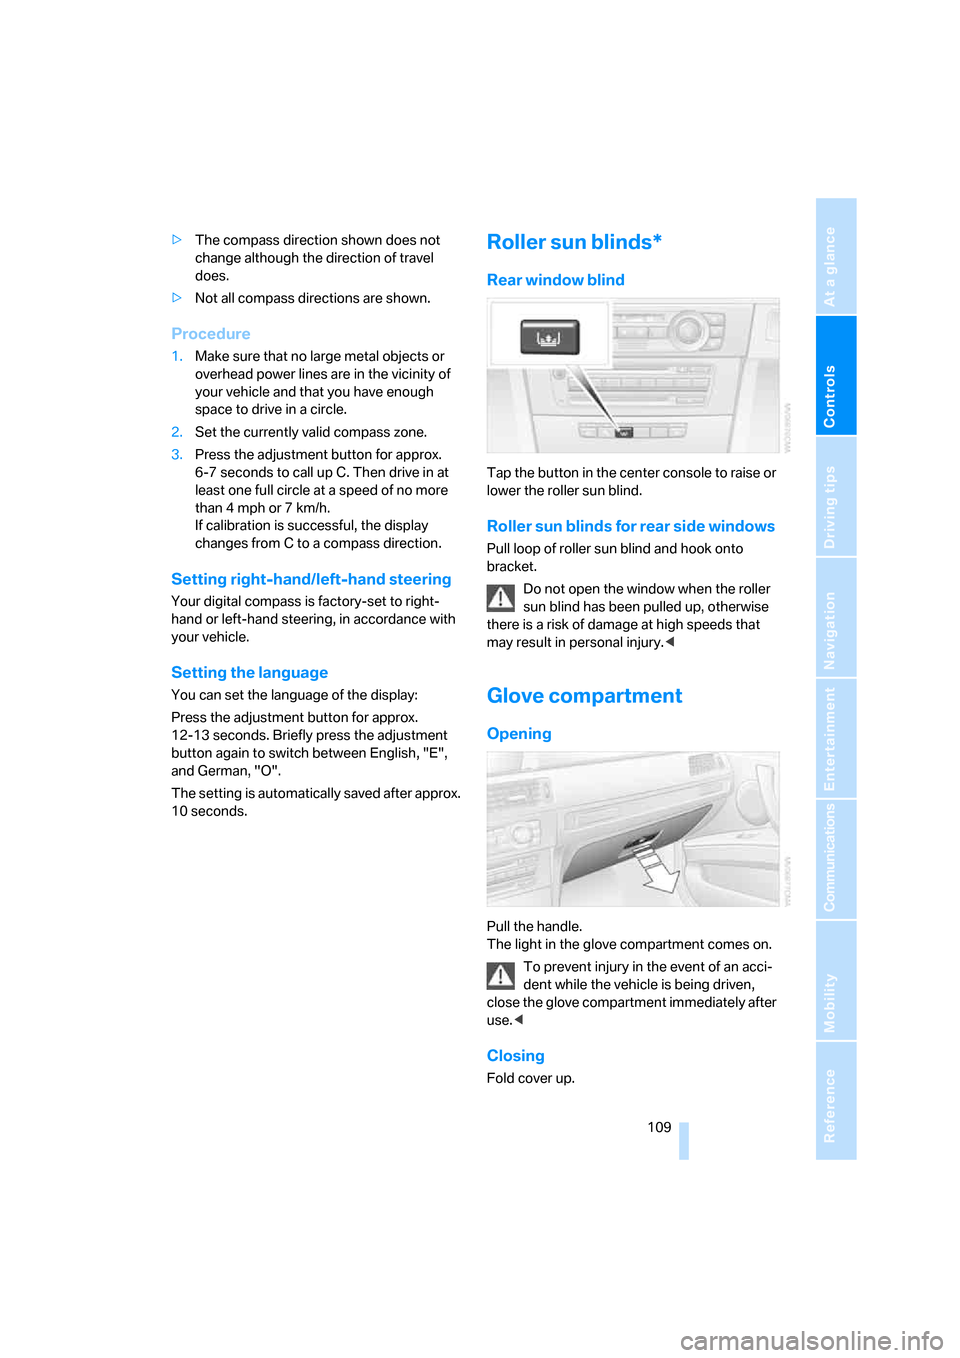
Rear window blind
Tap the button in the center console to raise or
lower the roller sun blind.
Roller sun blinds for rear side windows
Pull loop of roller sun blind and hook onto
bracket.
Do not open the window when the roller
sun blind has been pulled up, otherwise
there is a risk of damage at high speeds that
may result in personal injury.<
Glove compartment
Opening
Pull the handle.
The light in the glove compartment comes on.
To prevent injury in the event of an acci-
dent while the vehicle is being driven,
close the glove compartment immediately after
use.<
Closing
Fold cover up.