clock BMW 328XI SEDAN 2008 E90 Owner's Manual
[x] Cancel search | Manufacturer: BMW, Model Year: 2008, Model line: 328XI SEDAN, Model: BMW 328XI SEDAN 2008 E90Pages: 274, PDF Size: 8.88 MB
Page 14 of 274
Cockpit
12
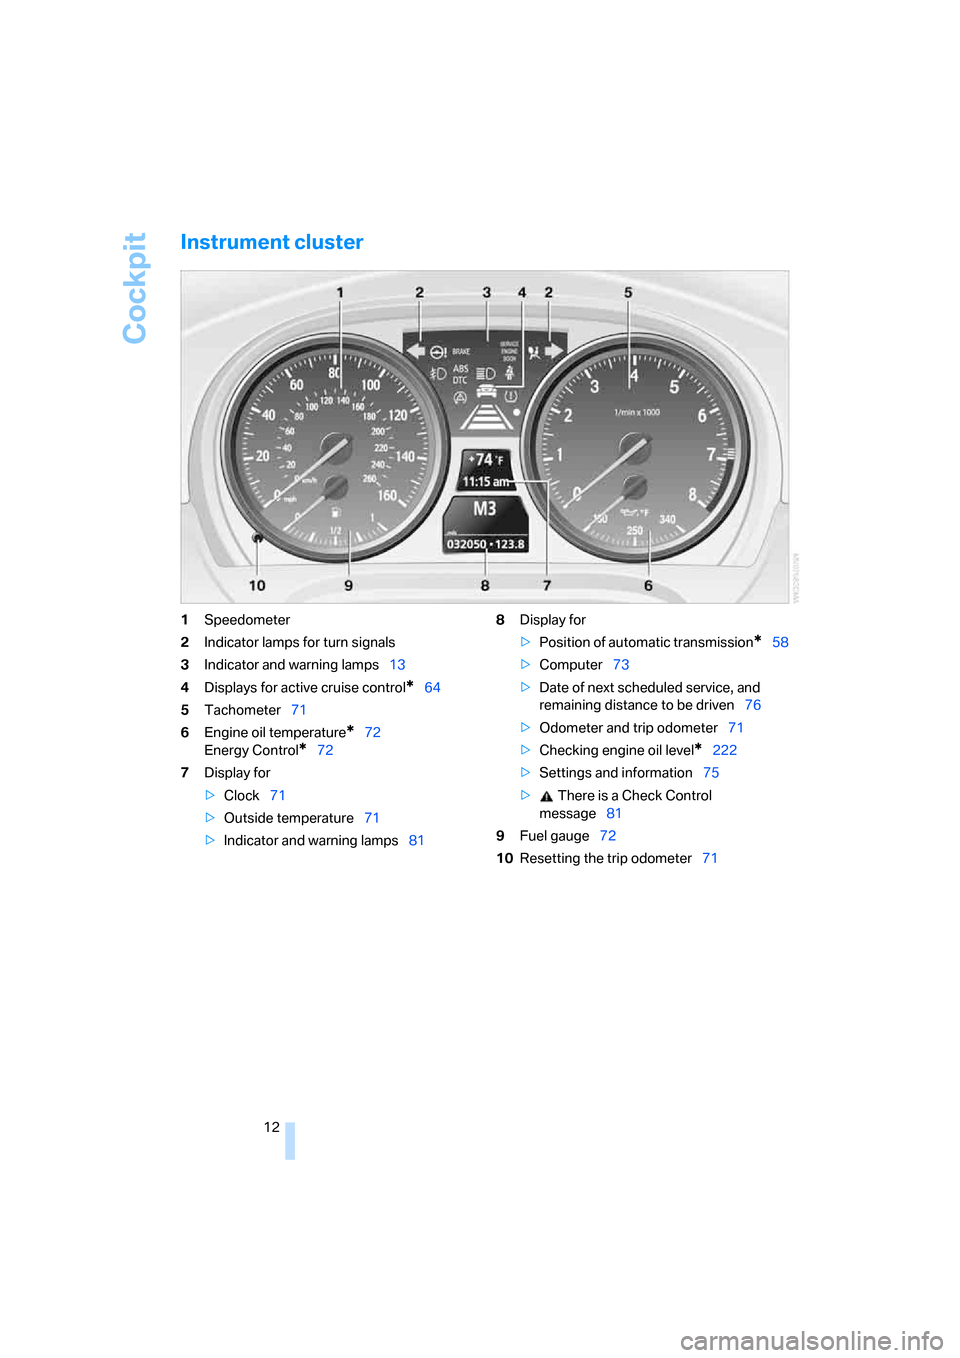
Instrument cluster
1Speedometer
2Indicator lamps for turn signals
3Indicator and warning lamps13
4Displays for active cruise control
*64
5Tachometer71
6Engine oil temperature
*72
Energy Control
*72
7Display for
>Clock71
>Outside temperature71
>Indicator and warning lamps818Display for
>Position of automatic transmission
*58
>Computer73
>Date of next scheduled service, and
remaining distance to be driven76
>Odometer and trip odometer71
>Checking engine oil level
*222
>Settings and information75
> There is a Check Control
message81
9Fuel gauge72
10Resetting the trip odometer71
Page 31 of 274
Controls
29Reference
At a glance
Driving tips
Communications
Navigation
Entertainment
Mobility
>Triple turn signal activation, refer to
page61
>Settings for the display on the Control Dis-
play and in the instrument cluster:
>12h/24h format of the clock, refer to
page80
>Date format, refer to page81
>Brightness of the Control Display, refer
to page84
>Language on the Control Display, refer
to page84
>Units of measure for fuel consumption,
distance covered/remaining distances,
and temperature, refer to page76
>Show visual warning for Park Distance Con-
trol PDC
*, refer to page85
>Light settings:
>Welcome lamps, refer to page96
>Pathway lighting, refer to page97
>Daytime running lamps, refer to page97
>Automatic climate control: activating/deac-
tivating AUTO program, cooling function
and automatic recirculated-air control, set-
ting temperature, air flow rate and distribu-
tion, refer to page101 ff
>Entertainment:
>Audio volume, refer to page157
>Tone control, refer to page157
>Speed-dependent volume control, refer
to page157
Central locking system
The concept
The central locking system is ready for opera-
tion whenever the driver's door is closed.
The system simultaneously engages and
releases the locks on the following:
>Doors
>Luggage compartment lid/tailgate
>Fuel filler door
Operating from outside
>Via the remote control
>Via the door lock
>In cars with convenient access
*, via the
handles on the driver's and front passen-
ger's doors
The anti-theft system is also operated at the
same time. It prevents the doors from being
unlocked using the lock buttons or door han-
dles. In addition, if the remote control is used,
the interior lamps and the door's courtesy
lamps
* are also switched on or off. The alarm
system
* is also armed or disarmed.
For further details of the alarm system,
refer to
page35.
Operating from inside
By means of the button for central locking, refer
to page32.
In the event of a sufficiently severe accident, the
central locking system unlocks automatically. In
addition, the hazard warning flashers and inte-
rior lamps come on.
Opening and closing:
Using the remote control
Persons or animals in a parked vehicle
could lock the doors from the inside. You
should therefore take the remote control with
you when you leave the vehicle so that the latter
can be opened from outside.<
Unlocking
Press the button.
The interior lamps, the courtesy lamps
* and the
welcome lamps come on.
You can set how the vehicle is to be unlocked.
The setting is stored for the remote control cur-
rently in use.
iDrive, for operating principle refer to page16.
1.Press the button.
This opens the start menu.
2.Press the controller to open the menu.
3.Select "Settings" and press the controller.
Page 45 of 274
Controls
43Reference
At a glance
Driving tips
Communications
Navigation
Entertainment
Mobility
Adjustments
Sitting safely
The ideal sitting position can make a vital con-
tribution to relaxed, fatigue-free driving. In con-
junction with the safety belts, the head
restraints and the airbags, the seated position
has a major influence on your safety in the event
of an accident. To ensure that the safety sys-
tems operate with optimal efficiency, we
strongly urge you to observe the instructions
contained in the following section.
For additional information on transporting chil-
dren safely, refer to page52.
Airbags
Always maintain an adequate distance
between yourself and the airbags. Always
grip the steering wheel on the rim, with your
hands in the 3 o'clock and 9 o'clock positions,
to minimize the risk of injury to the hands or
arms in the event of the airbag being triggered
off.
No one and nothing is to come between the air-
bags and the seat occupant.
Do not use the cover of the front airbag on the
front passenger side as a storage area. Make
sure that the front passenger is sitting correctly,
e.g. not resting feet or legs on the dashboard,
otherwise leg injuries can occur if the front air-
bag is triggered.
Make sure that passengers do not lean their
heads against the side or head airbags, other-
wise serious injuries could result if the airbags
suddenly deployed.<
Even if you follow all the instructions, injuries
resulting from contact with airbags cannot be
fully excluded, depending on the circum-
stances. The ignition and inflation noise may
provoke a mild hearing loss in extremely sensi-
tive individuals. This effect is usually only tem-
porary.
For airbag locations and additional information
on airbags, refer to page94.
Head restraint
A correctly adjusted head restraint reduces the
risk of neck injury in the event of an accident.
Adjust the head restraint in such a way
that its center is at approx. ear level. Oth-
erwise, there is an increased risk of injury in the
event of an accident.<
Head restraints, refer to page45.
Safety belt
Before every drive, make sure that all occupants
wear their safety belts. Airbags complement the
safety belt as an additional safety device, but
they do not represent a substitute.
Your vehicle has five seats, each of which is
equipped with a safety belt.
Never allow more than one person to
wear a single safety belt. Never allow
infants or small children to ride in a passenger's
lap. Make sure that the belt in the lap area sits
low across the hips and does not press against
the abdomen.
The safety belt must not rest against the throat,
run across sharp edges, pass over hard or frag-
ile objects or be pinched. Fasten the safety belt
so that it sits as snugly as possible against the
lap and shoulder without being twisted. Other-
wise the belt could slide over your hips and
injure your abdomen in the event of a frontal
collision.
Avoid wearing bulky clothing and regularly pull
the belt in the upper-body area taut, otherwise
its restraining effect could be impaired.
Sports Wagon: if the rear center safety belt is
used, the wider backrest must be locked in
place, refer to page114. Otherwise the safety
belt will have no restraining effect.<
Safety belts, refer to page48.
Page 73 of 274
Controls
71Reference
At a glance
Driving tips
Communications
Navigation
Entertainment
Mobility
Everything under control
Odometer, outside
temperature display, clock
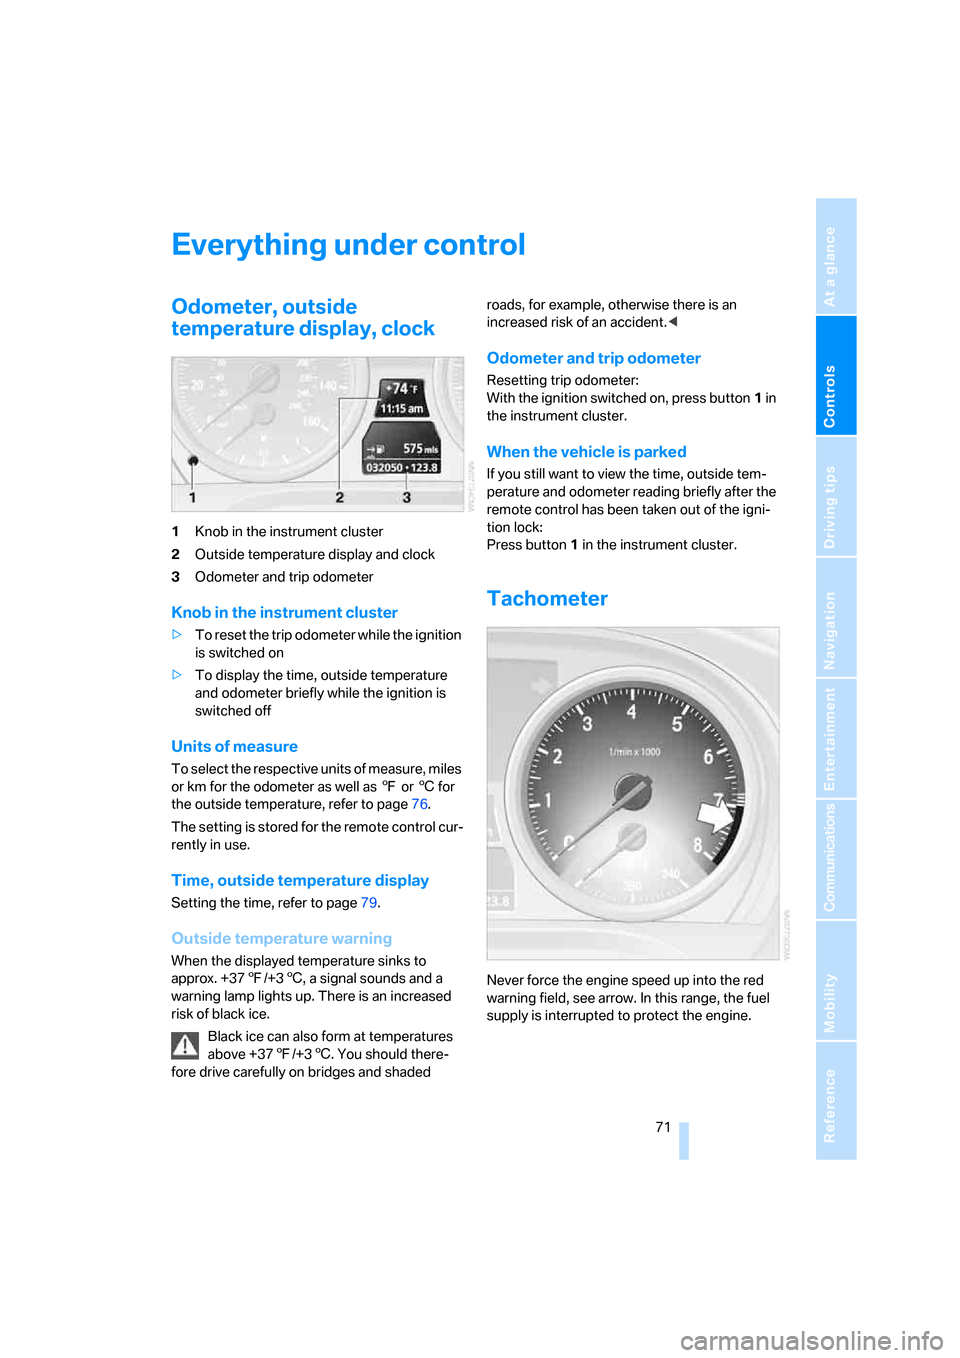
1Knob in the instrument cluster
2Outside temperature display and clock
3Odometer and trip odometer
Knob in the instrument cluster
>To reset the trip odometer while the ignition
is switched on
>To display the time, outside temperature
and odometer briefly while the ignition is
switched off
Units of measure
T o s e l e c t t h e r e s p e c t i v e u n i t s o f m e a s u r e , m i l e s
or km for the odometer as well as 7 or 6 for
the outside temperature, refer to page76.
The setting is stored for the remote control cur-
rently in use.
Time, outside temperature display
Setting the time, refer to page79.
Outside temperature warning
When the displayed temperature sinks to
approx. +377/+36, a signal sounds and a
warning lamp lights up. There is an increased
risk of black ice.
Black ice can also form at temperatures
above +377/+36. You should there-
fore drive carefully on bridges and shaded roads, for example, otherwise there is an
increased risk of an accident.<
Odometer and trip odometer
Resetting trip odometer:
With the ignition switched on, press button1 in
the instrument cluster.
When the vehicle is parked
If you still want to view the time, outside tem-
perature and odometer reading briefly after the
remote control has been taken out of the igni-
tion lock:
Press button 1 in the instrument cluster.
Tachometer
Never force the engine speed up into the red
warning field, see arrow. In this range, the fuel
supply is interrupted to protect the engine.
Page 81 of 274
Controls
79Reference
At a glance
Driving tips
Communications
Navigation
Entertainment
Mobility
Clock
The settings are stored for the remote control
currently in use, refer also to Personal Profile on
page28.
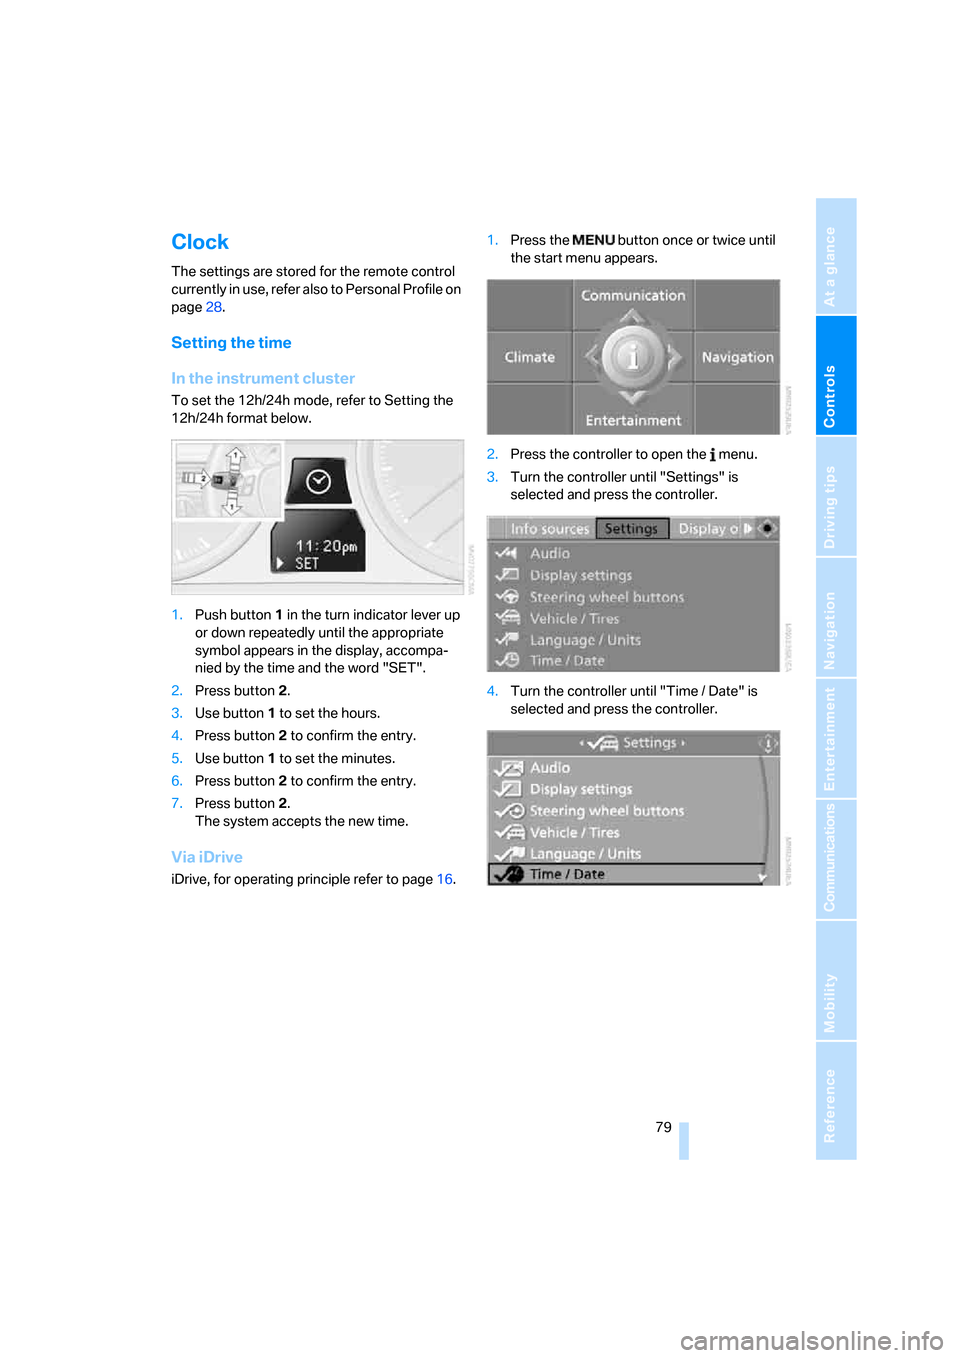
Setting the time
In the instrument cluster
To set the 12h/24h mode, refer to Setting the
12h/24h format below.
1.Push button 1 in the turn indicator lever up
or down repeatedly until the appropriate
symbol appears in the display, accompa-
nied by the time and the word "SET".
2.Press button 2.
3.Use button 1 to set the hours.
4.Press button 2 to confirm the entry.
5.Use button 1 to set the minutes.
6.Press button 2 to confirm the entry.
7.Press button 2.
The system accepts the new time.
Via iDrive
iDrive, for operating principle refer to page16.1.Press the button once or twice until
the start menu appears.
2.Press the controller to open the menu.
3.Turn the controller until "Settings" is
selected and press the controller.
4.Turn the controller until "Time / Date" is
selected and press the controller.
Page 208 of 274
Refueling
206
Refueling
Always switch off the engine before refu-
eling, otherwise, fuel cannot be added to
the tank and a message will be displayed.<
Take all precautionary measures and
observe all applicable regulations when
handling fuel. Do not carry any spare fuel con-
tainers in your vehicle. They can develop a leak
and cause an explosion or cause a fire in the
event of an accident.<
Fuel filler door
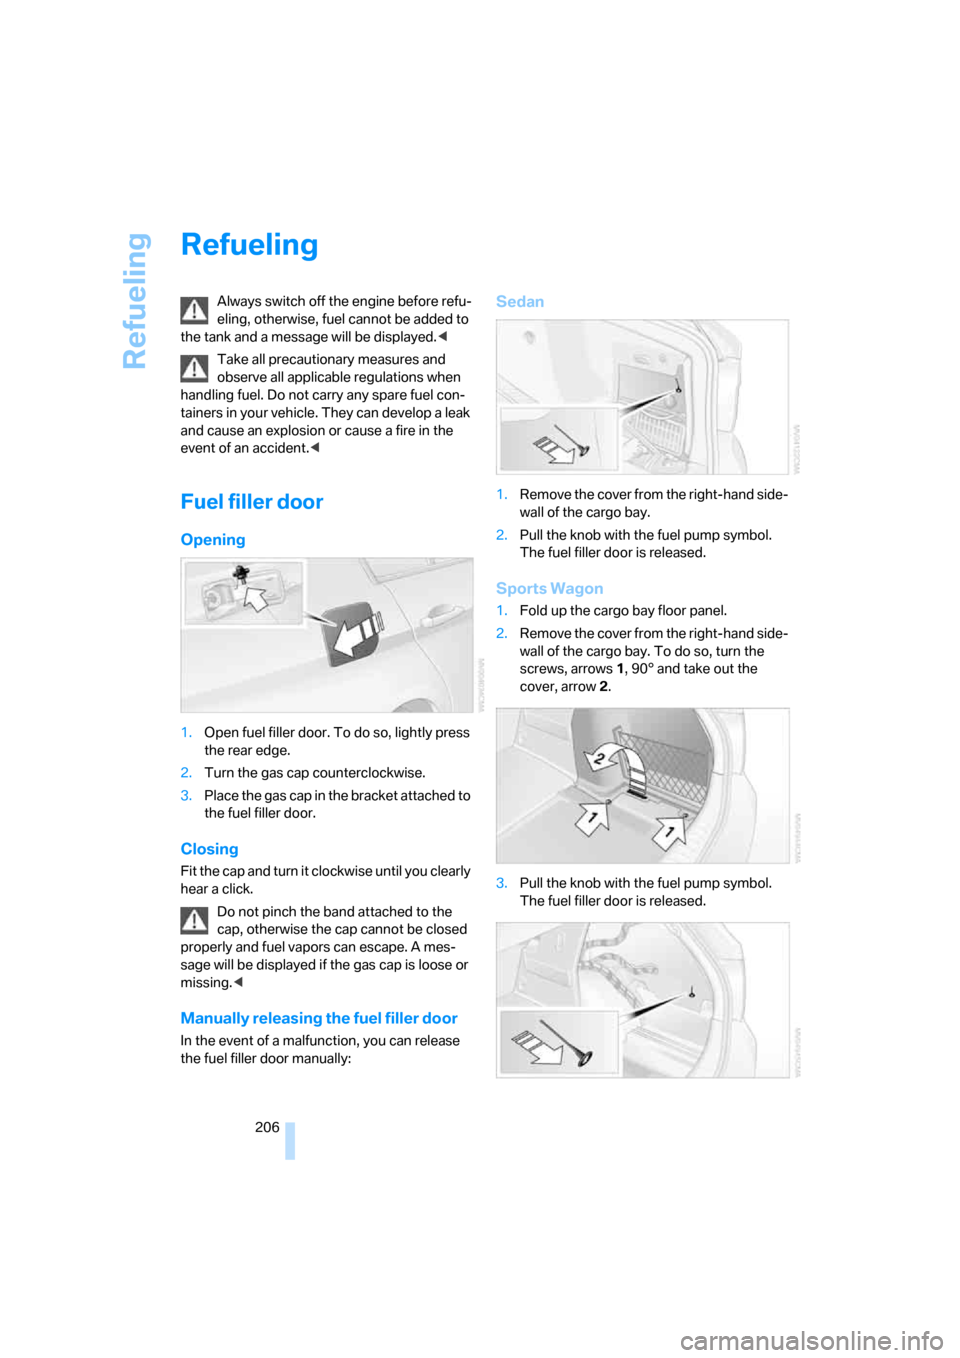
Opening
1.Open fuel filler door. To do so, lightly press
the rear edge.
2.Turn the gas cap counterclockwise.
3.Place the gas cap in the bracket attached to
the fuel filler door.
Closing
Fit the cap and turn it clockwise until you clearly
hear a click.
Do not pinch the band attached to the
cap, otherwise the cap cannot be closed
properly and fuel vapors can escape. A mes-
sage will be displayed if the gas cap is loose or
missing.<
Manually releasing the fuel filler door
In the event of a malfunction, you can release
the fuel filler door manually:
Sedan
1.Remove the cover from the right-hand side-
wall of the cargo bay.
2.Pull the knob with the fuel pump symbol.
The fuel filler door is released.
Sports Wagon
1.Fold up the cargo bay floor panel.
2.Remove the cover from the right-hand side-
wall of the cargo bay. To do so, turn the
screws, arrows 1, 90° and take out the
cover, arrow 2.
3.Pull the knob with the fuel pump symbol.
The fuel filler door is released.
Page 227 of 274
Mobility
225Reference
At a glance
Controls
Driving tips
Communications
Navigation
Entertainment
Comply with the appropriate environ-
mental protection regulations when dis-
posing of coolant additives.<
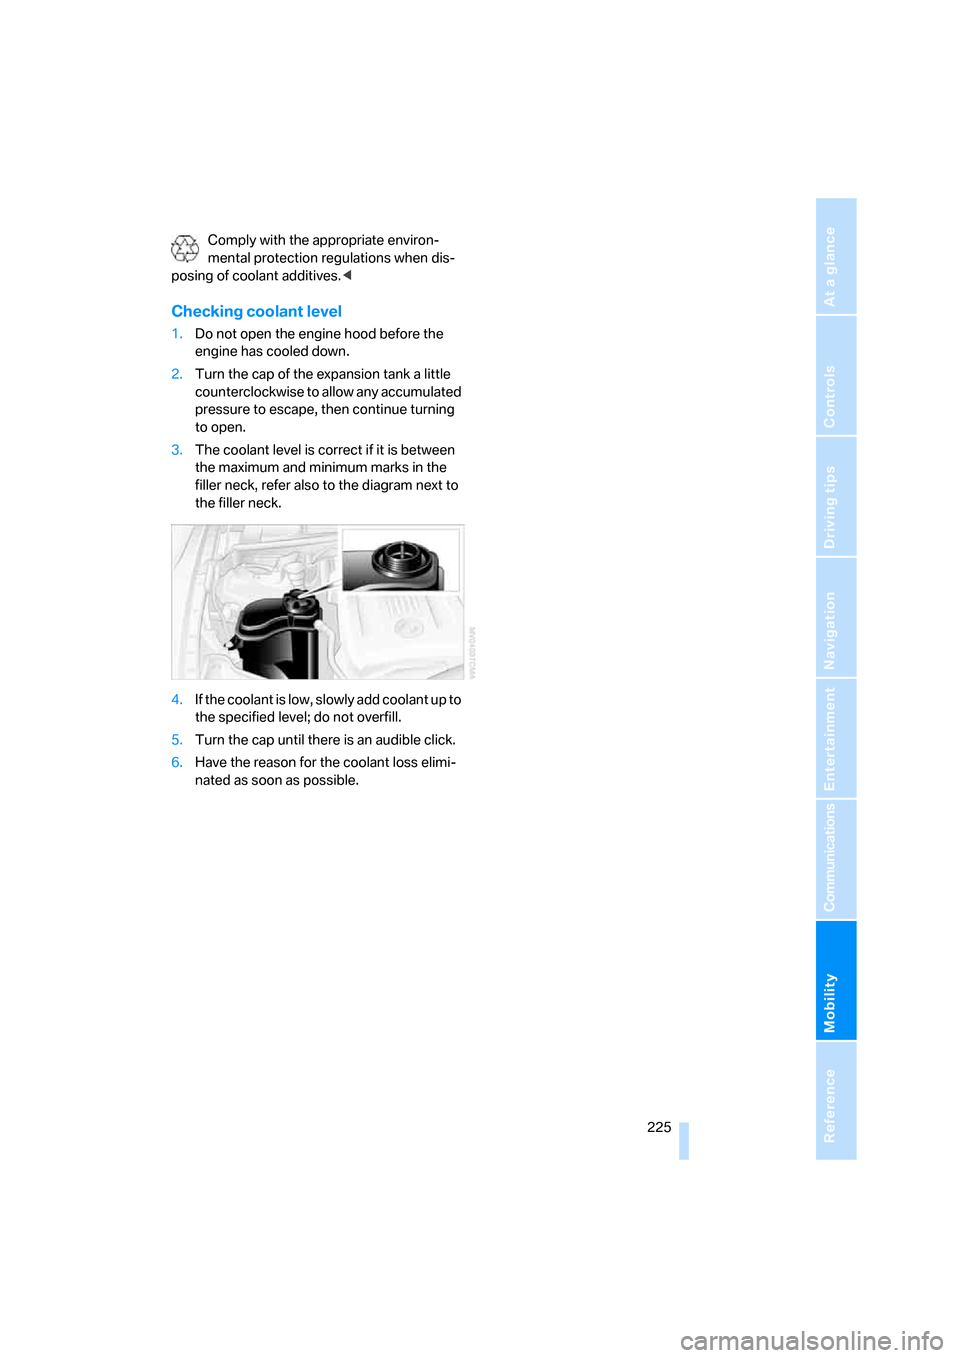
Checking coolant level
1.Do not open the engine hood before the
engine has cooled down.
2.Turn the cap of the expansion tank a little
counterclockwise to allow any accumulated
pressure to escape, then continue turning
to open.
3.The coolant level is correct if it is between
the maximum and minimum marks in the
filler neck, refer also to the diagram next to
the filler neck.
4.If the coolant is low, slowly add coolant up to
the specified level; do not overfill.
5.Turn the cap until there is an audible click.
6.Have the reason for the coolant loss elimi-
nated as soon as possible.
Page 232 of 274
Replacing components
230 There are separate headlamp covers for low-
beam headlamps and high-beam headlamps.
Be careful when installing the covers, oth-
erwise leaks could occur and cause dam-
age to the headlamp system.<
For checking and adjusting headlamp
aim, please contact your BMW center.<
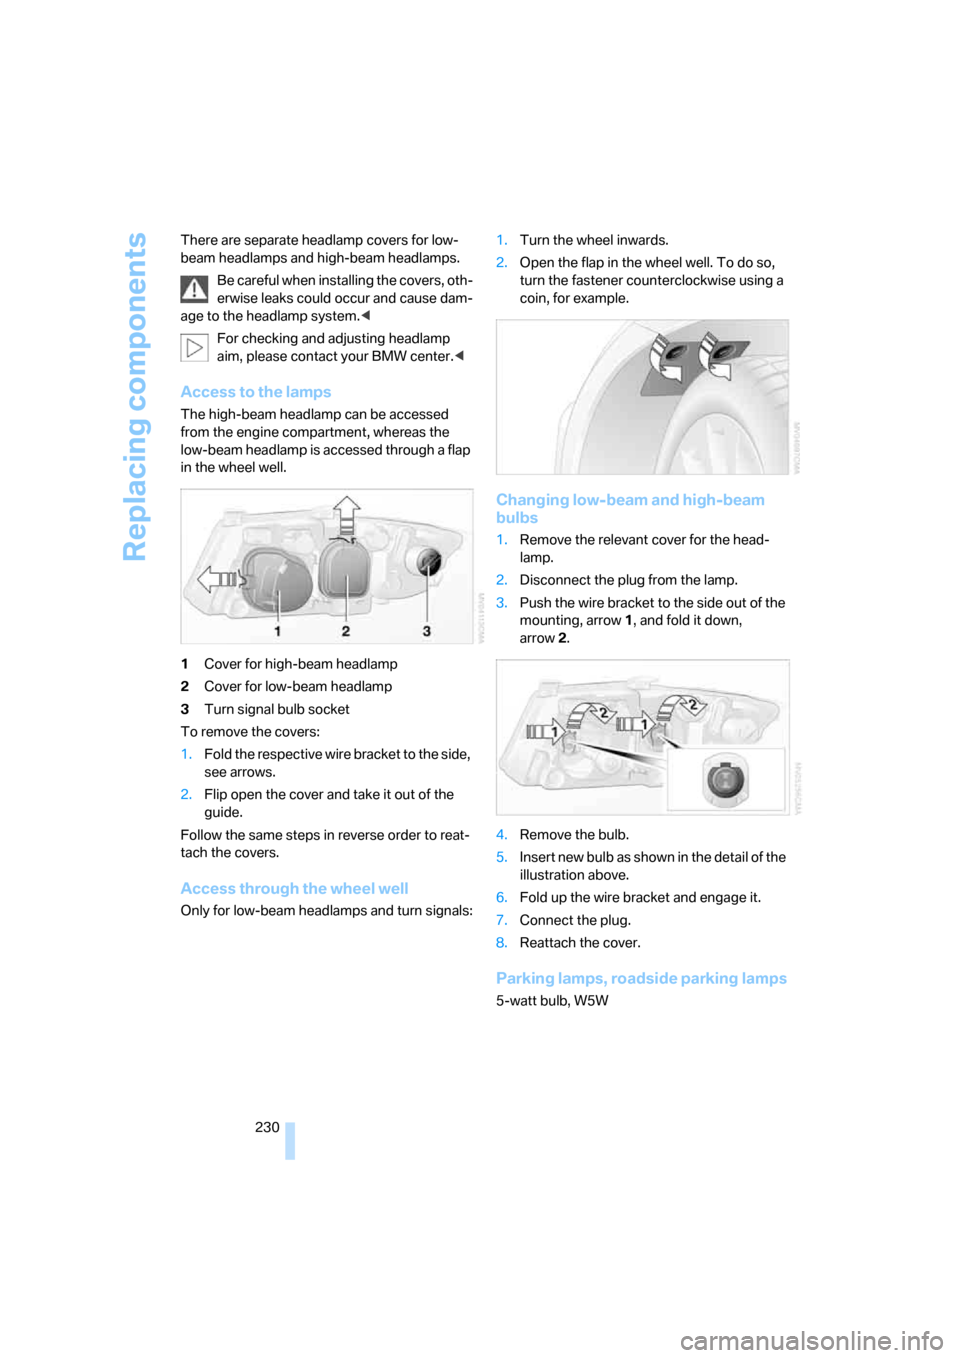
Access to the lamps
The high-beam headlamp can be accessed
from the engine compartment, whereas the
low-beam headlamp is accessed through a flap
in the wheel well.
1Cover for high-beam headlamp
2Cover for low-beam headlamp
3Turn signal bulb socket
To remove the covers:
1.Fold the respective wire bracket to the side,
see arrows.
2.Flip open the cover and take it out of the
guide.
Follow the same steps in reverse order to reat-
tach the covers.
Access through the wheel well
Only for low-beam headlamps and turn signals:1.Turn the wheel inwards.
2.Open the flap in the wheel well. To do so,
turn the fastener counterclockwise using a
coin, for example.
Changing low-beam and high-beam
bulbs
1.Remove the relevant cover for the head-
lamp.
2.Disconnect the plug from the lamp.
3.Push the wire bracket to the side out of the
mounting, arrow1, and fold it down,
arrow2.
4.Remove the bulb.
5.Insert new bulb as shown in the detail of the
illustration above.
6.Fold up the wire bracket and engage it.
7.Connect the plug.
8.Reattach the cover.
Parking lamps, roadside parking lamps
5-watt bulb, W5W
Page 234 of 274
Replacing components
232
Fender-mounted lamps
Sedan
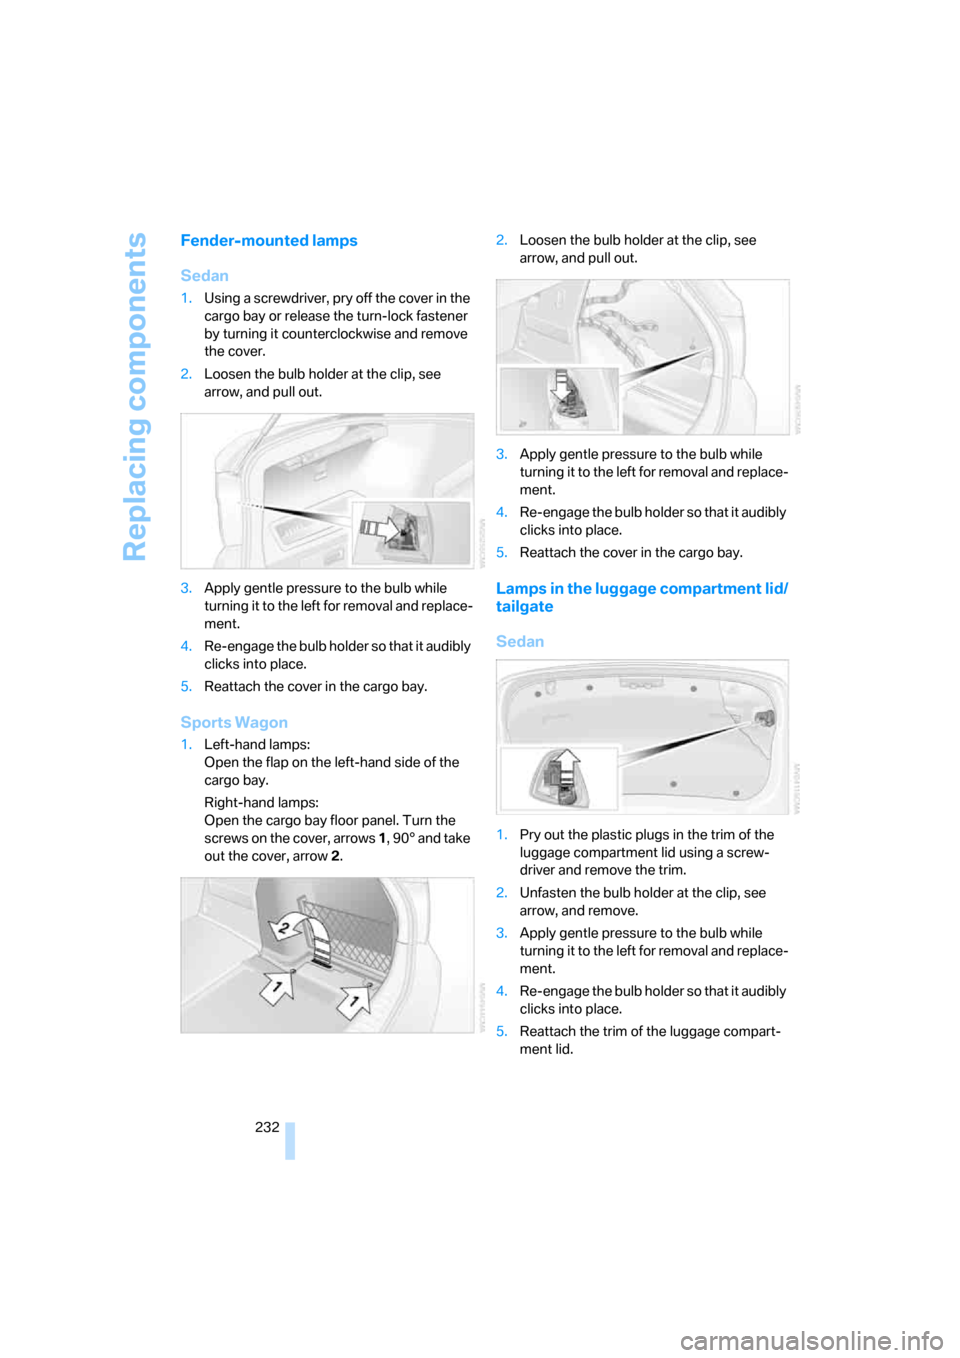
1.Using a screwdriver, pry off the cover in the
cargo bay or release the turn-lock fastener
by turning it counterclockwise and remove
the cover.
2.Loosen the bulb holder at the clip, see
arrow, and pull out.
3.Apply gentle pressure to the bulb while
turning it to the left for removal and replace-
ment.
4.Re-engage the bulb holder so that it audibly
clicks into place.
5.Reattach the cover in the cargo bay.
Sports Wagon
1.Left-hand lamps:
Open the flap on the left-hand side of the
cargo bay.
Right-hand lamps:
Open the cargo bay floor panel. Turn the
screws on the cover, arrows 1, 90° and take
out the cover, arrow 2.2.Loosen the bulb holder at the clip, see
arrow, and pull out.
3.Apply gentle pressure to the bulb while
turning it to the left for removal and replace-
ment.
4.Re-engage the bulb holder so that it audibly
clicks into place.
5.Reattach the cover in the cargo bay.
Lamps in the luggage compartment lid/
tailgate
Sedan
1.Pry out the plastic plugs in the trim of the
luggage compartment lid using a screw-
driver and remove the trim.
2.Unfasten the bulb holder at the clip, see
arrow, and remove.
3.Apply gentle pressure to the bulb while
turning it to the left for removal and replace-
ment.
4.Re-engage the bulb holder so that it audibly
clicks into place.
5.Reattach the trim of the luggage compart-
ment lid.
Page 237 of 274
Mobility
235Reference
At a glance
Controls
Driving tips
Communications
Navigation
Entertainment
Giving and receiving assistance
Emergency Request*
Conditions for an Emergency Request:
>Equipment version with full preparation
package mobile phone. This equipment
makes it possible to send an Emergency
Request even if no mobile phone is paired
with the vehicle.
>BMW Assist is activated. Activating
BMW Assist, refer to page202.
>Radio readiness is on.
>The BMW Assist system is logged on to a
mobile phone network.
>The Emergency Request system is opera-
ble.
Once your service contract for BMW Assist
expires, the BMW Assist system can be deacti-
vated by a BMW center without you having to
visit a workshop. Once the BMW Assist system
has been deactivated, Emergency Requests
are not possible. The BMW Assist system can
be reactivated by a BMW center after a new
contract has been signed.
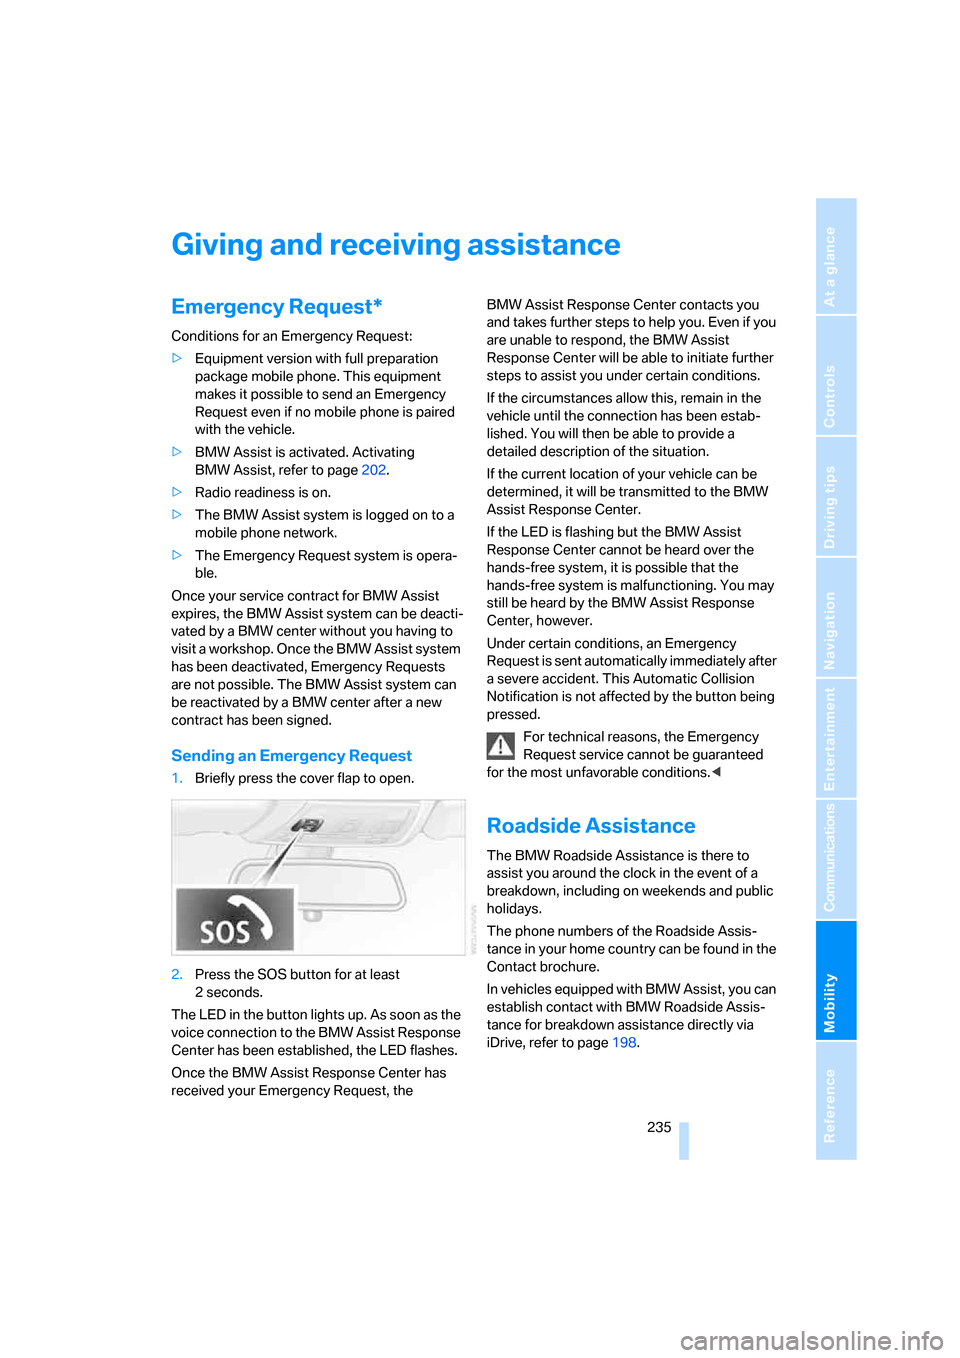
Sending an Emergency Request
1.Briefly press the cover flap to open.
2.Press the SOS button for at least
2seconds.
The LED in the button lights up. As soon as the
voice connection to the BMW Assist Response
Center has been established, the LED flashes.
Once the BMW Assist Response Center has
received your Emergency Request, the BMW Assist Response Center contacts you
and takes further steps to help you. Even if you
are unable to respond, the BMW Assist
Response Center will be able to initiate further
steps to assist you under certain conditions.
If the circumstances allow this, remain in the
vehicle until the connection has been estab-
lished. You will then be able to provide a
detailed description of the situation.
If the current location of your vehicle can be
determined, it will be transmitted to the BMW
Assist Response Center.
If the LED is flashing but the BMW Assist
Response Center cannot be heard over the
hands-free system, it is possible that the
hands-free system is malfunctioning. You may
still be heard by the BMW Assist Response
Center, however.
Under certain conditions, an Emergency
Request is sent automatically immediately after
a severe accident. This Automatic Collision
Notification is not affected by the button being
pressed.
For technical reasons, the Emergency
Request service cannot be guaranteed
for the most unfavorable conditions.<
Roadside Assistance
The BMW Roadside Assistance is there to
assist you around the clock in the event of a
breakdown, including on weekends and public
holidays.
The phone numbers of the Roadside Assis-
tance in your home country can be found in the
Contact brochure.
In vehicles equipped with BMW Assist, you can
establish contact with BMW Roadside Assis-
tance for breakdown assistance directly via
iDrive, refer to page198.