light BMW 330CI IDRIVE COUPE 2006 Owners Manual
[x] Cancel search | Manufacturer: BMW, Model Year: 2006, Model line: 330CI IDRIVE COUPE, Model: BMW 330CI IDRIVE COUPE 2006Pages: 239, PDF Size: 11.87 MB
Page 12 of 239
Cockpit
10
Cockpit
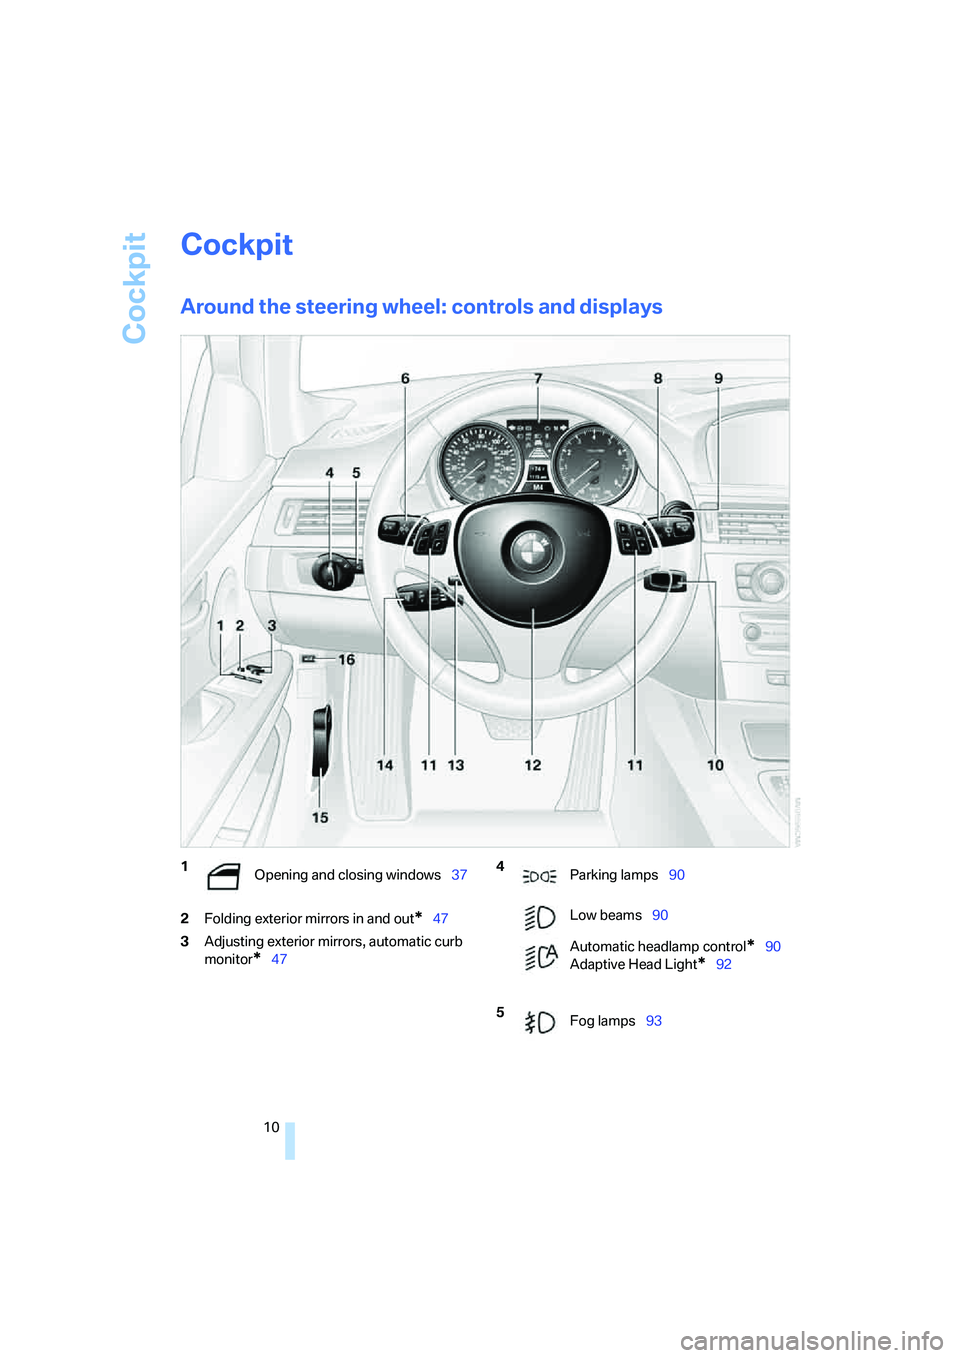
Around the steering wheel: controls and displays
2Folding exterior mirrors in and out*47
3Adjusting exterior mirrors, automatic curb
monitor
*47
1
Opening and closing windows37 4
Parking lamps90
Low beams90
Automatic headlamp control
*90
Adaptive Head Light
*92
5
Fog lamps93
ba8_E9293_US.book Seite 10 Freitag, 5. Mai 2006 1:02 13
Page 13 of 239
At a glance
11Reference
Controls
Driving tips
Communications
Navigation
Entertainment
Mobility
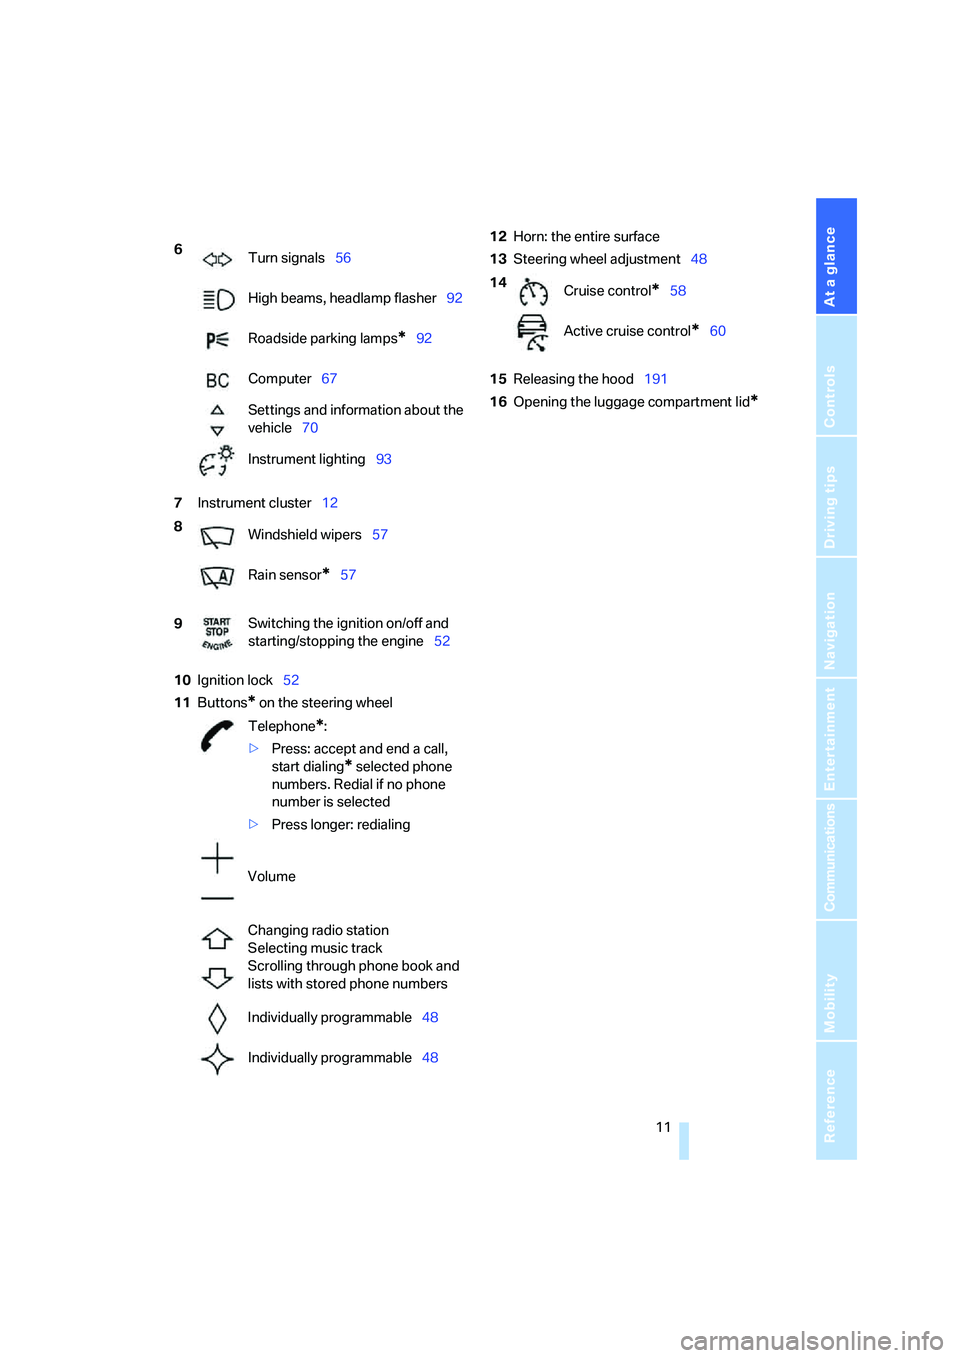
7Instrument cluster12
10Ignition lock52
11Buttons
* on the steering wheel12Horn: the entire surface
13Steering wheel adjustment48
15Releasing the hood191
16Opening the luggage compartment lid
*
6
Turn signals56
High beams, headlamp flasher92
Roadside parking lamps
*92
Computer67
Settings and information about the
vehicle70
Instrument lighting93
8
Windshield wipers57
Rain sensor
*57
9Switching the ignition on/off and
starting/stopping the engine52
Telephone
*:
>Press: accept and end a call,
start dialing
* selected phone
numbers. Redial if no phone
number is selected
>Press longer: redialing
Volume
Changing radio station
Selecting music track
Scrolling through phone book and
lists with stored phone numbers
Individually programmable48
Individually programmable48
14
Cruise control*58
Active cruise control
*60
ba8_E9293_US.book Seite 11 Freitag, 5. Mai 2006 1:02 13
Page 15 of 239
At a glance
13Reference
Controls
Driving tips
Communications
Navigation
Entertainment
Mobility
Indicator and warning lamps
The concept
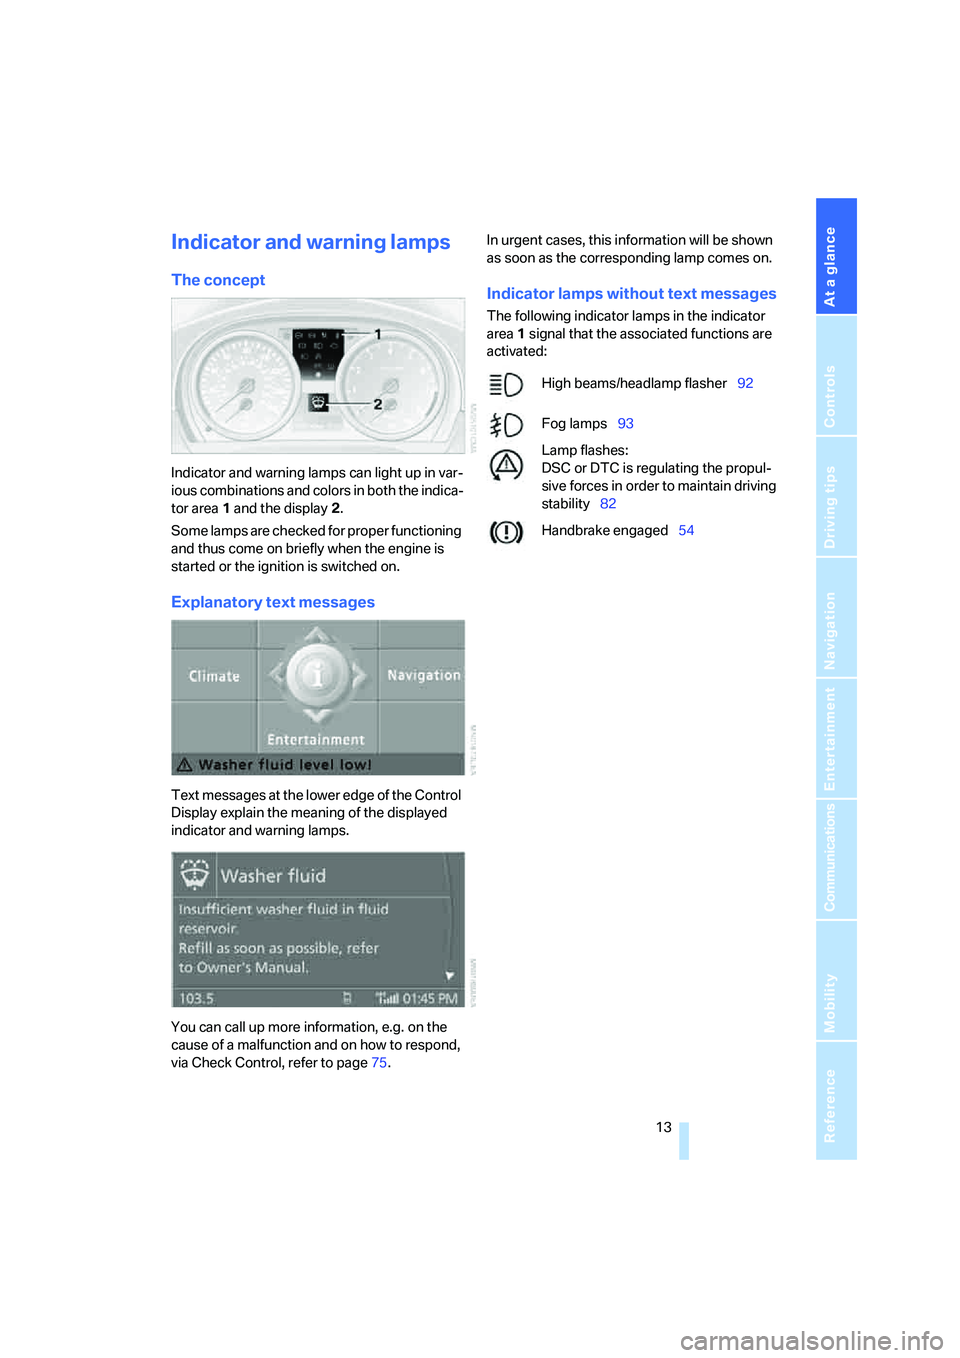
Indicator and warning lamps can light up in var-
ious combinations and colors in both the indica-
tor area 1 and the display 2.
Some lamps are checked for proper functioning
and thus come on briefly when the engine is
started or the ignition is switched on.
Explanatory text messages
Text messages at the lower edge of the Control
Display explain the meaning of the displayed
indicator and warning lamps.
You can call up more information, e.g. on the
cause of a malfunction and on how to respond,
via Check Control, refer to page75.In urgent cases, this information will be shown
as soon as the corresponding lamp comes on.
Indicator lamps without text messages
The following indicator lamps in the indicator
area1 signal that the associated functions are
activated:
High beams/headlamp flasher92
Fog lamps93
Lamp flashes:
DSC or DTC is regulating the propul-
sive forces in order to maintain driving
stability82
Handbrake engaged54
ba8_E9293_US.book Seite 13 Freitag, 5. Mai 2006 1:02 13
Page 20 of 239
iDrive
18
Calling up menu items in the start menu
As of radio readiness, refer to page52:
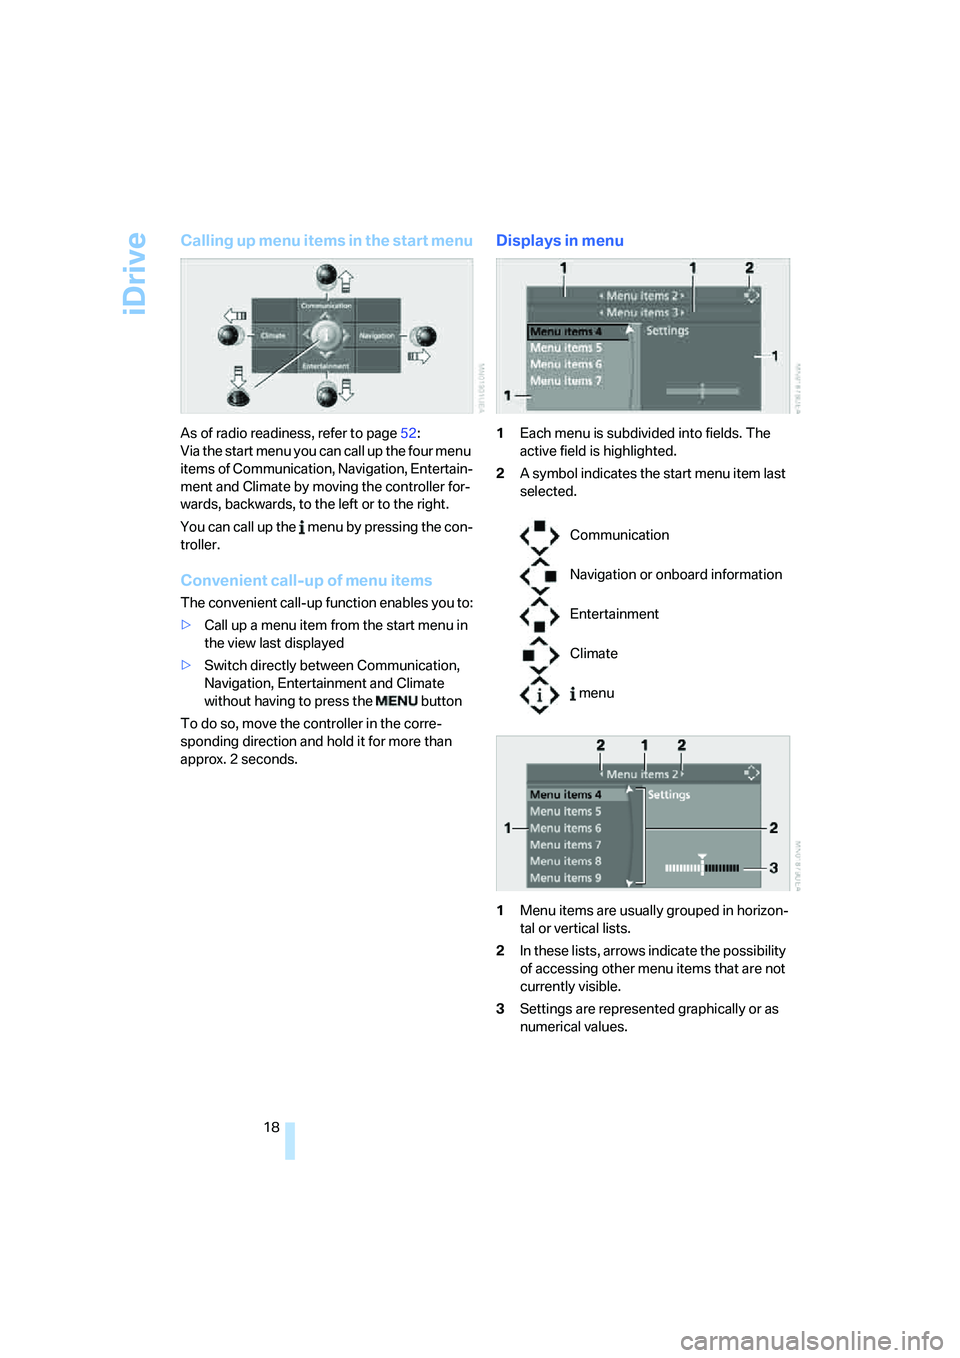
Via the start menu you can call up the four menu
items of Communication, Navigation, Entertain-
ment and Climate by moving the controller for-
wards, backwards, to the left or to the right.
You can call up the menu by pressing the con-
troller.
Convenient call-up of menu items
The convenient call-up function enables you to:
>Call up a menu item from the start menu in
the view last displayed
>Switch directly between Communication,
Navigation, Entertainment and Climate
without having to press the button
To do so, move the controller in the corre-
sponding direction and hold it for more than
approx. 2 seconds.
Displays in menu
1Each menu is subdivided into fields. The
active field is highlighted.
2A symbol indicates the start menu item last
selected.
1Menu items are usually grouped in horizon-
tal or vertical lists.
2In these lists, arrows indicate the possibility
of accessing other menu items that are not
currently visible.
3Settings are represented graphically or as
numerical values.
Communication
Navigation or onboard information
Entertainment
Climate
menu
ba8_E9293_US.book Seite 18 Freitag, 5. Mai 2006 1:02 13
Page 21 of 239
At a glance
19Reference
Controls
Driving tips
Communications
Navigation
Entertainment
Mobility
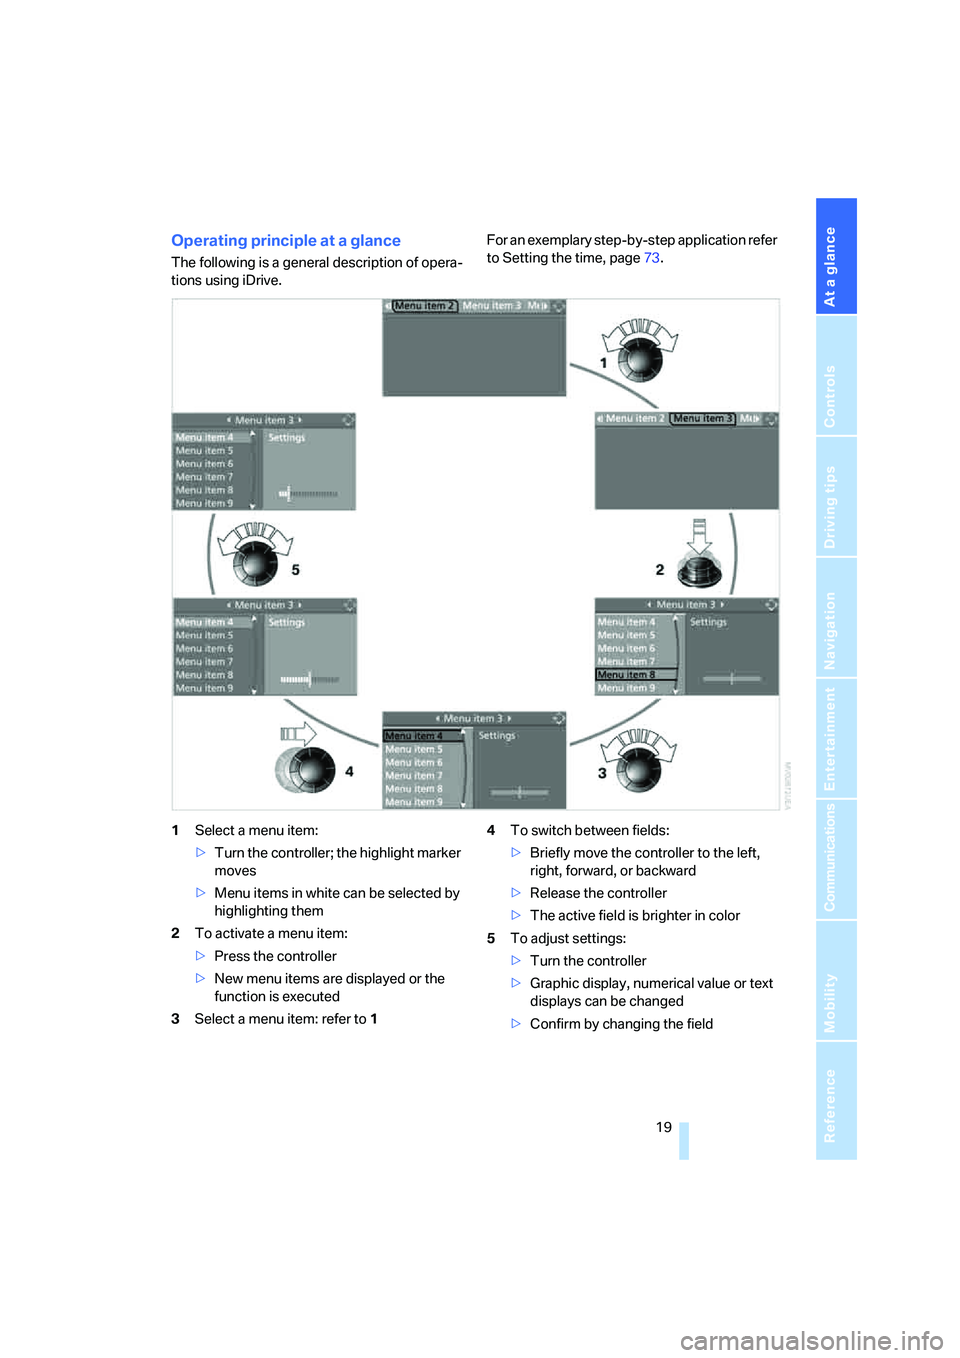
Operating principle at a glance
The following is a general description of opera-
tions using iDrive.For an exemplary step-by-step application refer
to Setting the time, page73.
1Select a menu item:
>Turn the controller; the highlight marker
moves
>Menu items in white can be selected by
highlighting them
2To activate a menu item:
>Press the controller
>New menu items are displayed or the
function is executed
3Select a menu item: refer to14To switch between fields:
>Briefly move the controller to the left,
right, forward, or backward
>Release the controller
>The active field is brighter in color
5To adjust settings:
>Turn the controller
>Graphic display, numerical value or text
displays can be changed
>Confirm by changing the field
ba8_E9293_US.book Seite 19 Freitag, 5. Mai 2006 1:02 13
Page 35 of 239
Controls
33Reference
At a glance
Driving tips
Communications
Navigation
Entertainment
Mobility
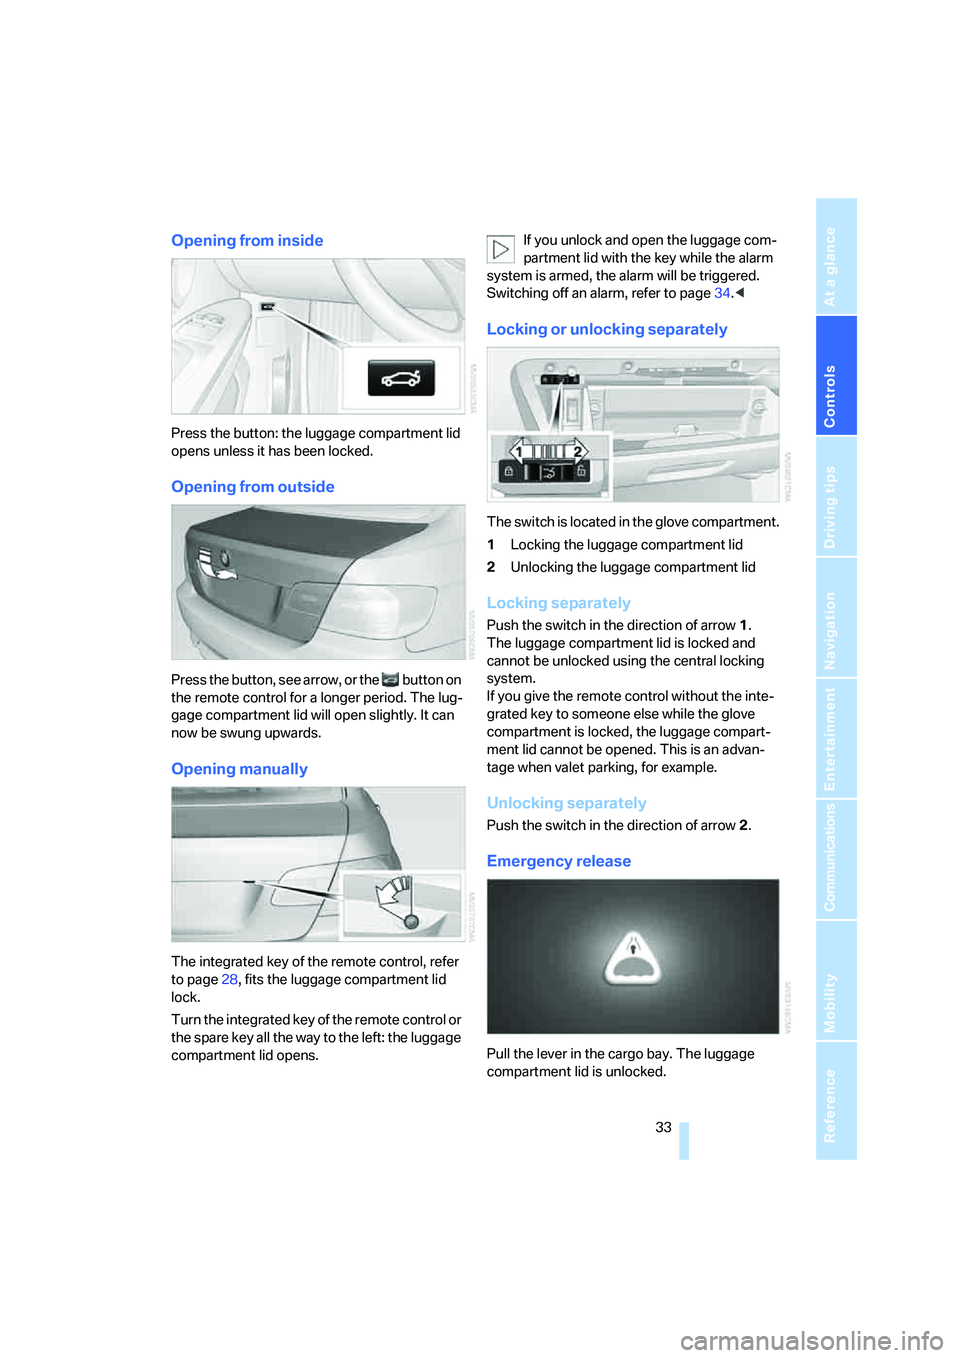
Opening from inside
Press the button: the luggage compartment lid
opens unless it has been locked.
Opening from outside
Press the button, see arrow, or the button on
the remote control for a longer period. The lug-
gage compartment lid will open slightly. It can
now be swung upwards.
Opening manually
The integrated key of the remote control, refer
to page28, fits the luggage compartment lid
lock.
Turn the integrated key of the remote control or
the spare key all the way to the left: the luggage
compartment lid opens.If you unlock and open the luggage com-
partment lid with the key while the alarm
system is armed, the alarm will be triggered.
Switching off an alarm, refer to page34.<
Locking or unlocking separately
The switch is located in the glove compartment.
1Locking the luggage compartment lid
2Unlocking the luggage compartment lid
Locking separately
Push the switch in the direction of arrow 1.
The luggage compartment lid is locked and
cannot be unlocked using the central locking
system.
If you give the remote control without the inte-
grated key to someone else while the glove
compartment is locked, the luggage compart-
ment lid cannot be opened. This is an advan-
tage when valet parking, for example.
Unlocking separately
Push the switch in the direction of arrow 2.
Emergency release
Pull the lever in the cargo bay. The luggage
compartment lid is unlocked.
ba8_E9293_US.book Seite 33 Freitag, 5. Mai 2006 1:02 13
Page 38 of 239
Opening and closing
36
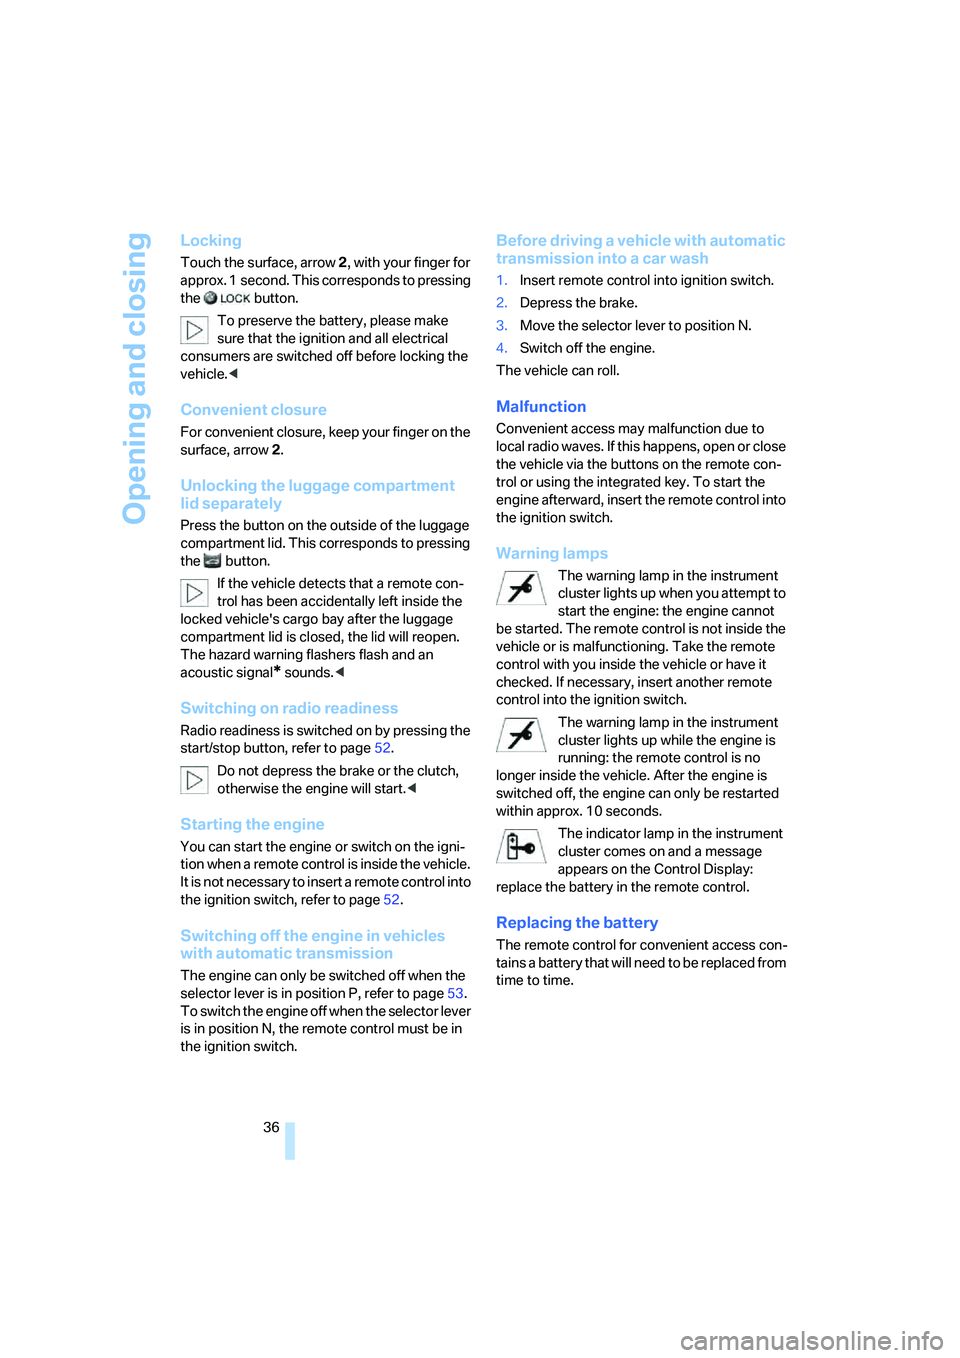
Locking
Touch the surface, arrow 2, with your finger for
approx. 1 second. This corresponds to pressing
the button.
To preserve the battery, please make
sure that the ignition and all electrical
consumers are switched off before locking the
vehicle.<
Convenient closure
For convenient closure, keep your finger on the
surface, arrow 2.
Unlocking the luggage compartment
lid separately
Press the button on the outside of the luggage
compartment lid. This corresponds to pressing
the button.
If the vehicle detects that a remote con-
trol has been accidentally left inside the
locked vehicle's cargo bay after the luggage
compartment lid is closed, the lid will reopen.
The hazard warning flashers flash and an
acoustic signal
* sounds.<
Switching on radio readiness
Radio readiness is switched on by pressing the
start/stop button, refer to page52.
Do not depress the brake or the clutch,
otherwise the engine will start.<
Starting the engine
You can start the engine or switch on the igni-
tion when a remote control is inside the vehicle.
It is not necessary to insert a remote control into
the ignition switch, refer to page52.
Switching off the engine in vehicles
with automatic transmission
The engine can only be switched off when the
selector lever is in position P, refer to page53.
To switch the engine off when the selector lever
is in position N, the remote control must be in
the ignition switch.
Before driving a vehicle with automatic
transmission into a car wash
1.Insert remote control into ignition switch.
2.Depress the brake.
3.Move the selector lever to position N.
4.Switch off the engine.
The vehicle can roll.
Malfunction
Convenient access may malfunction due to
local radio waves. If this happens, open or close
the vehicle via the buttons on the remote con-
trol or using the integrated key. To start the
engine afterward, insert the remote control into
the ignition switch.
Warning lamps
The warning lamp in the instrument
cluster lights up when you attempt to
start the engine: the engine cannot
be started. The remote control is not inside the
vehicle or is malfunctioning. Take the remote
control with you inside the vehicle or have it
checked. If necessary, insert another remote
control into the ignition switch.
The warning lamp in the instrument
cluster lights up while the engine is
running: the remote control is no
longer inside the vehicle. After the engine is
switched off, the engine can only be restarted
within approx. 10 seconds.
The indicator lamp in the instrument
cluster comes on and a message
appears on the Control Display:
replace the battery in the remote control.
Replacing the battery
The remote control for convenient access con-
tains a battery that will need to be replaced from
time to time.
ba8_E9293_US.book Seite 36 Freitag, 5. Mai 2006 1:02 13
Page 39 of 239
Controls
37Reference
At a glance
Driving tips
Communications
Navigation
Entertainment
Mobility
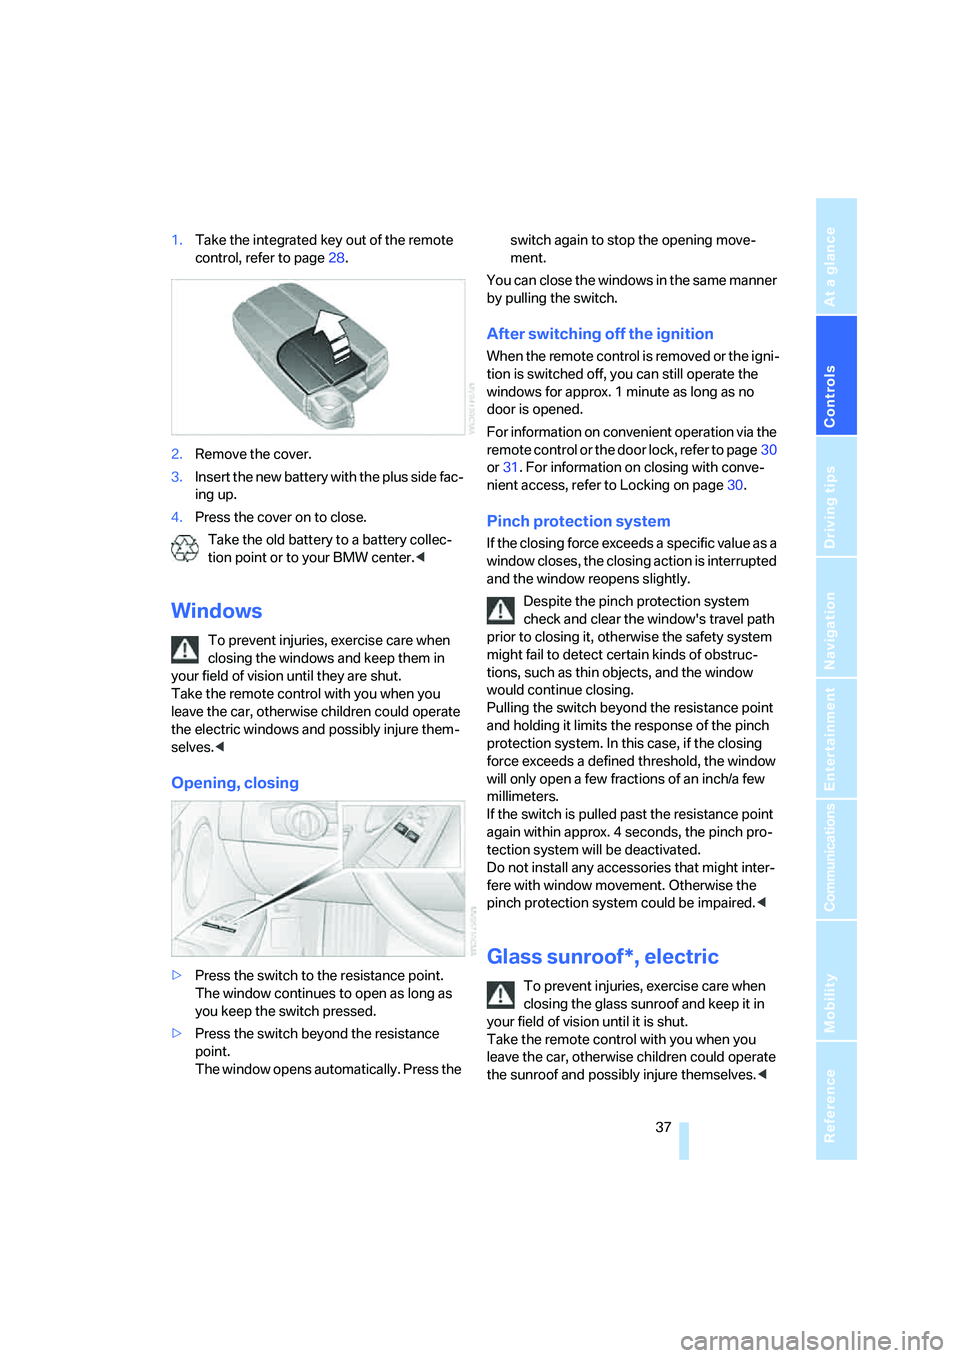
1.Take the integrated key out of the remote
control, refer to page28.
2.Remove the cover.
3.Insert the new battery with the plus side fac-
ing up.
4.Press the cover on to close.
Take the old battery to a battery collec-
tion point or to your BMW center.<
Windows
To prevent injuries, exercise care when
closing the windows and keep them in
your field of vision until they are shut.
Take the remote control with you when you
leave the car, otherwise children could operate
the electric windows and possibly injure them-
selves.<
Opening, closing
>Press the switch to the resistance point.
The window continues to open as long as
you keep the switch pressed.
>Press the switch beyond the resistance
point.
The window opens automatically. Press the switch again to stop the opening move-
ment.
You can close the windows in the same manner
by pulling the switch.
After switching off the ignition
When the remote control is removed or the igni-
tion is switched off, you can still operate the
windows for approx. 1 minute as long as no
door is opened.
For information on convenient operation via the
remote control or the door lock, refer to page30
or31. For information on closing with conve-
nient access, refer to Locking on page30.
Pinch protection system
If the closing force exceeds a specific value as a
window closes, the closing action is interrupted
and the window reopens slightly.
Despite the pinch protection system
check and clear the window's travel path
prior to closing it, otherwise the safety system
might fail to detect certain kinds of obstruc-
tions, such as thin objects, and the window
would continue closing.
Pulling the switch beyond the resistance point
and holding it limits the response of the pinch
protection system. In this case, if the closing
force exceeds a defined threshold, the window
will only open a few fractions of an inch/a few
millimeters.
If the switch is pulled past the resistance point
again within approx. 4 seconds, the pinch pro-
tection system will be deactivated.
Do not install any accessories that might inter-
fere with window movement. Otherwise the
pinch protection system could be impaired.<
Glass sunroof*, electric
To prevent injuries, exercise care when
closing the glass sunroof and keep it in
your field of vision until it is shut.
Take the remote control with you when you
leave the car, otherwise children could operate
the sunroof and possibly injure themselves.<
ba8_E9293_US.book Seite 37 Freitag, 5. Mai 2006 1:02 13
Page 40 of 239
Opening and closing
38
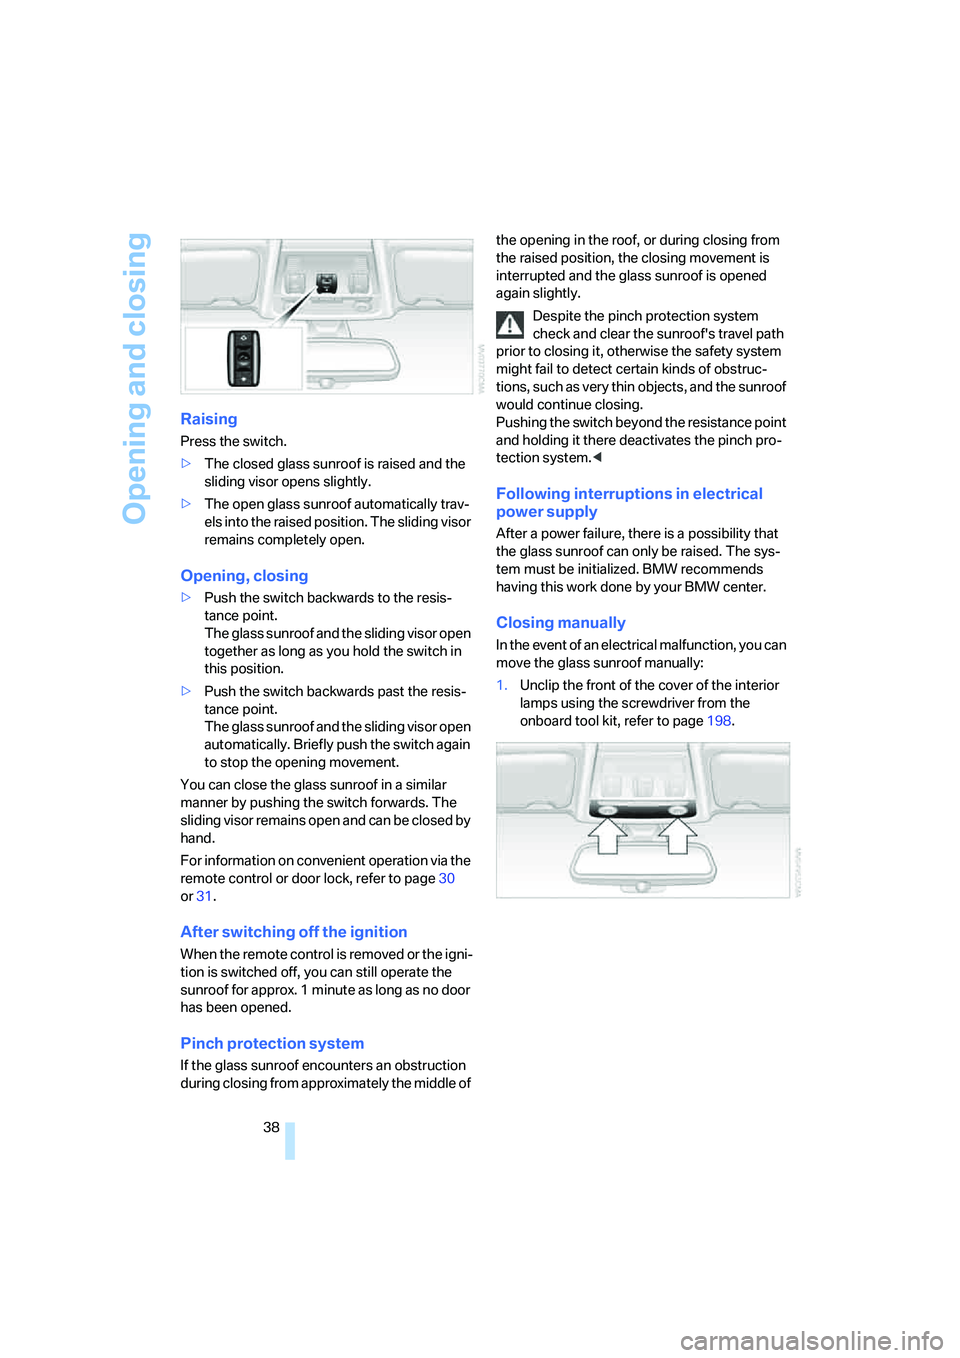
Raising
Press the switch.
>The closed glass sunroof is raised and the
sliding visor opens slightly.
>The open glass sunroof automatically trav-
els into the raised position. The sliding visor
remains completely open.
Opening, closing
>Push the switch backwards to the resis-
tance point.
The glass sunroof and the sliding visor open
together as long as you hold the switch in
this position.
>Push the switch backwards past the resis-
tance point.
The glass sunroof and the sliding visor open
automatically. Briefly push the switch again
to stop the opening movement.
You can close the glass sunroof in a similar
manner by pushing the switch forwards. The
sliding visor remains open and can be closed by
hand.
For information on convenient operation via the
remote control or door lock, refer to page30
or31.
After switching off the ignition
When the remote control is removed or the igni-
tion is switched off, you can still operate the
sunroof for approx. 1 minute as long as no door
has been opened.
Pinch protection system
If the glass sunroof encounters an obstruction
during closing from approximately the middle of the opening in the roof, or during closing from
the raised position, the closing movement is
interrupted and the glass sunroof is opened
again slightly.
Despite the pinch protection system
check and clear the sunroof's travel path
prior to closing it, otherwise the safety system
might fail to detect certain kinds of obstruc-
tions, such as very thin objects, and the sunroof
would continue closing.
Pushing the switch beyond the resistance point
and holding it there deactivates the pinch pro-
tection system.<
Following interruptions in electrical
power supply
After a power failure, there is a possibility that
the glass sunroof can only be raised. The sys-
tem must be initialized. BMW recommends
having this work done by your BMW center.
Closing manually
In the event of an electrical malfunction, you can
move the glass sunroof manually:
1.Unclip the front of the cover of the interior
lamps using the screwdriver from the
onboard tool kit, refer to page198.
ba8_E9293_US.book Seite 38 Freitag, 5. Mai 2006 1:02 13
Page 45 of 239
Controls
43Reference
At a glance
Driving tips
Communications
Navigation
Entertainment
Mobility
erwise, there is an increased risk of injury in the
event of an accident.<
Front seats
Height adjustment
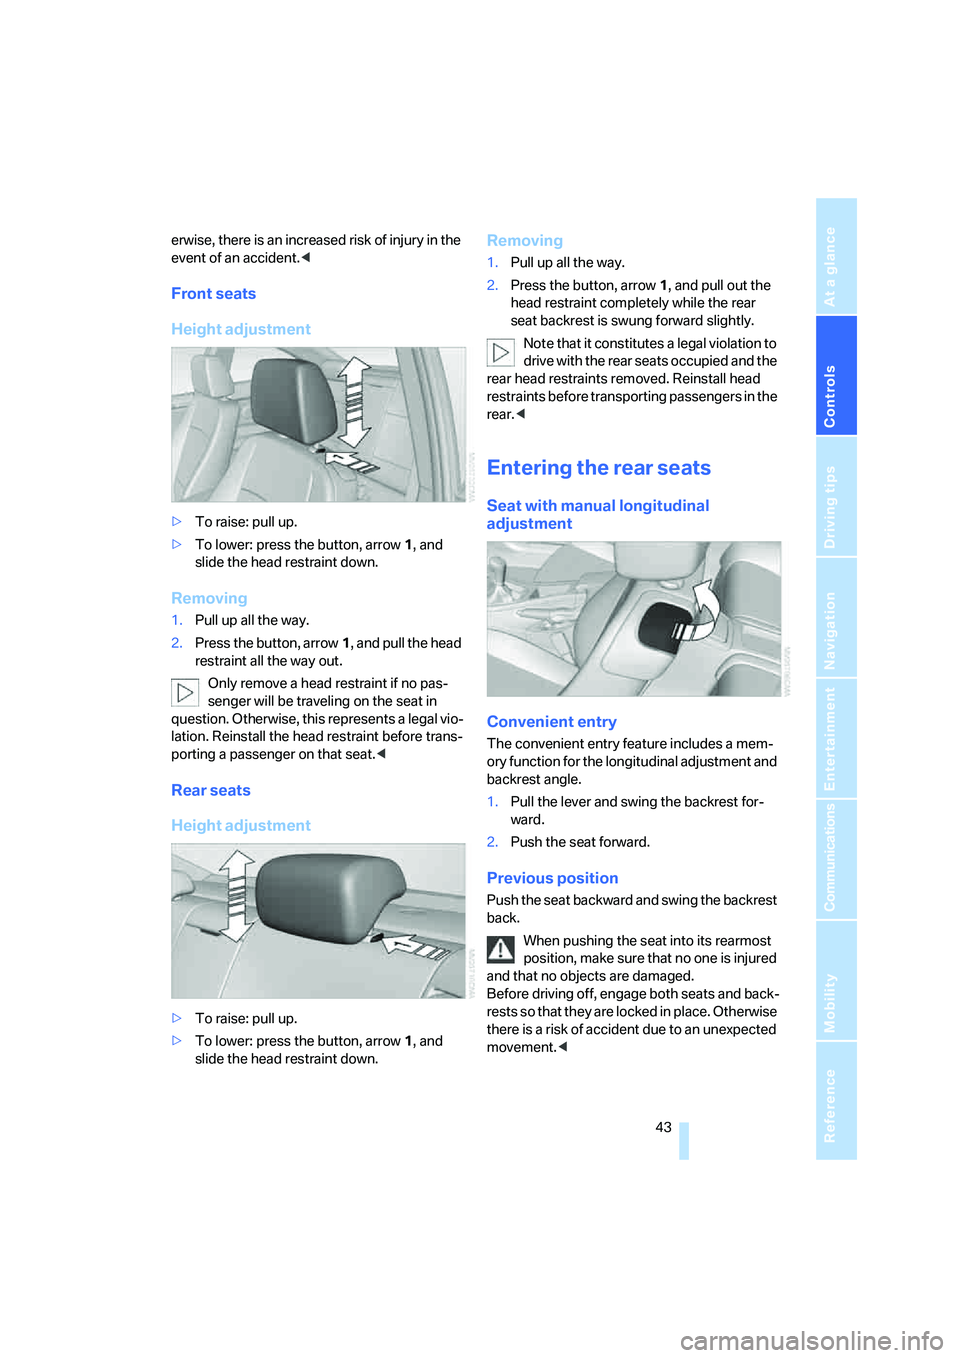
>To raise: pull up.
>To lower: press the button, arrow1, and
slide the head restraint down.
Removing
1.Pull up all the way.
2.Press the button, arrow1, and pull the head
restraint all the way out.
Only remove a head restraint if no pas-
senger will be traveling on the seat in
question. Otherwise, this represents a legal vio-
lation. Reinstall the head restraint before trans-
porting a passenger on that seat.<
Rear seats
Height adjustment
>To raise: pull up.
>To lower: press the button, arrow1, and
slide the head restraint down.
Removing
1.Pull up all the way.
2.Press the button, arrow 1, and pull out the
head restraint completely while the rear
seat backrest is swung forward slightly.
Note that it constitutes a legal violation to
drive with the rear seats occupied and the
rear head restraints removed. Reinstall head
restraints before transporting passengers in the
rear.<
Entering the rear seats
Seat with manual longitudinal
adjustment
Convenient entry
The convenient entry feature includes a mem-
ory function for the longitudinal adjustment and
backrest angle.
1.Pull the lever and swing the backrest for-
ward.
2.Push the seat forward.
Previous position
Push the seat backward and swing the backrest
back.
When pushing the seat into its rearmost
position, make sure that no one is injured
and that no objects are damaged.
Before driving off, engage both seats and back-
rests so that they are locked in place. Otherwise
there is a risk of accident due to an unexpected
movement.<
ba8_E9293_US.book Seite 43 Freitag, 5. Mai 2006 1:02 13