BMW 330XI IDRIVE SEDAN 2005 User Guide
Manufacturer: BMW, Model Year: 2005, Model line: 330XI IDRIVE SEDAN, Model: BMW 330XI IDRIVE SEDAN 2005Pages: 223, PDF Size: 7.49 MB
Page 11 of 223
Cockpit
10
Cockpit
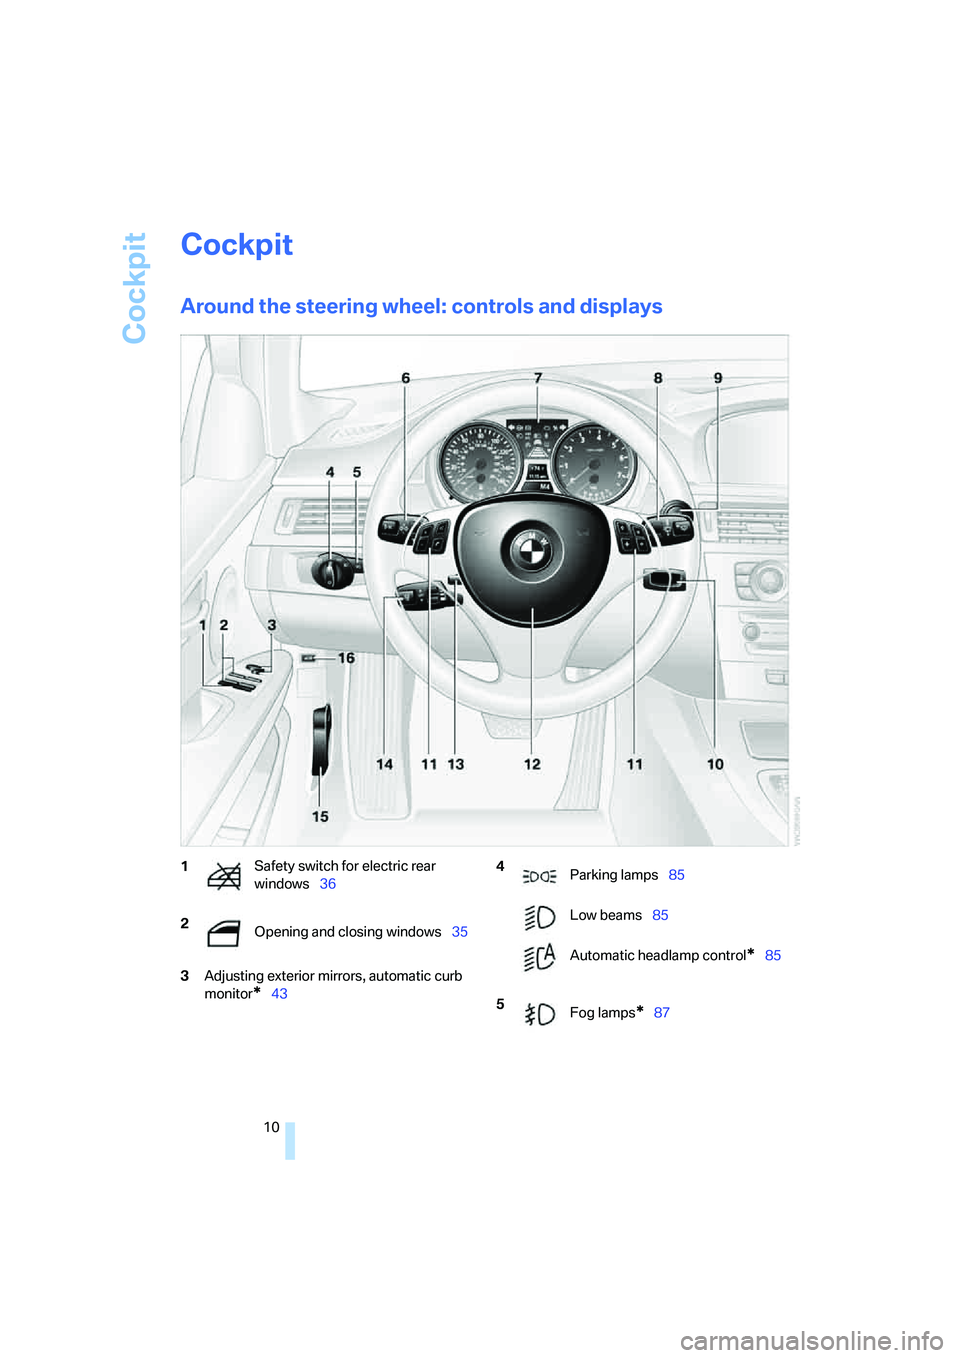
Around the steering wheel: controls and displays
3Adjusting exterior mirrors, automatic curb
monitor
*43
1Safety switch for electric rear
windows36
2
Opening and closing windows35 4
Parking lamps85
Low beams85
Automatic headlamp control
*85
5
Fog lamps
*87
Page 12 of 223
At a glance
11Reference
Controls
Driving tips
Communications
Navigation
Entertainment
Mobility
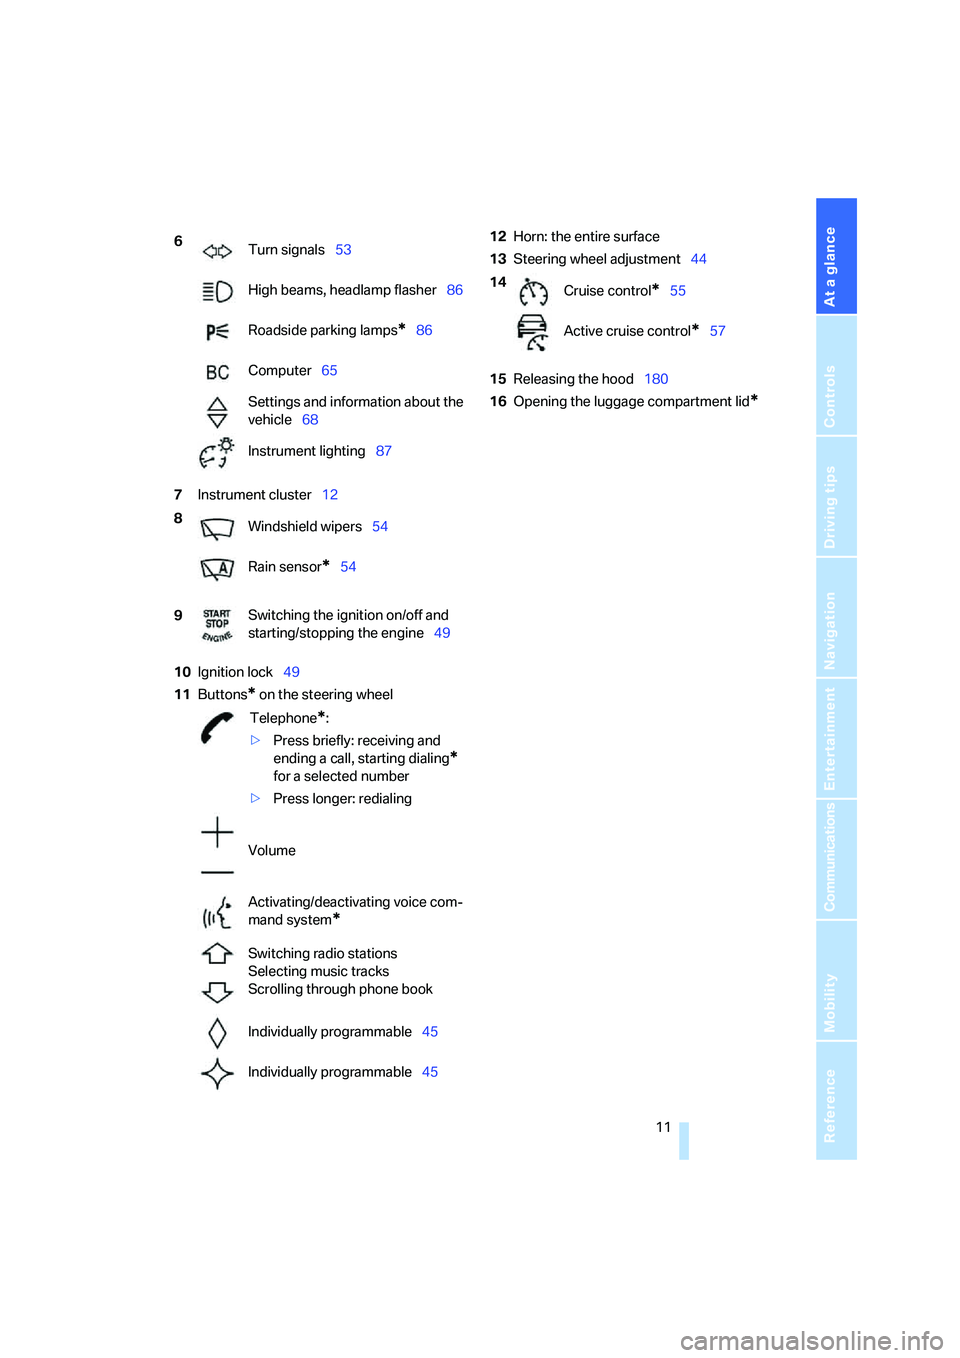
7Instrument cluster12
10Ignition lock49
11Buttons
* on the steering wheel12Horn: the entire surface
13Steering wheel adjustment44
15Releasing the hood180
16Opening the luggage compartment lid
*
6
Turn signals53
High beams, headlamp flasher86
Roadside parking lamps
*86
Computer65
Settings and information about the
vehicle68
Instrument lighting87
8
Windshield wipers54
Rain sensor
*54
9Switching the ignition on/off and
starting/stopping the engine49
Telephone
*:
>Press briefly: receiving and
ending a call, starting dialing
*
for a selected number
>Press longer: redialing
Volume
Activating/deactivating voice com-
mand system
*
Switching radio stations
Selecting music tracks
Scrolling through phone book
Individually programmable45
Individually programmable45
14
Cruise control*55
Active cruise control
*57
Page 13 of 223
Cockpit
12
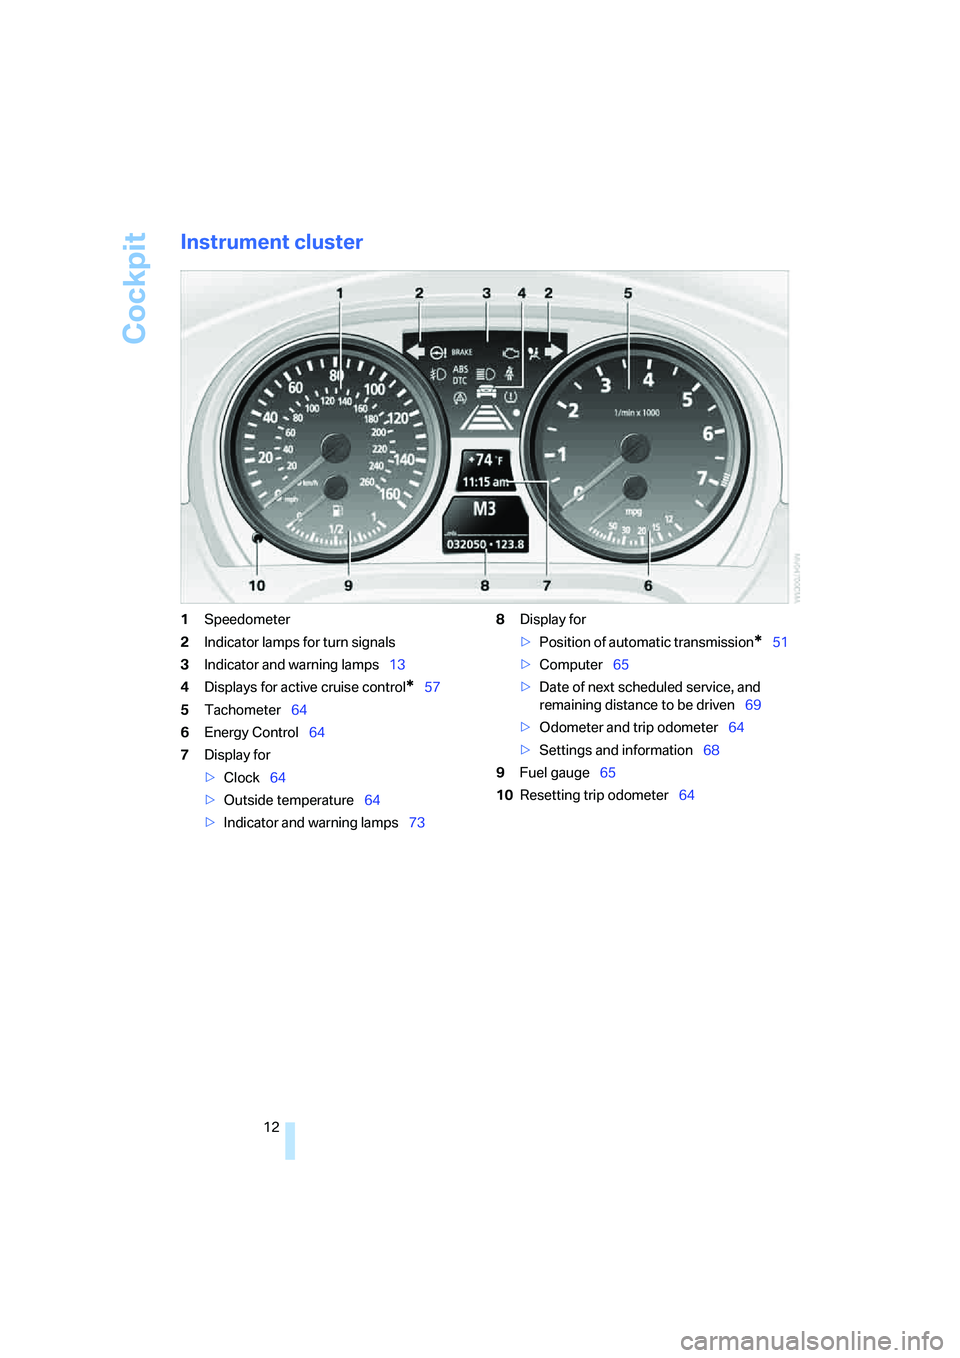
Instrument cluster
1Speedometer
2Indicator lamps for turn signals
3Indicator and warning lamps13
4Displays for active cruise control
*57
5Tachometer64
6Energy Control64
7Display for
>Clock64
>Outside temperature64
>Indicator and warning lamps738Display for
>Position of automatic transmission
*51
>Computer65
>Date of next scheduled service, and
remaining distance to be driven69
>Odometer and trip odometer64
>Settings and information68
9Fuel gauge65
10Resetting trip odometer64
Page 14 of 223
At a glance
13Reference
Controls
Driving tips
Communications
Navigation
Entertainment
Mobility
Indicator and warning lamps
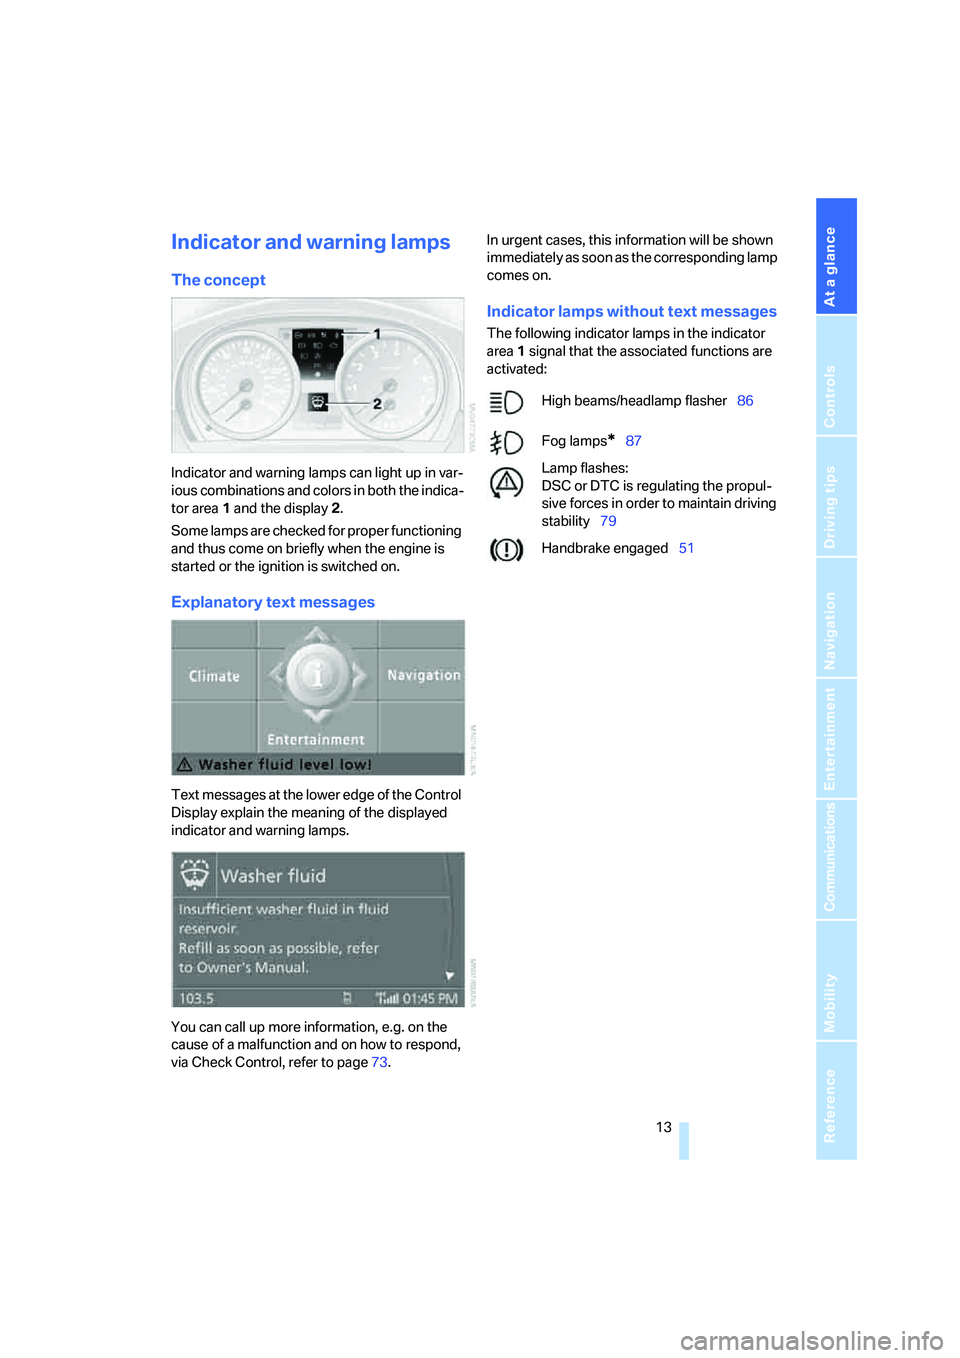
The concept
Indicator and warning lamps can light up in var-
ious combinations and colors in both the indica-
tor area 1 and the display 2.
Some lamps are checked for proper functioning
and thus come on briefly when the engine is
started or the ignition is switched on.
Explanatory text messages
Text messages at the lower edge of the Control
Display explain the meaning of the displayed
indicator and warning lamps.
You can call up more information, e.g. on the
cause of a malfunction and on how to respond,
via Check Control, refer to page73.In urgent cases, this information will be shown
immediately as soon as the corresponding lamp
comes on.
Indicator lamps without text messages
The following indicator lamps in the indicator
area1 signal that the associated functions are
activated:
High beams/headlamp flasher86
Fog lamps
*87
Lamp flashes:
DSC or DTC is regulating the propul-
sive forces in order to maintain driving
stability79
Handbrake engaged51
Page 15 of 223
Cockpit
14
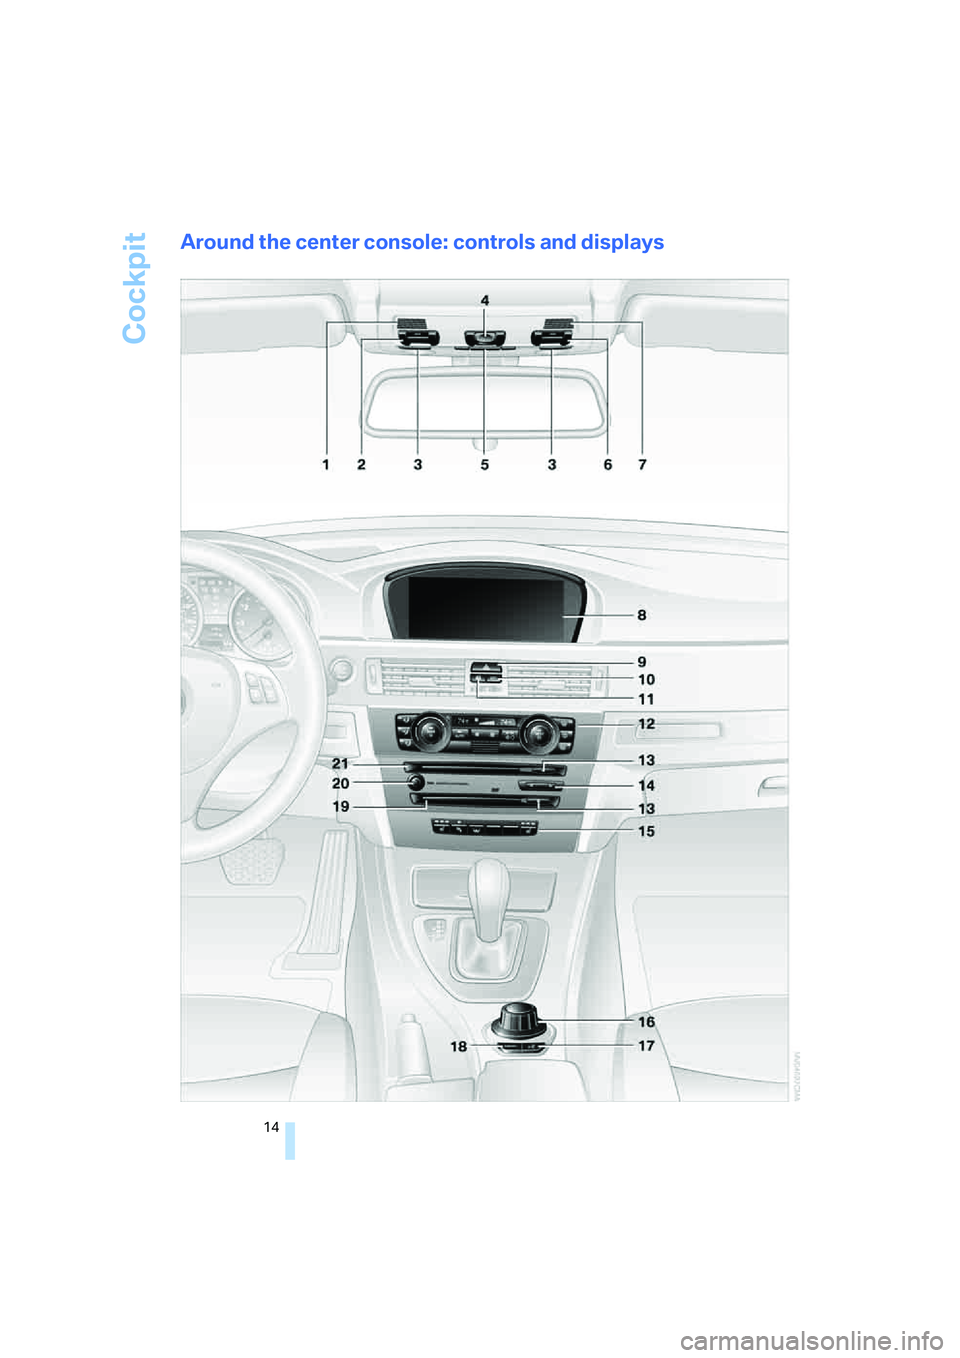
Around the center console: controls and displays
Page 16 of 223
At a glance
15Reference
Controls
Driving tips
Communications
Navigation
Entertainment
Mobility
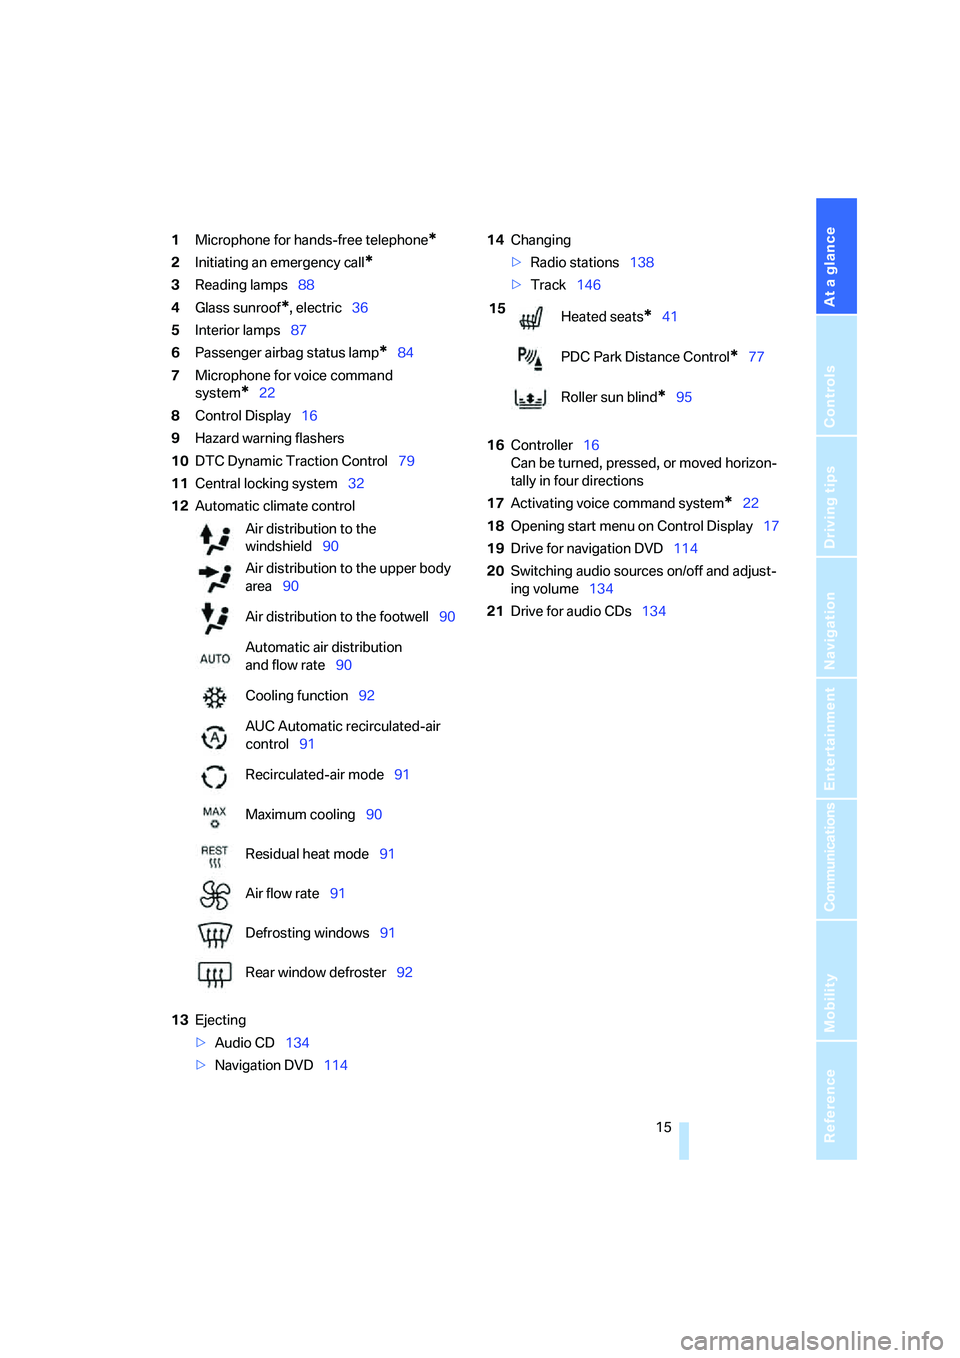
1Microphone for hands-free telephone*
2Initiating an emergency call*
3Reading lamps88
4Glass sunroof
*, electric36
5Interior lamps87
6Passenger airbag status lamp
*84
7Microphone for voice command
system
*22
8Control Display16
9Hazard warning flashers
10DTC Dynamic Traction Control79
11Central locking system32
12Automatic climate control
13Ejecting
>Audio CD134
>Navigation DVD11414Changing
>Radio stations138
>Track146
16Controller16
Can be turned, pressed, or moved horizon-
tally in four directions
17Activating voice command system
*22
18Opening start menu on Control Display17
19Drive for navigation DVD114
20Switching audio sources on/off and adjust-
ing volume134
21Drive for audio CDs134 Air distribution to the
windshield90
Air distribution to the upper body
area90
Air distribution to the footwell90
Automatic air distribution
and flow rate90
Cooling function92
AUC Automatic recirculated-air
control91
Recirculated-air mode91
Maximum cooling90
Residual heat mode91
Air flow rate91
Defrosting windows91
Rear window defroster92
15
Heated seats*41
PDC Park Distance Control
*77
Roller sun blind
*95
Page 17 of 223
iDrive
16
iDrive
iDrive integrates the functions of a large num-
ber of switches. This allows these functions to
be operated from a single central position. The
following section provides an introduction to basic menu navigation. The control of the indi-
vidual functions is described in connection with
the relevant equipment.
Controls
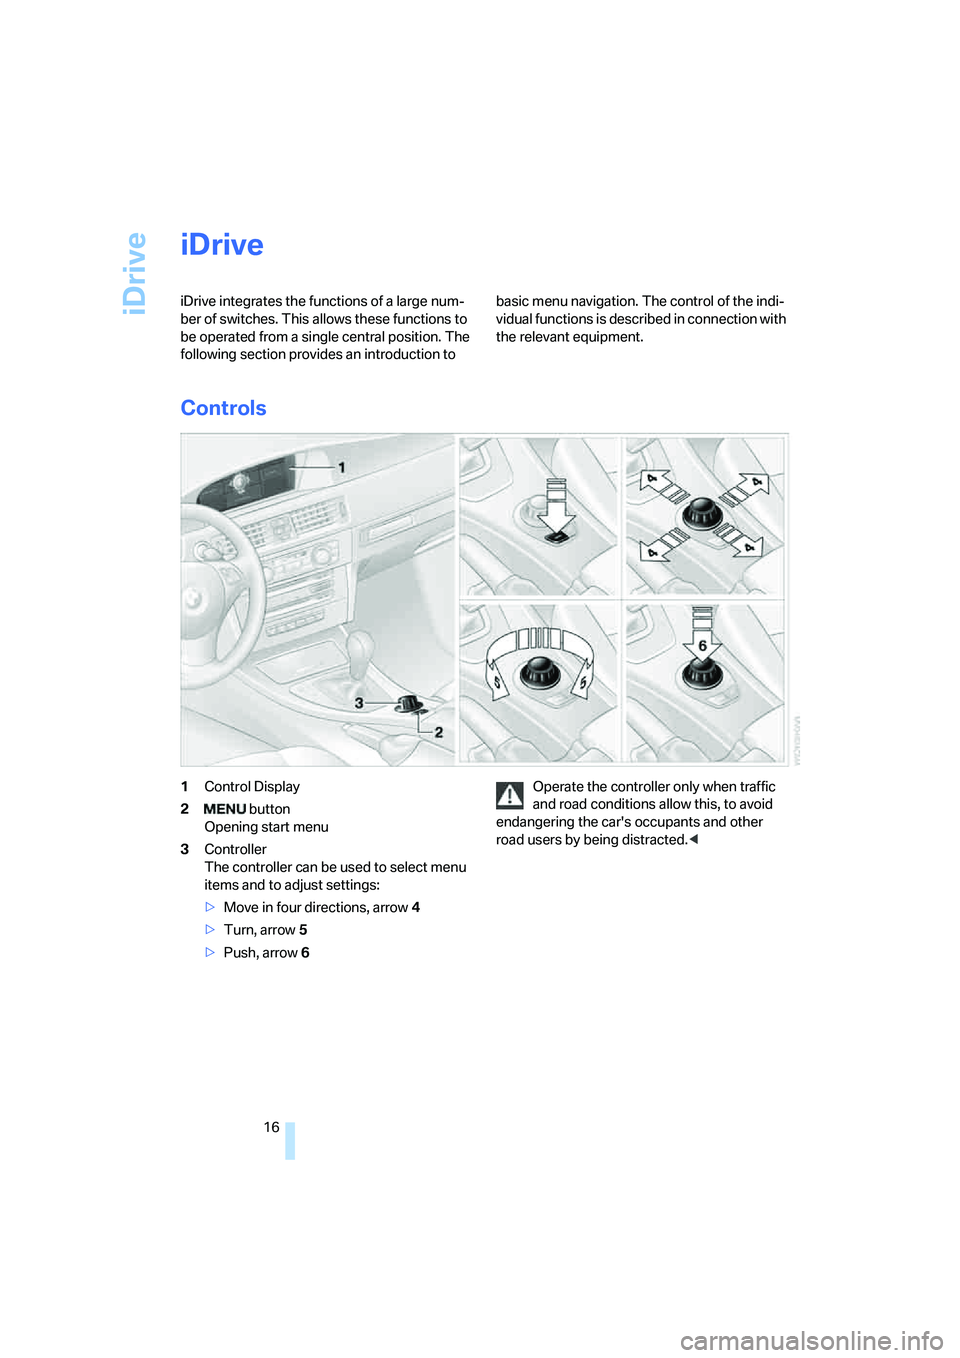
1Control Display
2 button
Opening start menu
3Controller
The controller can be used to select menu
items and to adjust settings:
>Move in four directions, arrow 4
>Turn, arrow 5
>Push, arrow 6Operate the controller only when traffic
and road conditions allow this, to avoid
endangering the car's occupants and other
road users by being distracted.<
Page 18 of 223
At a glance
17Reference
Controls
Driving tips
Communications
Navigation
Entertainment
Mobility
Menu overview
Communication
>Telephone*
>BMW Assist* or TeleService*
Navigation
>Navigation system
>Onboard information, e.g. for displaying the
average fuel consumption.
Entertainment
>Radio
>CD player and CD changer
*
>External audio device
Climate
>Air distribution
>Automatic program
menu
>Switching off Control Display
>Tone and display settings
>Settings for traffic information
>Settings for your vehicle, e.g. for the central
locking system
>Display of service requirements and dates
for statutory emissions and vehicle inspec-
tions
>Settings for telephone
Operating principle
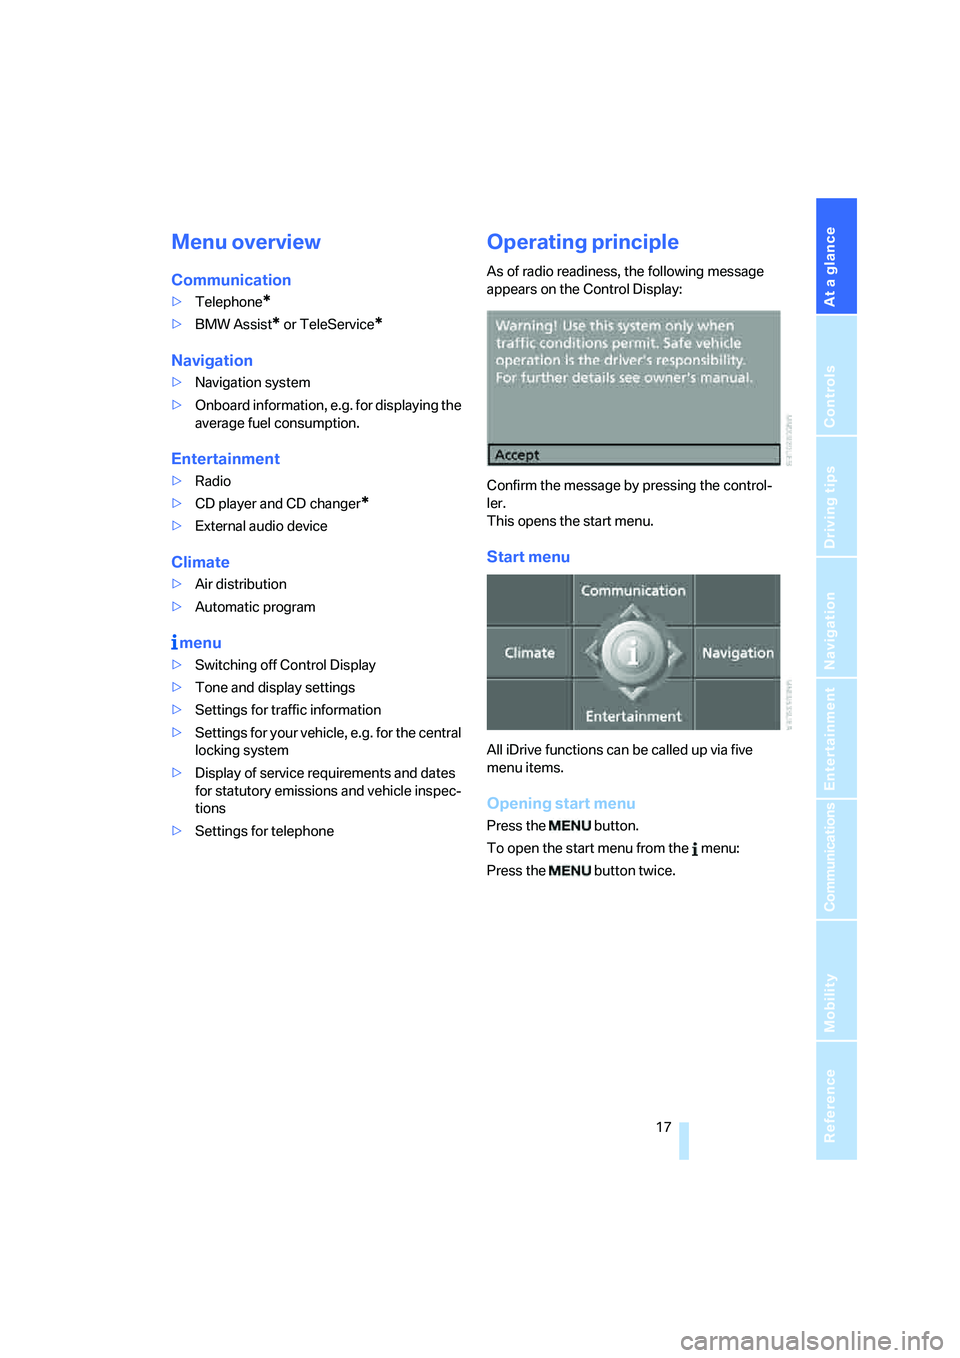
As of radio readiness, the following message
appears on the Control Display:
Confirm the message by pressing the control-
ler.
This opens the start menu.
Start menu
All iDrive functions can be called up via five
menu items.
Opening start menu
Press the button.
To open the start menu from the menu:
Press the button twice.
Page 19 of 223
iDrive
18
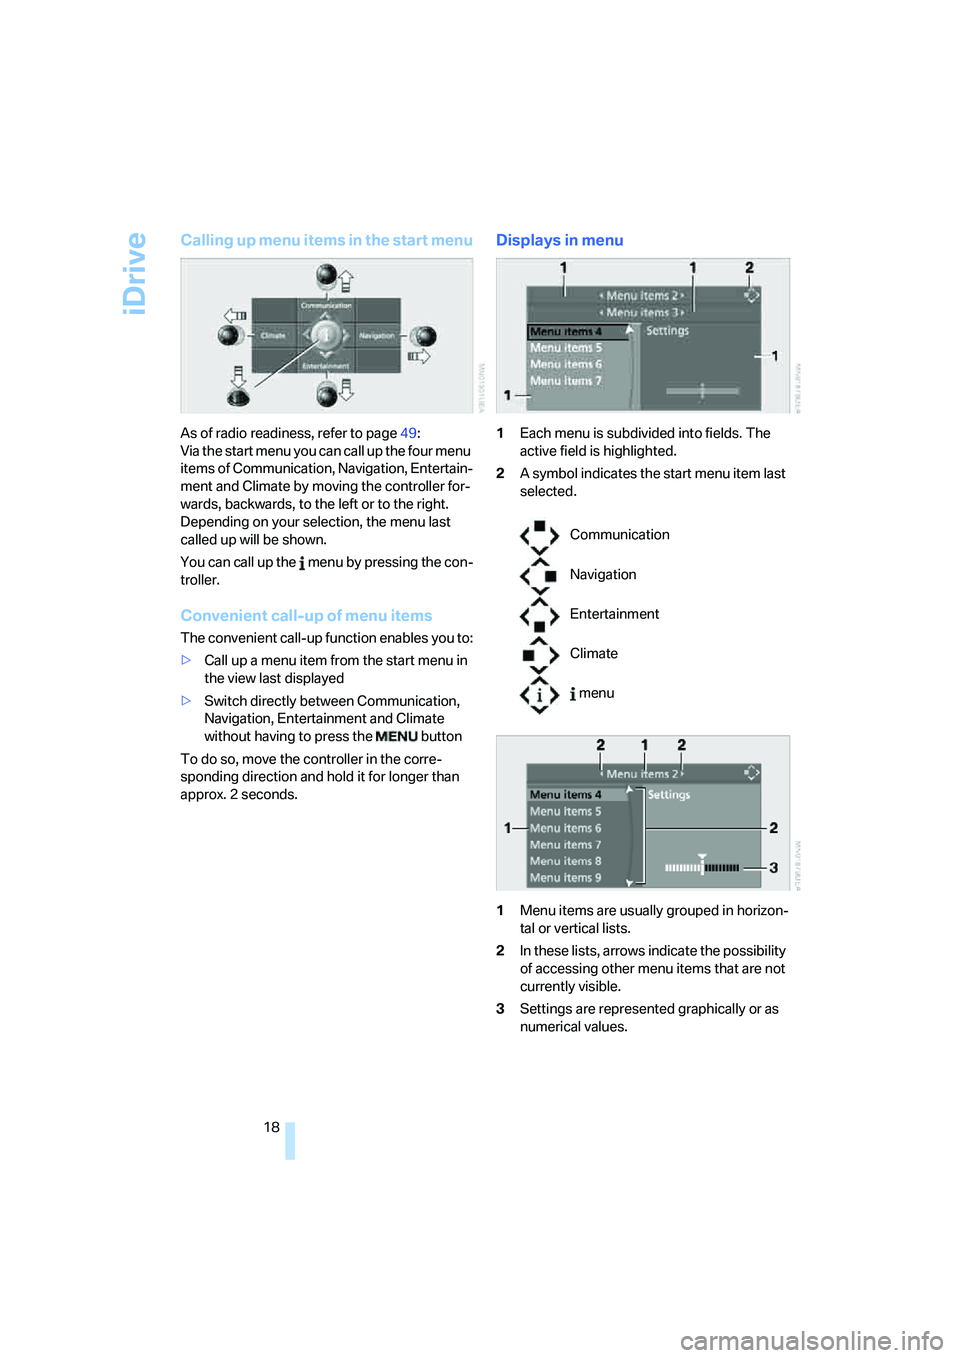
Calling up menu items in the start menu
As of radio readiness, refer to page49:
Via the start menu you can call up the four menu
items of Communication, Navigation, Entertain-
ment and Climate by moving the controller for-
wards, backwards, to the left or to the right.
Depending on your selection, the menu last
called up will be shown.
You can call up the menu by pressing the con-
troller.
Convenient call-up of menu items
The convenient call-up function enables you to:
>Call up a menu item from the start menu in
the view last displayed
>Switch directly between Communication,
Navigation, Entertainment and Climate
without having to press the button
To do so, move the controller in the corre-
sponding direction and hold it for longer than
approx. 2 seconds.
Displays in menu
1Each menu is subdivided into fields. The
active field is highlighted.
2A symbol indicates the start menu item last
selected.
1Menu items are usually grouped in horizon-
tal or vertical lists.
2In these lists, arrows indicate the possibility
of accessing other menu items that are not
currently visible.
3Settings are represented graphically or as
numerical values.
Communication
Navigation
Entertainment
Climate
menu
Page 20 of 223
At a glance
19Reference
Controls
Driving tips
Communications
Navigation
Entertainment
Mobility
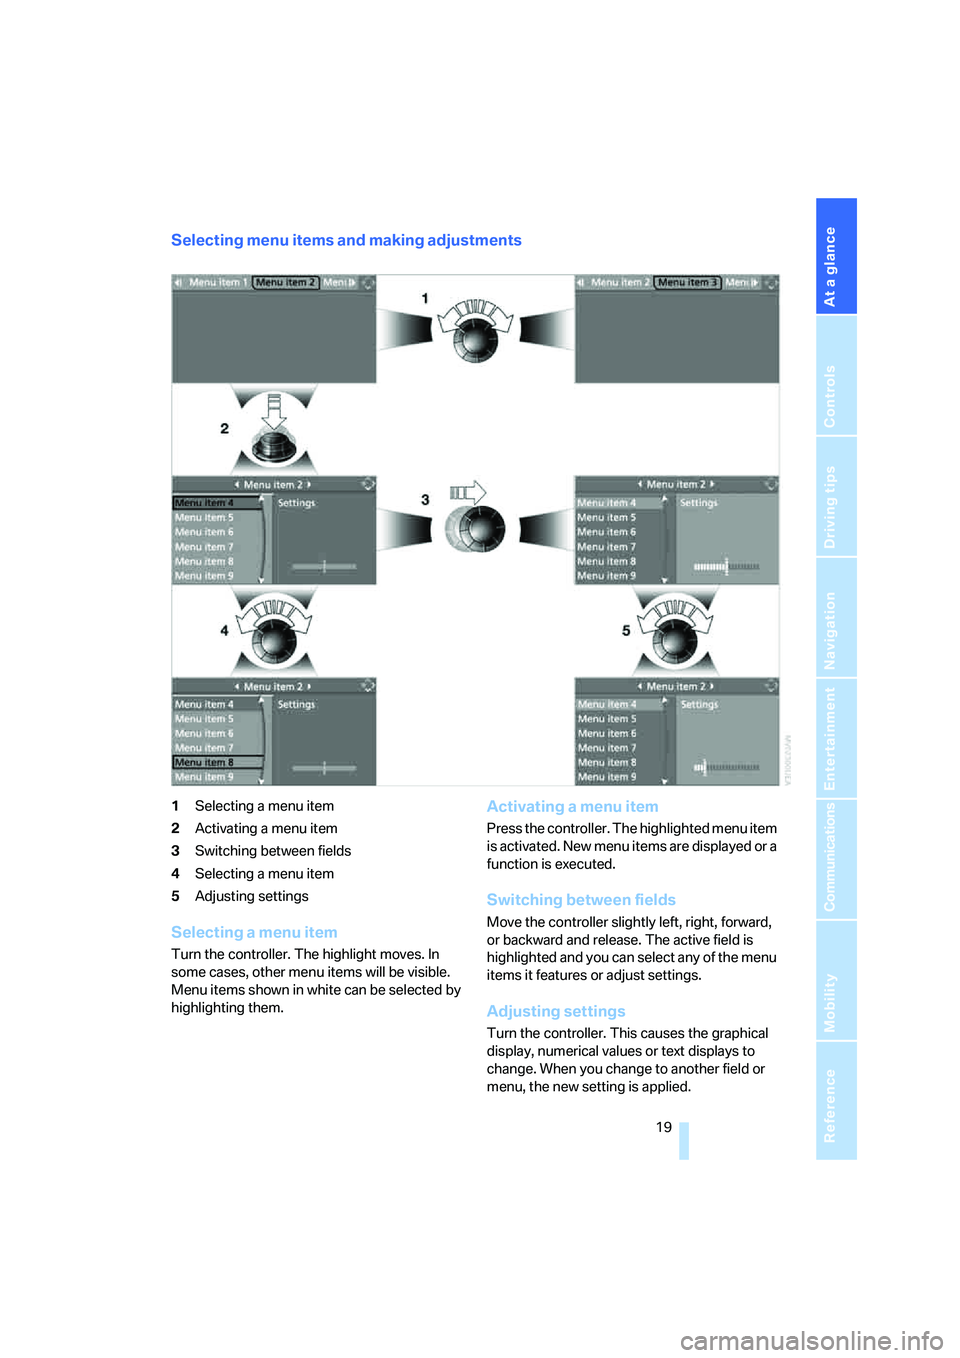
Selecting menu items and making adjustments
1Selecting a menu item
2Activating a menu item
3Switching between fields
4Selecting a menu item
5Adjusting settings
Selecting a menu item
Turn the controller. The highlight moves. In
some cases, other menu items will be visible.
Menu items shown in white can be selected by
highlighting them.
Activating a menu item
Press the controller. The highlighted menu item
is activated. New menu items are displayed or a
function is executed.
Switching between fields
Move the controller slightly left, right, forward,
or backward and release. The active field is
highlighted and you can select any of the menu
items it features or adjust settings.
Adjusting settings
Turn the controller. This causes the graphical
display, numerical values or text displays to
change. When you change to another field or
menu, the new setting is applied.