lights BMW 330XI IDRIVE SEDAN 2005 Owners Manual
[x] Cancel search | Manufacturer: BMW, Model Year: 2005, Model line: 330XI IDRIVE SEDAN, Model: BMW 330XI IDRIVE SEDAN 2005Pages: 223, PDF Size: 7.49 MB
Page 43 of 223
Adjustments
42
Seat and mirror memory*
You can store and call up two different combi-
nations of driver's-seat and exterior-mirror
positions.
Settings for the seat back width and lumbar
support are not stored in memory.
Storing
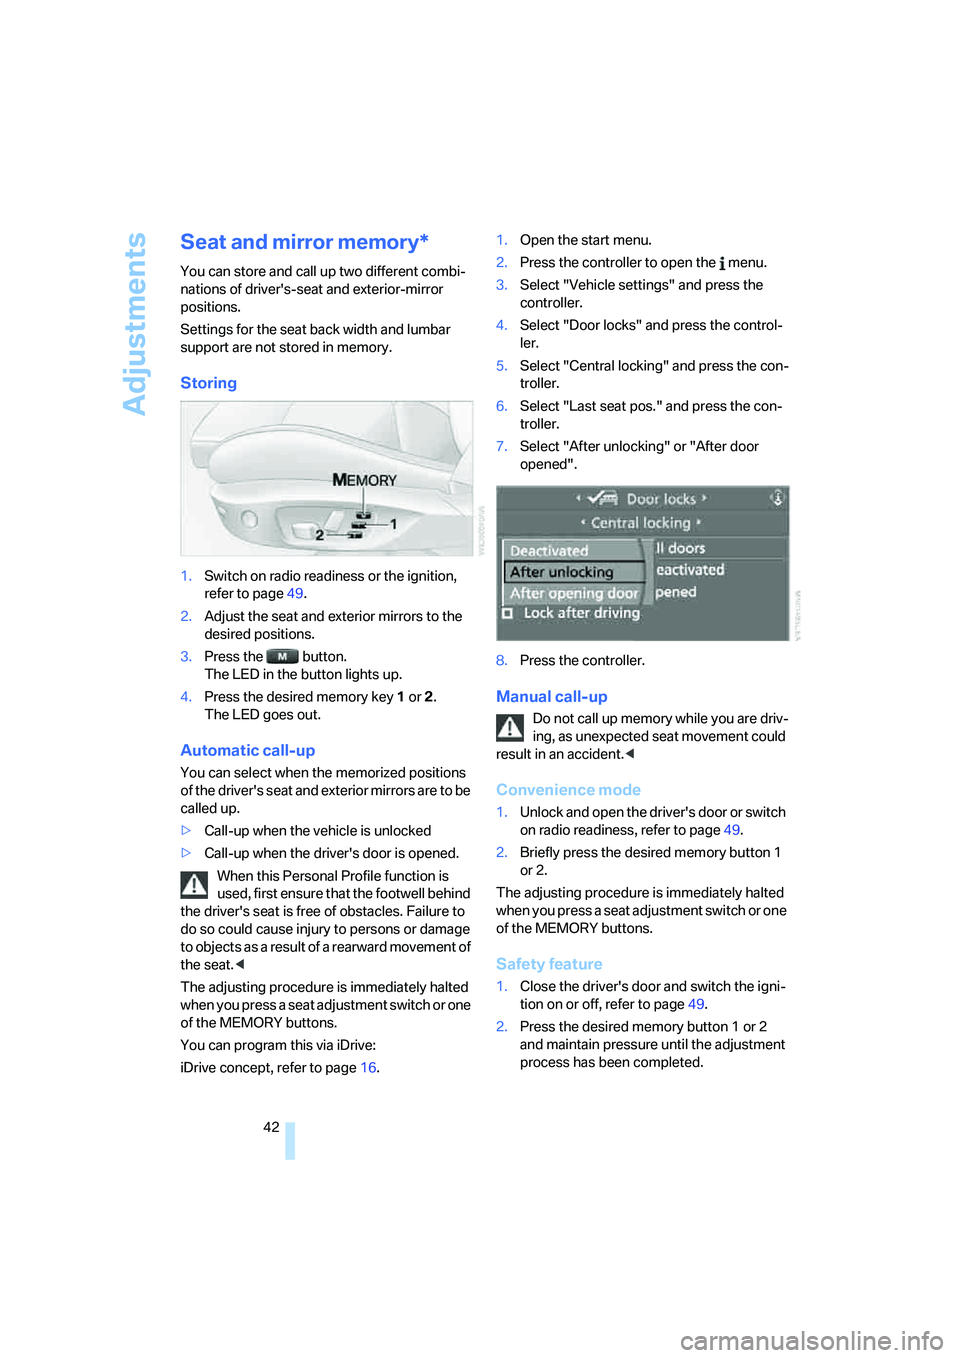
1.Switch on radio readiness or the ignition,
refer to page49.
2.Adjust the seat and exterior mirrors to the
desired positions.
3.Press the button.
The LED in the button lights up.
4.Press the desired memory key 1 or 2.
The LED goes out.
Automatic call-up
You can select when the memorized positions
of the driver's seat and exterior mirrors are to be
called up.
>Call-up when the vehicle is unlocked
>Call-up when the driver's door is opened.
When this Personal Profile function is
used, first ensure that the footwell behind
the driver's seat is free of obstacles. Failure to
do so could cause injury to persons or damage
to objects as a result of a rearward movement of
the seat.<
The adjusting procedure is immediately halted
when you press a seat adjustment switch or one
of the MEMORY buttons.
You can program this via iDrive:
iDrive concept, refer to page16.1.Open the start menu.
2.Press the controller to open the menu.
3.Select "Vehicle settings" and press the
controller.
4.Select "Door locks" and press the control-
ler.
5.Select "Central locking" and press the con-
troller.
6.Select "Last seat pos." and press the con-
troller.
7.Select "After unlocking" or "After door
opened".
8.Press the controller.
Manual call-up
Do not call up memory while you are driv-
ing, as unexpected seat movement could
result in an accident.<
Convenience mode
1.Unlock and open the driver's door or switch
on radio readiness, refer to page49.
2.Briefly press the desired memory button 1
or 2.
The adjusting procedure is immediately halted
when you press a seat adjustment switch or one
of the MEMORY buttons.
Safety feature
1.Close the driver's door and switch the igni-
tion on or off, refer to page49.
2.Press the desired memory button 1 or 2
and maintain pressure until the adjustment
process has been completed.
Page 55 of 223
Driving
54
Wiper system
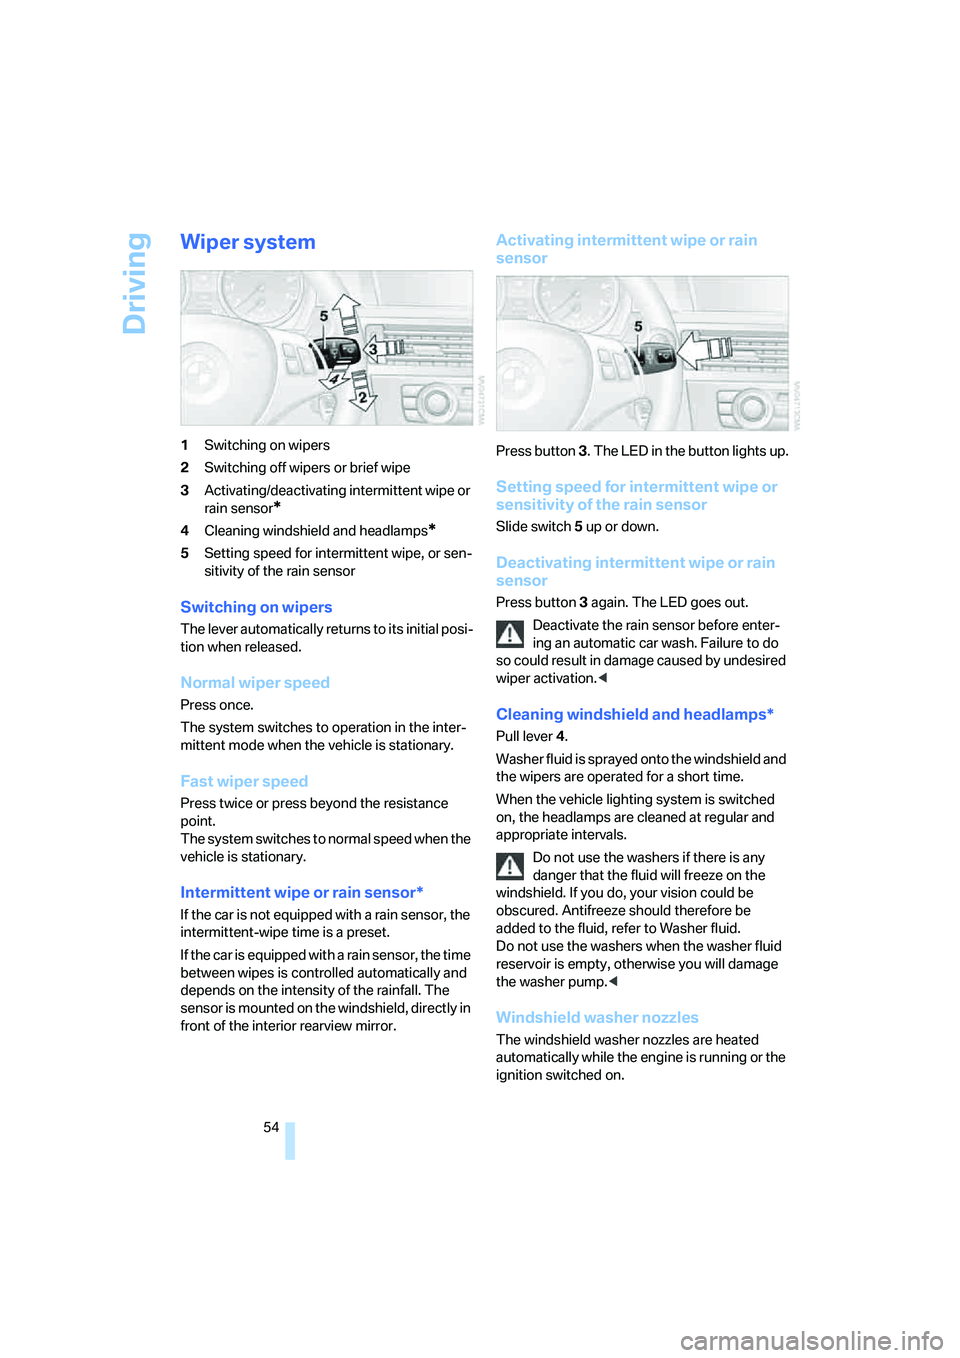
1Switching on wipers
2Switching off wipers or brief wipe
3Activating/deactivating intermittent wipe or
rain sensor
*
4Cleaning windshield and headlamps*
5Setting speed for intermittent wipe, or sen-
sitivity of the rain sensor
Switching on wipers
The lever automatically returns to its initial posi-
tion when released.
Normal wiper speed
Press once.
The system switches to operation in the inter-
mittent mode when the vehicle is stationary.
Fast wiper speed
Press twice or press beyond the resistance
point.
The system switches to normal speed when the
vehicle is stationary.
Intermittent wipe or rain sensor*
If the car is not equipped with a rain sensor, the
intermittent-wipe time is a preset.
If the car is equipped with a rain sensor, the time
between wipes is controlled automatically and
depends on the intensity of the rainfall. The
sensor is mounted on the windshield, directly in
front of the interior rearview mirror.
Activating intermittent wipe or rain
sensor
Press button 3. The LED in the button lights up.
Setting speed for intermittent wipe or
sensitivity of the rain sensor
Slide switch5 up or down.
Deactivating intermittent wipe or rain
sensor
Press button 3 again. The LED goes out.
Deactivate the rain sensor before enter-
ing an automatic car wash. Failure to do
so could result in damage caused by undesired
wiper activation.<
Cleaning windshield and headlamps*
Pull lever 4.
Washer fluid is sprayed onto the windshield and
the wipers are operated for a short time.
When the vehicle lighting system is switched
on, the headlamps are cleaned at regular and
appropriate intervals.
Do not use the washers if there is any
danger that the fluid will freeze on the
windshield. If you do, your vision could be
obscured. Antifreeze should therefore be
added to the fluid, refer to Washer fluid.
Do not use the washers when the washer fluid
reservoir is empty, otherwise you will damage
the washer pump.<
Windshield washer nozzles
The windshield washer nozzles are heated
automatically while the engine is running or the
ignition switched on.
Page 61 of 223
Driving
60 >When you deactivate the Dynamic Stability
Control DSC
>When DSC or ABS is intervening
>When the system does not recognize any
objects for a longer period of time, e.g. on
infrequently traveled roads without a shoul-
der or guard rails, or if the radar sensor is
covered with dirt, refer to page61
>When you actuate the handbrake while driv-
ing
When the system is deactivated, you
must brake the vehicle yourself and/or
maneuver as necessary, otherwise there is a
risk of accident.<
Warning lamp
The warning lamp comes on when
active cruise control has been auto-
matically deactivated due to one of
the following factors: you are driving under a
speed of 20 mph or 30 km/h, the handbrake is
applied, or DSC is intervening. A message
appears on the Control Display.
Resuming stored desired speed and
distance
Press button 4.
The stored speed and distance are regained
and maintained.
In the following instances, the stored speed is
deleted and can no longer be resumed:
>When driving control systems are interven-
ing
>In cars with manual transmission: when you
shift gears very slowly or engage neutral
gear
>In cars with automatic transmission: when
you engage selector lever position N
>When the ignition is switched off
Displays in the instrument cluster
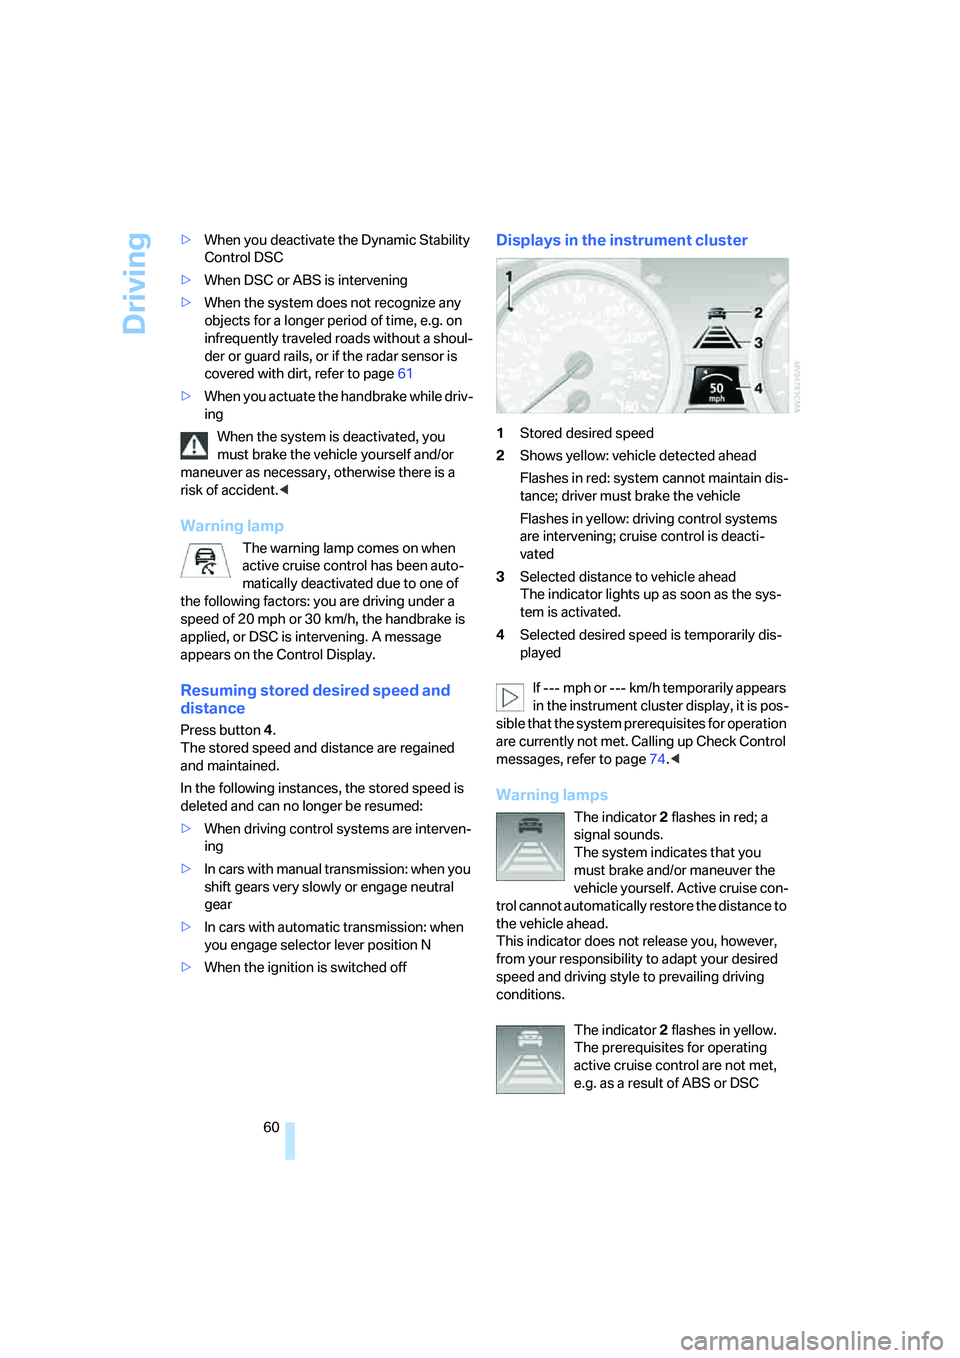
1Stored desired speed
2Shows yellow: vehicle detected ahead
Flashes in red: system cannot maintain dis-
tance; driver must brake the vehicle
Flashes in yellow: driving control systems
are intervening; cruise control is deacti-
vated
3Selected distance to vehicle ahead
The indicator lights up as soon as the sys-
tem is activated.
4Selected desired speed is temporarily dis-
played
If --- mph or --- km/h temporarily appears
in the instrument cluster display, it is pos-
sible that the system prerequisites for operation
are currently not met. Calling up Check Control
messages, refer to page74.<
Warning lamps
The indicator2 flashes in red; a
signal sounds.
The system indicates that you
must brake and/or maneuver the
vehicle yourself. Active cruise con-
trol cannot automatically restore the distance to
the vehicle ahead.
This indicator does not release you, however,
from your responsibility to adapt your desired
speed and driving style to prevailing driving
conditions.
The indicator 2 flashes in yellow.
The prerequisites for operating
active cruise control are not met,
e.g. as a result of ABS or DSC
Page 69 of 223
Everything under control
68
Settings and information
Operating principle
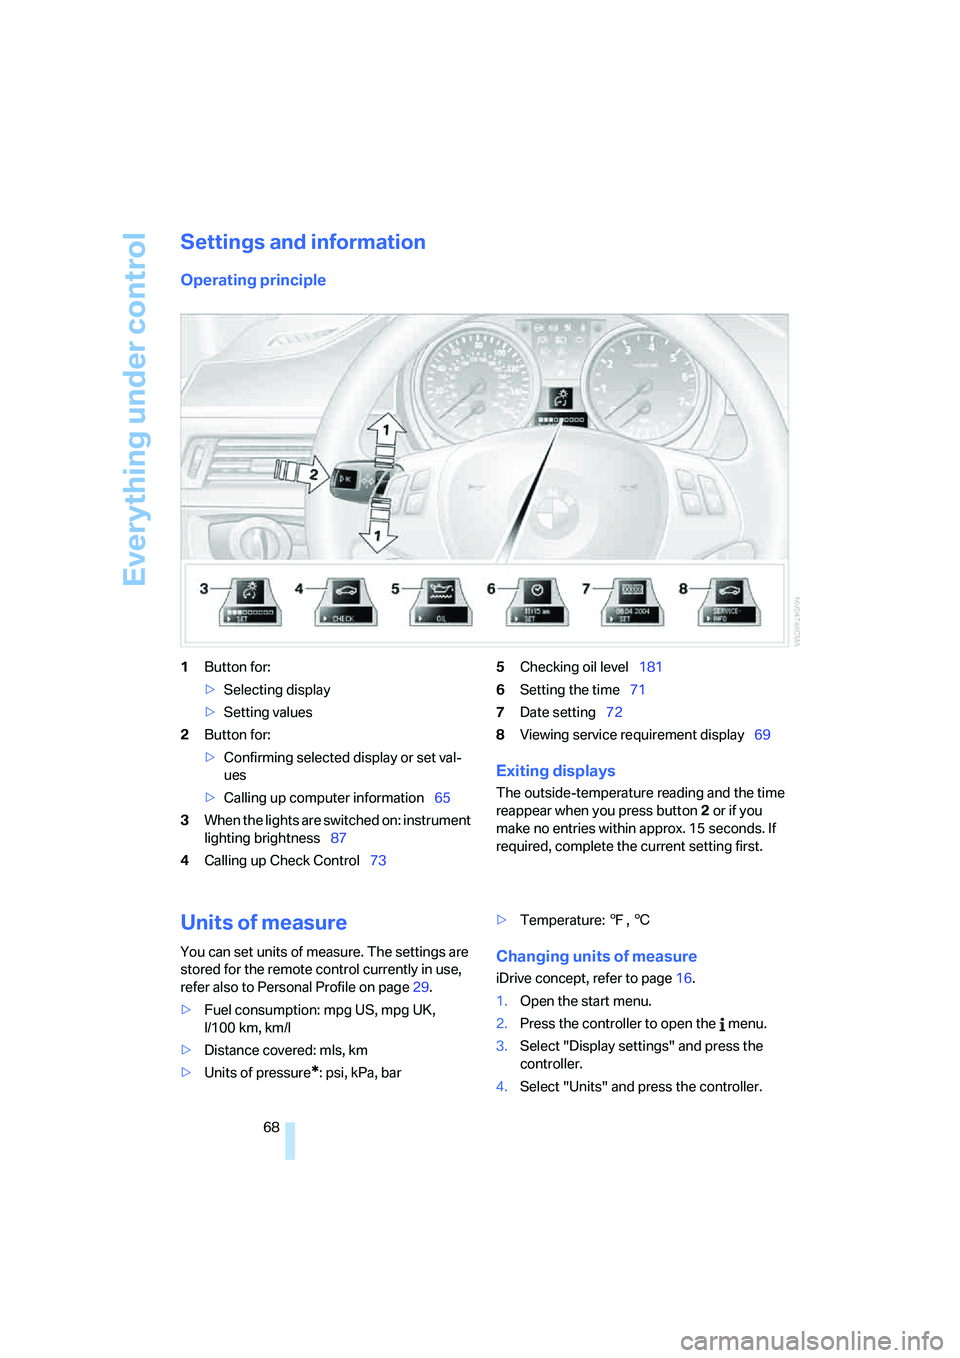
1Button for:
>Selecting display
>Setting values
2Button for:
>Confirming selected display or set val-
ues
>Calling up computer information65
3When the lights are switched on: instrument
lighting brightness87
4Calling up Check Control735Checking oil level181
6Setting the time71
7Date setting72
8Viewing service requirement display69
Exiting displays
The outside-temperature reading and the time
reappear when you press button2 or if you
make no entries within approx. 15 seconds. If
required, complete the current setting first.
Units of measure
You can set units of measure. The settings are
stored for the remote control currently in use,
refer also to Personal Profile on page29.
>Fuel consumption: mpg US, mpg UK,
l/100 km, km/l
>Distance covered: mls, km
>Units of pressure
*: psi, kPa, bar>Temperature: 7, 6
Changing units of measure
iDrive concept, refer to page16.
1.Open the start menu.
2.Press the controller to open the menu.
3.Select "Display settings" and press the
controller.
4.Select "Units" and press the controller.
Page 78 of 223
Controls
77Reference
At a glance
Driving tips
Communications
Navigation
Entertainment
Mobility
Technology for driving comfort and safety
PDC Park Distance Control*
The concept
The PDC assists you with maneuvering in tight
parking spaces. Acoustic signals and a visual
indicator
warn you of the presence of an object
in front of
* or behind your car. To measure the
distance, there are four ultrasonic sensors in
each bumper. The sensors at the front
* and at
the two rear corners have a range of approx.
24 in/60 cm; the rear middle sensors have
approx. 5 ft/1.50 m.
PDC is a parking aid that can indicate
objects when they are approached
slowly, as is usually the case when parking.
Avoid approaching an object at high speed, as
otherwise physical circumstances may lead to
the system warning being issued too late.<
Automatic mode
With the engine running or the ignition switched
on, the system is activated automatically after
approx. 1 second when you engage reverse
gear or move the automatic transmission selec-
tor lever to position R. Wait this short period
before driving.
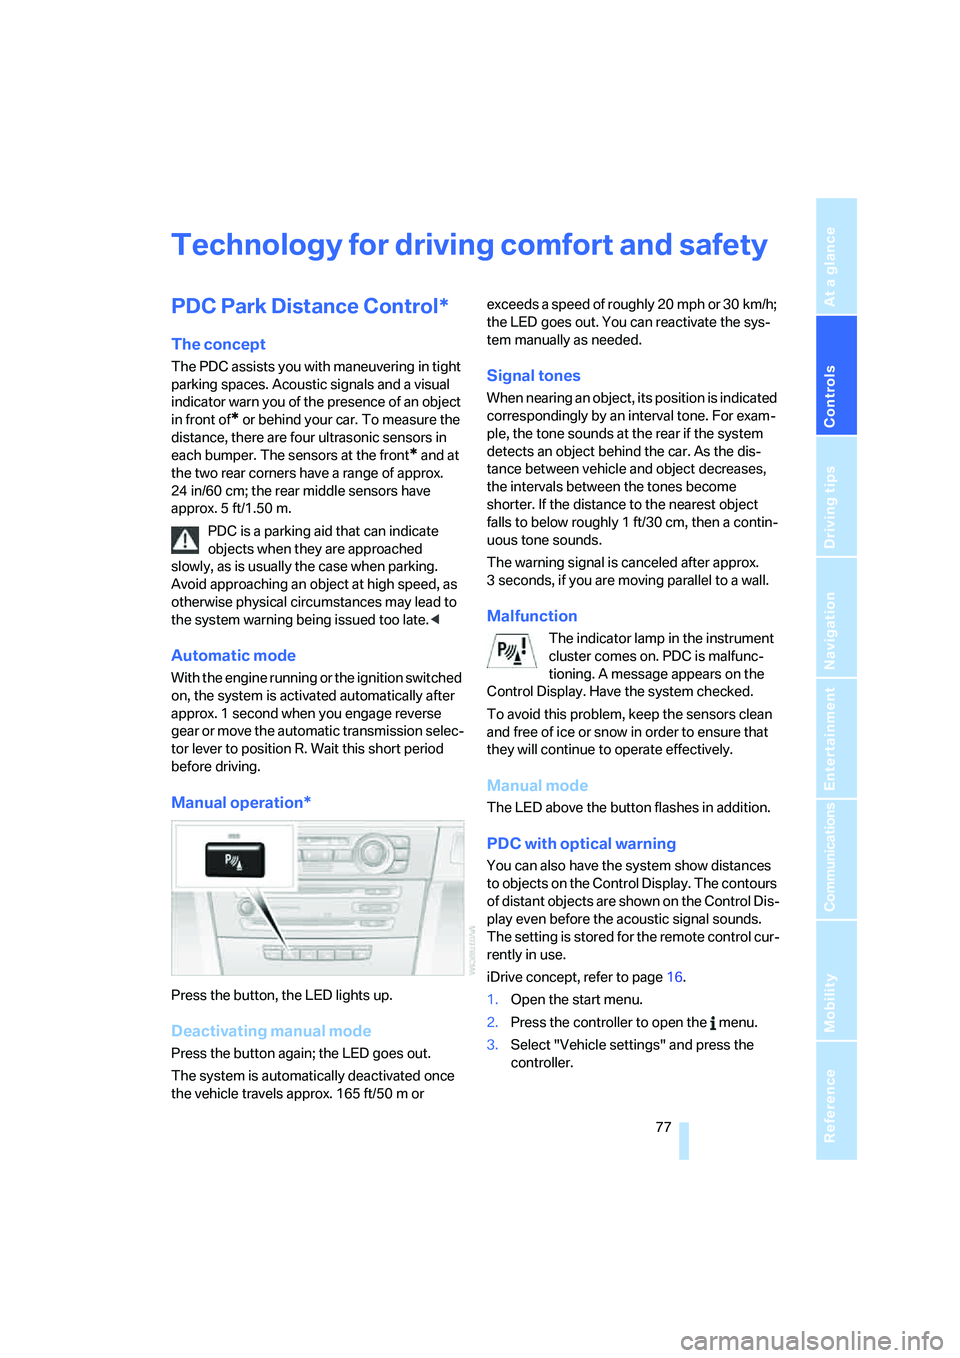
Manual operation*
Press the button, the LED lights up.
Deactivating manual mode
Press the button again; the LED goes out.
The system is automatically deactivated once
the vehicle travels approx. 165 ft/50 m or exceeds a speed of roughly 20 mph or 30 km/h;
the LED goes out. You can reactivate the sys-
tem manually as needed.
Signal tones
When nearing an object, its position is indicated
correspondingly by an interval tone. For exam-
ple, the tone sounds at the rear if the system
detects an object behind the car. As the dis-
tance between vehicle and object decreases,
the intervals between the tones become
shorter. If the distance to the nearest object
falls to below roughly 1 ft/30 cm, then a contin-
uous tone sounds.
The warning signal is canceled after approx.
3 seconds, if you are moving parallel to a wall.
Malfunction
The indicator lamp in the instrument
cluster comes on. PDC is malfunc-
tioning. A message appears on the
Control Display. Have the system checked.
To avoid this problem, keep the sensors clean
and free of ice or snow in order to ensure that
they will continue to operate effectively.
Manual mode
The LED above the button flashes in addition.
PDC with optical warning
You can also have the system show distances
to objects on the Control Display. The contours
of distant objects are shown on the Control Dis-
play even before the acoustic signal sounds.
The setting is stored for the remote control cur-
rently in use.
iDrive concept, refer to page16.
1.Open the start menu.
2.Press the controller to open the menu.
3.Select "Vehicle settings" and press the
controller.
Page 83 of 223
Technology for driving comfort and safety
82 ments. It also varies the steering force required
to turn the wheels depending on the speed at
which you are driving.
When you are driving in the low road-speed
range, e.g. in a town or when parking, the steer-
ing angle increases, i.e. the steering becomes
very direct, and less effort is required to turn the
wheels. In the higher speed range, on the other
hand, the steering angle is reduced more and
more. This improves the handling capability of
your BMW over the entire speed range.
In critical situations, the system can make tar-
geted corrections to the steering angle pro-
vided by the driver and thus stabilize the vehicle
before the driver intervenes. This stabilizing
intervention is simultaneously deactivated
when DSC is switched off, refer to page79.
Malfunction
The warning lamps come on. Active
steering is no longer operational. At
low speeds, greater steering wheel
movements are required, whereas at
higher speeds the vehicle reacts more sensi-
tively to steering wheel movements. Drive cau-
tiously and think well ahead. Have the system
checked.
If the warning lamp lights up during the first
engine starting following a power supply inter-
ruption, the system must be activated by being
initialized.
Initializing the system
1.Start the engine.
2.With the vehicle stationary, turn the steer-
ing wheel from the straight-ahead position
to the left as far as it will go and then back to
the straight-ahead position.
3.Switch off the engine.
When you start the engine again, all the func-
tions of Active steering are available once again.
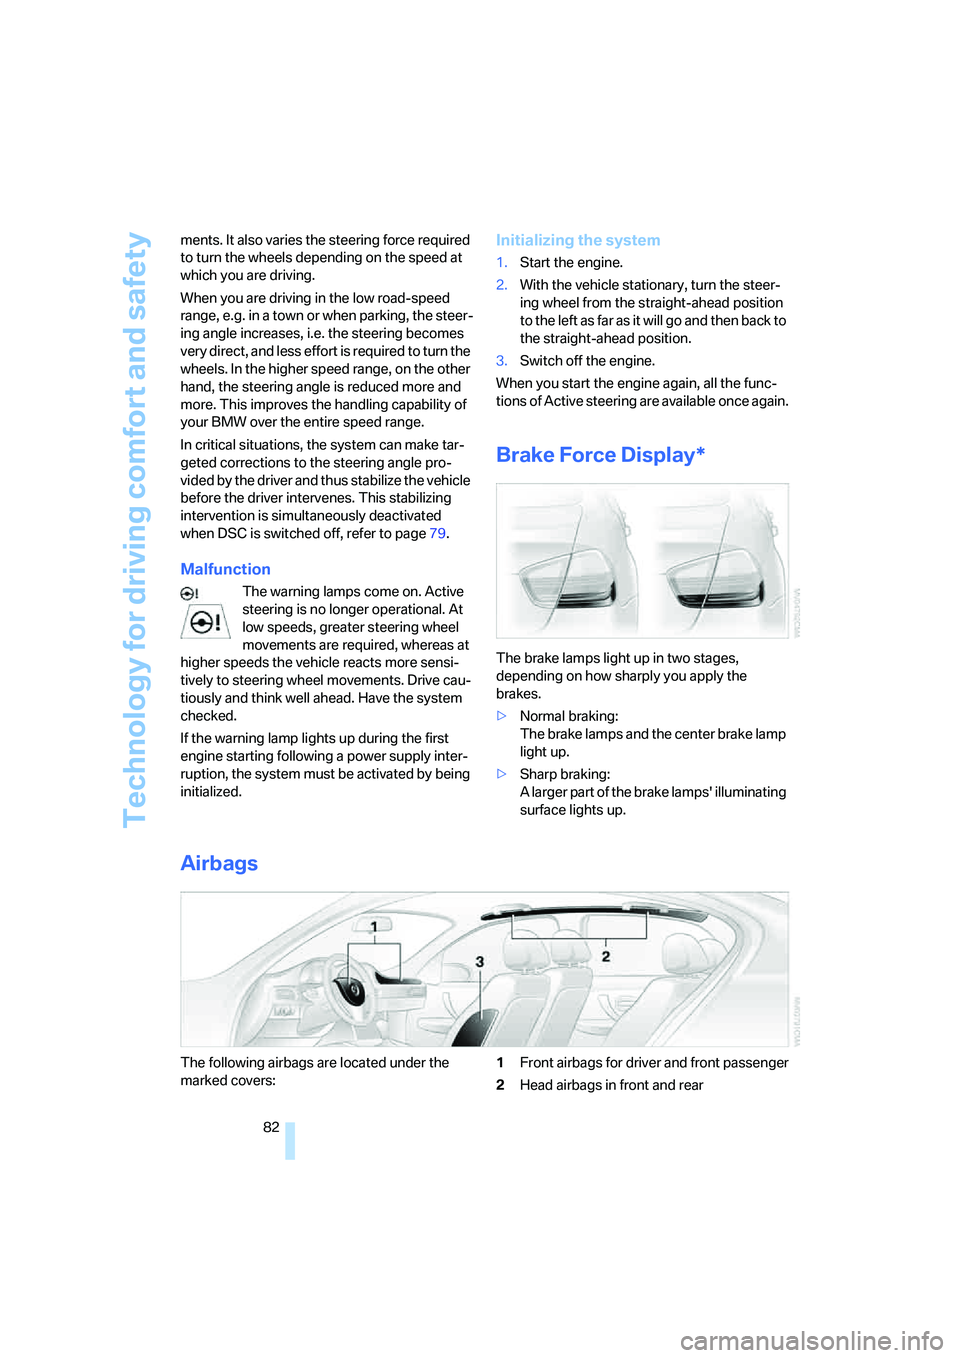
Brake Force Display*
The brake lamps light up in two stages,
depending on how sharply you apply the
brakes.
>Normal braking:
The brake lamps and the center brake lamp
light up.
>Sharp braking:
A larger part of the brake lamps' illuminating
surface lights up.
Airbags
The following airbags are located under the
marked covers:1Front airbags for driver and front passenger
2Head airbags in front and rear
Page 87 of 223
Lamps
86
Pathway lighting
If you activate the headlamp flasher after park-
ing the car, with the lights switched off, the low
beams come on and remain on for a certain
time. You can adjust the operating period or
deactivate the function using iDrive.
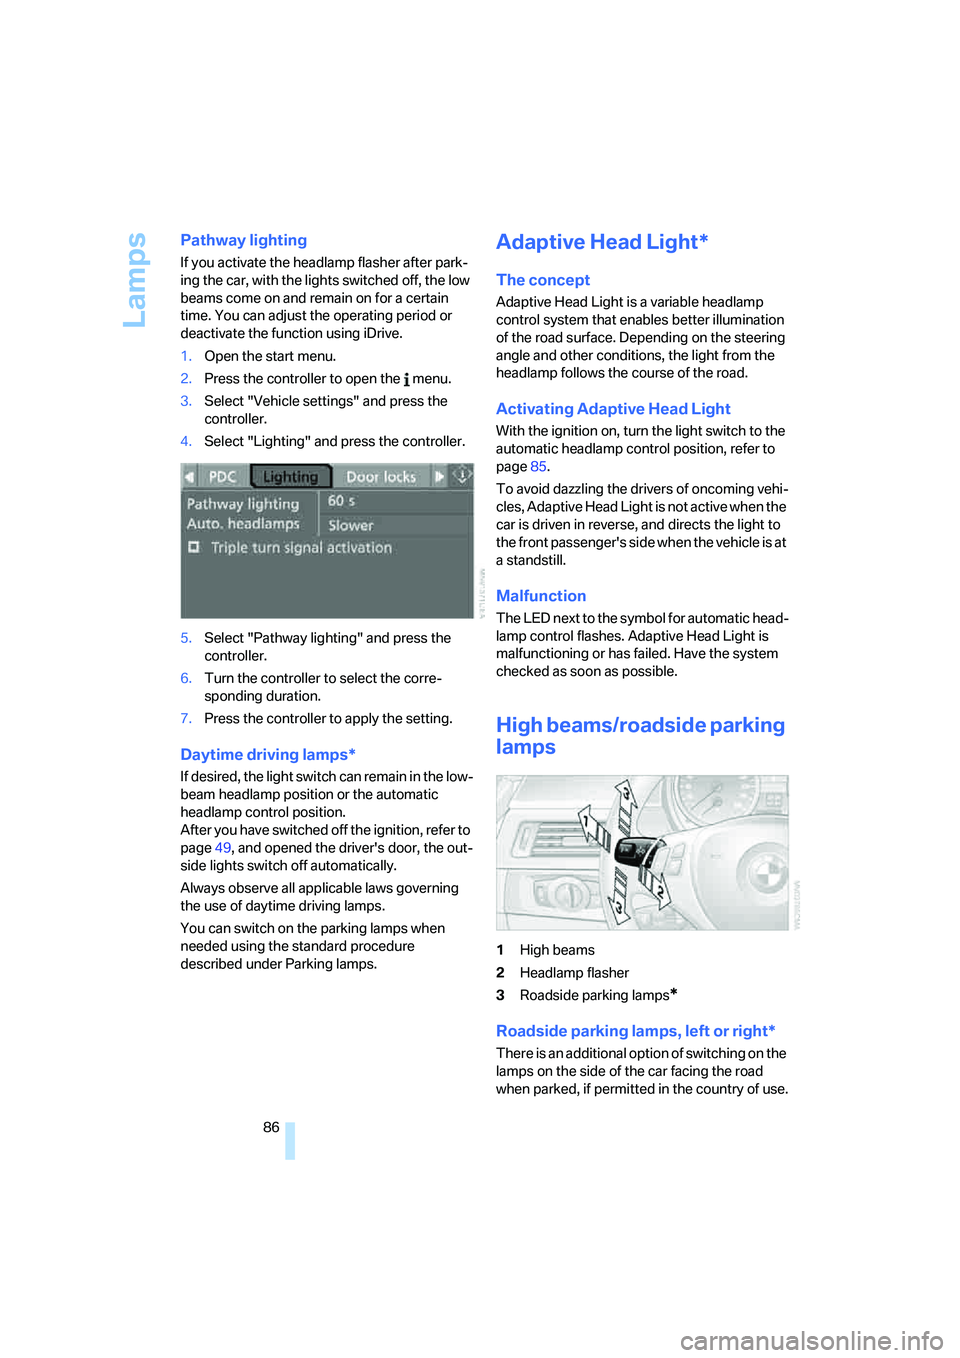
1.Open the start menu.
2.Press the controller to open the menu.
3.Select "Vehicle settings" and press the
controller.
4.Select "Lighting" and press the controller.
5.Select "Pathway lighting" and press the
controller.
6.Turn the controller to select the corre-
sponding duration.
7.Press the controller to apply the setting.
Daytime driving lamps*
If desired, the light switch can remain in the low-
beam headlamp position or the automatic
headlamp control position.
After you have switched off the ignition, refer to
page49, and opened the driver's door, the out-
side lights switch off automatically.
Always observe all applicable laws governing
the use of daytime driving lamps.
You can switch on the parking lamps when
needed using the standard procedure
described under Parking lamps.
Adaptive Head Light*
The concept
Adaptive Head Light is a variable headlamp
control system that enables better illumination
of the road surface. Depending on the steering
angle and other conditions, the light from the
headlamp follows the course of the road.
Activating Adaptive Head Light
With the ignition on, turn the light switch to the
automatic headlamp control position, refer to
page85.
To avoid dazzling the drivers of oncoming vehi-
cles, Adaptive Head Light is not active when the
car is driven in reverse, and directs the light to
the front passenger's side when the vehicle is at
a standstill.
Malfunction
The LED next to the symbol for automatic head-
lamp control flashes. Adaptive Head Light is
malfunctioning or has failed. Have the system
checked as soon as possible.
High beams/roadside parking
lamps
1High beams
2Headlamp flasher
3Roadside parking lamps
*
Roadside parking lamps, left or right*
There is an additional option of switching on the
lamps on the side of the car facing the road
when parked, if permitted in the country of use.
Page 88 of 223
Controls
87Reference
At a glance
Driving tips
Communications
Navigation
Entertainment
Mobility
With the remote control removed or with radio
readiness and ignition switched off, refer to
page49, press the stalk beyond its resistance
point in the appropriate direction 3. The flash-
ing turn signals must remain off.
The roadside parking lamps drain the bat-
tery. Do not use them for unduly long
periods of time, as otherwise the battery might
not have enough power to start the engine.<
Fog lamps*
The parking lamps or low beams must
be switched on for the fog lamps to
operate. The green indicator lamp in
the instrument cluster lights up whenever the
fog lamps are on.
The fog lamps are switched off whenever the
high beams are switched on.
If the automatic headlamp control is acti-
vated, the low beams will come on auto-
matically when you switch on the fog lamps.<
Instrument lighting
You can adjust the brightness of the instrument
lighting only when the parking lamps or the low
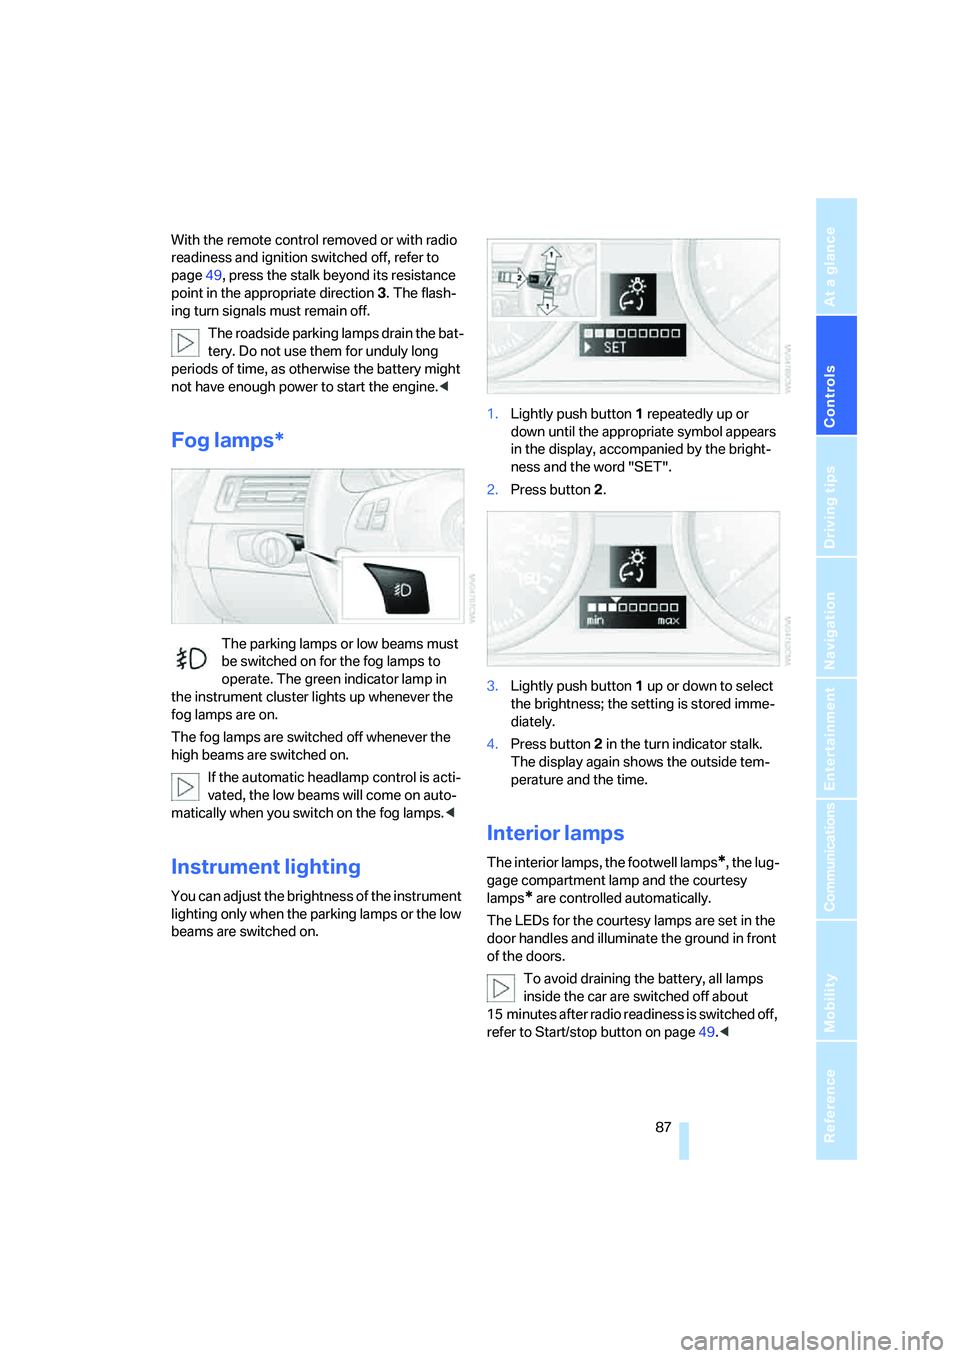
beams are switched on.1.Lightly push button 1 repeatedly up or
down until the appropriate symbol appears
in the display, accompanied by the bright-
ness and the word "SET".
2.Press button 2.
3.Lightly push button 1 up or down to select
the brightness; the setting is stored imme-
diately.
4.Press button 2 in the turn indicator stalk.
The display again shows the outside tem-
perature and the time.
Interior lamps
The interior lamps, the footwell lamps*, the lug-
gage compartment lamp and the courtesy
lamps
* are controlled automatically.
The LEDs for the courtesy lamps
are set in the
door handles and illuminate the ground in front
of the doors.
To avoid draining the battery, all lamps
inside the car are switched off about
15 minutes after radio readiness is switched off,
refer to Start/stop button on page49.<
Page 194 of 223
Mobility
193Reference
At a glance
Controls
Driving tips
Communications
Navigation
Entertainment
Giving and receiving assistance
Emergency calling*
Conditions for an emergency call:
>Radio readiness is switched on.
>The car phone is logged on to a portable
telephone network.
>The emergency call system is operable.
Initiating an emergency call
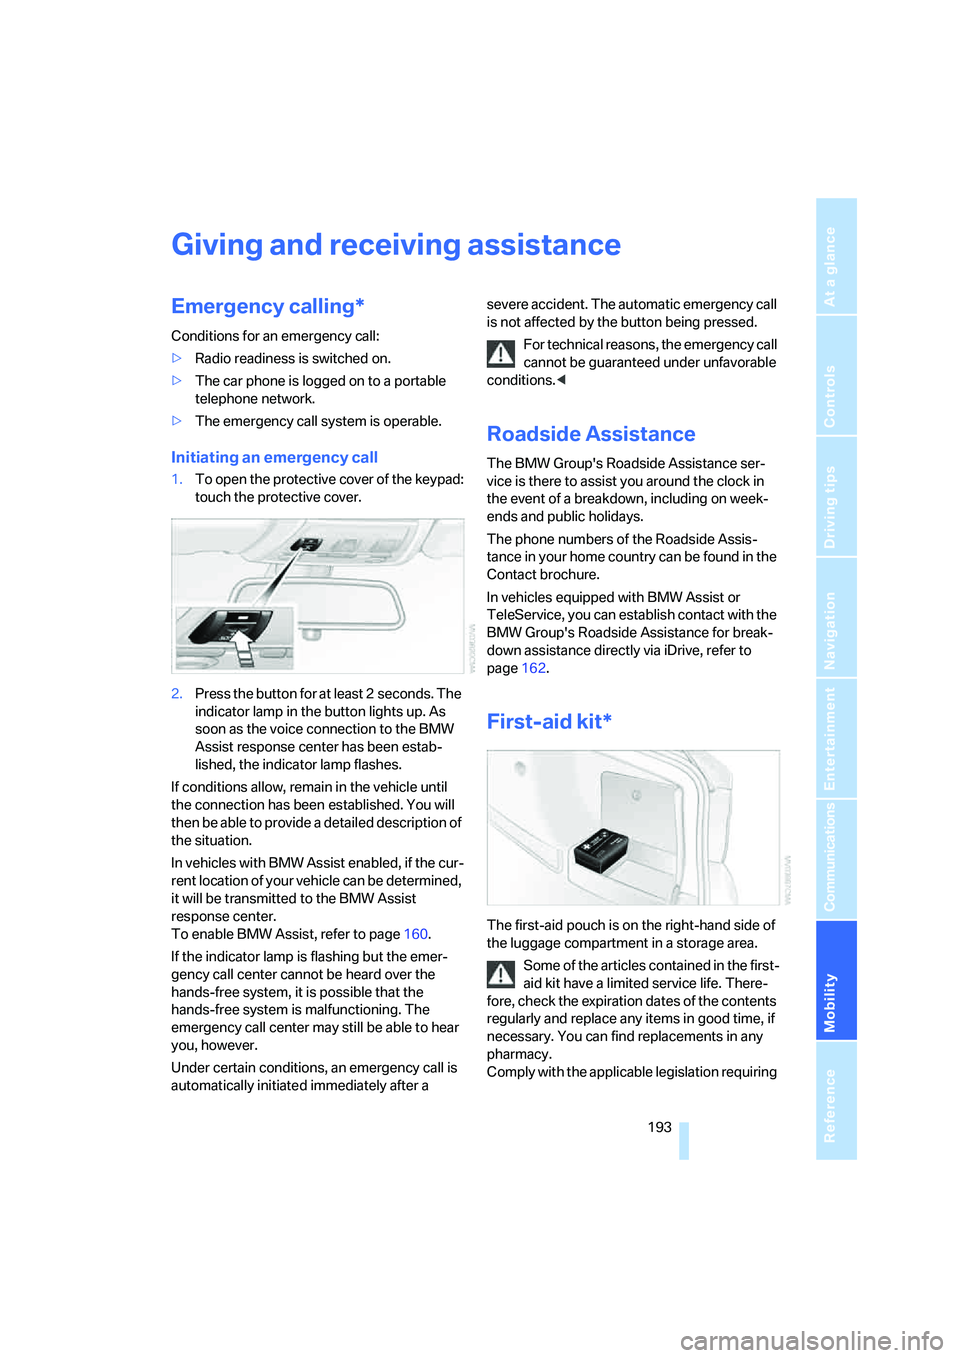
1.To open the protective cover of the keypad:
touch the protective cover.
2.Press the button for at least 2 seconds. The
indicator lamp in the button lights up. As
soon as the voice connection to the BMW
Assist response center has been estab-
lished, the indicator lamp flashes.
If conditions allow, remain in the vehicle until
the connection has been established. You will
then be able to provide a detailed description of
the situation.
In vehicles with BMW Assist enabled, if the cur-
rent location of your vehicle can be determined,
it will be transmitted to the BMW Assist
response center.
To enable BMW Assist, refer to page160.
If the indicator lamp is flashing but the emer-
gency call center cannot be heard over the
hands-free system, it is possible that the
hands-free system is malfunctioning. The
emergency call center may still be able to hear
you, however.
Under certain conditions, an emergency call is
automatically initiated immediately after a severe accident. The automatic emergency call
is not affected by the button being pressed.
For technical reasons, the emergency call
cannot be guaranteed under unfavorable
conditions.<
Roadside Assistance
The BMW Group's Roadside Assistance ser-
vice is there to assist you around the clock in
the event of a breakdown, including on week-
ends and public holidays.
The phone numbers of the Roadside Assis-
tance in your home country can be found in the
Contact brochure.
In vehicles equipped with BMW Assist or
TeleService, you can establish contact with the
BMW Group's Roadside Assistance for break-
down assistance directly via iDrive, refer to
page162.
First-aid kit*
The first-aid pouch is on the right-hand side of
the luggage compartment in a storage area.
Some of the articles contained in the first-
aid kit have a limited service life. There-
fore, check the expiration dates of the contents
regularly and replace any items in good time, if
necessary. You can find replacements in any
pharmacy.
Comply with the applicable legislation requiring
Page 219 of 223
Everything from A - Z
218 Temperature display
– ice warning64
– outside temperature64
– setting the units68
"Terminate services"163
"Text language"76
"Theater" tone settings136
Thigh support40
Third brake lamp, refer to
Center brake lamp190
Tilt alarm sensor35
Tilt function, passenger-side
mirror44
"Time"72
"Time format"72
Tire inflation pressures170
Tire pressure
– loss81
Tire pressure monitoring,
refer to Flat Tire Monitor80
Tire puncture, refer to Flat Tire
Monitor81
Tire Quality Grading176
Tires
– age176,178
– breaking in106
– changing, refer to Changing
wheels191
– condition177
– damage177
– inflation pressure170
– minimum tread depth177
– new tires178
– pressure monitoring, refer to
Flat Tire Monitor80
– puncture81
– Run-Flat Tires178
– size176
– wear indicators, refer to
Minimum tread depth177
– winter tires179
"Tone"135
Tone in audio mode
– adjusting135
– middle setting137
Tools, refer to Onboard tool
kit187
"Top 8" for portable
phone155Torque200
Touch tone dialing156
Tow bar196
Tow fittings195
Tow fittings for tow-starting
and towing away195
Towing195
– methods
196
Towing away
– car with automatic
transmission195
"Town / City" in destination
entry116
Tow rope196
Tow-starting195
Tracks
– random play sequence147
Track width, refer to
Dimensions200
Traction-assist feature, refer
to DSC78
Traction control, refer to DSC
Dynamic Stability
Control78
Trailer towing
– towing loads and gross
weight201
Transmission
– automatic transmission with
Steptronic51
– manual transmission51
Transporting children
safely46
Transport securing device,
refer to Securing cargo109
Tread depth, refer to Minimum
tire tread177
Treble, tone control135
"Trip computer"66
Trip computer66
Trip-distance counter, refer to
Trip odometer64
"Triple turn signal
activation"53,85
Trip odometer64
Trunk lid, refer to Luggage
compartment lid32
Trunk lights, refer to Luggage
compartment lamp87Turning circle, refer to
Dimensions200
Turn signals53
– indicator lamp12
– replacing bulbs189
Tying down loads, refer to
Cargo loading109
U
Underbody protection, refer to
Caring for your vehicle
brochure
Uniform Tire Quality Grading/
UTQR176
"Units"68
Units
– average consumption68
– temperature68
Universal garage door opener,
refer to Integrated universal
remote control93
Universal remote control93
"Unlock button"30
Unlocking
– from inside32
– from outside30
"Update services"163
V
Vehicle
– battery191
– breaking in106
– care, refer to Caring for your
vehicle brochure
– cargo loading108
– dimensions200
– Identification Number, refer
to Engine compartment181
– parking50
– washing, refer to Caring for
your vehicle brochure
– weight201
Vehicle jack191
Vehicle position, refer to
Displaying current
position129
"Vehicle settings"80