seat adjustment BMW 330XI SEDAN 2005 Owners Manual
[x] Cancel search | Manufacturer: BMW, Model Year: 2005, Model line: 330XI SEDAN, Model: BMW 330XI SEDAN 2005Pages: 223, PDF Size: 7.49 MB
Page 30 of 223
Controls
29Reference
At a glance
Driving tips
Communications
Navigation
Entertainment
Mobility
Personal Profile
You can set many of your BMW's functions to
suit your personal needs and preferences.
Without any action on your part, Personal Pro-
file ensures that most of these settings are
stored for the remote control currently in use.
When you unlock the car, the remote control
used for the purpose is recognized and the set-
tings stored for it are called up and imple-
mented.
This means that your personal settings are
active when you return to your BMW, even if the
car was used in the meantime by someone else
with a remote control of their own and the set-
tings were changed accordingly.
You can configure a maximum of three remote
controls for three different people. The prereq-
uisite for this is that each person has his or her
own remote control.
Personal Profile settings
For more information on specific settings, refer
to the specified pages.
>Response of the central locking system
when the car is unlocked, refer to page30
>Automatic locking of the vehicle, refer to
page32
>Automatic adjustment of the driver's seat
and the exterior mirrors after unlocking
*,
refer to page43
>Functions assigned to the programmable
buttons
* on the steering wheel, refer to
page45
>12h/24h mode of the clock, refer to page72
>Date format, refer to page73
>Brightness of the Control Display, refer to
page76
>Language on the Control Display, refer to
page76
>Units of measure for fuel consumption, dis-
tance covered/remaining distances, and
temperature, refer to page68
>Show visual warning for Park Distance Con-
trol PDC
*, refer to page77>Automatic climate control: AUTO program,
activating/deactivating cooling function and
automatic recirculated-air control, setting
temperature, air flow rate and distribution,
refer to page90 ff
>Audio volume, refer to page135
>Tone control, refer to page135
>Speed-dependent volume control, refer to
page135
Central locking system
The concept
The central locking system is ready for opera-
tion whenever the driver's door is closed.
The system simultaneously engages and
releases the locks on the following:
>Doors
>Luggage compartment lid
>Fuel filler door
Operation of the central locking system
from outside
>Via the remote control
>Via the door lock
The anti-theft system is automatically activated
whenever you operate the central locking sys-
tem from outside the vehicle. It prevents the
doors from being unlocked using the lock but-
tons or door handles. The interior lamp and the
courtesy lamps
* are also switched on or off
with the remote control. The alarm system
* is
also armed or disarmed.
For further details of the alarm system,
refer to
page34.
Operation of the central locking system
from inside
By means of the button for central locking, refer
to page32.
In the event of a sufficiently severe accident, the
central locking system unlocks automatically. In
addition, the hazard warning flashers and inte-
rior lamps come on.
Page 39 of 223
Adjustments
38
Adjustments
Sitting safely
The ideal sitting position can make a vital con-
tribution to relaxed, fatigue-free driving. In con-
junction with the safety belts, the head
restraints and the airbags, the seated position
has a major influence on your safety in the event
of an accident. To ensure that the safety sys-
tems operate with optimal efficiency, we
strongly urge you to observe the instructions
contained in the following section.
For additional information on transporting chil-
dren safely, refer to page46.
Airbags
Always maintain an adequate distance
between yourself and the airbags. Always
grip the steering wheel on the rim, with your
hands in the 3 o'clock and 9 o'clock positions,
to minimize the risk of injury to the hands or
arms in the event of the airbag being triggered
off.
No one and nothing is to come between the air-
bags and the seat occupant.
Do not use the cover of the front airbag on the
front passenger side as a storage area. Make
sure that the front passenger is sitting correctly
and does not rest feet or legs on the instrument
panel, otherwise leg injuries can occur if the
front airbag is triggered. Never let an occu-
pant's head rest near or on a side airbag
because the inflating airbag could cause a seri-
ous or fatal injury.<
Even if you adhere to all the instructions, inju-
ries resulting from contact with airbags cannot
be fully excluded, depending on the circum-
stances. The ignition and inflation noise may
provoke a mild hearing loss in extremely sensi-
tive individuals. This effect is usually only tem-
porary.
For airbag locations and additional information
on airbags, refer to page82.
Head restraint
A correctly adjusted head restraint reduces the
risk of neck injury in the event of an accident.
Adjust the head restraint in such a way
that its center is at approx. ear level. Oth-
erwise, there is a risk of injury should an acci-
dent occur.<
Safety belt
Before every drive, make sure that all occupants
wear their safety belts. Airbags complement the
safety belt as an additional safety device, but
they do not represent a substitute.
At all times, occupants should sit upright
and be properly restrained: infants and
small children in appropriate child-restraint sys-
tems; larger children and adults using the safety
belts. Never allow more than one person to
wear a single safety belt. Never allow infants or
small children to ride in a passenger's lap.
Expectant mothers should also wear the safety
belt, making sure that the strap in the pelvic
a r e a i s w e l l d o w n o n t h e h i p s a n d d o e s n o t p r e s s
against the abdominal region of the body.
Do not route the belt across your neck, or run it
across sharp edges. Be sure that the belt does
not become caught or jammed. The safety belt
should not be twisted and must be positioned
firmly over the pelvis and shoulder, as close to
the body as possible. It should not pass over
hard or fragile objects, otherwise the belt in the
pelvic area could slide over the hips in the event
of a head-on collision and injure the lower abdo-
men. Avoid wearing bulky clothing and regularly
pull the belt in the upper-body area taut, other-
wise its restraining effect could be impaired.<
Safety belts, refer to page43.
Page 40 of 223
Controls
39Reference
At a glance
Driving tips
Communications
Navigation
Entertainment
Mobility
Seats
Note before adjusting
Never attempt to adjust your seat while
the vehicle is moving. The seat could
respond with unexpected movement, and the
ensuing loss of vehicle control could lead to an
accident.
On the front passenger seat as well, do not
incline the backrest too far to the rear while the
vehicle is being driven, as otherwise there is a
danger in the event of an accident of sliding
under the safety belt, eliminating the protection
normally provided by the belt.<
Comply with the instructions on head restraint
height on page40, and on damaged safety
belts on page43.
Seat adjustment
Observe the adjustment instructions on
page39 to ensure the best possible per-
sonal protection.<
Longitudinal direction
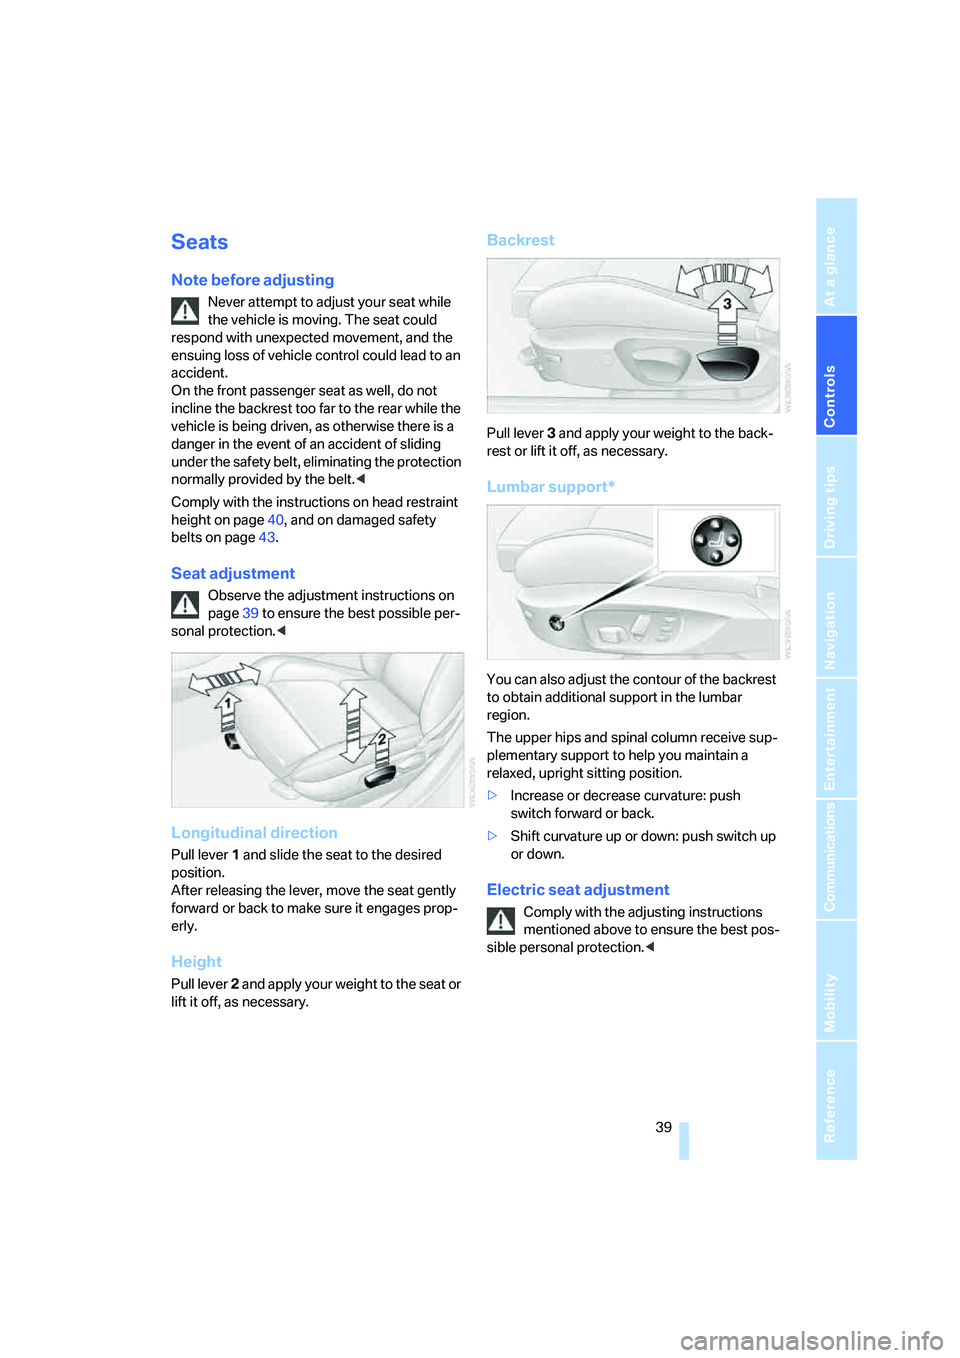
Pull lever 1 and slide the seat to the desired
position.
After releasing the lever, move the seat gently
forward or back to make sure it engages prop-
erly.
Height
Pull lever 2 and apply your weight to the seat or
lift it off, as necessary.
Backrest
Pull lever 3 and apply your weight to the back-
rest or lift it off, as necessary.
Lumbar support*
You can also adjust the contour of the backrest
to obtain additional support in the lumbar
region.
The upper hips and spinal column receive sup-
plementary support to help you maintain a
relaxed, upright sitting position.
>Increase or decrease curvature: push
switch forward or back.
>Shift curvature up or down: push switch up
or down.
Electric seat adjustment
Comply with the adjusting instructions
mentioned above to ensure the best pos-
sible personal protection.<
Page 41 of 223
Adjustments
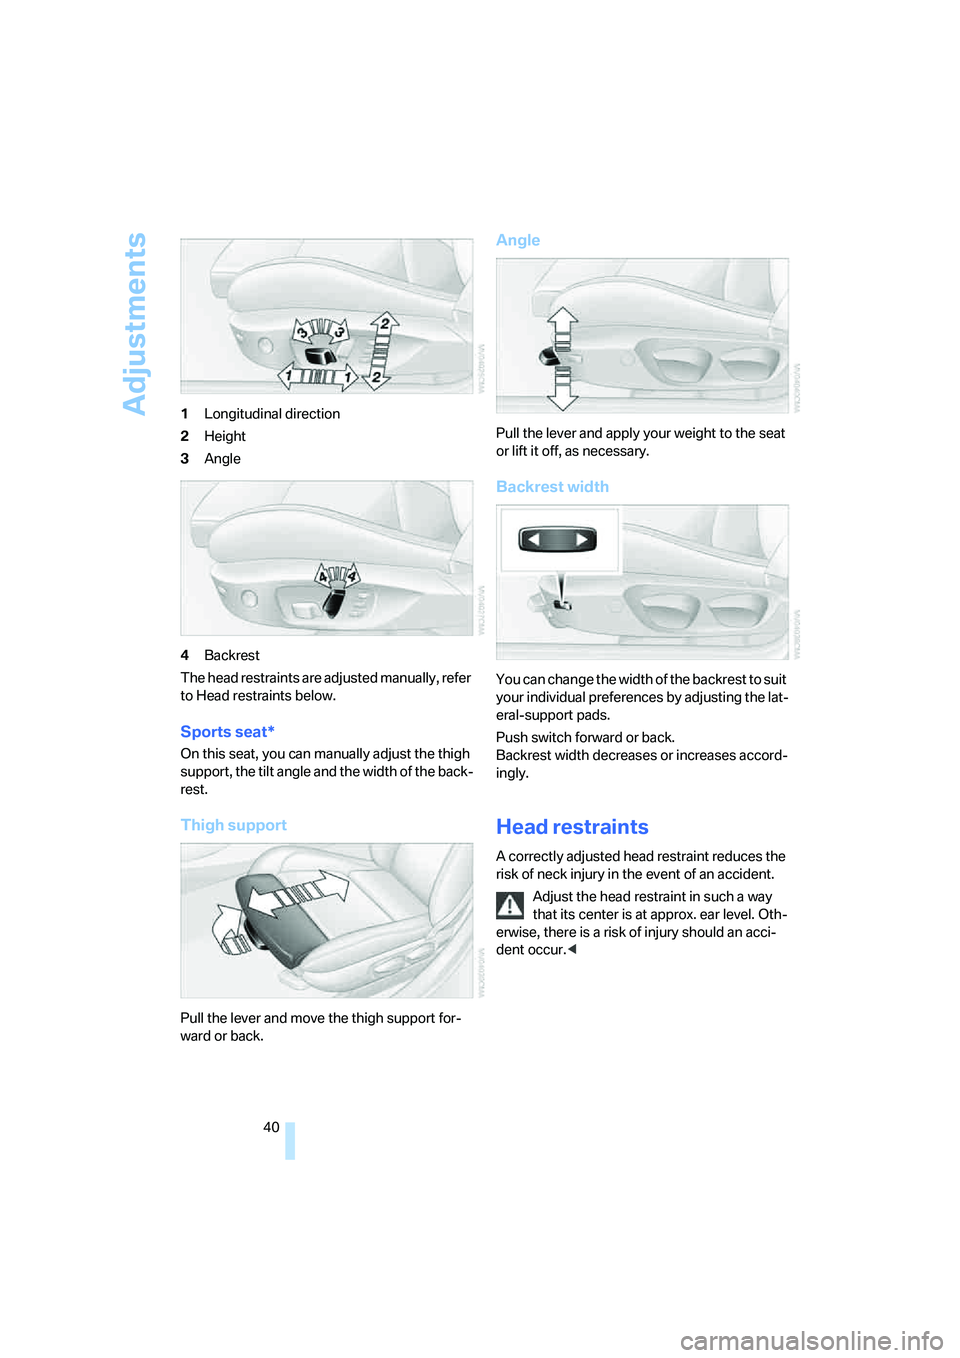
40 1Longitudinal direction
2Height
3Angle
4Backrest
The head restraints are adjusted manually, refer
to Head restraints below.
Sports seat*
On this seat, you can manually adjust the thigh
support, the tilt angle and the width of the back-
rest.
Thigh support
Pull the lever and move the thigh support for-
ward or back.
Angle
Pull the lever and apply your weight to the seat
or lift it off, as necessary.
Backrest width
You can change the width of the backrest to suit
your individual preferences by adjusting the lat-
eral-support pads.
Push switch forward or back.
Backrest width decreases or increases accord-
ingly.
Head restraints
A correctly adjusted head restraint reduces the
risk of neck injury in the event of an accident.
Adjust the head restraint in such a way
that its center is at approx. ear level. Oth-
erwise, there is a risk of injury should an acci-
dent occur.<
Page 42 of 223
Controls
41Reference
At a glance
Driving tips
Communications
Navigation
Entertainment
Mobility
Front seats
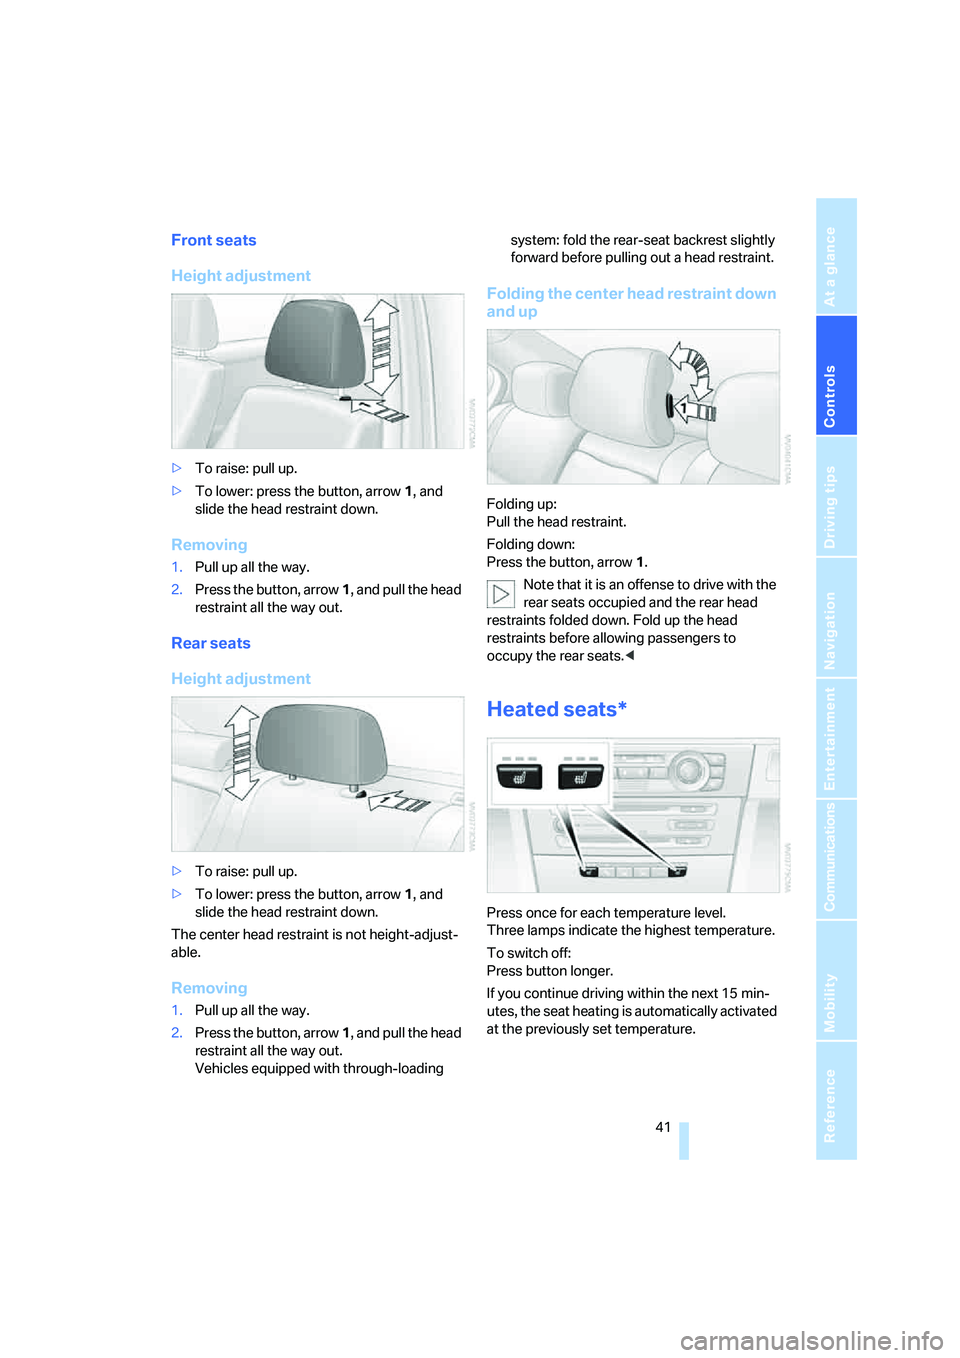
Height adjustment
>To raise: pull up.
>To lower: press the button, arrow1, and
slide the head restraint down.
Removing
1.Pull up all the way.
2.Press the button, arrow1, and pull the head
restraint all the way out.
Rear seats
Height adjustment
>To raise: pull up.
>To lower: press the button, arrow1, and
slide the head restraint down.
The center head restraint is not height-adjust-
able.
Removing
1.Pull up all the way.
2.Press the button, arrow1, and pull the head
restraint all the way out.
Vehicles equipped with through-loading system: fold the rear-seat backrest slightly
forward before pulling out a head restraint.
Folding the center head restraint down
and up
Folding up:
Pull the head restraint.
Folding down:
Press the button, arrow1.
Note that it is an offense to drive with the
rear seats occupied and the rear head
restraints folded down. Fold up the head
restraints before allowing passengers to
occupy the rear seats.<
Heated seats*
Press once for each temperature level.
Three lamps indicate the highest temperature.
To switch off:
Press button longer.
If you continue driving within the next 15 min-
utes, the seat heating is automatically activated
at the previously set temperature.
Page 43 of 223
Adjustments
42
Seat and mirror memory*
You can store and call up two different combi-
nations of driver's-seat and exterior-mirror
positions.
Settings for the seat back width and lumbar
support are not stored in memory.
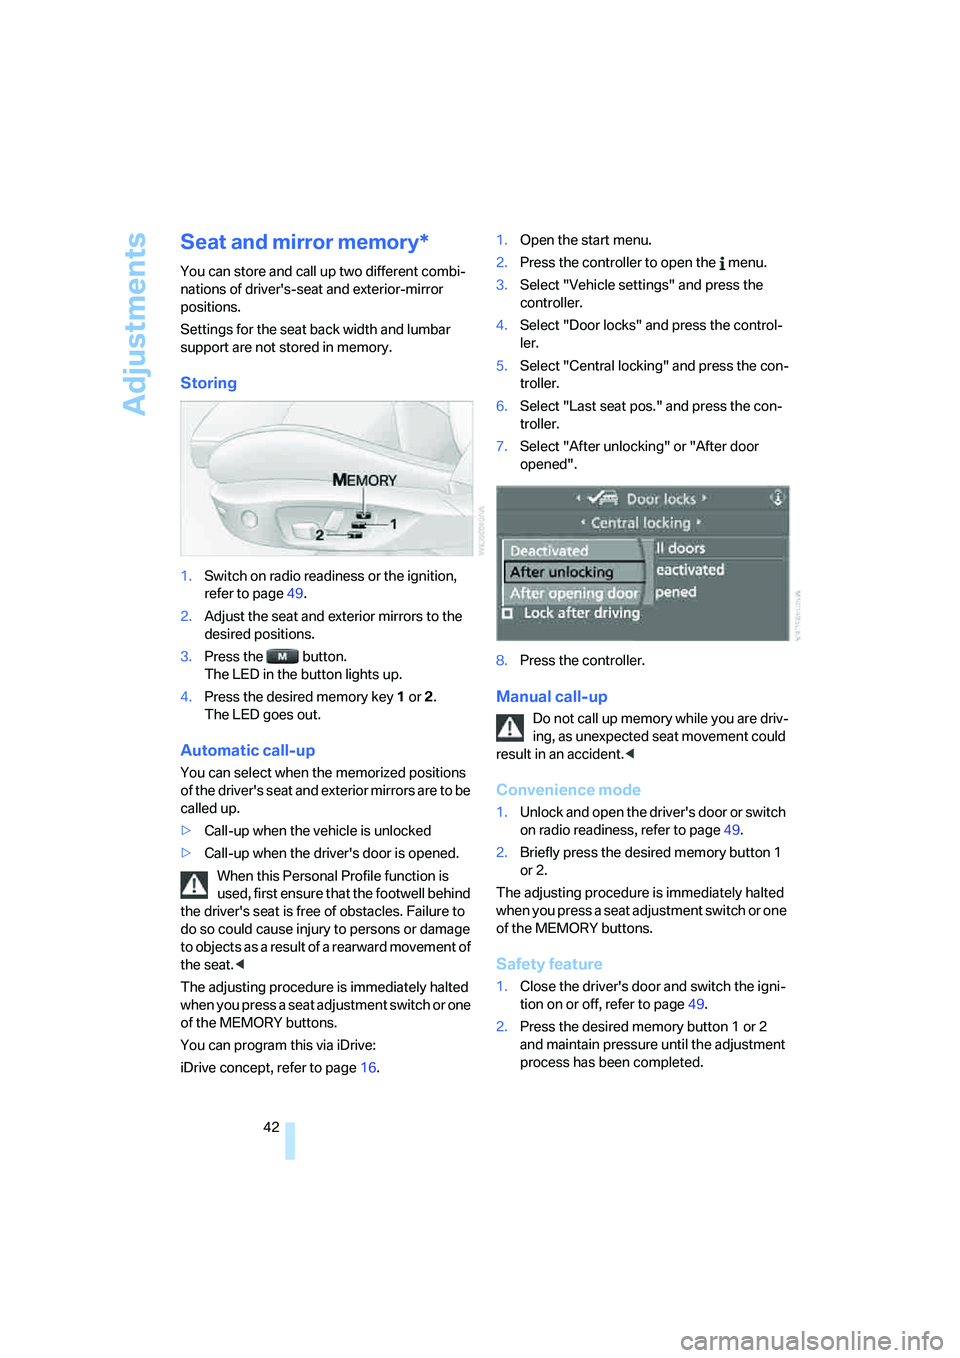
Storing
1.Switch on radio readiness or the ignition,
refer to page49.
2.Adjust the seat and exterior mirrors to the
desired positions.
3.Press the button.
The LED in the button lights up.
4.Press the desired memory key 1 or 2.
The LED goes out.
Automatic call-up
You can select when the memorized positions
of the driver's seat and exterior mirrors are to be
called up.
>Call-up when the vehicle is unlocked
>Call-up when the driver's door is opened.
When this Personal Profile function is
used, first ensure that the footwell behind
the driver's seat is free of obstacles. Failure to
do so could cause injury to persons or damage
to objects as a result of a rearward movement of
the seat.<
The adjusting procedure is immediately halted
when you press a seat adjustment switch or one
of the MEMORY buttons.
You can program this via iDrive:
iDrive concept, refer to page16.1.Open the start menu.
2.Press the controller to open the menu.
3.Select "Vehicle settings" and press the
controller.
4.Select "Door locks" and press the control-
ler.
5.Select "Central locking" and press the con-
troller.
6.Select "Last seat pos." and press the con-
troller.
7.Select "After unlocking" or "After door
opened".
8.Press the controller.
Manual call-up
Do not call up memory while you are driv-
ing, as unexpected seat movement could
result in an accident.<
Convenience mode
1.Unlock and open the driver's door or switch
on radio readiness, refer to page49.
2.Briefly press the desired memory button 1
or 2.
The adjusting procedure is immediately halted
when you press a seat adjustment switch or one
of the MEMORY buttons.
Safety feature
1.Close the driver's door and switch the igni-
tion on or off, refer to page49.
2.Press the desired memory button 1 or 2
and maintain pressure until the adjustment
process has been completed.
Page 44 of 223
Controls
43Reference
At a glance
Driving tips
Communications
Navigation
Entertainment
Mobility
If the button was pressed accidentally:
press the button again; the LED goes out.
Safety belts
Observe the adjustment instructions on
page39 to ensure the best possible per-
sonal protection.<
Before every drive, make sure that all occupants
wear their safety belts. Airbags complement the
safety belt as an additional safety device, but
they do not represent a substitute.
On the rear seats, the center belt lock marked
with the letters CENTER is solely intended for
the center passenger.
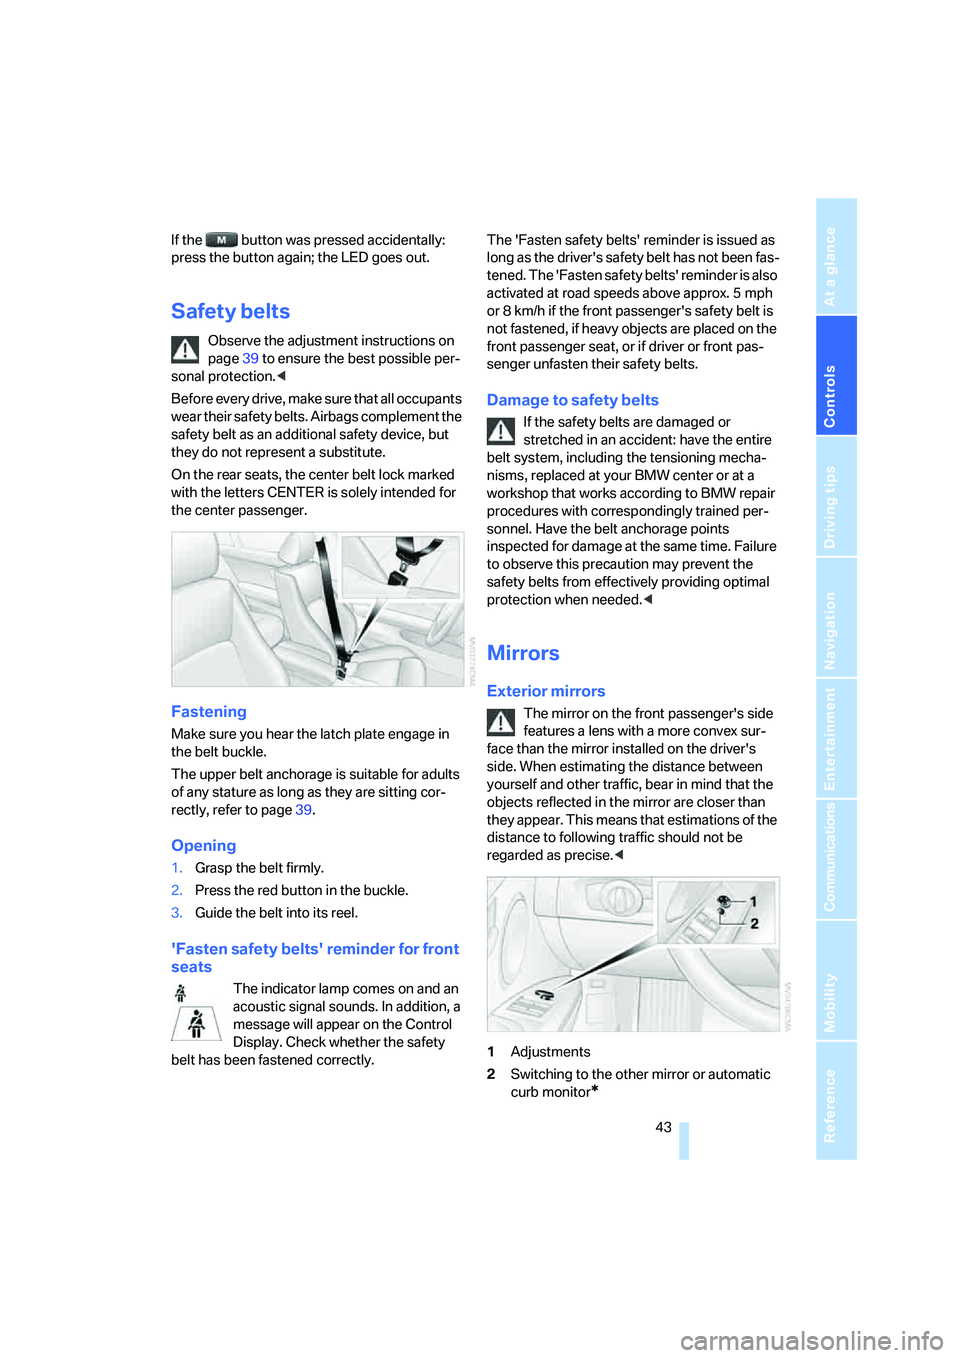
Fastening
Make sure you hear the latch plate engage in
the belt buckle.
The upper belt anchorage is suitable for adults
of any stature as long as they are sitting cor-
rectly, refer to page39.
Opening
1.Grasp the belt firmly.
2.Press the red button in the buckle.
3.Guide the belt into its reel.
'Fasten safety belts' reminder for front
seats
The indicator lamp comes on and an
acoustic signal sounds. In addition, a
message will appear on the Control
Display. Check whether the safety
belt has been fastened correctly.The 'Fasten safety belts' reminder is issued as
long as the driver's safety belt has not been fas-
tened. The 'Fasten safety belts' reminder is also
activated at road speeds above approx. 5 mph
or 8 km/h if the front passenger's safety belt is
not fastened, if heavy objects are placed on the
front passenger seat, or if driver or front pas-
senger unfasten their safety belts.
Damage to safety belts
If the safety belts are damaged or
stretched in an accident: have the entire
belt system, including the tensioning mecha-
nisms, replaced at your BMW center or at a
workshop that works according to BMW repair
procedures with correspondingly trained per-
sonnel. Have the belt anchorage points
inspected for damage at the same time. Failure
to observe this precaution may prevent the
safety belts from effectively providing optimal
protection when needed.<
Mirrors
Exterior mirrors
The mirror on the front passenger's side
features a lens with a more convex sur-
face than the mirror installed on the driver's
side. When estimating the distance between
yourself and other traffic, bear in mind that the
objects reflected in the mirror are closer than
they appear. This means that estimations of the
distance to following traffic should not be
regarded as precise.<
1Adjustments
2Switching to the other mirror or automatic
curb monitor
*
Page 45 of 223
Adjustments
44 The positions of the exterior mirrors are stored
for the remote control currently used
*, refer to
Personal Profile, page29.
Manual adjustment
The mirrors can also be adjusted manually, if
necessary: press the edge of the glass.
To prevent the exterior mirrors on this
vehicle from being damaged, always fold
them in by hand before entering an automatic
car wash.<
Automatic heating*
At outside temperatures below a certain limit,
both exterior mirrors are automatically heated
while the engine is running or the ignition
switched on.
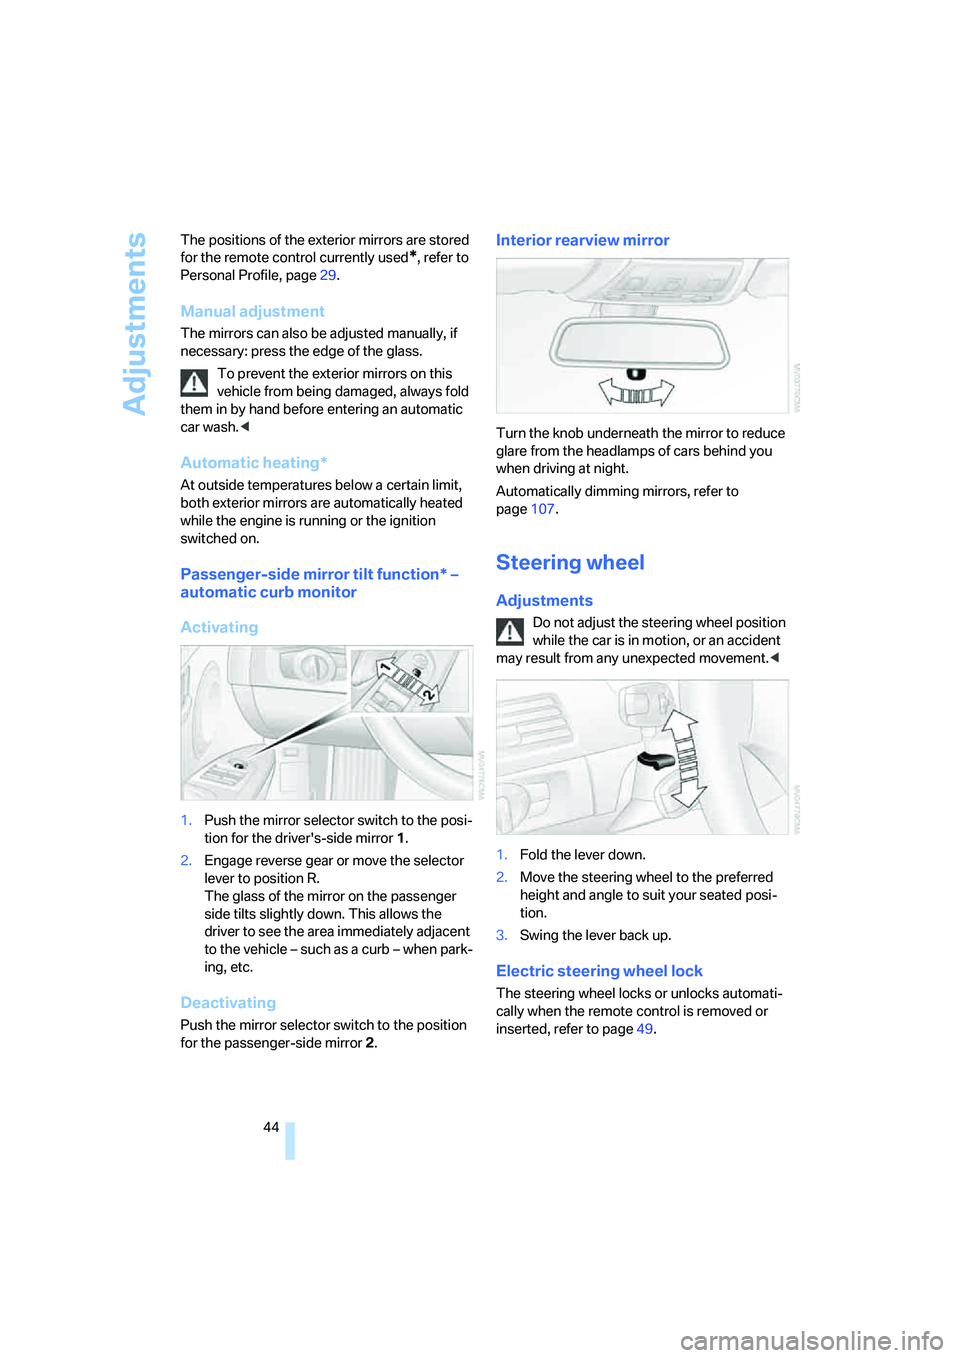
Passenger-side mirror tilt function* –
automatic curb monitor
Activating
1.Push the mirror selector switch to the posi-
tion for the driver's-side mirror 1.
2.Engage reverse gear or move the selector
lever to position R.
The glass of the mirror on the passenger
side tilts slightly down. This allows the
driver to see the area immediately adjacent
to the vehicle – such as a curb – when park-
ing, etc.
Deactivating
Push the mirror selector switch to the position
for the passenger-side mirror 2.
Interior rearview mirror
Turn the knob underneath the mirror to reduce
glare from the headlamps of cars behind you
when driving at night.
Automatically dimming mirrors, refer to
page107.
Steering wheel
Adjustments
Do not adjust the steering wheel position
while the car is in motion, or an accident
may result from any unexpected movement.<
1.Fold the lever down.
2.Move the steering wheel to the preferred
height and angle to suit your seated posi-
tion.
3.Swing the lever back up.
Electric steering wheel lock
The steering wheel locks or unlocks automati-
cally when the remote control is removed or
inserted, refer to page49.
Page 84 of 223
Controls
83Reference
At a glance
Driving tips
Communications
Navigation
Entertainment
Mobility
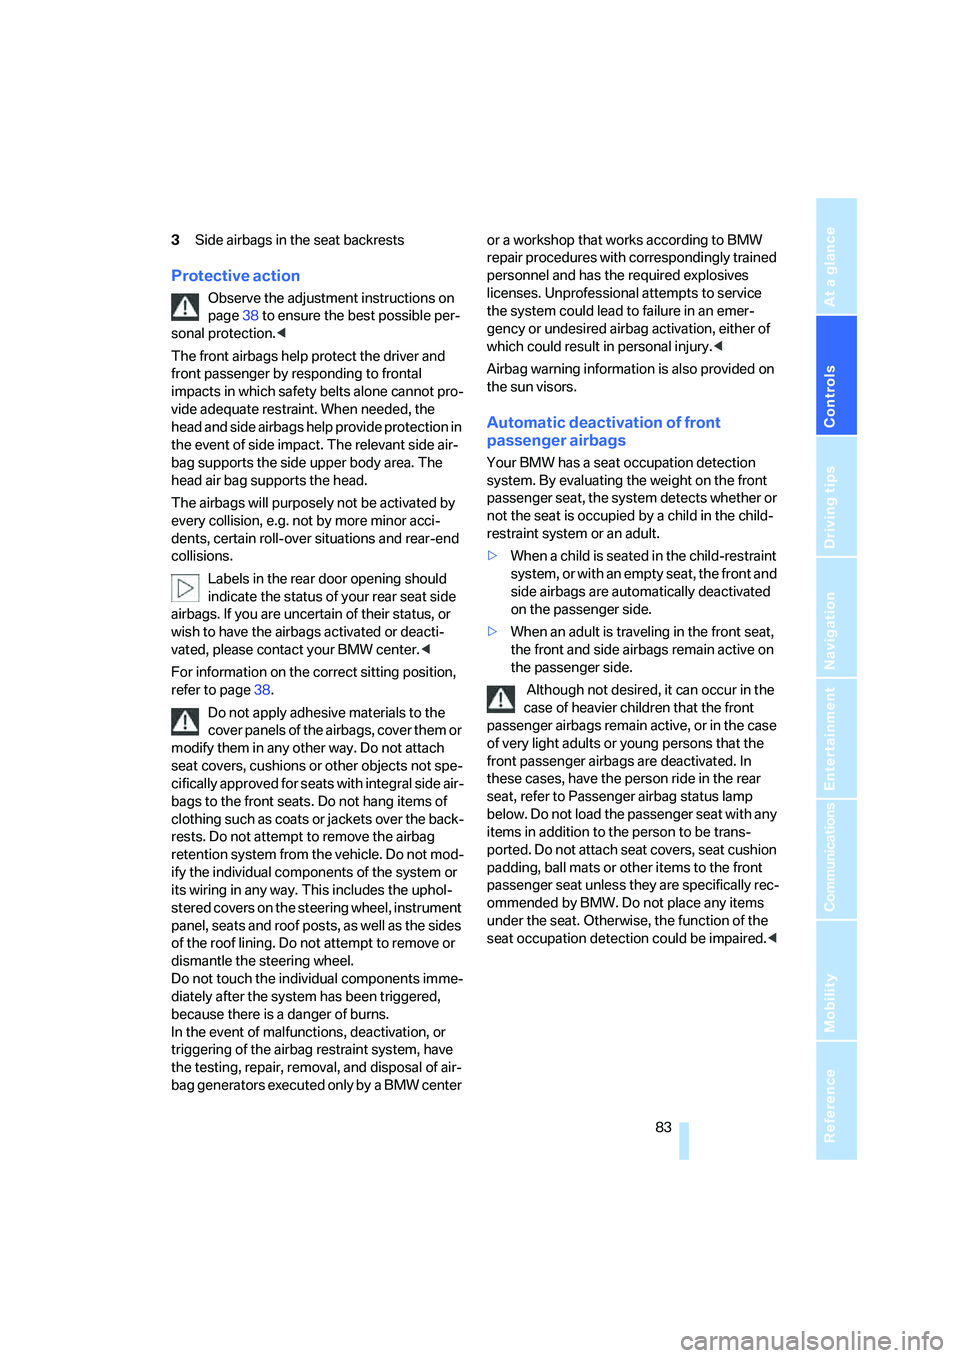
3Side airbags in the seat backrests
Protective action
Observe the adjustment instructions on
page38 to ensure the best possible per-
sonal protection.<
The front airbags help protect the driver and
front passenger by responding to frontal
impacts in which safety belts alone cannot pro-
vide adequate restraint. When needed, the
head and side airbags help provide protection in
the event of side impact. The relevant side air-
bag supports the side upper body area. The
head air bag supports the head.
The airbags will purposely not be activated by
every collision, e.g. not by more minor acci-
dents, certain roll-over situations and rear-end
collisions.
Labels in the rear door opening should
indicate the status of your rear seat side
airbags. If you are uncertain of their status, or
wish to have the airbags activated or deacti-
vated, please contact your BMW center.<
For information on the correct sitting position,
refer to page38.
Do not apply adhesive materials to the
cover panels of the airbags, cover them or
modify them in any other way. Do not attach
seat covers, cushions or other objects not spe-
cifically approved for seats with integral side air-
bags to the front seats. Do not hang items of
clothing such as coats or jackets over the back-
rests. Do not attempt to remove the airbag
retention system from the vehicle. Do not mod-
ify the individual components of the system or
its wiring in any way. This includes the uphol-
stered covers on the steering wheel, instrument
panel, seats and roof posts, as well as the sides
of the roof lining. Do not attempt to remove or
dismantle the steering wheel.
Do not touch the individual components imme-
diately after the system has been triggered,
because there is a danger of burns.
In the event of malfunctions, deactivation, or
triggering of the airbag restraint system, have
the testing, repair, removal, and disposal of air-
bag generators executed only by a BMW center or a workshop that works according to BMW
repair procedures with correspondingly trained
personnel and has the required explosives
licenses. Unprofessional attempts to service
the system could lead to failure in an emer-
gency or undesired airbag activation, either of
which could result in personal injury.<
Airbag warning information is also provided on
the sun visors.
Automatic deactivation of front
passenger airbags
Your BMW has a seat occupation detection
system. By evaluating the weight on the front
passenger seat, the system detects whether or
not the seat is occupied by a child in the child-
restraint system or an adult.
>When a child is seated in the child-restraint
system, or with an empty seat, the front and
side airbags are automatically deactivated
on the passenger side.
>When an adult is traveling in the front seat,
the front and side airbags remain active on
the passenger side.
Although not desired, it can occur in the
case of heavier children that the front
passenger airbags remain active, or in the case
of very light adults or young persons that the
front passenger airbags are deactivated. In
these cases, have the person ride in the rear
seat, refer to Passenger airbag status lamp
below. Do not load the passenger seat with any
items in addition to the person to be trans-
ported. Do not attach seat covers, seat cushion
padding, ball mats or other items to the front
passenger seat unless they are specifically rec-
ommended by BMW. Do not place any items
under the seat. Otherwise, the function of the
seat occupation detection could be impaired.<
Page 208 of 223
Reference 207
At a glance
Controls
Driving tips
Communications
Navigation
Entertainment
Mobility
"Automatic programs" with
automatic climate control91
Automatic recirculated-air
control AUC91
Automatic station search139
Automatic transmission with
Steptronic51
– interlock51,52
– overriding selector lever
lock53
– shiftlock52
– sport program52
– towing away195
– tow-starting195
AUTO program for automatic
climate control90
"Autostore"
on the radio140
AUX-IN149
– port97
Average fuel consumption66
– setting the units68
Average speed65
"Avoid ferries" in
navigation124
Avoid freeways for
navigation123
"Avoid highways" in
navigation123
Avoiding unintentional
alarms35
"Avoid tollroads" in
navigation124
Axle loads, refer to
Weights201
"A - Z"154
B
Backrests, refer to Seats39
Backrest width adjustment40
Back seats, refer to Rear seats
– adjusting head restraints41
Backup lamps
– replacing bulbs190
Backup lamps, refer to Tail
lamps189
Balance, tone control135Bar, refer to Tow-starting,
towing away196
Bass, tone control135
Battery191
– charging191
– disposal191
– jump starting194
– temporary power failure191
Being towed195
Belts, refer to Safety belts43
Belt tensioner, refer to Safety
belts43
Beverage holders, refer to
Cup holders98
Black ice, refer to Ice
warning64
Blower, refer to Air flow
rate91
BMW Assist160
– enabling160
– services offered161
"BMW Contact"164
"BMW Contact
Numbers"164
BMW Maintenance
System185
"BMW Service"162
"BMW Service settings"161
Bottle holders, refer to Cup
holders98
Brake assist, refer to Dynamic
Brake Control78
Brake fluid184
– level too low184
– warning lamp184
Brake fluid, refer to Service
requirements69
Brake Force Display82
Brake hydraulics, refer to
Brakes184
Brake lamps
– Brake Force Display82
– replacing bulbs190
Brake pads, breaking in106
Brake rotors108
– brakes106
– breaking in106Brakes
– ABS78
– BMW Maintenance
System185
– brake fluid184
– brake pads184
– breaking in106
– handbrake51
– service requirements69
Brakes, refer to Braking
safely107
Brake system106
– BMW Maintenance
System185
– brake fluid184
– brake pads184
– breaking in106
– disc brakes108
Breakdown services, refer to
Roadside Assistance193
Breaking in the clutch106
Breaking in the
differential106
Break-in period106
"Brightness"76
Bulb changing, refer to Lamps
and bulbs187
Button for starting engine49
Buttons on steering wheel11
C
California Proposition 65
warning5
"Call"154
Call
– accepting153
– displaying accepted155
– ending154
– in absence155
– starting153
Calling
– from phone book154
– from Top 8 list155
– redialing155
Can holders, refer to Cup
holders98
Capacities201