ECU BMW 335I 2010 User Guide
[x] Cancel search | Manufacturer: BMW, Model Year: 2010, Model line: 335I, Model: BMW 335I 2010Pages: 274, PDF Size: 8.69 MB
Page 112 of 274
Practical interior accessories
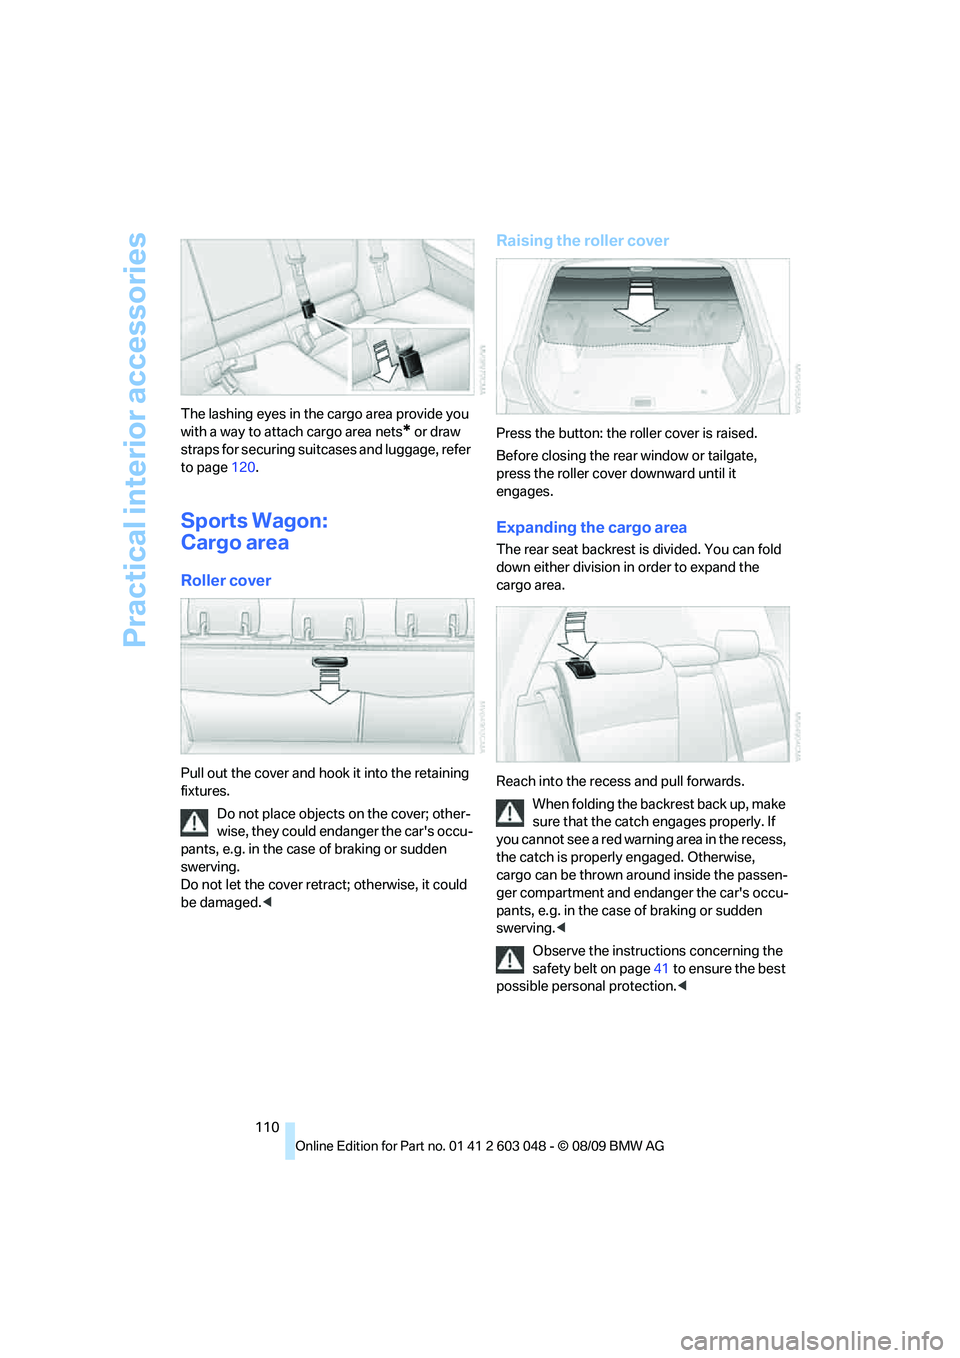
110 The lashing eyes in the cargo area provide you
with a way to attach cargo area nets
* or draw
straps for securing suitcases and luggage, refer
to page120.
Sports Wagon:
Cargo area
Roller cover
Pull out the cover and hook it into the retaining
fixtures.
Do not place objects on the cover; other-
wise, they could endanger the car's occu-
pants, e.g. in the case of braking or sudden
swerving.
Do not let the cover retract; otherwise, it could
be damaged.<
Raising the roller cover
Press the button: the roller cover is raised.
Before closing the rear window or tailgate,
press the roller cover downward until it
engages.
Expanding the cargo area
The rear seat backrest is divided. You can fold
down either division in order to expand the
cargo area.
Reach into the recess and pull forwards.
When folding the backrest back up, make
sure that the catch engages properly. If
you cannot see a red warning area in the recess,
the catch is properly engaged. Otherwise,
cargo can be thrown around inside the passen-
ger compartment and endanger the car's occu-
pants, e.g. in the case of braking or sudden
swerving.<
Observe the instructions concerning the
safety belt on page41 to ensure the best
possible personal protection.<
Page 113 of 274
Controls
111Reference
At a glance
Driving tips
Communications
Navigation
Entertainment
Mobility
Partition net
Do not let the partition net retract; other-
wise, there is a risk of danger and the par-
tition net could be damaged.<
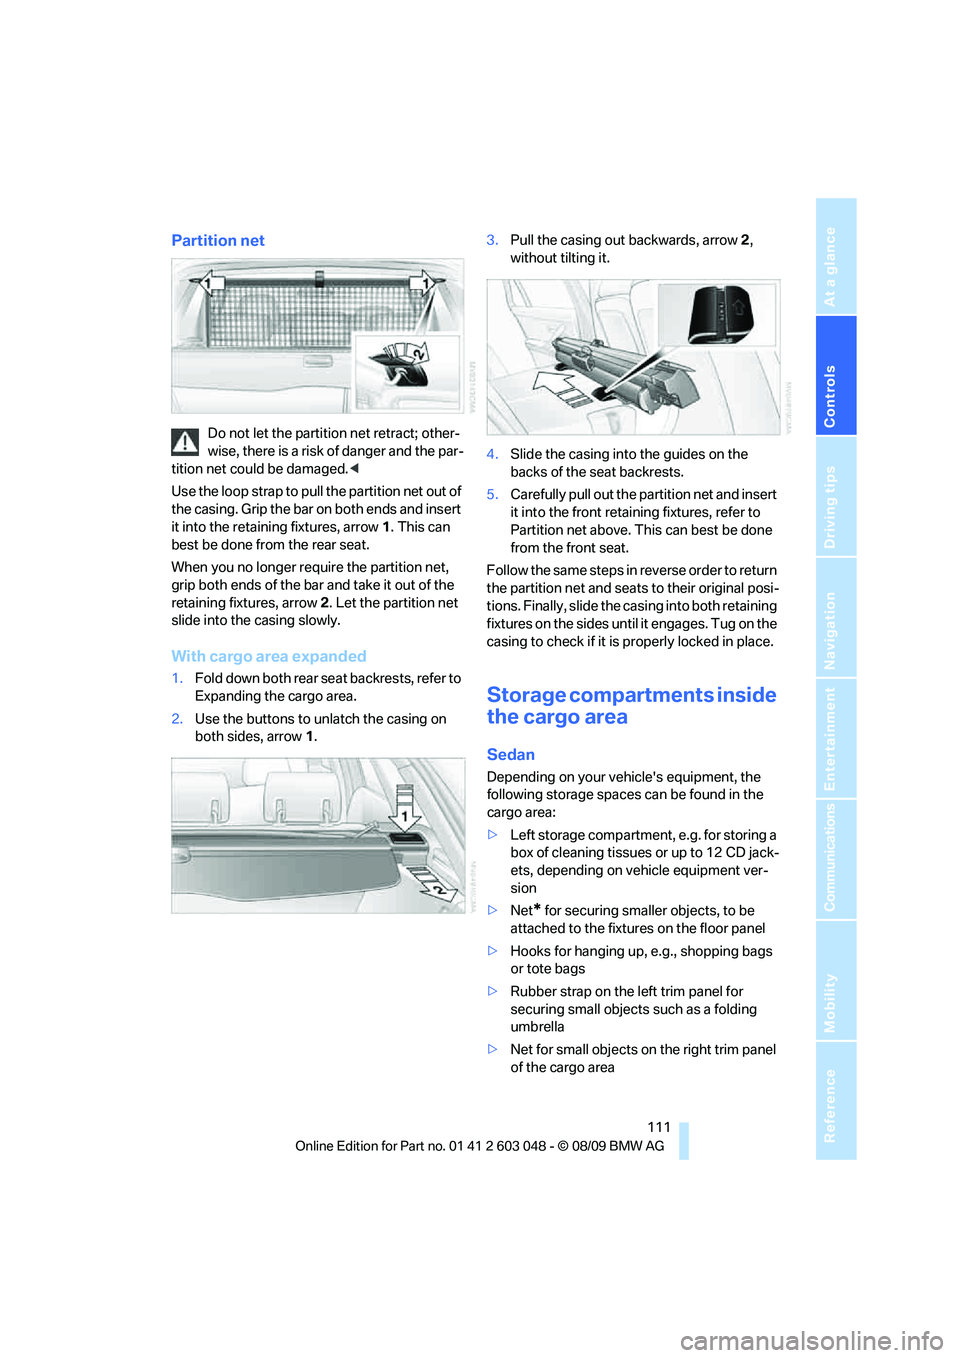
Use the loop strap to pull the partition net out of
the casing. Grip the bar on both ends and insert
it into the retaining fixtures, arrow 1. This can
best be done from the rear seat.
When you no longer require the partition net,
grip both ends of the bar and take it out of the
retaining fixtures, arrow 2. Let the partition net
slide into the casing slowly.
With cargo area expanded
1.Fold down both rear seat backrests, refer to
Expanding the cargo area.
2.Use the buttons to unlatch the casing on
both sides, arrow 1.3.Pull the casing out backwards, arrow 2,
without tilting it.
4.Slide the casing into the guides on the
backs of the seat backrests.
5.Carefully pull out the partition net and insert
it into the front retaining fixtures, refer to
Partition net above. This can best be done
from the front seat.
Follow the same steps in reverse order to return
the partition net and seats to their original posi-
tions. Finally, slide the casing into both retaining
fixtures on the sides until it engages. Tug on the
casing to check if it is properly locked in place.
Storage compartments inside
the cargo area
Sedan
Depending on your vehicle's equipment, the
following storage spaces can be found in the
cargo area:
>Left storage compartment, e.g. for storing a
box of cleaning tissues or up to 12 CD jack-
ets, depending on vehicle equipment ver-
sion
>Net
* for securing smaller objects, to be
attached to the fixtures on the floor panel
>Hooks for hanging up, e.g., shopping bags
or tote bags
>Rubber strap on the left trim panel for
securing small objects such as a folding
umbrella
>Net for small objects on the right trim panel
of the cargo area
Page 114 of 274

Practical interior accessories
112 >Folding, removable box
* under the floor
panel, e.g. for wet or dirty items
>Stowage compartment under the floor
panel
>Insertable dividers
* and removable storage
tray for the storage compartment under the
floor panel
Sports Wagon
The following storage spaces can be found in
the cargo area:
>Umbrella holder
* on the bottom of the par-
tition net casing
>Rubber strap on the left
* and right trim
panel for securing small objects such as a
folding umbrella
>Hooks for hanging up shopping bags or tote
bags, for example, on the left and right sides
of the cargo area
>Net for small objects on the right trim panel
of the cargo area
>Stowage compartment under the floor
panel
Depending on your vehicle's equipment, other
storage spaces can be found in the cargo area:
>Net
* for securing smaller objects, to be
attached to the fixtures on the floor panel
>Net
* on the left side trim of the cargo area
instead of the rubber strap
>Reversible floor panel with integrated plas-
tic cover
* for cargo area or bumper
>Folding, removable box
* under the floor
panel, e.g. for wet or dirty items>Insertable dividers
* and removable storage
tray for the storage compartment under the
floor panel
Folding up the floor panel
Do not exceed the maximum permissible
load of 55 lbs/25 kg for the storage com-
partment under the floor panel; otherwise, dam-
age could result.<
Sedan
Press the floor panel against the ceiling of the
cargo area; a locking device holds the floor
panel in place. To detach the floor panel, pull it
out of the locking device.
Sports Wagon
Fold up the floor panel and take it out or lean it
forward.
Lashing eyes
You will find lashing eyelets in the cargo area for
securing luggage items with nets or tensioning
straps, refer to page120.
Ski bag*
The ski bag is designed for safe, clean transport
of up to 4 pairs of standard skis or up to
2snowboards.
With the ski bag you can stow skis with a length
of up to 6 ft 10 in/2.10 m. When skis of 6 ft 10 in/
2.10 m length are loaded, the overall capacity of
the ski bag is reduced due to its tapered design.
Page 115 of 274
Controls
113Reference
At a glance
Driving tips
Communications
Navigation
Entertainment
Mobility
Loading
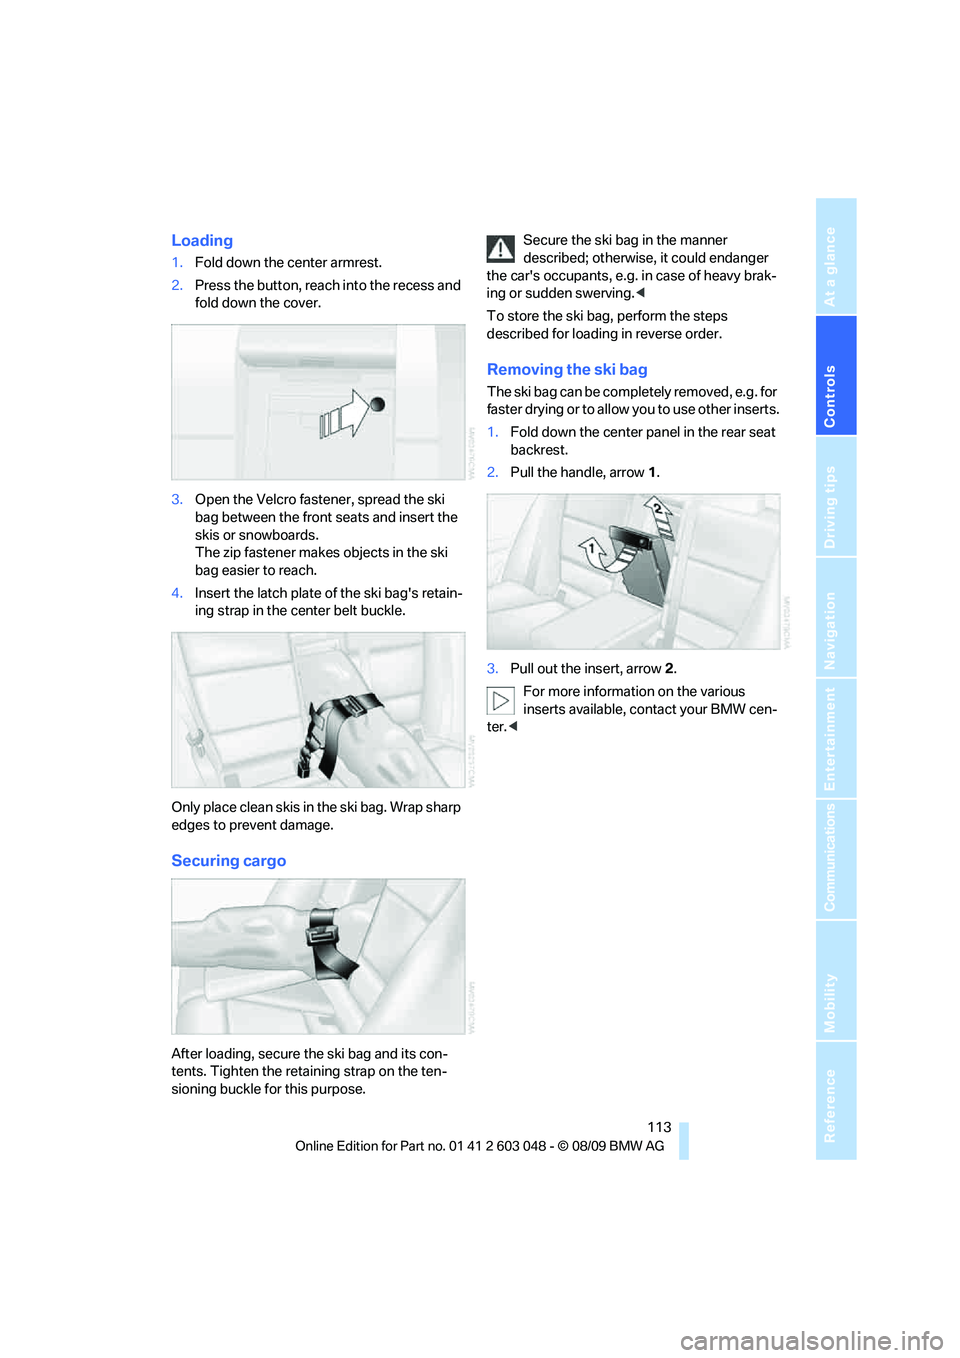
1.Fold down the center armrest.
2.Press the button, reach into the recess and
fold down the cover.
3.Open the Velcro fastener, spread the ski
bag between the front seats and insert the
skis or snowboards.
The zip fastener makes objects in the ski
bag easier to reach.
4.Insert the latch plate of the ski bag's retain-
ing strap in the center belt buckle.
Only place clean skis in the ski bag. Wrap sharp
edges to prevent damage.
Securing cargo
After loading, secure the ski bag and its con-
tents. Tighten the retaining strap on the ten-
sioning buckle for this purpose.Secure the ski bag in the manner
described; otherwise, it could endanger
the car's occupants, e.g. in case of heavy brak-
ing or sudden swerving.<
To store the ski bag, perform the steps
described for loading in reverse order.
Removing the ski bag
The ski bag can be completely removed, e.g. for
faster drying or to allow you to use other inserts.
1.Fold down the center panel in the rear seat
backrest.
2.Pull the handle, arrow1.
3.Pull out the insert, arrow 2.
For more information on the various
inserts available, contact your BMW cen-
ter.<
Page 121 of 274
Driving tips
119Reference
At a glance
Controls
Communications
Navigation
Entertainment
Mobility
When the vehicle is parked
Condensation forms while the automatic cli-
mate control is in operation, and then exits
under the vehicle. Traces of condensed water
under the vehicle are therefore normal.
Cargo loading
To avoid loading the tires beyond their
approved carrying capacity, never over-
load the vehicle. Overloading can lead to over-
heating and increases the rate at which damage
develops inside the tires. This can ultimately
result in a sudden blowout.<
Make sure that no liquids are spilled or
leak from their containers in the cargo
area, as this could result in damage to the vehi-
cle.<
Determining loading limit
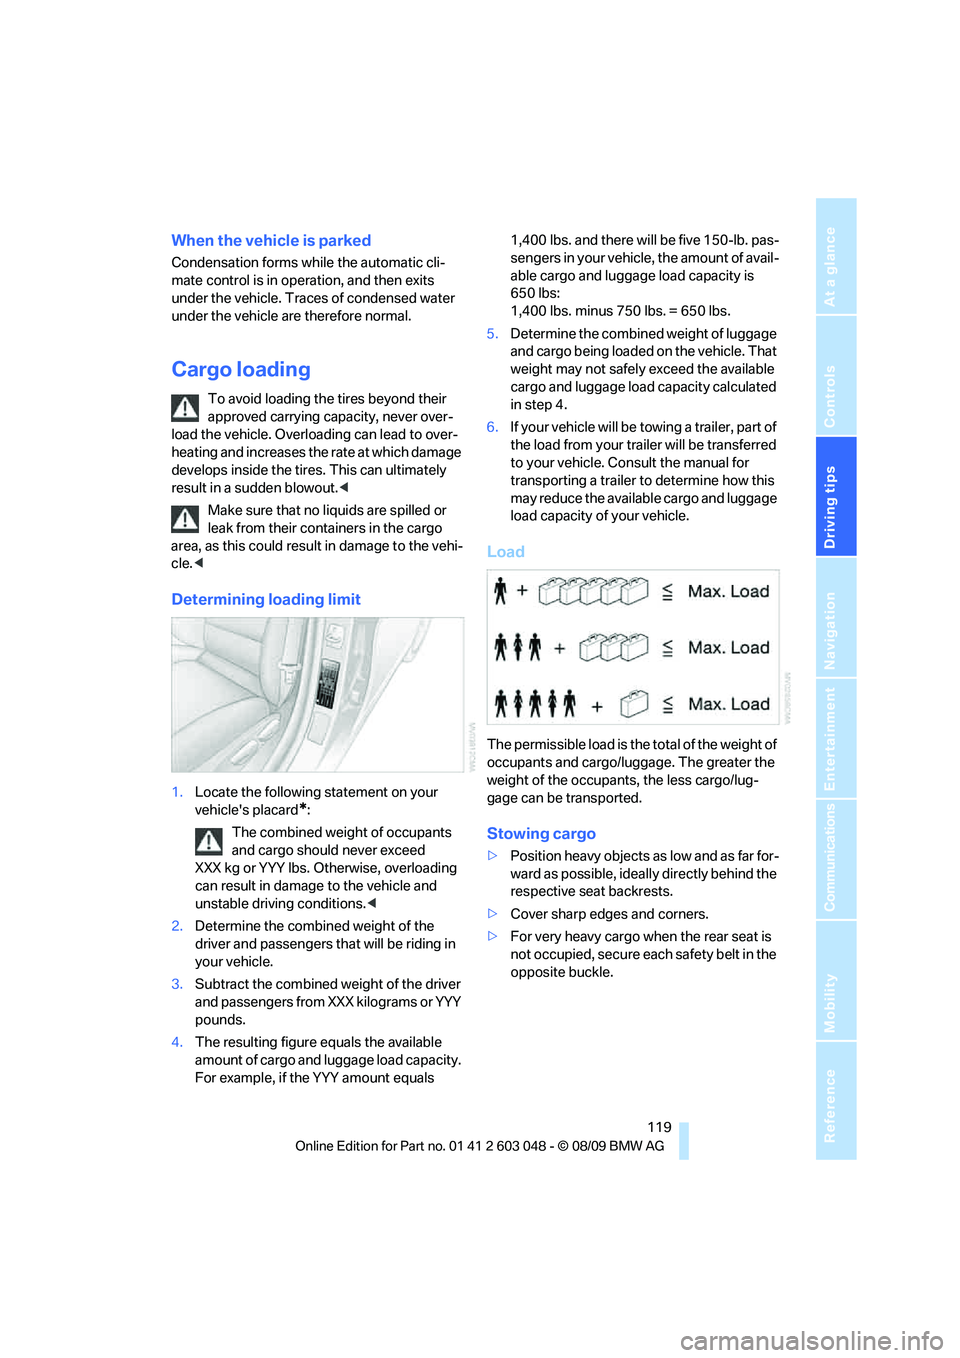
1.Locate the following statement on your
vehicle's placard
*:
The combined weight of occupants
and cargo should never exceed
XXX kg or YYY lbs. Otherwise, overloading
can result in damage to the vehicle and
unstable driving conditions.<
2.Determine the combined weight of the
driver and passengers that will be riding in
your vehicle.
3.Subtract the combined weight of the driver
and passengers from XXX kilograms or YYY
pounds.
4.The resulting figure equals the available
amount of cargo and luggage load capacity.
For example, if the YYY amount equals 1,400 lbs. and there will be five 150-lb. pas-
sengers in your vehicle, the amount of avail-
able cargo and luggage load capacity is
650 lbs:
1,400 lbs. minus 750 lbs. = 650 lbs.
5.Determine the combined weight of luggage
and cargo being loaded on the vehicle. That
weight may not safely exceed the available
cargo and luggage load capacity calculated
in step 4.
6.If your vehicle will be towing a trailer, part of
the load from your trailer will be transferred
to your vehicle. Consult the manual for
transporting a trailer to determine how this
may reduce the available cargo and luggage
load capacity of your vehicle.
Load
The permissible load is the total of the weight of
occupants and cargo/luggage. The greater the
weight of the occupants, the less cargo/lug-
gage can be transported.
Stowing cargo
>Position heavy objects as low and as far for-
ward as possible, ideally directly behind the
respective seat backrests.
>Cover sharp edges and corners.
>For very heavy cargo when the rear seat is
not occupied, secure each safety belt in the
opposite buckle.
Page 122 of 274
Things to remember when driving
120
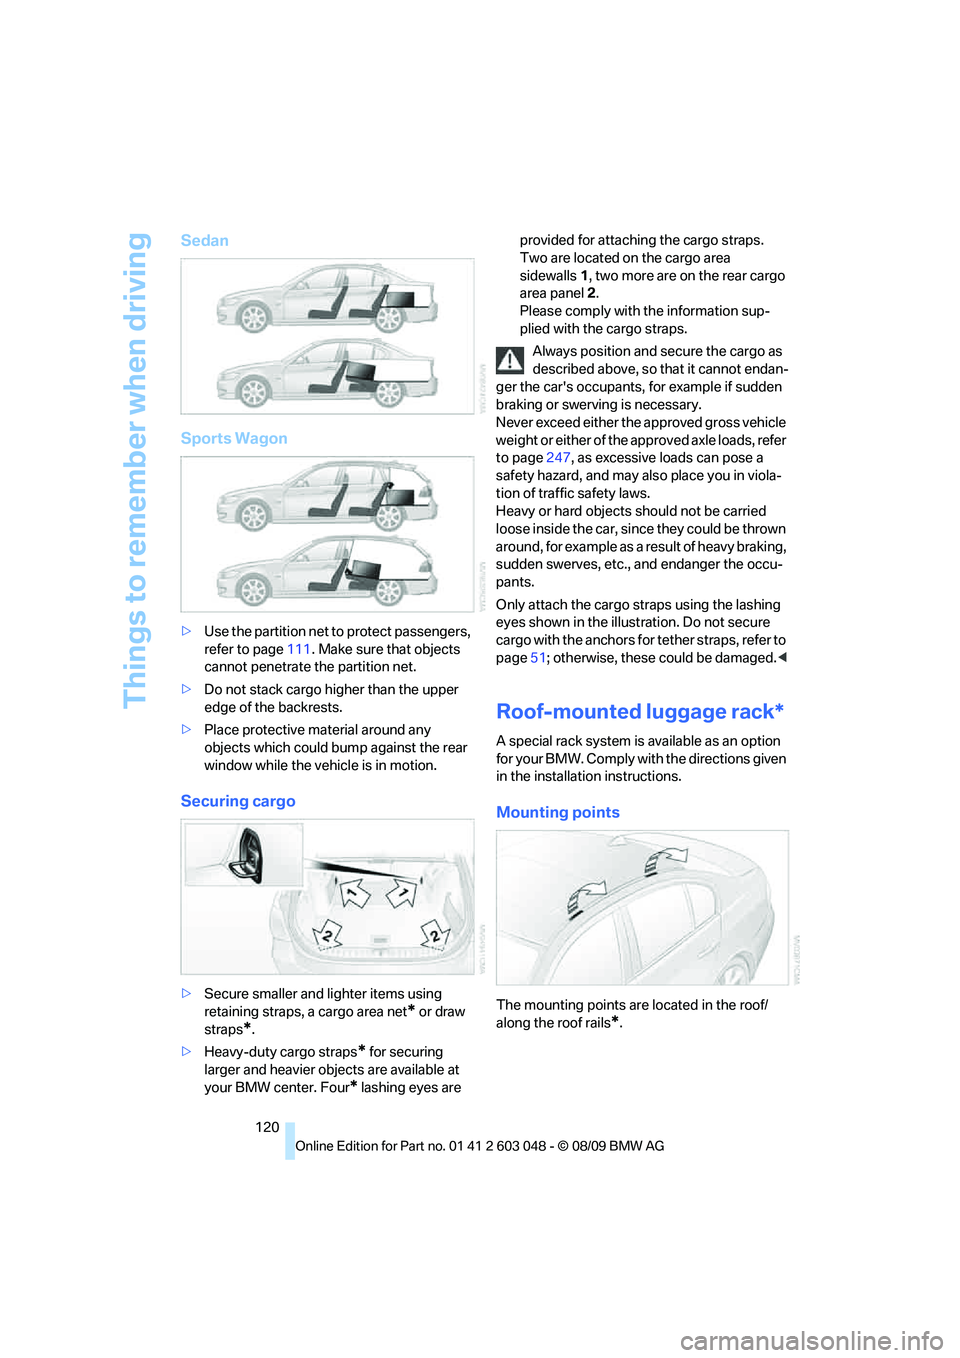
Sedan
Sports Wagon
>Use the partition net to protect passengers,
refer to page111. Make sure that objects
cannot penetrate the partition net.
>Do not stack cargo higher than the upper
edge of the backrests.
>Place protective material around any
objects which could bump against the rear
window while the vehicle is in motion.
Securing cargo
>Secure smaller and lighter items using
retaining straps, a cargo area net
* or draw
straps
*.
>Heavy-duty cargo straps
* for securing
larger and heavier objects are available at
your BMW center. Four
* lashing eyes are provided for attaching the cargo straps.
Two are located on the cargo area
sidewalls1, two more are on the rear cargo
area panel2.
Please comply with the information sup-
plied with the cargo straps.
Always position and secure the cargo as
described above, so that it cannot endan-
ger the car's occupants, for example if sudden
braking or swerving is necessary.
Never exceed either the approved gross vehicle
weight or either of the approved axle loads, refer
to page247, as excessive loads can pose a
safety hazard, and may also place you in viola-
tion of traffic safety laws.
Heavy or hard objects should not be carried
loose inside the car, since they could be thrown
around, for example as a result of heavy braking,
sudden swerves, etc., and endanger the occu-
pants.
Only attach the cargo straps using the lashing
eyes shown in the illustration. Do not secure
cargo with the anchors for tether straps, refer to
page51; otherwise, these could be damaged.<
Roof-mounted luggage rack*
A special rack system is available as an option
f o r y o u r B M W . C o m p l y w i t h t h e d i r e c t i o n s g i v e n
in the installation instructions.
Mounting points
The mounting points are located in the roof/
along the roof rails
*.
Page 123 of 274
Driving tips
121Reference
At a glance
Controls
Communications
Navigation
Entertainment
Mobility
Loading roof-mounted luggage rack
Because roof racks raise the vehicle's center of
gravity when loaded, they have a major effect on
vehicle handling and steering response.
You should therefore always remember not to
exceed the approved roof load capacity, the
approved gross vehicle weight or the axle loads
when loading the rack.
You can find the applicable data under Weights
on page247.
The roof load must be distributed uniformly and
should not be too large in area. Heavy items
should always be placed at the bottom. Be sure
that adequate clearance is maintained for rais-
ing the glass roof, and that objects do not
project into the opening path of the trunk lid/
tailgate.
Fasten roof-mounted cargo correctly and
securely to prevent it from shifting or falling off
during the trip.
Drive smoothly. Avoid sudden acceleration and
braking maneuvers. Take corners gently.
Page 178 of 274
Telephone
176 sion is dependent on your mobile phone,
refer to the operating instructions of the
mobile phone if necessary, and can take
several minutes.
>Four mobile phones can be paired.
>Specific settings may be necessary in some
mobile phones, e.g. authorization or a
secure connection, refer to the mobile
phone operating instructions.
If not all phone book entries are displayed:
>Transfer all phone book entries from the
SIM card to the mobile phone, if necessary.
>Phone book entries with special characters
may not be displayed.
Checks to perform if pairing is
unsuccessful
>Is the mobile phone supported by the
mobile phone preparation package? You
can obtain information on the Internet at:
www.bmw.com/bluetooth
>Do the Bluetooth passkeys on the mobile
phone and vehicle match? The same Blue-
tooth passkey must be entered on the
mobile phone's display and via iDrive.
>Did it take you more than 30 seconds to
enter the Bluetooth passkey? Then repeat
the pairing procedure.
>Are too many Bluetooth devices connected
to the mobile phone? If so, delete the con-
nections with other devices on the mobile
phone.
>Is the mobile phone no longer responding?
Switch the mobile phone off and on or
briefly disconnect the power supply.
>Repeat the pairing procedure.
>If all items on the list have been checked
and the mobile phone still cannot be paired,
please contact Customer Relations.
Connecting a particular mobile phone
If more than one mobile phone is detected by
the vehicle, the mobile phone at the top of the
list is connected. A different mobile phone can
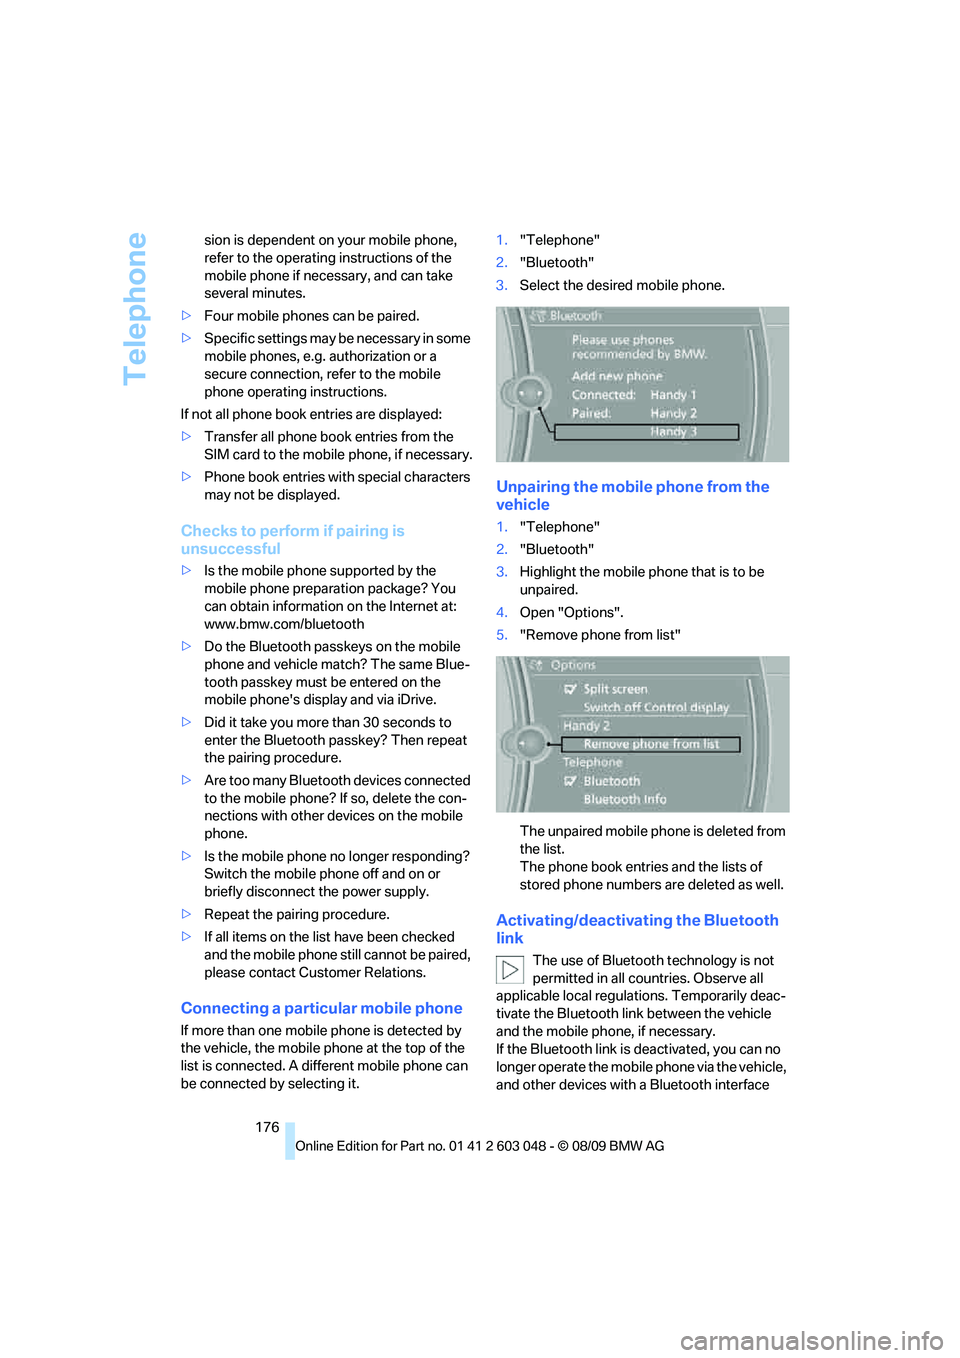
be connected by selecting it.1."Telephone"
2."Bluetooth"
3.Select the desired mobile phone.
Unpairing the mobile phone from the
vehicle
1."Telephone"
2."Bluetooth"
3.Highlight the mobile phone that is to be
unpaired.
4.Open "Options".
5."Remove phone from list"
The unpaired mobile phone is deleted from
the list.
The phone book entries and the lists of
stored phone numbers are deleted as well.
Activating/deactivating the Bluetooth
link
The use of Bluetooth technology is not
permitted in all countries. Observe all
applicable local regulations. Temporarily deac-
tivate the Bluetooth link between the vehicle
and the mobile phone, if necessary.
If the Bluetooth link is deactivated, you can no
longer operate the mobile phone via the vehicle,
and other devices with a Bluetooth interface
Page 220 of 274
Under the hood
218
Under the hood
Do not work on the car unless you pos-
sess the necessary technical knowledge.
If you are unfamiliar with the statutory guide-
lines, have any work on the vehicle performed
only by a BMW center or by a workshop that
work according to BMW repair procedures with
correspondingly trained personnel. If this work
is not carried out properly, there is a danger of
subsequent damage and related safety haz-
ards.<
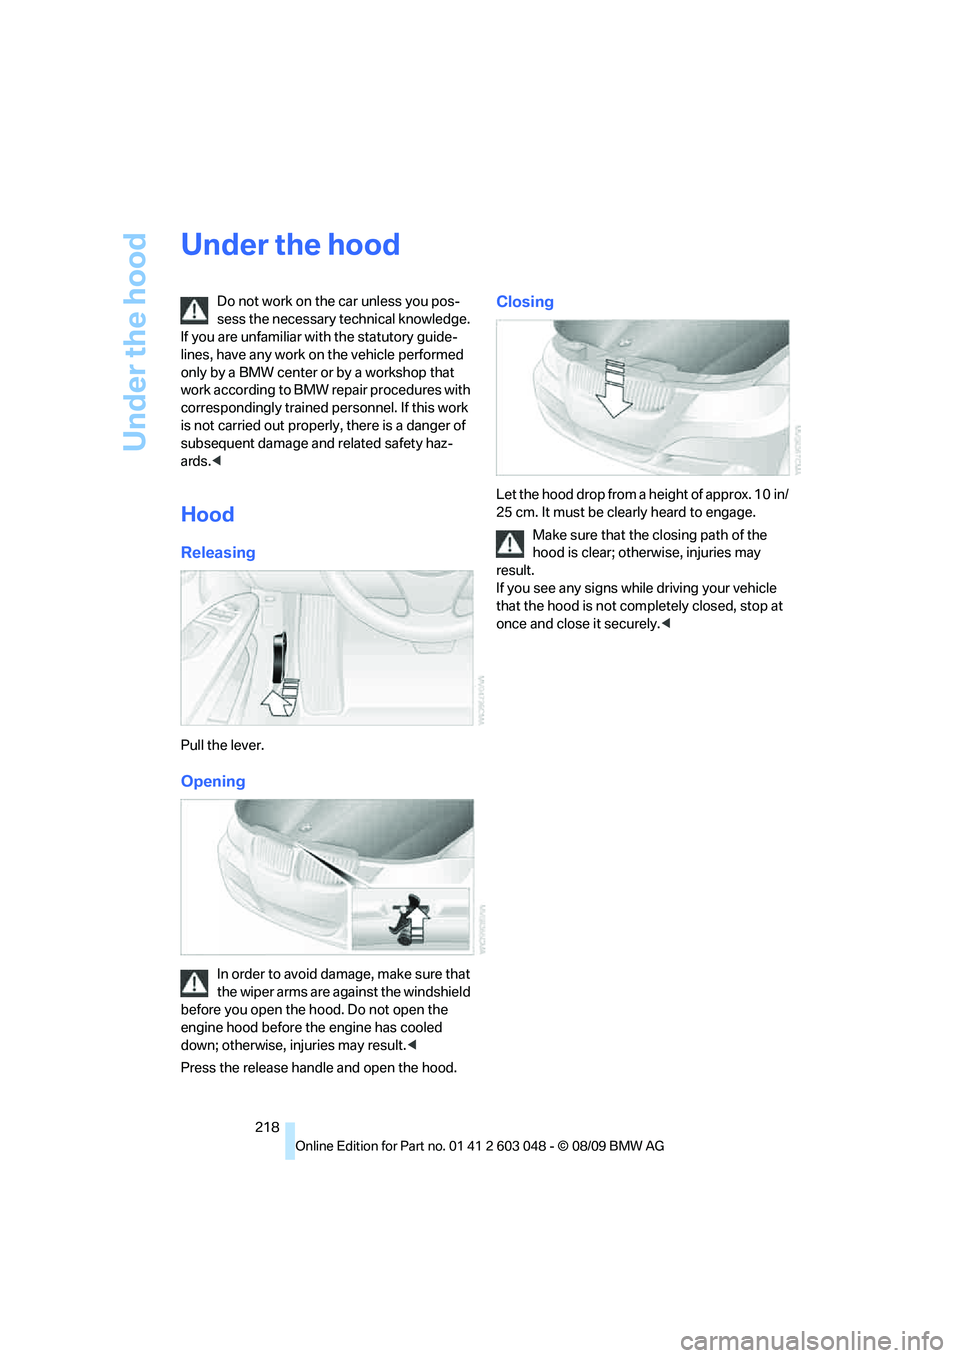
Hood
Releasing
Pull the lever.
Opening
In order to avoid damage, make sure that
the wiper arms are against the windshield
before you open the hood. Do not open the
engine hood before the engine has cooled
down; otherwise, injuries may result.<
Press the release handle and open the hood.
Closing
Let the hood drop from a height of approx. 10 in/
25 cm. It must be clearly heard to engage.
Make sure that the closing path of the
hood is clear; otherwise, injuries may
result.
If you see any signs while driving your vehicle
that the hood is not completely closed, stop at
once and close it securely.<
Page 238 of 274
Replacing components
236
Disposal
Have old batteries disposed of by your
BMW center or bring them to a recycling
center. Maintain the battery in an upright posi-
tion for transport and storage. Always secure
the battery against tipping over during trans-
port.<
Power failure
After a temporary power loss, the functioning of
some equipment may be limited and require
reinitialization. Individual settings may likewise
have been lost and will have to be programmed:
>Time and date
These values must be updated, refer to
page75.
>Radio
In some cases, stations may have to be
stored again, refer to page147.
>Navigation system
Operability must be waited for, refer to
page124.
>Glass roof
It may happen that the roof can only be
raised. The system must be initialized.
Please contact your BMW center.
>Panorama glass roof
It may happen that the roof can only be
raised. The system must be initialized.
Please contact your BMW center.
>Seat and mirror memory
The positions must be stored again, refer to
page45.
>Inside rearview mirror with digital compass
The system must be calibrated, refer to
page104.
>Active steering
The system automatically initializes itself
briefly during a trip. The system is deacti-
vated during this time, refer to page88.
>xDrive
The system automatically initializes itself
during a trip. Indicator lamps light up during
this time. If the lamps do not go out during
the current trip, have the system checked.
Fuses
Never attempt to repair a blown fuse and
do not replace a defective fuse with a sub-
stitute of another color or amperage rating; oth-
erwise, this could lead to a circuit overload, ulti-
mately resulting in a fire in the vehicle.<
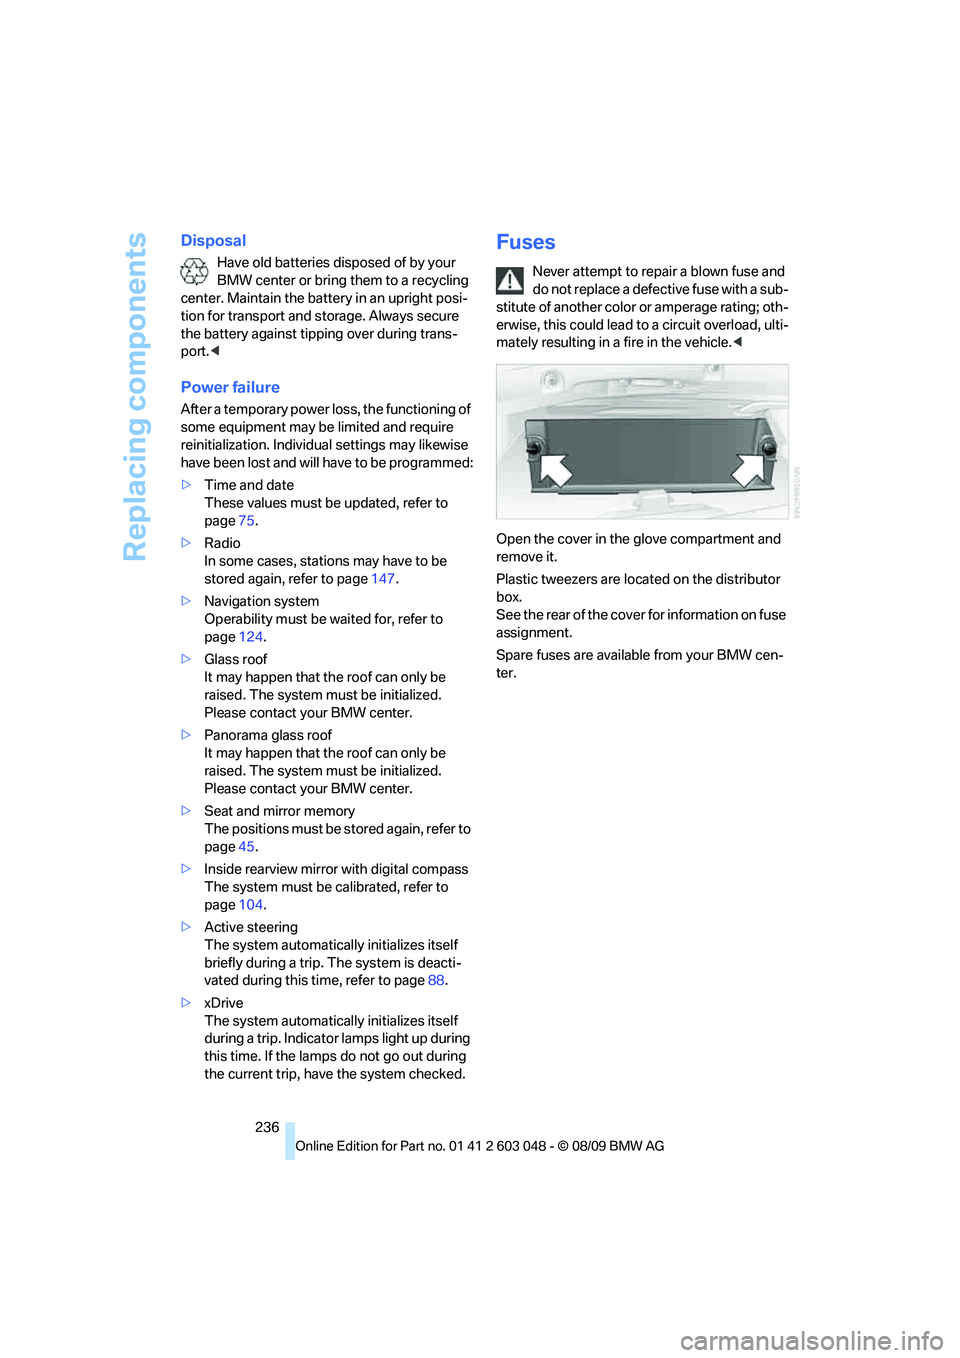
Open the cover in the glove compartment and
remove it.
Plastic tweezers are located on the distributor
box.
See the rear of the cover for information on fuse
assignment.
Spare fuses are available from your BMW cen-
ter.