safety bet BMW 335I CONVERTIBLE 2009 E93 Owner's Manual
[x] Cancel search | Manufacturer: BMW, Model Year: 2009, Model line: 335I CONVERTIBLE, Model: BMW 335I CONVERTIBLE 2009 E93Pages: 260, PDF Size: 7.95 MB
Page 7 of 260
5Reference
At a glance
Controls
Driving tips
Communications
Navigation
Entertainment
Mobility
The individual vehicle
When you ordered your BMW, you chose vari-
ous items of equipment. This Owner's Manual
describes the entire array of options and equip-
ment available with a specific BMW model.
Please bear in mind that the manual may con-
tain information on accessories and equipment
that you have not specified for your own vehicle.
Sections describing options and special equip-
ment are marked by asterisks
* to assist you in
identifying possible differences between the
descriptions in this manual and your own vehi-
cle's equipment.
If equipment in your BMW is not described in
this Owner's Manual, please refer to the accom-
panying Supplementary Owner's Manuals.
Editorial notice
BMW pursues a policy of continuous, ongoing
development that is conceived to ensure that
our vehicles continue to embody the highest
quality and safety standards combined with
advanced, state-of-the-art technology. For this
reason, it is possible in exceptional cases that
features described in this Owner's Manual
could differ from those on your vehicle.
For your own safety
Maintenance and repair
Advanced technology, e.g. the use of
modern materials and powerful electron-
ics, requires specially adapted maintenance
and repair methods. You should therefore have
the corresponding work on your vehicle per-
formed only by your BMW center or at a work-
shop that works according to BMW repair pro-
cedures with correspondingly trained
personnel. If this work is not carried out prop-
erly, there is a danger of subsequent damage
and related safety hazards.<
Parts and accessories
For your own safety, use genuine parts
and accessories approved by BMW.
When you purchase accessories tested and
approved by BMW and Original BMW Parts, you
simultaneously acquire the assurance that they
have been thoroughly tested by BMW to ensure
optimum performance when installed on your
vehicle.
BMW warrants these parts to be free from
defects in material and workmanship.
BMW will not accept any liability for damage
resulting from installation of parts and accesso-
ries not approved by BMW.
BMW cannot test every product made by other
manufacturers to verify if it can be used on a
BMW safely and without risk to either the vehi-
cle, its operation, or its occupants.
Original BMW Parts, BMW Accessories and
other products approved by BMW, together
with professional advice on using these items,
are available from all BMW centers.
Installation and operation of non-BMW
approved accessories such as alarms, radios,
amplifiers, radar detectors, wheels, suspension
components, brake dust shields, telephones,
including operation of any mobile phone from
within the vehicle without using an externally
mounted antenna, or transceiver equipment, for
instance, CBs, walkie-talkies, ham radio or sim-
ilar accessories, may cause extensive damage
Page 8 of 260
Notes
6 to the vehicle, compromise its safety, interfere
with the vehicle's electrical system or affect the
validity of the BMW Limited Warranty. See your
BMW center for additional information.<
Maintenance, replacement, or repair of
the emission control devices and sys-
tems may be performed by any automotive
repair establishment or individual using any cer-
tified automotive part.<
California Proposition 65 warning
California law requires us to issue the following
warning:
Engine exhaust and a wide variety of
automobile components and parts,
including components found in the interior fur-
nishings in a vehicle, contain or emit chemicals
known to the State of California to cause cancer
and birth defects and reproductive harm. In
addition, certain fluids contained in vehicles and
certain products of component wear contain or
emit chemicals known to the State of California
to cause cancer and birth defects or other
reproductive harm.
Battery posts, terminals and related accesso-
ries contain lead and lead compounds. Wash
your hands after handling.
Used engine oil contains chemicals that have
caused cancer in laboratory animals. Always
protect your skin by washing thoroughly with
soap and water.<
Service and warranty
We recommend that you read this publication
thoroughly.
Your BMW is covered by the following warran-
ties:
>New Vehicle Limited Warranty
>Rust Perforation Limited Warranty
>Federal Emissions System Defect Warranty
>Federal Emissions Performance Warranty
>California Emission Control System Limited
Warranty
Detailed information about these warranties is
listed in the Service and Warranty Information
Booklet for US models or in the Warranty and
Service Guide Booklet for Canadian models.
Reporting safety defects
For US customers
The following only applies to vehicles owned
and operated in the US.
If you believe that your vehicle has a defect
which could cause a crash or could cause injury
or death, you should immediately inform the
National Highway Traffic Safety Administration,
NHTSA, in addition to notifying BMW of North
America, LLC, P.O. Box 1227, Westwood, New
Jersey 07675-1227, Telephone 1-800-831-
1117.
If NHTSA receives similar complaints, it may
open an investigation, and if it finds that a safety
defect exists in a group of vehicles, it may order
a recall and remedy campaign. However,
NHTSA cannot become involved in individual
problems between you, your dealer, or BMW of
North America, LLC.
To contact NHTSA, you may call the Vehicle
Safety Hotline toll-free at 1-888-327-4236
(TTY: 1-800-424-9153); go to
http://www.safercar.gov; or write to: Adminis-
trator, NHTSA, 400 Seventh Street, SW.,
Washington, DC 20590. You can also obtain
other information about motor vehicle safety
from http://www.safercar.gov
Page 42 of 260
Opening and closing
40
Interruption
The automatic sequence of movements is
interrupted if the switch for hardtop operation is
released. The sequence can be continued in
the desired direction by pushing or pulling the
switch.
A hardtop that is not fully opened or
closed is a safety hazard.
Do not interrupt and resume the closing proce-
dure several times in close succession as this
could damage the mechanism.<
If the hardtop is not fully opened or
closed, the luggage compartment lid can-
not be opened and the windows cannot be
moved.<
Convenient operation with remote
control or via door lock
Refer to pages28 and30.
Wind deflector*
The wind deflector keeps air movements in the
passenger compartment to a minimum when
the hardtop is open and provides an even more
comfortable ride, particularly at high speeds.
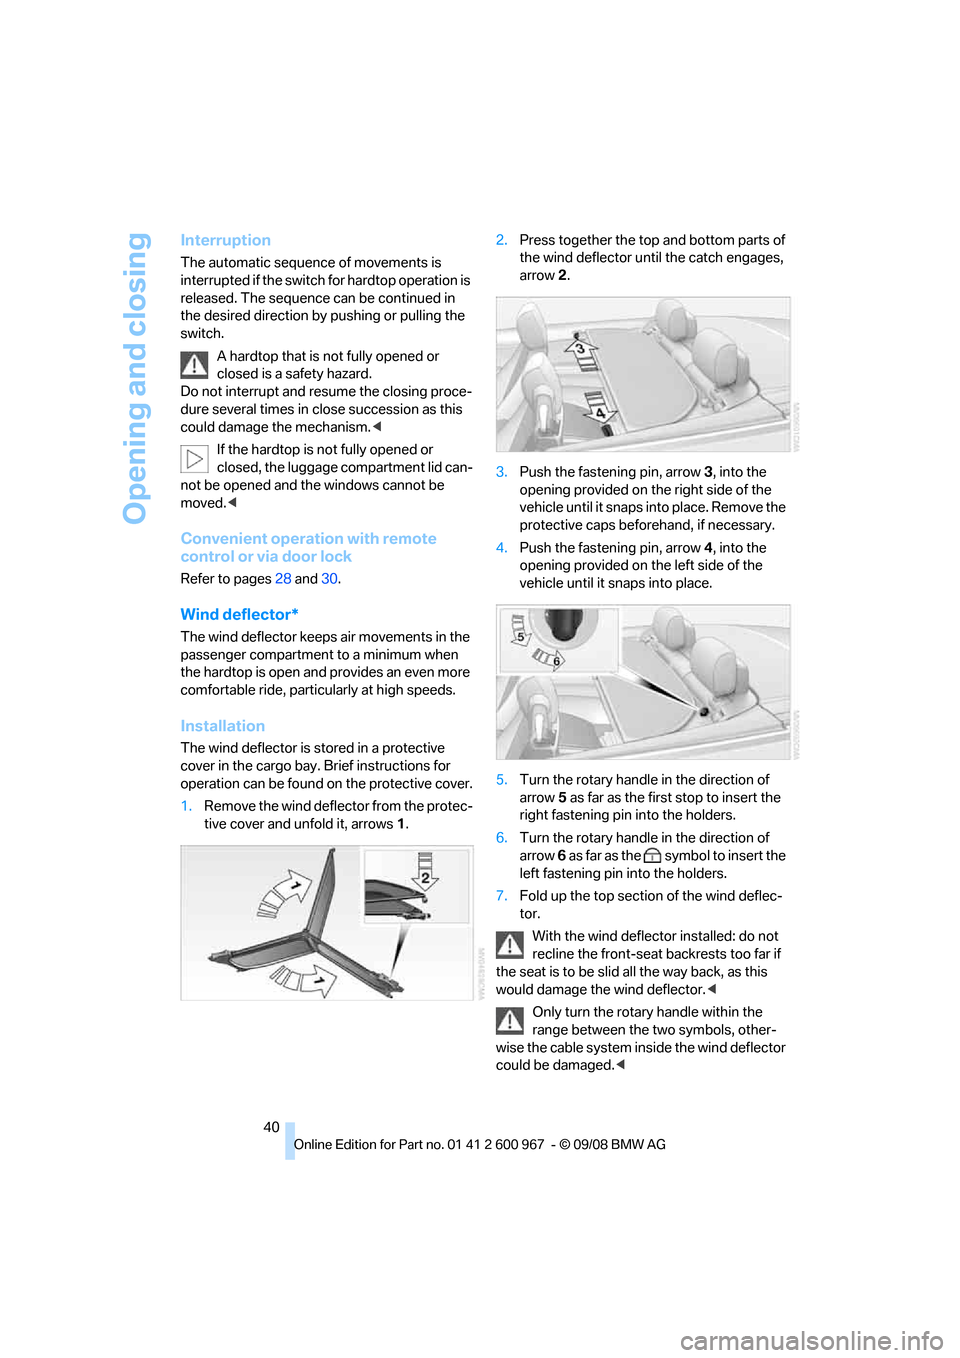
Installation
The wind deflector is stored in a protective
cover in the cargo bay. Brief instructions for
operation can be found on the protective cover.
1.Remove the wind deflector from the protec-
tive cover and unfold it, arrows 1.2.Press together the top and bottom parts of
the wind deflector until the catch engages,
arrow 2.
3.Push the fastening pin, arrow 3, into the
opening provided on the right side of the
vehicle until it snaps into place. Remove the
protective caps beforehand, if necessary.
4.Push the fastening pin, arrow 4, into the
opening provided on the left side of the
vehicle until it snaps into place.
5.Turn the rotary handle in the direction of
arrow 5 as far as the first stop to insert the
right fastening pin into the holders.
6.Turn the rotary handle in the direction of
arrow 6 as far as the symbol to insert the
left fastening pin into the holders.
7.Fold up the top section of the wind deflec-
tor.
With the wind deflector installed: do not
recline the front-seat backrests too far if
the seat is to be slid all the way back, as this
would damage the wind deflector.<
Only turn the rotary handle within the
range between the two symbols, other-
wise the cable system inside the wind deflector
could be damaged.<
Page 44 of 260
Adjustments
42
Adjustments
Sitting safely
The ideal sitting position can make a vital con-
tribution to relaxed, fatigue-free driving. In con-
junction with the safety belts, the head
restraints and the airbags, the seated position
has a major influence on your safety in the event
of an accident. To ensure that the safety sys-
tems operate with optimal efficiency, we
strongly urge you to observe the instructions
contained in the following section.
For additional information on transporting chil-
dren safely, refer to page52.
Airbags
Always maintain an adequate distance
between yourself and the airbags. Always
grip the steering wheel on the rim, with your
hands in the 3 o'clock and 9 o'clock positions,
to minimize the risk of injury to the hands or
arms in the event of the airbag being triggered
off.
No one and nothing is to come between the air-
bags and the seat occupant.
Do not use the cover of the front airbag on the
front passenger side as a storage area. Make
sure that the front passenger is sitting correctly,
e.g. not resting feet or legs on the dashboard,
otherwise leg injuries can occur if the front air-
bag is triggered.
Make sure that passengers do not lean their
heads against the side or head airbags, other-
wise serious injuries could result if the airbags
suddenly deployed.<
Even if you follow all the instructions, injuries
resulting from contact with airbags cannot be
fully excluded, depending on the circum-
stances. The ignition and inflation noise may
provoke a mild hearing loss in extremely sensi-
tive individuals. This effect is usually only tem-
porary.
For airbag locations and additional information
on airbags, refer to page90.
Head restraint
A correctly adjusted head restraint reduces the
risk of neck injury in the event of an accident.
Adjust the head restraint in such a way
that its center is at approx. ear level. Oth-
erwise, there is an increased risk of injury in the
event of an accident.<
Head restraints, refer to page44.
Safety belt
Before every drive, make sure that all occupants
wear their safety belts. Airbags complement the
safety belt as an additional safety device, but
they do not represent a substitute.
Your vehicle has four seats, each of which is
equipped with a safety belt.
Never allow more than one person to
wear a single safety belt. Never allow
infants or small children to ride in a passenger's
lap. Make sure that the belt in the lap area sits
low across the hips and does not press against
the abdomen.
The safety belt must not rest against the throat,
run across sharp edges, pass over hard or frag-
ile objects or be pinched. Fasten the safety belt
so that it sits as snugly as possible against the
lap and shoulder without being twisted. Other-
wise the belt could slide over your hips and
injure your abdomen in the event of a frontal
collision.
Avoid wearing bulky clothing and regularly pull
the belt in the upper-body area taut, otherwise
its restraining effect could be impaired.<
Safety belts, refer to page48.
Seats
Note before adjusting
Never attempt to adjust your seat while
the vehicle is moving. The seat could
respond with unexpected movement, and the
ensuing loss of vehicle control could lead to an
Page 55 of 260
Controls
53Reference
At a glance
Driving tips
Communications
Navigation
Entertainment
Mobility
3.Allow the belt strap to retract and pull it taut
against the child-restraint system.
The safety belt is locked.
To unlock the safety belt
1.Open the belt buckle.
2.Remove the child-restraint system.
3.Allow the safety belt strap to retract all the
way.
LATCH child-restraint fixing
system
LATCH: Lower Anchors and Tethers for CHil-
dren.
To install and use the LATCH child
restraint system, follow the operating and
safety instructions provided by the manufac-
turer of the system, otherwise the protective
function of the seat may be compromised.<
Before installing the child seat, pull the belt out
of the area for the child-restraint fixing system.
Ensure that both lower LATCH anchors
are correctly engaged and that the child
restraint system is resting firmly against the
backrest, otherwise the protective function of
the seat may be compromised.<
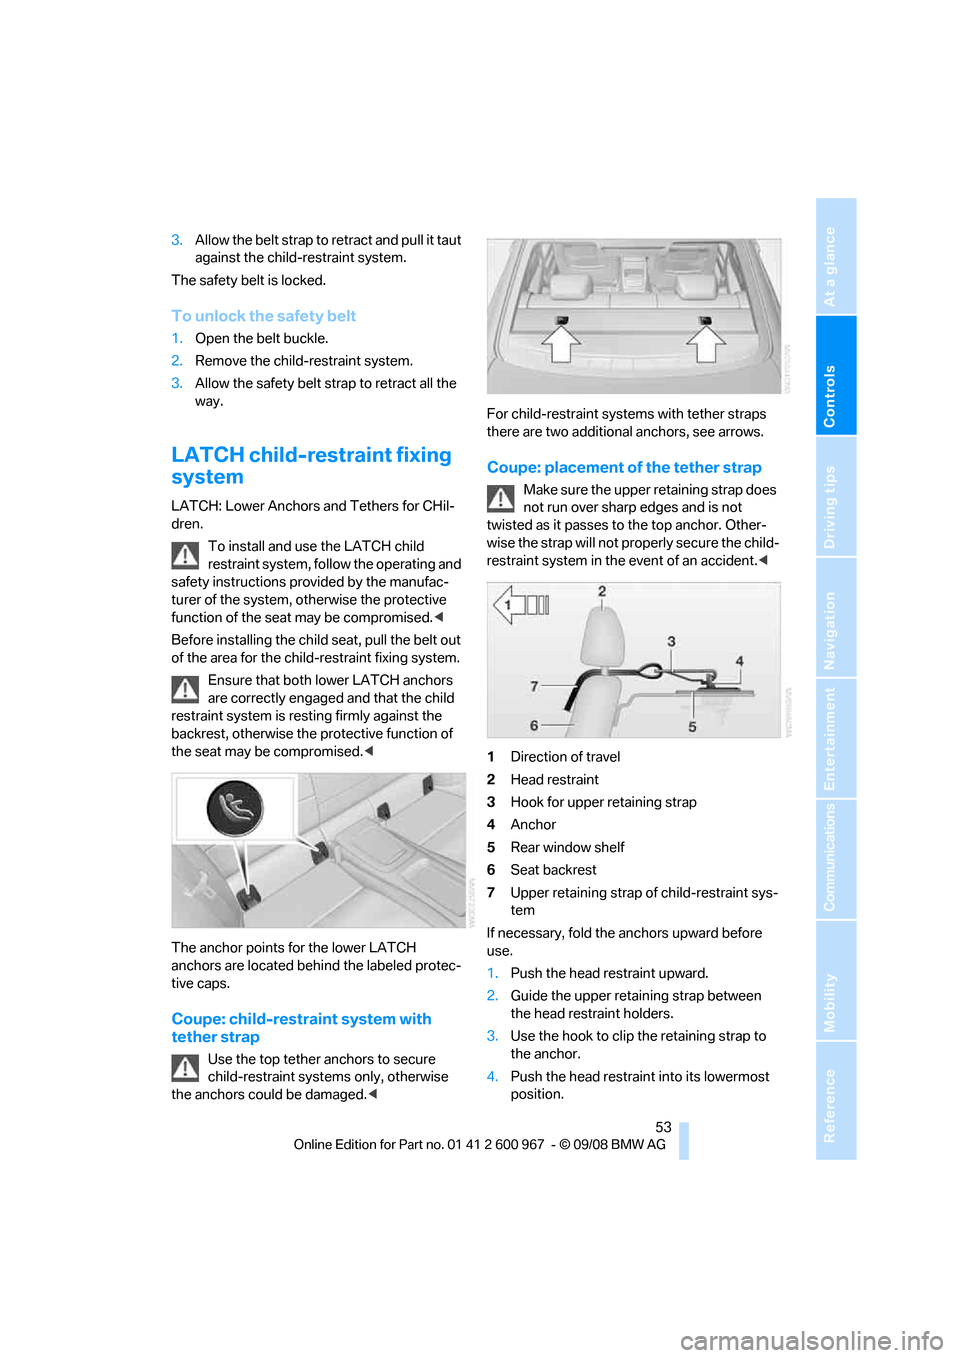
The anchor points for the lower LATCH
anchors are located behind the labeled protec-
tive caps.
Coupe: child-restraint system with
tether strap
Use the top tether anchors to secure
child-restraint systems only, otherwise
the anchors could be damaged.
Coupe: placement of the tether strap
Make sure the upper retaining strap does
not run over sharp edges and is not
twisted as it passes to the top anchor. Other-
wise the strap will not properly secure the child-
restraint system in the event of an accident.<
1Direction of travel
2Head restraint
3Hook for upper retaining strap
4Anchor
5Rear window shelf
6Seat backrest
7Upper retaining strap of child-restraint sys-
tem
If necessary, fold the anchors upward before
use.
1.Push the head restraint upward.
2.Guide the upper retaining strap between
the head restraint holders.
3.Use the hook to clip the retaining strap to
the anchor.
4.Push the head restraint into its lowermost
position.
Page 82 of 260
Everything under control
80
Settings on the Control
Display
Language on the Control Display
Setting the language
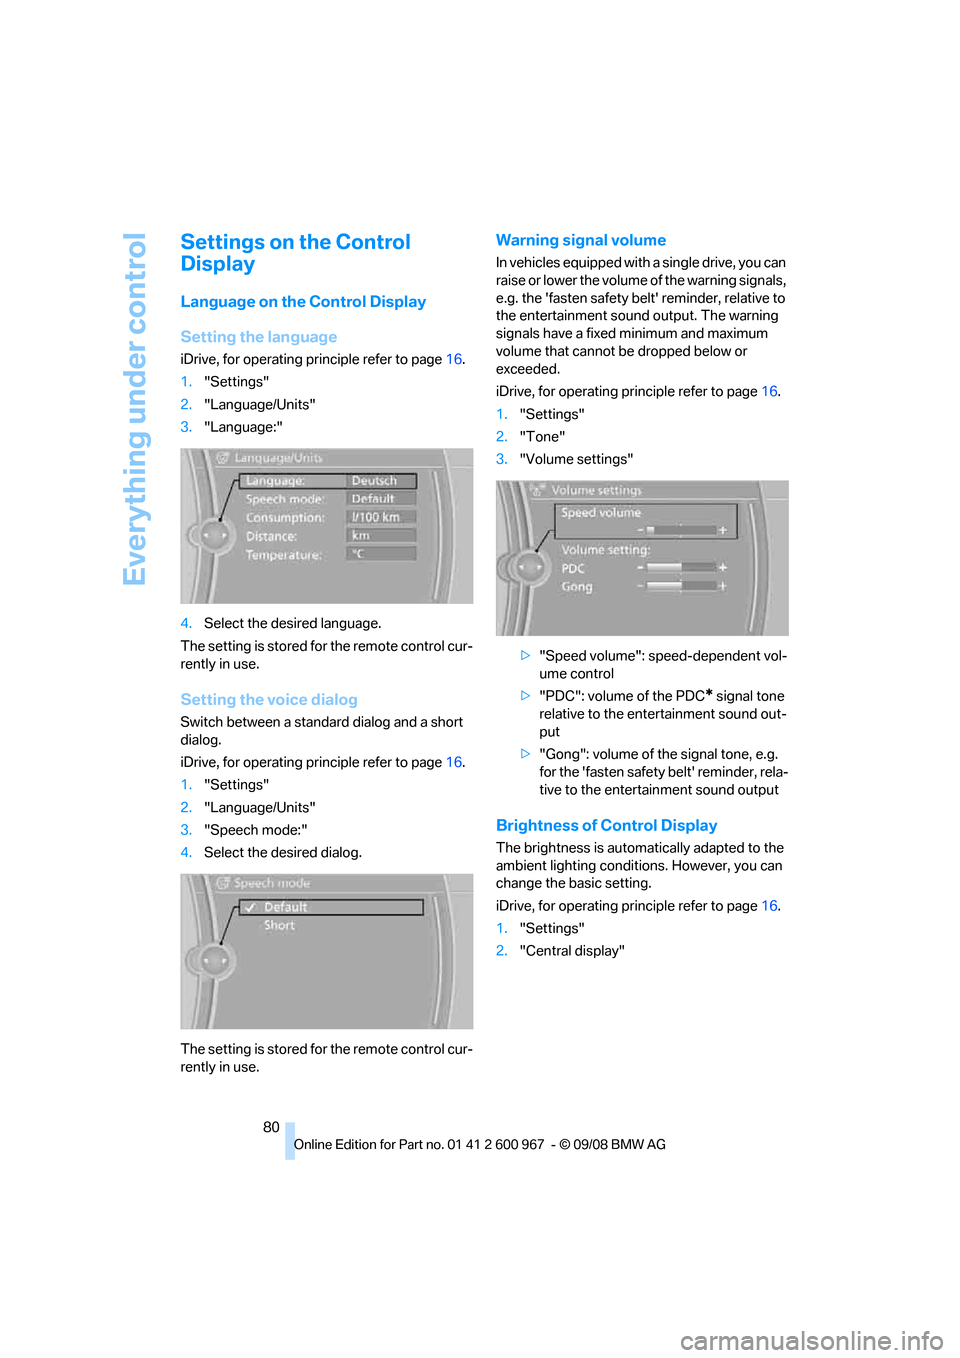
iDrive, for operating principle refer to page16.
1."Settings"
2."Language/Units"
3."Language:"
4.Select the desired language.
The setting is stored for the remote control cur-
rently in use.
Setting the voice dialog
Switch between a standard dialog and a short
dialog.
iDrive, for operating principle refer to page16.
1."Settings"
2."Language/Units"
3."Speech mode:"
4.Select the desired dialog.
The setting is stored for the remote control cur-
rently in use.
Warning signal volume
In vehicles equipped with a single drive, you can
raise or lower the volume of the warning signals,
e.g. the 'fasten safety belt' reminder, relative to
the entertainment sound output. The warning
signals have a fixed minimum and maximum
volume that cannot be dropped below or
exceeded.
iDrive, for operating principle refer to page16.
1."Settings"
2."Tone"
3."Volume settings"
>"Speed volume": speed-dependent vol-
ume control
>"PDC": volume of the PDC
* signal tone
relative to the entertainment sound out-
put
>"Gong": volume of the signal tone, e.g.
for the 'fasten safety belt' reminder, rela-
tive to the entertainment sound output
Brightness of Control Display
The brightness is automatically adapted to the
ambient lighting conditions. However, you can
change the basic setting.
iDrive, for operating principle refer to page16.
1."Settings"
2."Central display"
Page 84 of 260
Technology for driving comfort and safety
82
Technology for driving comfort and safety
Park Distance Control PDC*
The concept
The PDC assists you with maneuvering in tight
parking spaces. Acoustic signals and a visual
indicator
warn you of the presence of an object
behind your vehicle. To measure the distance,
there are four ultrasonic sensors in either
bumper.
These sensors have a range of approx. 6.5 ft/
2 m. However, an acoustic warning does not
sound until an object is approx. 24 in/60 cm
from the corner sensors, or approx. 5 ft/1.50 m
from the center sensors.
PDC is a parking aid that can indicate
objects when they are approached
slowly, as is usually the case when parking.
Avoid approaching an object at high speed, oth-
erwise physical circumstances may lead to the
system warning being issued too late.<
Switching on automatically
With the engine running or the ignition switched
on, the system is activated approx. 1 second
after you engage reverse gear or selector lever
or transmission position R. Wait this short
period before driving.
Switching off automatically
After approx. 165 ft/50 m of driving or above
approx. 20 mph/approx. 30 km/h, the system
switches off and the LED goes out.
Signal tones
When nearing an object, its position is indicated
correspondingly by an interval tone. As the dis-
tance between vehicle and object decreases,
the intervals between the tones become
shorter. If the distance to the nearest object
falls to below roughly 1 ft/30 cm, then a contin-
uous tone sounds.
An interval tone is interrupted after approx.
3seconds>if you remain in front of an object that has
been detected by only one of the corner
sensors
>if you are driving parallel to a wall.
Malfunction
The indicator lamp in the instrument
cluster comes on. PDC is malfunc-
tioning. A message appears on the
Control Display. Have the system checked.
To avoid this problem, keep the sensors clean
and free of ice or snow in order to ensure that
they will continue to operate effectively. When
using a high-pressure cleaner, do not spray the
sensors for extended periods of time and only
from a distance of at least 4 in/10 cm.
PDC with visual warning
The approach of the vehicle to an object is
shown on the Control Display. Objects that are
farther away are displayed on the Control Dis-
play before a signal tone sounds. The display
appears on the Control Display as soon as PDC
is activated.
System limitations
Even with PDC, final responsibility for
estimating the distance between the
vehicle and any obstructions always remains
with the driver. Even when sensors are pro-
vided, there is a blind spot in which objects can
no longer be detected. The system is also sub-
ject to the physical limits that apply to all forms
of ultrasonic measurement, such as those
encountered with trailer towbars and hitches,
thin or wedge-shaped objects, etc. Low objects
that have already been displayed, e.g. curbs,
can disappear again from the detection area of
the sensors before or after a continuous tone
sounds. Higher, protruding objects, e.g. ledges,
cannot be detected. Therefore, always drive
cautiously, otherwise there is a risk of personal
injury or property damage.
Loud sound sources outside or inside the car
Page 85 of 260
Controls
83Reference
At a glance
Driving tips
Communications
Navigation
Entertainment
Mobility
can drown out the PDC signal. Therefore,
always drive cautiously, otherwise there is a risk
of personal injury or property damage.<
Driving stability control
systems
Your BMW has a number of systems that help
to maintain the vehicle's stability even in
adverse driving conditions.
Antilock Brake System ABS
ABS prevents locking of the wheels during
braking. Safe steering response is maintained
even during full braking. Active safety is thus
increased.
The ABS is operational every time you start the
engine. Braking safely, refer to page118.
Electronic brake-force distribution
The system controls the brake pressure in the
rear wheels to ensure stable braking behavior.
Dynamic Brake Control DBC
When you apply the brakes rapidly, this system
automatically produces the maximum braking
force boost and thus helps to achieve the short-
est possible braking distance during full brak-
ing. This system exploits all of the benefits pro-
vided by ABS.
Do not reduce the pressure on the brake for the
duration of the full braking application.
Dynamic Stability Control DSC
DSC prevents the driving wheels from losing
traction when you pull away from rest or accel-
erate. The system also recognizes unstable
driving conditions, for example if the rear of the
car is about to swerve or if momentum is acting
at an angle past the front wheels. In these
cases, DSC helps the vehicle maintain a safe
course within physical limits by reducing engine
output and through braking actions at the indi-
vidual wheels.
The laws of physics cannot be repealed,
even with DSC. An appropriate driving style always remains the responsibility of the
driver. Therefore, do not reduce the additional
s a f e t y m a r g i n a g a i n b y t a k i n g r i s k s , a s t h i s c o u l d
result in an accident.<
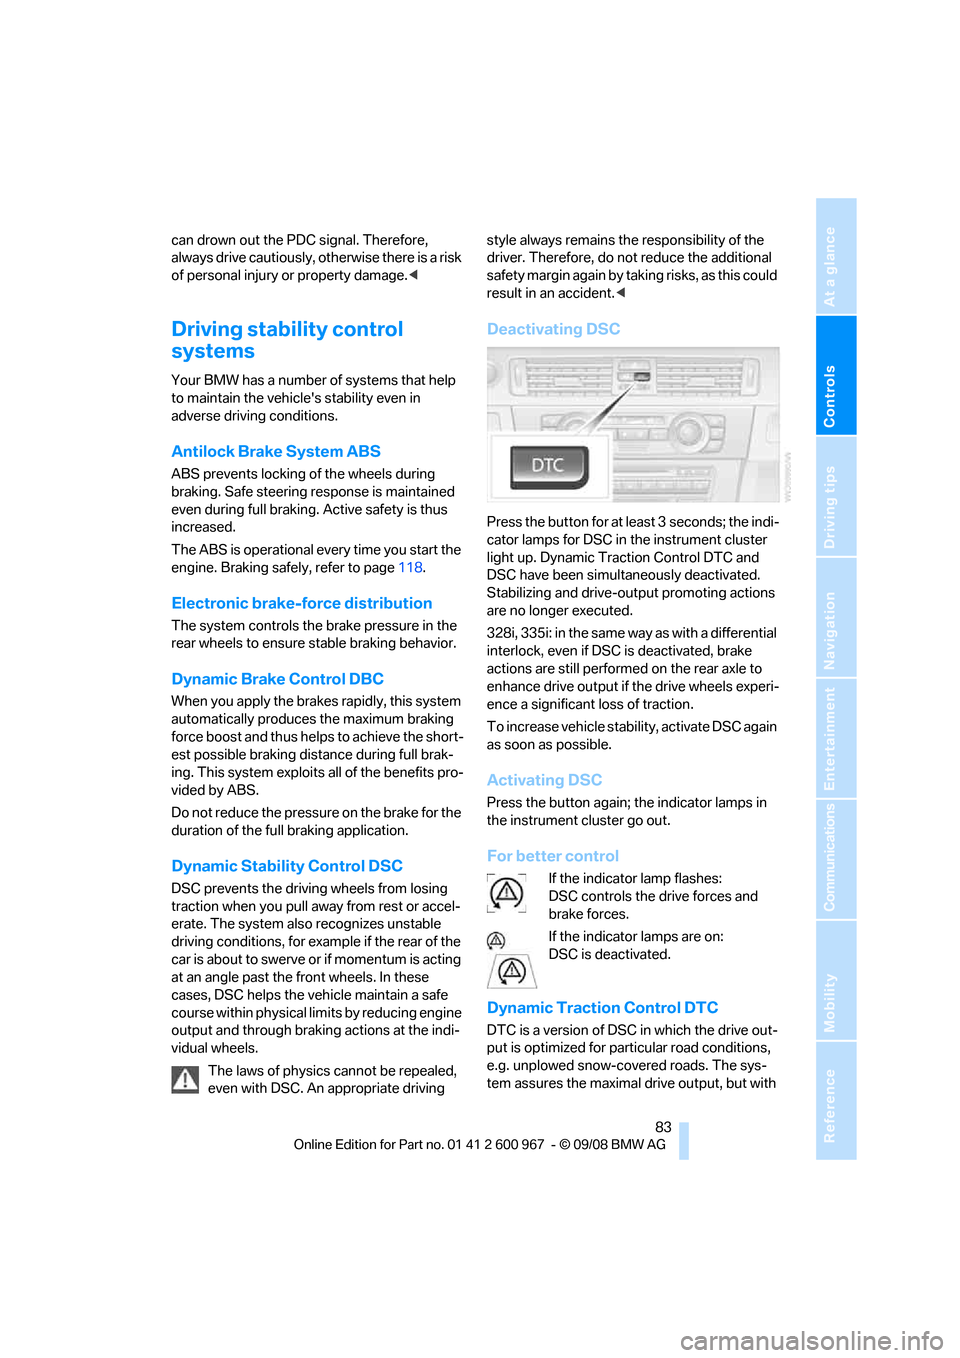
Deactivating DSC
Press the button for at least 3 seconds; the indi-
cator lamps for DSC in the instrument cluster
light up. Dynamic Traction Control DTC and
DSC have been simultaneously deactivated.
Stabilizing and drive-output promoting actions
are no longer executed.
328i, 335i: in the same way as with a differential
interlock, even if DSC is deactivated, brake
actions are still performed on the rear axle to
enhance drive output if the drive wheels experi-
ence a significant loss of traction.
To increase vehicle stability, activate DSC again
as soon as possible.
Activating DSC
Press the button again; the indicator lamps in
the instrument cluster go out.
For better control
If the indicator lamp flashes:
DSC controls the drive forces and
brake forces.
If the indicator lamps are on:
DSC is deactivated.
Dynamic Traction Control DTC
DTC is a version of DSC in which the drive out-
put is optimized for particular road conditions,
e.g. unplowed snow-covered roads. The sys-
tem assures the maximal drive output, but with
Page 86 of 260
Technology for driving comfort and safety
84 reduced driving stability. It is therefore neces-
sary to drive with appropriate caution.
You may find it useful to briefly activate DTC
under the following special circumstances:
>When driving uphill on snow-covered roads,
in slush or on unplowed, snow-covered
roads
>When rocking a stuck vehicle free or start-
ing off in deep snow or on loose ground
>When driving with snow chains
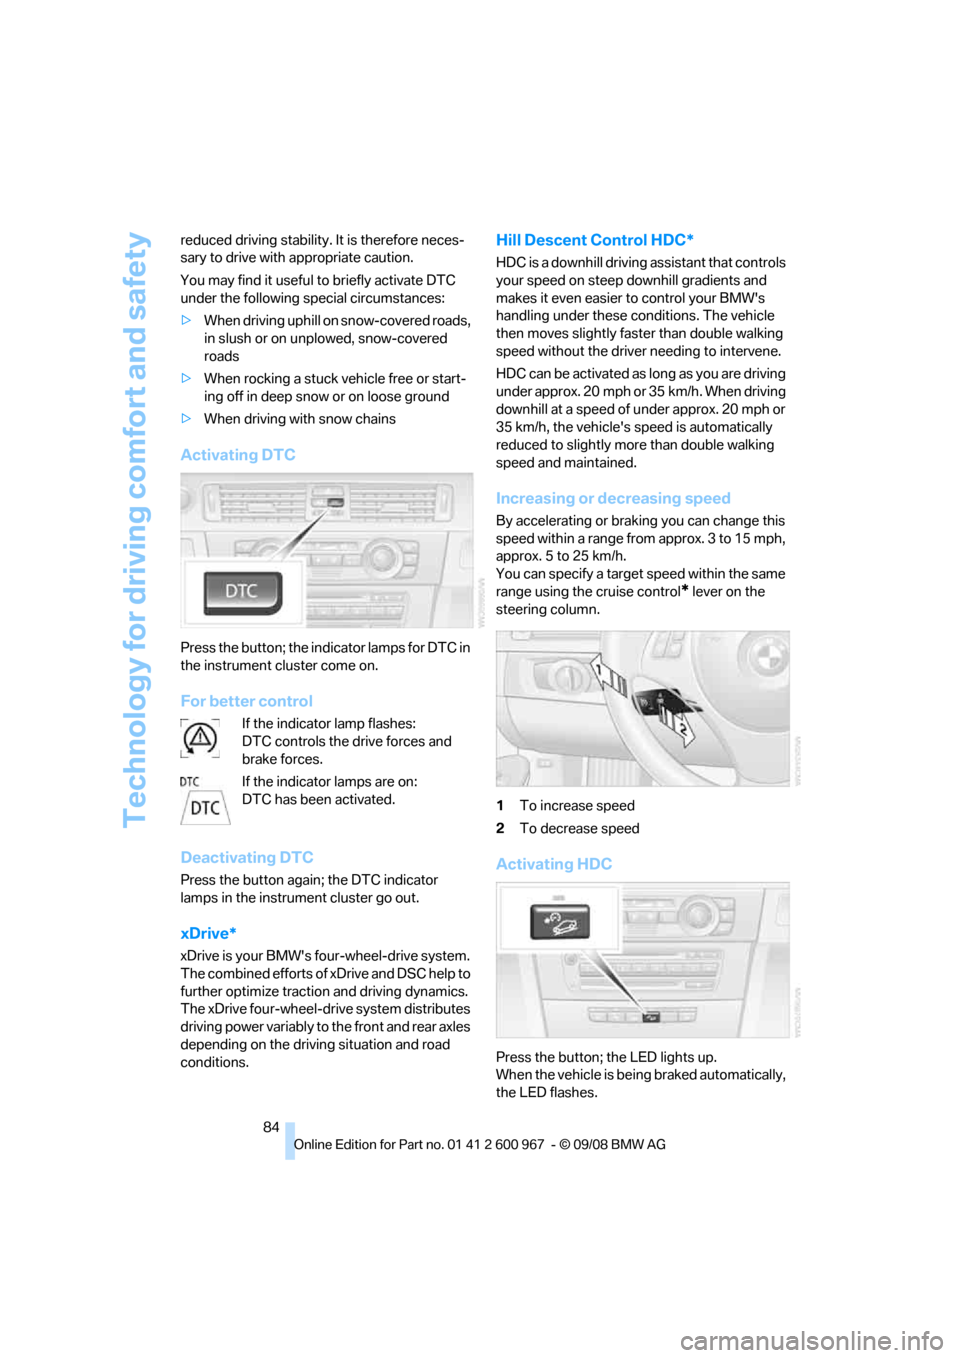
Activating DTC
Press the button; the indicator lamps for DTC in
the instrument cluster come on.
For better control
If the indicator lamp flashes:
DTC controls the drive forces and
brake forces.
If the indicator lamps are on:
DTC has been activated.
Deactivating DTC
Press the button again; the DTC indicator
lamps in the instrument cluster go out.
xDrive*
xDrive is your BMW's four-wheel-drive system.
The combined efforts of xDrive and DSC help to
further optimize traction and driving dynamics.
The xDrive four-wheel-drive system distributes
driving power variably to the front and rear axles
depending on the driving situation and road
conditions.
Hill Descent Control HDC*
HDC is a downhill driving assistant that controls
your speed on steep downhill gradients and
makes it even easier to control your BMW's
handling under these conditions. The vehicle
then moves slightly faster than double walking
speed without the driver needing to intervene.
HDC can be activated as long as you are driving
under approx. 20 mph or 35 km/h. When driving
downhill at a speed of under approx. 20 mph or
35 km/h, the vehicle's speed is automatically
reduced to slightly more than double walking
speed and maintained.
Increasing or decreasing speed
By accelerating or braking you can change this
speed within a range from approx. 3 to 15 mph,
approx. 5 to 25 km/h.
You can specify a target speed within the same
range using the cruise control
* lever on the
steering column.
1To increase speed
2To decrease speed
Activating HDC
Press the button; the LED lights up.
When the vehicle is being braked automatically,
the LED flashes.
Page 104 of 260
Practical interior accessories
102
Practical interior accessories
Integrated universal remote
control*
The concept
The integrated universal remote control can
replace as many as three hand-held transmit-
ters for various remote-controlled devices,
such as garage doors and gates or lighting sys-
tems. The integrated universal remote control
registers and stores signals from the original
hand-held transmitters.
The signal of an original hand-held transmitter
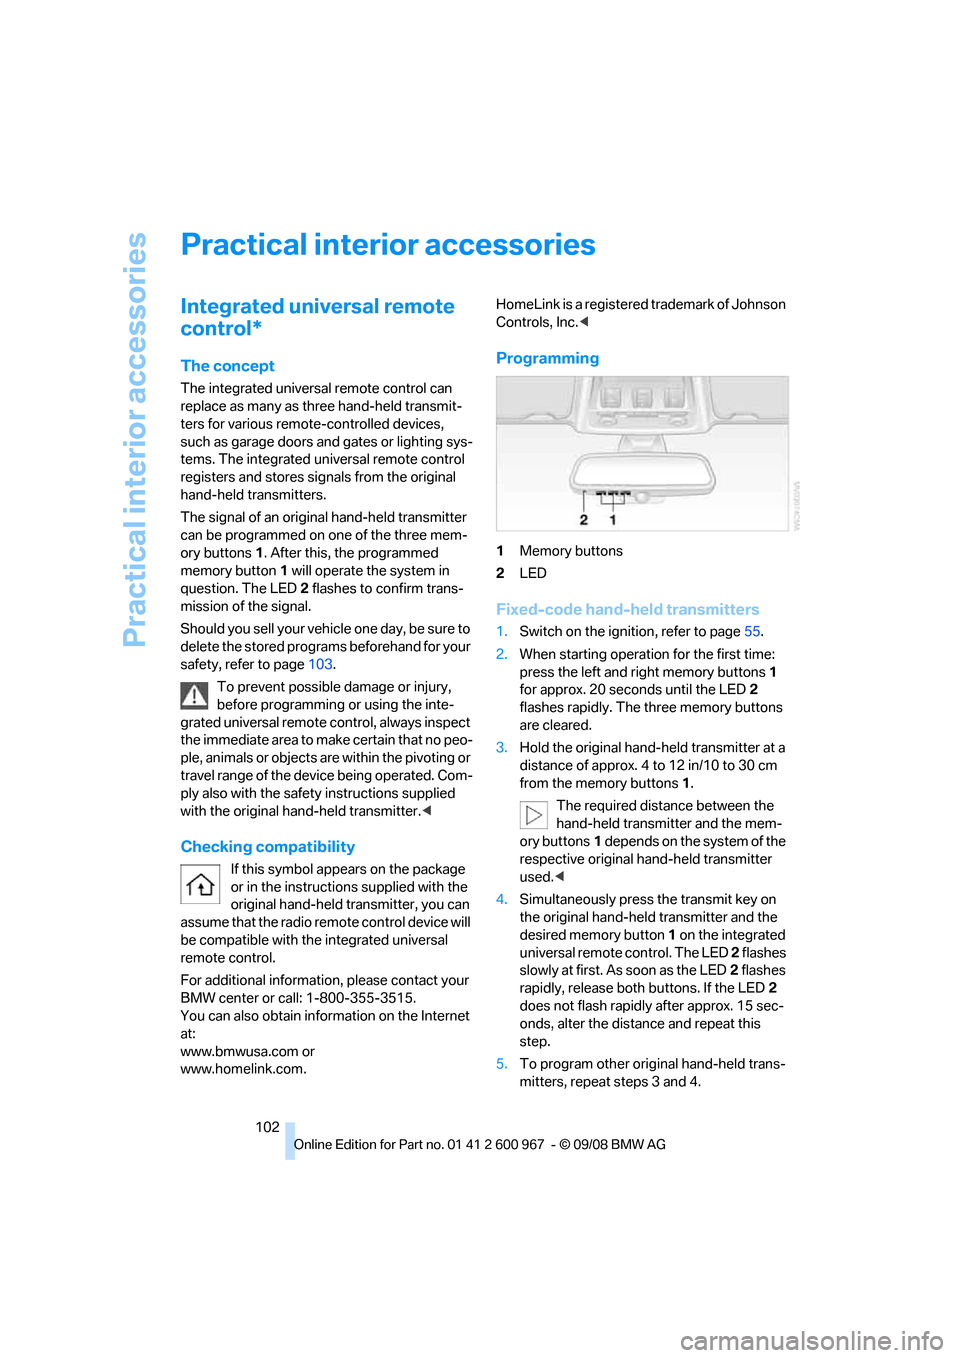
can be programmed on one of the three mem-
ory buttons1. After this, the programmed
memory button1 will operate the system in
question. The LED2 flashes to confirm trans-
mission of the signal.
Should you sell your vehicle one day, be sure to
delete the stored programs beforehand for your
safety, refer to page103.
To prevent possible damage or injury,
before programming or using the inte-
grated universal remote control, always inspect
the immediate area to make certain that no peo-
ple, animals or objects are within the pivoting or
travel range of the device being operated. Com-
ply also with the safety instructions supplied
with the original hand-held transmitter.<
Checking compatibility
If this symbol appears on the package
or in the instructions supplied with the
original hand-held transmitter, you can
assume that the radio remote control device will
be compatible with the integrated universal
remote control.
For additional information, please contact your
BMW center or call: 1-800-355-3515.
You can also obtain information on the Internet
at:
www.bmwusa.com or
www.homelink.com. HomeLink is a registered trademark of Johnson
Controls, Inc.<
Programming
1Memory buttons
2LED
Fixed-code hand-held transmitters
1.Switch on the ignition, refer to page55.
2.When starting operation for the first time:
press the left and right memory buttons1
for approx. 20 seconds until the LED2
flashes rapidly. The three memory buttons
are cleared.
3.Hold the original hand-held transmitter at a
distance of approx. 4 to 12 in/10 to 30 cm
from the memory buttons1.
The required distance between the
hand-held transmitter and the mem-
ory buttons1 depends on the system of the
respective original hand-held transmitter
used.<
4.Simultaneously press the transmit key on
the original hand-held transmitter and the
desired memory button 1 on the integrated
universal remote control. The LED 2 flashes
slowly at first. As soon as the LED2 flashes
rapidly, release both buttons. If the LED2
does not flash rapidly after approx. 15 sec-
onds, alter the distance and repeat this
step.
5.To program other original hand-held trans-
mitters, repeat steps 3 and 4.