stop start BMW 335I XDRIVE CONVERTIBLE 2011 E94 User Guide
[x] Cancel search | Manufacturer: BMW, Model Year: 2011, Model line: 335I XDRIVE CONVERTIBLE, Model: BMW 335I XDRIVE CONVERTIBLE 2011 E94Pages: 278, PDF Size: 8.23 MB
Page 107 of 278
Controls
105Reference
At a glance
Driving tips
Communications
Navigation
Entertainment
Mobility
If the automatic headlamp control is acti-
vated, the low beams will come on auto-
matically when you switch on the fog lamps.<
Instrument lighting
You can adjust the brightness of the instrument
lighting only when the parking lamps or the low
beams are switched on.
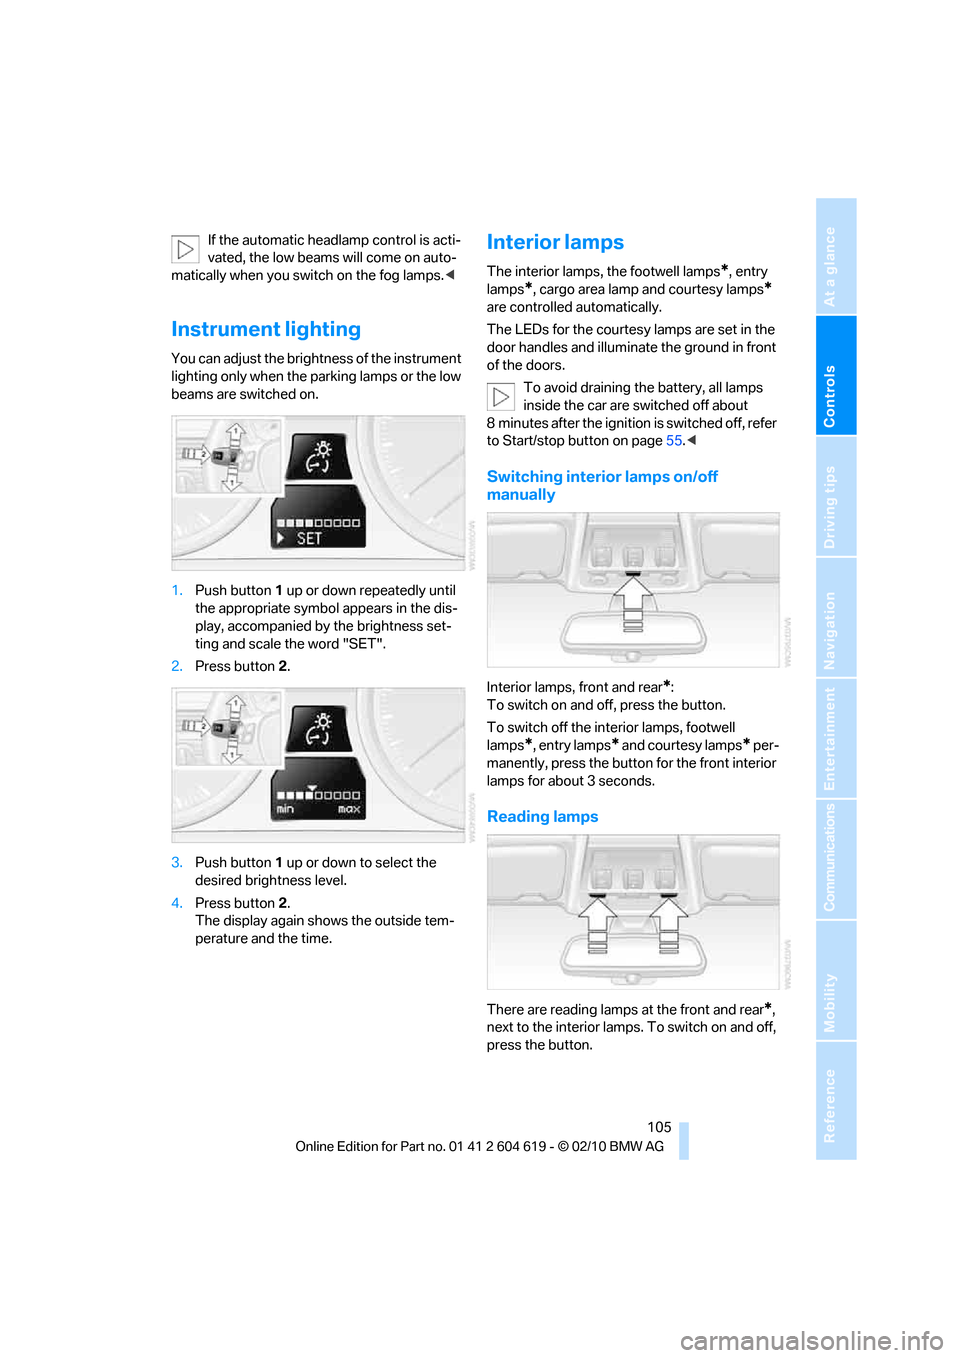
1.Push button 1 up or down repeatedly until
the appropriate symbol appears in the dis-
play, accompanied by the brightness set-
ting and scale the word "SET".
2.Press button 2.
3.Push button 1 up or down to select the
desired brightness level.
4.Press button 2.
The display again shows the outside tem-
perature and the time.
Interior lamps
The interior lamps, the footwell lamps*, entry
lamps
*, cargo area lamp and courtesy lamps*
are controlled automatically.
The LEDs for the courtesy lamps
are set in the
door handles and illuminate the ground in front
of the doors.
To avoid draining the battery, all lamps
inside the car are switched off about
8 minutes after the ignition is switched off, refer
to Start/stop button on page55.<
Switching interior lamps on/off
manually
Interior lamps, front and rear*:
To switch on and off, press the button.
To switch off the interior lamps, footwell
lamps
*, entry lamps* and courtesy lamps* per-
manently, press the button for the front interior
lamps for about 3 seconds.
Reading lamps
There are reading lamps at the front and rear*,
next to the interior lamps. To switch on and off,
press the button.
Page 146 of 278
Destination guidance
144
Destination guidance
Starting destination
guidance
1."Navigation"
2."Enter address"
3.Select the destination.
4."Accept destination"
5."Start guidance"
The route is displayed on the Control Display
after it is calculated.
In the map view, the distance from the destina-
tion/intermediate destination and the estimated
arrival time are displayed.
Terminating destination
guidance
1."Navigation"
2."Map"
3.Select the symbol.
4."Stop guidance"
Continuing destination
guidance
If the destination was not reached during the
last trip, destination guidance can be resumed.
"Resume guidance"
Route criteria
General information
You can influence the calculated route by
choosing certain route criteria. You can change
the route criteria as often as you like during des-
tination entry or during destination guidance.
The route is planned according to fixed rules.
The type of road is taken into account, e.g.
whether it is a highway or a winding road. As a
result, the routes recommended by the naviga-
tion system may not always be the same ones
that you would choose based on personal expe-
rience.
The settings are stored for the remote control
currently in use.
Changing route criteria
1."Navigation"
2."Map"
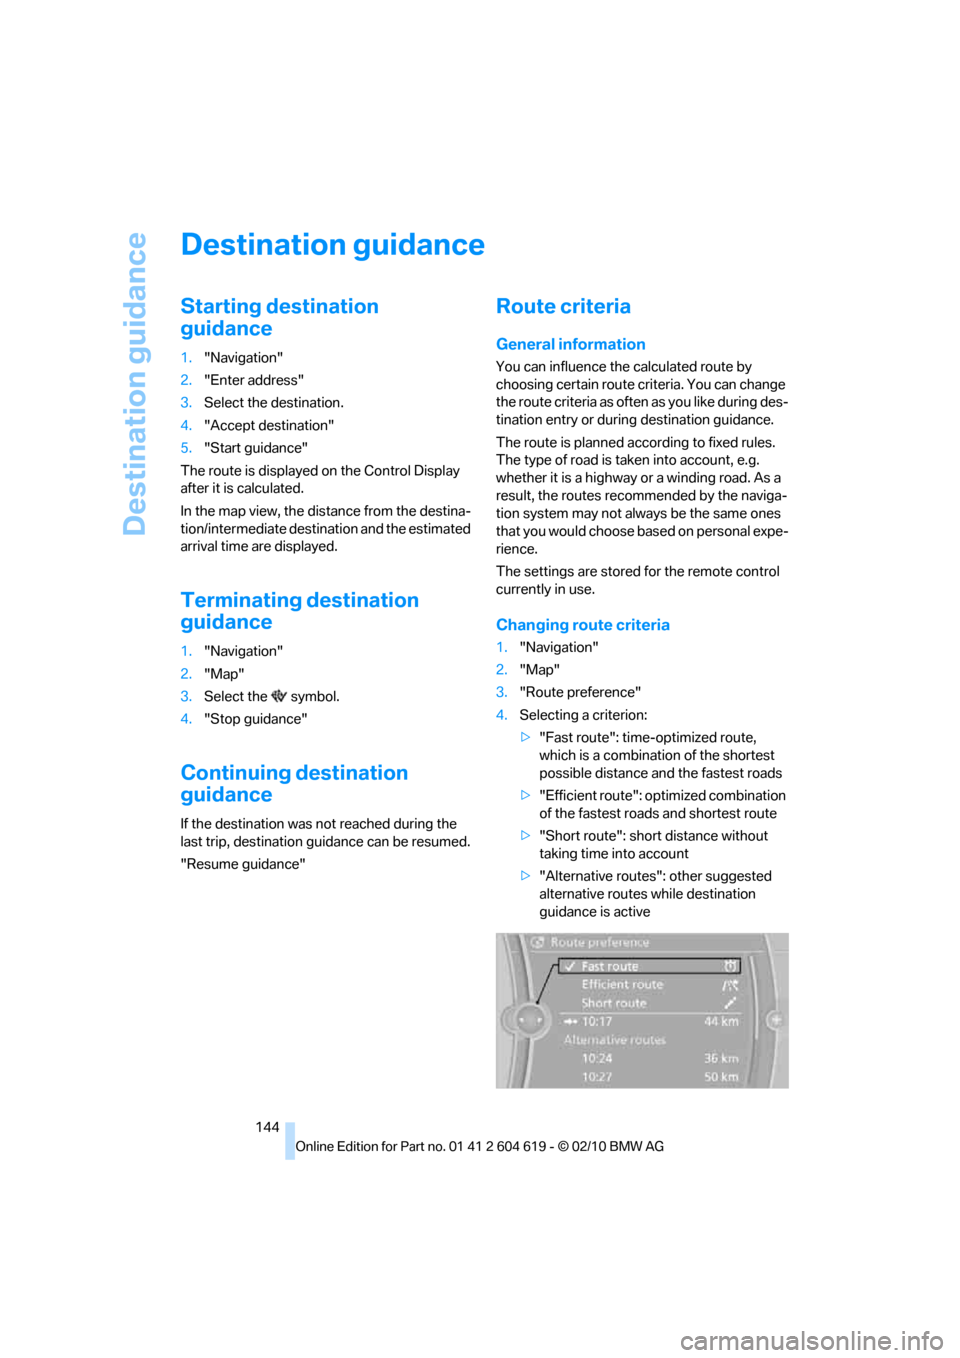
3."Route preference"
4.Selecting a criterion:
>"Fast route": time-optimized route,
which is a combination of the shortest
possible distance and the fastest roads
>"Efficient route": optimized combination
of the fastest roads and shortest route
>"Short route": short distance without
taking time into account
>"Alternative routes": other suggested
alternative routes while destination
guidance is active
Page 148 of 278
Destination guidance
146
Gas station recommendations
The remaining range is calculated and gas sta-
tions along the route are recommended.
1."Navigation"
2."Route information"
3."Recommended refuel"
A list of gas stations is displayed.
4.Select a gas station.
5.Select the symbol.
6."Start guidance" or "Add as another dest.".
Destination guidance
through voice instructions
Switching voice instructions on/off
Voice instructions can be switched on or off
during destination guidance.
1."Navigation"
2."Map"
3. Select the symbol.
For rapid access, the feature can be stored on a
programmable memory key, refer to page20.
Repeating a voice instruction
1."Navigation"
2."Map"
3. Highlight the symbol.
4.Press the controller twice.
Adjusting the volume of voice
instructions*
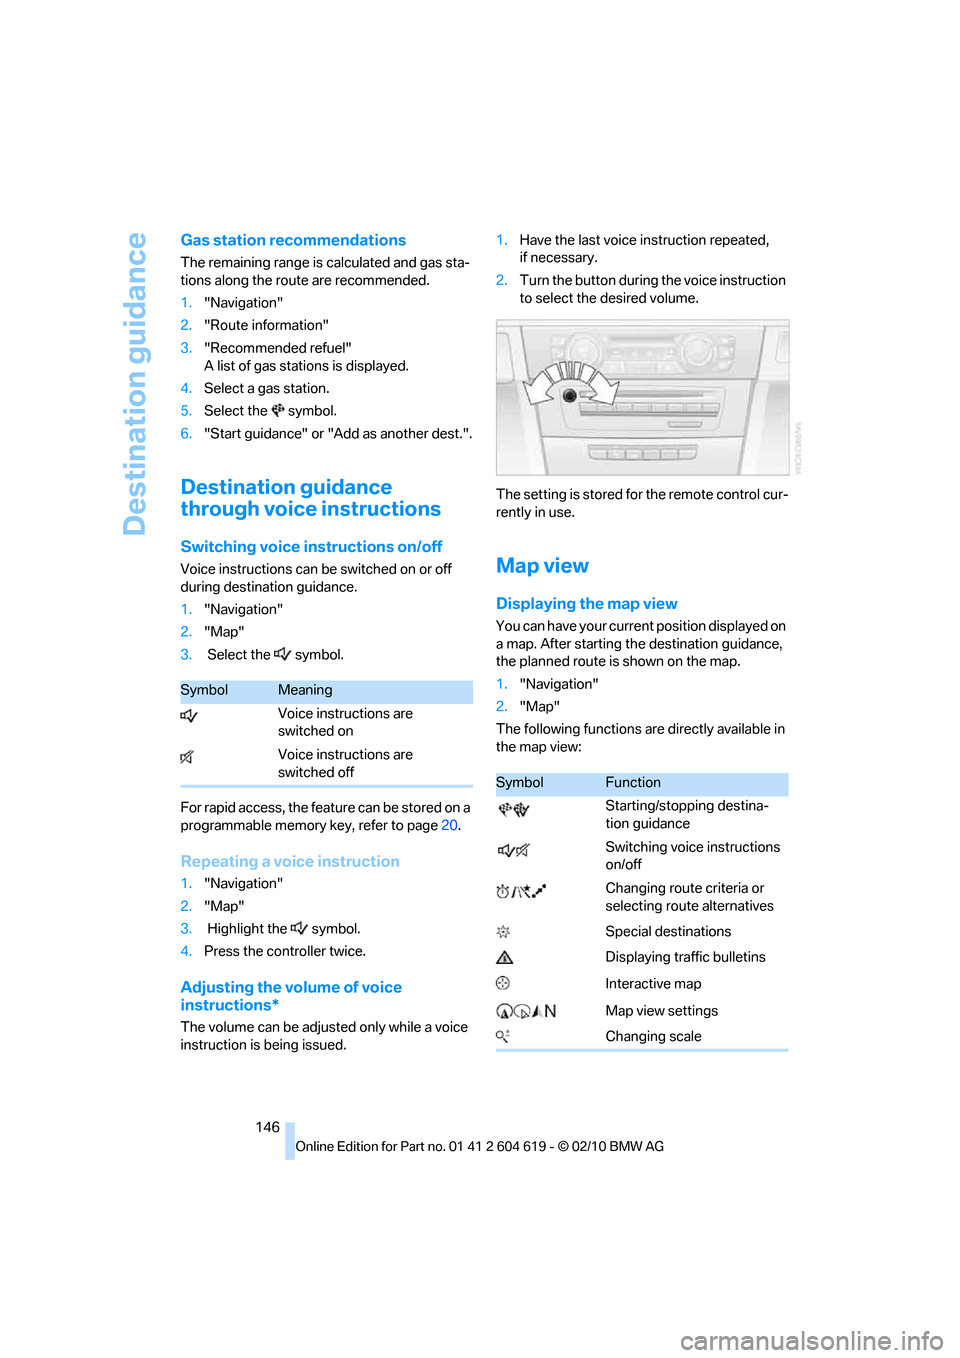
The volume can be adjusted only while a voice
instruction is being issued.1.Have the last voice instruction repeated,
if necessary.
2.Turn the button during the voice instruction
to select the desired volume.
The setting is stored for the remote control cur-
rently in use.
Map view
Displaying the map view
You can have your current position displayed on
a map. After starting the destination guidance,
the planned route is shown on the map.
1."Navigation"
2."Map"
The following functions are directly available in
the map view:
SymbolMeaning
Voice instructions are
switched on
Voice instructions are
switched off
SymbolFunction
Starting/stopping destina-
tion guidance
Switching voice instructions
on/off
Changing route criteria or
selecting route alternatives
Special destinations
Displaying traffic bulletins
Interactive map
Map view settings
Changing scale
Page 170 of 278
CD/DVD player and CD changer
168 In fast forward/reverse: the speed increases
every time the controller is pressed. To stop,
start playback.
DVD menu
1.If necessary, turn the controller to open the
Video menu.
2. "DVD menu"
The DVD menu is displayed. The display
depends on the contents of the DVD.
>To select menu items: move and press the
controller.
>To change to the Video menu: turn the con-
troller and select "Back".
DVD/VCD settings
For some DVDs, settings can only be made via
the DVD menu; refer also to the information on
your DVD.
Language*
1.Turn the controller during playback.
2.Open "Options".
3."Audio/language"
4.Select the desired language.The languages that are available depend on the
DVD.
Subtitles*
Subtitles can be selected if they are contained
on the DVD.
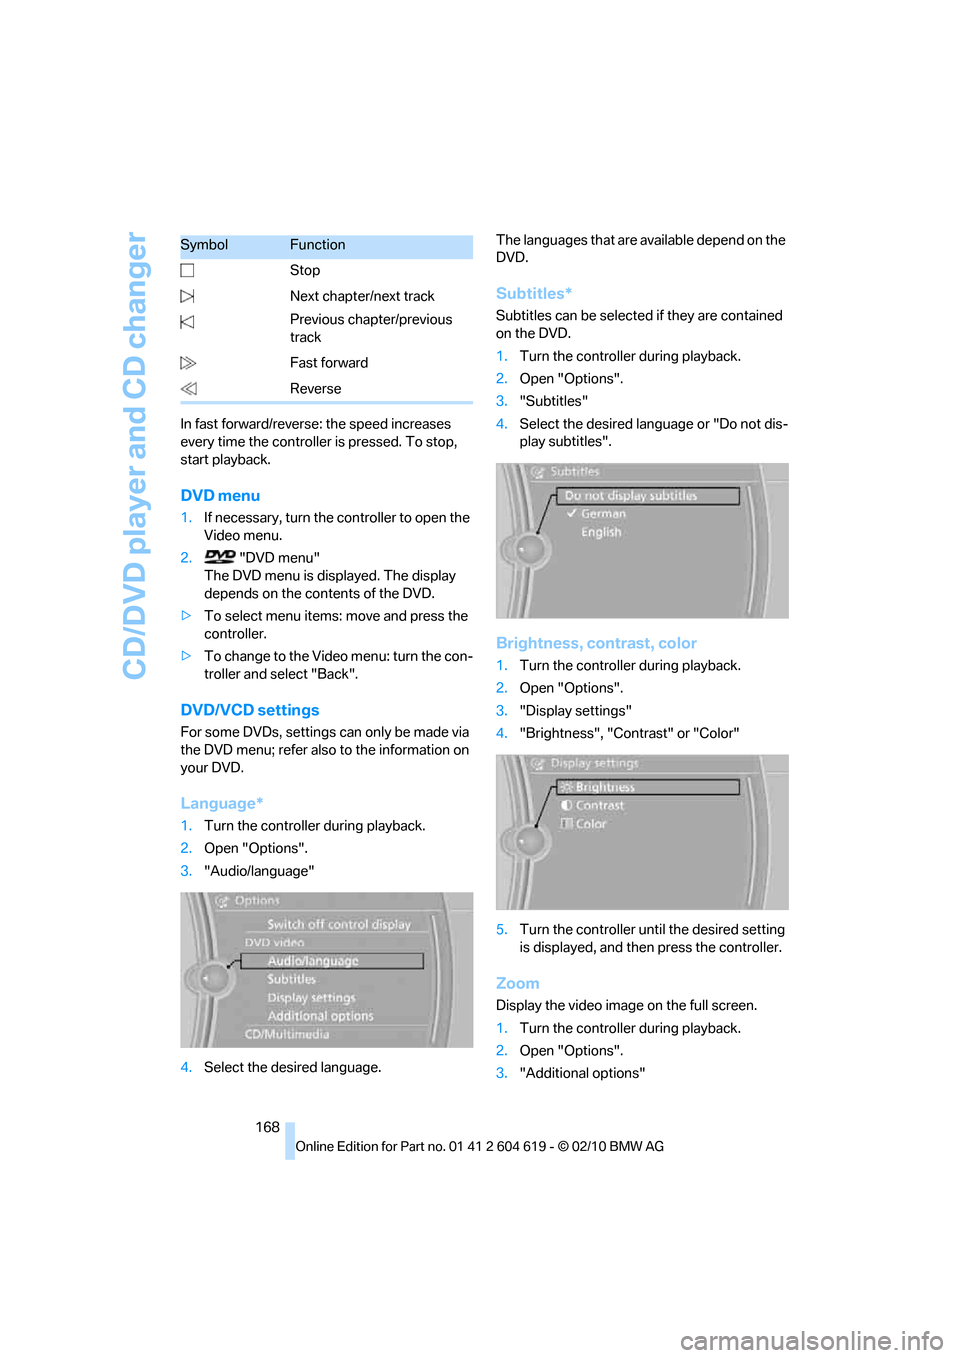
1.Turn the controller during playback.
2.Open "Options".
3."Subtitles"
4.Select the desired language or "Do not dis-
play subtitles".
Brightness, contrast, color
1.Turn the controller during playback.
2.Open "Options".
3."Display settings"
4."Brightness", "Contrast" or "Color"
5.Turn the controller until the desired setting
is displayed, and then press the controller.
Zoom
Display the video image on the full screen.
1.Turn the controller during playback.
2.Open "Options".
3."Additional options" Stop
Next chapter/next track
Previous chapter/previous
track
Fast forward
Reverse
SymbolFunction
Page 187 of 278
185
Entertainment
Reference
At a glance
Controls
Driving tips Communications
Navigation
Mobility
>Bluetooth has been activated in the vehicle,
refer to page187, and on the mobile phone.
>Depending on the mobile phone, certain
settings may be necessary on the mobile
phone, e.g. via the following menu items:
>Bluetooth switched on
>Connection must be allowed without
requiring further confirmation
>Reconnection
>Depending on the mobile phone type, the
power-saving mode setting, for example,
may result in a paired mobile phone not
being detected by the vehicle.
>For pairing purposes, define any 4 to 16-
digit number as a Bluetooth passkey,
e.g. 25081107. A long and complex number
offers the best protection against unautho-
rized access. This Bluetooth passkey is no
longer required after pairing is successful.
>The ignition is switched on.
Pair the mobile phone with the vehicle
only when the car is stationary, to avoid
endangering the car's occupants and other
road users by being distracted.<
Switch on ignition
1.Insert remote control all the way into the
ignition lock.
2.Switch on ignition without operating the
brake or clutch or pressing the start/stop
button.
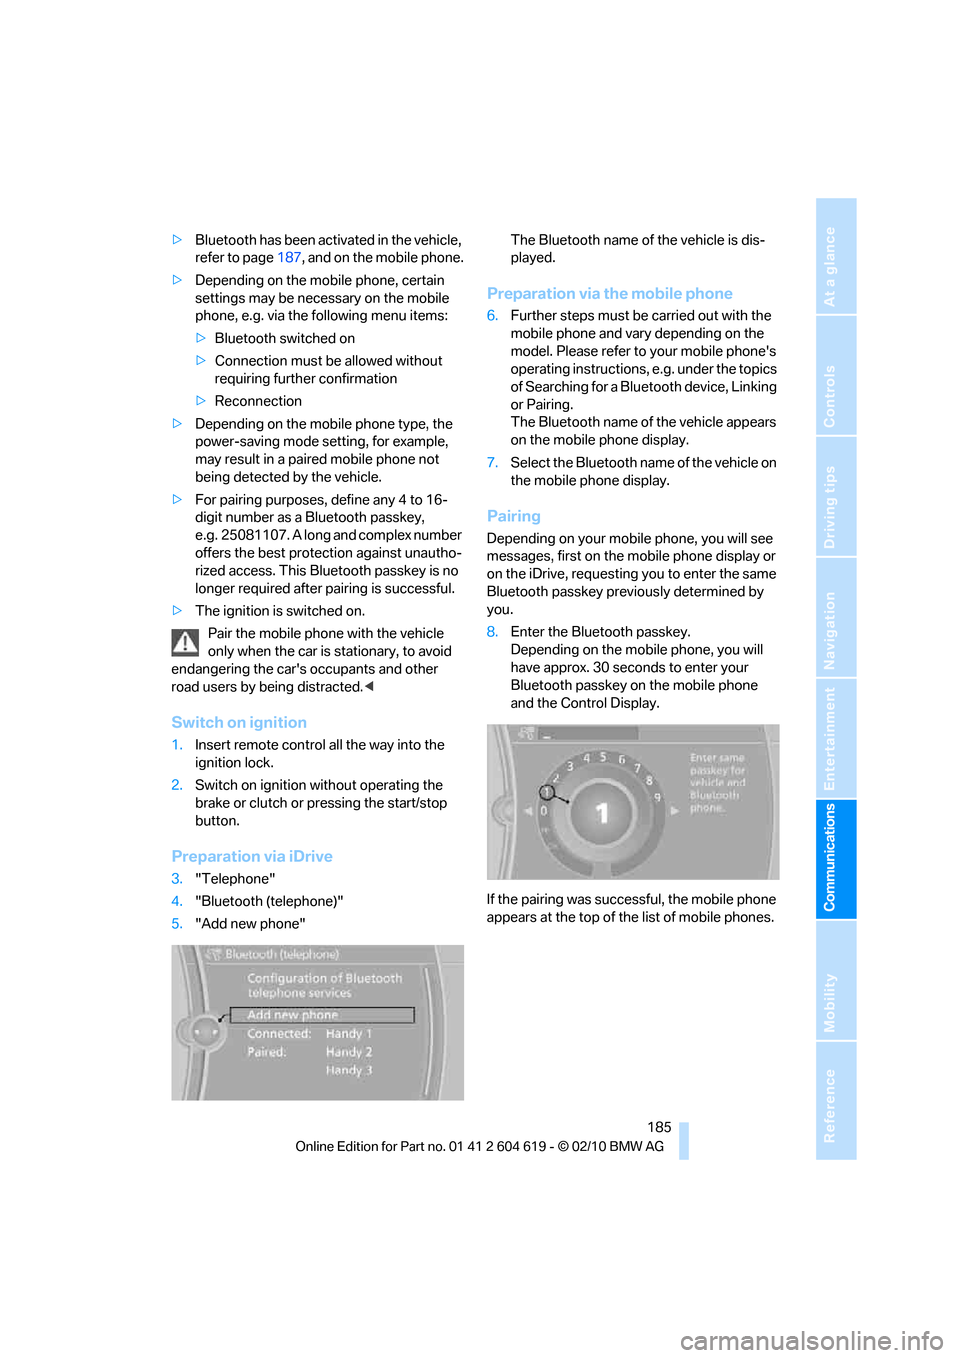
Preparation via iDrive
3."Telephone"
4."Bluetooth (telephone)"
5."Add new phone"The Bluetooth name of the vehicle is dis-
played.
Preparation via the mobile phone
6.Further steps must be carried out with the
mobile phone and vary depending on the
model. Please refer to your mobile phone's
operating instructions, e.g. under the topics
of Searching for a Bluetooth device, Linking
or Pairing.
The Bluetooth name of the vehicle appears
on the mobile phone display.
7.Select the Bluetooth name of the vehicle on
the mobile phone display.
Pairing
Depending on your mobile phone, you will see
messages, first on the mobile phone display or
on the iDrive, requesting you to enter the same
Bluetooth passkey previously determined by
you.
8.Enter the Bluetooth passkey.
Depending on the mobile phone, you will
have approx. 30 seconds to enter your
Bluetooth passkey on the mobile phone
and the Control Display.
If the pairing was successful, the mobile phone
appears at the top of the list of mobile phones.
Page 245 of 278
Mobility
243Reference
At a glance
Controls
Driving tips
Communications
Navigation
Entertainment
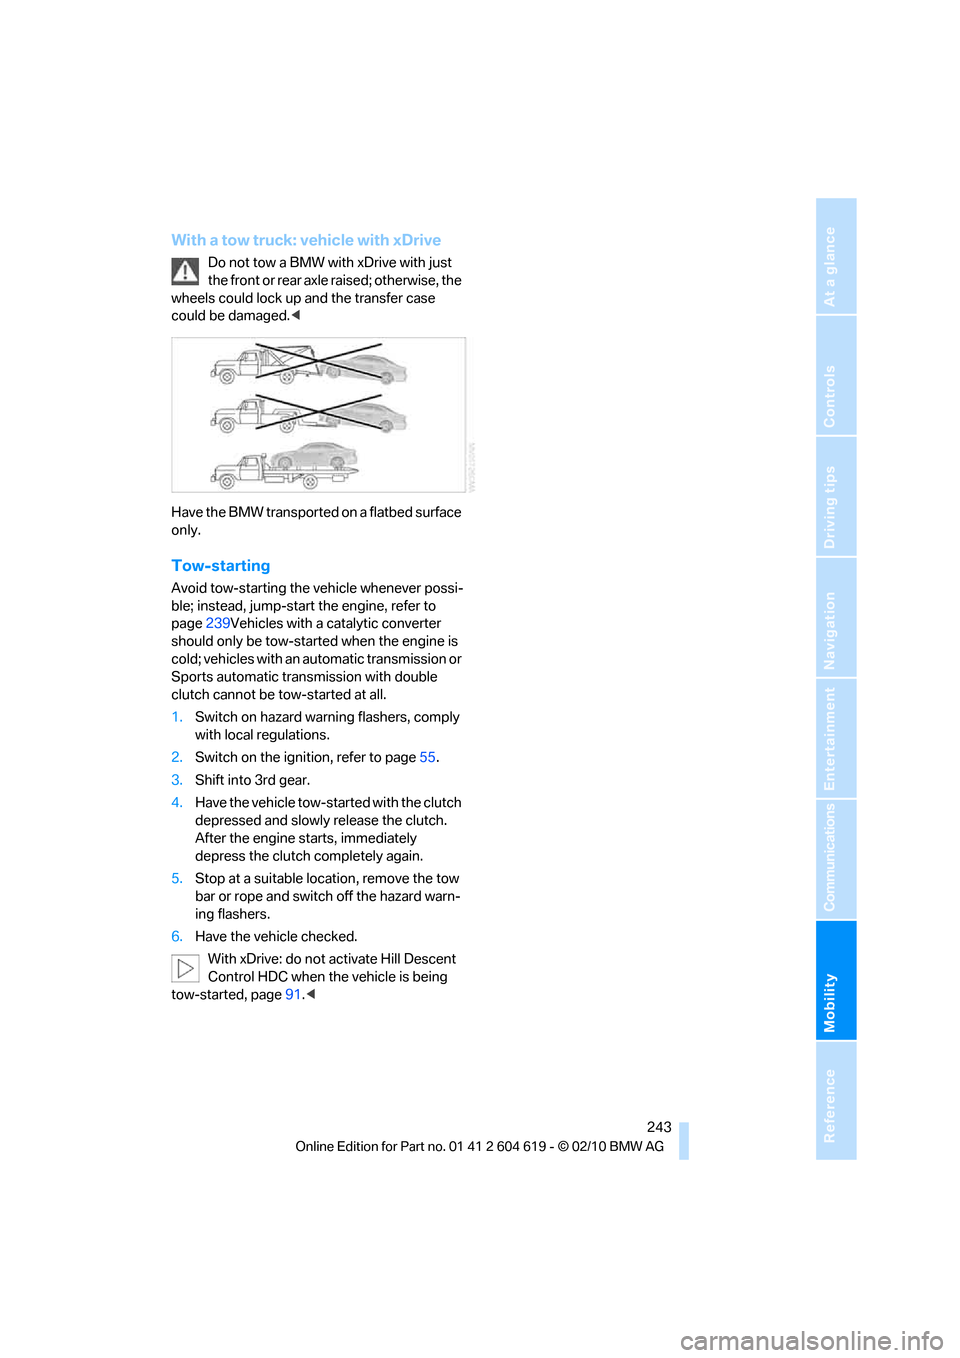
With a tow truck: vehicle with xDrive
Do not tow a BMW with xDrive with just
the front or rear axle raised; otherwise, the
wheels could lock up and the transfer case
could be damaged.<
Have the BMW transported on a flatbed surface
only.
Tow-starting
Avoid tow-starting the vehicle whenever possi-
ble; instead, jump-start the engine, refer to
page239Vehicles with a catalytic converter
should only be tow-started when the engine is
cold; vehicles with an automatic transmission or
Sports automatic transmission with double
clutch cannot be tow-started at all.
1.Switch on hazard warning flashers, comply
with local regulations.
2.Switch on the ignition, refer to page55.
3.Shift into 3rd gear.
4.Have the vehicle tow-started with the clutch
depressed and slowly release the clutch.
After the engine starts, immediately
depress the clutch completely again.
5.Stop at a suitable location, remove the tow
bar or rope and switch off the hazard warn-
ing flashers.
6.Have the vehicle checked.
With xDrive: do not activate Hill Descent
Control HDC when the vehicle is being
tow-started, page91.<
Page 255 of 278
Reference 253
At a glance
Controls
Driving tips
Communications
Navigation
Entertainment
Mobility
Presets
Telephone
Navigation
General information
FunctionCommand
Opening the stored stations{Presets}
Choosing a stored station{Select preset}
Selecting a stored station{Preset …} e.g. stored station 2
FunctionCommand
Opening the Telephone menu{Telephone}
Displaying the phone book{Phonebook}
Redialing{Redial}
Displaying accepted calls{Received calls}
Dialing a phone number{Dial number}
Displaying the list of messages{Messages}
Displaying Bluetooth devices{Bluetooth}
FunctionCommand
Navigation menu{Navigation}
Opening destination entry{Enter address}
Entering an address{Enter address}
Opening destination guidance{Guidance}
Starting destination guidance{Start guidance}
Ending destination guidance{Stop guidance}
Opening the home address{Home address}
Opening the route criteria{Route preference}
Opening the route{Route information}
Switching on the voice instructions{Switch on voice instructions}
Repeating a voice instruction{Repeat voice instructions}
Switching off the voice instructions{Switch off voice instructions}
Displaying the address book{Address book}
Page 261 of 278
Reference 259
At a glance
Controls
Driving tips
Communications
Navigation
Entertainment
Mobility
AUX-IN
– port115
AUX-IN port177
Available services202
Average fuel consumption77
– setting the units80
Average speed77
Avoid highways in
navigation144
Avoiding unintentional
alarms33
Axle loads, refer to
Weights249
B
Backrest contour, refer to
Lumbar support44
Backrests, refer to Seat
adjustment43
Backrest width adjustment44
Back seats
– refer to Rear seats46
Bag holder119
Band-aids, refer to First aid
pouch239
Bar, refer to Towing
methods242
Base plate for telephone or
mobile phone
– refer to Snap-in adapter195
– refer to Snap-in adapter in
the center armrest storage
compartment115
Bass, tone setting154
Battery237
– charging237
– disposal35,237
– jump-starting239
– remote control26
– replacing237
– temporary power failure237
Battery for mobile phone195
Battery renewal
– remote control35
– remote control for vehicle35
Being towed241
Belt hand-over49
– pinch protection system50Belts, refer to Safety belts49
Belt tensioner, refer to Safety
belts49
Beverage holders, refer to
Cupholders116
Black ice, refer to Outside
temperature warning75
Blinds, refer to Roller sun
blinds114
Blower, refer to Air
volume108
Bluetooth, activating/
deactivating187
BMW
– car shampoo232
BMW Assist198
BMW Assist,
activating200,202
BMW Homepage4
BMW Maintenance
System227
BMW Search200
BMW webpage4
Bottle holders, refer to
Cupholders116
Brake Assist, refer to Dynamic
Brake Control DBC89
Brake fluid, refer to Service
requirements80
Brake Force Display97
Brake lamps
– Brake Force Display97
Brake pads126
– breaking in126
Brake rotors128
– brakes126
– breaking in126
Brakes
– ABS89
– BMW Maintenance
System227
– Brake Force Display97
– breaking in126
– parking brake57
– service requirements80
Brakes, refer to Braking
safely128Brake system126
– BMW Maintenance
System227
– breaking in126
– disc brakes128
Breakdown services, refer to
Roadside Assistance238
Breaking in the clutch126
Breaking in the differential,
refer to Engine and
differential126
Break-in period126
Brightness of the Control
Display87
Bulb changing, refer to Lamps
and bulbs233
Button for starting the engine,
refer to Start/stop button55
Buttons on the steering
wheel11
C
California Proposition 65
warning6
Call
– accepting188
– ending188
– rejecting188
Calling, refer to Phone
numbers, dialing188
Calling, refer to Telephone
owner's manual
Can holders, refer to
Cupholders116
Capacities250
Capacity of the cargo area249
Car battery, refer to Vehicle
battery237
Car care, refer to Care229
Page 272 of 278
Everything from A to Z
270 Speed limit86
Speed limit warning, refer to
Speed limit86
Speedometer12
Speed reading, refer to
Speedometer12
Speed Volume155
Split screen, refer to Control
Display, switching on/off19
Split screen content, refer to
Display for split screen
content, selecting20
Sport program with 7-gear
Sports automatic
transmission with double
clutch61
Sports automatic
transmission with double
clutch60
– driving dynamics control62
– Kick-down61
– Launch Control64
– manually unlocking parking
lock63
– neutral61
– reverse gear61
Spray nozzles, refer to
Cleaning windshield and
headlamps66
Stability control, refer to
Driving stability control
systems89
Start/stop button55
– starting the engine56
– switching off the engine56
Starting, refer to Starting the
engine56
Starting assistance, refer to
Jump-starting239
Starting difficulties
– jump-starting239
Starting the engine
– start/stop button55
Start menu17State/province, for
navigation135
Station, selecting
– radio157
Status of this Owner's Manual
at time of printing5
Steam jet229,230
Steering wheel51
– adjustment51
– buttons on steering
wheel11
– heating51
– lock55
– locking with Comfort
Access34
– shift paddles62
Steering wheel buttons, refer
to Shift paddles62
Steering with variable ratio,
refer to Active steering
96
Steptronic, refer to Automatic
transmission with
Steptronic58
Storage232
Storage compartments116
Storage nets120
Stored trip, calling up143
Storing a destination in the
address book137
Storing music172
Storing seat positions, refer to
Seat and mirror memory48
Storing tires221
Stowage, refer to Storage
compartments116
Street, entering,
navigation136
Summer tires, refer to Wheels
and tires208
Surround155
SVCD167
SW, waveband157
Switches, refer to Cockpit10
Switching off
– engine56Switching off the engine
– start/stop button55
Switching on
– audio154
– CD changer154
– CD player154
– radio154
Switching the cooling function
on and off108
Switch-on times of parked car
ventilation, preselecting110
Symbols4
– status information19
T
Tachometer75
Tailgate, refer to Trunk lid31
Tail lamp
– replacing bulb235
Tail lamp, refer to Tail
lamps235
Tail lamps235
– replacing bulb235,236
Tank contents, refer to
Capacities250
Technical data246
– dimensions247
Technical modifications, refer
to For your own safety5
Telephone184
– installation location, refer to
Center armrest115
– refer to separate Owner's
Manual
– voice commands192
TeleService199
TeleService Diagnosis200
TeleService Help200
Temperature
– automatic climate
control107
– changing unit of measure80
– coolant, refer to Coolant
temperature76