window BMW 335IS COUPE 2011 E93 User Guide
[x] Cancel search | Manufacturer: BMW, Model Year: 2011, Model line: 335IS COUPE, Model: BMW 335IS COUPE 2011 E93Pages: 278, PDF Size: 8.23 MB
Page 41 of 278
Controls
39Reference
At a glance
Driving tips
Communications
Navigation
Entertainment
Mobility
>If you open the hardtop while it is wet, e.g.
after driving in the rain, water may drip into
the cargo area. If necessary, remove items
from the cargo area beforehand to avoid
water stains or soiling.
Do not place any objects on the retract-
able hardtop or on the trunk lid; other-
wise, they could fall during movements of the
retractable hardtop and cause damage or injury.
Never move the retractable hardtop when the
rollover protection system is in the activated
position.
Driving when the hardtop is not fully opened or
closed may result in damage or injury.
Do not reach into the mechanism during the
opening or closing procedure. Keep children
away from the swiveling area of the retractable
hardtop.<
The retractable hardtop cannot be moved
at temperatures below + 147/–106. A
message appears on the Control Display.<
The retractable hardtop can only be
opened and closed when the vehicle is
stationary. To avoid causing damage, do not
drive off until the hardtop has stopped mov-
ing.<
Before opening and closing
>Comply with the safety precautions
described above.
>Ensure that the cargo area partition is
folded down and engaged on both sides,
refer to page119; otherwise, it will not be
possible to open the retractable hardtop.
>Do not place any objects next to or on the
cargo area partition and close the storage
compartment on the left side of the cargo
area.
>Do not exceed the maximum loading height
under the cargo area partition; refer to the
label in the cargo area showing a line indi-
cating the maximum height.
>Ensure that the trunk lid is closed.
>The vehicle should be parked on fairly
level ground. Excessive angle is indicated
by a lamp.
Opening and closing
When the vehicle is stationary and at radio
readiness or beyond, refer to page55:
If possible, conserve the battery by only
operating the retractable hardtop when
the engine is running.
Before closing the retractable hardtop, remove
all foreign objects from the windshield frame as
these could prevent the hardtop from closing
properly.<
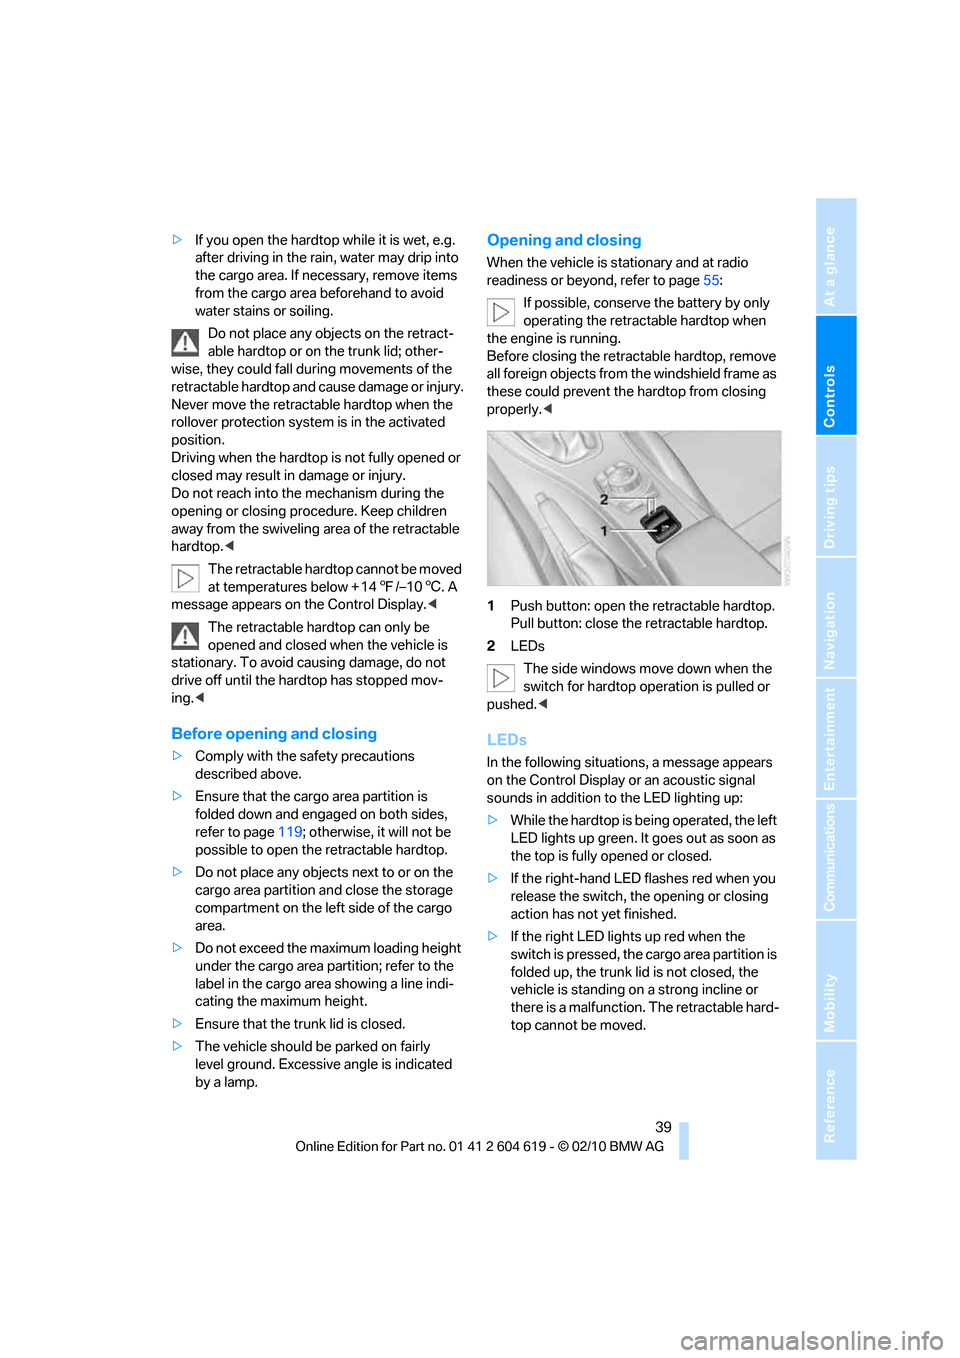
1Push button: open the retractable hardtop.
Pull button: close the retractable hardtop.
2LEDs
The side windows move down when the
switch for hardtop operation is pulled or
pushed.<
LEDs
In the following situations, a message appears
on the Control Display or an acoustic signal
sounds in addition to the LED lighting up:
>While the hardtop is being operated, the left
LED lights up green. It goes out as soon as
the top is fully opened or closed.
>If the right-hand LED flashes red when you
release the switch, the opening or closing
action has not yet finished.
>If the right LED lights up red when the
switch is pressed, the cargo area partition is
folded up, the trunk lid is not closed, the
vehicle is standing on a strong incline or
there is a malfunction. The retractable hard-
top cannot be moved.
Page 42 of 278
Opening and closing
40
Interruption
The automatic sequence of movements is
interrupted if the switch for hardtop operation is
released. The sequence can be continued in
the desired direction by pushing or pulling the
switch.
A hardtop that is not fully opened or
closed is a safety hazard.
Do not interrupt and resume the closing proce-
dure several times in close succession as this
could damage the mechanism.<
If the hardtop is not fully opened or
closed, the trunk lid cannot be opened
and the windows cannot be moved.<
Convenient operation with remote
control or via door lock
Refer to pages28 and30.
Wind deflector*
The wind deflector keeps air movements in the
passenger compartment to a minimum when
the hardtop is open and provides an even more
comfortable ride, particularly at high speeds.
Installation
The wind deflector is stored in a protective
cover in the cargo area. Brief instructions for
operation can be found on the protective cover.
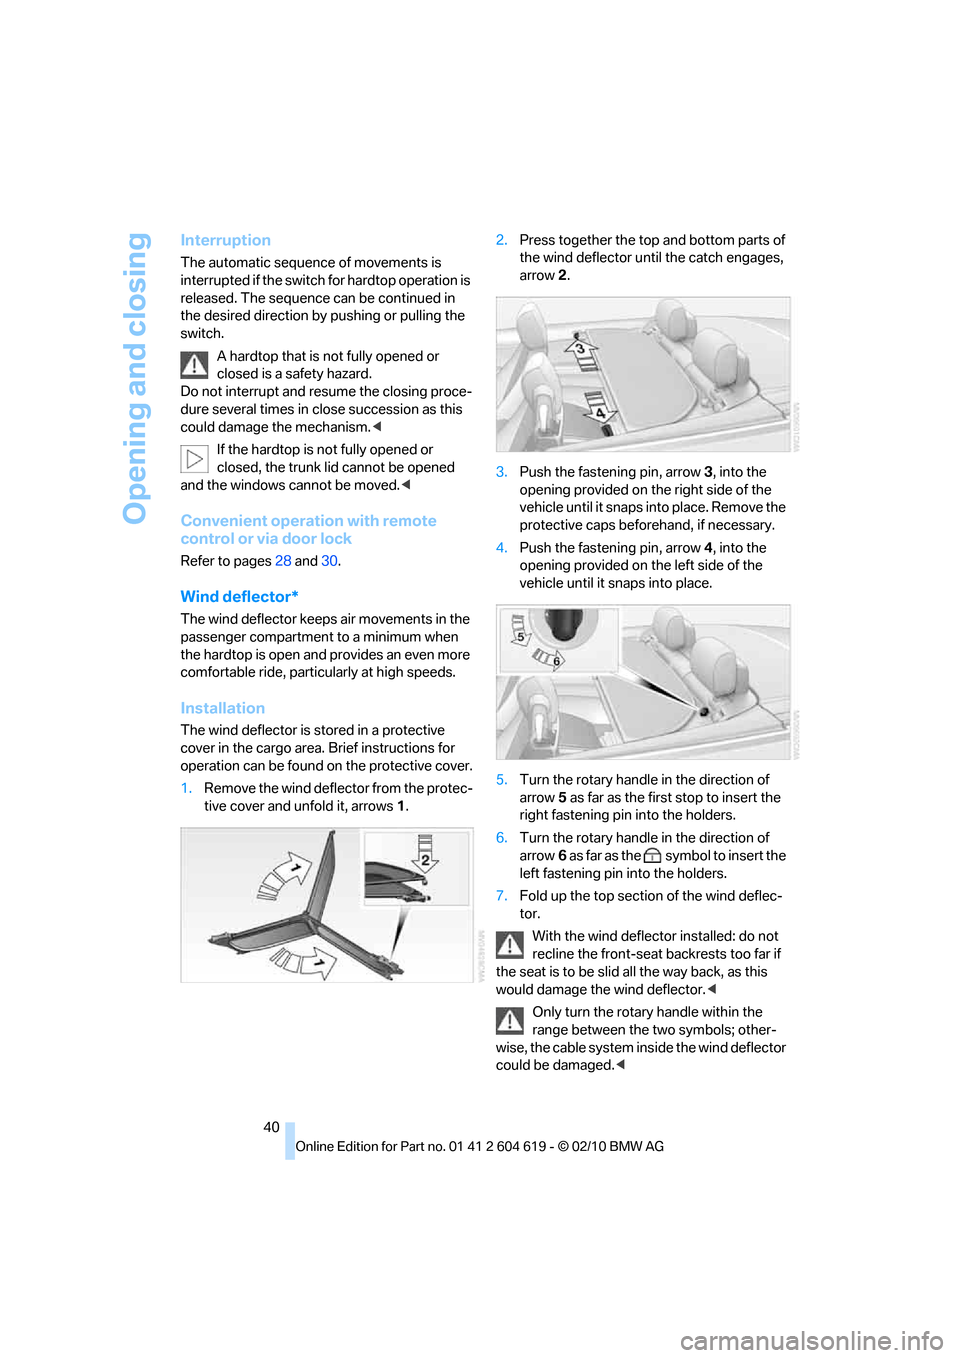
1.Remove the wind deflector from the protec-
tive cover and unfold it, arrows1.2.Press together the top and bottom parts of
the wind deflector until the catch engages,
arrow 2.
3.Push the fastening pin, arrow3, into the
opening provided on the right side of the
vehicle until it snaps into place. Remove the
protective caps beforehand, if necessary.
4.Push the fastening pin, arrow4, into the
opening provided on the left side of the
vehicle until it snaps into place.
5.Turn the rotary handle in the direction of
arrow5 as far as the first stop to insert the
right fastening pin into the holders.
6.Turn the rotary handle in the direction of
arrow6 as far as the symbol to insert the
left fastening pin into the holders.
7.Fold up the top section of the wind deflec-
tor.
With the wind deflector installed: do not
recline the front-seat backrests too far if
the seat is to be slid all the way back, as this
would damage the wind deflector.<
Only turn the rotary handle within the
range between the two symbols; other-
wise, the cable system inside the wind deflector
could be damaged.<
Page 43 of 278
Controls
41Reference
At a glance
Driving tips
Communications
Navigation
Entertainment
Mobility
Removing the wind deflector
Proceed in the reverse order as used for instal-
lation.
Protective caps are provided in the vehicle for
the holders of the wind deflector.
Folding
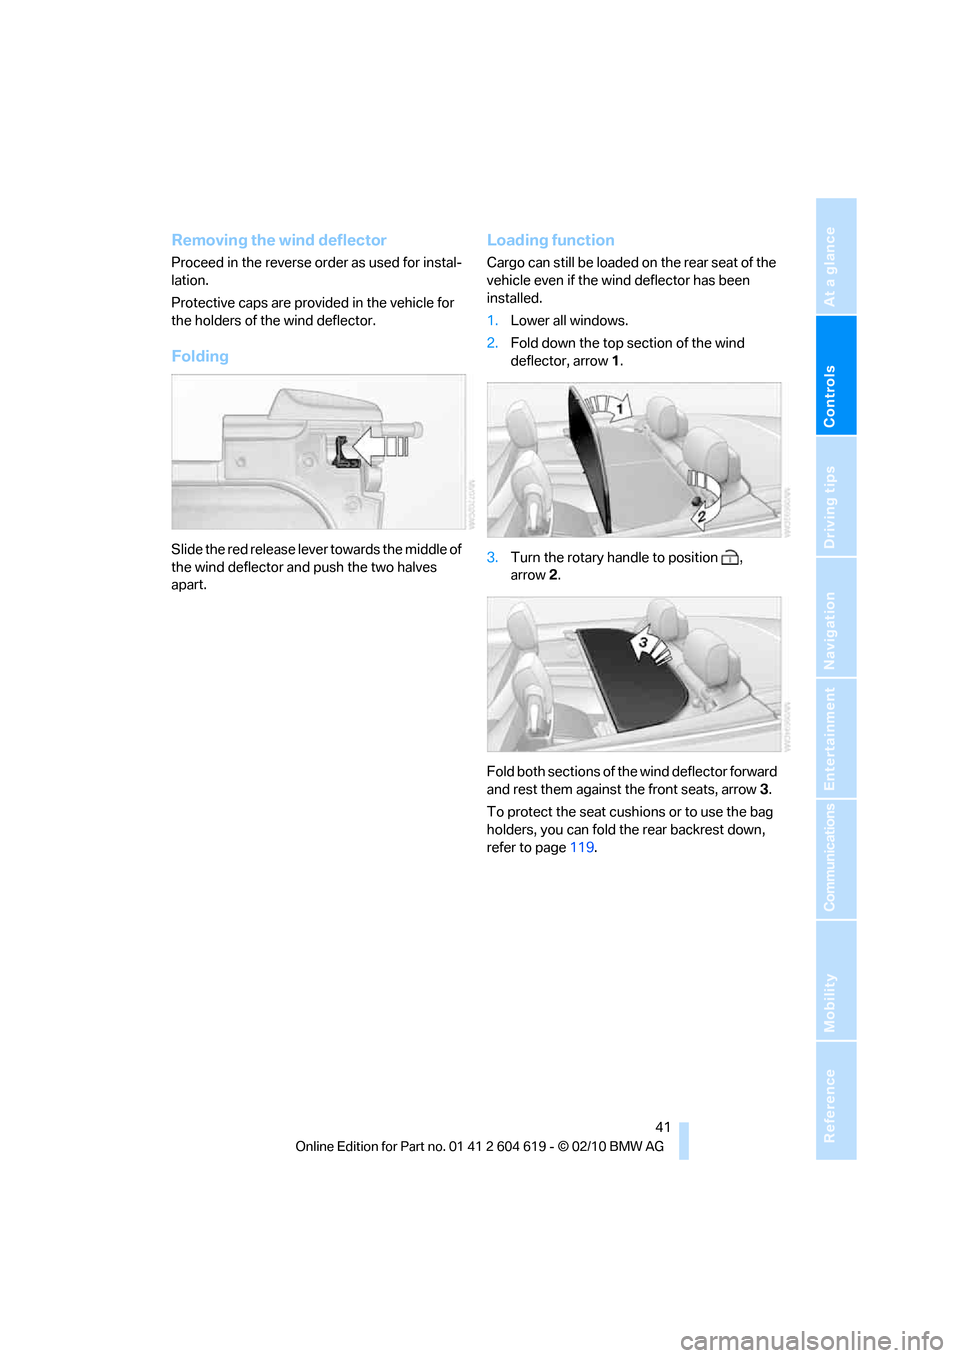
Slide the red release lever towards the middle of
the wind deflector and push the two halves
apart.
Loading function
Cargo can still be loaded on the rear seat of the
vehicle even if the wind deflector has been
installed.
1.Lower all windows.
2.Fold down the top section of the wind
deflector, arrow1.
3.Turn the rotary handle to position ,
arrow2.
Fold both sections of the wind deflector forward
and rest them against the front seats, arrow3.
To protect the seat cushions or to use the bag
holders, you can fold the rear backrest down,
refer to page119.
Page 56 of 278
Transporting children safely
54
Placement of the tether strap
Coupe
Make sure the upper retaining strap does
not run over sharp edges and is not
twisted as it passes to the top anchor. Other-
wise, the strap will not properly secure the child
restraint system in the event of an accident.<
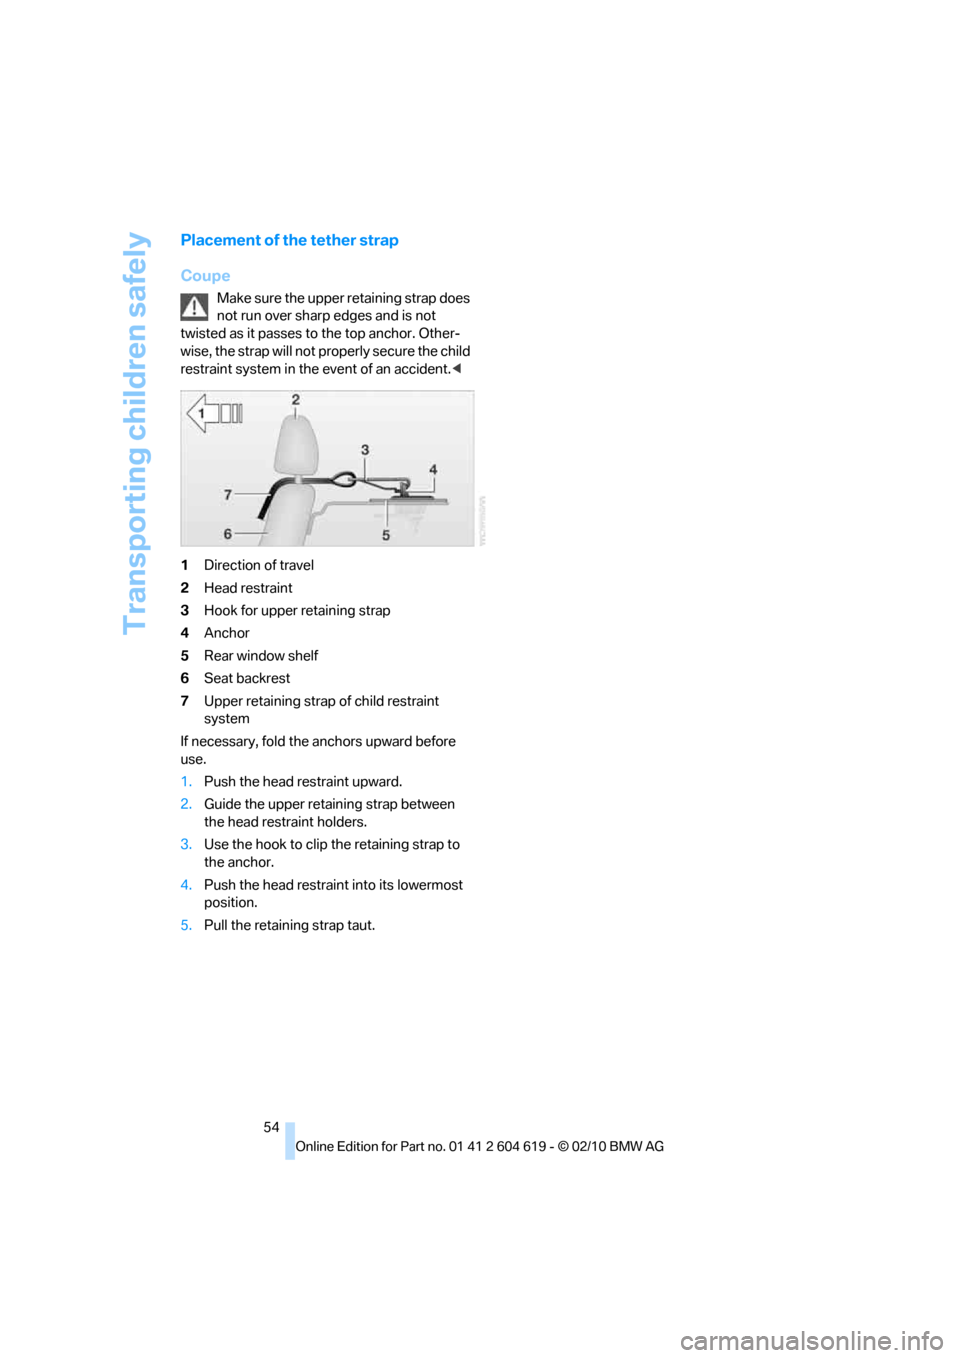
1Direction of travel
2Head restraint
3Hook for upper retaining strap
4Anchor
5Rear window shelf
6Seat backrest
7Upper retaining strap of child restraint
system
If necessary, fold the anchors upward before
use.
1.Push the head restraint upward.
2.Guide the upper retaining strap between
the head restraint holders.
3.Use the hook to clip the retaining strap to
the anchor.
4.Push the head restraint into its lowermost
position.
5.Pull the retaining strap taut.
Page 100 of 278
Technology for driving comfort and safety
98
Airbags
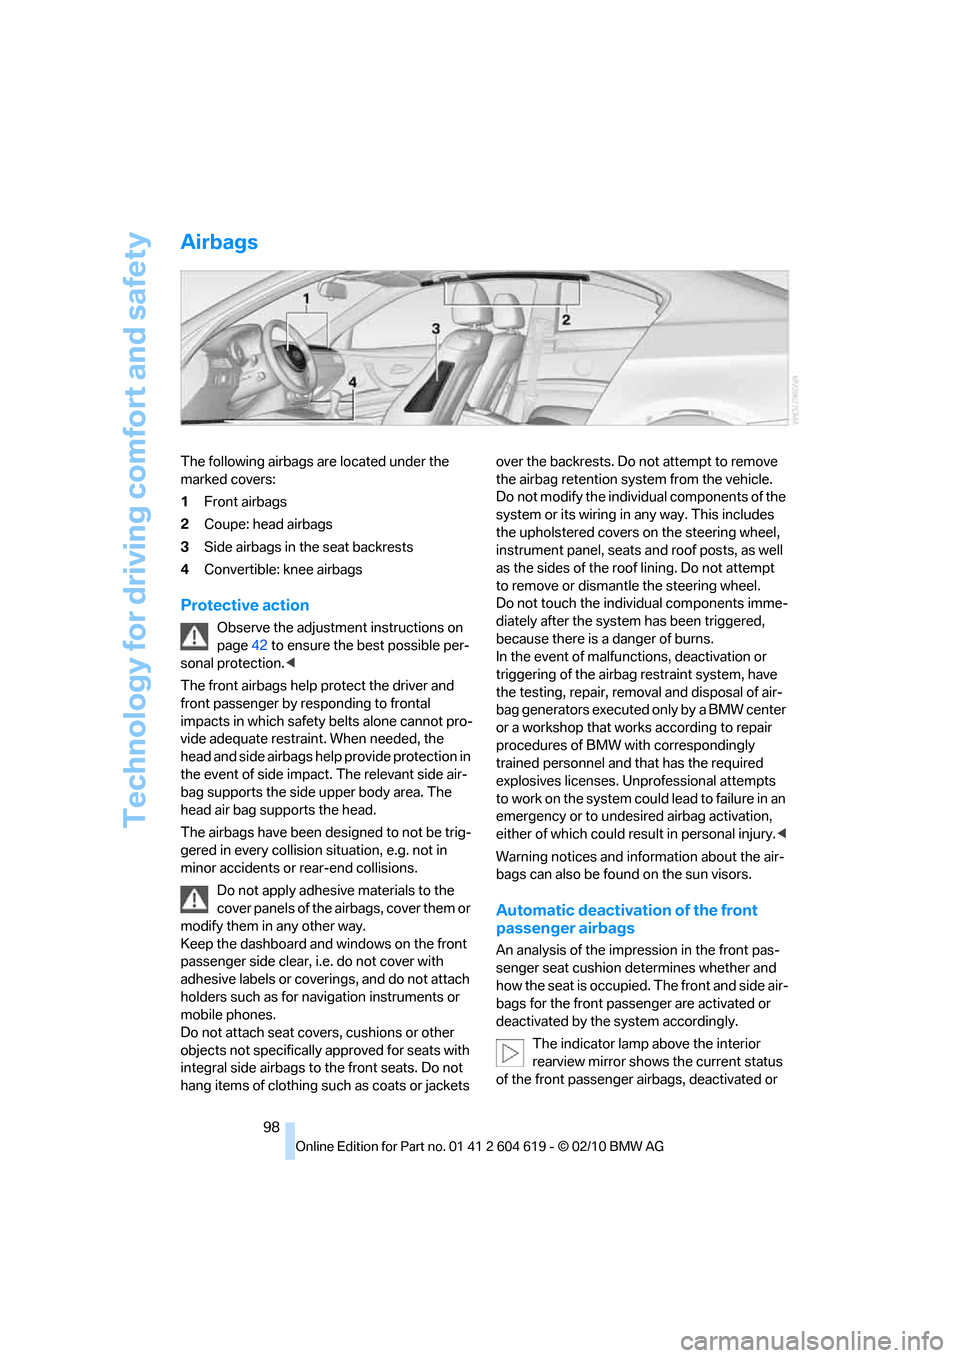
The following airbags are located under the
marked covers:
1Front airbags
2Coupe: head airbags
3Side airbags in the seat backrests
4Convertible: knee airbags
Protective action
Observe the adjustment instructions on
page42 to ensure the best possible per-
sonal protection.<
The front airbags help protect the driver and
front passenger by responding to frontal
impacts in which safety belts alone cannot pro-
vide adequate restraint. When needed, the
head and side airbags help provide protection in
the event of side impact. The relevant side air-
bag supports the side upper body area. The
head air bag supports the head.
The airbags have been designed to not be trig-
gered in every collision situation, e.g. not in
minor accidents or rear-end collisions.
Do not apply adhesive materials to the
cover panels of the airbags, cover them or
modify them in any other way.
Keep the dashboard and windows on the front
passenger side clear, i.e. do not cover with
adhesive labels or coverings, and do not attach
holders such as for navigation instruments or
mobile phones.
Do not attach seat covers, cushions or other
objects not specifically approved for seats with
integral side airbags to the front seats. Do not
hang items of clothing such as coats or jackets over the backrests. Do not attempt to remove
the airbag retention system from the vehicle.
Do not modify the individual components of the
system or its wiring in any way. This includes
the upholstered covers on the steering wheel,
instrument panel, seats and roof posts, as well
as the sides of the roof lining. Do not attempt
to remove or dismantle the steering wheel.
Do not touch the individual components imme-
diately after the system has been triggered,
because there is a danger of burns.
In the event of malfunctions, deactivation or
triggering of the airbag restraint system, have
the testing, repair, removal and disposal of air-
bag generators executed only by a BMW center
or a workshop that works according to repair
procedures of BMW with correspondingly
trained personnel and that has the required
explosives licenses. Unprofessional attempts
to work on the system could lead to failure in an
emergency or to undesired airbag activation,
either of which could result in personal injury.<
Warning notices and information about the air-
bags can also be found on the sun visors.
Automatic deactivation of the front
passenger airbags
An analysis of the impression in the front pas-
senger seat cushion determines whether and
how the seat is occupied. The front and side air-
bags for the front passenger are activated or
deactivated by the system accordingly.
The indicator lamp above the interior
rearview mirror shows the current status
of the front passenger airbags, deactivated or
Page 108 of 278
Climate
106
Climate
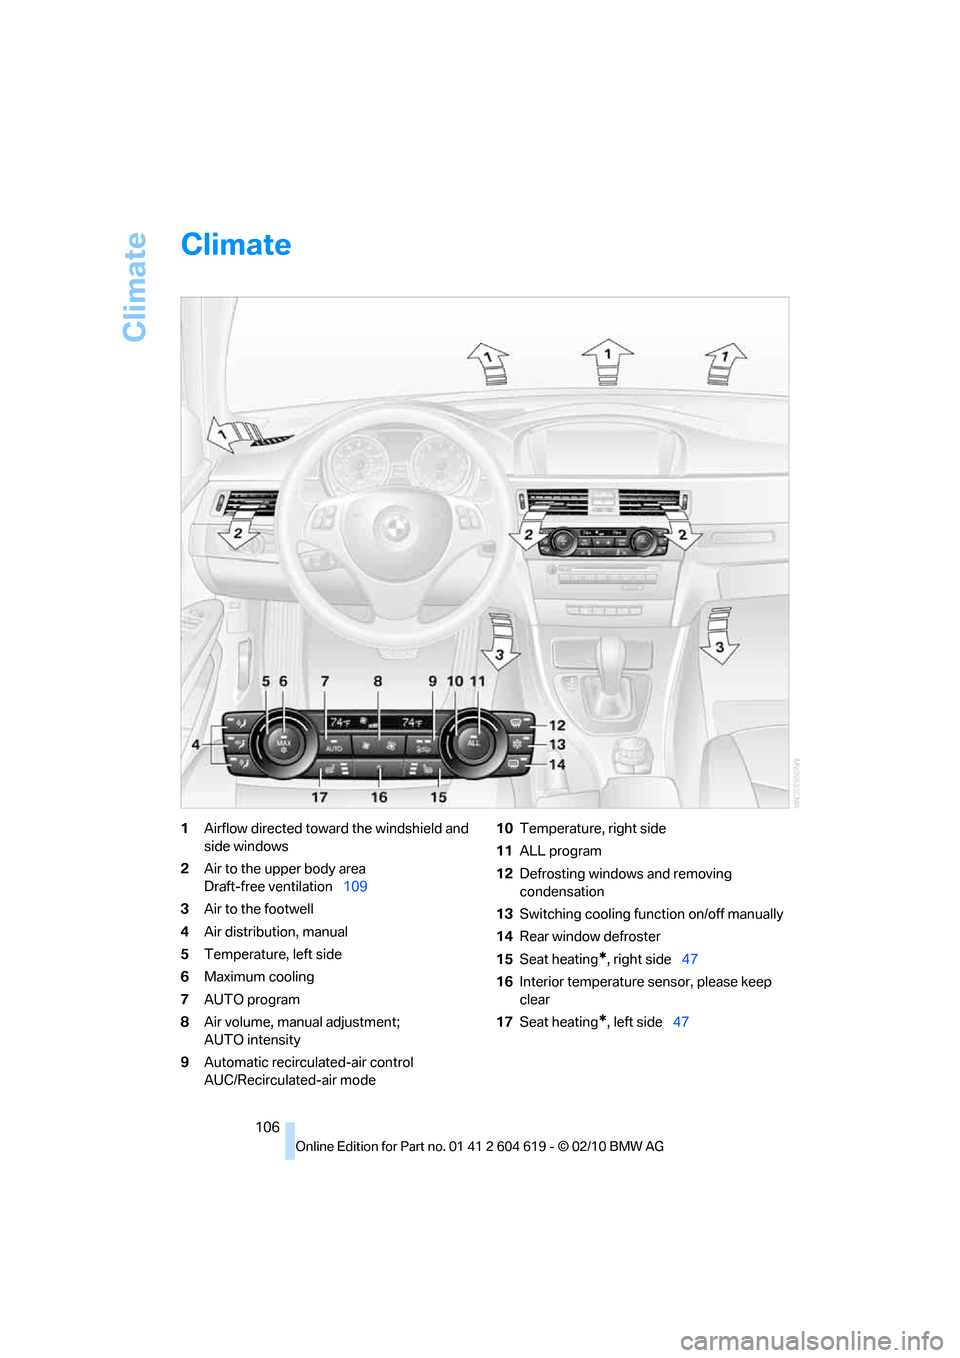
1Airflow directed toward the windshield and
side windows
2Air to the upper body area
Draft-free ventilation109
3Air to the footwell
4Air distribution, manual
5Temperature, left side
6Maximum cooling
7AUTO program
8Air volume, manual adjustment;
AUTO intensity
9Automatic recirculated-air control
AUC/Recirculated-air mode10Temperature, right side
11ALL program
12Defrosting windows and removing
condensation
13Switching cooling function on/off manually
14Rear window defroster
15Seat heating
*, right side47
16Interior temperature sensor, please keep
clear
17Seat heating
*, left side47
Page 109 of 278
Controls
107Reference
At a glance
Driving tips
Communications
Navigation
Entertainment
Mobility
Automatic climate control
Comfortable interior climate
AUTO program7 offers the ideal air distribution
and air volume for almost all conditions, refer to
AUTO program below. All you need to do is
select an interior temperature which is comfort-
able for you.
The following sections inform you in detail
about how to adjust the settings.
Most settings are stored for the remote control
currently in use, refer also to Personal Profile
settings on page26.
Adjusting air distribution manually
The air distribution can be
switched on and off manually. The
air is directed to the windshield, to
the upper body area and to the
footwell.
The automatic air distribution can be switched
back on by pressing the AUTO button. The
cooling function is switched on automatically
and the manual air distribution setting is
cleared.
Temperature
Turn to set the desired tempera-
ture.
The automatic climate control
achieves this temperature as
quickly as possible regardless of the season,
using maximum cooling or heating power if nec-
essary, and then maintains it.
Avoid rapid switching between different tem-
perature settings. The automatic climate con-
trol will not have sufficient time to adjust the set
temperature.
Maximum heating power can be obtained with
the highest setting, regardless of the outside
temperature.
The system cools steadily in the lowest setting,
regardless of the outside temperature.
Maximum cooling
Press the button.
The system is set to the lowest
temperature, maximum air volume
and recirculated-air mode.
Air flows out of the vent outlets for the upper
body region. Open them for this purpose.
Air is cooled as quickly as possible:
>Above an outside temperature of approx.
327/06
>When the engine is running
AUTO program
Press the button.
Air volume, air distribution and
temperature are controlled auto-
matically.
Depending on the selected temperature, AUTO
intensity and outside influences, the air is
directed toward the windshield, the side win-
dows, the upper body and the footwell.
Pressing the AUTO button automatically
switches on the cooling function.
At the same time, a condensation sensor con-
trols the program so as to prevent window con-
densation as much as possible.
The program is switched off when the air distri-
bution is set manually or the button is pressed
again.
Intensity of the AUTO program
With the AUTO program switched on, auto-
matic control of the air volume and air distribu-
tion can be adjusted:
Press the left side of the button
to reduce the intensity. Press
the right side of the button to
increase it.
The selected intensity is shown on the display
of the automatic climate control.
Page 110 of 278
Climate
108
Convertible program
The Convertible program is active when the
hardtop is open and the AUTO program is
switched on. In the Convertible program, the
automatic climate control is optimized for driv-
ing with the hardtop open. In addition, the air
volume is increased as vehicle speed increases.
The effectiveness of the Convertible pro-
gram can be enhanced considerably by
installing the wind deflector.<
Adjusting air volume manually
To be able to manually adjust the air volume,
switch off the AUTO program first.
Press the left side of the button
to reduce the air volume. Press
the right side of the button to
increase it.
The air volume may be reduced or the blower
may be switched off entirely to save on battery
power. The display remains the same.
Automatic recirculated-air control
AUC/Recirculated-air mode
You can respond to unpleasant odors or pollut-
ants in the immediate environment by tempo-
rarily suspending the supply of outside air. The
system then recirculates the air currently within
the vehicle.
Press the button repeatedly to
select an operating mode:
>LED off: outside air flows in continuously.
>Left-hand LED on, AUC mode: a sensor
detects pollutants in the outside air and
controls the shut-off automatically.
>Right-hand LED on, recirculated-air mode:
the supply of outside air is permanently
shut off. If the windows fog over, switch off
recirculated-air mode and increase the air
volume, if necessary. Make sure that air can
flow onto the windshield.
The recirculated-air mode should not be
used over an extended period of time;
otherwise, the air quality inside the car will dete-
riorate continuously.<
Via the button on the steering wheel
You can switch quickly between the recircu-
lated-air mode and the previous mode using a
button
on the steering wheel, refer to page11.
ALL program
Press the button.
The current temperature setting
on the driver's side is transferred to
the front passenger side.
If the temperature setting on the driver's side is
changed, the temperature on the front passen-
ger side is changed as well.
The program is switched off when the setting is
adjusted on the front passenger side or the but-
ton is pressed again.
Defrosting windows and removing
condensation
Press the button.
Quickly removes ice and conden-
sation from the windshield and
front side windows.
For this purpose, also switch on the cooling
function.
Switching cooling function on/off
The passenger compartment can only be
cooled while the engine is running.
Press the button.
The air is cooled and dehumidified
and – depending on the tempera-
ture setting – warmed again.
Depending on the weather, the windshield may
fog up briefly when the engine is started.
Pressing the AUTO button automatically
switches on the cooling function.
Rear window defroster
Press the button.
The defroster is switched off auto-
matically after a certain time.
Depending on your vehicle's equipment, the
upper wires serve as an antenna and are not
part of the rear window defroster.
Page 111 of 278
Controls
109Reference
At a glance
Driving tips
Communications
Navigation
Entertainment
Mobility
Switching the system on/off
Switching off
With the blower at its lowest
setting, press the left side of the
button to switch off the automatic
climate control.
All displays are cleared except for the rear win-
dow defroster if it is switched on.
The outside air supply is blocked when
the automatic climate control is switched
off. If the air quality deteriorates or the window
fogs over, switch the system back on and
increase the air volume.<
Switching on
Press any button except the ALL or the rear
window defroster button to reactivate the
automatic climate control.
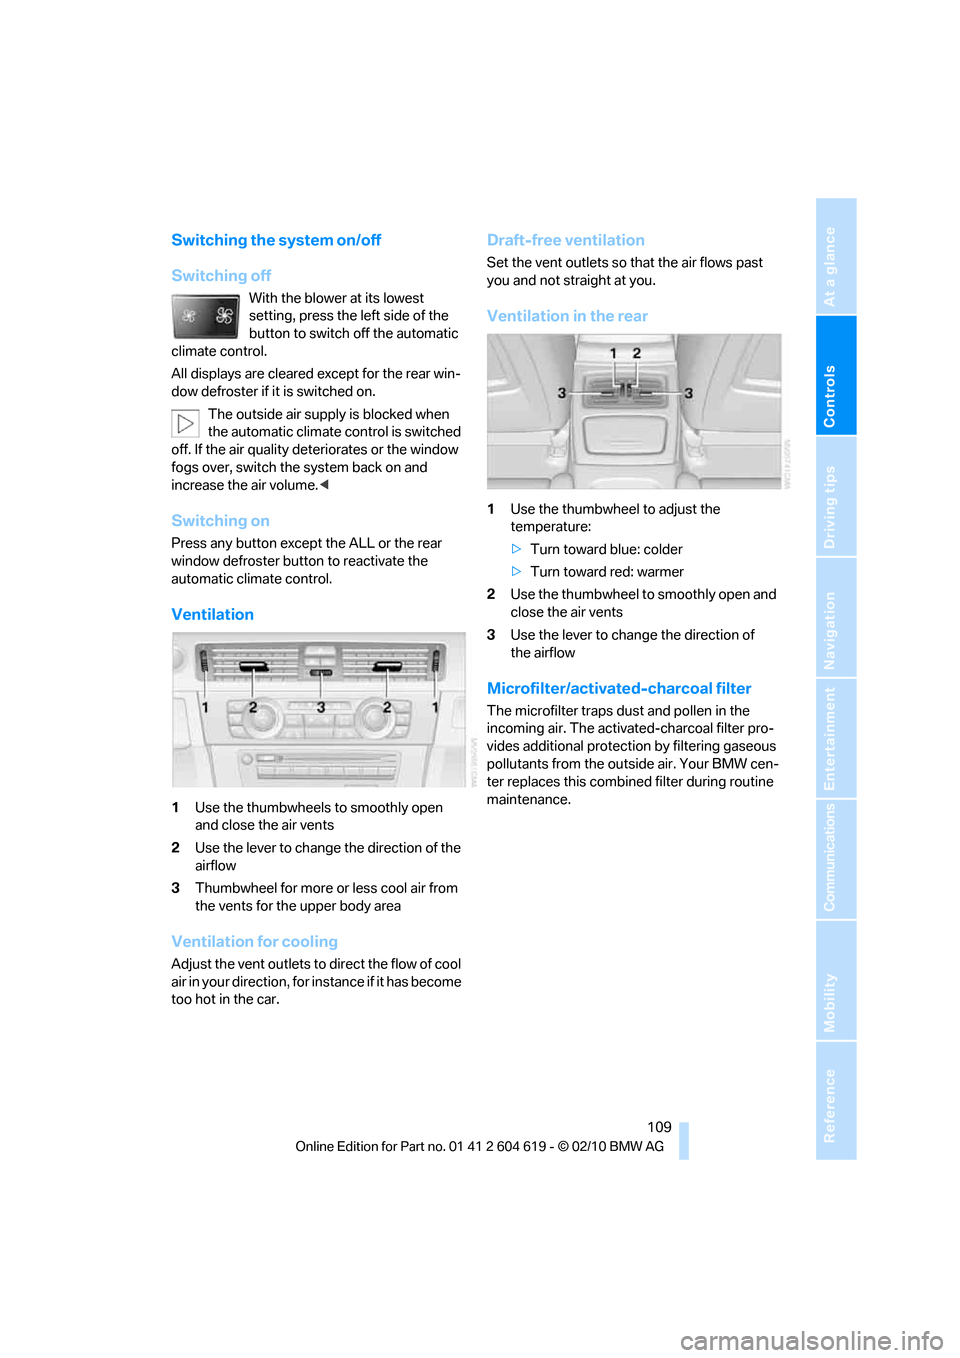
Ventilation
1Use the thumbwheels to smoothly open
and close the air vents
2Use the lever to change the direction of the
airflow
3Thumbwheel for more or less cool air from
the vents for the upper body area
Ventilation for cooling
Adjust the vent outlets to direct the flow of cool
air in your direction, for instance if it has become
too hot in the car.
Draft-free ventilation
Set the vent outlets so that the air flows past
you and not straight at you.
Ventilation in the rear
1Use the thumbwheel to adjust the
temperature:
>Turn toward blue: colder
>Turn toward red: warmer
2Use the thumbwheel to smoothly open and
close the air vents
3Use the lever to change the direction of
the airflow
Microfilter/activated-charcoal filter
The microfilter traps dust and pollen in the
incoming air. The activated-charcoal filter pro-
vides additional protection by filtering gaseous
pollutants from the outside air. Your BMW cen-
ter replaces this combined filter during routine
maintenance.
Page 128 of 278
Things to remember when driving
126
Things to remember when driving
Break-in period
Moving parts need breaking-in time to adjust to
each other. Please follow the instructions below
in order to achieve the optimal service life and
economy of operation for your vehicle.
Engine and differential
Always obey all official speed limits.
Up to 1,200 miles/2,000 km
Drive at varying engine and road speeds, but do
not exceed an engine speed of 4,500 rpm or a
road speed of 100 mph/160 km/h.
Avoid full-throttle operation and use of the
transmission's kickdown mode.
After driving 1,200 miles/2,000 km
Engine and vehicle speeds can be gradually
increased.
Tires
Due to technical factors associated with their
manufacture, tires do not achieve their full trac-
tion potential until after an initial break-in
period. Therefore, drive cautiously during the
first 200 miles/300 km.
Brake system
Brakes require an initial break-in period of
approx. 300 miles/500 km to achieve optimized
contact and wear patterns between brake pads
and rotors. Drive cautiously during this break-in
period.
Clutch
The function of the clutch reaches its optimal
level only after a distance driven of approx.
300 miles/500 km. During this break-in period,
engage the clutch gently.
Following part replacement
The same break-in procedures should be
observed if any of the components mentioned
above have to be renewed in the course of the
vehicle's operating life.
Saving fuel
The fuel consumption of your vehicle depends
on several factors. You can lower fuel consump-
tion and the environmental impact by taking
certain measures, adjusting your driving style
and having the vehicle serviced regularly.
Remove any unneeded cargo
Additional weight increases fuel consumption.
Remove any mounted parts after you
have finished using them
Remove unneeded additional mirrors, the roof
rack and the rear luggage rack after use.
Mounted parts affect the vehicle's aerodynam-
ics and increase fuel consumption.
Close the windows and glass roof
An open glass roof or window causes higher air
resistance and thus increases fuel consump-
tion.
Check tire inflation pressure regularly
Check the tire inflation pressure at least twice a
month and before embarking on a long journey,
and correct it if necessary.
Low tire inflation pressure causes higher rolling
resistance and thus increases fuel consumption
and tire wear.
Set off immediately
Do not let the engine warm up while the car is
still standing, but set off immediately at moder-
ate engine speed. This is the fastest way for the
cold engine to reach its operating temperature.