window BMW 335XI 2008 Owner's Manual
[x] Cancel search | Manufacturer: BMW, Model Year: 2008, Model line: 335XI, Model: BMW 335XI 2008Pages: 274, PDF Size: 8.88 MB
Page 105 of 274
Controls
103Reference
At a glance
Driving tips
Communications
Navigation
Entertainment
Mobility
it off while also increasing the air flow rate as
required.
The recirculated-air mode should not be used
over an extended period of time, otherwise the
air quality inside the car will deteriorate contin-
uously.<
Via the button* on the steering wheel
You can switch quickly between the recircu-
lated-air mode and the previous mode using an
individually programmable button
on the steer-
ing wheel, refer to page11.
Residual heat
The heat stored in the engine is
used to heat the passenger com-
partment, e.g. while stopped at a
school to pick up a child.
The function can be switched on when the fol-
lowing conditions are met:
>Up to 15 minutes after the engine has been
switched off
>While the engine is at operating tempera-
ture
>As long as battery voltage is sufficient
>At an outside temperature below 777/
256
The LED is lit when the function is on.
As of radio readiness, you can set the interior
temperature, the air flow rate and the air distri-
bution.
Defrosting windows and removing
condensation
Quickly removes ice and conden-
sation from the windshield and
front side windows.
Switch on the cooling function as well.
Switching cooling function on/off
The cooling function cools and
dehumidifies the incoming air
before reheating it as required,
according to the temperature setting. This
function is only available while the engine is
running.The cooling function helps prevent condensa-
tion on the windows or removes it quickly.
Depending on the weather, the windshield may
fog over briefly when the engine is started.
The cooling function is automatically switched
on along with the AUTO program.
Rear window defroster
The defroster is switched off auto-
matically after a certain time.
Depending on your vehicle's
equipment, the upper wires serve as an antenna
and are not part of the rear window defroster.
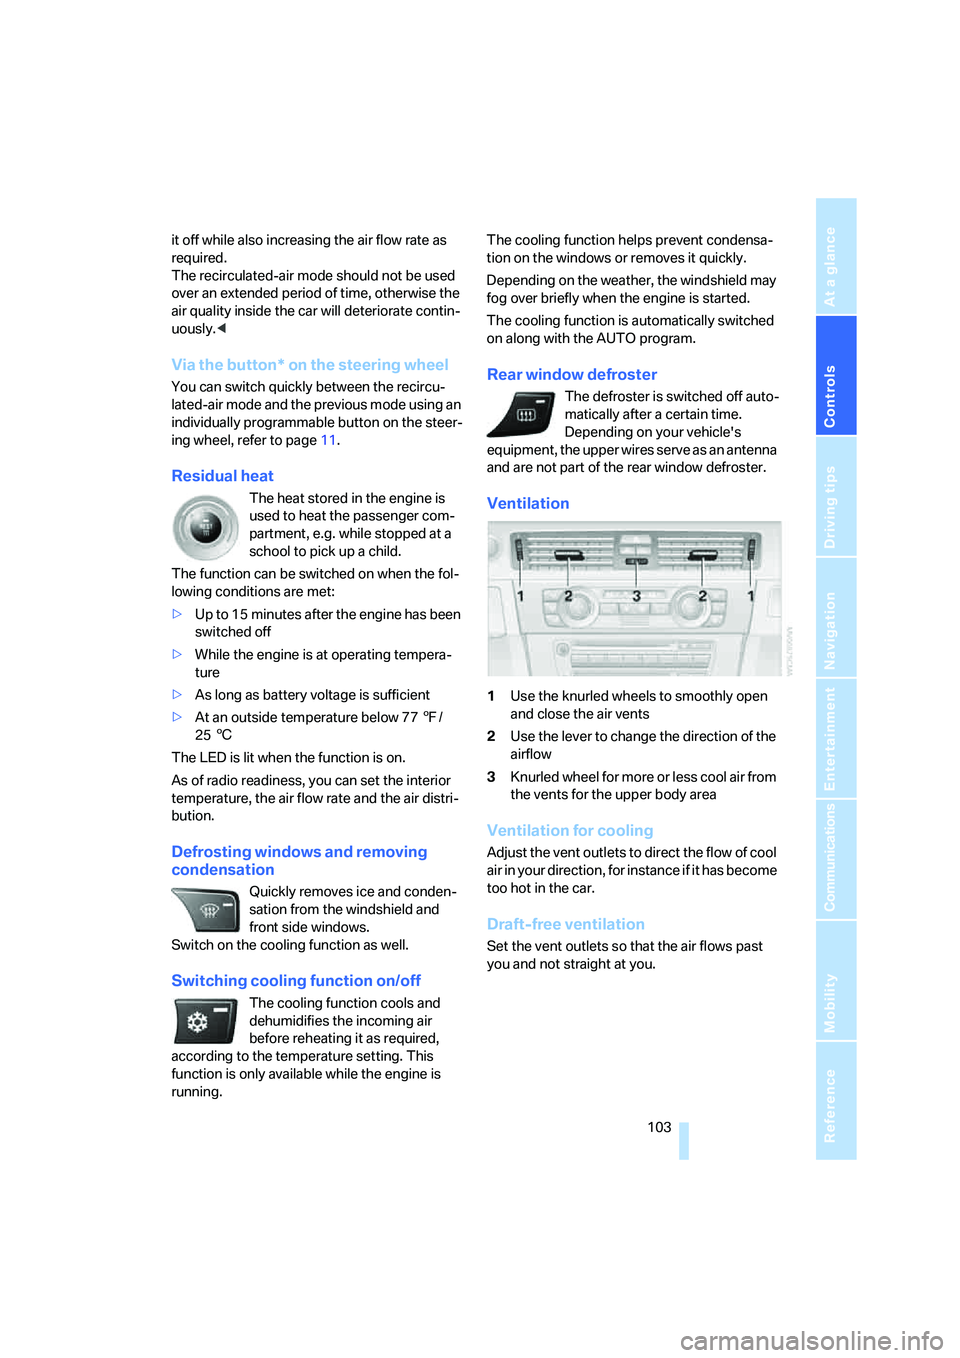
Ventilation
1Use the knurled wheels to smoothly open
and close the air vents
2Use the lever to change the direction of the
airflow
3Knurled wheel for more or less cool air from
the vents for the upper body area
Ventilation for cooling
Adjust the vent outlets to direct the flow of cool
air in your direction, for instance if it has become
too hot in the car.
Draft-free ventilation
Set the vent outlets so that the air flows past
you and not straight at you.
Page 111 of 274
Controls
109Reference
At a glance
Driving tips
Communications
Navigation
Entertainment
Mobility
>The compass direction shown does not
change although the direction of travel
does.
>Not all compass directions are shown.
Procedure
1.Make sure that no large metal objects or
overhead power lines are in the vicinity of
your vehicle and that you have enough
space to drive in a circle.
2.Set the currently valid compass zone.
3.Press the adjustment button for approx.
6-7 seconds to call up C. Then drive in at
least one full circle at a speed of no more
than 4 mph or 7 km/h.
If calibration is successful, the display
changes from C to a compass direction.
Setting right-hand/left-hand steering
Your digital compass is factory-set to right-
hand or left-hand steering, in accordance with
your vehicle.
Setting the language
You can set the language of the display:
Press the adjustment button for approx.
12-13 seconds. Briefly press the adjustment
button again to switch between English, "E",
and German, "O".
The setting is automatically saved after approx.
10 seconds.
Roller sun blinds*
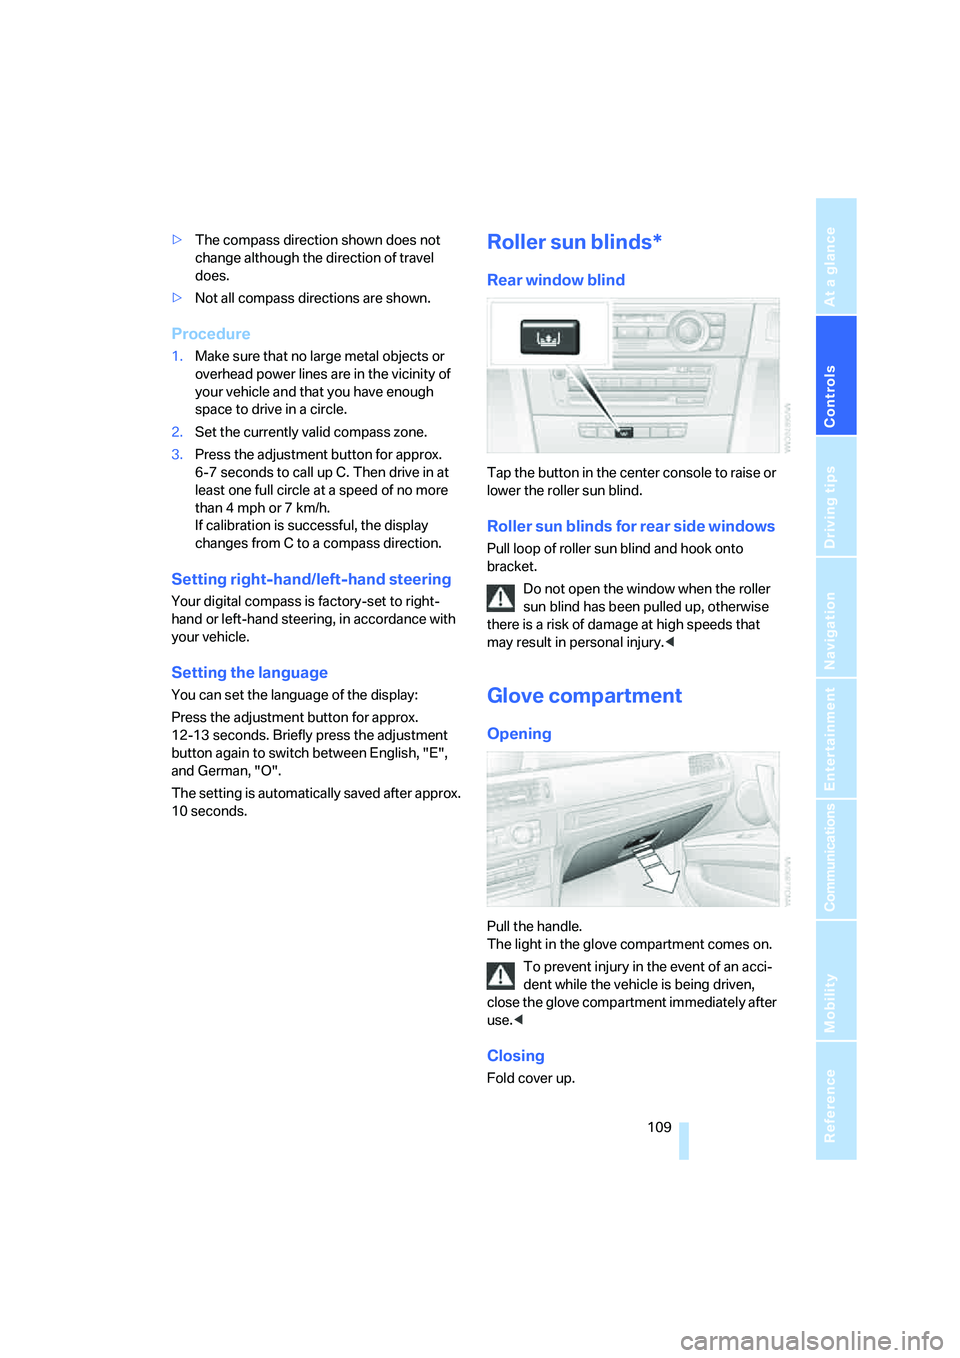
Rear window blind
Tap the button in the center console to raise or
lower the roller sun blind.
Roller sun blinds for rear side windows
Pull loop of roller sun blind and hook onto
bracket.
Do not open the window when the roller
sun blind has been pulled up, otherwise
there is a risk of damage at high speeds that
may result in personal injury.<
Glove compartment
Opening
Pull the handle.
The light in the glove compartment comes on.
To prevent injury in the event of an acci-
dent while the vehicle is being driven,
close the glove compartment immediately after
use.<
Closing
Fold cover up.
Page 115 of 274
Controls
113Reference
At a glance
Driving tips
Communications
Navigation
Entertainment
Mobility
Sedan:
Through-loading system*
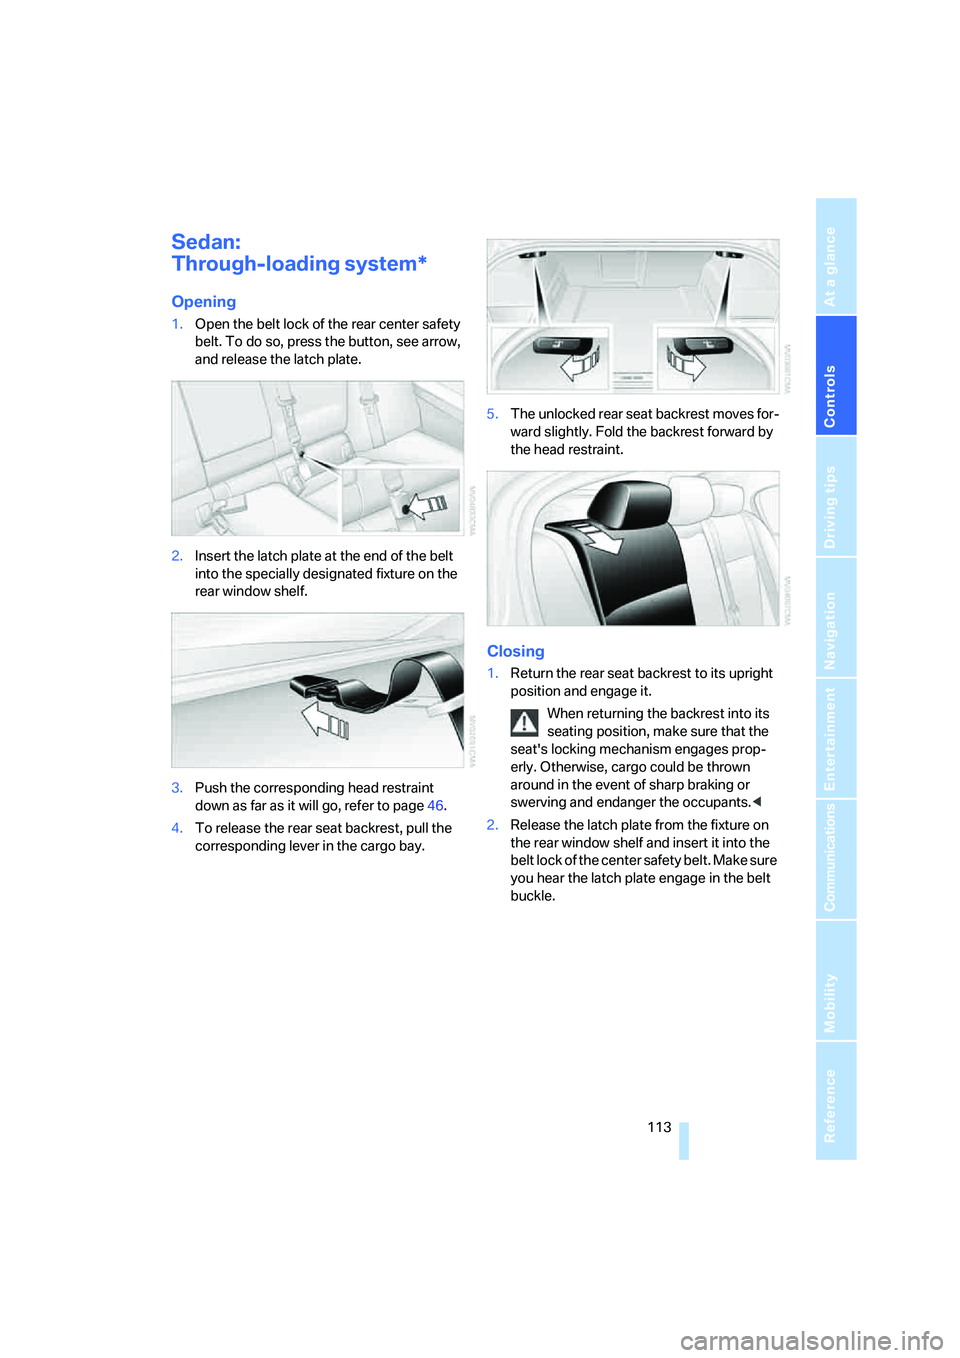
Opening
1.Open the belt lock of the rear center safety
belt. To do so, press the button, see arrow,
and release the latch plate.
2.Insert the latch plate at the end of the belt
into the specially designated fixture on the
rear window shelf.
3.Push the corresponding head restraint
down as far as it will go, refer to page46.
4.To release the rear seat backrest, pull the
corresponding lever in the cargo bay.5.The unlocked rear seat backrest moves for-
ward slightly. Fold the backrest forward by
the head restraint.
Closing
1.Return the rear seat backrest to its upright
position and engage it.
When returning the backrest into its
seating position, make sure that the
seat's locking mechanism engages prop-
erly. Otherwise, cargo could be thrown
around in the event of sharp braking or
swerving and endanger the occupants.<
2.Release the latch plate from the fixture on
the rear window shelf and insert it into the
belt lock of the center safety belt. Make sure
you hear the latch plate engage in the belt
buckle.
Page 116 of 274
Practical interior accessories
114 The lashing eyes in the cargo bay provide you
with a way to attach cargo bay nets
* or draw
straps for securing suitcases and luggage, refer
to page124.
Sports Wagon:
Cargo bay
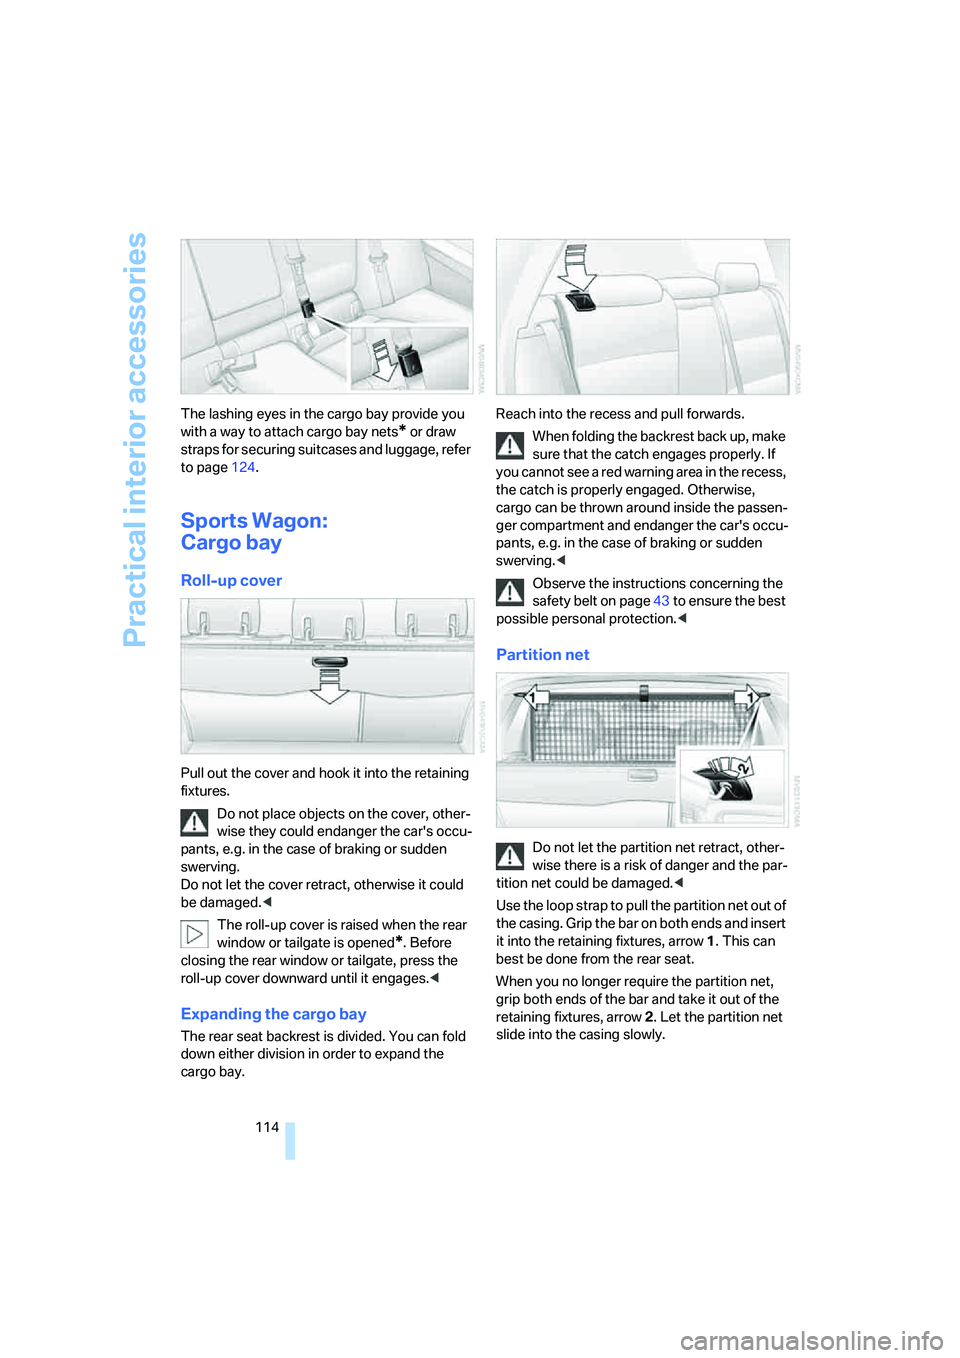
Roll-up cover
Pull out the cover and hook it into the retaining
fixtures.
Do not place objects on the cover, other-
wise they could endanger the car's occu-
pants, e.g. in the case of braking or sudden
swerving.
Do not let the cover retract, otherwise it could
be damaged.<
The roll-up cover is raised when the rear
window or tailgate is opened
*. Before
closing the rear window or tailgate, press the
roll-up cover downward until it engages.<
Expanding the cargo bay
The rear seat backrest is divided. You can fold
down either division in order to expand the
cargo bay.Reach into the recess and pull forwards.
When folding the backrest back up, make
sure that the catch engages properly. If
you cannot see a red warning area in the recess,
the catch is properly engaged. Otherwise,
cargo can be thrown around inside the passen-
ger compartment and endanger the car's occu-
pants, e.g. in the case of braking or sudden
swerving.<
Observe the instructions concerning the
safety belt on page43 to ensure the best
possible personal protection.<
Partition net
Do not let the partition net retract, other-
wise there is a risk of danger and the par-
tition net could be damaged.<
Use the loop strap to pull the partition net out of
the casing. Grip the bar on both ends and insert
it into the retaining fixtures, arrow 1. This can
best be done from the rear seat.
When you no longer require the partition net,
grip both ends of the bar and take it out of the
retaining fixtures, arrow 2. Let the partition net
slide into the casing slowly.
Page 122 of 274
Things to remember when driving
120
Things to remember when driving
Break-in period
Moving parts need breaking-in time to adjust to
each other. Please follow the instructions below
in order to achieve the optimal service life and
economy of operation for your vehicle.
Engine and differential
Always obey all official speed limits.
Up to 1,200 miles/2,000 km
Drive at varying engine and road speeds, but do
not exceed an engine speed of 4500 rpm or a
road speed of 100 mph/160 km/h.
Avoid full-throttle operation and use of the
transmission's kick-down mode.
After driving 1,200 miles/2,000 km
Engine and vehicle speeds can be gradually
increased.
Tires
Due to technical factors associated with their
manufacture, tires do not achieve their full trac-
tion potential until after an initial break-in
period. Therefore, drive cautiously during the
first 200 miles/300 km.
Brake system
Brakes require an initial break-in period of
approx. 300 miles/500 km to achieve optimized
contact and wear patterns between brake pads
and rotors. Drive cautiously during this break-in
period.
Clutch
The function of the clutch reaches its optimal
level only after a distance driven of approx.
300 miles/500 km. During this break-in period,
engage the clutch gently.
Following part replacement
The same break-in procedures should be
observed if any of the components mentioned
above have to be renewed in the course of the
vehicle's operating life.
Saving fuel
The fuel consumption of your vehicle depends
on several factors. You can lower fuel consump-
tion and the environmental impact by taking
certain measures, adjusting your driving style
and having the vehicle serviced regularly.
Remove any unneeded cargo
Additional weight increases fuel consumption.
Remove any mounted parts after you
have finished using them
Remove unneeded additional mirrors, the roof
rack and the rear luggage rack after use.
Mounted parts affect the vehicle's aerodynam-
ics and increase fuel consumption.
Close the windows and glass roof
An open glass roof or window causes higher air
resistance and thus increases fuel consump-
tion.
Check tire inflation pressure regularly
Check the tire inflation pressure at least twice a
month and before embarking on a long journey,
and correct it if necessary.
Low tire inflation pressure causes higher rolling
resistance and thus increases fuel consumption
and tire wear.
Set off immediately
Do not let the engine warm up while the car is
still standing, but set off immediately at moder-
ate engine speed. This is the fastest way for the
cold engine to reach its operating temperature.
Page 123 of 274
Driving tips
121Reference
At a glance
Controls
Communications
Navigation
Entertainment
Mobility
Drive defensively
Avoid unnecessary acceleration and braking
maneuvers. To do so, keep an adequate dis-
tance to the forward vehicle. A defensive and
smooth driving style keeps fuel consumption
down.
Avoid high engine speeds
Only use first gear when setting off. In second
and higher gears, accelerate without hesitation
or pauses. When accelerating, shift up before
reaching high engine speeds.
When you reach the desired speed, shift into
the highest applicable gear and drive with the
engine speed as low as possible and at a con-
stant speed.
As a rule: driving at low engine speeds lowers
fuel consumption and reduces wear.
Coasting
When approaching a red light, take your foot off
the accelerator and coast to a stop in the high-
est applicable gear.
O n a d o w n h il l s lo p e , t a k e y o u r f o o t o f f t h e a c c el -
erator and coast in a suitable gear.
The fuel supply is interrupted when coasting.
Switch off the engine during lengthy
stops
Switch off the engine when stopping for lengthy
periods, e.g. at traffic lights, railroad crossings
or in traffic congestions. You achieve fuel sav-
ings even if standing time is as short as approx.
4 seconds.
Switch off functions you do not need at
the moment
Functions such as the air conditioner and the
seat or rear window heating draw large amounts
of power and consume additional fuel. Espe-
cially in city traffic and in stop and go driving
they have a considerable impact. Therefore,
switch these functions off when they are not
really needed.
Have the vehicle serviced
Have the vehicle serviced regularly to achieve
good economy and a long vehicle life. BMW
recommends having the vehicle serviced at a
BMW center. Also note the BMW service sys-
tem, refer to page226.
General driving notes
Close the luggage compartment lid/
tailgate
Operate the vehicle only when the lug-
gage compartment lid/tailgate and rear
window are closed. Otherwise, exhaust fumes
could enter the interior of the vehicle.<
If the vehicle must be driven with the luggage
compartment lid/tailgate open:
1.Close all windows and the glass roof.
2.Greatly increase the air volume of the auto-
matic climate control system, refer to
page102.
Hot exhaust system
In all vehicles, extremely high tempera-
tures are generated in the exhaust sys-
tem. Do not remove the heat shields installed
adjacent to various sections of the exhaust sys-
tem, and never apply undercoating to them.
When driving, standing at idle and while park-
ing, take care to avoid possible contact
between the hot exhaust system and any highly
flammable materials such as hay, leaves, grass,
etc. Such contact could lead to a fire, with the
risk of serious personal injuries and property
damage. Do not touch hot exhaust tail pipes.
Otherwise there is a risk of burns.<
Hydroplaning
When driving on wet or slushy roads,
reduce road speed. If you do not, a wedge
of water can form between tires and road sur-
face. This situation, known as hydroplaning,
means that the tire can completely lose contact
with the road surface, so that neither the car can
be steered nor the brake be properly applied.<
Page 125 of 274
Driving tips
123Reference
At a glance
Controls
Communications
Navigation
Entertainment
Mobility
Sports Wagon: rear window wiper
Driving through an automatic car wash can
result in damage to the rear window wiper. If
necessary, ask the operator of the car wash
about protective measures you should take.
With convenient access and automatic
transmission
Insert the remote control into the ignition
switch.
The engine can be switched off when the selec-
tor lever is in position N. Refer also to page37.
Cargo loading
To avoid loading the tires beyond their
approved carrying capacity, never over-
load the vehicle. Overloading can lead to over-
heating and increases the rate at which damage
develops inside the tires. This can ultimately
result in a sudden blow-out.<
Make sure that no liquids are spilled or
leak from their containers in the cargo
bay, as this could result in damage to the vehi-
cle.<
Determining loading limit
1.Locate the following statement on your
vehicle's placard
*:
The combined weight of occupants
and cargo should never exceed
XXX kg or YYY lbs. Otherwise, overloading
can result in damage to the vehicle and
unstable driving conditions.<
2.Determine the combined weight of the
driver and passengers that will be riding in
your vehicle.3.Subtract the combined weight of the driver
and passengers from XXX kilograms or YYY
pounds.
4.The resulting figure equals the available
amount of cargo and luggage load capacity.
For example, if the YYY amount equals
1,400 lbs. and there will be five 150-lb. pas-
sengers in your vehicle, the amount of avail-
able cargo and luggage load capacity is
650 lbs:
1,400 lbs. minus 750 lbs. = 650 lbs.
5.Determine the combined weight of luggage
and cargo being loaded on the vehicle. That
weight may not safely exceed the available
cargo and luggage load capacity calculated
in step 4.
6.If your vehicle will be towing a trailer, part of
the load from your trailer will be transferred
to your vehicle. Consult the manual for
transporting a trailer to determine how this
may reduce the available cargo and luggage
load capacity of your vehicle.
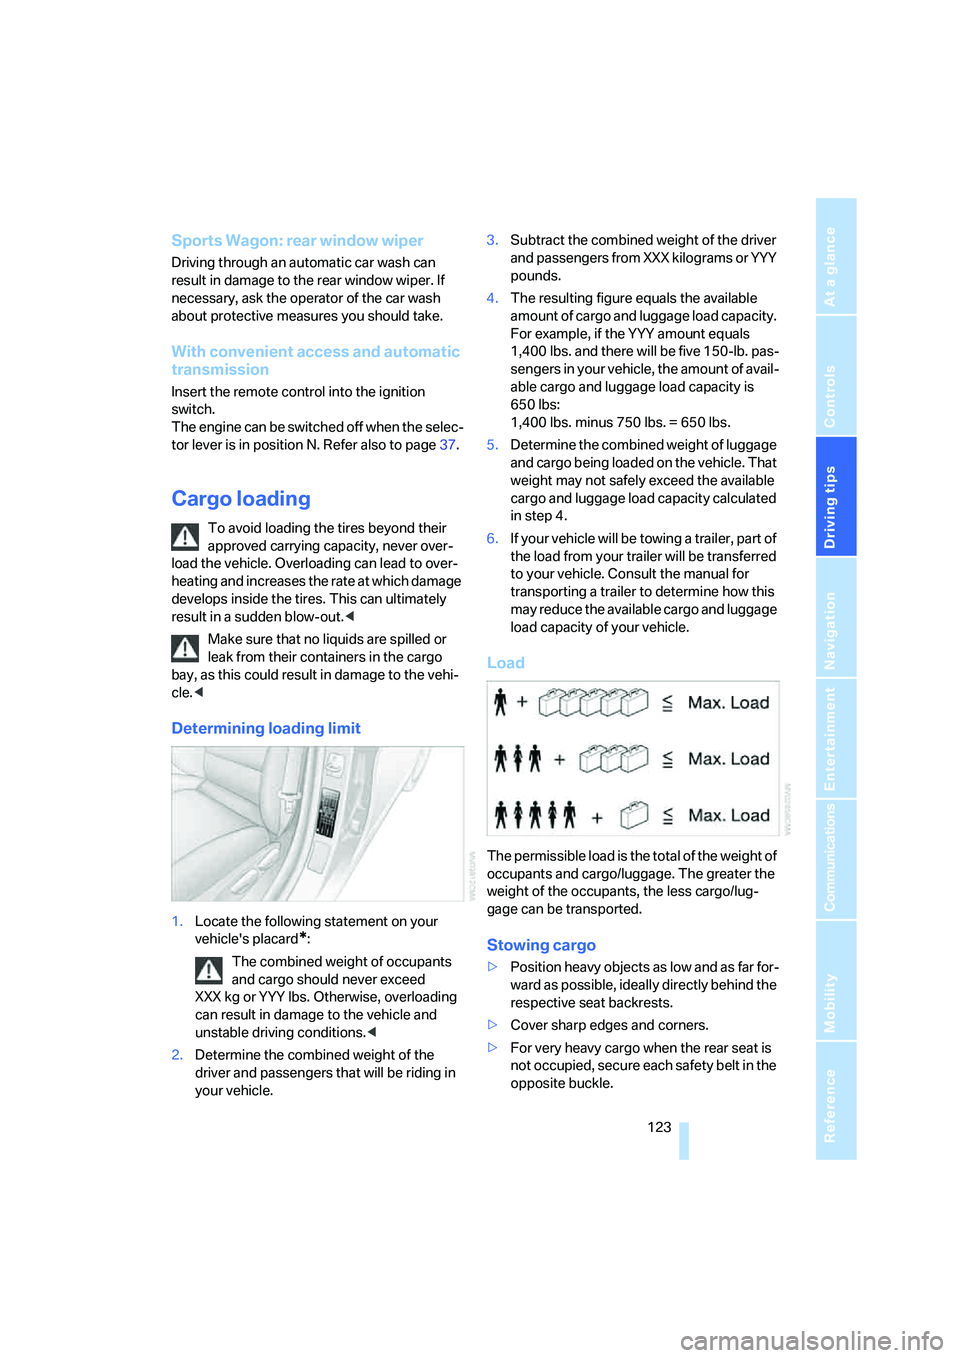
Load
The permissible load is the total of the weight of
occupants and cargo/luggage. The greater the
weight of the occupants, the less cargo/lug-
gage can be transported.
Stowing cargo
>Position heavy objects as low and as far for-
ward as possible, ideally directly behind the
respective seat backrests.
>Cover sharp edges and corners.
>For very heavy cargo when the rear seat is
not occupied, secure each safety belt in the
opposite buckle.
Page 126 of 274
Things to remember when driving
124
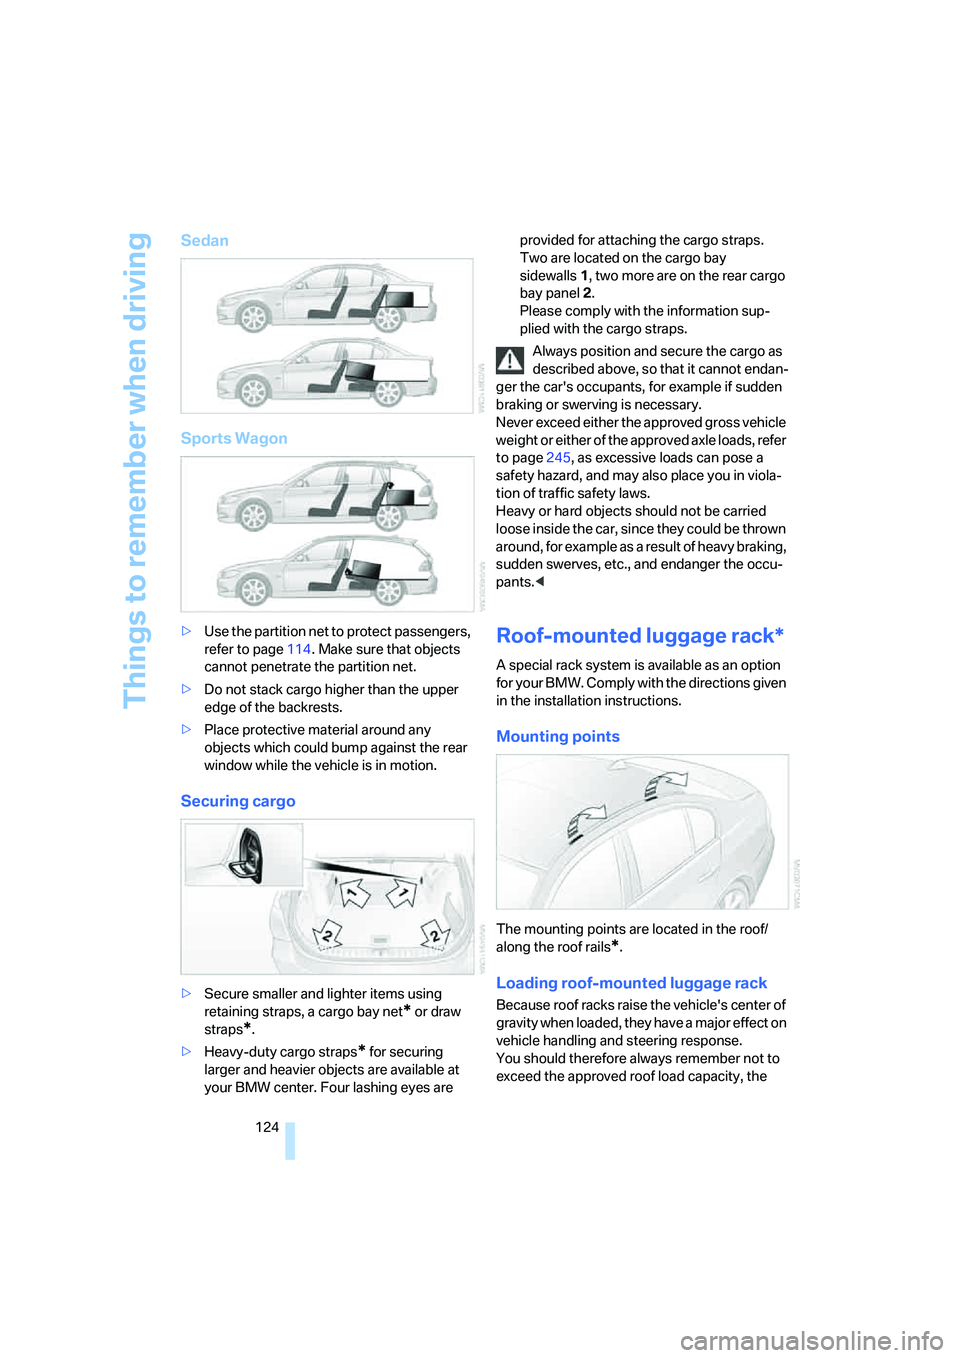
Sedan
Sports Wagon
>Use the partition net to protect passengers,
refer to page114. Make sure that objects
cannot penetrate the partition net.
>Do not stack cargo higher than the upper
edge of the backrests.
>Place protective material around any
objects which could bump against the rear
window while the vehicle is in motion.
Securing cargo
>Secure smaller and lighter items using
retaining straps, a cargo bay net
* or draw
straps
*.
>Heavy-duty cargo straps
* for securing
larger and heavier objects are available at
your BMW center. Four lashing eyes are provided for attaching the cargo straps.
Two are located on the cargo bay
sidewalls1, two more are on the rear cargo
bay panel2.
Please comply with the information sup-
plied with the cargo straps.
Always position and secure the cargo as
described above, so that it cannot endan-
ger the car's occupants, for example if sudden
braking or swerving is necessary.
Never exceed either the approved gross vehicle
weight or either of the approved axle loads, refer
to page245, as excessive loads can pose a
safety hazard, and may also place you in viola-
tion of traffic safety laws.
Heavy or hard objects should not be carried
loose inside the car, since they could be thrown
around, for example as a result of heavy braking,
sudden swerves, etc., and endanger the occu-
pants.<
Roof-mounted luggage rack*
A special rack system is available as an option
f o r y o u r B M W . C o m p l y w i t h t h e d i r e c t i o n s g i v e n
in the installation instructions.
Mounting points
The mounting points are located in the roof/
along the roof rails
*.
Loading roof-mounted luggage rack
Because roof racks raise the vehicle's center of
gravity when loaded, they have a major effect on
vehicle handling and steering response.
You should therefore always remember not to
exceed the approved roof load capacity, the
Page 130 of 274
Starting the navigation system
128
Starting the navigation system
Your navigation system can use satellites to
ascertain the precise position of your vehicle
and guide you reliably to any destination you
enter.
Navigation DVD
The navigation system requires a special navi-
gation DVD. You can obtain the latest version at
your BMW center.
Inserting navigation DVD
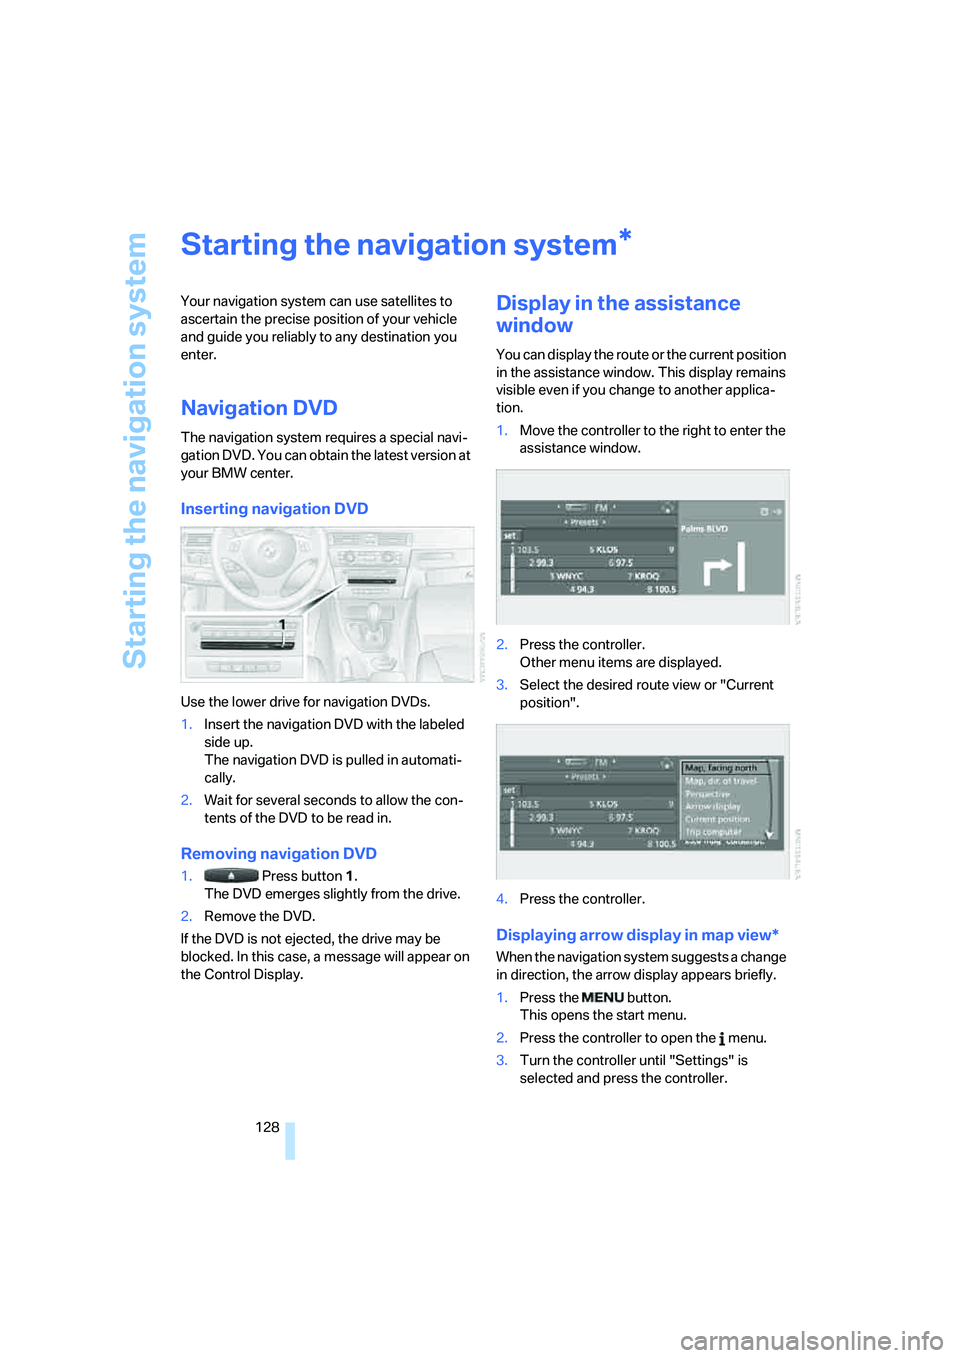
Use the lower drive for navigation DVDs.
1.Insert the navigation DVD with the labeled
side up.
The navigation DVD is pulled in automati-
cally.
2.Wait for several seconds to allow the con-
tents of the DVD to be read in.
Removing navigation DVD
1. Press button 1.
The DVD emerges slightly from the drive.
2.Remove the DVD.
If the DVD is not ejected, the drive may be
blocked. In this case, a message will appear on
the Control Display.
Display in the assistance
window
You can display the route or the current position
in the assistance window. This display remains
visible even if you change to another applica-
tion.
1.Move the controller to the right to enter the
assistance window.
2.Press the controller.
Other menu items are displayed.
3.Select the desired route view or "Current
position".
4.Press the controller.
Displaying arrow display in map view*
When the navigation system suggests a change
in direction, the arrow display appears briefly.
1.Press the button.
This opens the start menu.
2.Press the controller to open the menu.
3.Turn the controller until "Settings" is
selected and press the controller.
*
Page 131 of 274
Navigation
Driving tips
129Reference
At a glance
Controls
Communications
Entertainment
Mobility
4.Turn the controller until "Language / Units"
is selected and press the controller.
5.If necessary, move the highlight marker to
the uppermost field. Turn the controller
until "Languages" is selected and press the
controller.
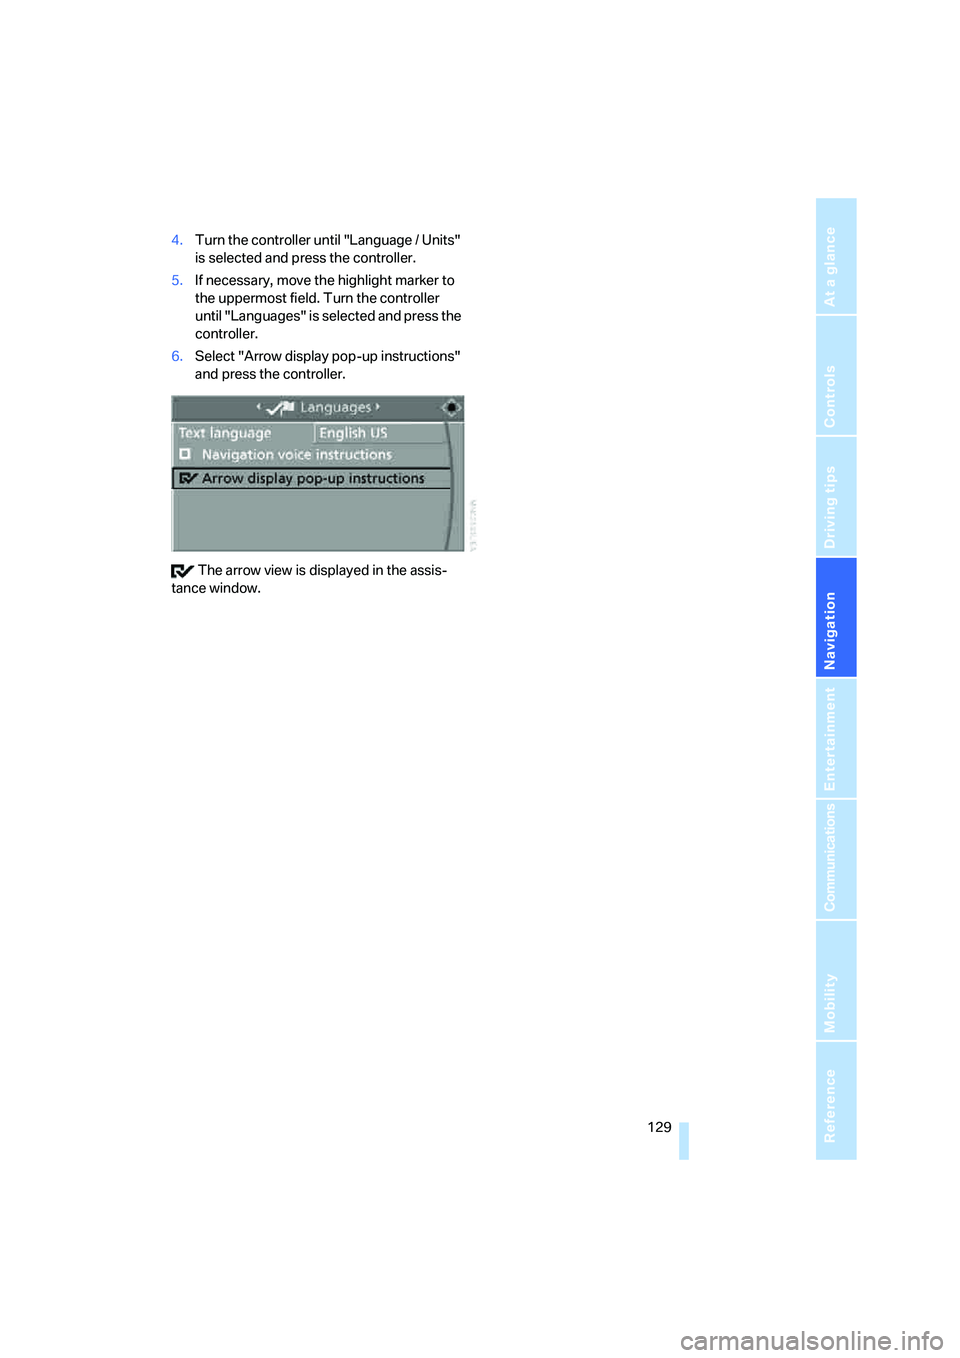
6.Select "Arrow display pop-up instructions"
and press the controller.
The arrow view is displayed in the assis-
tance window.