Jack BMW 4 SERIES CONVERTIBLE 2016 F33 Owner's Manual
[x] Cancel search | Manufacturer: BMW, Model Year: 2016, Model line: 4 SERIES CONVERTIBLE, Model: BMW 4 SERIES CONVERTIBLE 2016 F33Pages: 247, PDF Size: 5.22 MB
Page 101 of 247

Information on how to ensure the optimal
protective effect of the airbags▷Keep at a distance from the airbags.▷Always grasp the steering wheel on the
steering wheel rim, holding your hands at
the 3 o'clock and 9 o'clock positions, to
keep the risk of injury to your hands or
arms as low as possible when the airbag is
triggered.▷There should be no person, animals, or ob‐
jects between an airbag and a person.▷Do not use the cover of the front airbag on
the front passenger side as a storage area.▷Dashboard and windshield on the front
passenger side must stay clear - do not at‐
tach adhesive labels or coverings and do
not attach brackets or cables, e. g., for GPS
devices or' mobile phones.▷Make sure that the front passenger is sit‐
ting correctly, i.e., keeps his or her feet and
legs in the footwell; otherwise, leg injuries
might occur when front airbag is activated.▷Do not place slip covers, seat cushions or
other objects on the front passenger seat
that are not approved specifically for seats
with integrated side airbags.▷Do not hang pieces of clothing, such as
jackets, over the backrests.▷Make sure that occupants keep their heads
away from the side airbag; otherwise, inju‐
ries might occur when airbag is activated.▷Do not remove the airbag system.▷Do not remove the steering wheel.▷Do not apply adhesive materials to the air‐
bag cover panels, do not cover them or
modify them in any way.▷Never modify either the individual compo‐
nents or the wiring in the airbag system.
This also applies to steering wheel covers,
the dashboard, and the seats.◀
Even when you follow all instructions very
closely, injury from contact with the airbags
cannot be ruled out in certain situations.
The ignition and inflation noise may lead to
short-term and, in most cases, temporary
hearing impairment in sensitive individuals.
Malfunction, deactivation and after de‐
ploying the airbags
Do not touch the individual components imme‐
diately after the system has been triggered;
otherwise, you may risk burns.
Only have the airbags checked, repaired or dis‐
mantled and the airbag generator scrapped by
the service center or an authorized repair shop
for handling explosives.
Non-professional attempts to service the sys‐
tem could lead to failure in an emergency or
unintentional activation of the airbag - both
may lead to injury.◀
Warnings and information on the airbags are
also found on the sun visors.
Functional readiness of the airbag
system
When the ignition is reel on, the warn‐
ing lamp in the instrument cluster lights
up briefly and thereby indicates the op‐
erational readiness of the entire airbag system
and the belt tensioner.
Airbag system malfunctioning▷Warning lamp does not come on when the
ignition is turned on.▷The warning lamp lights up continuously.
In case of a malfunction have airbag sys‐
tem checked immediately.
In case of a malfunction have airbag system
checked immediately; otherwise, there is a risk
that the system does not function as expected
in case of a severe accident.◀
Seite 97SafetyControls97
Online Edition for Part no. 01 40 2 960 547 - II/15
Page 217 of 247

These lights are made using LED technology.
Contact your service center in the event of a
malfunction.
Changing wheels
Hints When using run-flat tires or sealants, a tire
does not need to be changed immediately in
the event of pressure loss due to a flat tire.
Which is why no spare tire is available.
The tools for changing wheels are available as
accessories from your service center.
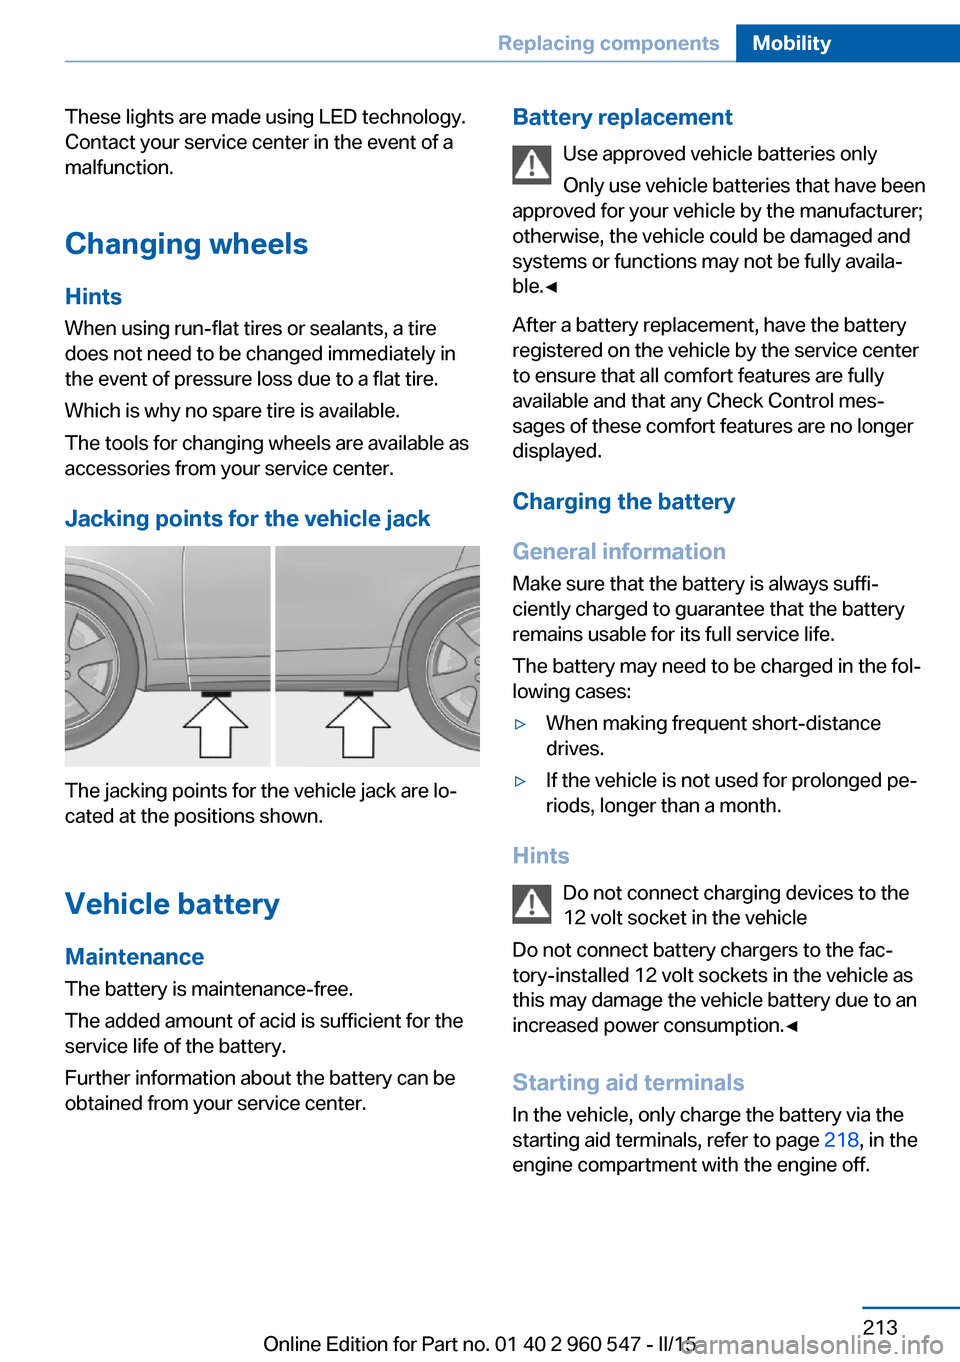
Jacking points for the vehicle jack
The jacking points for the vehicle jack are lo‐
cated at the positions shown.
Vehicle battery Maintenance
The battery is maintenance-free.
The added amount of acid is sufficient for the
service life of the battery.
Further information about the battery can be
obtained from your service center.
Battery replacement
Use approved vehicle batteries only
Only use vehicle batteries that have been
approved for your vehicle by the manufacturer;
otherwise, the vehicle could be damaged and
systems or functions may not be fully availa‐
ble.◀
After a battery replacement, have the battery registered on the vehicle by the service center
to ensure that all comfort features are fully
available and that any Check Control mes‐
sages of these comfort features are no longer
displayed.
Charging the battery
General information Make sure that the battery is always suffi‐
ciently charged to guarantee that the battery
remains usable for its full service life.
The battery may need to be charged in the fol‐
lowing cases:▷When making frequent short-distance
drives.▷If the vehicle is not used for prolonged pe‐
riods, longer than a month.
Hints
Do not connect charging devices to the
12 volt socket in the vehicle
Do not connect battery chargers to the fac‐
tory-installed 12 volt sockets in the vehicle as
this may damage the vehicle battery due to an
increased power consumption.◀
Starting aid terminals
In the vehicle, only charge the battery via the
starting aid terminals, refer to page 218, in the
engine compartment with the engine off.
Seite 213Replacing componentsMobility213
Online Edition for Part no. 01 40 2 960 547 - II/15
Page 240 of 247

Heating, neck 54
Heavy cargo, stowing 172
Height, vehicle 228
High-beam Assistant 93
High beams 69
High beams/low beams, refer to High-beam Assistant 93
Hills 170
Hill start assistant, refer to Drive-off assistant 123
Hints 6
Holder for beverages 165
Homepage 6
Hood 200
Horn 14
Hot exhaust system 168
HUD Head-up Display 89
Hydroplaning 169
I Ice warning, see External temperature warning 81
Icy roads, see External tem‐ perature warning 81
Identification marks, tires 190
Identification number, see ve‐ hicle identification num‐
ber 9
iDrive 18
Ignition key, refer to Remote control 34
Ignition off 64
Ignition on 64
Indication of a flat tire 101 , 104
Indicator and alarm lamps, see Check Control 77
Indicator lamp, see Check Control 77
Individual air distribu‐ tion 146, 150
Individual settings, refer to Personal Profile 35
Inflation pressure, tires 186 Inflation pressure warning
FTM, tires 104
Info display, refer to On- Board computer 85
Initialize, Tire Pressure Moni‐ tor TPM 101
Initializing, Flat Tire Monitor FTM 104
Instrument cluster 76
Instrument cluster, electronic displays 76
Instrument lighting 94
Integrated key 34
Integrated Owner's Manual in the vehicle 30
Intelligent Emergency Re‐ quest 216
Intelligent Safety 106
Intensity, AUTO pro‐ gram 149
Interior equipment 153
Interior lights 94
Interior lights during unlock‐ ing 37
Interior lights with the vehicle locked 38
Interior motion sensor 44
Interior rearview mirror, auto‐ matic dimming feature 59
Interior rearview mirror, com‐ pass 155
Interior rearview mirror, man‐ ually dimmable 59
Internet page 6
Interval display, service re‐ quirements 82
Interval mode 70
J
Jacking points for the vehicle jack 213
Joystick, Steptronic transmis‐ sion 72
Jump-starting 217 K
Key/remote control 34
Keyless Go, refer to Comfort Access 41
Key Memory, refer to Per‐ sonal Profile 35
Kickdown, Steptronic trans‐ mission 72
Knee airbag 96
L
Lamp replacement 207
Lamp replacement, front 208
Lamp replacement, rear 210
Lane departure warning 114
Lane margin, warning 114
Language on Control Dis‐ play 88
Lashing eyes, securing cargo 172
LATCH child restraint sys‐ tem 63
Launch Control 74
Leather, care 222
LED light, bulb replace‐ ment 209
LEDs, light-emitting di‐ odes 208
Length, vehicle 228
Letters and numbers, enter‐ ing 25
Light alloy wheels, care 223
Light control 92
Light-emitting diodes, LEDs 208
Lighter 157
Lighting 91
Lights 91
Lights and bulbs 207
Light switch 91
Load 172
Loading 171
Loading aid 159 Seite 236ReferenceEverything from A to Z236
Online Edition for Part no. 01 40 2 960 547 - II/15
Page 244 of 247

Tire tread 191
Tone, see user's manual for Navigation, Entertainment
and Communication
Tool 207
Top View 138
Total vehicle weight 229
Touchpad 21
Tow fitting 219
Towing 219
Tow lug, see Tow fitting 219
Tow-starting 219
TPM Tire Pressure Moni‐ tor 100
Traction control 120
TRACTION, driving dynam‐ ics 120
Transmission lock, electronic unlocking 74
Transmission, Steptronic transmission 71
Transporting children safely 61
Tread, tires 191
Trip computer 86
Triple turn signal activa‐ tion 68
Trip odometer 81
Trunk lid closing 40
Trunk lid, emergency unlock‐ ing 41
Trunk lid opening 40
Trunk lid via remote con‐ trol 38
Trunk, trunk partition 49
Turning circle 228
Turning circle lines, rearview camera 136
Turn signals, operation 68
U Unintentional alarm 45
Units of measure 89
Universal remote control 153 Unlock button, Steptronic
transmission 72
Unlocking/locking via door lock 39
Unlocking/locking with re‐ mote control 37
Unlocking, settings 42
Updates made after the edito‐ rial deadline 7
Upholstery care 223
USB interface 158
V Vanity mirror 157
Variable sport steering 121
Vehicle battery 213
Vehicle battery, replac‐ ing 213
Vehicle, break-in 168
Vehicle care 222
Vehicle features and op‐ tions 6
Vehicle identification num‐ ber 9
Vehicle jack 213
Vehicle paint 222
Vehicle storage 224
Vehicle wash 221
Ventilation 151
Ventilation, refer to Parked- car ventilation 151
VIN, see vehicle identification number 9
Voice activation system 27
W Warning and indicator lamps, see Check Control 77
Warning displays, see Check Control 77
Warning messages, see Check Control 77
Warning triangle 217
Warranty 7 Washer fluid 71
Washer nozzles, wind‐ shield 70
Washer system 69
Washing, vehicle 221
Water on roads 169
Weights 229
Welcome lamps during un‐ locking 37
Welcome lights 91
Wheel base, vehicle 228
Wheel cleaner 223
Wheels, changing 192
Wheels, everything on wheels and tires 186
Wheels, Flat Tire Monitor FTM 104
Wheels, Tire Pressure Moni‐ tor TPM 100
Width, vehicle 228
Wind deflector 49
Window defroster, rear 146, 150
Windows, powered 45
Windshield washer fluid 71
Windshield washer noz‐ zles 70
Windshield washer sys‐ tem 69
Windshield wiper 69
Winter storage, care 224
Winter tires, suitable tires 193
Winter tires, tread 191
Wiper 69
Wiper blades, replacing 207
Wiper fluid 71
Wiper, fold-out position 70
Wiper system 69
Wood, care 223
Word match concept, naviga‐ tion 25
Wrench, see Onboard vehicle tool kit 207 Seite 240ReferenceEverything from A to Z240
Online Edition for Part no. 01 40 2 960 547 - II/15