width BMW 4 SERIES COUPE 2014 F32 Owner's Manual
[x] Cancel search | Manufacturer: BMW, Model Year: 2014, Model line: 4 SERIES COUPE, Model: BMW 4 SERIES COUPE 2014 F32Pages: 244, PDF Size: 6.13 MB
Page 53 of 244
AdjustingVehicle features and options
This chapter describes all standard, country-
specific and optional features offered with the
series. It also describes features that are not
necessarily available in your car, e. g., due to
the selected options or country versions. This
also applies to safety-related functions and
systems.
Sitting safely
The ideal seating position can make a vital
contribution to relaxed, fatigue-free driving.
The seating position plays an important role in
an accident in combination with:▷Safety belts, refer to page 53.▷Head restraints, refer to page 55.▷Airbags, refer to page 96.
Seats
Hints Do not adjust the seat while driving
Do not adjust the driver's seat while driv‐
ing, or the seat could respond with unexpected
movement and the ensuing loss of vehicle
control could lead to an accident.◀
Do not incline the backrest too far to the
rear
Also on the front passenger side, do not incline
the backrest on the front passenger side too far to the rear while driving, or there is a risk of
slipping under the safety belt in the event of an
accident. This would eliminate the protection
normally provided by the belt.◀
Keep the movement area unobstructed
When changing the seat position, keep
the seat's area of movement unobstructed;
otherwise, people might get injured or objects
damaged.◀
Manually adjustable seats
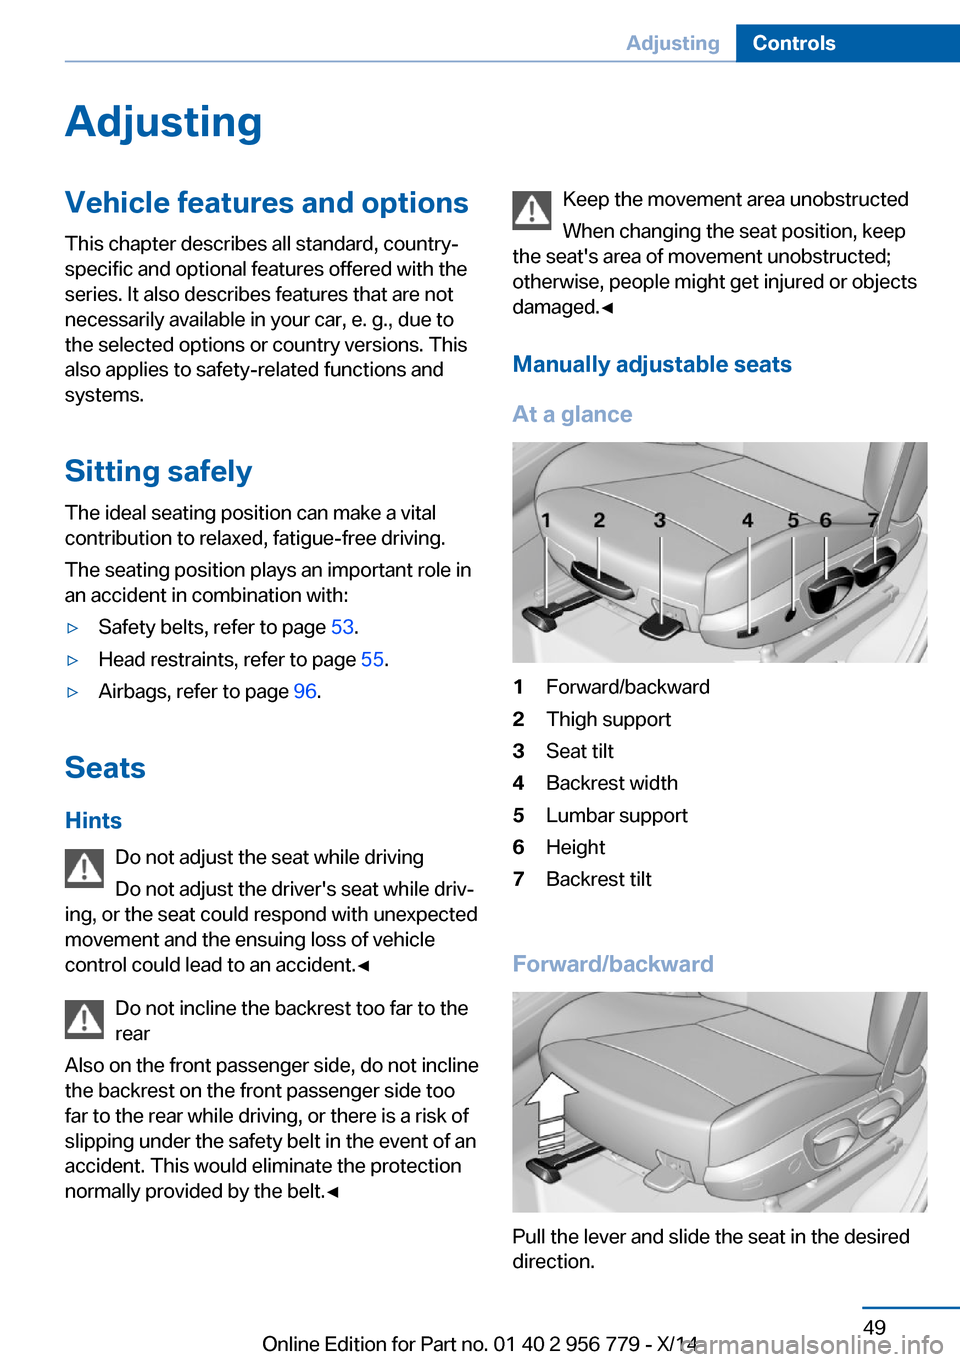
At a glance1Forward/backward2Thigh support3Seat tilt4Backrest width5Lumbar support6Height7Backrest tilt
Forward/backward
Pull the lever and slide the seat in the desired
direction.
Seite 49AdjustingControls49
Online Edition for Part no. 01 40 2 956 779 - X/14
Page 54 of 244
After releasing the lever, move the seat for‐
ward or back slightly making sure it engages
properly.
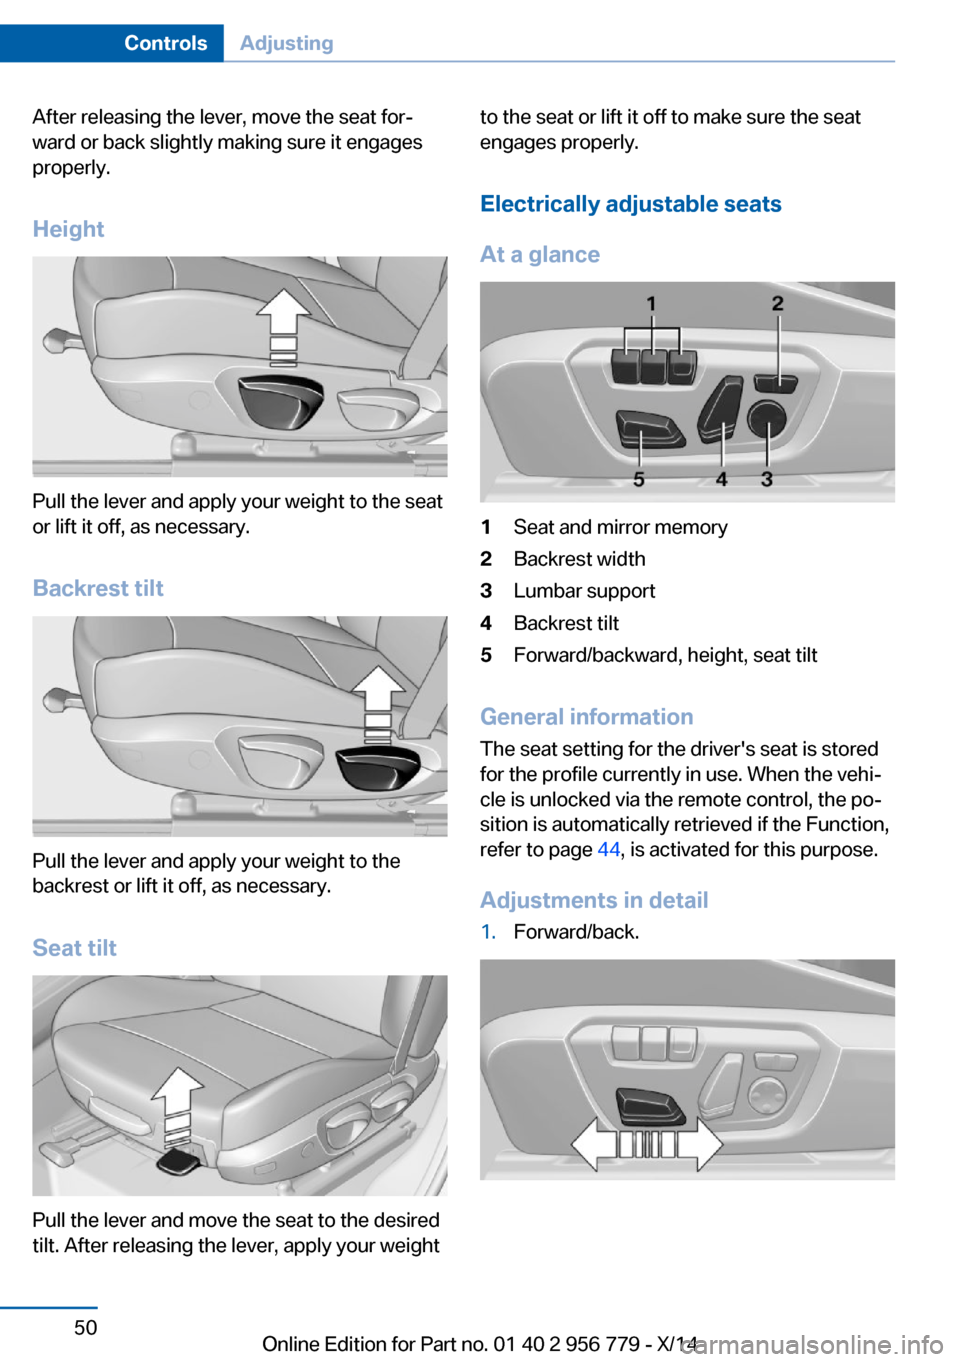
Height
Pull the lever and apply your weight to the seat
or lift it off, as necessary.
Backrest tilt
Pull the lever and apply your weight to the
backrest or lift it off, as necessary.
Seat tilt
Pull the lever and move the seat to the desired
tilt. After releasing the lever, apply your weight
to the seat or lift it off to make sure the seat
engages properly.
Electrically adjustable seats
At a glance1Seat and mirror memory2Backrest width3Lumbar support4Backrest tilt5Forward/backward, height, seat tilt
General information
The seat setting for the driver's seat is stored
for the profile currently in use. When the vehi‐
cle is unlocked via the remote control, the po‐
sition is automatically retrieved if the Function,
refer to page 44, is activated for this purpose.
Adjustments in detail
1.Forward/back.Seite 50ControlsAdjusting50
Online Edition for Part no. 01 40 2 956 779 - X/14
Page 55 of 244
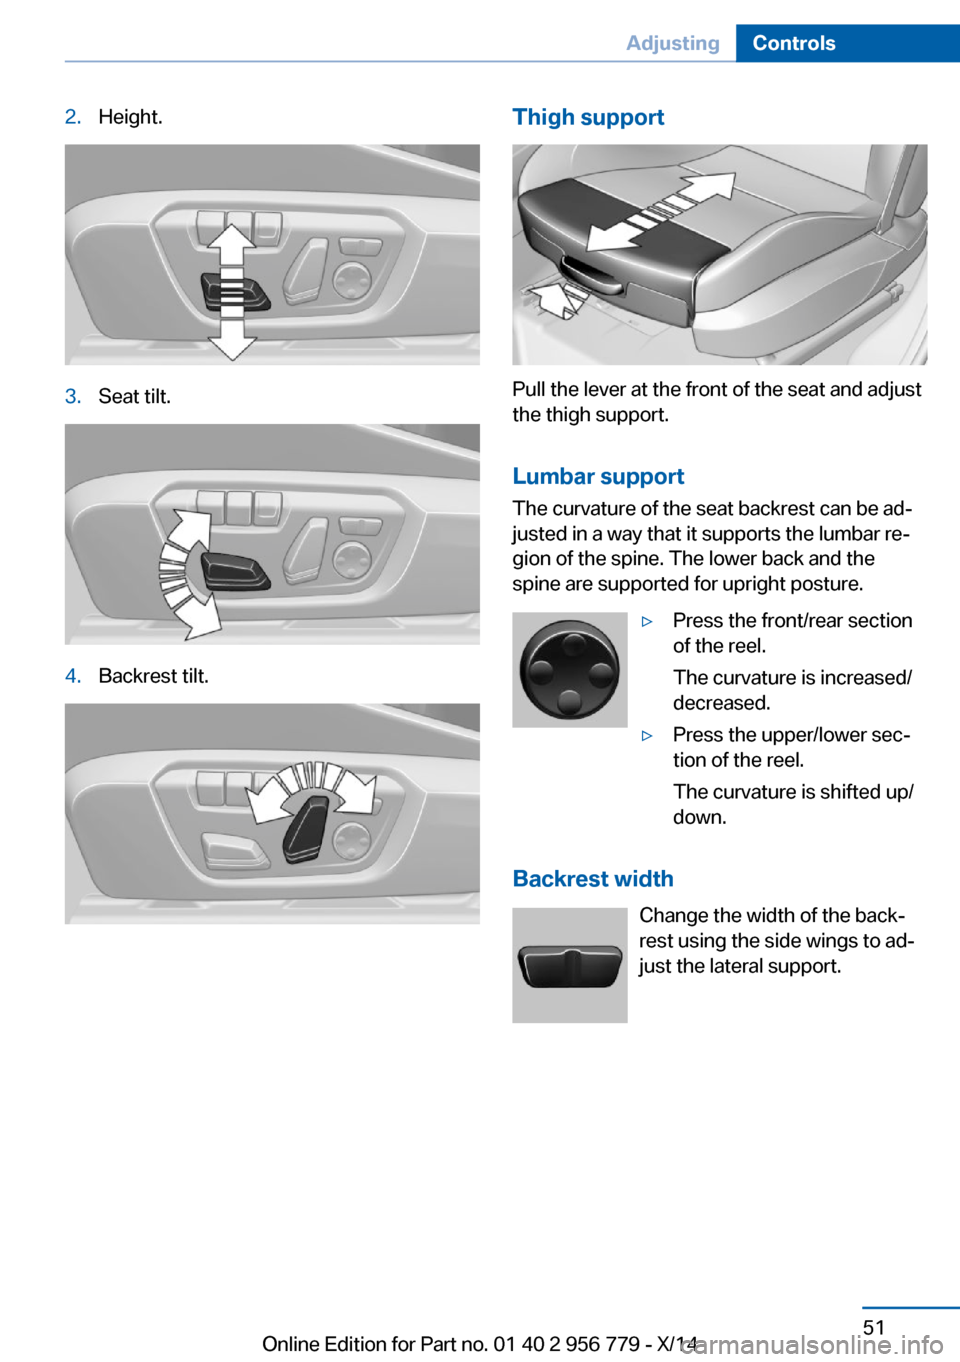
2.Height.3.Seat tilt.4.Backrest tilt.Thigh support
Pull the lever at the front of the seat and adjust
the thigh support.
Lumbar support The curvature of the seat backrest can be ad‐
justed in a way that it supports the lumbar re‐
gion of the spine. The lower back and the
spine are supported for upright posture.
▷Press the front/rear section
of the reel.
The curvature is increased/
decreased.▷Press the upper/lower sec‐
tion of the reel.
The curvature is shifted up/
down.
Backrest width
Change the width of the back‐
rest using the side wings to ad‐
just the lateral support.
Seite 51AdjustingControls51
Online Edition for Part no. 01 40 2 956 779 - X/14
Page 60 of 244
Seat and mirror memory
Hints Do not retrieve the memory while driving
Do not retrieve the memory setting while
driving, as an unexpected movement of the
seat could result in an accident.◀
Keep the movement area unobstructed
When changing the seat position, keep
the seat's area of movement unobstructed;
otherwise, people might get injured or objects
damaged.◀
The concept Two driver's seat and exterior mirror positions
can be stored per profile, refer to page 35, and
called up. Settings for the backrest width and
lumbar support are not stored in memory.
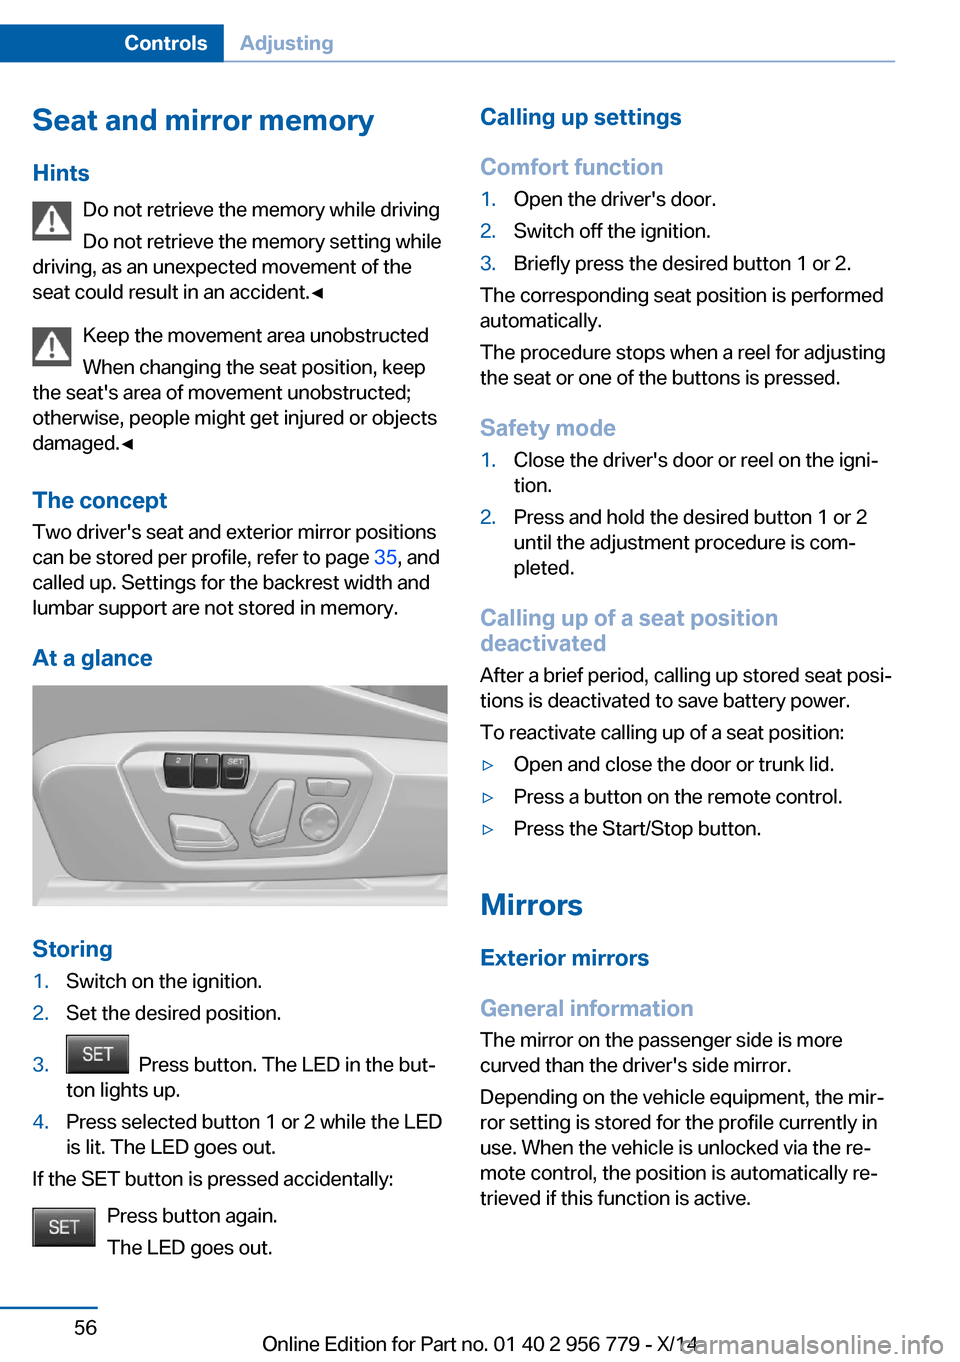
At a glance
Storing
1.Switch on the ignition.2.Set the desired position.3. Press button. The LED in the but‐
ton lights up.4.Press selected button 1 or 2 while the LED
is lit. The LED goes out.
If the SET button is pressed accidentally:
Press button again.
The LED goes out.
Calling up settings
Comfort function1.Open the driver's door.2.Switch off the ignition.3.Briefly press the desired button 1 or 2.
The corresponding seat position is performed
automatically.
The procedure stops when a reel for adjusting
the seat or one of the buttons is pressed.
Safety mode
1.Close the driver's door or reel on the igni‐
tion.2.Press and hold the desired button 1 or 2
until the adjustment procedure is com‐
pleted.
Calling up of a seat position
deactivated
After a brief period, calling up stored seat posi‐
tions is deactivated to save battery power.
To reactivate calling up of a seat position:
▷Open and close the door or trunk lid.▷Press a button on the remote control.▷Press the Start/Stop button.
Mirrors
Exterior mirrors
General information The mirror on the passenger side is more
curved than the driver's side mirror.
Depending on the vehicle equipment, the mir‐
ror setting is stored for the profile currently in
use. When the vehicle is unlocked via the re‐
mote control, the position is automatically re‐
trieved if this function is active.
Seite 56ControlsAdjusting56
Online Edition for Part no. 01 40 2 956 779 - X/14
Page 61 of 244
NoteEstimating distances correctly
Objects reflected in the mirror are closer
than they appear. Do not estimate the distance
to the traffic behind you based on what you
see in the mirror, as this will increase your risk
of an accident.◀
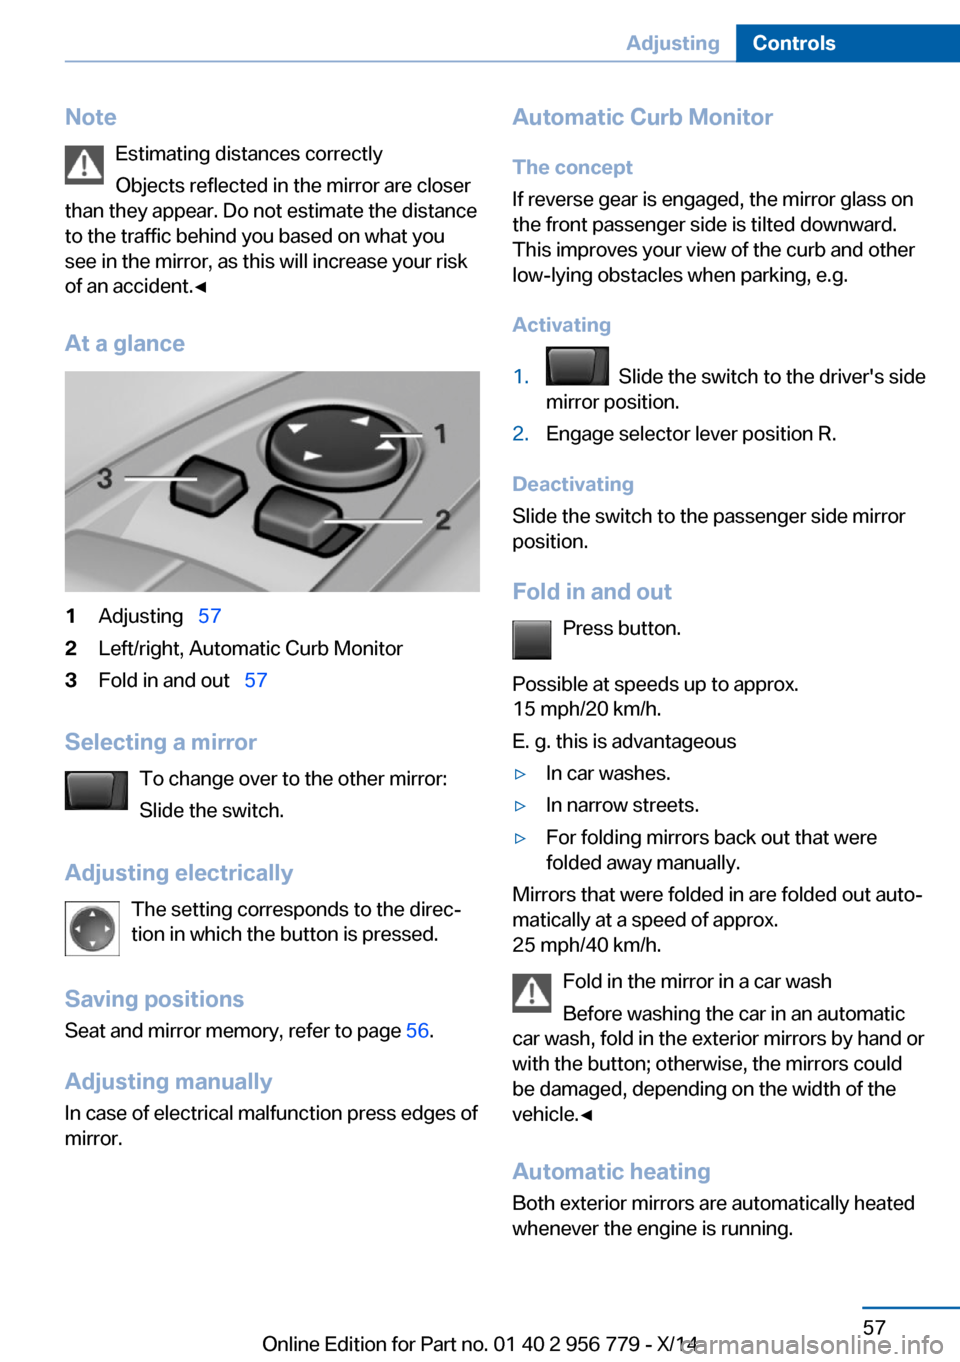
At a glance1Adjusting 572Left/right, Automatic Curb Monitor3Fold in and out 57
Selecting a mirror
To change over to the other mirror:
Slide the switch.
Adjusting electrically The setting corresponds to the direc‐
tion in which the button is pressed.
Saving positions
Seat and mirror memory, refer to page 56.
Adjusting manually
In case of electrical malfunction press edges of
mirror.
Automatic Curb Monitor
The concept
If reverse gear is engaged, the mirror glass on
the front passenger side is tilted downward.
This improves your view of the curb and other
low-lying obstacles when parking, e.g.
Activating1. Slide the switch to the driver's side
mirror position.2.Engage selector lever position R.
Deactivating
Slide the switch to the passenger side mirror
position.
Fold in and out Press button.
Possible at speeds up to approx.
15 mph/20 km/h.
E. g. this is advantageous
▷In car washes.▷In narrow streets.▷For folding mirrors back out that were
folded away manually.
Mirrors that were folded in are folded out auto‐
matically at a speed of approx.
25 mph/40 km/h.
Fold in the mirror in a car wash
Before washing the car in an automatic
car wash, fold in the exterior mirrors by hand or
with the button; otherwise, the mirrors could
be damaged, depending on the width of the
vehicle.◀
Automatic heating
Both exterior mirrors are automatically heated
whenever the engine is running.
Seite 57AdjustingControls57
Online Edition for Part no. 01 40 2 956 779 - X/14
Page 64 of 244
of unexpected movement of the rear seat
backrest.◀
On the front passenger seat
Deactivating airbags Deactivating the front-seat passenger
airbags
If a child restraint system is used in the front
passenger seat, deactivate the front-seat pas‐
senger airbags; otherwise, there is an in‐
creased risk of injury to the child when the air‐
bags are activated, even with a child restraint
system.◀
After installing a child restraint system in the
front passenger seat, make sure that the front,
knee and side airbags on the front passenger
side are deactivated.
Deactivate the front-seat passenger airbags
automatically, refer to page 98.
Seat position and height
Before installing a child restraint system, move
the front passenger seat as far back as possi‐
ble and adjust its height to the highest and
thus best possible position for the belt and to
offer optimal protection in the event of an acci‐
dent.
If the upper anchorage of the safety belt is lo‐
cated in front of the belt guide of the child seat,
move the passenger seat carefully forward un‐
til the best possible belt guide position is
reached.
Backrest width Backrest width for the child seat
Before installing a child restraint system
in the front passenger seat, the backrest width
must be opened completely. Do not changethe adjustment after this; otherwise, the stabil‐
ity of the child seat will be reduced.◀
Adjustable backrest width: before installing a
child restraint system in the front passenger
seat, open the backrest width completely. Do
not change the backrest width again and do
not call up a memory position.
Child seat security
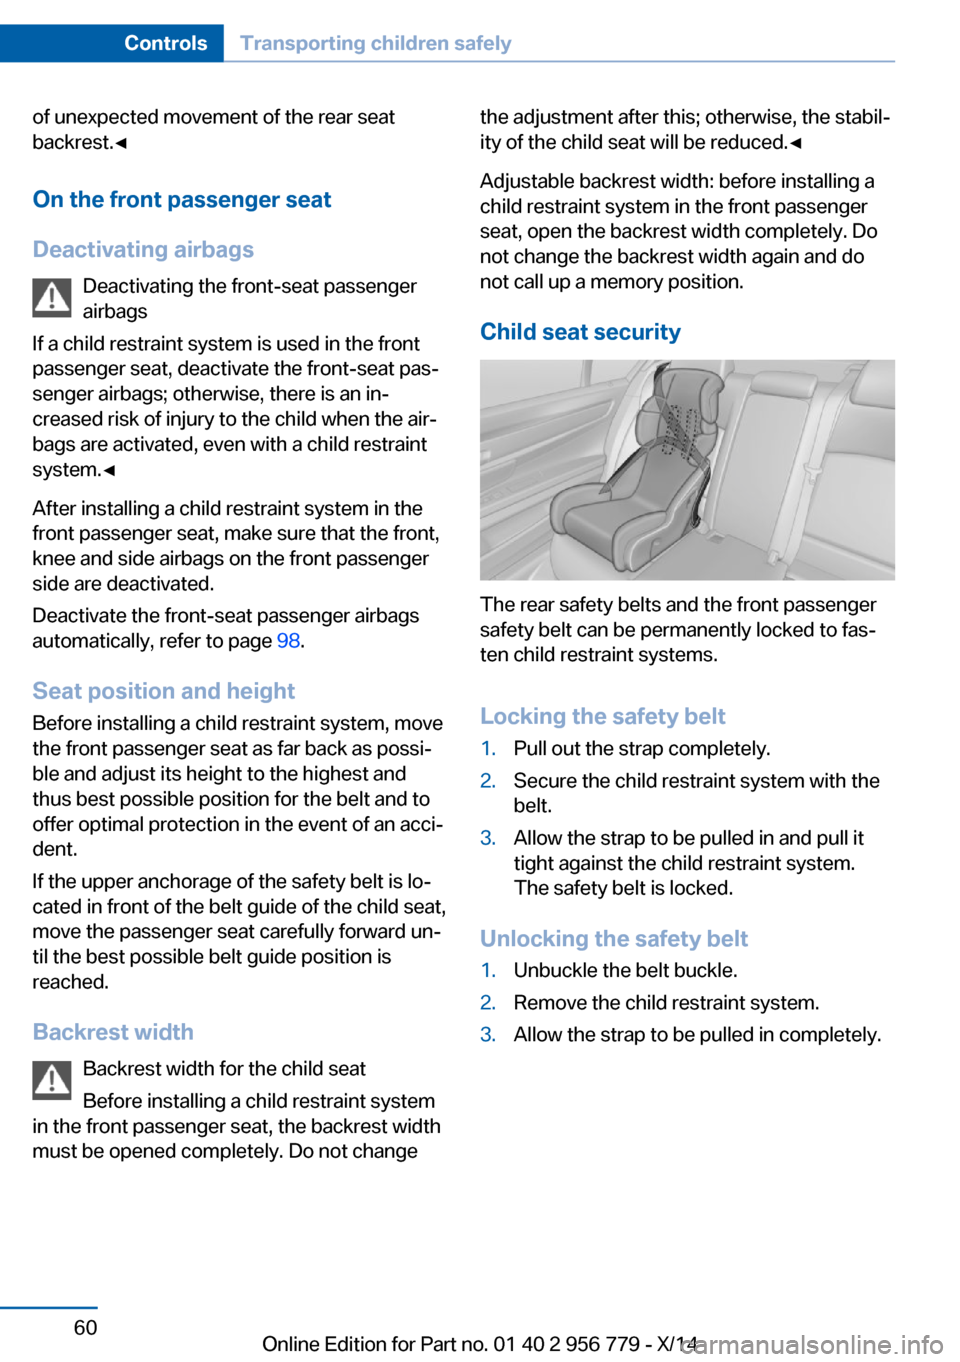
The rear safety belts and the front passenger
safety belt can be permanently locked to fas‐
ten child restraint systems.
Locking the safety belt
1.Pull out the strap completely.2.Secure the child restraint system with the
belt.3.Allow the strap to be pulled in and pull it
tight against the child restraint system.
The safety belt is locked.
Unlocking the safety belt
1.Unbuckle the belt buckle.2.Remove the child restraint system.3.Allow the strap to be pulled in completely.Seite 60ControlsTransporting children safely60
Online Edition for Part no. 01 40 2 956 779 - X/14
Page 196 of 244
Seite 192MobilityWheels and tires190
Online Edition for Part no. 01 40 2 956 779 - X/14
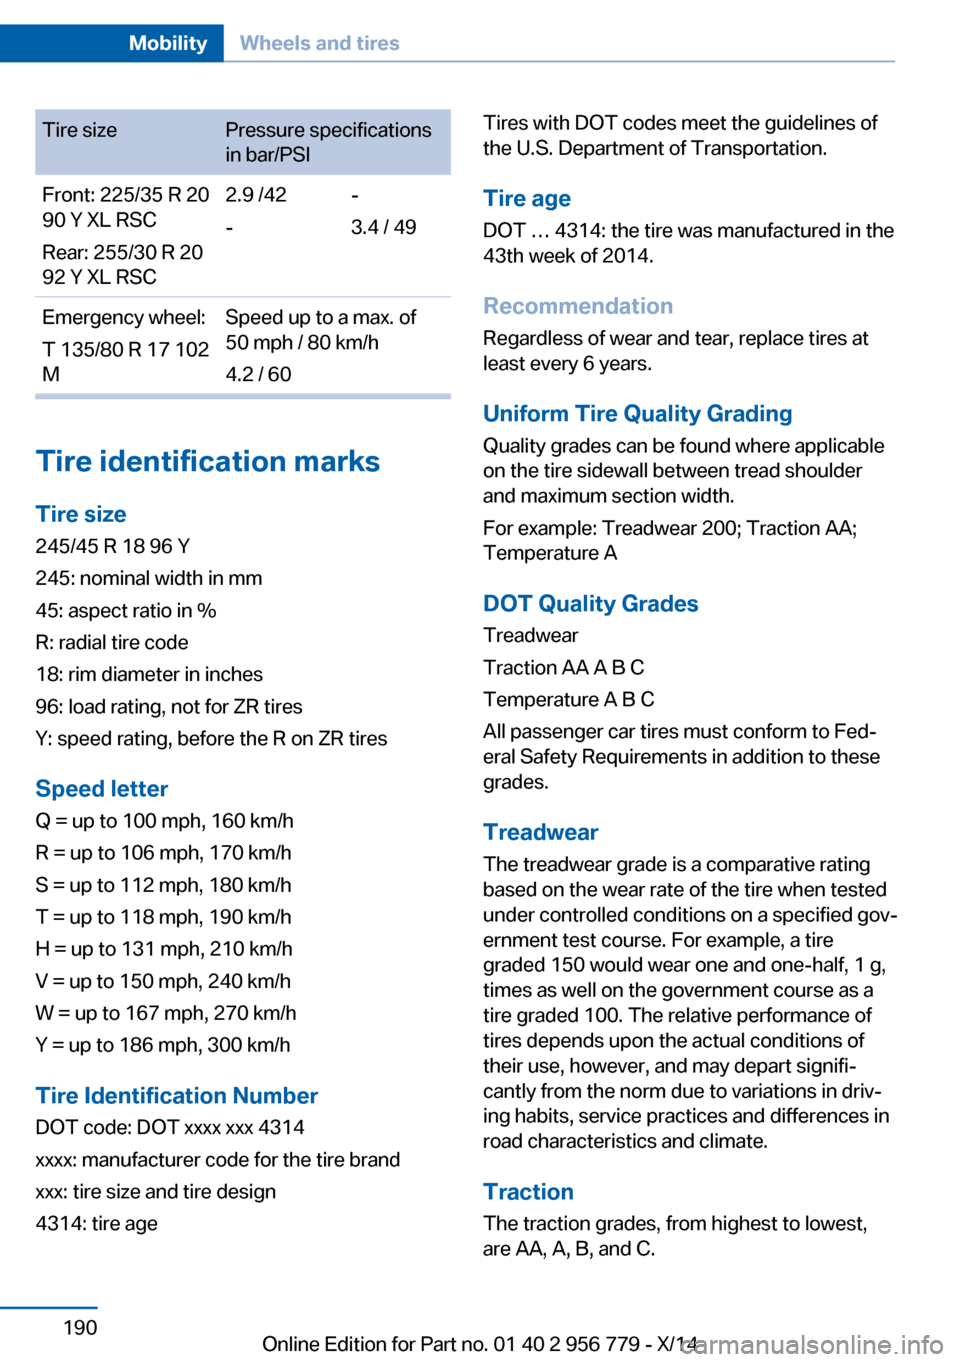
Tire sizePressure specifications
in bar/PSI
Front: 225/35 R 20
90 Y XL RSC
Rear: 255/30 R 20
92 Y XL RSC
2.9 /42
-
-
3.4 / 49
Emergency wheel:
T 135/80 R 17 102
M
Speed up to a max. of
50 mph / 80 km/h
4.2 / 60
Tire identification marks
Tire size
245/45 R 18 96 Y
245: nominal width in mm
45: aspect ratio in %
R: radial tire code
18: rim diameter in inches
96: load rating, not for ZR tires
Y: speed rating, before the R on ZR tires
Speed letter
Q = up to 100 mph, 160 km/h
R = up to 106 mph, 170 km/h
S = up to 112 mph, 180 km/h
T = up to 118 mph, 190 km/h
H = up to 131 mph, 210 km/h
V = up to 150 mph, 240 km/h
W = up to 167 mph, 270 km/h
Y = up to 186 mph, 300 km/h
Tire Identification Number
DOT code: DOT xxxx xxx 4314
xxxx: manufacturer code for the tire brand
xxx: tire size and tire design
4314: tire age
Tires with DOT codes meet the guidelines of
the U.S. Department of Transportation.
Tire age
DOT … 4314: the tire was manufactured in the
43th week of 2014.
Recommendation
Regardless of wear and tear, replace tires at
least every 6 years.
Uniform Tire Quality Grading
Quality grades can be found where applicable
on the tire sidewall between tread shoulder
and maximum section width.
For example: Treadwear 200; Traction AA;
Temperature A
DOT Quality Grades
Treadwear
Traction AA A B C
Temperature A B C
All passenger car tires must conform to Fed‐
eral Safety Requirements in addition to these
grades.
Treadwear
The treadwear grade is a comparative rating
based on the wear rate of the tire when tested
under controlled conditions on a specified gov‐
ernment test course. For example, a tire
graded 150 would wear one and one-half, 1 g,
times as well on the government course as a
tire graded 100. The relative performance of
tires depends upon the actual conditions of
their use, however, and may depart signifi‐
cantly from the norm due to variations in driv‐
ing habits, service practices and differences in
road characteristics and climate.
Traction
The traction grades, from highest to lowest,
are AA, A, B, and C.
Page 224 of 244
CareVehicle features and optionsThis chapter describes all standard, country-
specific and optional features offered with the
series. It also describes features that are not
necessarily available in your car, e. g., due to
the selected options or country versions. This
also applies to safety-related functions and
systems.
Car washes
General information
Regularly remove foreign objects such as
leaves in the area below the windshield when
the hood is raised.
Wash your vehicle frequently, particularly in
winter. Intense soiling and road salt can dam‐
age the vehicle.
Hints Steam jets or high-pressure washers
When using steam jets or high-pressure
washers, hold them a sufficient distance away
and use a maximum temperature of
140 ℉/60 ℃.
If the vehicle has a glass sunroof, ensure that a
distance of at least 31.5 inches/80 cm is main‐
tained. Holding them too close or using exces‐
sively high pressures or temperatures can
cause damage or preliminary damage that may
then lead to long-term damage.
Follow the user's manual for the high-pressure
washer.◀
Cleaning sensors/cameras with high-
pressure washers
When using high-pressure washers, do not
spray the exterior sensors and cameras, e.g.,
Park Distance Control, for extended periods oftime and only from a distance of at least
12 in/30 cm.◀
Automatic car washes
Hints Do not use high pressure washing sys‐
tems
With washing systems operating at high pres‐
sures and nozzle positions close to the win‐
dows, drops of water can penetrate.◀▷Give preference to cloth car washes or
those that use soft brushes in order to
avoid paint damage.▷Make sure that the wheels and tires are not
damaged by the transport mechanisms.▷Fold in the exterior mirrors; otherwise, they
may be damaged, depending on the width
of the vehicle.▷Deactivate the rain sensor, refer to
page 69, to avoid unintentional wiper acti‐
vation.▷In some cases, an unintentional alarm can
be triggered by the interior motion sensor
of the alarm system. Follow the instruc‐
tions on avoiding an unintentional alarm,
refer to page 45.
Guide rails in car washes
Avoid car washes with guide rails higher
than 4 in/10 cm; otherwise, the vehicle body
could be damaged.◀
Before driving into a car wash In order to ensure that the vehicle can roll in a
car wash, take the following steps:
Manual transmission:
1.Drive into the car wash.2.Shift to neutral.Seite 218MobilityCare218
Online Edition for Part no. 01 40 2 956 779 - X/14
Page 230 of 244
Technical dataVehicle features and options
This chapter describes all standard, country-
specific and optional features offered with the
series. It also describes features that are notnecessarily available in your car, e. g., due to
the selected options or country versions. This
also applies to safety-related functions and
systems.
Note
The technical data and specifications in this
Owner's Manual are used as guidance values.
The vehicle-specific data can deviate from this,
for example, due to the selected special equip‐
ment, country version or country-specific
measurement method. Detailed values can befound in the approval documents, on informa‐
tion signs on the vehicle or can be obtained
from the service center.
The information in the vehicle documents al‐
ways has priority.
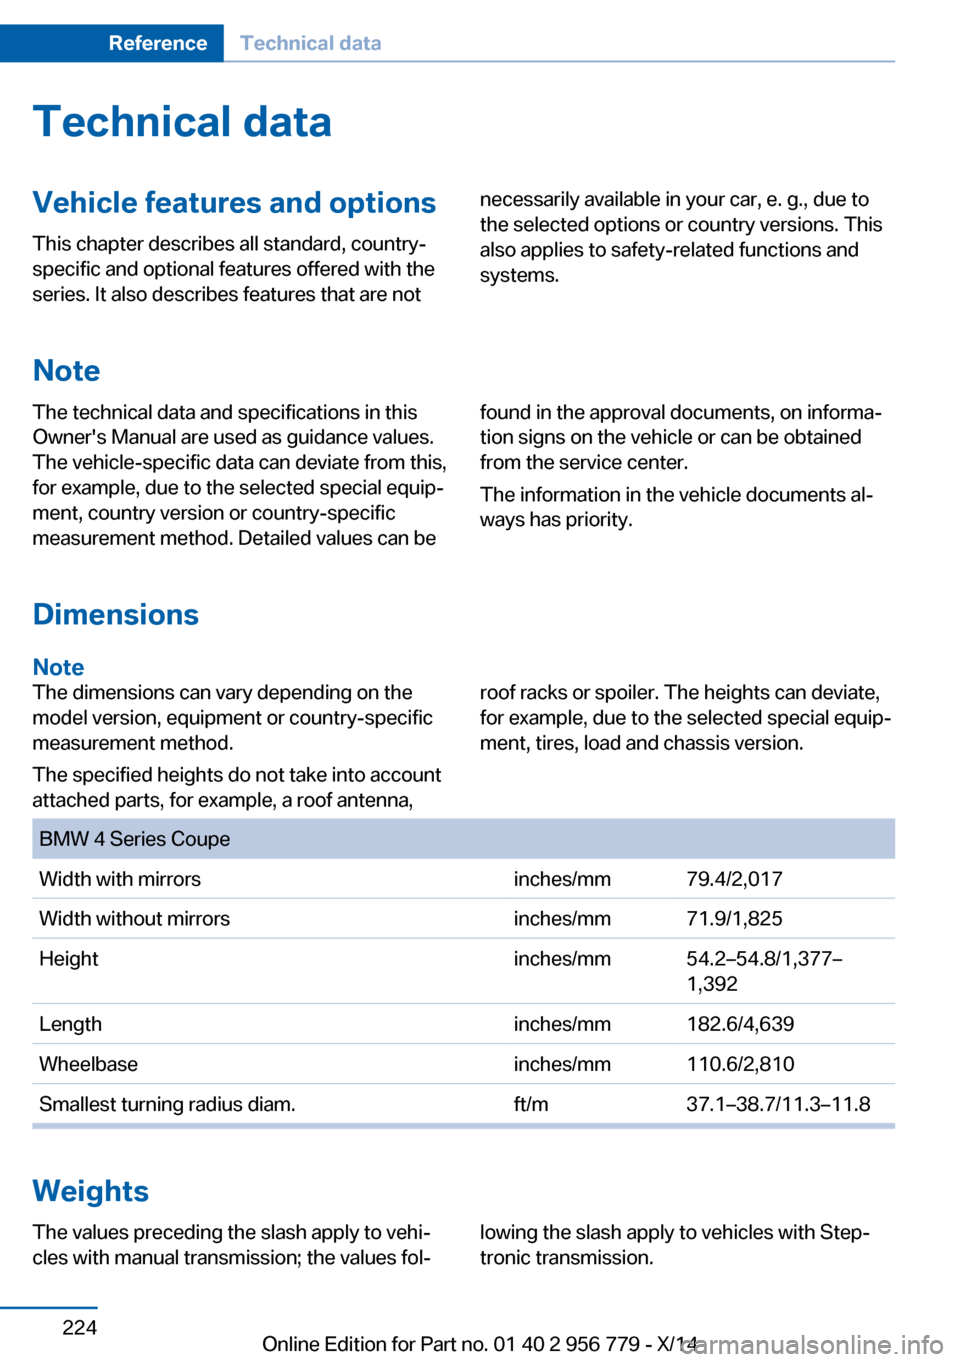
Dimensions
Note
The dimensions can vary depending on the
model version, equipment or country-specific
measurement method.
The specified heights do not take into account
attached parts, for example, a roof antenna,roof racks or spoiler. The heights can deviate,
for example, due to the selected special equip‐
ment, tires, load and chassis version. BMW 4 Series CoupeWidth with mirrorsinches/mm79.4/2,017 Width without mirrorsinches/mm71.9/1,825Heightinches/mm54.2–54.8/1,377–
1,392Lengthinches/mm182.6/4,639Wheelbaseinches/mm110.6/2,810Smallest turning radius diam.ft/m37.1–38.7/11.3–11.8
Weights
The values preceding the slash apply to vehi‐
cles with manual transmission; the values fol‐lowing the slash apply to vehicles with Step‐
tronic transmission.Seite 224ReferenceTechnical data224
Online Edition for Part no. 01 40 2 956 779 - X/14
Page 234 of 244
Everything from A to Z
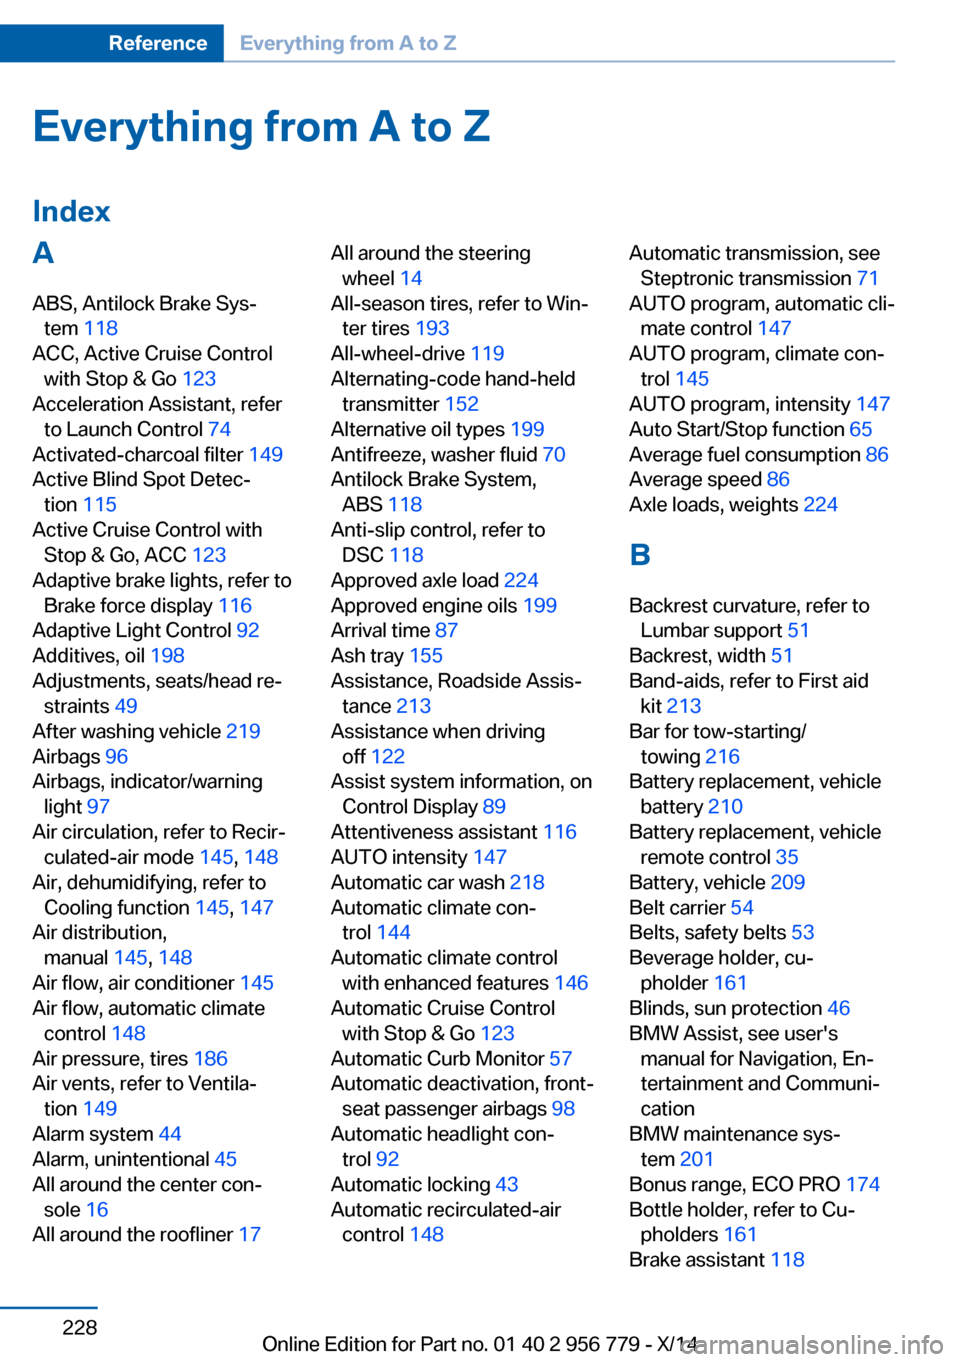
IndexA ABS, Antilock Brake Sys‐ tem 118
ACC, Active Cruise Control with Stop & Go 123
Acceleration Assistant, refer to Launch Control 74
Activated-charcoal filter 149
Active Blind Spot Detec‐ tion 115
Active Cruise Control with Stop & Go, ACC 123
Adaptive brake lights, refer to Brake force display 116
Adaptive Light Control 92
Additives, oil 198
Adjustments, seats/head re‐ straints 49
After washing vehicle 219
Airbags 96
Airbags, indicator/warning light 97
Air circulation, refer to Recir‐ culated-air mode 145, 148
Air, dehumidifying, refer to Cooling function 145, 147
Air distribution, manual 145, 148
Air flow, air conditioner 145
Air flow, automatic climate control 148
Air pressure, tires 186
Air vents, refer to Ventila‐ tion 149
Alarm system 44
Alarm, unintentional 45
All around the center con‐ sole 16
All around the roofliner 17 All around the steering
wheel 14
All-season tires, refer to Win‐ ter tires 193
All-wheel-drive 119
Alternating-code hand-held transmitter 152
Alternative oil types 199
Antifreeze, washer fluid 70
Antilock Brake System, ABS 118
Anti-slip control, refer to DSC 118
Approved axle load 224
Approved engine oils 199
Arrival time 87
Ash tray 155
Assistance, Roadside Assis‐ tance 213
Assistance when driving off 122
Assist system information, on Control Display 89
Attentiveness assistant 116
AUTO intensity 147
Automatic car wash 218
Automatic climate con‐ trol 144
Automatic climate control with enhanced features 146
Automatic Cruise Control with Stop & Go 123
Automatic Curb Monitor 57
Automatic deactivation, front- seat passenger airbags 98
Automatic headlight con‐ trol 92
Automatic locking 43
Automatic recirculated-air control 148 Automatic transmission, see
Steptronic transmission 71
AUTO program, automatic cli‐ mate control 147
AUTO program, climate con‐ trol 145
AUTO program, intensity 147
Auto Start/Stop function 65
Average fuel consumption 86
Average speed 86
Axle loads, weights 224
B Backrest curvature, refer to Lumbar support 51
Backrest, width 51
Band-aids, refer to First aid kit 213
Bar for tow-starting/ towing 216
Battery replacement, vehicle battery 210
Battery replacement, vehicle remote control 35
Battery, vehicle 209
Belt carrier 54
Belts, safety belts 53
Beverage holder, cu‐ pholder 161
Blinds, sun protection 46
BMW Assist, see user's manual for Navigation, En‐
tertainment and Communi‐
cation
BMW maintenance sys‐ tem 201
Bonus range, ECO PRO 174
Bottle holder, refer to Cu‐ pholders 161
Brake assistant 118 Seite 228ReferenceEverything from A to Z228
Online Edition for Part no. 01 40 2 956 779 - X/14