Functions BMW 4 SERIES GRAN COUPE 2016 F36 User Guide
[x] Cancel search | Manufacturer: BMW, Model Year: 2016, Model line: 4 SERIES GRAN COUPE, Model: BMW 4 SERIES GRAN COUPE 2016 F36Pages: 249, PDF Size: 5.3 MB
Page 31 of 249
Voice activation systemVehicle features and options
This chapter describes all standard, country-
specific and optional features offered with the
series. It also describes features that are not
necessarily available in your car, e. g., due to
the selected options or country versions. This
also applies to safety-related functions and
systems. The respectively applicable country
provisions must be observed when using the
respective features and systems.
The concept▷Most functions displayed on the Control
Display can be operated by voice com‐
mands via the voice activation system. The
system supports you with announcements
during input.▷Functions that can only be used when the
vehicle is stationary cannot be used via the
voice activation system.▷The system uses a special microphone on
the driver's side.▷›...‹ Verbal instructions in the Owner's
Manual to use with the voice activation
system.
Requirements
Via the Control Display, set a language that is
also supported by the voice activation system
so that the spoken commands can be identi‐
fied.
Set the language, refer to page 91.
Using voice activation
Activating the voice activation system1. Press button on the steering
wheel.2.Wait for the signal.3.Say the command.
A command that is recognized by the voice
activation system is announced and dis‐
played in the instrument cluster.
This symbol in the instrument cluster indi‐
cates that the voice activation system is active.
If no other commands are available, use func‐
tion via iDrive.
Terminating the voice activation
system
Briefly press the button on the steer‐
ing wheel or ›Cancel‹.
Possible commands Most menu items on the Control Display can
be voiced as commands.
The available commands depend on the menu
that is currently displayed on the Control Dis‐
play.
There are short commands for many functions.
You may select lists such as phone lists via
voice activation. Read these lists out loud ex‐
actly as they show in the respective list.
Having possible commands read aloud You can have available commands read out
loud for you: ›Voice commands‹
E. g. if the "Settings" menu is displayed, the
commands for the settings are read out loud.
Seite 27Voice activation systemAt a glance27
Online Edition for Part no. 01 40 2 960 707 - II/15
Page 32 of 249
Executing functions using short
commands
Execute functions on the main menu via short
commands. It almost doesn't matter which
menu item is selected, e.g., ›Vehicle status‹.
List of short commands for the voice activation
system, see Navigation, Entertainment, Com‐
munication Owner's Manual.
Help dialog for the voice activation
system
Calling up help dialog: ›Help‹
Additional commands for the help dialog:▷›Help with examples‹: announces informa‐
tion about the current operating options
and the most important commands for
them.▷›Help with voice activation‹: information
about the principle of operation for the
voice activation system is announced.
One example: open the tone
settings
Via the main menu The commands of the menu items are spoken
just as they are selected via the controller.
1.Turn on the Entertainment sound output if
needed.2. Press button on the steering
wheel.3.›Radio‹4.›Tone‹
Via short command
The desired tone settings can also be started
via a short command.
1.Turn on the Entertainment sound output if
needed.2. Press button on the steering
wheel.3.›Tone‹
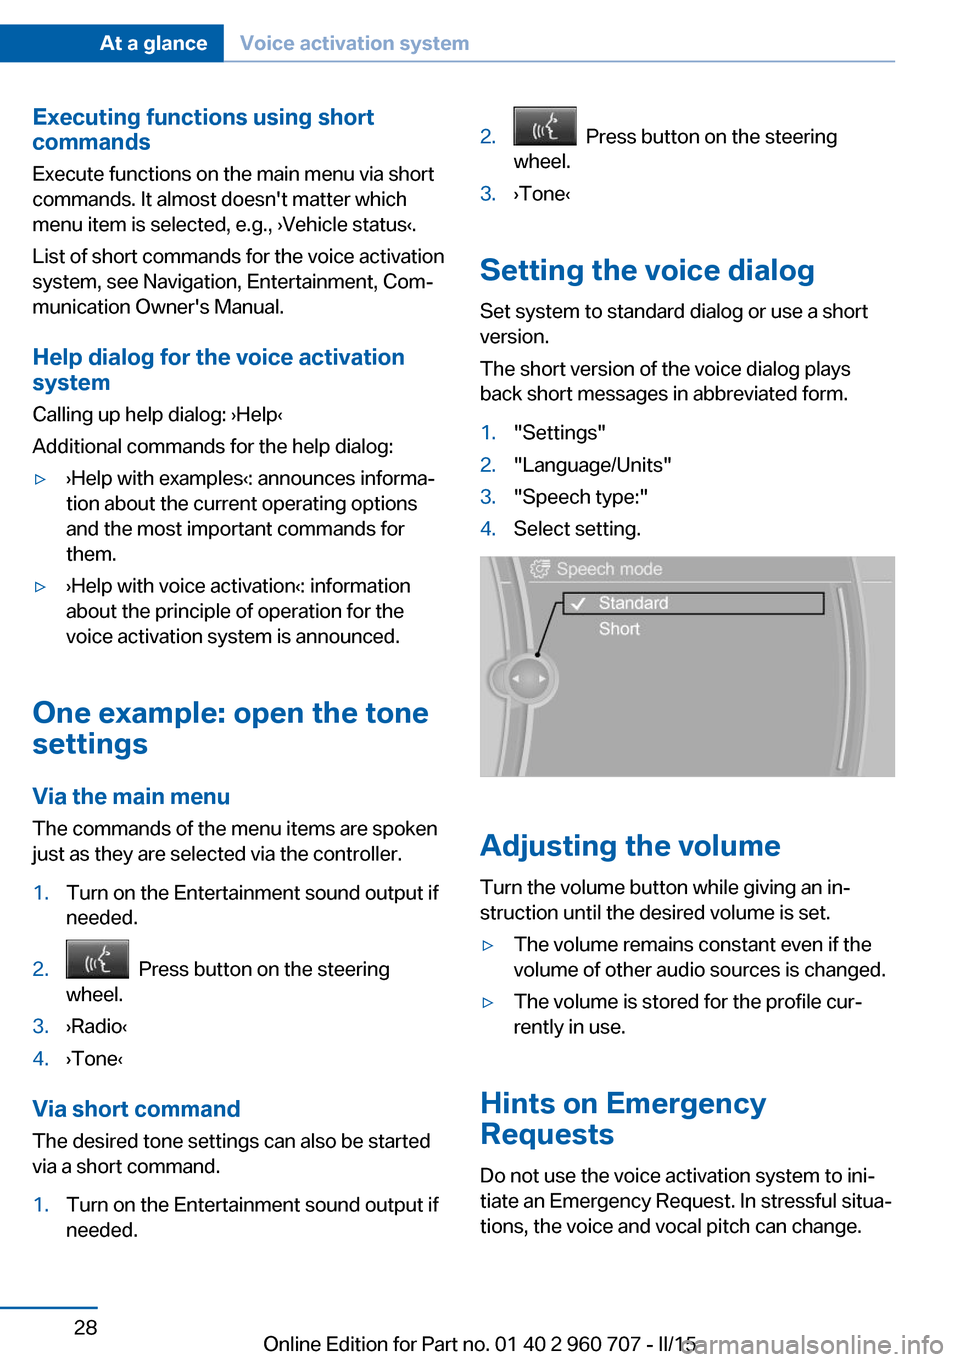
Setting the voice dialog
Set system to standard dialog or use a short
version.
The short version of the voice dialog plays
back short messages in abbreviated form.
1."Settings"2."Language/Units"3."Speech type:"4.Select setting.
Adjusting the volume
Turn the volume button while giving an in‐
struction until the desired volume is set.
▷The volume remains constant even if the
volume of other audio sources is changed.▷The volume is stored for the profile cur‐
rently in use.
Hints on Emergency
Requests
Do not use the voice activation system to ini‐
tiate an Emergency Request. In stressful situa‐
tions, the voice and vocal pitch can change.
Seite 28At a glanceVoice activation system28
Online Edition for Part no. 01 40 2 960 707 - II/15
Page 34 of 249
Integrated Owner's Manual in the vehicleVehicle features and optionsThis chapter describes all standard, country-
specific and optional features offered with the
series. It also describes features that are not
necessarily available in your car, e. g., due to
the selected options or country versions. This
also applies to safety-related functions and
systems. The respectively applicable country
provisions must be observed when using the
respective features and systems.
Integrated Owner's Manual
in the vehicle
The Integrated Owner's Manual can be dis‐
played on the Control Display. It specifically
describes features and functions found in the
vehicle.
Components of the Integrated
Owner's Manual
The Integrated Owner's Manual consists of
three parts, which offer various levels of infor‐
mation or possible access.
Quick Reference Guide The Quick Reference Guide provides informa‐
tion how to operate the car, how to use basic
vehicle functions or what to do in case of a
breakdown. This information can also be dis‐
played while driving.
Search by images
Image search provides information and de‐
scriptions. This is helpful when the terminol‐
ogy for a feature is not at hand.
Owner's Manual Search for information and descriptions by en‐
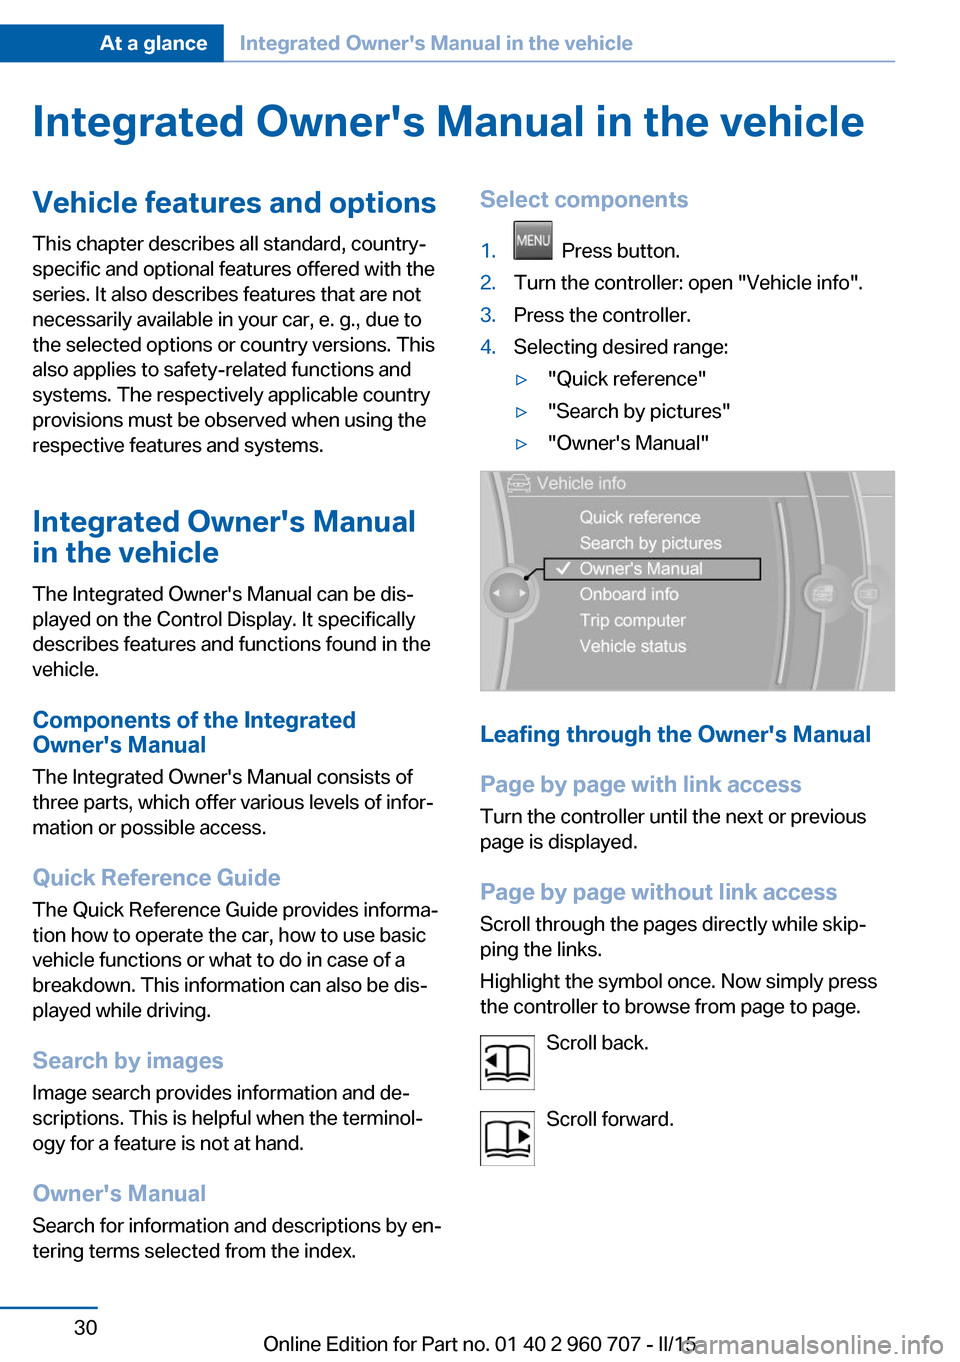
tering terms selected from the index.Select components1. Press button.2.Turn the controller: open "Vehicle info".3.Press the controller.4.Selecting desired range:▷"Quick reference"▷"Search by pictures"▷"Owner's Manual"
Leafing through the Owner's Manual
Page by page with link access
Turn the controller until the next or previous
page is displayed.
Page by page without link access
Scroll through the pages directly while skip‐
ping the links.
Highlight the symbol once. Now simply press
the controller to browse from page to page.
Scroll back.
Scroll forward.
Seite 30At a glanceIntegrated Owner's Manual in the vehicle30
Online Edition for Part no. 01 40 2 960 707 - II/15
Page 38 of 249
Opening and closingVehicle features and options
This chapter describes all standard, country-
specific and optional features offered with the
series. It also describes features that are not
necessarily available in your car, e. g., due to
the selected options or country versions. This
also applies to safety-related functions and
systems. The respectively applicable country
provisions must be observed when using the
respective features and systems.
Remote control/key General information
The vehicle is supplied with two remote con‐
trols with integrated key.
Every remote control holds a replaceable bat‐
tery.
You may set the key functions depending on
the optional features and country-specific ver‐
sion. For Settings, refer to page 45.
The vehicle stores personal settings for every
remote control. Personal Profile, refer to
page 35.
The remote controls hold information on re‐
quired maintenance. Service data in the re‐
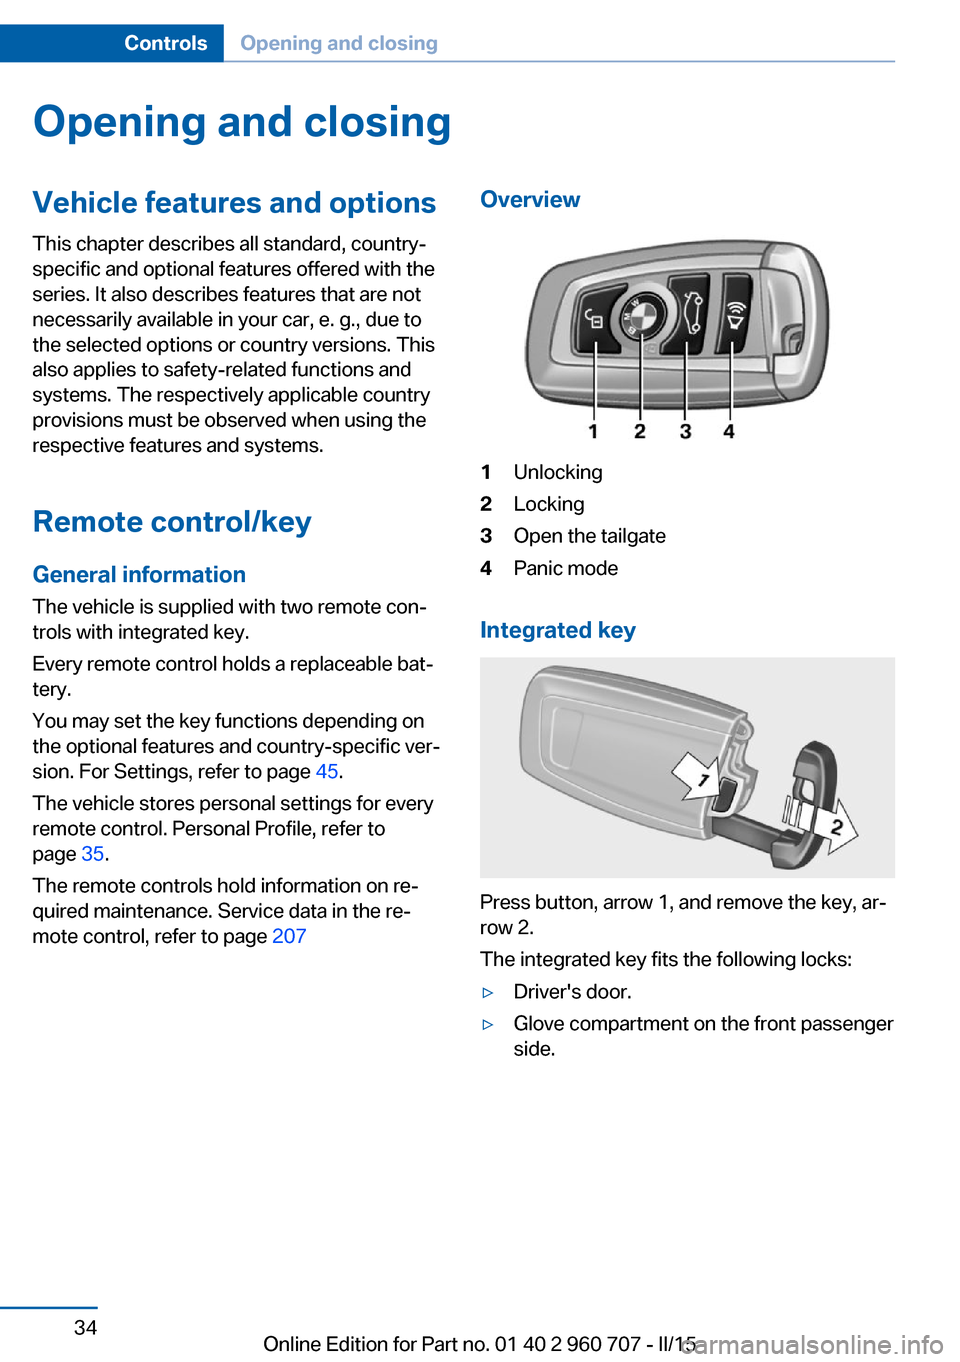
mote control, refer to page 207Overview1Unlocking2Locking3Open the tailgate4Panic mode
Integrated key
Press button, arrow 1, and remove the key, ar‐
row 2.
The integrated key fits the following locks:
▷Driver's door.▷Glove compartment on the front passenger
side.Seite 34ControlsOpening and closing34
Online Edition for Part no. 01 40 2 960 707 - II/15
Page 40 of 249
vated. All settings stored in the profile are au‐
tomatically applied.
If several drivers use their own remote control,
the vehicle will adjust the personal settings
during unlocking. These settings are also re‐
stored, if the vehicle has been used in the
meantime by a person with a different remote
control.
Changes to the settings are automatically
saved in the personal profile.
Three personal profiles and a guest profile can
be created.
Adjusting
The settings for the following systems and
functions are saved in the active profile. The
scope of storable settings is country- and
equipment-dependable.▷Unlocking and locking.▷Lights.▷Climate control.▷Radio.▷Instrument cluster.▷Programmable memory buttons.▷Volumes, tone.▷Control Display.▷Navigation.▷Park Distance Control PDC.▷Rearview camera▷Side View.▷Head-up Display.▷Driving Dynamics Control.▷Driver's seat position, exterior mirror posi‐
tion, steering wheel position.▷Cruise control.▷Intelligent Safety.▷Active Blind Spot Detection.Profile management
Opening profiles Regardless of the remote control in use a dif‐
ferent profile may be activated.1."Settings"2."Profiles"3.Select a profile.▷All settings stored in the called-up profile
are automatically applied.▷The called-up profile is assigned to the re‐
mote control being used at the time.▷If the profile is already assigned to a differ‐
ent remote control, this profile will apply to
both remote controls. It cannot be differen‐
tiated anymore between the settings for
the two remote controls.
Renaming profiles
A personal name can be assigned to every pro‐
file to avoid confusion between the profiles.
1."Settings"2."Profiles"3."Options"4."Rename current profile"
Resetting profiles
The settings of the active profile are reset to
their default values.
1."Settings"2."Profiles"3."Options"4."Reset current profile"
Exporting profiles
Most settings of the active profile can be ex‐
ported.
This can be helpful for securing and retrieving
personal settings, before delivering the vehicle
to a workshop, e.g. Profiles can be taken to an‐
Seite 36ControlsOpening and closing36
Online Edition for Part no. 01 40 2 960 707 - II/15
Page 55 of 249
AdjustingVehicle features and options
This chapter describes all standard, country-
specific and optional features offered with the
series. It also describes features that are not
necessarily available in your car, e. g., due to
the selected options or country versions. This
also applies to safety-related functions and
systems. The respectively applicable country
provisions must be observed when using the
respective features and systems.
Sitting safely The ideal seating position can make a vital
contribution to relaxed, fatigue-free driving.
The seating position plays an important role in
an accident in combination with:▷Safety belts, refer to page 54.▷Head restraints, refer to page 55.▷Airbags, refer to page 98.
Seats
Hints Do not adjust the seat while driving
Do not adjust the driver's seat while driv‐
ing, or the seat could respond with unexpected
movement and the ensuing loss of vehicle
control could lead to an accident.◀
Do not incline the backrest too far to the
rear
Do not incline the backrest too far to the rear
while driving, or there is a risk of slipping under
the safety belt in the event of an accident. This
would eliminate the protection normally pro‐
vided by the belt.◀
Keep the movement area unobstructed
When changing the seat position, keep
the seat's area of movement unobstructed;
otherwise, people might get injured or objects
damaged.◀
Middle seat
The 4 Series Gran Coupe is designed as a
4+1-seater vehicle.
The middle seat is of limited usefulness. It is
recommended that this seat only be used by
persons who can use the backrest as a substi‐
tute for the head restraint.
Adjusting the head restraints, refer to
page 55.
Manually adjustable seats
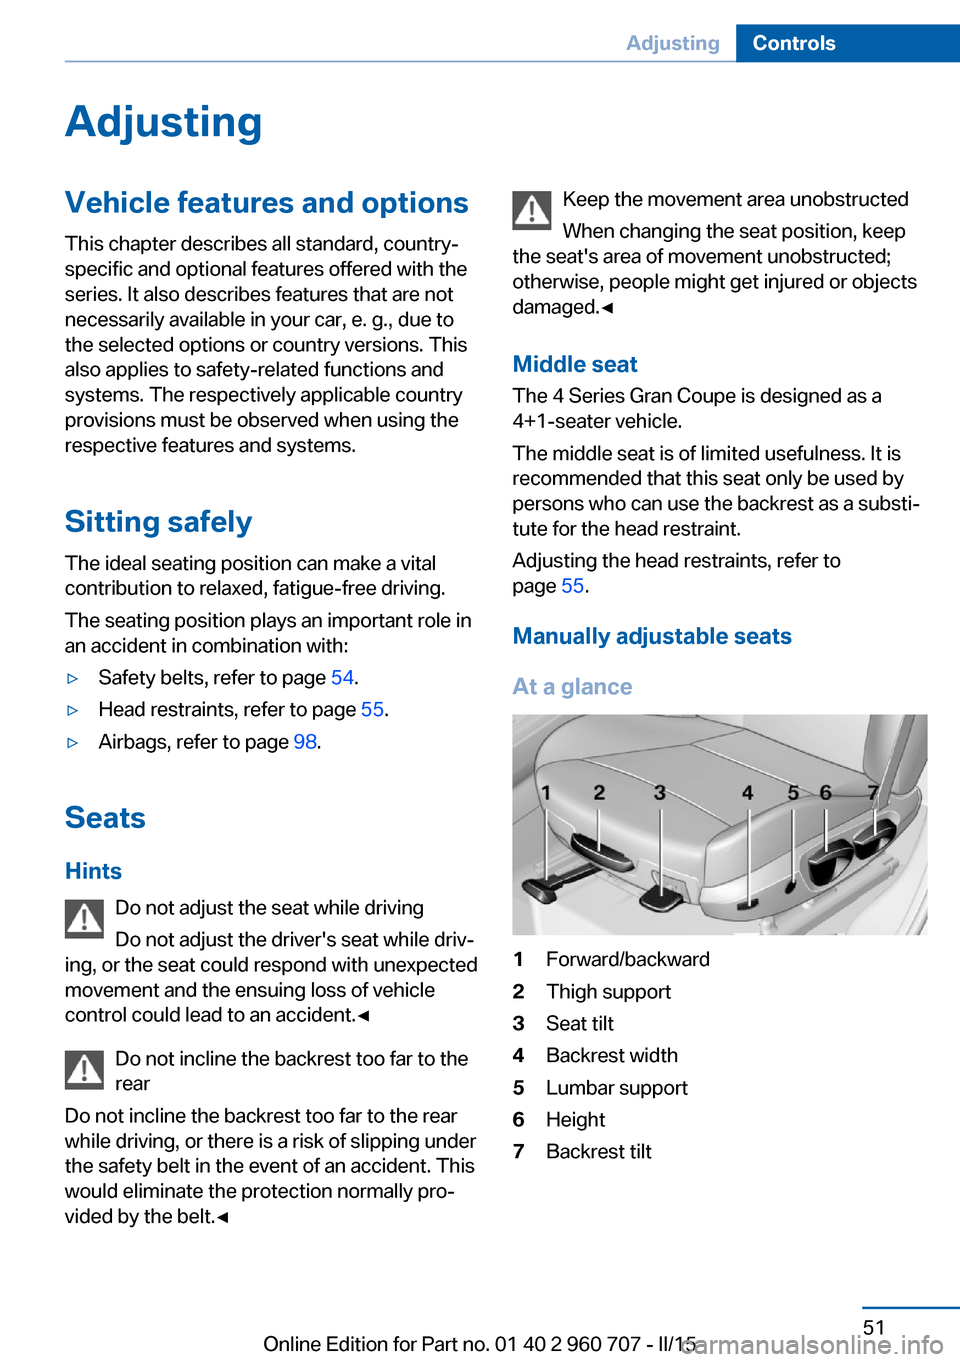
At a glance1Forward/backward2Thigh support3Seat tilt4Backrest width5Lumbar support6Height7Backrest tiltSeite 51AdjustingControls51
Online Edition for Part no. 01 40 2 960 707 - II/15
Page 65 of 249
Transporting children safelyVehicle features and optionsThis chapter describes all standard, country-
specific and optional features offered with the
series. It also describes features that are not
necessarily available in your car, e. g., due tothe selected options or country versions. This
also applies to safety-related functions and
systems. The respectively applicable country
provisions must be observed when using the
respective features and systems.
The right place for children
Note
Children in the vehicle
Do not leave children unattended in the
vehicle; otherwise, they could endanger them‐
selves and other persons, e.g., by opening the
doors.◀
Children should always be in the rear Accident research shows that the safest place
for children is in the back seat.
Transporting children in the rear
Only transport children younger than
13 years of age or shorter than 5 ft/150 cm in
the rear in child restraint systems provided in
accordance with the age, weight and size of
the child; otherwise, there is an increased risk
of injury in an accident.
Children 13 years of age or older must wear a
safety belt as soon as a suitable child restraint
system can no longer be used due to their age,
weight and size.◀
Children on the front passenger seat
Should it ever be necessary to use a child re‐
straint system in the front passenger seat,
make sure that the front, knee and side airbags
on the front passenger side are deactivated.
Automatic deactivation of front-seat passen‐
ger airbags, refer to page 100.Note
Deactivating the front-seat passenger
airbags
If a child restraint system is used in the front
passenger seat, deactivate the front-seat pas‐
senger airbags; otherwise, there is an in‐
creased risk of injury to the child when the air‐
bags are activated, even with a child restraint
system.◀
Installing child restraint
systems
Hints Manufacturer's information for child re‐straint systems
To select, mount and use child restraint sys‐
tems, observe the information provided by the
system manufacturer; otherwise, the protec‐
tive effect can be lost.◀
Ensuring the stability of the child seat
When installing child restraint systems,
make sure that the child seat is securely fas‐
tened to the backrest of the seat. Angle and
headrest of the backrest might need to be ad‐
justed or possibly be removed. Make sure that
all backrests are securely locked. Otherwise
the stability of the child seat can be affected,
and there is an increased risk of injury becauseSeite 61Transporting children safelyControls61
Online Edition for Part no. 01 40 2 960 707 - II/15
Page 68 of 249
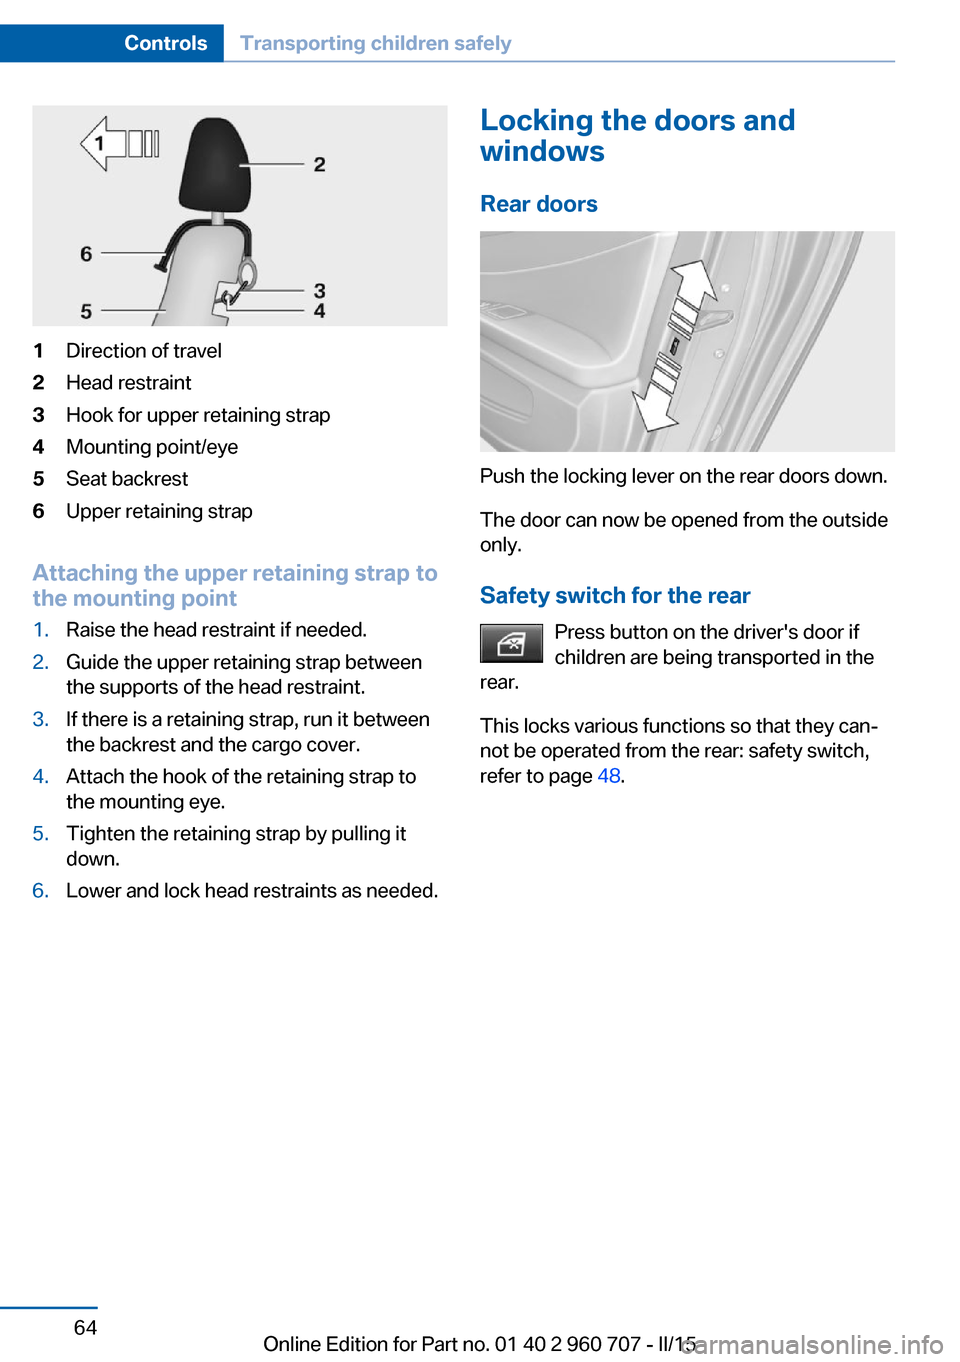
1Direction of travel2Head restraint3Hook for upper retaining strap4Mounting point/eye5Seat backrest6Upper retaining strap
Attaching the upper retaining strap to
the mounting point
1.Raise the head restraint if needed.2.Guide the upper retaining strap between
the supports of the head restraint.3.If there is a retaining strap, run it between
the backrest and the cargo cover.4.Attach the hook of the retaining strap to
the mounting eye.5.Tighten the retaining strap by pulling it
down.6.Lower and lock head restraints as needed.Locking the doors and
windows
Rear doors
Push the locking lever on the rear doors down.
The door can now be opened from the outside
only.
Safety switch for the rear Press button on the driver's door if
children are being transported in the
rear.
This locks various functions so that they can‐
not be operated from the rear: safety switch,
refer to page 48.
Seite 64ControlsTransporting children safely64
Online Edition for Part no. 01 40 2 960 707 - II/15
Page 69 of 249
DrivingVehicle features and options
This chapter describes all standard, country-
specific and optional features offered with the
series. It also describes features that are not
necessarily available in your car, e. g., due to
the selected options or country versions. This
also applies to safety-related functions and
systems. The respectively applicable country
provisions must be observed when using the
respective features and systems.
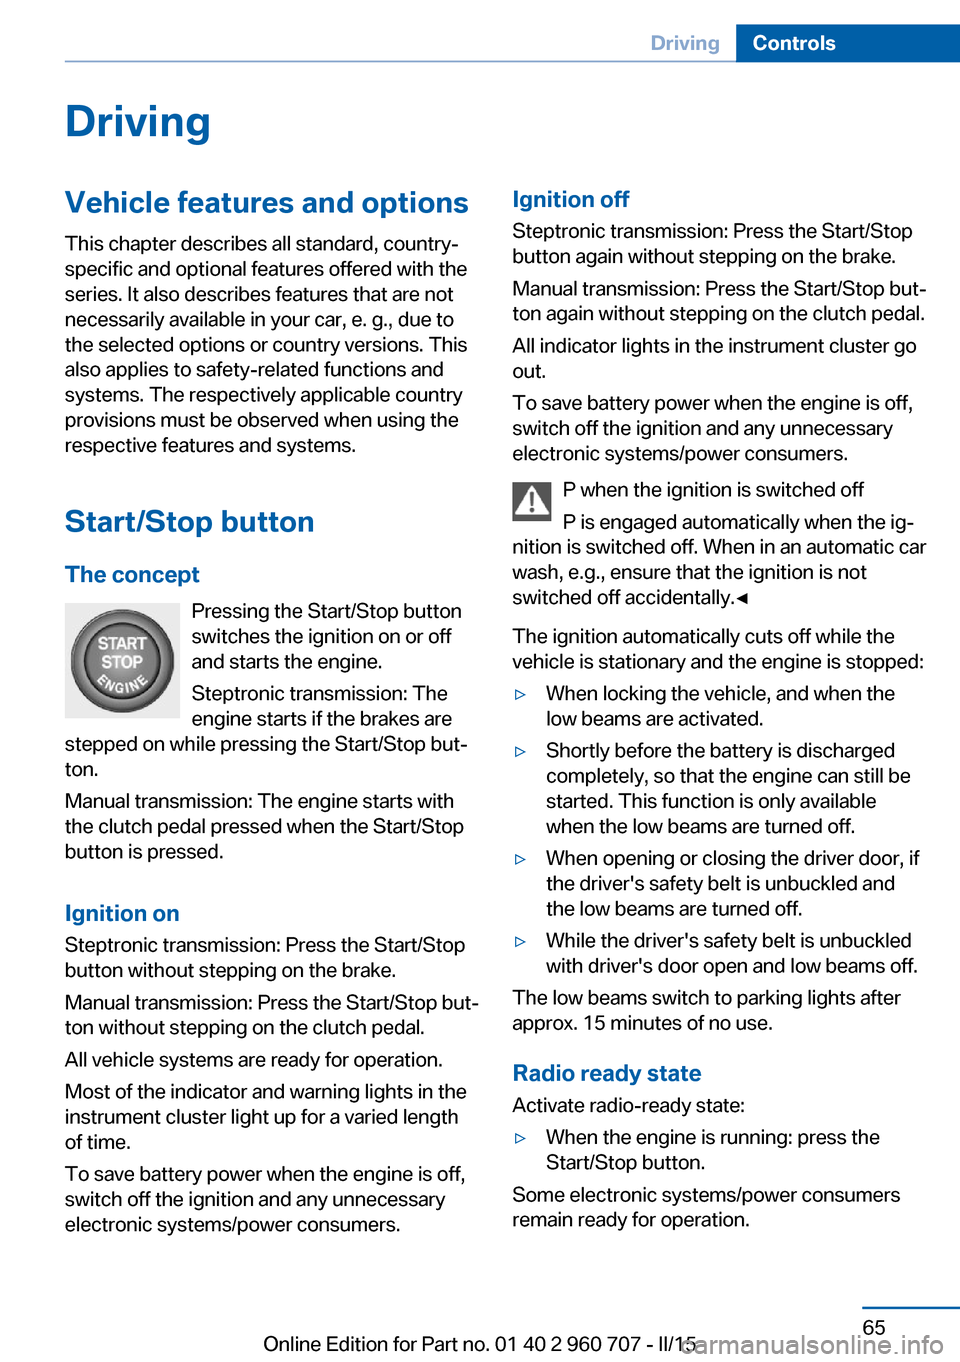
Start/Stop button The concept Pressing the Start/Stop button
switches the ignition on or off
and starts the engine.
Steptronic transmission: The
engine starts if the brakes are
stepped on while pressing the Start/Stop but‐
ton.
Manual transmission: The engine starts with
the clutch pedal pressed when the Start/Stop
button is pressed.
Ignition onSteptronic transmission: Press the Start/Stop
button without stepping on the brake.
Manual transmission: Press the Start/Stop but‐
ton without stepping on the clutch pedal.
All vehicle systems are ready for operation.
Most of the indicator and warning lights in the
instrument cluster light up for a varied length
of time.
To save battery power when the engine is off,
switch off the ignition and any unnecessary
electronic systems/power consumers.Ignition off
Steptronic transmission: Press the Start/Stop
button again without stepping on the brake.
Manual transmission: Press the Start/Stop but‐
ton again without stepping on the clutch pedal.
All indicator lights in the instrument cluster go
out.
To save battery power when the engine is off,
switch off the ignition and any unnecessary
electronic systems/power consumers.
P when the ignition is switched off
P is engaged automatically when the ig‐
nition is switched off. When in an automatic car wash, e.g., ensure that the ignition is not
switched off accidentally.◀
The ignition automatically cuts off while the
vehicle is stationary and the engine is stopped:▷When locking the vehicle, and when the
low beams are activated.▷Shortly before the battery is discharged
completely, so that the engine can still be
started. This function is only available
when the low beams are turned off.▷When opening or closing the driver door, if
the driver's safety belt is unbuckled and
the low beams are turned off.▷While the driver's safety belt is unbuckled
with driver's door open and low beams off.
The low beams switch to parking lights after
approx. 15 minutes of no use.
Radio ready state
Activate radio-ready state:
▷When the engine is running: press the
Start/Stop button.
Some electronic systems/power consumers
remain ready for operation.
Seite 65DrivingControls65
Online Edition for Part no. 01 40 2 960 707 - II/15
Page 82 of 249
DisplaysVehicle features and optionsThis chapter describes all standard, country-
specific and optional features offered with the
series. It also describes features that are not
necessarily available in your car, e. g., due tothe selected options or country versions. This
also applies to safety-related functions and
systems. The respectively applicable country
provisions must be observed when using the
respective features and systems.
Overview, instrument cluster
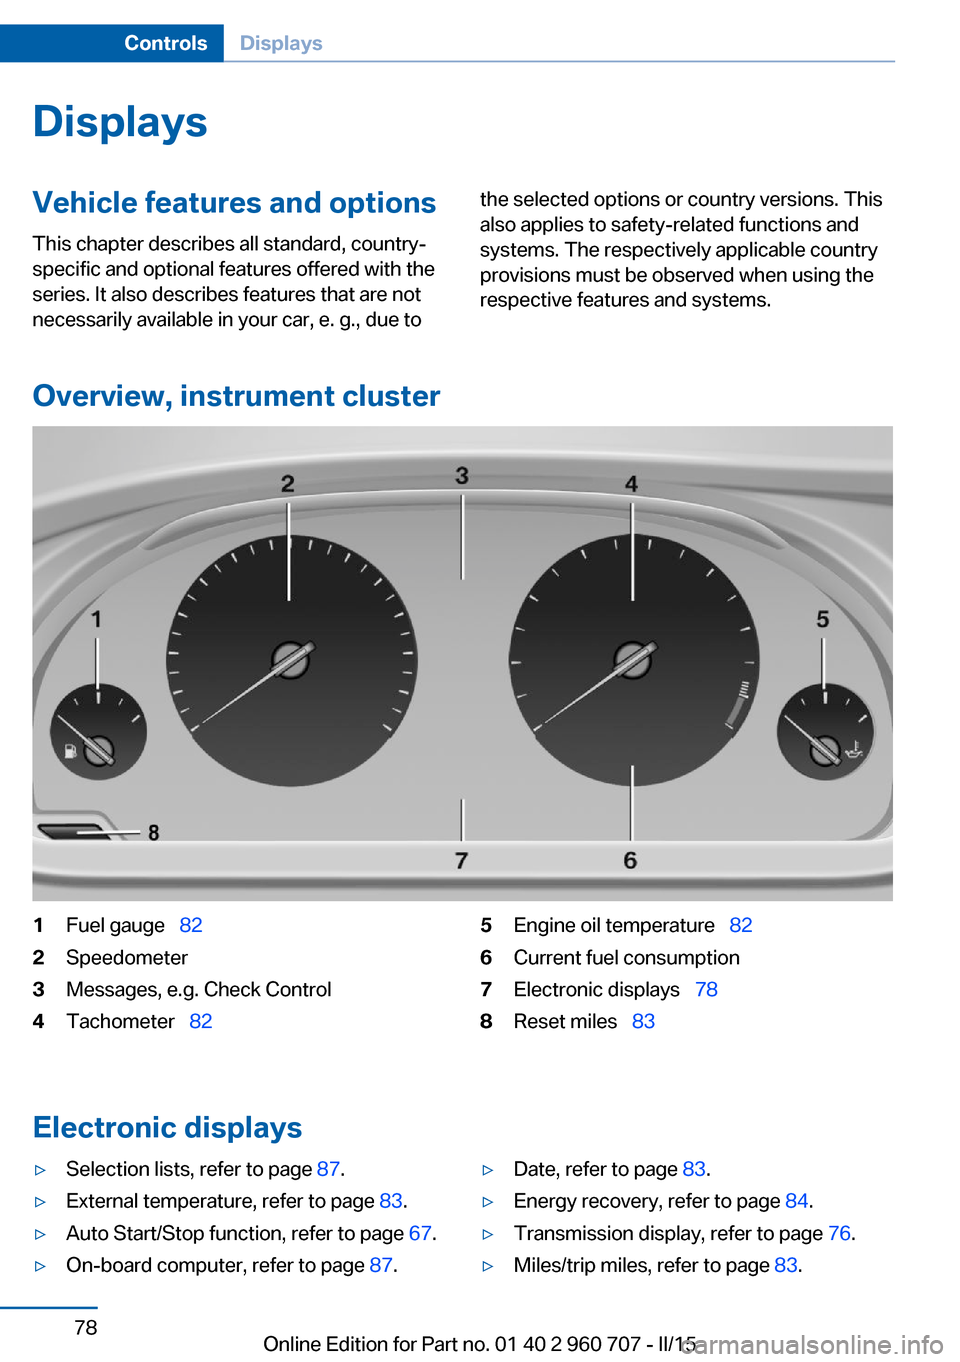
1Fuel gauge 822Speedometer3Messages, e.g. Check Control4Tachometer 825Engine oil temperature 826Current fuel consumption7Electronic displays 788Reset miles 83
Electronic displays
▷Selection lists, refer to page 87.▷External temperature, refer to page 83.▷Auto Start/Stop function, refer to page 67.▷On-board computer, refer to page 87.▷Date, refer to page 83.▷Energy recovery, refer to page 84.▷Transmission display, refer to page 76.▷Miles/trip miles, refer to page 83.Seite 78ControlsDisplays78
Online Edition for Part no. 01 40 2 960 707 - II/15