lock BMW 435I COUPE 2014 Owners Manual
[x] Cancel search | Manufacturer: BMW, Model Year: 2014, Model line: 435I COUPE, Model: BMW 435I COUPE 2014Pages: 236, PDF Size: 6.08 MB
Page 13 of 236
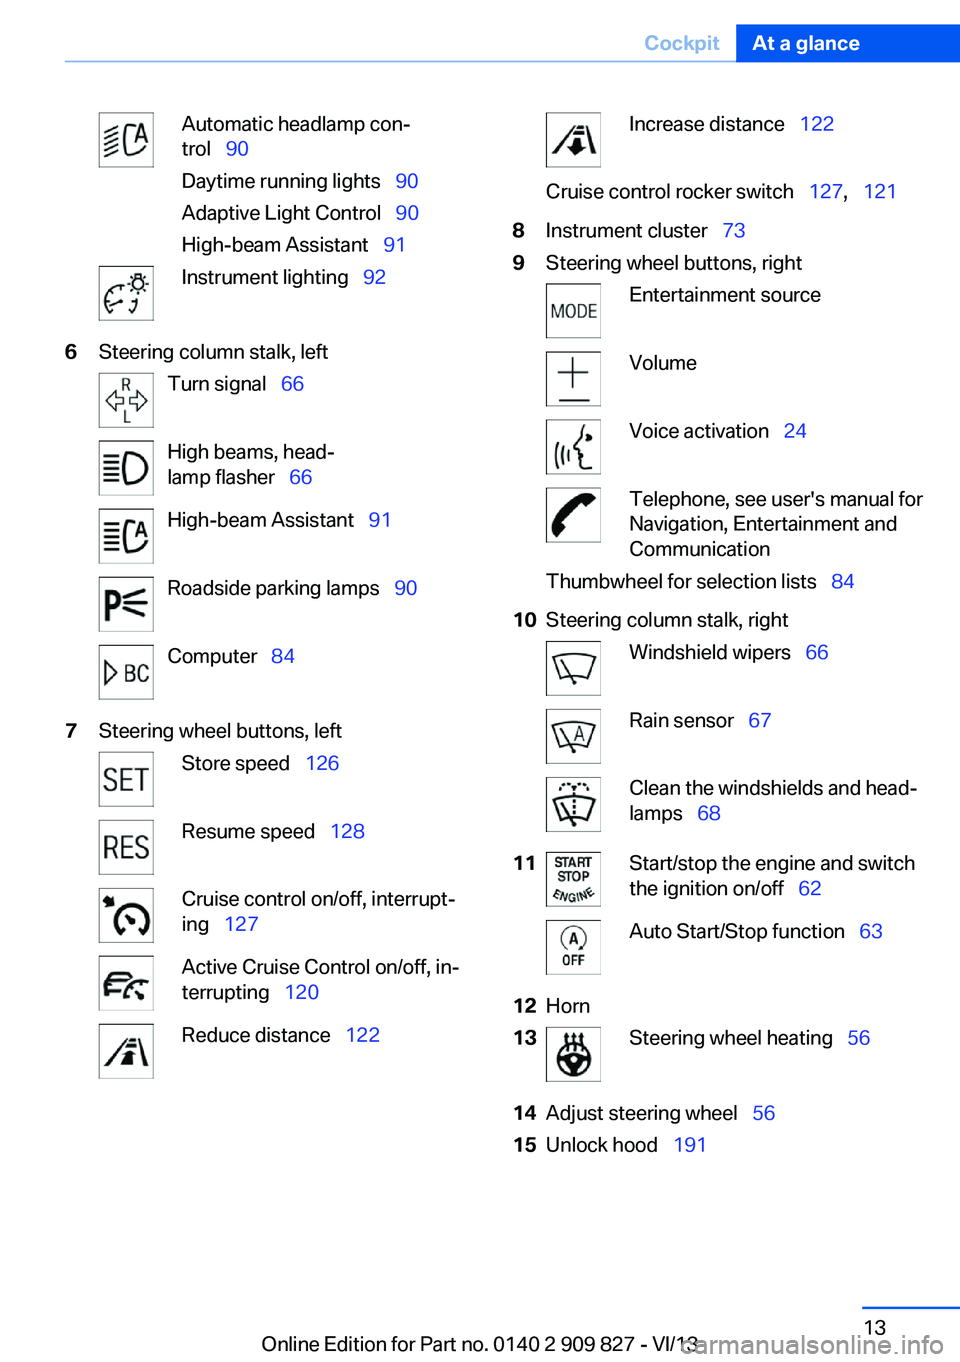
Automatic headlamp con‐
trol 90
Daytime running lights 90
Adaptive Light Control 90
High-beam Assistant 91Instrument lighting 926Steering column stalk, leftTurn signal 66High beams, head‐
lamp flasher 66High-beam Assistant 91Roadside parking lamps 90Computer 847Steering wheel buttons, leftStore speed 126Resume speed 128Cruise control on/off, interrupt‐
ing 127Active Cruise Control on/off, in‐
terrupting 120Reduce distance 122Increase distance 122Cruise control rocker switch 127, 1218Instrument cluster 739Steering wheel buttons, rightEntertainment sourceVolumeVoice activation 24Telephone, see user's manual for
Navigation, Entertainment and
CommunicationThumbwheel for selection lists 8410Steering column stalk, rightWindshield wipers 66Rain sensor 67Clean the windshields and head‐
lamps 6811Start/stop the engine and switch
the ignition on/off 62Auto Start/Stop function 6312Horn13Steering wheel heating 5614Adjust steering wheel 5615Unlock hood 191Seite 13CockpitAt a glance13
Online Edition for Part no. 0140 2 909 827 - VI/13
Page 14 of 236
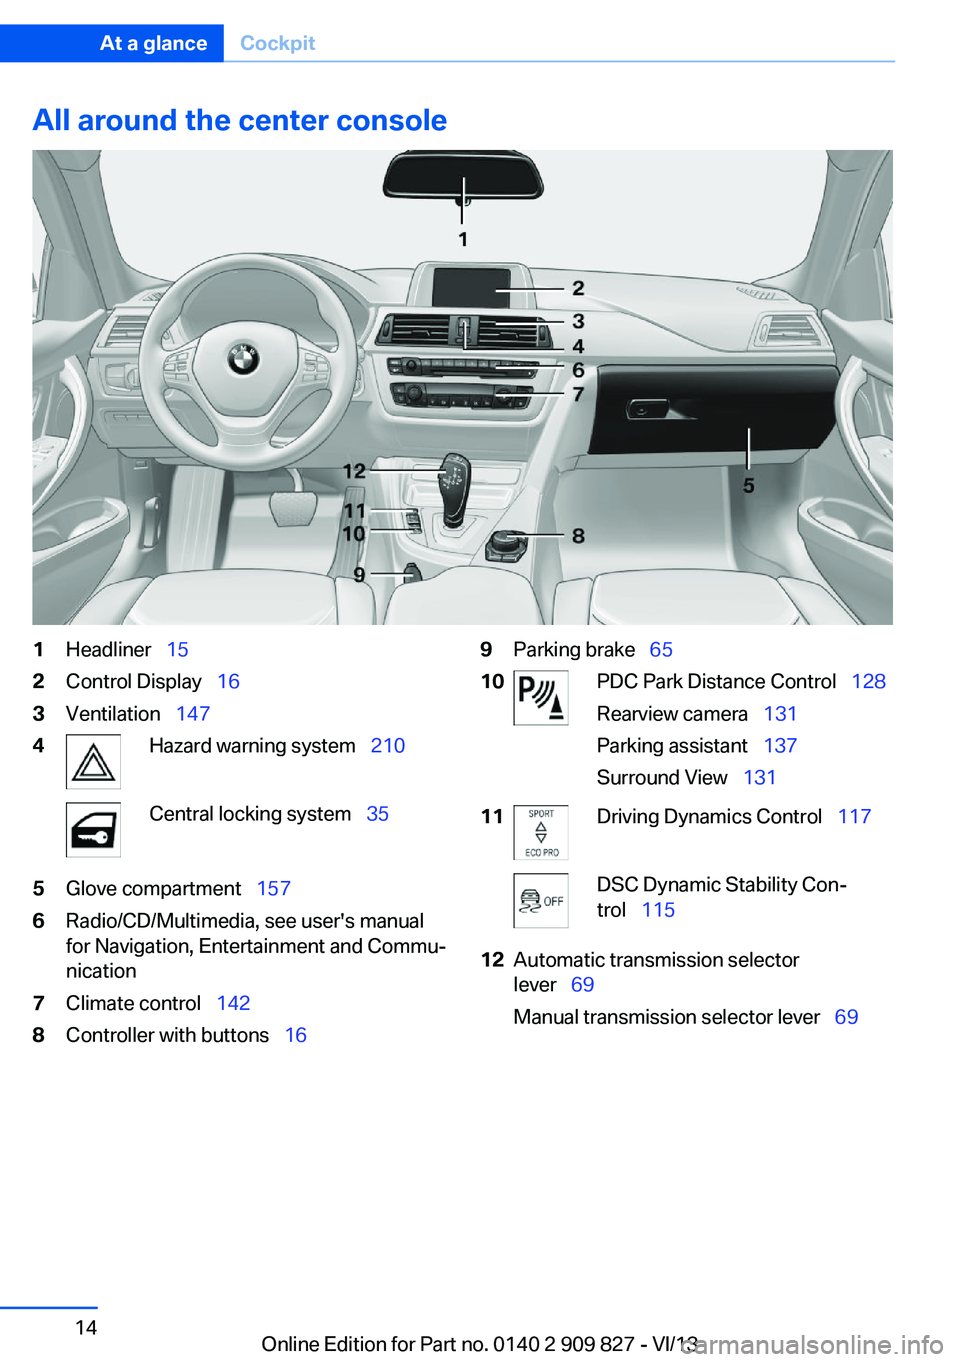
All around the center console1Headliner 152Control Display 163Ventilation 1474Hazard warning system 210Central locking system 355Glove compartment 1576Radio/CD/Multimedia, see user's manual
for Navigation, Entertainment and Commu‐
nication7Climate control 1428Controller with buttons 169Parking brake 6510PDC Park Distance Control 128
Rearview camera 131
Parking assistant 137
Surround View 13111Driving Dynamics Control 117DSC Dynamic Stability Con‐
trol 11512Automatic transmission selector
lever 69
Manual transmission selector lever 69Seite 14At a glanceCockpit14
Online Edition for Part no. 0140 2 909 827 - VI/13
Page 20 of 236
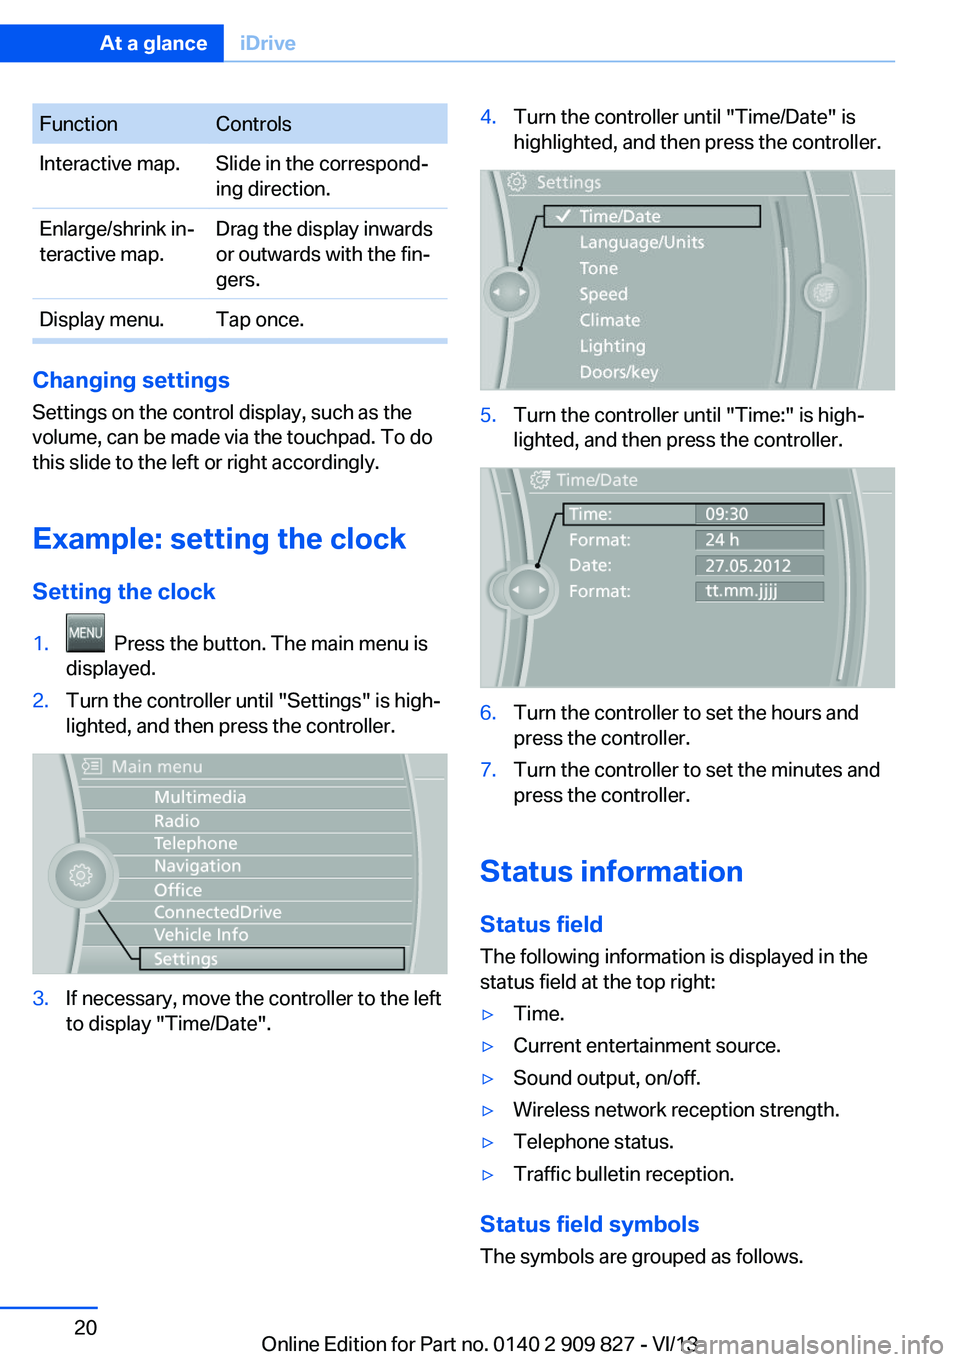
FunctionControlsInteractive map.Slide in the correspond‐
ing direction.Enlarge/shrink in‐
teractive map.Drag the display inwards
or outwards with the fin‐
gers.Display menu.Tap once.
Changing settings
Settings on the control display, such as the
volume, can be made via the touchpad. To do
this slide to the left or right accordingly.
Example: setting the clock Setting the clock
1. Press the button. The main menu is
displayed.2.Turn the controller until "Settings" is high‐
lighted, and then press the controller.3.If necessary, move the controller to the left
to display "Time/Date".4.Turn the controller until "Time/Date" is
highlighted, and then press the controller.5.Turn the controller until "Time:" is high‐
lighted, and then press the controller.6.Turn the controller to set the hours and
press the controller.7.Turn the controller to set the minutes and
press the controller.
Status information
Status field The following information is displayed in the
status field at the top right:
▷Time.▷Current entertainment source.▷Sound output, on/off.▷Wireless network reception strength.▷Telephone status.▷Traffic bulletin reception.
Status field symbols
The symbols are grouped as follows.
Seite 20At a glanceiDrive20
Online Edition for Part no. 0140 2 909 827 - VI/13
Page 21 of 236
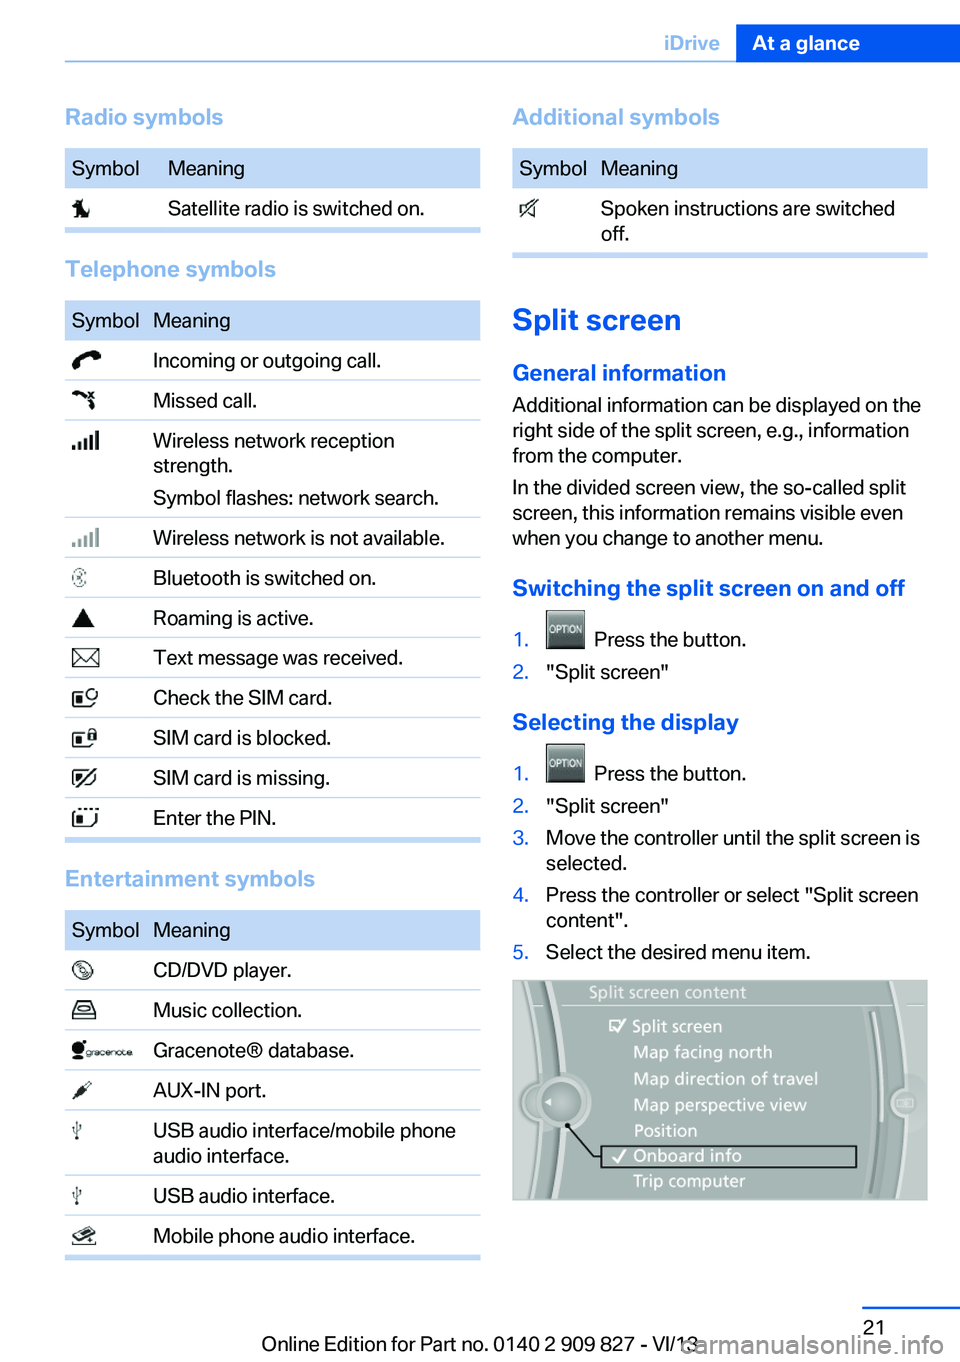
Radio symbolsSymbolMeaning Satellite radio is switched on.
Telephone symbols
SymbolMeaning Incoming or outgoing call. Missed call. Wireless network reception
strength.
Symbol flashes: network search. Wireless network is not available. Bluetooth is switched on. Roaming is active. Text message was received. Check the SIM card. SIM card is blocked. SIM card is missing. Enter the PIN.
Entertainment symbols
SymbolMeaning CD/DVD player. Music collection. Gracenote® database. AUX-IN port. USB audio interface/mobile phone
audio interface. USB audio interface. Mobile phone audio interface.Additional symbolsSymbolMeaning Spoken instructions are switched
off.
Split screen
General information Additional information can be displayed on the
right side of the split screen, e.g., information
from the computer.
In the divided screen view, the so-called split
screen, this information remains visible even when you change to another menu.
Switching the split screen on and off
1. Press the button.2."Split screen"
Selecting the display
1. Press the button.2."Split screen"3.Move the controller until the split screen is
selected.4.Press the controller or select "Split screen
content".5.Select the desired menu item.Seite 21iDriveAt a glance21
Online Edition for Part no. 0140 2 909 827 - VI/13
Page 32 of 236
Opening and closingVehicle equipment
All standard, country-specific and optional
equipment that is offered in the model series is
described in this chapter. Therefore, equip‐
ment is also described that is not available in a
vehicle, e. g., because of the selected optional
equipment or country variant. This also applies
for safety-related functions and systems.
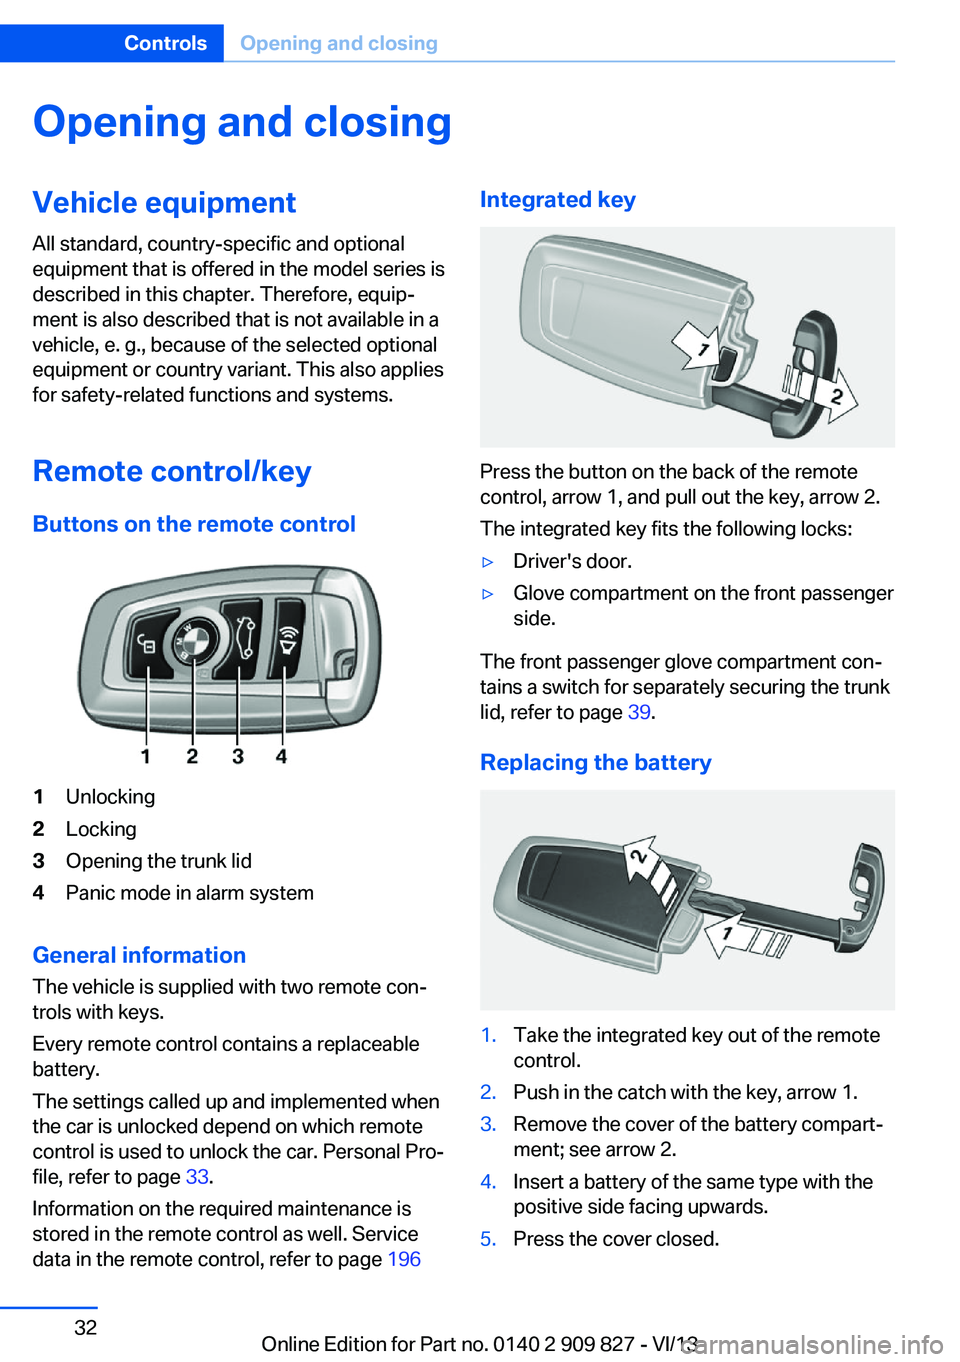
Remote control/key Buttons on the remote control1Unlocking2Locking3Opening the trunk lid4Panic mode in alarm system
General information
The vehicle is supplied with two remote con‐
trols with keys.
Every remote control contains a replaceable
battery.
The settings called up and implemented when
the car is unlocked depend on which remote
control is used to unlock the car. Personal Pro‐
file, refer to page 33.
Information on the required maintenance is
stored in the remote control as well. Service
data in the remote control, refer to page 196
Integrated key
Press the button on the back of the remote
control, arrow 1, and pull out the key, arrow 2.
The integrated key fits the following locks:
▷Driver's door.▷Glove compartment on the front passenger
side.
The front passenger glove compartment con‐
tains a switch for separately securing the trunk
lid, refer to page 39.
Replacing the battery
1.Take the integrated key out of the remote
control.2.Push in the catch with the key, arrow 1.3.Remove the cover of the battery compart‐
ment; see arrow 2.4.Insert a battery of the same type with the
positive side facing upwards.5.Press the cover closed.Seite 32ControlsOpening and closing32
Online Edition for Part no. 0140 2 909 827 - VI/13
Page 33 of 236
Take the used battery to a recycling
center or to your service center.
New remote controls You can obtain new remote controls from your
service center.
Loss of the remote controls Lost remote controls can be blocked by your
service center.
Emergency detection of remote
control
It is possible to switch on the ignition or start
the engine in situations such as the following:▷Interference of radio transmission to re‐
mote control by external sources.▷Discharged battery in the remote control.▷Interference of radio transmission by mo‐
bile devices in close proximity to the re‐
mote control.▷Interference of radio transmission by
charger while charging items such as mo‐
bile devices in the vehicle.
A Check Control message is displayed if an at‐
tempt is made to switch on the ignition or start
the engine.
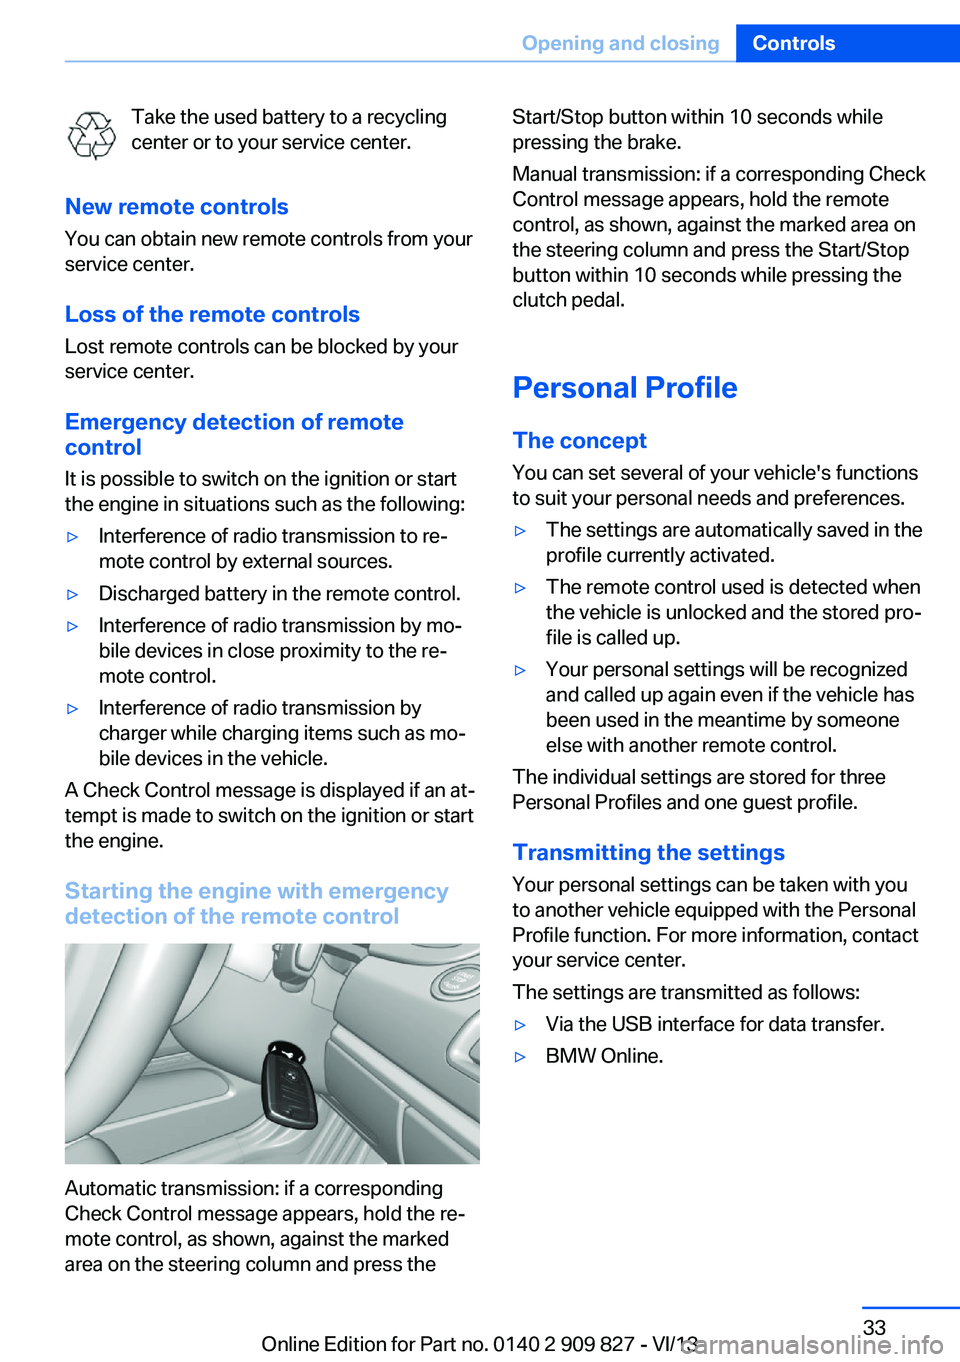
Starting the engine with emergency
detection of the remote control
Automatic transmission: if a corresponding
Check Control message appears, hold the re‐
mote control, as shown, against the marked
area on the steering column and press the
Start/Stop button within 10 seconds while
pressing the brake.
Manual transmission: if a corresponding Check
Control message appears, hold the remote
control, as shown, against the marked area on
the steering column and press the Start/Stop
button within 10 seconds while pressing the
clutch pedal.
Personal Profile
The concept You can set several of your vehicle's functions
to suit your personal needs and preferences.▷The settings are automatically saved in the
profile currently activated.▷The remote control used is detected when
the vehicle is unlocked and the stored pro‐
file is called up.▷Your personal settings will be recognized
and called up again even if the vehicle has
been used in the meantime by someone
else with another remote control.
The individual settings are stored for three
Personal Profiles and one guest profile.
Transmitting the settings
Your personal settings can be taken with you
to another vehicle equipped with the Personal
Profile function. For more information, contact
your service center.
The settings are transmitted as follows:
▷Via the USB interface for data transfer.▷BMW Online.Seite 33Opening and closingControls33
Online Edition for Part no. 0140 2 909 827 - VI/13
Page 35 of 236
▷CD/Multimedia: audio source listened to
last.▷Unlocking/locking of the vehicle: settings.▷Driving Dynamics Control: sport program▷Driver's seat position: automatically re‐
trieved after unlocking.▷Programmable memory buttons: assign‐
ment.▷Head-up Display: selection, brightness,
position and rotation of the display.▷Headlamp courtesy delay feature: time set‐
ting.▷Tone: tone settings.▷Automatic climate control/Automatic cli‐
mate control with enhanced features: set‐
tings.▷Navigation: map views, route criteria, voice
output on/off.▷Park Distance Control PDC: adjusting the
signal tone volume.▷Radio: stored stations, station listened to
last, special settings.▷Rearview camera: selection of functions
and type of display.▷Side View: selection of the display type.▷Language on the Control Display.▷Lane departure warning: last setting, on/
off.▷Active Blind Spot Detection: last setting,
on/off.▷Daytime running lights: current setting.▷Triple turn signal activation.▷Locking the vehicle: after a brief period or
after starting to drive.
Central locking system
The concept The central locking system becomes active
when the driver's door is closed.
The system simultaneously engages and re‐
leases the locks on the following:▷Doors.▷Trunk lid.▷Fuel filler flap.
Operating from the outside
▷Via the remote control.▷Via the door handles of the driver's and
front passenger doors.
The following takes place simultaneously
when locking/unlocking the vehicle via the re‐
mote control:
▷Depending on how the vehicle is equipped,
the theft protection is activated/deacti‐
vated. Theft protection prevents the doors
from being unlocked using the lock but‐
tons or the door opener.▷The welcome lamps, interior lamps and
courtesy lamps are switched on and off.▷The alarm system, refer to page 42, is
armed or disarmed.
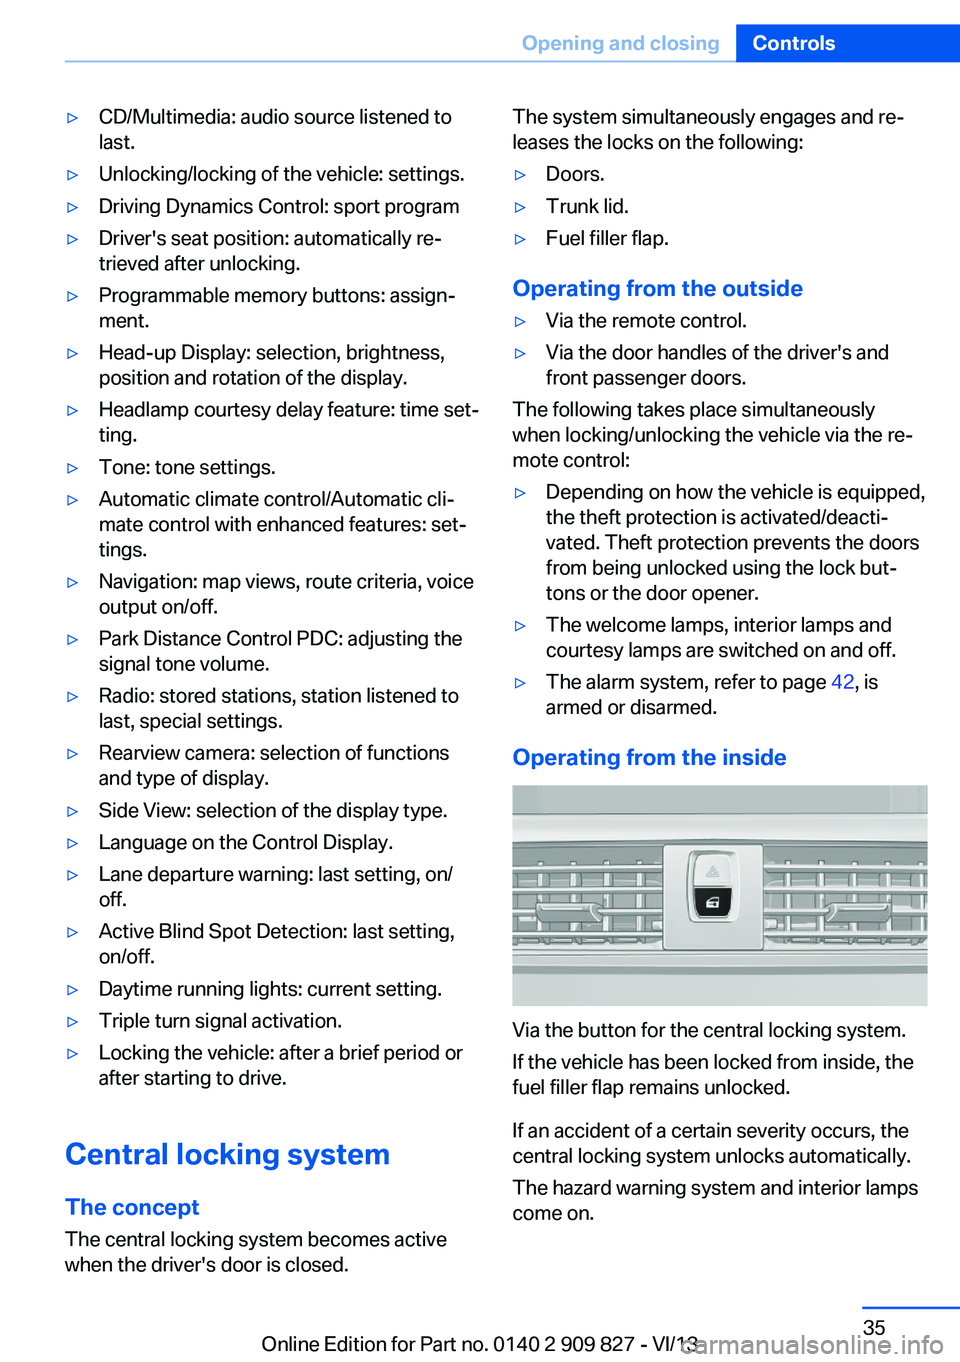
Operating from the inside
Via the button for the central locking system.
If the vehicle has been locked from inside, the
fuel filler flap remains unlocked.
If an accident of a certain severity occurs, the
central locking system unlocks automatically.
The hazard warning system and interior lamps
come on.
Seite 35Opening and closingControls35
Online Edition for Part no. 0140 2 909 827 - VI/13
Page 36 of 236
Opening and closing: from
the outside
Using the remote control
General information Take the remote control with you
People or animals left unattended in a
parked vehicle can lock the doors from the in‐
side. Always take the remote control with you
when leaving the vehicle so that the vehicle
can then be opened from the outside.◀
Unlocking Press the button on the remote con‐
trol.
The vehicle is unlocked.
Welcome lamps, interior lamp and courtesy
lamps are switched on.
You can set how the vehicle is to be unlocked.
Create the settings, refer to page 41.
Convenient opening The remote control can be used to simultane‐
ously open the windows and the glass sunroof.
Press and hold the button on the re‐
mote control.
The windows and the glass sunroof open.
Releasing the button stops the motion.
Locking Press the button on the remote control.
Locking from the outside
Do not lock the vehicle from the outside
if there are people in it, as the vehicle cannot
be unlocked from inside without special knowl‐
edge.◀Switching on interior lamps and
courtesy lamps
Press the button on the remote control
with the vehicle locked.
Panic mode
You can trigger the alarm system if you find
yourself in a dangerous situation.
Press the button on the remote con‐
trol for at least 3 seconds.
To switch off the alarm: press any button.
Opening the trunk lid Press the button on the remote con‐
trol for approx. 1 second.
The trunk lid opens, regardless of whether it
was previously locked or unlocked.
During opening, the trunk lid pivots back and
up. Ensure that adequate clearance is available
before opening.
In some vehicle equipment variants, the trunk
lid can only be opened using the remote con‐
trol if the vehicle has been unlocked.
Do not place the remote control in the
cargo area
Take the remote control with you and do not
leave it in the cargo area; otherwise, the re‐
mote control is locked inside the vehicle when
the trunk lid is closed.◀
The trunk lid is locked again as soon as it is
pushed closed.
Malfunction If the vehicle can no longer be locked or un‐
locked with the remote control, the battery
may be discharged or there may be interfer‐
ence from external sources such as mobile
phones, metal objects, overhead power lines,
transmission towers, etc.Seite 36ControlsOpening and closing36
Online Edition for Part no. 0140 2 909 827 - VI/13
Page 37 of 236
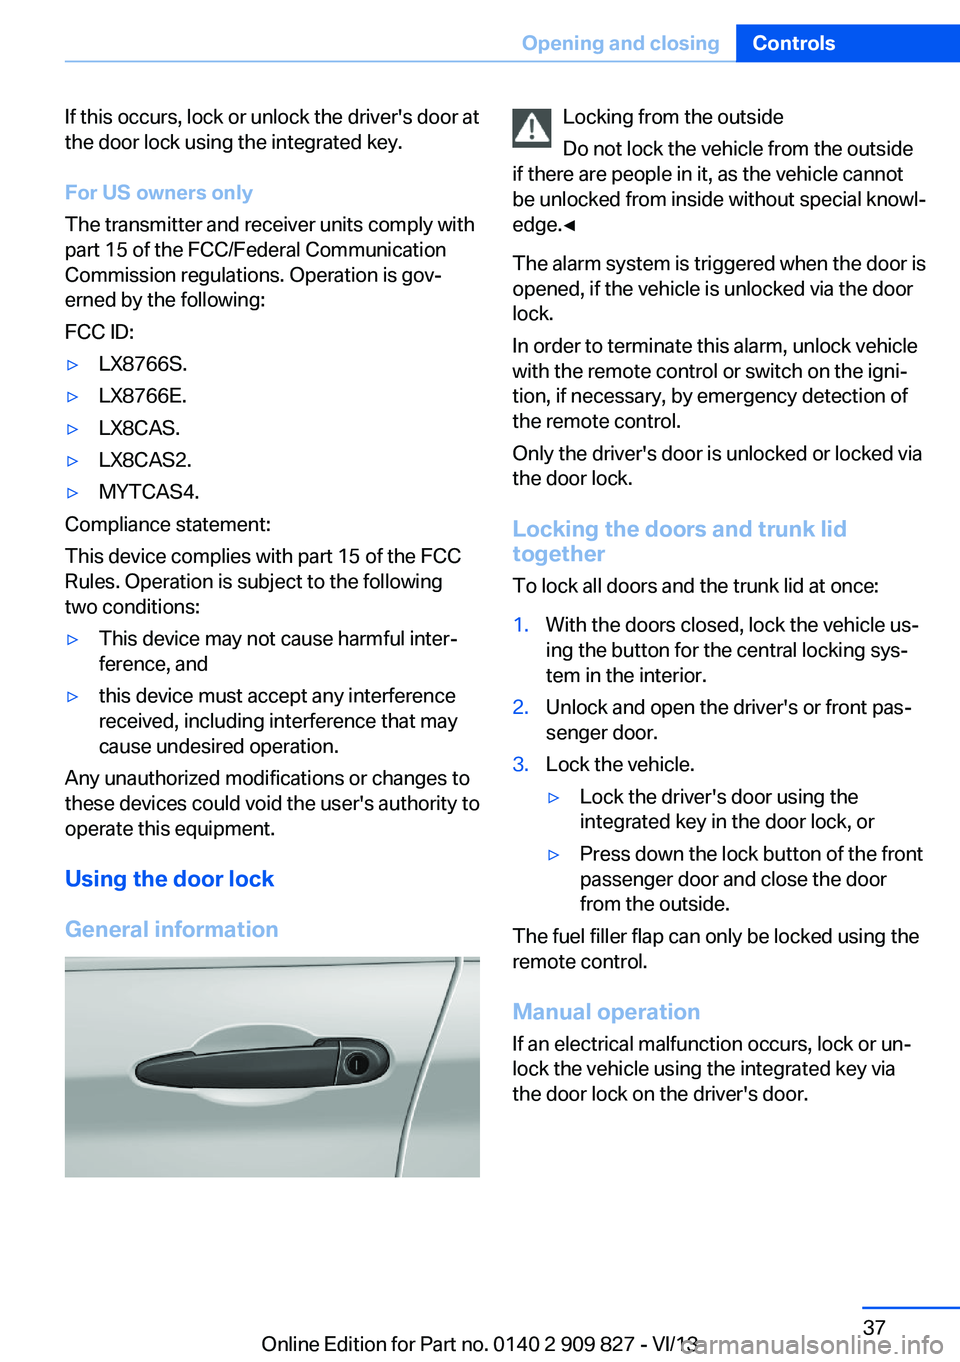
If this occurs, lock or unlock the driver's door at
the door lock using the integrated key.
For US owners only
The transmitter and receiver units comply with
part 15 of the FCC/Federal Communication
Commission regulations. Operation is gov‐
erned by the following:
FCC ID:▷LX8766S.▷LX8766E.▷LX8CAS.▷LX8CAS2.▷MYTCAS4.
Compliance statement:
This device complies with part 15 of the FCC
Rules. Operation is subject to the following
two conditions:
▷This device may not cause harmful inter‐
ference, and▷this device must accept any interference
received, including interference that may
cause undesired operation.
Any unauthorized modifications or changes to
these devices could void the user's authority to
operate this equipment.
Using the door lock
General information
Locking from the outside
Do not lock the vehicle from the outside
if there are people in it, as the vehicle cannot
be unlocked from inside without special knowl‐
edge.◀
The alarm system is triggered when the door is
opened, if the vehicle is unlocked via the door
lock.
In order to terminate this alarm, unlock vehicle
with the remote control or switch on the igni‐
tion, if necessary, by emergency detection of
the remote control.
Only the driver's door is unlocked or locked via
the door lock.
Locking the doors and trunk lid
together
To lock all doors and the trunk lid at once:1.With the doors closed, lock the vehicle us‐
ing the button for the central locking sys‐
tem in the interior.2.Unlock and open the driver's or front pas‐
senger door.3.Lock the vehicle.▷Lock the driver's door using the
integrated key in the door lock, or▷Press down the lock button of the front
passenger door and close the door
from the outside.
The fuel filler flap can only be locked using the
remote control.
Manual operation If an electrical malfunction occurs, lock or un‐
lock the vehicle using the integrated key via
the door lock on the driver's door.
Seite 37Opening and closingControls37
Online Edition for Part no. 0140 2 909 827 - VI/13
Page 38 of 236
Opening and closing: from
the inside
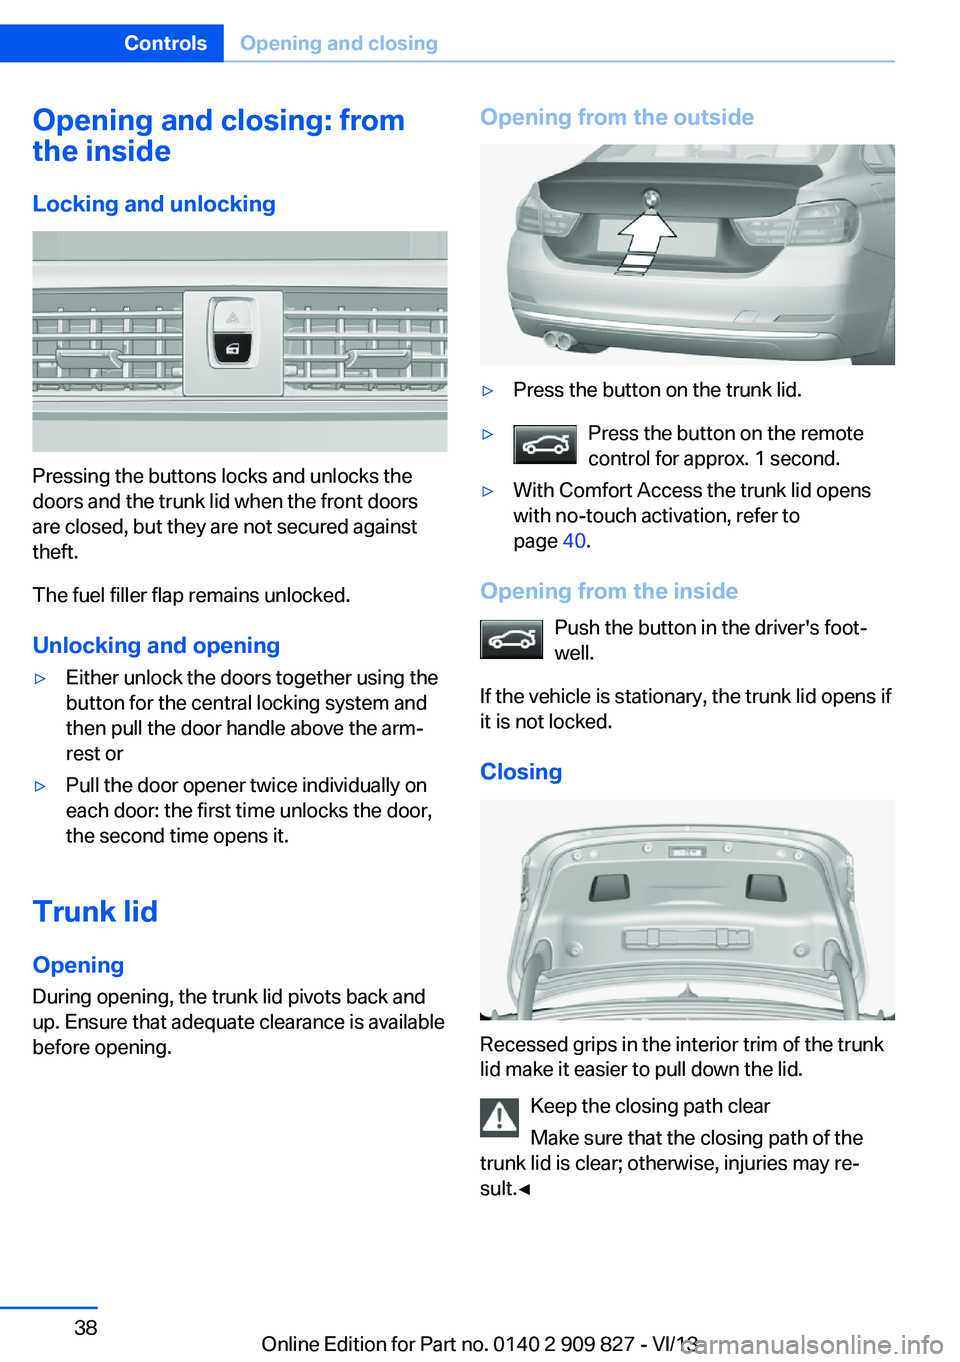
Locking and unlocking
Pressing the buttons locks and unlocks the
doors and the trunk lid when the front doors
are closed, but they are not secured against
theft.
The fuel filler flap remains unlocked.
Unlocking and opening
▷Either unlock the doors together using the
button for the central locking system and
then pull the door handle above the arm‐
rest or▷Pull the door opener twice individually on
each door: the first time unlocks the door,
the second time opens it.
Trunk lid
Opening
During opening, the trunk lid pivots back and
up. Ensure that adequate clearance is available
before opening.
Opening from the outside▷Press the button on the trunk lid.▷Press the button on the remote
control for approx. 1 second.▷With Comfort Access the trunk lid opens
with no-touch activation, refer to
page 40.
Opening from the inside
Push the button in the driver's foot‐
well.
If the vehicle is stationary, the trunk lid opens if
it is not locked.
Closing
Recessed grips in the interior trim of the trunk
lid make it easier to pull down the lid.
Keep the closing path clear
Make sure that the closing path of the
trunk lid is clear; otherwise, injuries may re‐
sult.◀
Seite 38ControlsOpening and closing38
Online Edition for Part no. 0140 2 909 827 - VI/13