manual radio set BMW 5 SERIES 2010 Owners Manual
[x] Cancel search | Manufacturer: BMW, Model Year: 2010, Model line: 5 SERIES, Model: BMW 5 SERIES 2010Pages: 271, PDF Size: 9.19 MB
Page 17 of 271
At a glance
15Reference
Controls
Driving tips
Communications
Navigation
Entertainment
Mobility
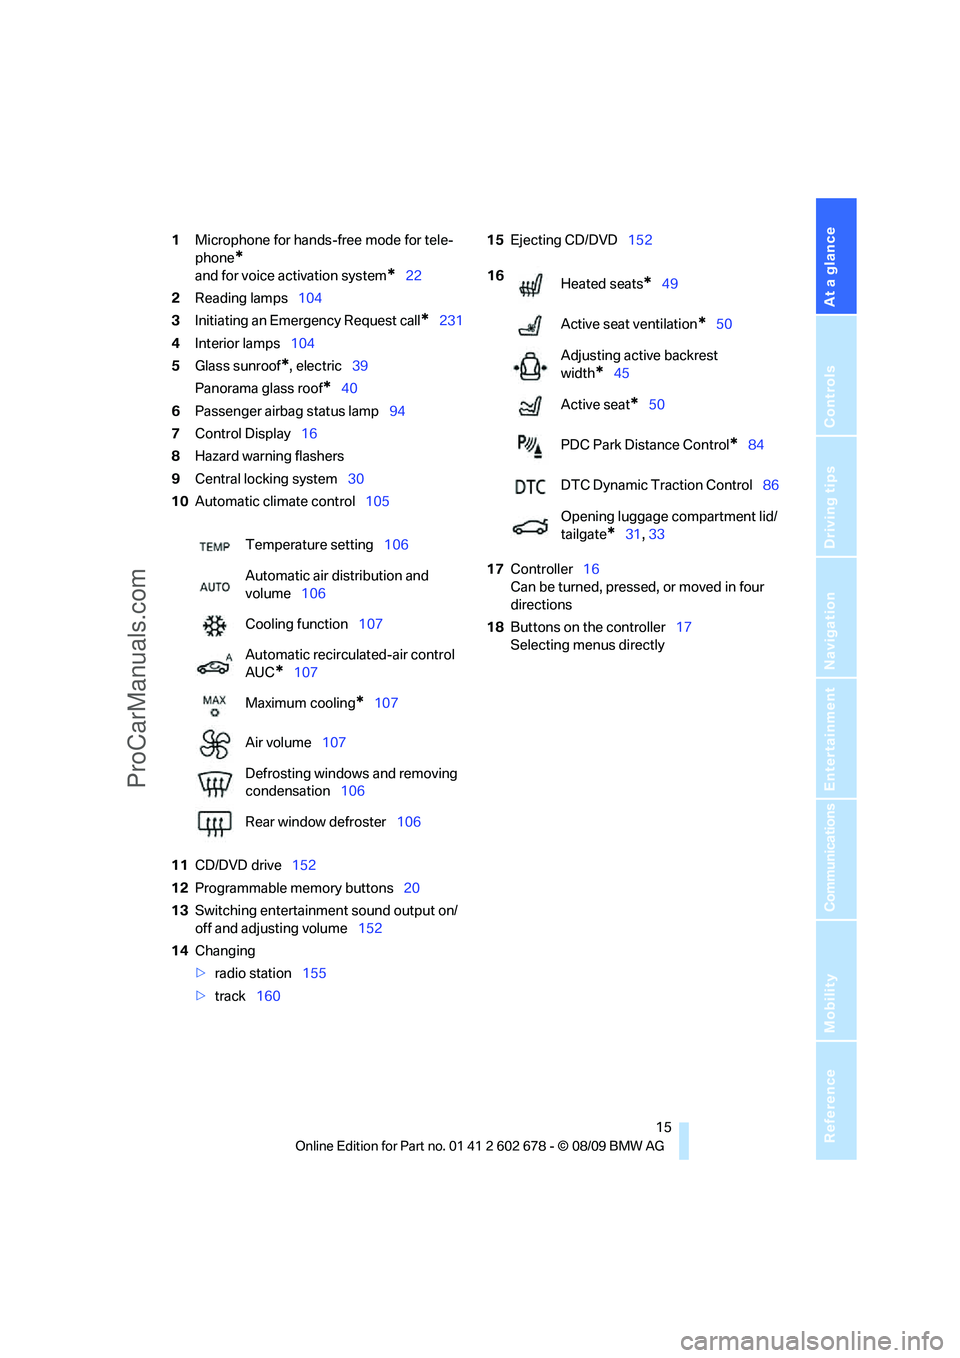
1Microphone for hands-free mode for tele-
phone
*
and for voice activation system*22
2Reading lamps104
3Initiating an Emergency Request call
*231
4Interior lamps104
5Glass sunroof
*, electric39
Panorama glass roof
*40
6Passenger airbag status lamp94
7Control Display16
8Hazard warning flashers
9Central locking system30
10Automatic climate control105
11CD/DVD drive152
12Programmable memory buttons20
13Switching entertainment sound output on/
off and adjusting volume152
14Changing
>radio station155
>track16015Ejecting CD/DVD152
17Controller16
Can be turned, pressed, or moved in four
directions
18Buttons on the controller17
Selecting menus directly Temperature setting106
Automatic air distribution and
volume106
Cooling function107
Automatic recirculated-air control
AUC
*107
Maximum cooling
*107
Air volume107
Defrosting windows and removing
condensation106
Rear window defroster106
16
Heated seats*49
Active seat ventilation
*50
Adjusting active backrest
width
*45
Active seat
*50
PDC Park Distance Control
*84
DTC Dynamic Traction Control86
Opening luggage compartment lid/
tailgate
*31, 33
ProCarManuals.com
Page 19 of 271
At a glance
17Reference
Controls
Driving tips
Communications
Navigation
Entertainment
Mobility
Operating principle
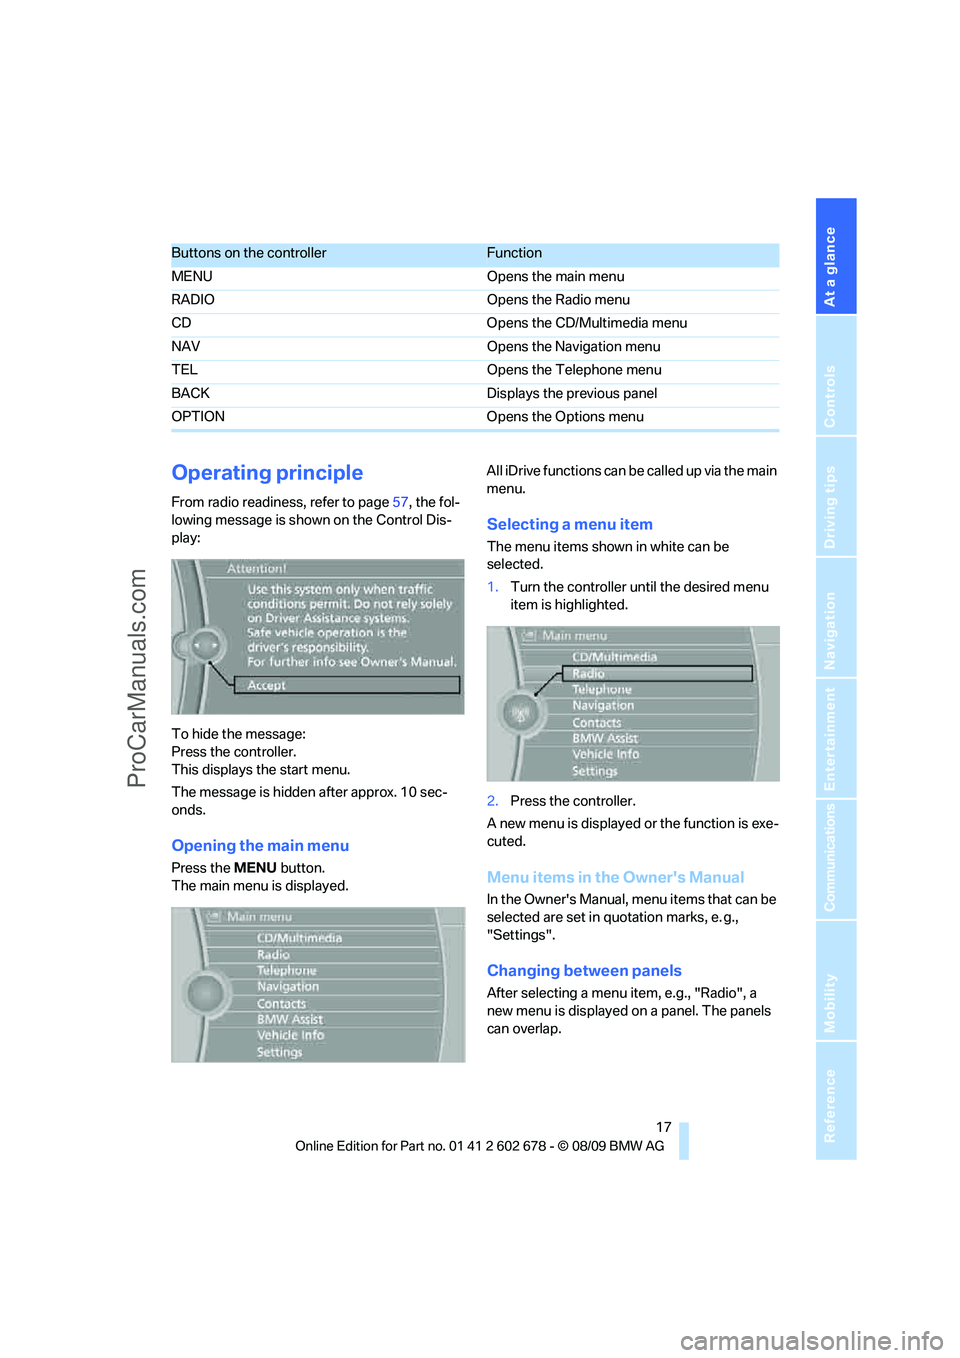
From radio readiness, refer to page57, the fol-
lowing message is shown on the Control Dis-
play:
To hide the message:
Press the controller.
This displays the start menu.
The message is hidden after approx. 10 sec-
onds.
Opening the main menu
Press the MENU button.
The main menu is displayed.All iDrive functions can be called up via the main
menu.
Selecting a menu item
The menu items shown in white can be
selected.
1.Turn the controller until the desired menu
item is highlighted.
2.Press the controller.
A new menu is displayed or the function is exe-
cuted.
Menu items in the Owner's Manual
In the Owner's Manual, menu items that can be
selected are set in quotation marks, e. g.,
"Settings".
Changing between panels
After selecting a menu item, e.g., "Radio", a
new menu is displayed on a panel. The panels
can overlap.
Buttons on the controllerFunction
MENU Opens the main menu
RADIO Opens the Radio menu
CD Opens the CD/Multimedia menu
NAV Opens the Navigation menu
TEL Opens the Telephone menu
BACK Displays the previous panel
OPTION Opens the Options menu
ProCarManuals.com
Page 21 of 271
At a glance
19Reference
Controls
Driving tips
Communications
Navigation
Entertainment
Mobility
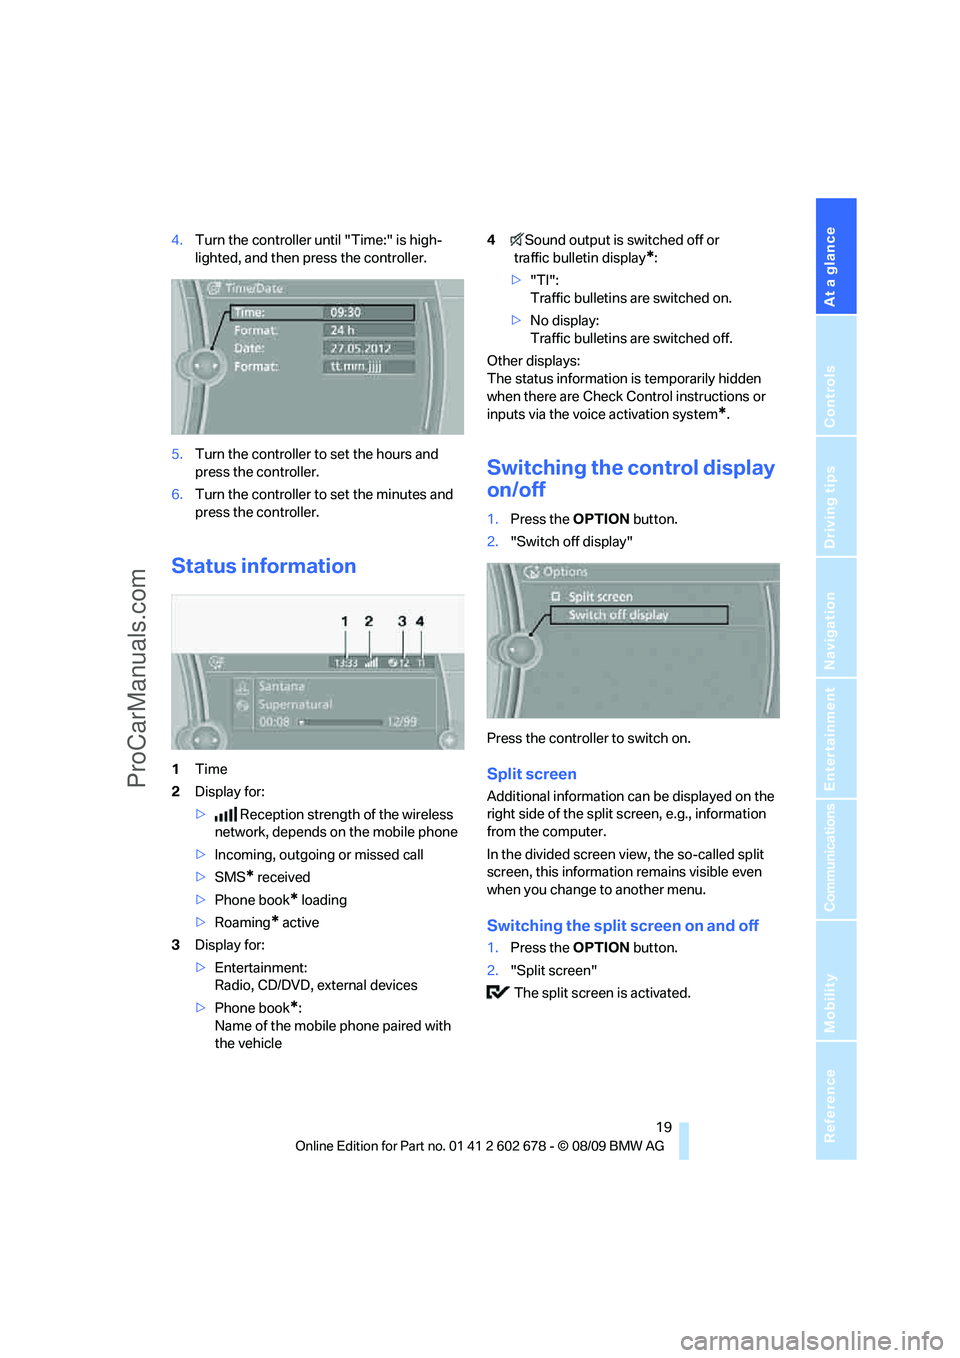
4.Turn the controller until "Time:" is high-
lighted, and then press the controller.
5.Turn the controller to set the hours and
press the controller.
6.Turn the controller to set the minutes and
press the controller.
Status information
1Time
2Display for:
>Reception strength of the wireless
network, depends on the mobile phone
>Incoming, outgoing or missed call
>SMS
* received
>Phone book
* loading
>Roaming
* active
3Display for:
>Entertainment:
Radio, CD/DVD, external devices
>Phone book
*:
Name of the mobile phone paired with
the vehicle4Sound output is switched off or
traffic bulletin display
*:
>"TI":
Traffic bulletins are switched on.
>No display:
Traffic bulletins are switched off.
Other displays:
The status information is temporarily hidden
when there are Check Control instructions or
inputs via the voice activation system
*.
Switching the control display
on/off
1.Press the OPTION button.
2."Switch off display"
Press the controller to switch on.
Split screen
Additional information can be displayed on the
right side of the split screen, e.g., information
from the computer.
In the divided screen view, the so-called split
screen, this information remains visible even
when you change to another menu.
Switching the split screen on and off
1.Press the OPTION button.
2."Split screen"
The split screen is activated.
ProCarManuals.com
Page 25 of 271
At a glance
23Reference
Controls
Driving tips
Communications
Navigation
Entertainment
Mobility
Calling up functions immediately via
short commands
Short commands enable you to perform certain
functions immediately, irrespective of which
menu item is selected, refer to page243.
Example: selecting the track of a CD
1.Switch on entertainment sound output if
necessary.
2.Press the button on the steering wheel.
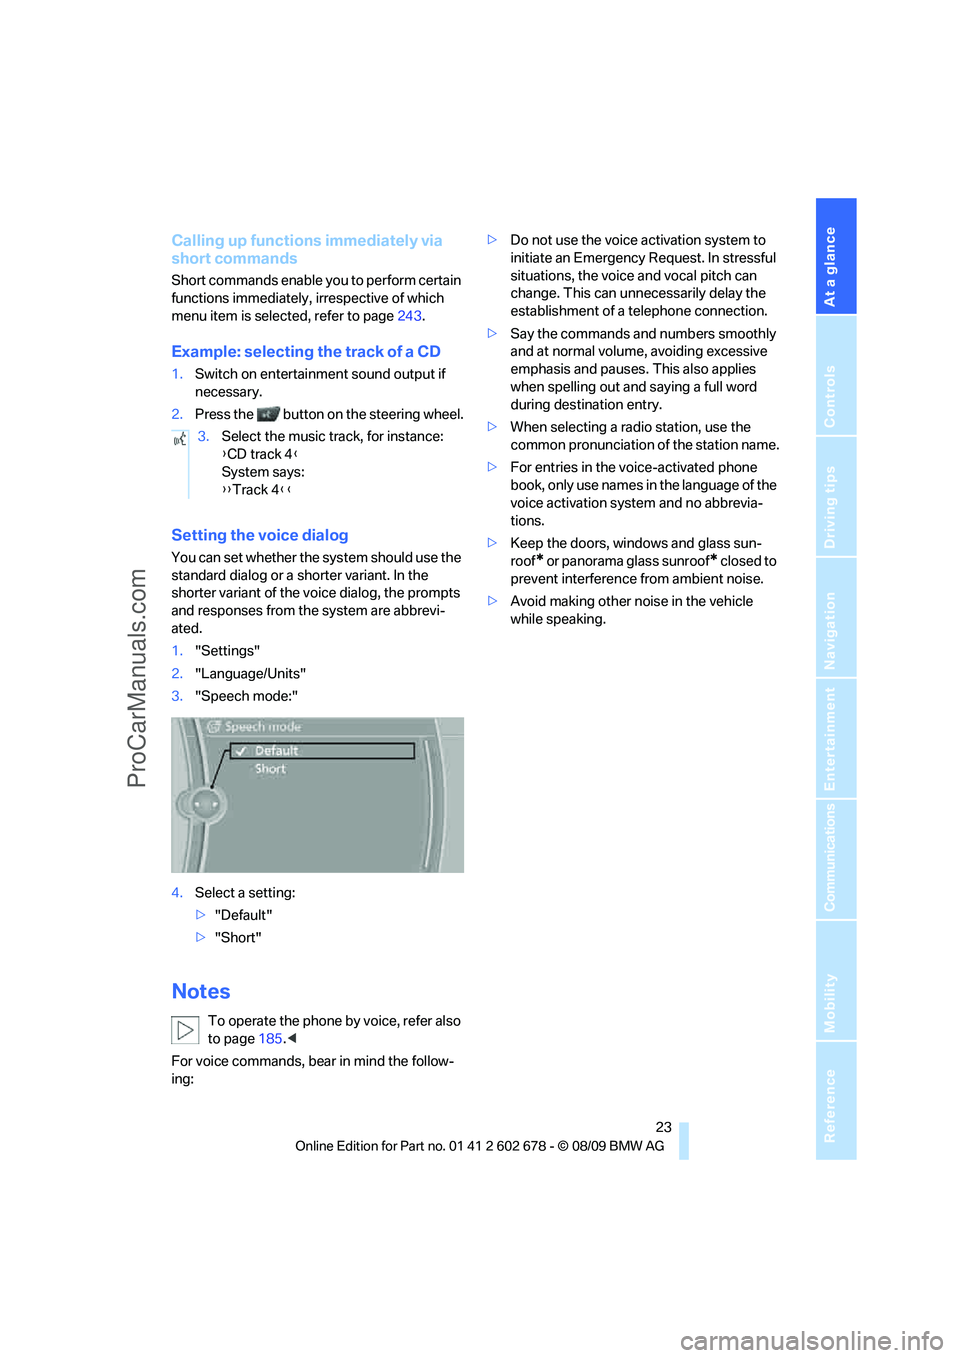
Setting the voice dialog
You can set whether the system should use the
standard dialog or a shorter variant. In the
shorter variant of the voice dialog, the prompts
and responses from the system are abbrevi-
ated.
1."Settings"
2."Language/Units"
3."Speech mode:"
4.Select a setting:
>"Default"
>"Short"
Notes
To operate the phone by voice, refer also
to page185.<
For voice commands, bear in mind the follow-
ing:>Do not use the voice activation system to
initiate an Emergency Request. In stressful
situations, the voice and vocal pitch can
change. This can unnecessarily delay the
establishment of a telephone connection.
>Say the commands and numbers smoothly
and at normal volume, avoiding excessive
emphasis and pauses. This also applies
when spelling out and saying a full word
during destination entry.
>When selecting a radio station, use the
common pronunciation of the station name.
>For entries in the voice-activated phone
book, only use names in the language of the
voice activation system and no abbrevia-
tions.
>Keep the doors, windows and glass sun-
roof
* or panorama glass sunroof* closed to
prevent interference from ambient noise.
>Avoid making other noise in the vehicle
while speaking. 3.Select the music track, for instance:
{CD track 4}
System says:
{{Track 4}}
ProCarManuals.com
Page 28 of 271
Opening and closing
26
Opening and closing
Keys/remote control
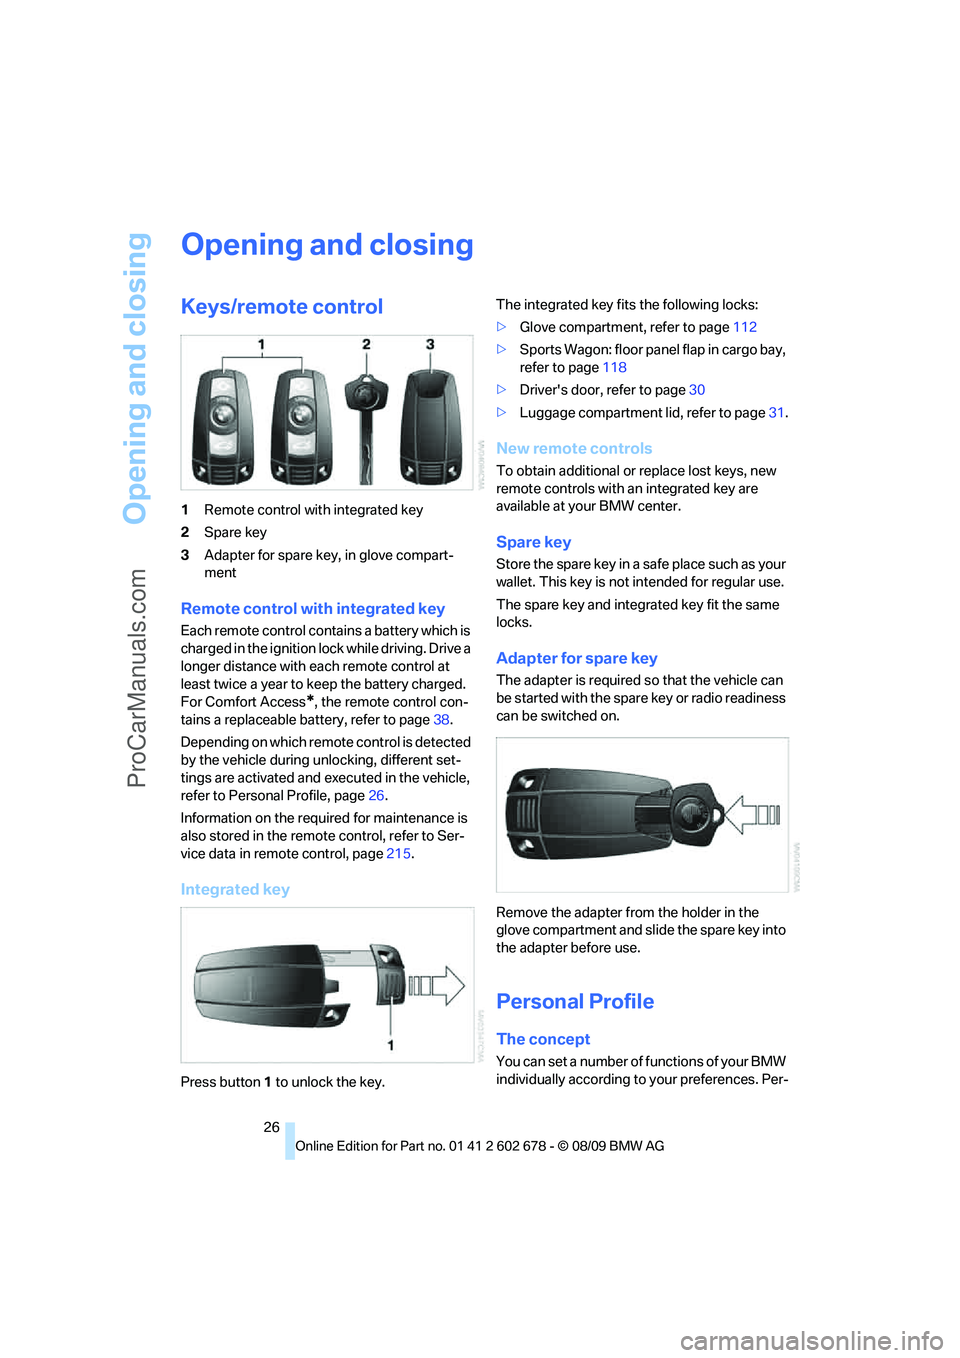
1Remote control with integrated key
2Spare key
3Adapter for spare key, in glove compart-
ment
Remote control with integrated key
Each remote control contains a battery which is
charged in the ignition lock while driving. Drive a
longer distance with each remote control at
least twice a year to keep the battery charged.
For Comfort Access
*, the remote control con-
tains a replaceable battery, refer to page38.
Depending on which remote control is detected
by the vehicle during unlocking, different set-
tings are activated and executed in the vehicle,
refer to Personal Profile, page26.
Information on the required for maintenance is
also stored in the remote control, refer to Ser-
vice data in remote control, page215.
Integrated key
Press button1 to unlock the key.The integrated key fits the following locks:
>Glove compartment, refer to page112
>Sports Wagon: floor panel flap in cargo bay,
refer to page118
>Driver's door, refer to page30
>Luggage compartment lid, refer to page31.
New remote controls
To obtain additional or replace lost keys, new
remote controls with an integrated key are
available at your BMW center.
Spare key
Store the spare key in a safe place such as your
wallet. This key is not intended for regular use.
The spare key and integrated key fit the same
locks.
Adapter for spare key
The adapter is required so that the vehicle can
be started with the spare key or radio readiness
can be switched on.
Remove the adapter from the holder in the
glove compartment and slide the spare key into
the adapter before use.
Personal Profile
The concept
You can set a number of functions of your BMW
individually according to your preferences. Per-
ProCarManuals.com
Page 29 of 271
Controls
27Reference
At a glance
Driving tips
Communications
Navigation
Entertainment
Mobility
sonal Profile ensures that most of these set-
tings are stored for the remote control currently
in use without you having to do anything. When
the vehicle is unlocked, the corresponding
remote control is detected and the settings
stored for it are called up and carried out.
This means that you will always find your BMW
set to your own personal settings even if
another person with his/her own remote control
and settings has used the vehicle since the last
time you drove it. The individual settings are
stored for a maximum of four remote controls,
for two with Comfort Access
*.
Personal Profile settings
Details on the settings are provided on the
specified pages.
>Behavior of the central locking system
when unlocking vehicle, refer to page28
>Automatic locking of the vehicle, refer to
page30
>Displays on Control Display:
>Brightness of the Control Display, refer
to page83
>Measuring units for consumption, route/
distances, temperature, and pressure,
refer to page76
>12h/24h clock format, refer to page79
>Date format, refer to page79
>Language on Control Display, refer to
page82
>Lighting settings:
>Triple turn signal activation, refer to
page63
>Welcome lamps, refer to page100
>Pathway lighting, refer to page101
>Daytime running lamps
*, refer to
page101
>High-beam Assistant
*, refer to
page102
>PDC Park Distance Control
*: optical warn-
ing, refer to page84
>Head-up Display
*: selection and brightness
of display, refer to page96>BMW Night Vision
*: display settings, refer
to page98
>Automatic climate control: AUTO program
and intensity, cooling function, and auto-
matic recirculated air control/recirculated-
air mode, temperature, air distribution, tem-
perature in the upper body region, refer to
text starting on page106
>Navigation system
*: voice instructions for
destination guidance, refer to page143
In addition, the following, most recently
selected settings are recalled during unlocking:
>Programmable memory buttons: selecting
stored functions, refer to page20
>Positions of driver's seat, outside mirrors,
and steering wheel
*, refer to page45
>Audio sources: volume and tone settings,
refer to page152
>Radio:
>Display of stored stations, refer to
page157
>Switching RDS Radio Data System on/
off
*, refer to page156
>Phone: volume setting, refer to page181
Central locking system
The concept
The central locking system functions when the
driver's door is closed.
The system simultaneously engages and
releases the locks on the following:
>Doors
>Luggage compartment lid or tailgate and
rear window
>Fuel filler flap
Operating from outside
>Via the remote control
>Using door lock
>With Comfort Access
* via the door handles
ProCarManuals.com
Page 31 of 271
Controls
29Reference
At a glance
Driving tips
Communications
Navigation
Entertainment
Mobility
Sedan: opening luggage
compartment lid
Press the button for approx. 1 second.
The luggage compartment lid opens, regard-
less of whether it was previously locked or
unlocked.
During opening, the luggage compart-
ment lid pivots back and up. Make sure
that adequate clearance is available before
opening.
To prevent accidentally locking yourself out,
never lay the remote control in the cargo bay. A
previously locked luggage compartment lid is
also locked again after closing.<
Sports Wagon: unlocking tailgate
Press the button for approx. 1 second.
The tailgate will open slightly, regardless of
whether it was previously locked or unlocked.
During opening, the tailgate pivots back
and up. Make sure that adequate clear-
ance is available before opening.
To prevent accidentally locking yourself out,
never lay the remote control in the cargo bay. A
previously locked tailgate is also locked again
after closing.
When opening the tailgate, the luggage com-
partment roller cover is raised.<
If pointed or sharp-edged objects could
strike the rear window while driving, be
sure to provide protection around all edges.
Failure to do so could result in damage to the
heating conductors of the rear window.<
Confirmation signals
You can activate or deactivate the confirmation
signals.
iDrive, for operating principle refer to page16.
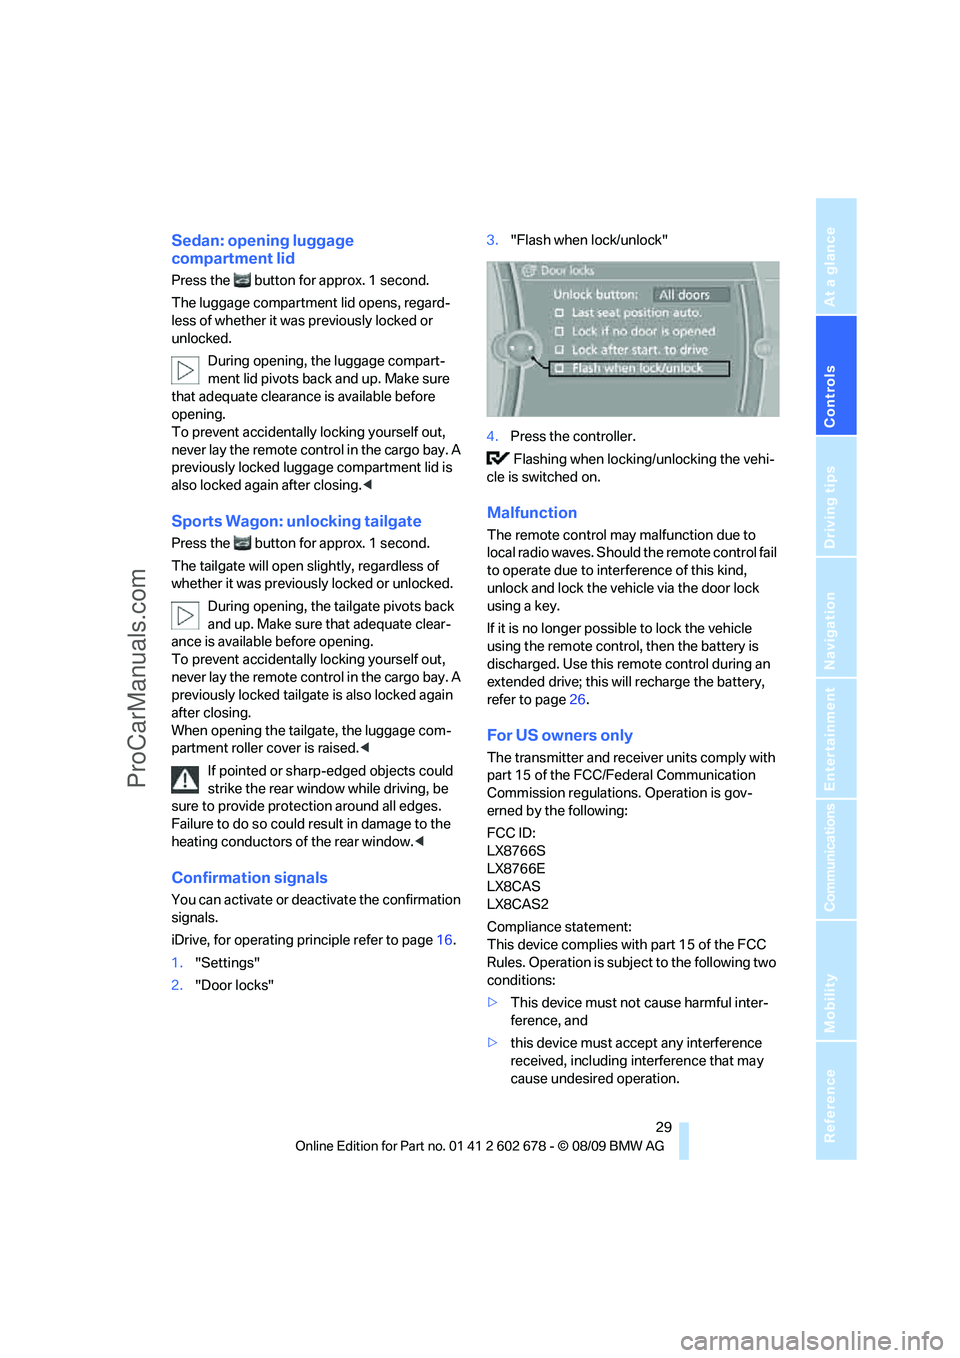
1."Settings"
2."Door locks"3."Flash when lock/unlock"
4.Press the controller.
Flashing when locking/unlocking the vehi-
cle is switched on.
Malfunction
The remote control may malfunction due to
local radio waves. Should the remote control fail
to operate due to interference of this kind,
unlock and lock the vehicle via the door lock
using a key.
If it is no longer possible to lock the vehicle
using the remote control, then the battery is
discharged. Use this remote control during an
extended drive; this will recharge the battery,
refer to page26.
For US owners only
The transmitter and receiver units comply with
part 15 of the FCC/Federal Communication
Commission regulations. Operation is gov-
erned by the following:
FCC ID:
LX8766S
LX8766E
LX8CAS
LX8CAS2
Compliance statement:
This device complies with part 15 of the FCC
Rules. Operation is subject to the following two
conditions:
>This device must not cause harmful inter-
ference, and
>this device must accept any interference
received, including interference that may
cause undesired operation.
ProCarManuals.com
Page 48 of 271
Adjusting
46 The adjustment of the lumbar support is not
stored in the memory.
Storing
1.Switch on radio readiness or ignition, refer
to page57.
2.Set the desired seat, exterior mirror and
steering wheel positions.
3.Press the button:
The LED in the button lights up.
4.Press the desired memory button 1 or 2:
The LED goes out.
Requesting
Do not request a position from the mem-
ory while the vehicle is moving. There is a
risk of accident from unexpected movement of
the seat or steering wheel.<
Comfort mode
1.Open the driver's door after unlocking or
switch on radio readiness.
2.Briefly press the desired memory button1
or2.
The system cancels the adjustment procedure
when you briefly press one of the seat adjust-
ment switches or one of the memory buttons.
Safety feature
1.Close the driver's door and switch the igni-
tion on or off.
2.Press the desired memory button1 or2
and keep it pressed until the adjustment
process has been completed.
If the button was pressed inadvertently:
press the button again; the LED goes out.
Requesting with remote control
The last positions of the driver's seat, the exte-
rior rearview mirrors, and steering wheel are
stored for the remote control currently in use.
You can choose when the position is requested:
>Request when unlocking vehicle
>Request when opening driver's doorWhen using this feature, always make
sure that the footwell behind the driver's
seat is empty and unobstructed. Failure to do
so could cause injury to persons or damage to
objects behind the seat as a result of a rearward
movement of the seat.<
The system cancels the adjustment procedure
when you briefly press one of the seat adjust-
ment switches or one of the memory buttons.
Selecting automatic call-up
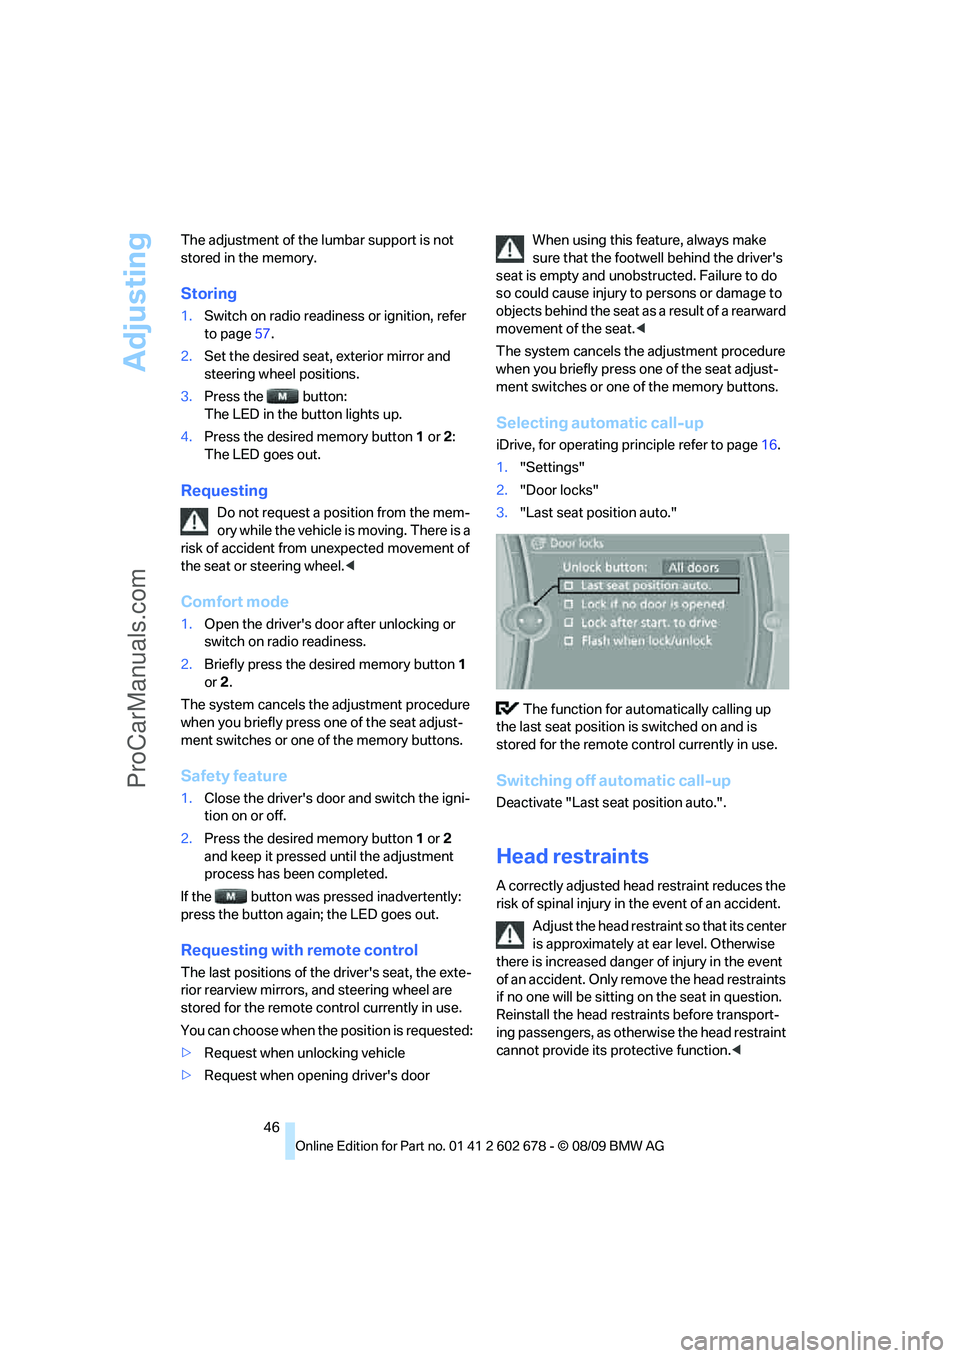
iDrive, for operating principle refer to page16.
1."Settings"
2."Door locks"
3."Last seat position auto."
The function for automatically calling up
the last seat position is switched on and is
stored for the remote control currently in use.
Switching off automatic call-up
Deactivate "Last seat position auto.".
Head restraints
A correctly adjusted head restraint reduces the
risk of spinal injury in the event of an accident.
Adjust the head restraint so that its center
is approximately at ear level. Otherwise
there is increased danger of injury in the event
of an accident. Only remove the head restraints
if no one will be sitting on the seat in question.
Reinstall the head restraints before transport-
ing passengers, as otherwise the head restraint
cannot provide its protective function.<
ProCarManuals.com
Page 73 of 271
Controls
71Reference
At a glance
Driving tips
Communications
Navigation
Entertainment
Mobility
Rules. Operation is subject to the following two
conditions:
>This device must not cause harmful inter-
ference, and>this device must accept any interference
received, including interference that may
cause undesired operation.
Any unauthorized modifications or
changes to these devices could void the
user’s authority to operate this equipment.<
System limitations
As with conventional cruise control sys-
tems, active cruise control in no way
diminishes or substitutes for the driver's own
personal responsibility, alertness and aware-
ness in adjusting speed, braking or otherwise
controlling the vehicle. The driver should
decide when to use the system on the basis of
road, traffic, visibility, and weather conditions.
Active cruise control is intended for use on
highway-type roadways where traffic is moving
relatively smoothly. Do not use this system in
city driving; in complex driving situations; on
curvy, winding roads, slippery roads or roads
with sharp curves such as highway off-ramps;
during inclement weather such as snow, strong
rain or fog; or when entering interchanges, ser-
vice/parking areas or toll booths. It is also
important to regulate your vehicle's speed and
distance setting within applicable legal limits.
Always be ready to take action or apply the
brakes if necessary, especially when the sys-
tem is actively following a vehicle in front of
you.<
Always remember that the range and abil-
ity of the system do have physical limita-
tions. For example, the system may not detect
vehicles driving ahead if they suddenly brake
heavily in stop-and-go traffic during accelera-
tion. The system will not apply the brakes or
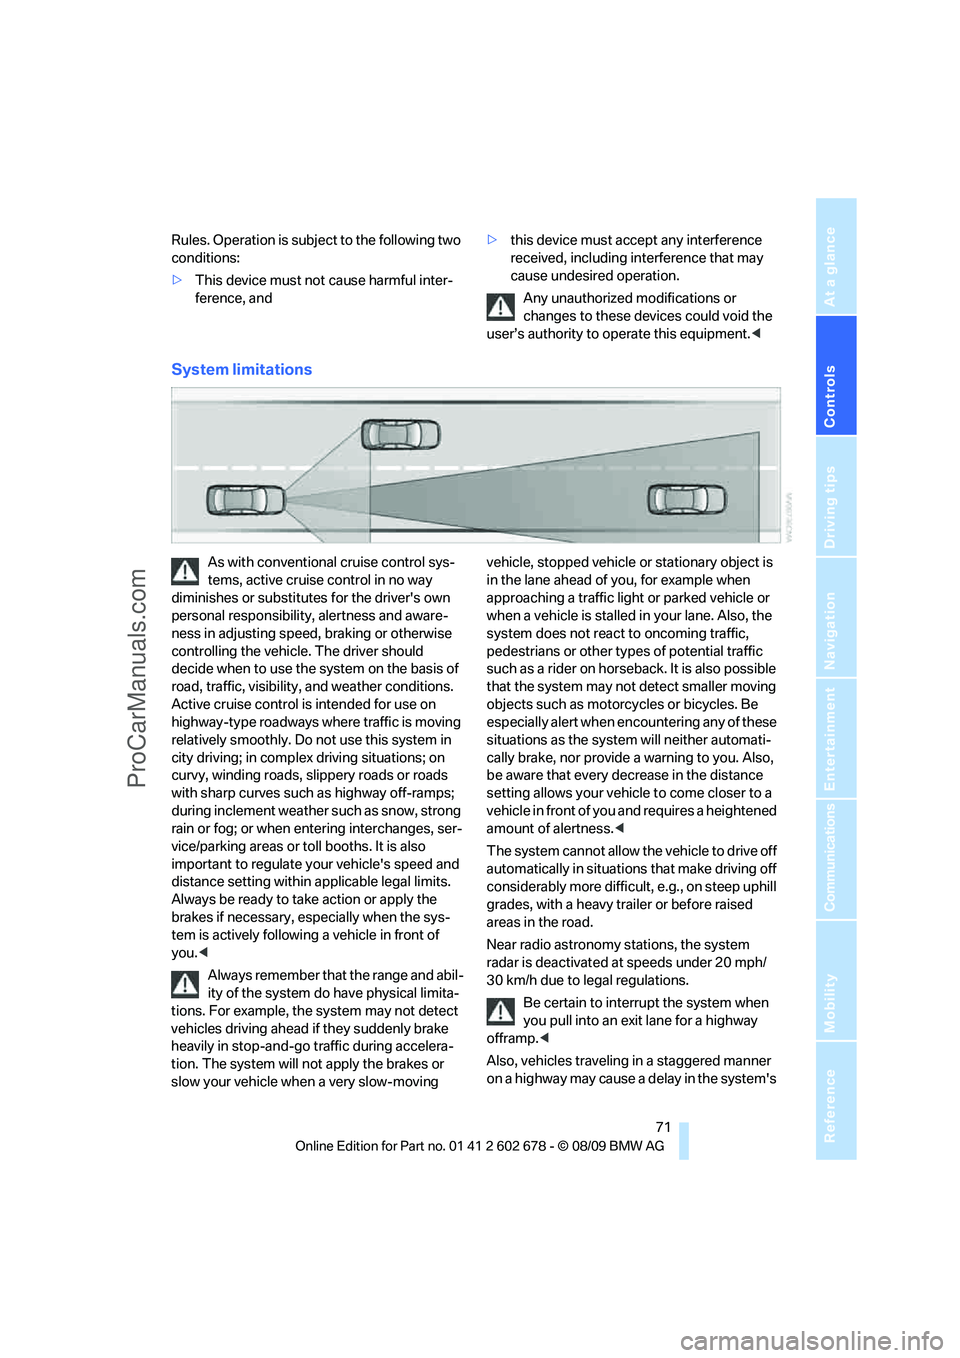
slow your vehicle when a very slow-moving vehicle, stopped vehicle or stationary object is
in the lane ahead of you, for example when
approaching a traffic light or parked vehicle or
when a vehicle is stalled in your lane. Also, the
system does not react to oncoming traffic,
pedestrians or other types of potential traffic
such as a rider on horseback. It is also possible
that the system may not detect smaller moving
objects such as motorcycles or bicycles. Be
especially alert when encountering any of these
situations as the system will neither automati-
cally brake, nor provide a warning to you. Also,
be aware that every decrease in the distance
setting allows your vehicle to come closer to a
vehicle in front of you and requires a heightened
amount of alertness.<
The system cannot allow the vehicle to drive off
automatically in situations that make driving off
considerably more difficult, e.g., on steep uphill
grades, with a heavy trailer or before raised
areas in the road.
Near radio astronomy stations, the system
radar is deactivated at speeds under 20 mph/
30 km/h due to legal regulations.
Be certain to interrupt the system when
you pull into an exit lane for a highway
offramp.<
Also, vehicles traveling in a staggered manner
on a highway may cause a delay in the system's
ProCarManuals.com
Page 76 of 271
Controls Overview
74
Controls Overview
Odometer, outside
temperature display, clock,
date
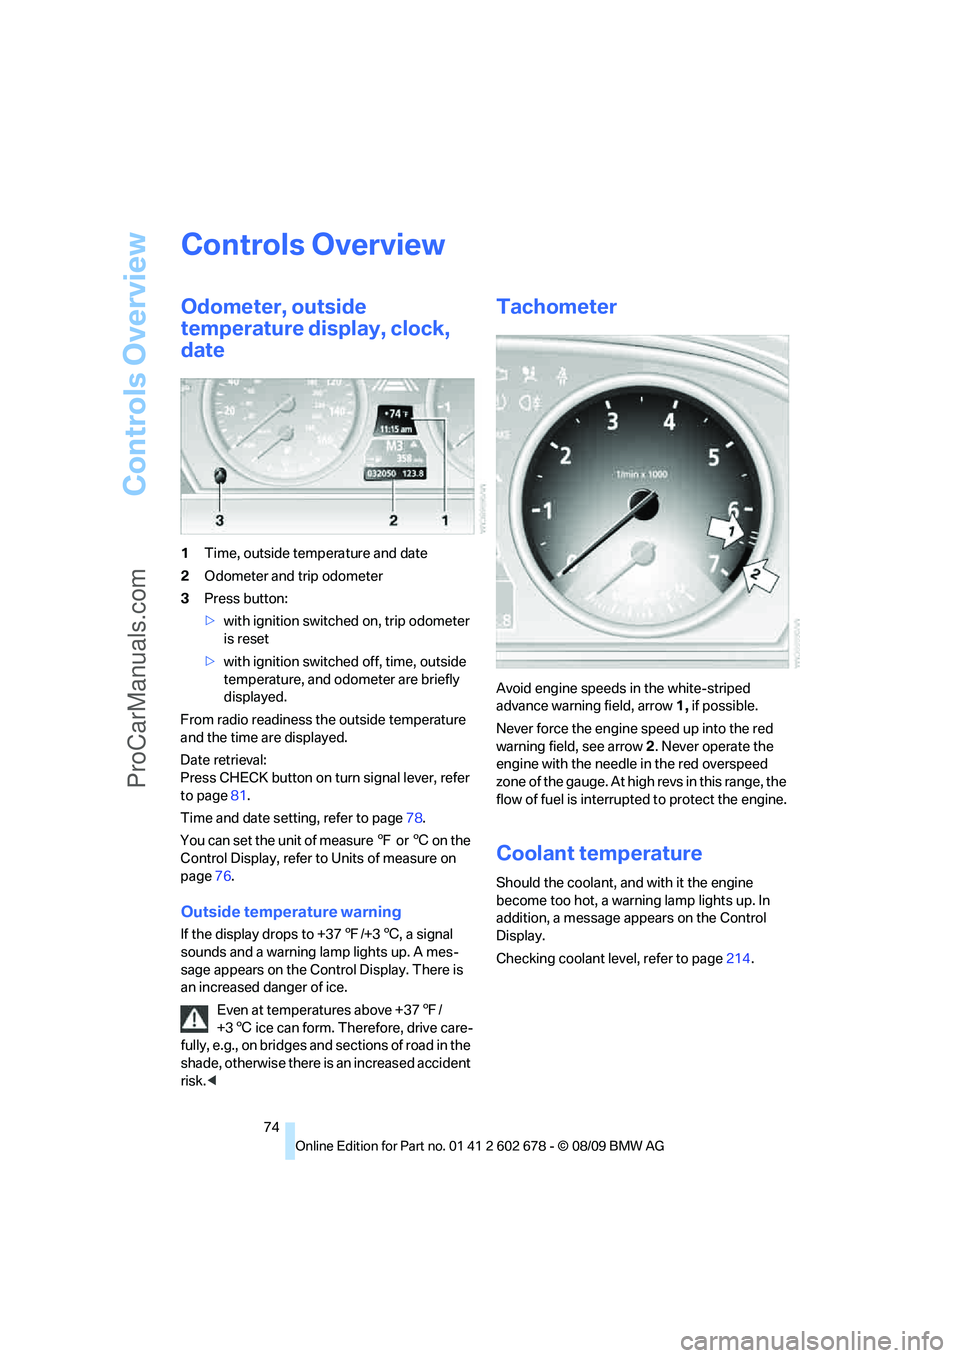
1Time, outside temperature and date
2Odometer and trip odometer
3Press button:
>with ignition switched on, trip odometer
is reset
>with ignition switched off, time, outside
temperature, and odometer are briefly
displayed.
From radio readiness the outside temperature
and the time are displayed.
Date retrieval:
Press CHECK button on turn signal lever, refer
to page81.
Time and date setting, refer to page78.
You can set the unit of measure 7 or 6 on the
Control Display, refer to Units of measure on
page76.
Outside temperature warning
If the display drops to +377/+36, a signal
sounds and a warning lamp lights up. A mes-
sage appears on the Control Display. There is
an increased danger of ice.
Even at temperatures above +377/
+36 ice can form. Therefore, drive care-
fully, e.g., on bridges and sections of road in the
shade, otherwise there is an increased accident
risk.<
Tachometer
Avoid engine speeds in the white-striped
advance warning field, arrow1, if possible.
Never force the engine speed up into the red
warning field, see arrow2. Never operate the
engine with the needle in the red overspeed
z o n e o f t h e g a u g e . A t h i g h r e v s i n t h i s r a n g e , t h e
flow of fuel is interrupted to protect the engine.
Coolant temperature
Should the coolant, and with it the engine
become too hot, a warning lamp lights up. In
addition, a message appears on the Control
Display.
Checking coolant level, refer to page214.
ProCarManuals.com