Car seat BMW 5 SERIES 2014 F10 Owner's Manual
[x] Cancel search | Manufacturer: BMW, Model Year: 2014, Model line: 5 SERIES, Model: BMW 5 SERIES 2014 F10Pages: 273, PDF Size: 5.73 MB
Page 6 of 273
Addendum
text beginning, “This should only be
done by your service center . . .”
should be disregarded and the
following text should be read in lieu
thereof: “BMW recommends having
this work performed by a service
center as it is important that this
safety feature functions properly.”
7.At page 59, under the heading:
“Active head restraint,” the
paragraph beginning, “Only attach
accessories . . .” should be
disregarded and the following text
should be read in lieu thereof:
“BMW recommends that you attach
accessories approved by BMW to
the seat or head restraint.”
8.At page 102, under the heading:
“Special windshield,” the paragraph
beginning, “Therefore, have the
special windshield . . .” should be
disregarded and the following text
should be read in lieu thereof:
“BMW recommends that you have
the special windshield replaced by
the service center.”
9.At page 190 under the heading:
“Objects within the range of
movement of the pedals” and at
page 251 under the heading:
“Carpets and floor mats,” the
paragraph that begins: “Only use
floor mats . . .” should be
disregarded and the following
language should be read in lieu
thereof: “The manufacturer of your
vehicle recommends that you use
floor mats that have been identified
by it as appropriate for use in your
vehicle and that can be properly
fixed in place.”
10.At page 211, under the heading
“Tire inflation pressure
specifications,” the sentence
beginning, “Tire inflation pressure
specifications apply to approved tire
sizes . . . .” should be disregarded.
11.At page 223, under the heading:
“Mounting,” the paragraph
beginning, “Have mounting and
balancing . . .” should be
disregarded and the following text
should be read in lieu thereof:
“BMW recommends that you have
mounting and balancing performed
by your service center or a tire
mounting specialist.”
12.At page 223, under the heading:
“Approved wheels and tires,” the
term “Approved” should be
disregarded and in lieu thereof, the
term “Recommended” should be
read in its place. In addition, the
text of that section should be
disregarded and the following text
should be read in lieu thereof:
The manufacturer of your vehicle
strongly suggests that you use
wheels and tires that have been
recommended by the vehicle
manufacturer for your vehicle type;
otherwise, for example, despite
having the same official size ratings,
variations can lead to body contact
and with it, the risk of severe
accidents.
The manufacturer of your vehicle
does not evaluate non-
recommended wheels and tires to
determine if they are suitable for
use on your vehicle.
Page 18 of 273
CockpitVehicle features and options
This chapter describes all standard, country-
specific and optional features offered with the
series. It also describes features that are notnecessarily available in your car, e. g., due to
the selected options or country versions. This
also applies to safety-related functions and
systems.
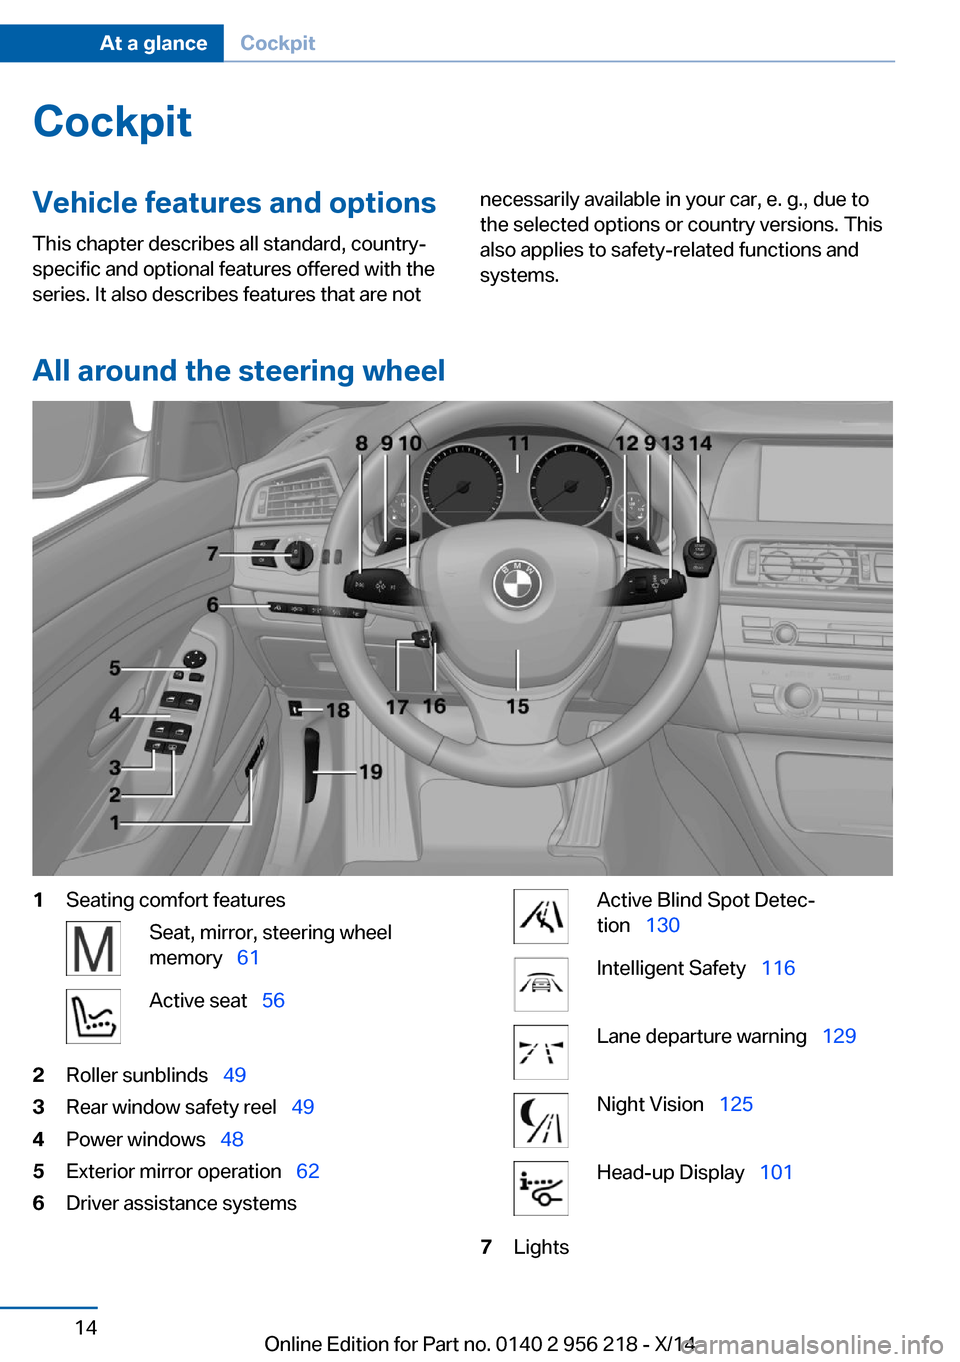
All around the steering wheel
1Seating comfort featuresSeat, mirror, steering wheel
memory 61Active seat 562Roller sunblinds 493Rear window safety reel 494Power windows 485Exterior mirror operation 626Driver assistance systemsActive Blind Spot Detec‐
tion 130Intelligent Safety 116Lane departure warning 129Night Vision 125Head-up Display 1017LightsSeite 14At a glanceCockpit14
Online Edition for Part no. 0140 2 956 218 - X/14
Page 51 of 273
objects damaged when the seat is moved
back.◀
The adjustment procedure is interrupted:▷When a seat position reel is pressed.▷When a button of the seat, mirror, and
steering wheel memory is pressed briefly.
Activating the setting
1."Settings"2."Doors/key"3."Last seat position autom."
Alarm system
The conceptWhen the vehicle is locked, the vehicle alarm
system responds to:
▷Opening a door, the hood or the trunk lid.▷Movements in the interior.▷Changes in the vehicle tilt, e. g., during at‐
tempts at stealing a wheel or when towing
the car.▷Disconnected battery voltage.
The alarm system briefly signals tampering:
▷By sounding an acoustic alarm.▷By switching on the hazard warning sys‐
tem.▷By flashing the daytime running lights.
Arming and disarming the alarm
system
When you unlock or lock the vehicle, either
with the remote control, Comfort Access or at
the door lock the alarm system is disarmed or
armed at the same time.
Door lock and armed alarm systemUnlocking via the door lock will trigger the
alarm on some country-specific versions.
Trunk lid and armed alarm system
The trunk lid can be opened even when the
alarm system is armed.
After the trunk lid is closed, it is locked and
monitored again when the doors are locked.
The hazard warning system flashes once.
Panic mode
You can trigger the alarm system if you find
yourself in a dangerous situation.
Press button on the remote control for
at least 3 seconds.
To reel off the alarm: press any button.
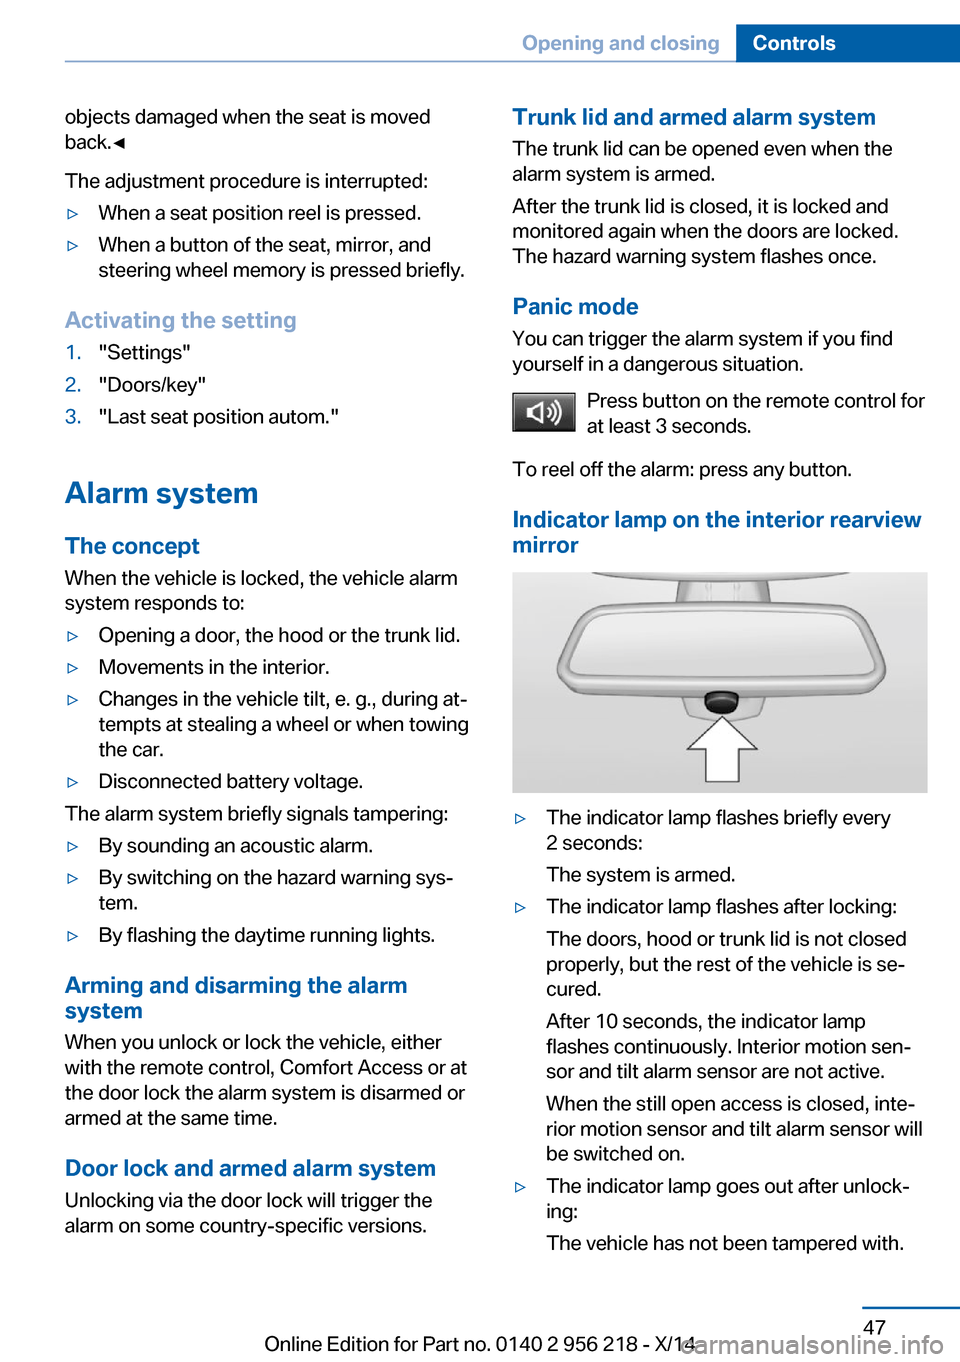
Indicator lamp on the interior rearview
mirror▷The indicator lamp flashes briefly every
2 seconds:
The system is armed.▷The indicator lamp flashes after locking:
The doors, hood or trunk lid is not closed
properly, but the rest of the vehicle is se‐
cured.
After 10 seconds, the indicator lamp
flashes continuously. Interior motion sen‐
sor and tilt alarm sensor are not active.
When the still open access is closed, inte‐
rior motion sensor and tilt alarm sensor will
be switched on.▷The indicator lamp goes out after unlock‐
ing:
The vehicle has not been tampered with.Seite 47Opening and closingControls47
Online Edition for Part no. 0140 2 956 218 - X/14
Page 57 of 273
AdjustingVehicle features and options
This chapter describes all standard, country-
specific and optional features offered with the
series. It also describes features that are not
necessarily available in your car, e. g., due to
the selected options or country versions. This
also applies to safety-related functions and
systems.
Sitting safely
The ideal seating position can make a vital
contribution to relaxed, fatigue-free driving.
The seating position plays an important role in
an accident in combination with:▷Safety belts, refer to page 57.▷Head restraints, refer to page 58.▷Airbags, refer to page 108.
Seats
Hints Do not adjust the seat while driving
Do not adjust the driver's seat while driv‐
ing, or the seat could respond with unexpected
movement and the ensuing loss of vehicle
control could lead to an accident.◀
Do not incline the backrest too far to the
rear
Also on the front passenger side, do not incline
the backrest on the front passenger side too far to the rear while driving, or there is a risk of
slipping under the safety belt in the event of an
accident. This would eliminate the protection
normally provided by the belt.◀
Keep the movement area unobstructed
When changing the seat position, keep
the seat's area of movement unobstructed;
otherwise, people might get injured or objects
damaged.◀
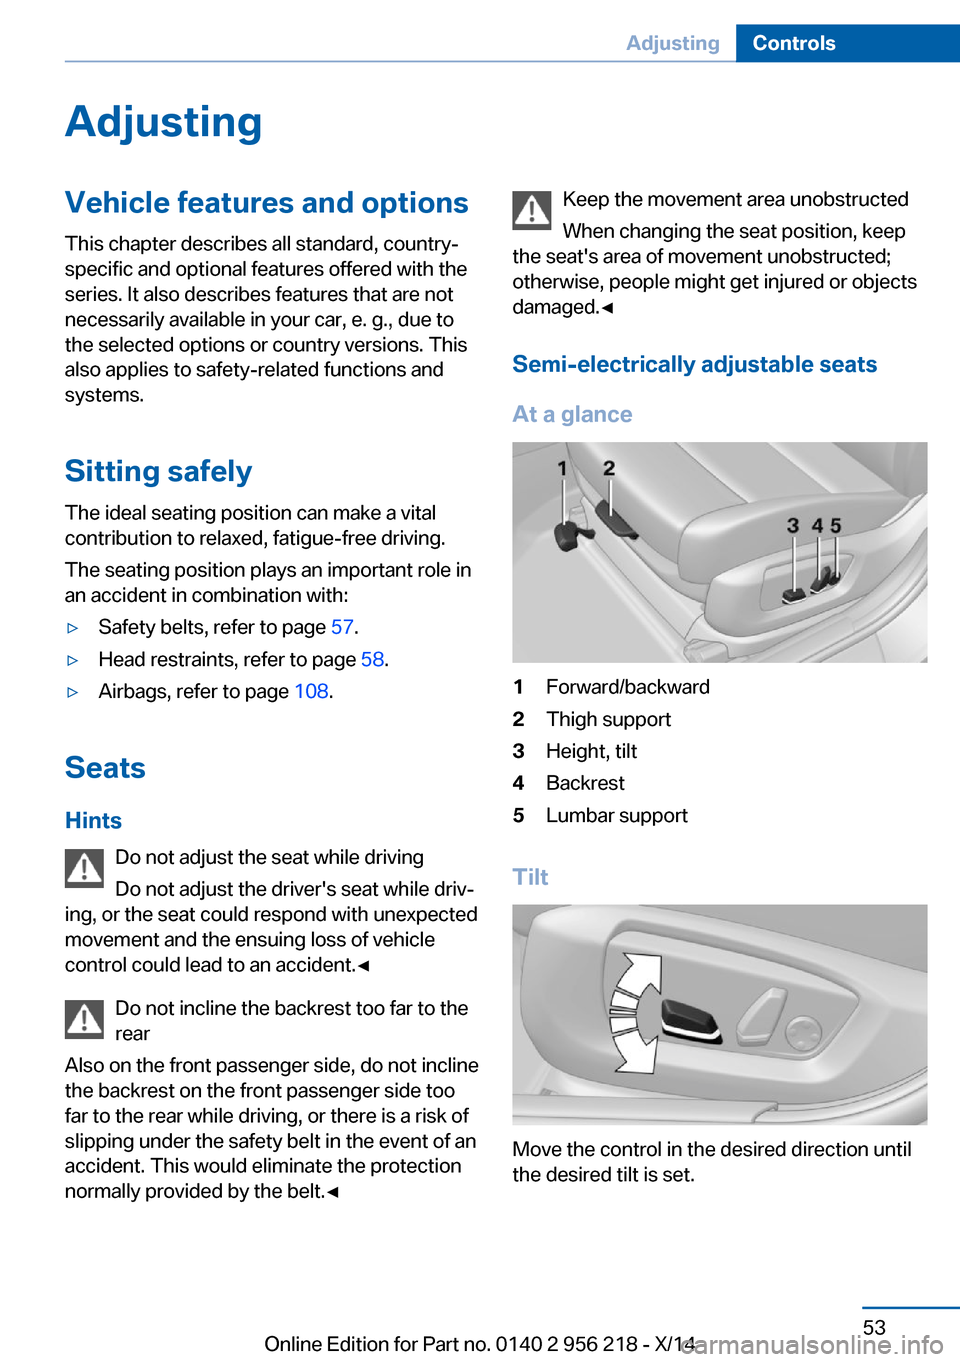
Semi-electrically adjustable seatsAt a glance1Forward/backward2Thigh support3Height, tilt4Backrest5Lumbar support
Tilt
Move the control in the desired direction until
the desired tilt is set.
Seite 53AdjustingControls53
Online Edition for Part no. 0140 2 956 218 - X/14
Page 66 of 273
Mirrors
Exterior mirrors
General information The mirror on the passenger side is more
curved than the driver's side mirror.
Depending on the vehicle equipment, the mir‐
ror setting is stored for the profile currently in
use. When the vehicle is unlocked via the re‐
mote control, the position is automatically re‐
trieved if this function is active.
Note Estimating distances correctly
Objects reflected in the mirror are closer
than they appear. Do not estimate the distance
to the traffic behind you based on what you
see in the mirror, as this will increase your risk
of an accident.◀
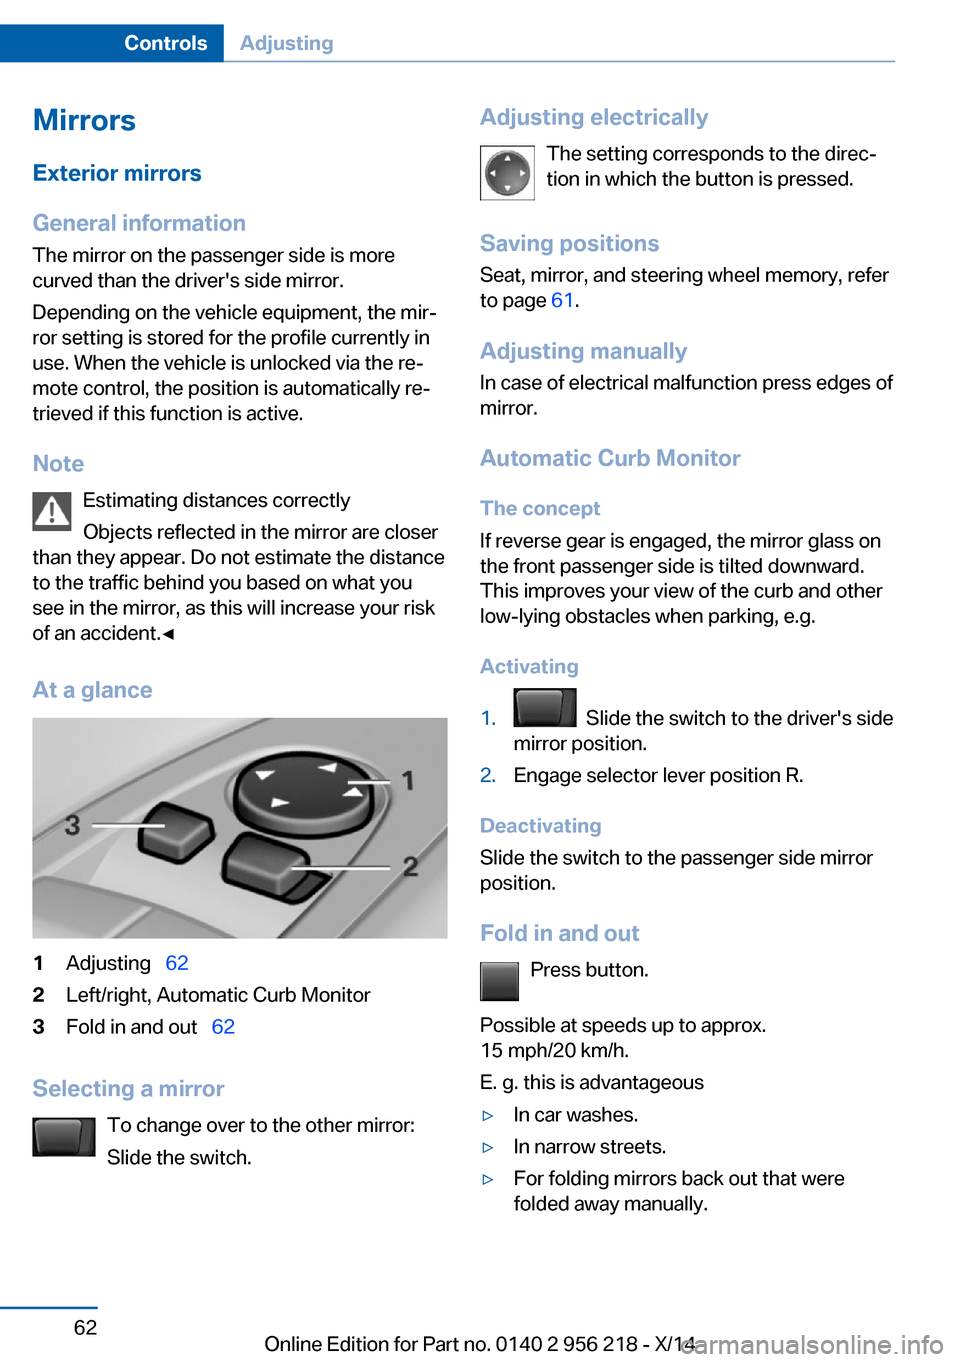
At a glance1Adjusting 622Left/right, Automatic Curb Monitor3Fold in and out 62
Selecting a mirror
To change over to the other mirror:
Slide the switch.
Adjusting electrically
The setting corresponds to the direc‐
tion in which the button is pressed.
Saving positions
Seat, mirror, and steering wheel memory, refer
to page 61.
Adjusting manually In case of electrical malfunction press edges of
mirror.
Automatic Curb Monitor
The concept
If reverse gear is engaged, the mirror glass on
the front passenger side is tilted downward.
This improves your view of the curb and other
low-lying obstacles when parking, e.g.
Activating1. Slide the switch to the driver's side
mirror position.2.Engage selector lever position R.
Deactivating
Slide the switch to the passenger side mirror
position.
Fold in and out Press button.
Possible at speeds up to approx.
15 mph/20 km/h.
E. g. this is advantageous
▷In car washes.▷In narrow streets.▷For folding mirrors back out that were
folded away manually.Seite 62ControlsAdjusting62
Online Edition for Part no. 0140 2 956 218 - X/14
Page 69 of 273
Transporting children safelyVehicle features and optionsThis chapter describes all standard, country-
specific and optional features offered with the
series. It also describes features that are notnecessarily available in your car, e. g., due to
the selected options or country versions. This
also applies to safety-related functions and
systems.
The right place for children
Note
Children in the vehicle
Do not leave children unattended in the
vehicle; otherwise, they could endanger them‐
selves and other persons, e.g., by opening the
doors.◀
Children should always be in the rear Accident research shows that the safest place
for children is in the back seat.
Transporting children in the rear
Only transport children younger than
13 years of age or shorter than 5 ft/150 cm in
the rear in child restraint systems provided in
accordance with the age, weight and size of
the child; otherwise, there is an increased risk
of injury in an accident.
Children 13 years of age or older must wear a
safety belt as soon as a suitable child restraint
system can no longer be used due to their age,
weight and size.◀
Children on the front passenger seat
Should it ever be necessary to use a child re‐
straint system in the front passenger seat,
make sure that the front, knee and side airbags
on the front passenger side are deactivated.
Automatic deactivation of front-seat passen‐
ger airbags, refer to page 110.Note
Deactivating the front-seat passenger
airbags
If a child restraint system is used in the front
passenger seat, deactivate the front-seat pas‐
senger airbags; otherwise, there is an in‐
creased risk of injury to the child when the air‐
bags are activated, even with a child restraint
system.◀
Installing child restraint
systems
Hints Manufacturer's information for child re‐straint systems
To select, mount and use child restraint sys‐
tems, observe the information provided by the
system manufacturer; otherwise, the protec‐
tive effect can be lost.◀
Ensuring the stability of the child seat
When installing child restraint systems,
make sure that the child seat is securely fas‐
tened to the backrest of the seat. Angle and
headrest of the backrest might need to be ad‐
justed or possibly be removed. Make sure that
all backrests are securely locked. Otherwise
the stability of the child seat can be affected,
and there is an increased risk of injury becauseSeite 65Transporting children safelyControls65
Online Edition for Part no. 0140 2 956 218 - X/14
Page 70 of 273
of unexpected movement of the rear seat
backrest.◀
On the front passenger seat
Deactivating airbags Deactivating the front-seat passenger
airbags
If a child restraint system is used in the front
passenger seat, deactivate the front-seat pas‐
senger airbags; otherwise, there is an in‐
creased risk of injury to the child when the air‐
bags are activated, even with a child restraint
system.◀
After installing a child restraint system in the
front passenger seat, make sure that the front,
knee and side airbags on the front passenger
side are deactivated.
Deactivate the front-seat passenger airbags
automatically, refer to page 110.
Seat position and height
Before installing a child restraint system, move
the front passenger seat as far back as possi‐
ble and bring it up to medium height to obtain
the best possible position for the belt and to
offer optimal protection in the event of an acci‐
dent.
If the upper anchorage of the safety belt is lo‐
cated in front of the belt guide of the child seat,
move the passenger seat carefully forward un‐
til the best possible belt guide position is
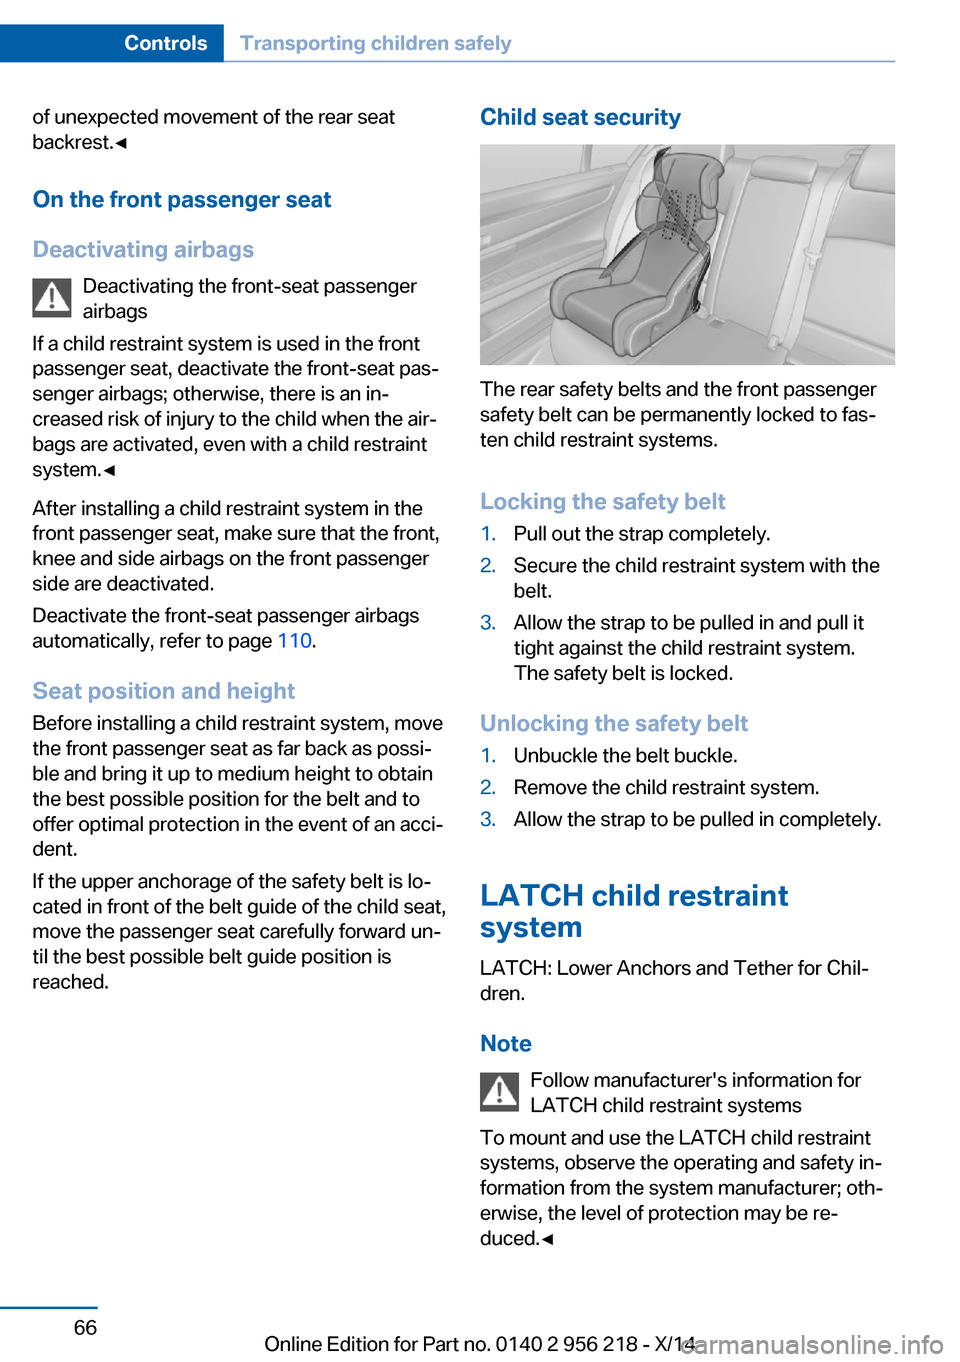
reached.Child seat security
The rear safety belts and the front passenger
safety belt can be permanently locked to fas‐
ten child restraint systems.
Locking the safety belt
1.Pull out the strap completely.2.Secure the child restraint system with the
belt.3.Allow the strap to be pulled in and pull it
tight against the child restraint system.
The safety belt is locked.
Unlocking the safety belt
1.Unbuckle the belt buckle.2.Remove the child restraint system.3.Allow the strap to be pulled in completely.
LATCH child restraint
system
LATCH: Lower Anchors and Tether for Chil‐
dren.
Note Follow manufacturer's information for
LATCH child restraint systems
To mount and use the LATCH child restraint
systems, observe the operating and safety in‐
formation from the system manufacturer; oth‐
erwise, the level of protection may be re‐
duced.◀
Seite 66ControlsTransporting children safely66
Online Edition for Part no. 0140 2 956 218 - X/14
Page 137 of 273
Starting at approximately 43 mph/70 km/h, the
system is active and can display a recommen‐
dation to take a break.
Break recommendation
If the driver becomes increasingly less alert or
fatigued, a message is displayed in the Control
Display with the recommendation to take a
break.
A recommendation to take a break is displayed
only once during an uninterrupted trip.
After a break, another recommendation to take
a break cannot be displayed until after approxi‐
mately 45 minutes.
System limits
The function may be limited in the following
situations, for instance, and will either output
an incorrect warning or no warning at all:▷When the clock is set incorrectly.▷When the vehicle speed is mainly below
about 43 mph/70 km/h.▷With a sporty driving style, such as during
rapid acceleration or when cornering fast.▷In active driving situations, such as when
changing lanes frequently.▷When the road surface is poor.▷In the event of strong side winds.
PreCrash
The concept With this system critical driving situations that
might result in an accident can be detected
above a speed of approx. 20 mph/30 km/h. In these situations, preventive measures are au‐
tomatically taken to minimize the risk of an ac‐
cident as much as possible.
Critical driving situations may include:
▷Emergency stop.▷Severe understeering.▷Severe oversteering.If the vehicle includes the front-end collision
warning or front-end collision warning with
braking feature, impending collisions with vehi‐
cles driving ahead or stopped in front of you
can also be detected within the system's
range.
Note Personal responsibility
The system cannot possibly serve as a
substitute for the driver's personal judgment of
the traffic situation. The system may not al‐
ways detect critical situations reliably and in a
timely manner. Adapt speed to traffic situation
and drive alertly; otherwise, a risk to safety may
result.◀
Function
After the safety belt is buckled, the front belts
are automatically pretensioned once after the
vehicle is driven is away.
In critical driving situations, the following indi‐
vidual functions become active as needed:▷The front belts are automatically preten‐
sioned.▷Automatic closing of the windows.▷Automatic closing of the glass sunroof.▷For vehicles equipped with power backrest
adjustment: automatic positioning of the
backrest for the front passenger seat.
After a critical driving situation without an acci‐
dent, the front belts are loosened again. All
other systems can be restored to the desired
setting.
If the belt tension does not loosen automati‐
cally, stop the vehicle and unbuckle the belt
using the red button in the buckle. Fasten the
belt before continuing on your trip.
PostCrash
In the event of an accident, the system can
bring the car to a halt automatically without in‐
tervention by the driver in certain situations.
Seite 133SafetyControls133
Online Edition for Part no. 0140 2 956 218 - X/14
Page 169 of 273
Climate controlVehicle features and options
This chapter describes all standard, country-
specific and optional features offered with the
series. It also describes features that are notnecessarily available in your car, e. g., due to
the selected options or country versions. This
also applies to safety-related functions and
systems.
Automatic climate control
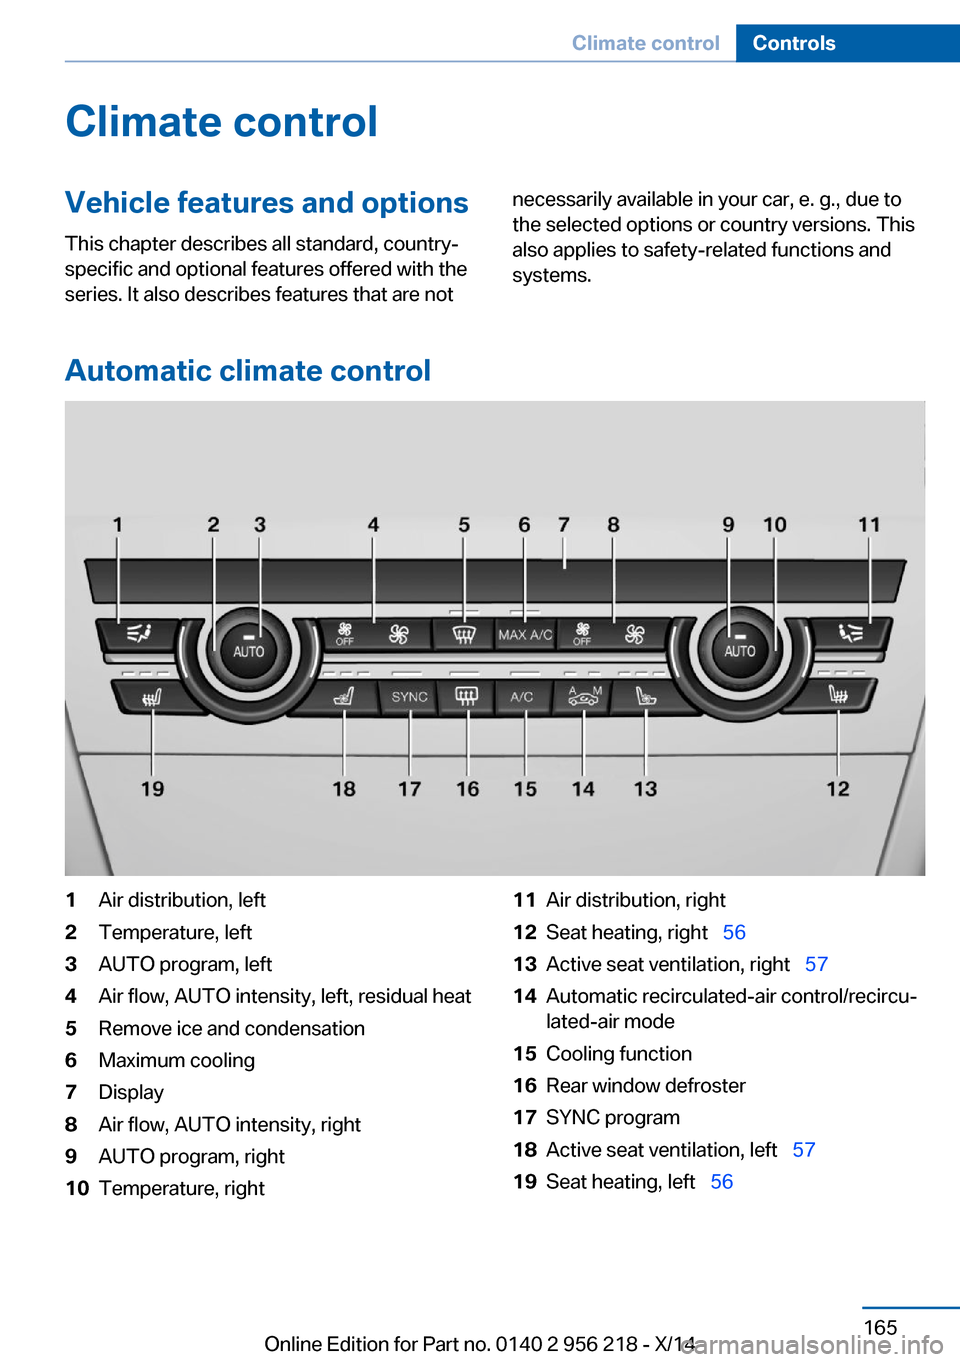
1Air distribution, left2Temperature, left3AUTO program, left4Air flow, AUTO intensity, left, residual heat5Remove ice and condensation6Maximum cooling7Display8Air flow, AUTO intensity, right9AUTO program, right10Temperature, right11Air distribution, right12Seat heating, right 5613Active seat ventilation, right 5714Automatic recirculated-air control/recircu‐
lated-air mode15Cooling function16Rear window defroster17SYNC program18Active seat ventilation, left 5719Seat heating, left 56Seite 165Climate controlControls165
Online Edition for Part no. 0140 2 956 218 - X/14
Page 181 of 273
Rear center console
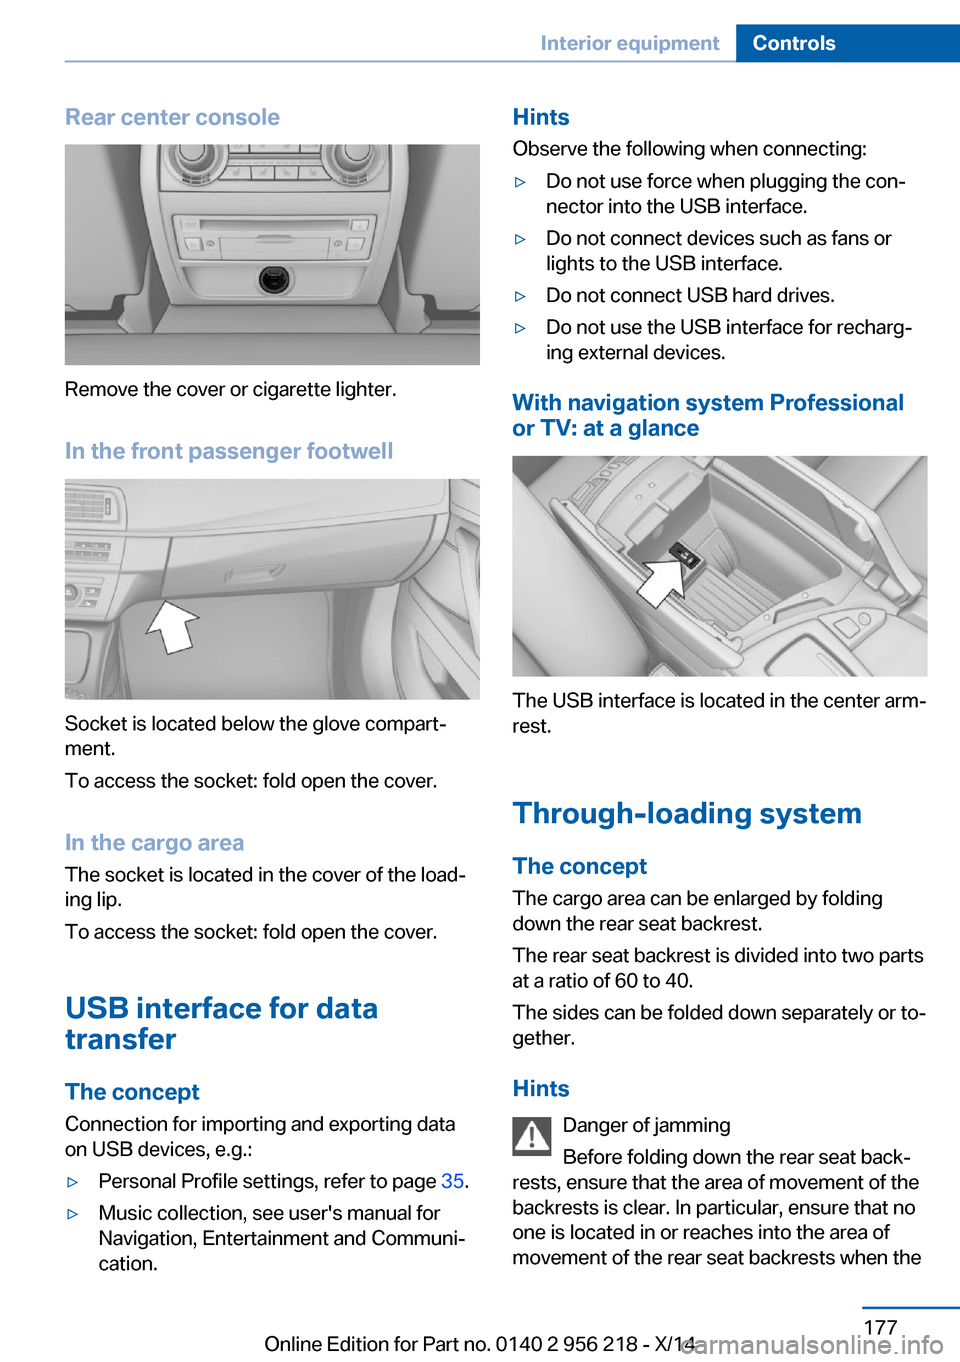
Remove the cover or cigarette lighter.
In the front passenger footwell
Socket is located below the glove compart‐
ment.
To access the socket: fold open the cover.
In the cargo area The socket is located in the cover of the load‐
ing lip.
To access the socket: fold open the cover.
USB interface for data
transfer
The concept Connection for importing and exporting data
on USB devices, e.g.:
▷Personal Profile settings, refer to page 35.▷Music collection, see user's manual for
Navigation, Entertainment and Communi‐
cation.Hints
Observe the following when connecting:▷Do not use force when plugging the con‐
nector into the USB interface.▷Do not connect devices such as fans or
lights to the USB interface.▷Do not connect USB hard drives.▷Do not use the USB interface for recharg‐
ing external devices.
With navigation system Professional
or TV: at a glance
The USB interface is located in the center arm‐
rest.
Through-loading system The concept The cargo area can be enlarged by folding
down the rear seat backrest.
The rear seat backrest is divided into two parts at a ratio of 60 to 40.
The sides can be folded down separately or to‐
gether.
Hints Danger of jamming
Before folding down the rear seat back‐
rests, ensure that the area of movement of the
backrests is clear. In particular, ensure that no
one is located in or reaches into the area of
movement of the rear seat backrests when the
Seite 177Interior equipmentControls177
Online Edition for Part no. 0140 2 956 218 - X/14