Flash BMW 5 SERIES 2014 F10 Owner's Manual
[x] Cancel search | Manufacturer: BMW, Model Year: 2014, Model line: 5 SERIES, Model: BMW 5 SERIES 2014 F10Pages: 273, PDF Size: 5.73 MB
Page 19 of 273
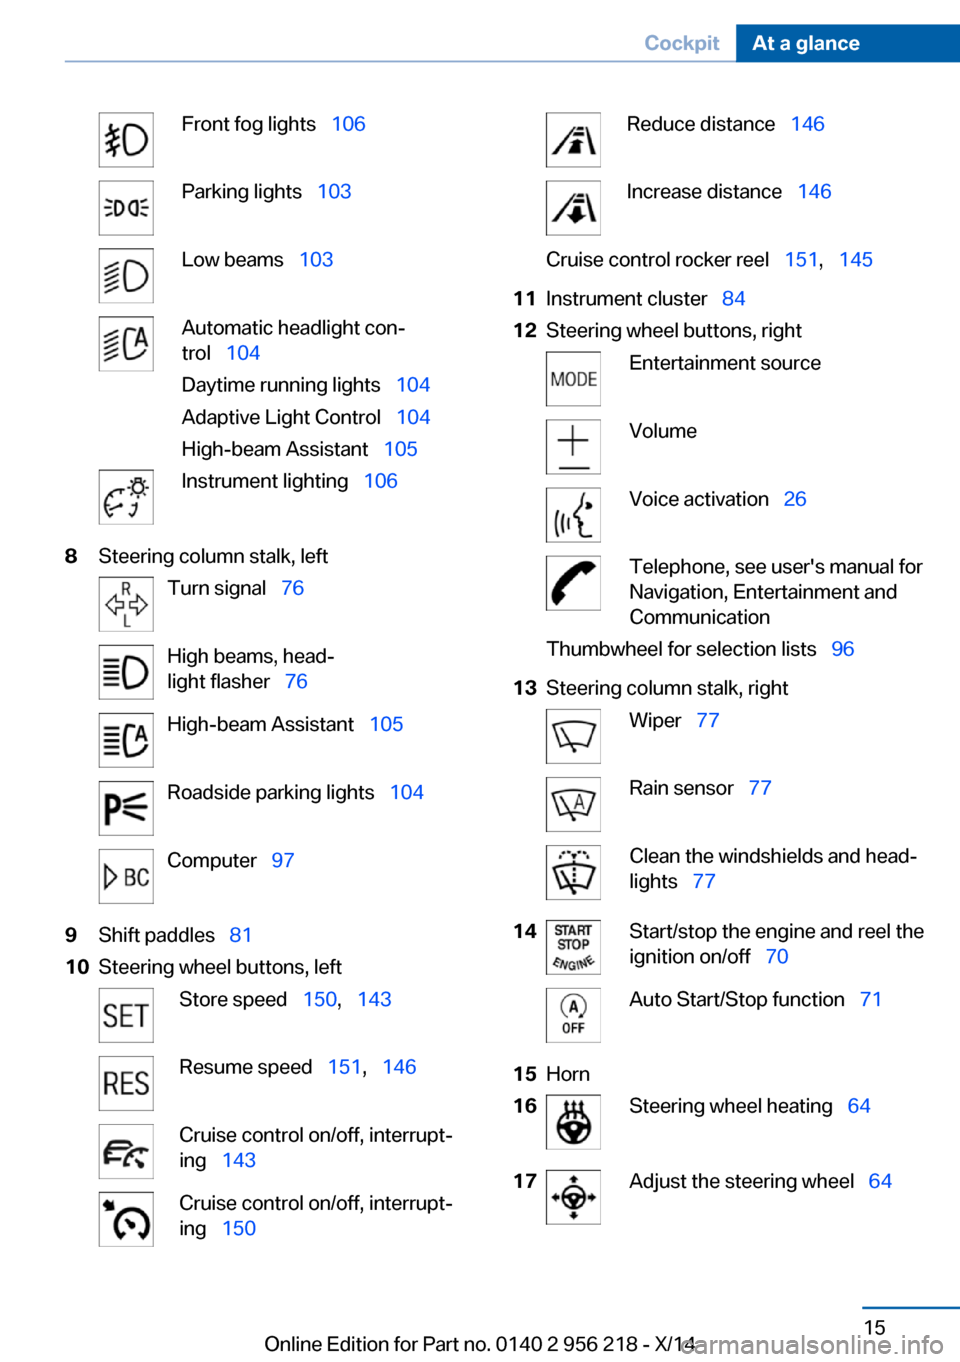
Front fog lights 106Parking lights 103Low beams 103Automatic headlight con‐
trol 104
Daytime running lights 104
Adaptive Light Control 104
High-beam Assistant 105Instrument lighting 1068Steering column stalk, leftTurn signal 76High beams, head‐
light flasher 76High-beam Assistant 105Roadside parking lights 104Computer 979Shift paddles 8110Steering wheel buttons, leftStore speed 150, 143Resume speed 151, 146Cruise control on/off, interrupt‐
ing 143Cruise control on/off, interrupt‐
ing 150Reduce distance 146Increase distance 146Cruise control rocker reel 151, 14511Instrument cluster 8412Steering wheel buttons, rightEntertainment sourceVolumeVoice activation 26Telephone, see user's manual for
Navigation, Entertainment and
CommunicationThumbwheel for selection lists 9613Steering column stalk, rightWiper 77Rain sensor 77Clean the windshields and head‐
lights 7714Start/stop the engine and reel the
ignition on/off 70Auto Start/Stop function 7115Horn16Steering wheel heating 6417Adjust the steering wheel 64Seite 15CockpitAt a glance15
Online Edition for Part no. 0140 2 956 218 - X/14
Page 26 of 273
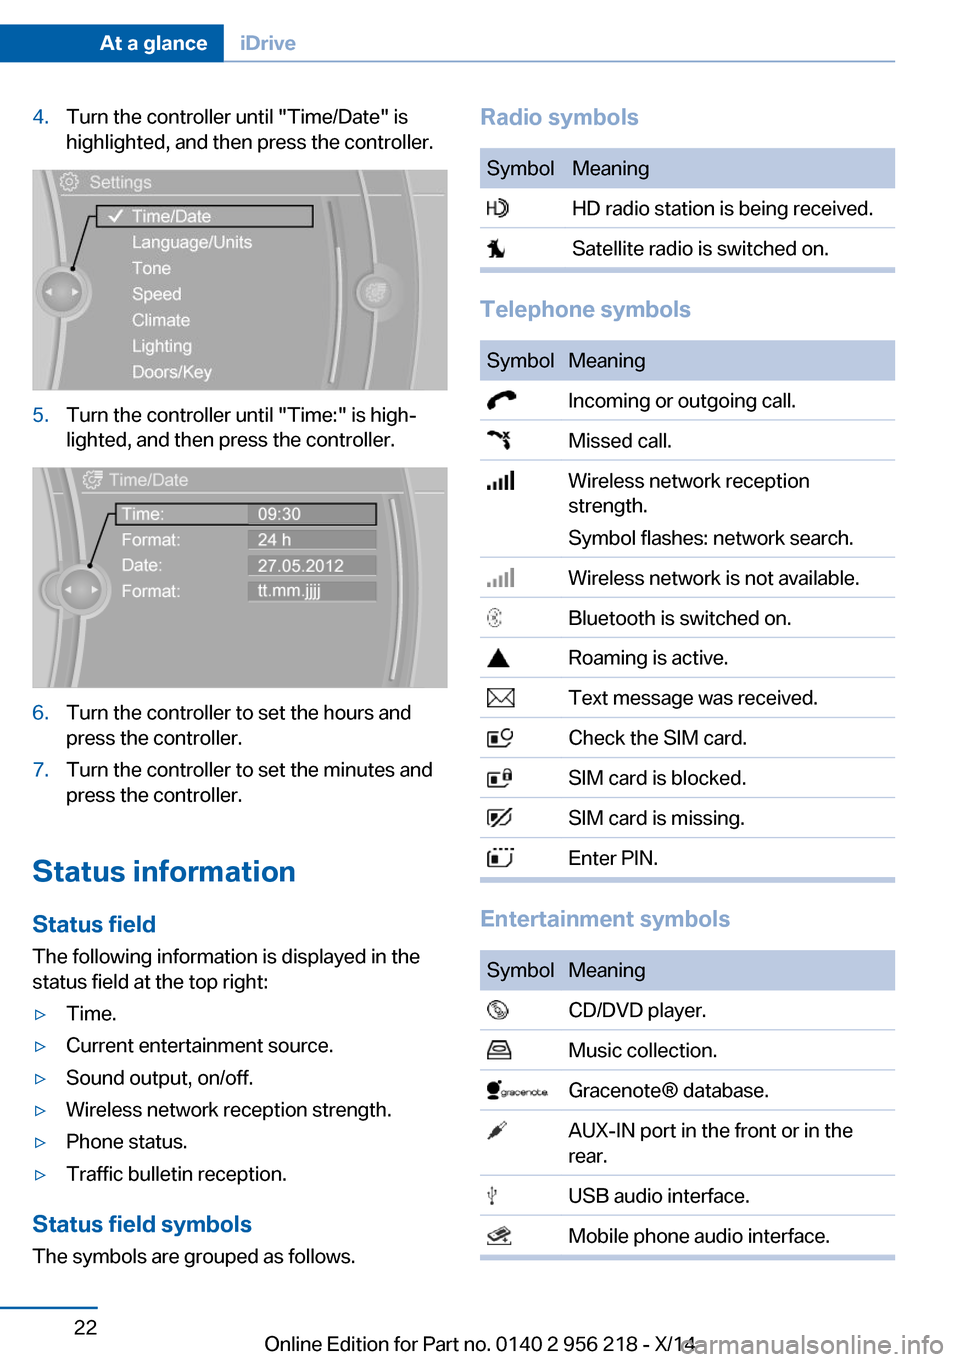
4.Turn the controller until "Time/Date" is
highlighted, and then press the controller.5.Turn the controller until "Time:" is high‐
lighted, and then press the controller.6.Turn the controller to set the hours and
press the controller.7.Turn the controller to set the minutes and
press the controller.
Status information
Status field The following information is displayed in the
status field at the top right:
▷Time.▷Current entertainment source.▷Sound output, on/off.▷Wireless network reception strength.▷Phone status.▷Traffic bulletin reception.
Status field symbols
The symbols are grouped as follows.
Radio symbolsSymbolMeaning HD radio station is being received. Satellite radio is switched on.
Telephone symbols
SymbolMeaning Incoming or outgoing call. Missed call. Wireless network reception
strength.
Symbol flashes: network search. Wireless network is not available. Bluetooth is switched on. Roaming is active. Text message was received. Check the SIM card. SIM card is blocked. SIM card is missing. Enter PIN.
Entertainment symbols
SymbolMeaning CD/DVD player. Music collection. Gracenote® database. AUX-IN port in the front or in the
rear. USB audio interface. Mobile phone audio interface.Seite 22At a glanceiDrive22
Online Edition for Part no. 0140 2 956 218 - X/14
Page 48 of 273
Separately unlocking the trunk lidPress button on the exterior of the trunk lid.
This corresponds to pressing
the re‐
mote control button.
The situation of the doors does not change.
Do not place the remote control in the
cargo area
Take the remote control with you and do not
leave it in the cargo area; otherwise, the re‐
mote control is locked inside the vehicle when
the trunk lid is closed.◀
Open trunk lid with no-touch
activation
With Comfort Access, the trunk lid can be
opened with no-touch activation using the re‐
mote control you are carrying.
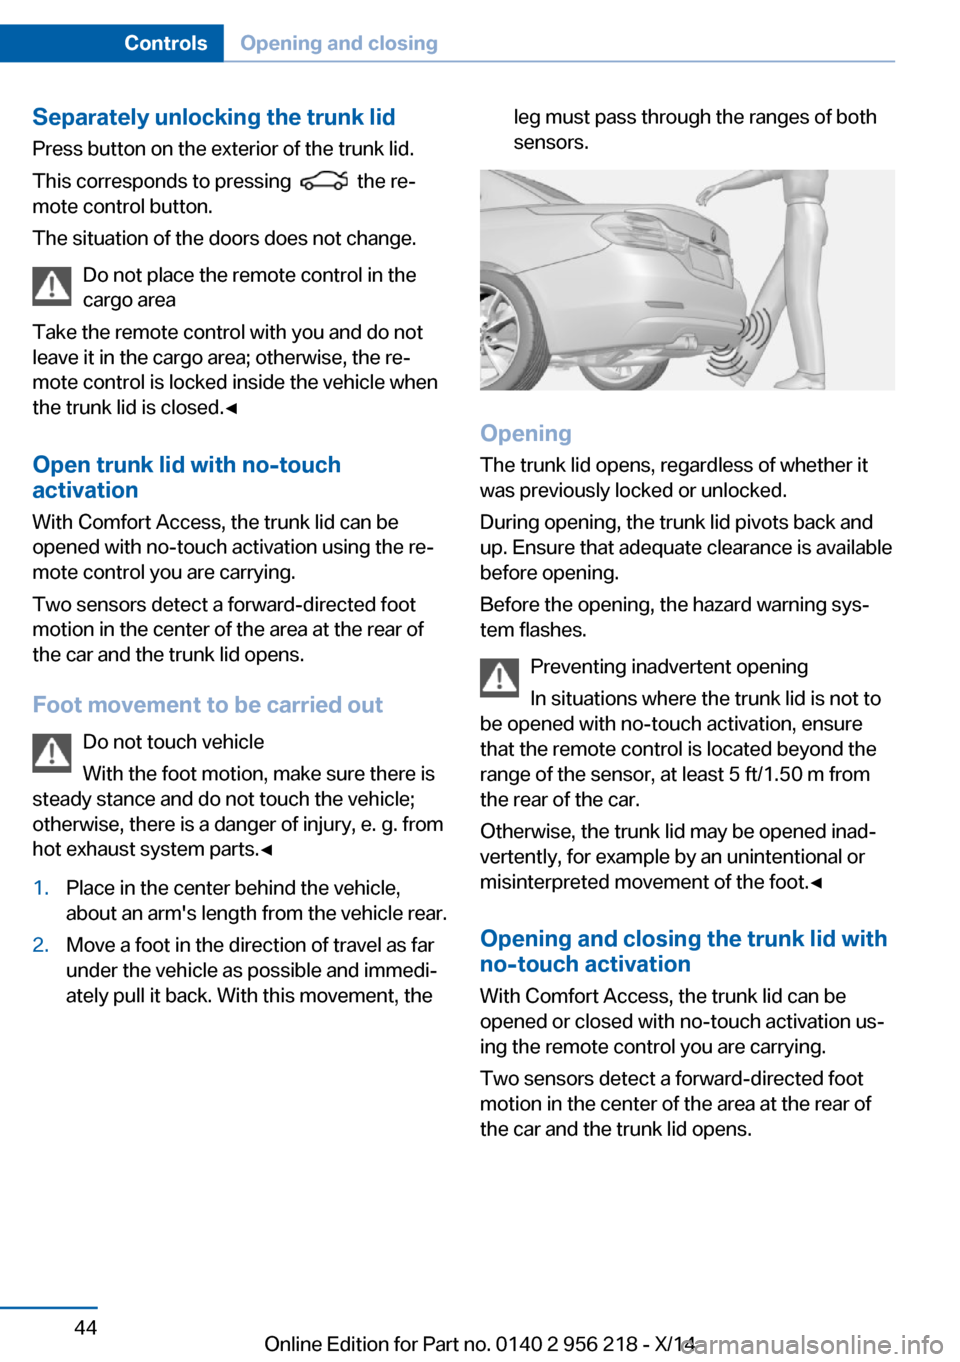
Two sensors detect a forward-directed foot
motion in the center of the area at the rear of
the car and the trunk lid opens.
Foot movement to be carried out Do not touch vehicle
With the foot motion, make sure there is
steady stance and do not touch the vehicle;
otherwise, there is a danger of injury, e. g. from
hot exhaust system parts.◀
1.Place in the center behind the vehicle,
about an arm's length from the vehicle rear.2.Move a foot in the direction of travel as far
under the vehicle as possible and immedi‐
ately pull it back. With this movement, theleg must pass through the ranges of both
sensors.
Opening
The trunk lid opens, regardless of whether it
was previously locked or unlocked.
During opening, the trunk lid pivots back and
up. Ensure that adequate clearance is available
before opening.
Before the opening, the hazard warning sys‐
tem flashes.
Preventing inadvertent opening
In situations where the trunk lid is not to
be opened with no-touch activation, ensure
that the remote control is located beyond the
range of the sensor, at least 5 ft/1.50 m from
the rear of the car.
Otherwise, the trunk lid may be opened inad‐
vertently, for example by an unintentional or
misinterpreted movement of the foot.◀
Opening and closing the trunk lid with
no-touch activation
With Comfort Access, the trunk lid can be
opened or closed with no-touch activation us‐
ing the remote control you are carrying.
Two sensors detect a forward-directed foot
motion in the center of the area at the rear of
the car and the trunk lid opens.
Seite 44ControlsOpening and closing44
Online Edition for Part no. 0140 2 956 218 - X/14
Page 49 of 273
Foot movement to be carried outDo not touch vehicle
With the foot motion, make sure there is
steady stance and do not touch the vehicle; otherwise, there is a danger of injury, e. g. from
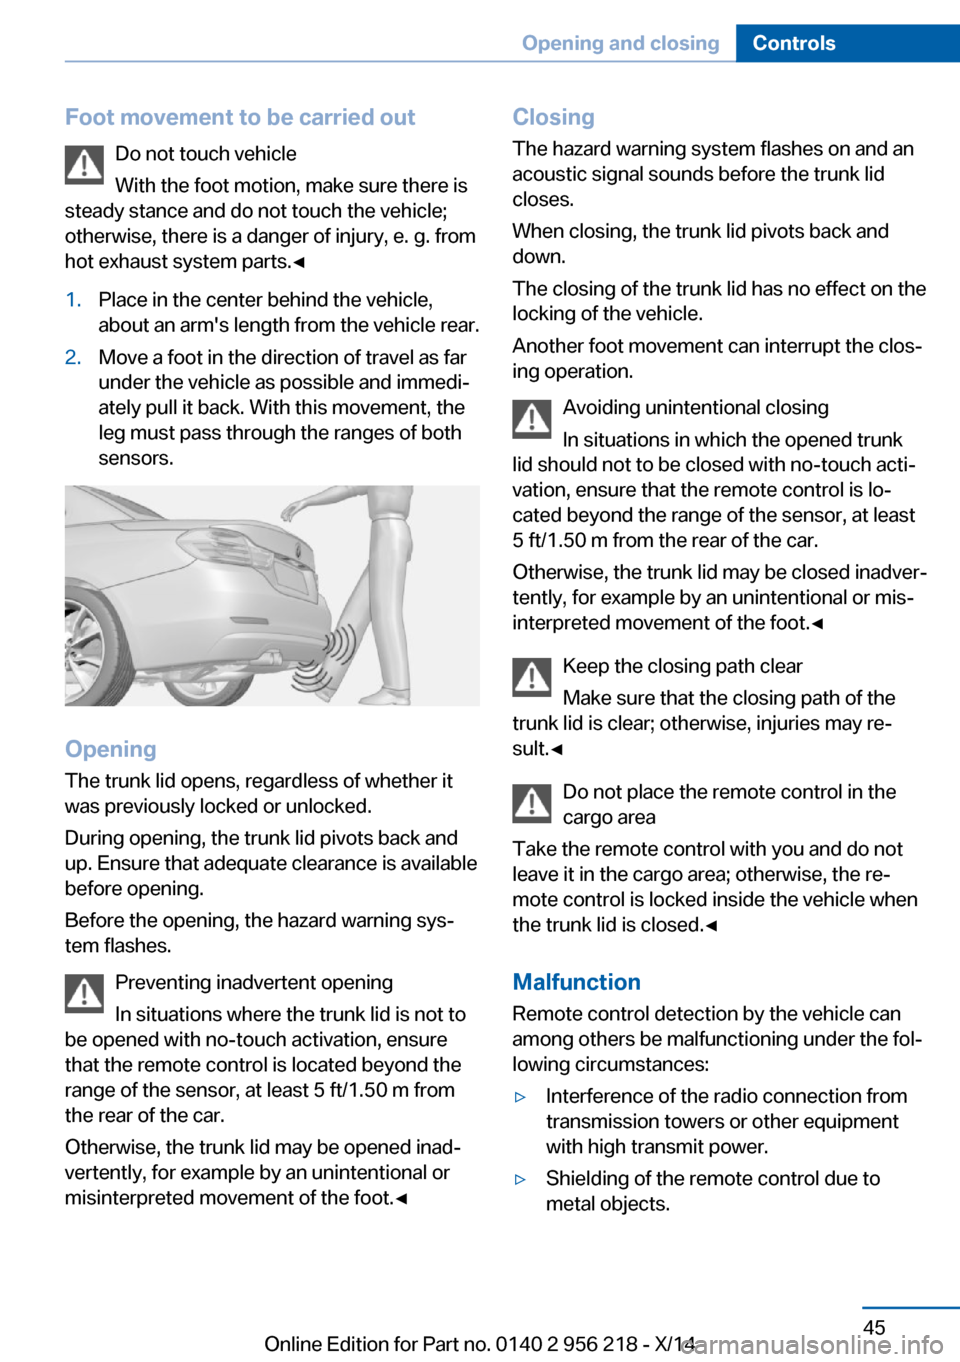
hot exhaust system parts.◀1.Place in the center behind the vehicle,
about an arm's length from the vehicle rear.2.Move a foot in the direction of travel as far
under the vehicle as possible and immedi‐
ately pull it back. With this movement, the
leg must pass through the ranges of both
sensors.
Opening
The trunk lid opens, regardless of whether it
was previously locked or unlocked.
During opening, the trunk lid pivots back and
up. Ensure that adequate clearance is available
before opening.
Before the opening, the hazard warning sys‐
tem flashes.
Preventing inadvertent opening
In situations where the trunk lid is not to
be opened with no-touch activation, ensure
that the remote control is located beyond the
range of the sensor, at least 5 ft/1.50 m from
the rear of the car.
Otherwise, the trunk lid may be opened inad‐
vertently, for example by an unintentional or
misinterpreted movement of the foot.◀
Closing
The hazard warning system flashes on and an
acoustic signal sounds before the trunk lid closes.
When closing, the trunk lid pivots back and
down.
The closing of the trunk lid has no effect on the
locking of the vehicle.
Another foot movement can interrupt the clos‐
ing operation.
Avoiding unintentional closing
In situations in which the opened trunk
lid should not to be closed with no-touch acti‐
vation, ensure that the remote control is lo‐
cated beyond the range of the sensor, at least
5 ft/1.50 m from the rear of the car.
Otherwise, the trunk lid may be closed inadver‐
tently, for example by an unintentional or mis‐
interpreted movement of the foot.◀
Keep the closing path clear
Make sure that the closing path of the
trunk lid is clear; otherwise, injuries may re‐
sult.◀
Do not place the remote control in the
cargo area
Take the remote control with you and do not
leave it in the cargo area; otherwise, the re‐
mote control is locked inside the vehicle when
the trunk lid is closed.◀
Malfunction
Remote control detection by the vehicle can
among others be malfunctioning under the fol‐
lowing circumstances:▷Interference of the radio connection from
transmission towers or other equipment
with high transmit power.▷Shielding of the remote control due to
metal objects.Seite 45Opening and closingControls45
Online Edition for Part no. 0140 2 956 218 - X/14
Page 50 of 273
▷Interference of the radio connection from
mobile phones or other electronic devices
in direct proximity.
Do not transport the remote control together
with metal objects or electronic devices.
In the case of a malfunction, unlock and lock
the vehicle using the buttons of the remote
control or using the integrated key, refer to
page 39.
Adjusting
Unlocking The settings are saved in the active profile, re‐
fer to page 35.
Doors
1."Settings"2."Doors/key"3. Select the symbol.4.Select the desired function:▷"Driver's door only"
Only the driver's door and the fuel filler
flap are unlocked. Pressing again un‐
locks the entire vehicle.▷"All doors"
The entire vehicle is unlocked.
Trunk lid
Depending on optional features and country
version, this setting is not offered in some
cases.
1."Settings"2."Doors/key"3. Select the symbol.4.Select the desired function:▷"Tailgate"
The trunk lid is opened.▷"Tailgate + door(s)"The trunk lid is opened and the doors
are unlocked.
Confirmation signals from the vehicle
The settings are saved in the active profile, re‐
fer to page 35.
1."Settings"2."Doors/key"3.Deactivate or activate the desired confir‐
mation signals.▷"Acoustic sig. lock/unlock"▷"Flash when lock/unlock"
Automatic locking
The settings are saved in the active profile, re‐fer to page 35.
1."Settings"2."Doors/key"3.Select the desired function:▷"Lock if no door is opened"
The vehicle locks automatically after a
short period of time if no door is
opened.▷"Lock after start driving"
The vehicle locks automatically after
you drive off.
Retrieving the seat, mirror, and
steering wheel settings
The driver's seat, exterior mirror, and steering
wheel position adjusted last will be stored for
the active profile.
When the vehicle is unlocked, these positions
are automatically retrieved if this function was
activated.
Pinch hazard when moving back the seat
If this function is used, first make sure
that the footwell behind the driver's seat is
empty. Otherwise, people might get injured or
Seite 46ControlsOpening and closing46
Online Edition for Part no. 0140 2 956 218 - X/14
Page 51 of 273
objects damaged when the seat is moved
back.◀
The adjustment procedure is interrupted:▷When a seat position reel is pressed.▷When a button of the seat, mirror, and
steering wheel memory is pressed briefly.
Activating the setting
1."Settings"2."Doors/key"3."Last seat position autom."
Alarm system
The conceptWhen the vehicle is locked, the vehicle alarm
system responds to:
▷Opening a door, the hood or the trunk lid.▷Movements in the interior.▷Changes in the vehicle tilt, e. g., during at‐
tempts at stealing a wheel or when towing
the car.▷Disconnected battery voltage.
The alarm system briefly signals tampering:
▷By sounding an acoustic alarm.▷By switching on the hazard warning sys‐
tem.▷By flashing the daytime running lights.
Arming and disarming the alarm
system
When you unlock or lock the vehicle, either
with the remote control, Comfort Access or at
the door lock the alarm system is disarmed or
armed at the same time.
Door lock and armed alarm systemUnlocking via the door lock will trigger the
alarm on some country-specific versions.
Trunk lid and armed alarm system
The trunk lid can be opened even when the
alarm system is armed.
After the trunk lid is closed, it is locked and
monitored again when the doors are locked.
The hazard warning system flashes once.
Panic mode
You can trigger the alarm system if you find
yourself in a dangerous situation.
Press button on the remote control for
at least 3 seconds.
To reel off the alarm: press any button.
Indicator lamp on the interior rearview
mirror▷The indicator lamp flashes briefly every
2 seconds:
The system is armed.▷The indicator lamp flashes after locking:
The doors, hood or trunk lid is not closed
properly, but the rest of the vehicle is se‐
cured.
After 10 seconds, the indicator lamp
flashes continuously. Interior motion sen‐
sor and tilt alarm sensor are not active.
When the still open access is closed, inte‐
rior motion sensor and tilt alarm sensor will
be switched on.▷The indicator lamp goes out after unlock‐
ing:
The vehicle has not been tampered with.Seite 47Opening and closingControls47
Online Edition for Part no. 0140 2 956 218 - X/14
Page 52 of 273
▷The indicator lamp flashes after unlocking
until the engine ignition is switched on, but
no longer than approx. 5 minutes:
An alarm has been triggered.
Tilt alarm sensor The tilt of the vehicle is monitored.
The alarm system responds in situations such
as attempts to steal a wheel or when the car is
towed.
Interior motion sensor The windows and glass sunroof must be
closed for the system to function properly.
Avoiding unintentional alarms The tilt alarm sensor and interior motion sen‐
sor can be switched off together, such as in
the following situations:
▷In automatic car washes.▷In duplex garages.▷During transport on trains carrying vehi‐
cles, at sea or on a trailer.▷With animals in the vehicle.
Switching off the tilt alarm sensor and
interior motion sensor
Press the remote control button again
within 10 seconds as soon as the vehicle
is locked.
The indicator lamp lights up for approx. 2 sec‐
onds and then continues to flash.
The tilt alarm sensor and interior motion sen‐
sor are turned off, until the vehicle is locked again.
Switching off the alarm
▷Unlock vehicle with the remote control or
reel on the ignition, if needed through
emergency detection of remote control, re‐
fer to page 35.▷With Comfort Access: If you are carrying
the remote control on your person, grasp
the driver side or front passenger side door
handle completely.
Power windows
General information Take the remote control with you
Take the remote control with you when
leaving the vehicle so that children, e.g., can‐
not operate the power windows and injure
themselves.◀
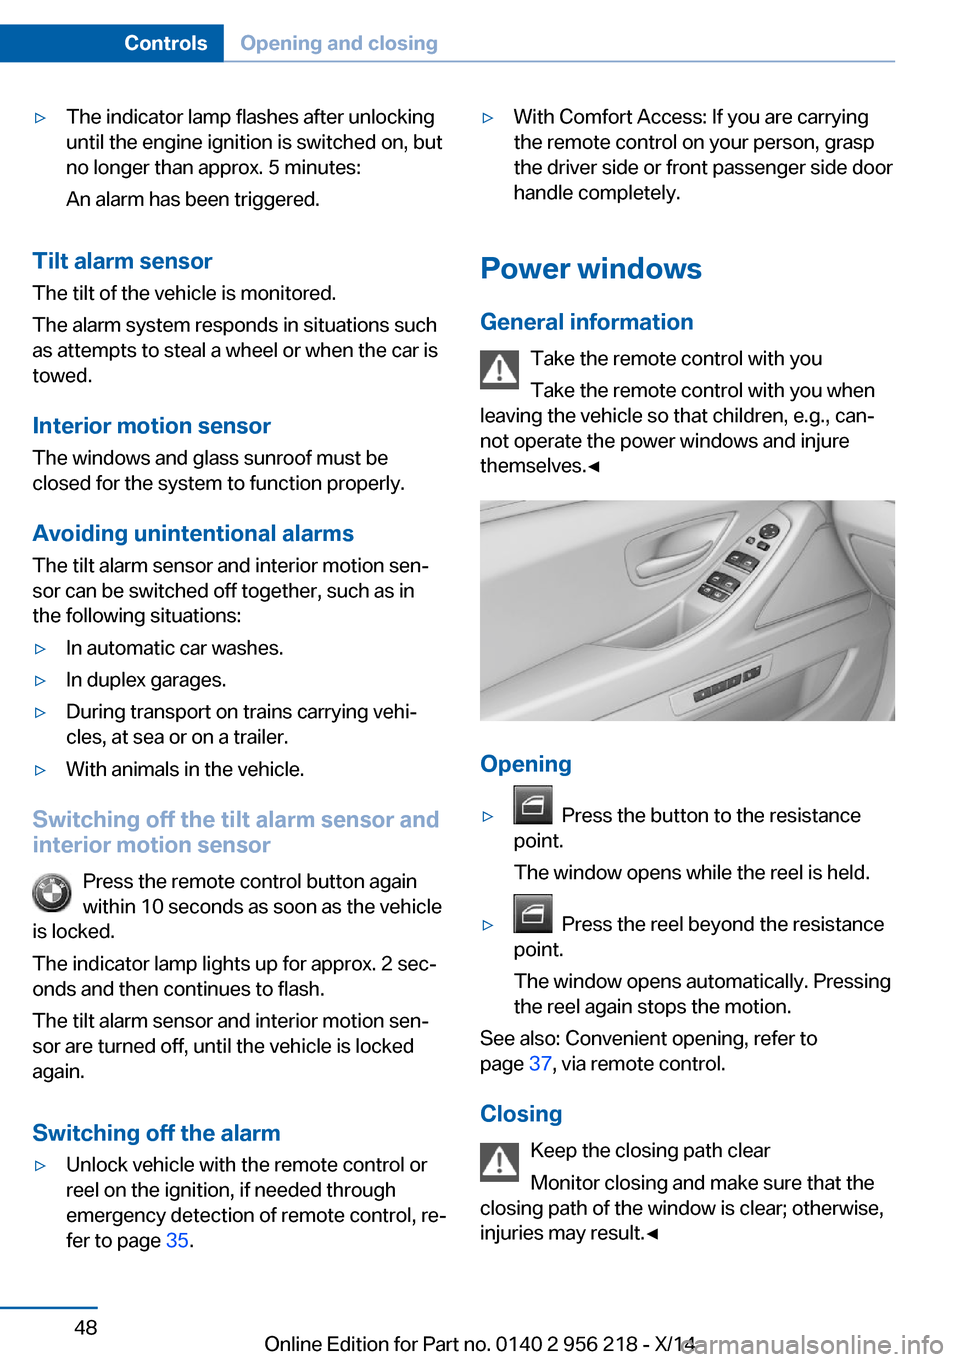
Opening
▷ Press the button to the resistance
point.
The window opens while the reel is held.▷ Press the reel beyond the resistance
point.
The window opens automatically. Pressing
the reel again stops the motion.
See also: Convenient opening, refer to
page 37, via remote control.
Closing Keep the closing path clear
Monitor closing and make sure that the
closing path of the window is clear; otherwise,
injuries may result.◀
Seite 48ControlsOpening and closing48
Online Edition for Part no. 0140 2 956 218 - X/14
Page 80 of 273
After a power failure
Putting the parking brake into
operation1.Switch on the ignition.2. Press the reel while stepping on the
brake pedal or selector lever position P is
set.
It may take several seconds for the brake to be
put into operation. Any sounds associated with
this are normal.
The indicator lamp in the instrument
cluster goes out as soon as the parking
brake is ready for operation.
Turn signal, high beams,
headlight flasher
Turn signal
Hints Do not adjust the exterior mirrors
Do not adjust the exterior mirror while
driving and when blinker/hazards are on, or
else the additional blinker lights in the exterior
mirror are out of position and can't be seen.◀
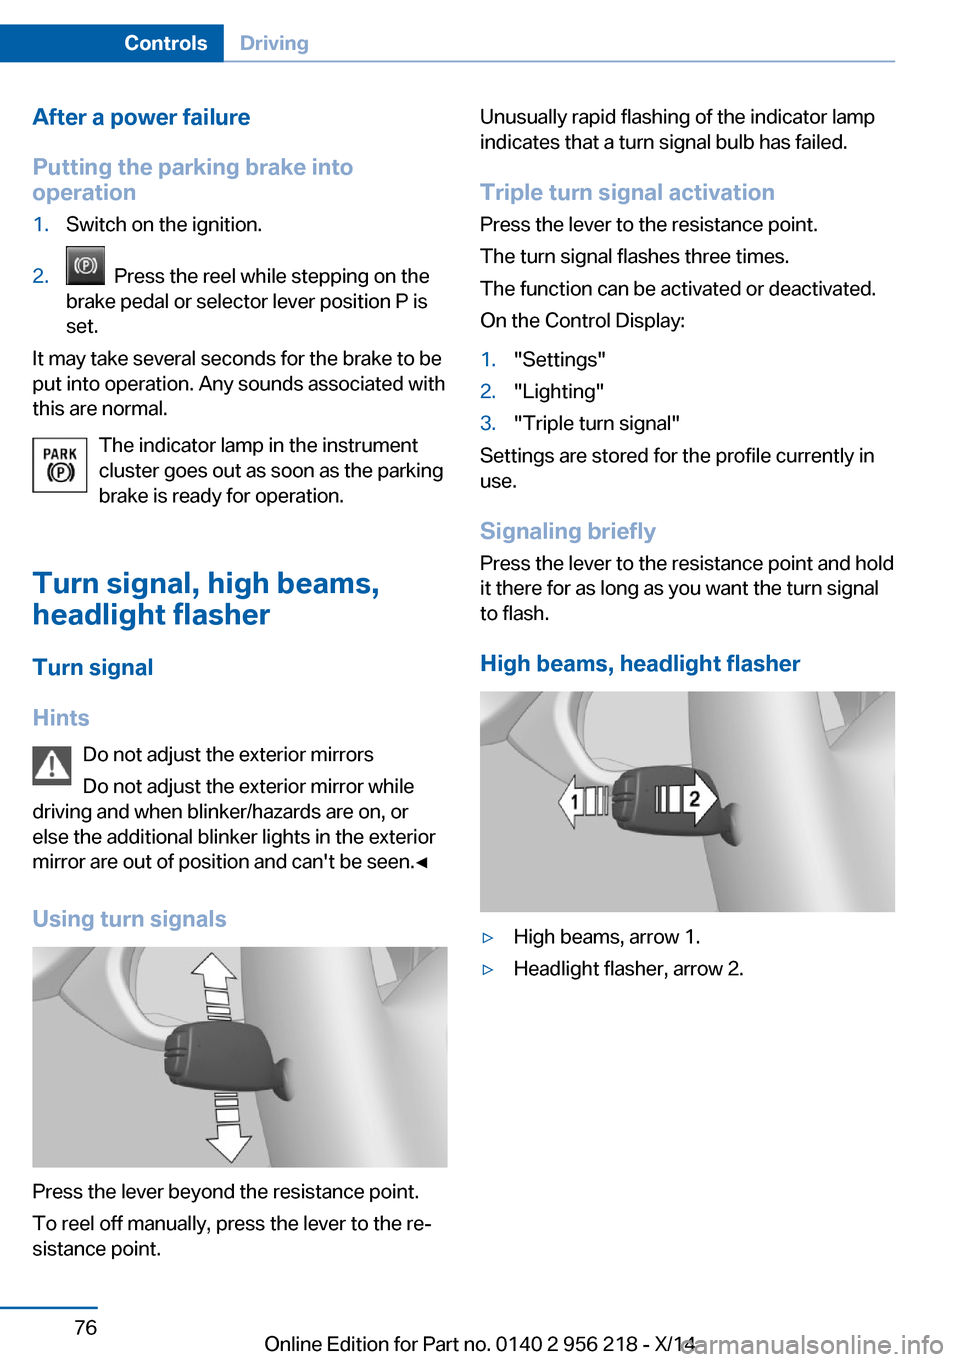
Using turn signals
Press the lever beyond the resistance point.
To reel off manually, press the lever to the re‐
sistance point.
Unusually rapid flashing of the indicator lamp
indicates that a turn signal bulb has failed.
Triple turn signal activation Press the lever to the resistance point.
The turn signal flashes three times.
The function can be activated or deactivated.
On the Control Display:1."Settings"2."Lighting"3."Triple turn signal"
Settings are stored for the profile currently in
use.
Signaling briefly
Press the lever to the resistance point and hold
it there for as long as you want the turn signal
to flash.
High beams, headlight flasher
▷High beams, arrow 1.▷Headlight flasher, arrow 2.Seite 76ControlsDriving76
Online Edition for Part no. 0140 2 956 218 - X/14
Page 92 of 273
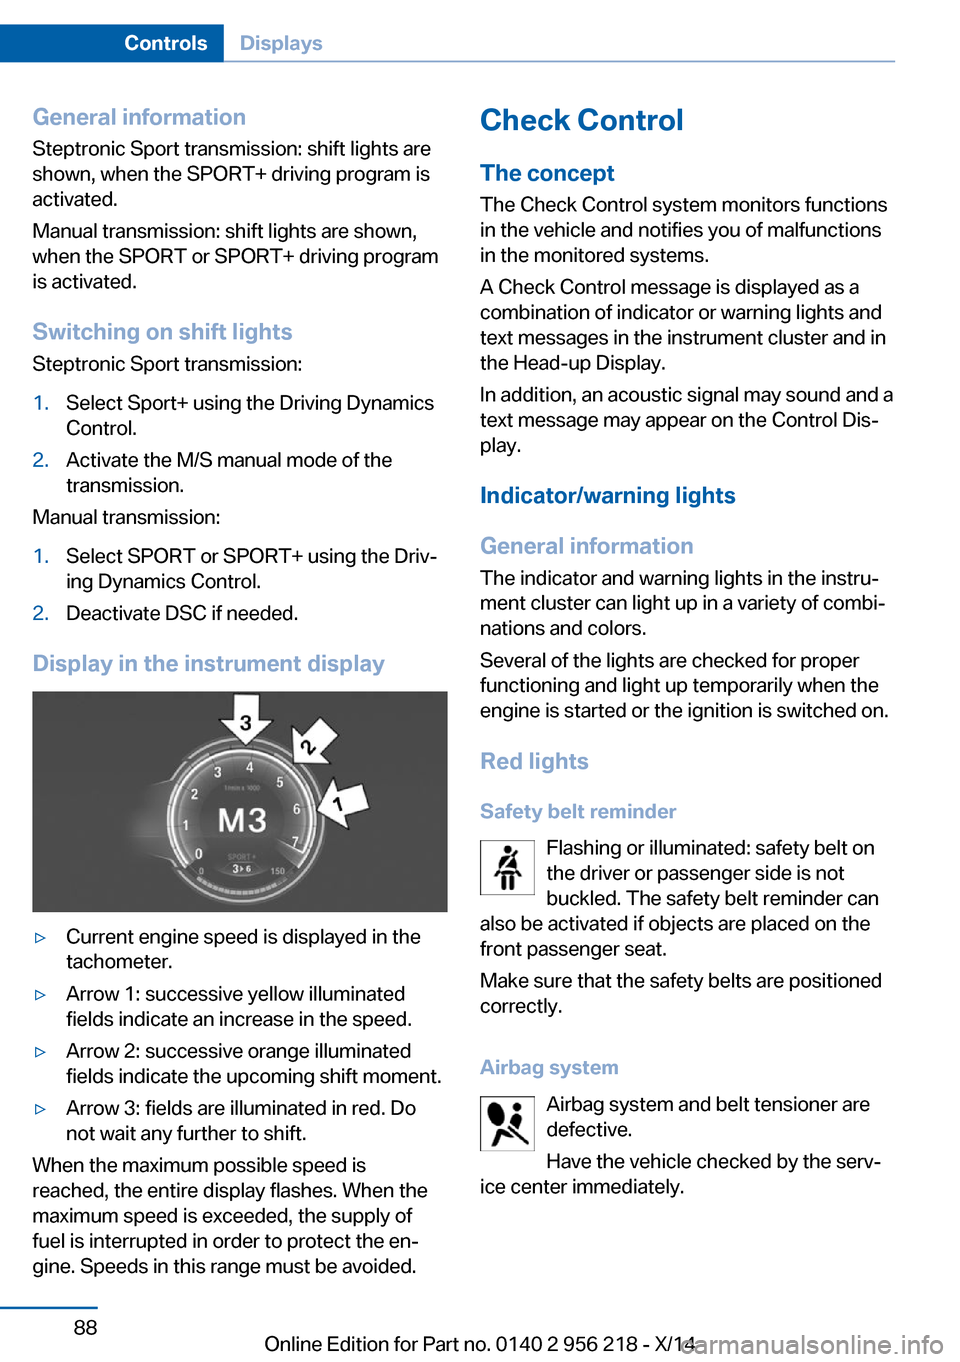
General information
Steptronic Sport transmission: shift lights are
shown, when the SPORT+ driving program is
activated.
Manual transmission: shift lights are shown,
when the SPORT or SPORT+ driving program
is activated.
Switching on shift lightsSteptronic Sport transmission:1.Select Sport+ using the Driving Dynamics
Control.2.Activate the M/S manual mode of the
transmission.
Manual transmission:
1.Select SPORT or SPORT+ using the Driv‐
ing Dynamics Control.2.Deactivate DSC if needed.
Display in the instrument display
▷Current engine speed is displayed in the
tachometer.▷Arrow 1: successive yellow illuminated
fields indicate an increase in the speed.▷Arrow 2: successive orange illuminated
fields indicate the upcoming shift moment.▷Arrow 3: fields are illuminated in red. Do
not wait any further to shift.
When the maximum possible speed is
reached, the entire display flashes. When the
maximum speed is exceeded, the supply of
fuel is interrupted in order to protect the en‐
gine. Speeds in this range must be avoided.
Check Control
The concept The Check Control system monitors functions
in the vehicle and notifies you of malfunctions
in the monitored systems.
A Check Control message is displayed as a
combination of indicator or warning lights and
text messages in the instrument cluster and in
the Head-up Display.
In addition, an acoustic signal may sound and a text message may appear on the Control Dis‐
play.
Indicator/warning lights
General information
The indicator and warning lights in the instru‐
ment cluster can light up in a variety of combi‐
nations and colors.
Several of the lights are checked for proper
functioning and light up temporarily when the
engine is started or the ignition is switched on.
Red lights Safety belt reminder Flashing or illuminated: safety belt onthe driver or passenger side is not
buckled. The safety belt reminder can
also be activated if objects are placed on the
front passenger seat.
Make sure that the safety belts are positioned
correctly.
Airbag system Airbag system and belt tensioner aredefective.
Have the vehicle checked by the serv‐
ice center immediately.Seite 88ControlsDisplays88
Online Edition for Part no. 0140 2 956 218 - X/14
Page 93 of 273
Parking brakeThe parking brake is set.
For additional information, refer to Release
parking brake, refer to page 74.
Brake system Continue to drive moderately.
Have the vehicle checked by the serv‐
ice center immediately.
Front-end collision warning Illuminated: advance warning is issued,
e.g., when there is the impending dan‐
ger of a collision or the distance to the
vehicle ahead is too small.
Increase distance.
Flashing: acute warning of the imminent dan‐
ger of a collision when the vehicle approaches
another vehicle at a relatively high differential
speed.
Intervention by braking or make an evasive ma‐
neuver.
Pedestrian warning Symbol in the instrument cluster.
Symbol in the instrument display.
If a collision with a person detected in this way
is imminent, the symbol lights up and a signal sounds.Orange lights
Active Cruise Control The number bars shows the selected
distance from the vehicle driving
ahead.
For additional information, refer to Active
Cruise Control with Stop & Go function, ACC,
refer to page 143.
Vehicle detection, Active Cruise Control Illuminated: vehicle driving ahead de‐
tected.
Flashing: the conditions are not ade‐
quate for operating the system.
The system was deactivated but applies the
brakes until you actively resume control by
pressing on the brake pedal or accelerator
pedal.
Yellow lights
Antilock Brake System ABS It reduces the braking distance to a
minimum during emergency stops.
Illuminated: avoid abrupt braking if pos‐
sible. Braking force boost in some
cases defective. Stop carefully. Take
into account longer brake travel. Have this
checked by the service center immediately.
DSC Dynamic Stability Control Flashing: DSC controls the drive and
braking forces. The vehicle is stabi‐
lized. Reduce speed and adapt driving
profile to the driving circumstances.
Illuminated: DSC failed. Have the system
checked by the service center.
For additional information, refer to Dynamic
Stability Control DSC, refer to page 135.Seite 89DisplaysControls89
Online Edition for Part no. 0140 2 956 218 - X/14