torque BMW 525i 1998 E39 Workshop Manual
[x] Cancel search | Manufacturer: BMW, Model Year: 1998, Model line: 525i, Model: BMW 525i 1998 E39Pages: 1002
Page 934 of 1002
Downloaded from www.Manualslib.com manuals search engine
l Sunroof
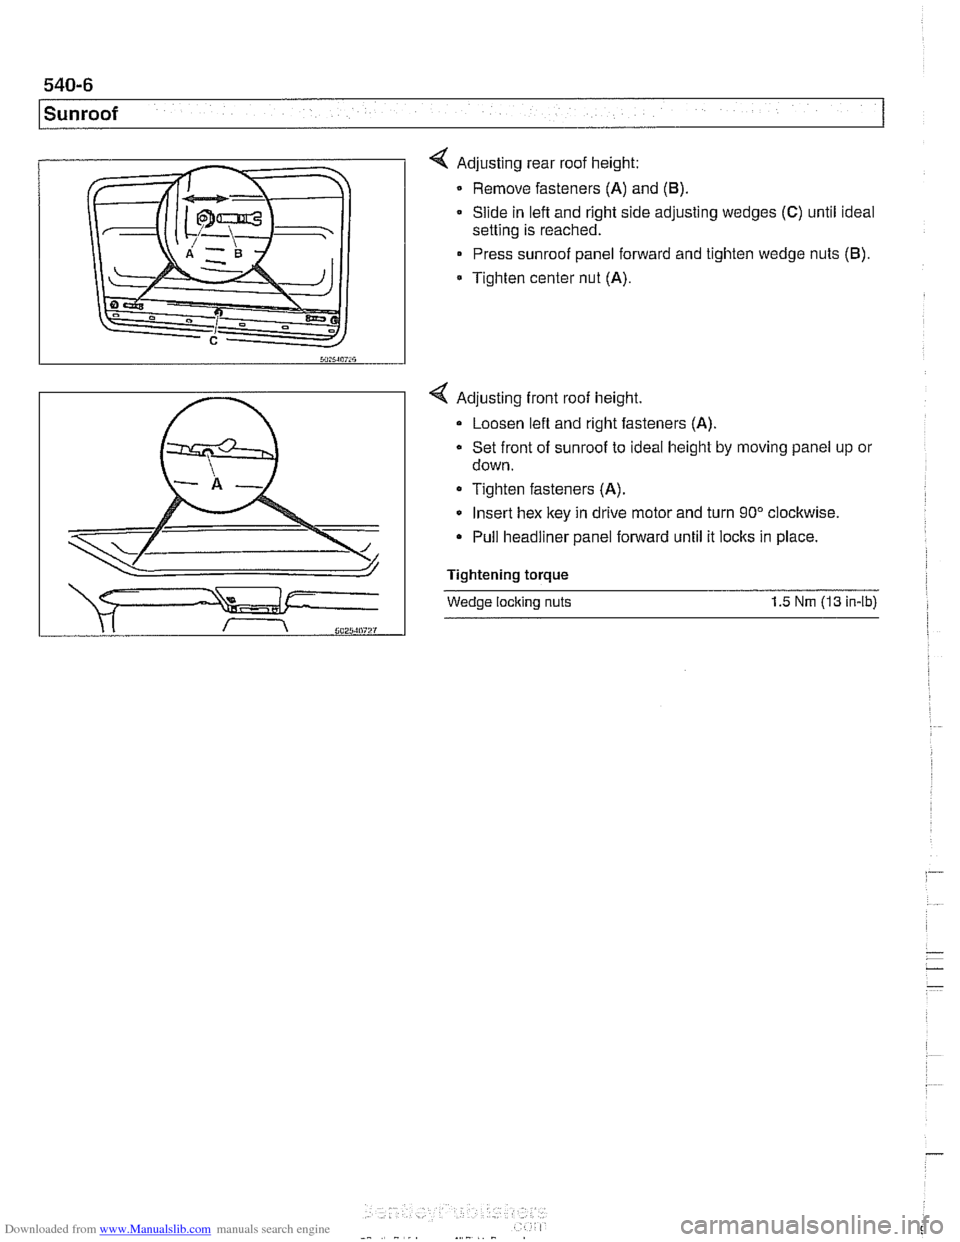
4 Adjusting rear roof height:
Remove fasteners
(A) and (6)
Slide in left and right side adjusting wedges (C) until ideal
setting is reached.
Press sunroof panel forward and tighten wedge nuts
(6).
* Tighten center nut (A).
4 Adjusting front roof height.
Loosen lefl and right fasteners
(A)
Set front of sunroof to ideal height by moving panel up or
down.
Tighten fasteners
(A).
Insert hex key in drive motor and turn 90" clockwise.
Pull headliner panel forward until it locks in place.
Tightening torque
Wedge locking nuts 1.5 Nm (1 3 in-lb)
Page 935 of 1002
Downloaded from www.Manualslib.com manuals search engine
Sunroof
Sunroof with glass roof panel, adjusting - -
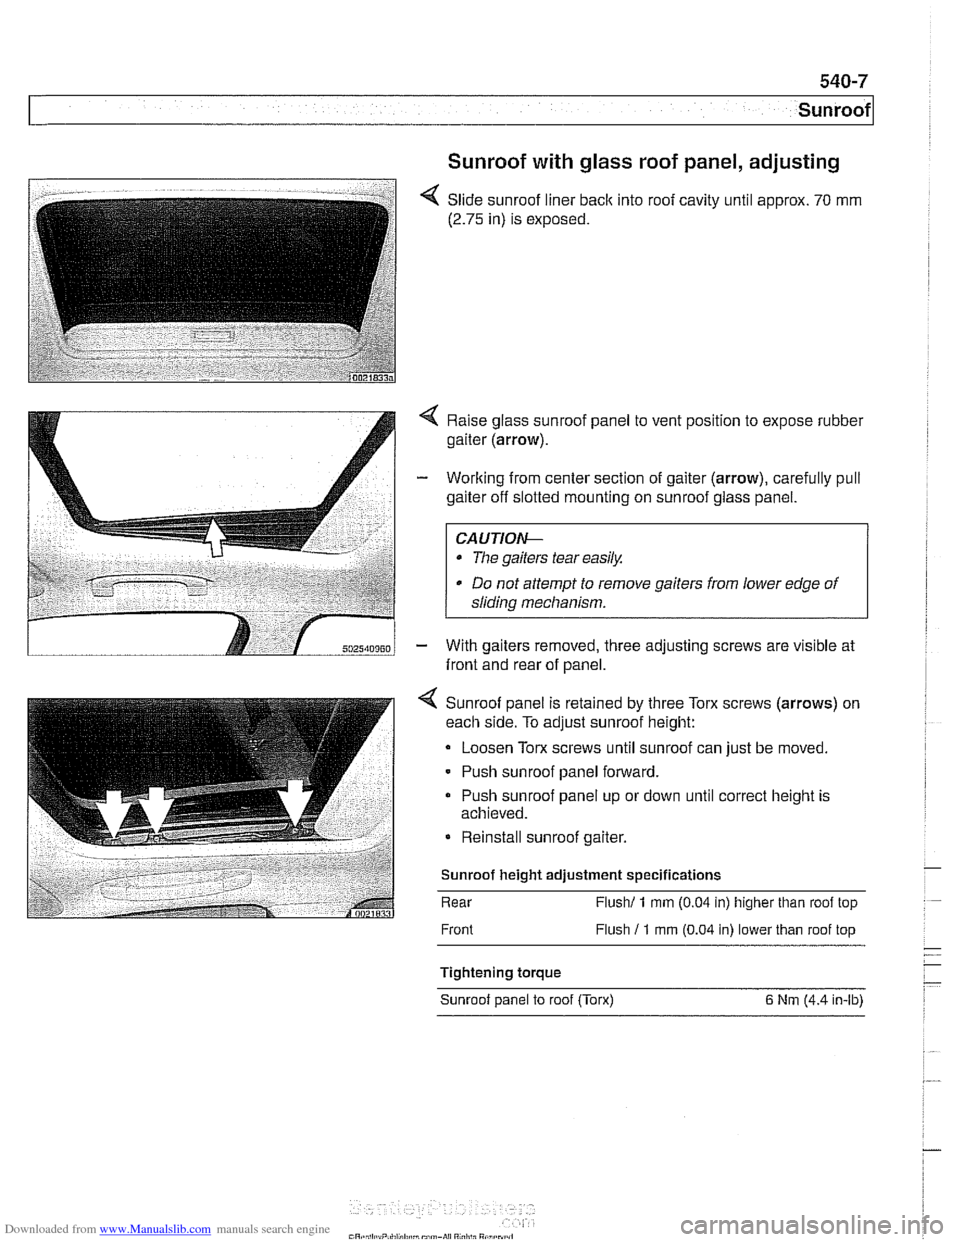
< Slide sunroof liner back into roof cavity until approx. 70 mm
(2.75 in) is exposed.
Raise glass sunroof panel to vent position to expose rubber
gaiter (arrow).
- Working from center section of gaiter (arrow), carefully pull
gaiter off slotted mounting on sunroof glass panel.
CA UTIOW-
The gaiters tear easik
* Do not attempt to remove gaiters from lower edge of
sliding mechanism.
- With gaiters removed, three adjusting screws are visible at
front and rear of panel.
4 Sunroof panel is retained by three Torx screws (arrows) on
each side. To adjust sunroof height:
Loosen Torx screws until sunroof can just be moved.
- Push sunroof panel forward.
Push sunroof panel up or down until correct height is
achieved.
Reinstall sunroof gaiter.
Sunroof height adjustment specifications
Rear
Flush1 1 rnrn (0.04 in) higher than roof top
Front Flush
11 rnrn (0.04 in) lower than roof top
Tightening torque Sunroof panel to roof (Torx)
6 Nrn (4.4 in-lb)
Page 937 of 1002
Downloaded from www.Manualslib.com manuals search engine
Sunroof
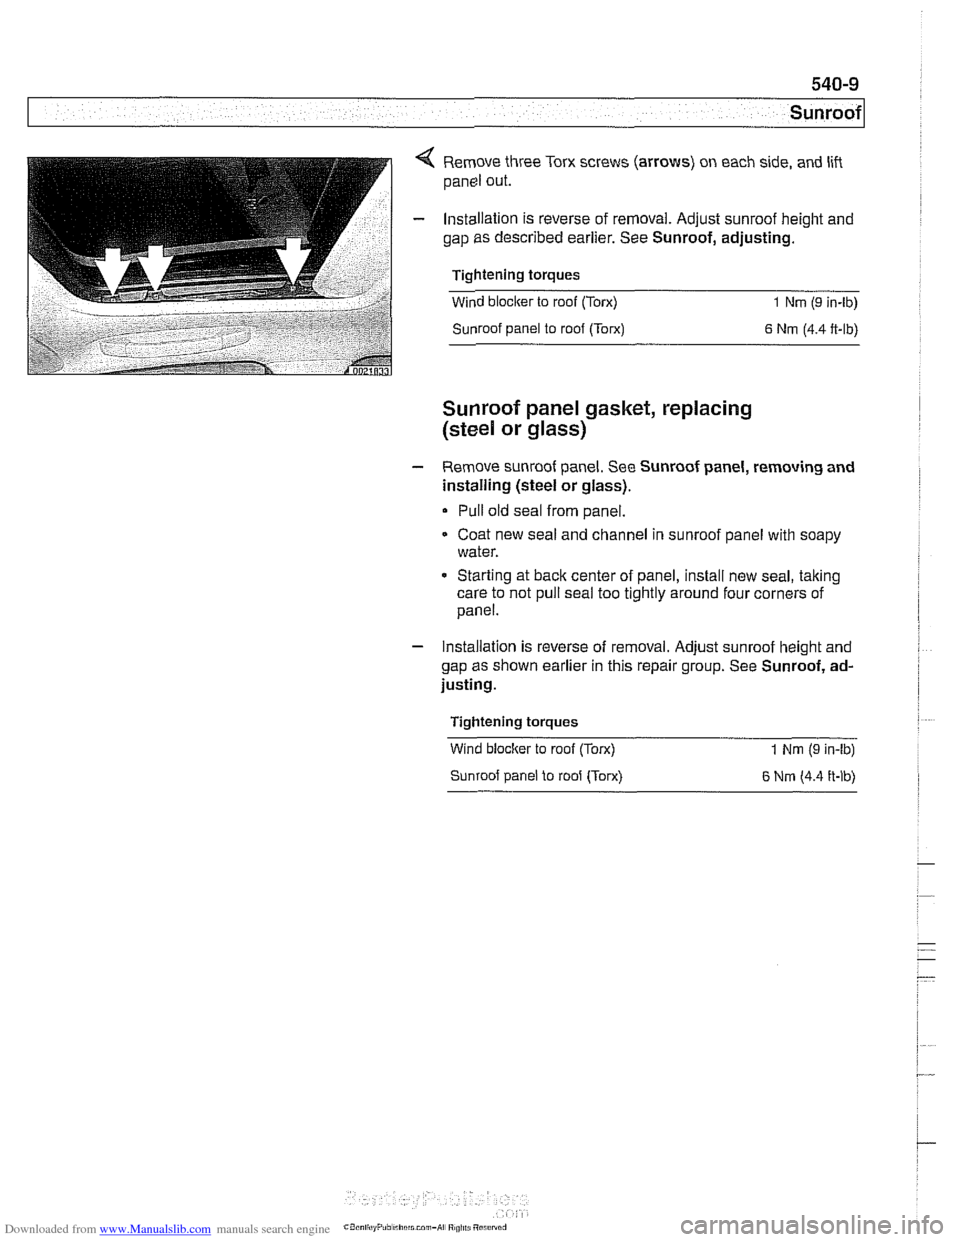
4 Remove three Torx screws (arrows) on each side, and lift
panel out.
- Installation is reverse of removal. Adjust sunroof height and
gap as described earlier. See Sunroof, adjusting.
Tightening torques
Wind blocker to roof (Torx)
1 Nm (9 in-lb)
Sunroof panel to roof (Torx)
6 Nm (4.4 ft-lb)
Sunroof panel gasket, replacing
(steel
or glass)
- Remove sunroof panei. See Sunroof panei, removing and
installing (steel or glass).
Pull old seal from panel.
Coat new seal and channel in sunroof panel with soapy
water.
* Starting at back center of panel, install new seal, taking
care to not pull seal too tightly around four corners of
panel.
- Installation is reverse of removal. Adjust sunroof height and
gap as shown earlier in this repair group. See Sunroof, ad-
justing.
Tightening torques
Wind
bloclter to roof (Torx)
Sunroof panel to roof (Torx) 1 Nm (9 in-lb)
6 Nrn (4.4 ft-lb)
Page 938 of 1002
Downloaded from www.Manualslib.com manuals search engine
.-
Sunroof
Sunroof motor, replacing
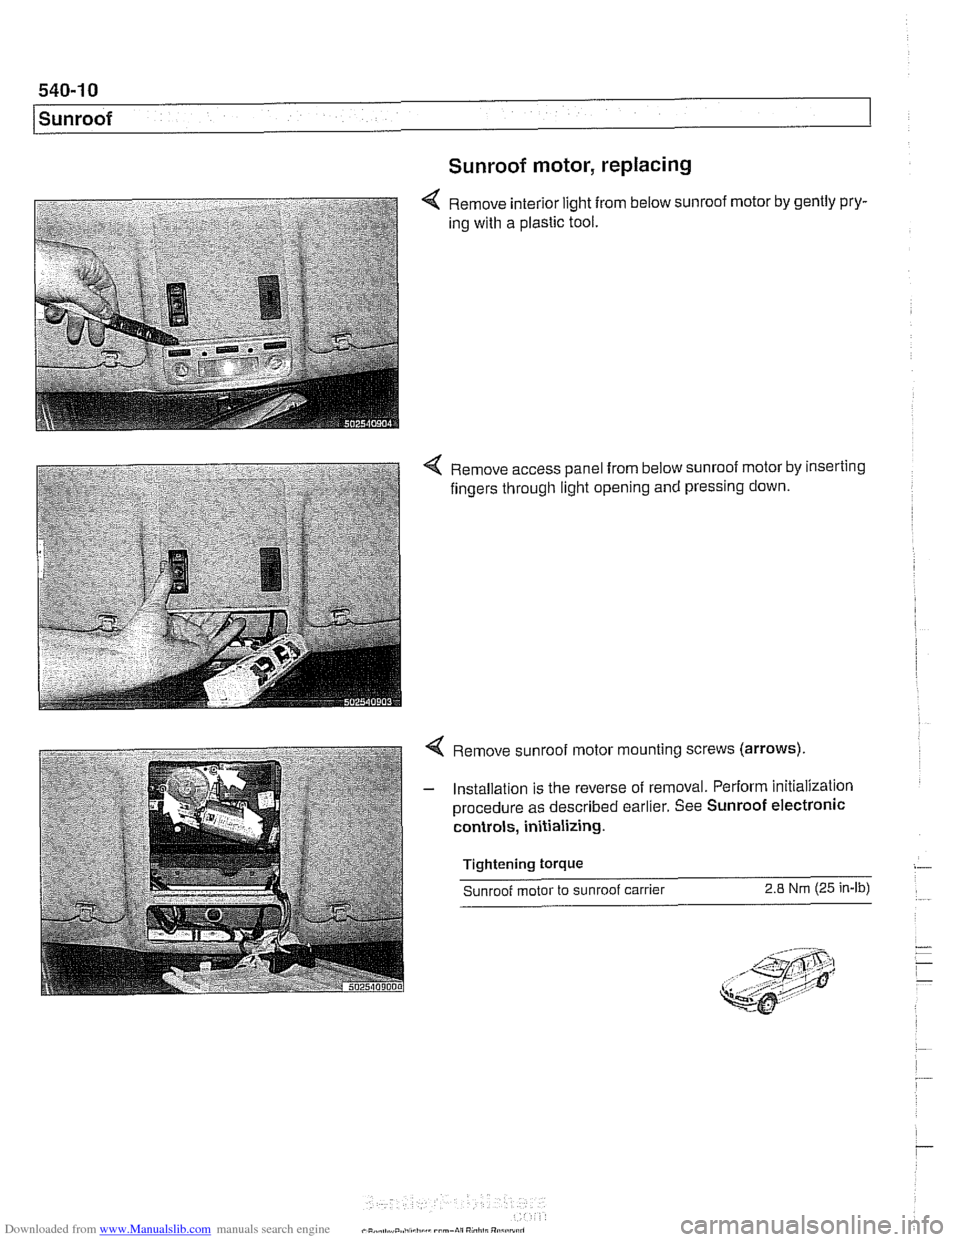
Remove interior light from below sunroof motor by gently pry-
ing with a plastic tool.
4 Remove access panel from below sunroof motor by inserting
fingers through light opening and pressing down.
4 Remove sunroof motor mounting screws (arrows).
- Installation is the reverse of removal. Perform initialization
procedure as described earlier. See Sunroof electronic
controls, initializing.
Tightening
torque
Sunroof motor to sunroof carrier 2.8 Nm (25 in-lb)
Page 943 of 1002
Downloaded from www.Manualslib.com manuals search engine
Seat ~eltsl
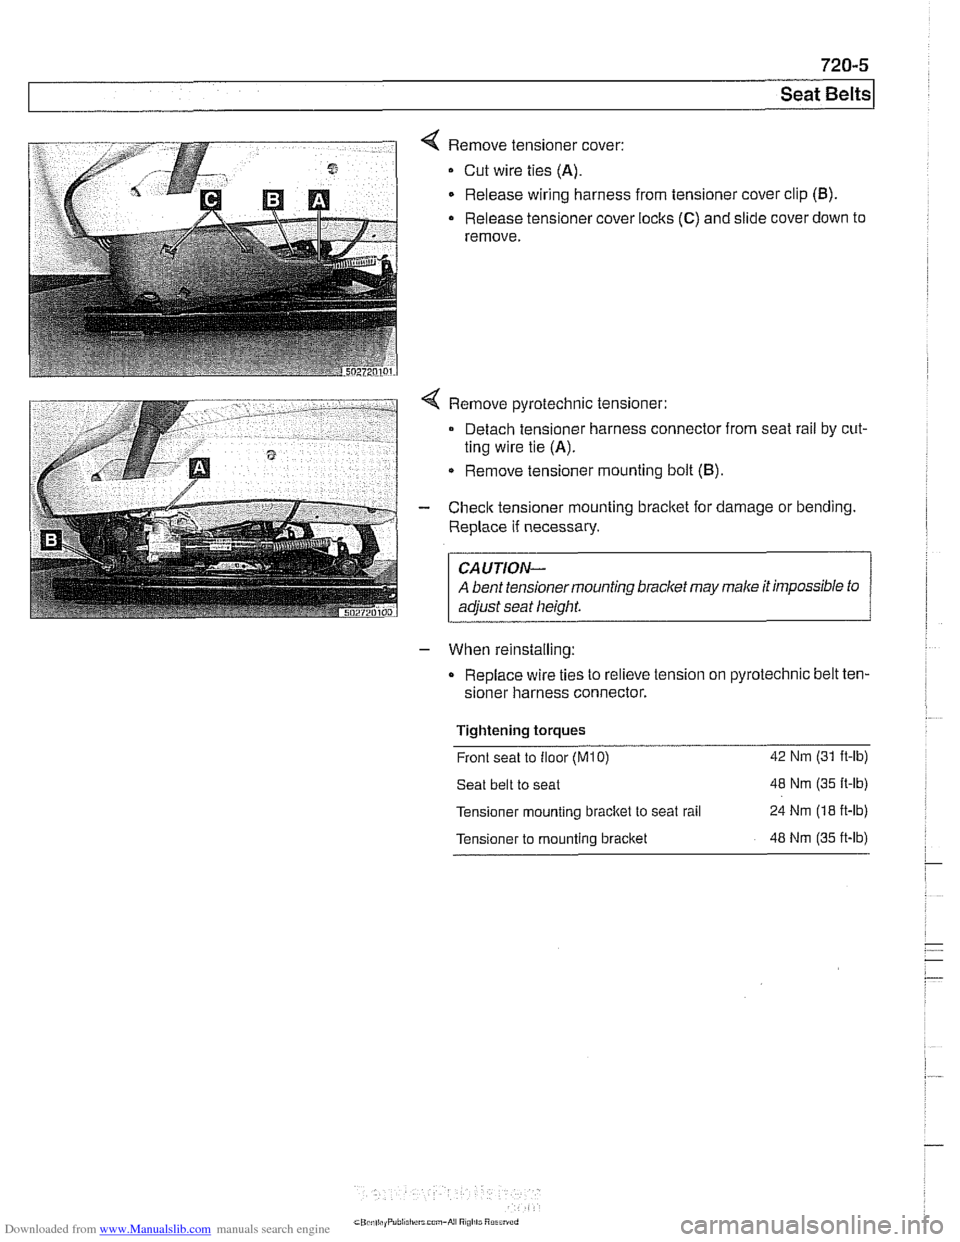
< Remove tensioner cover:
Cut wire ties (A).
Release wiring harness from tensioner cover clip (B).
- Release tensioner cover locks (C) and slide cover down to
remove.
- When reinstalling:
Replace wire ties to relieve tension on pyrotechnic belt
ten-
sioner harness connector.
Tightening torques . -
Front seat to floor (M10) 42 Nm (31 it-lb)
Seat belt to seat 48 Nm (35 It-lb)
Tensioner mounting bracitet
to seat rail 24 Nm (18 it-lb)
Tensioner to mounting bracket 48 Nm (35 it-lb)
Page 946 of 1002
Downloaded from www.Manualslib.com manuals search engine
720-8
I Seat Belts
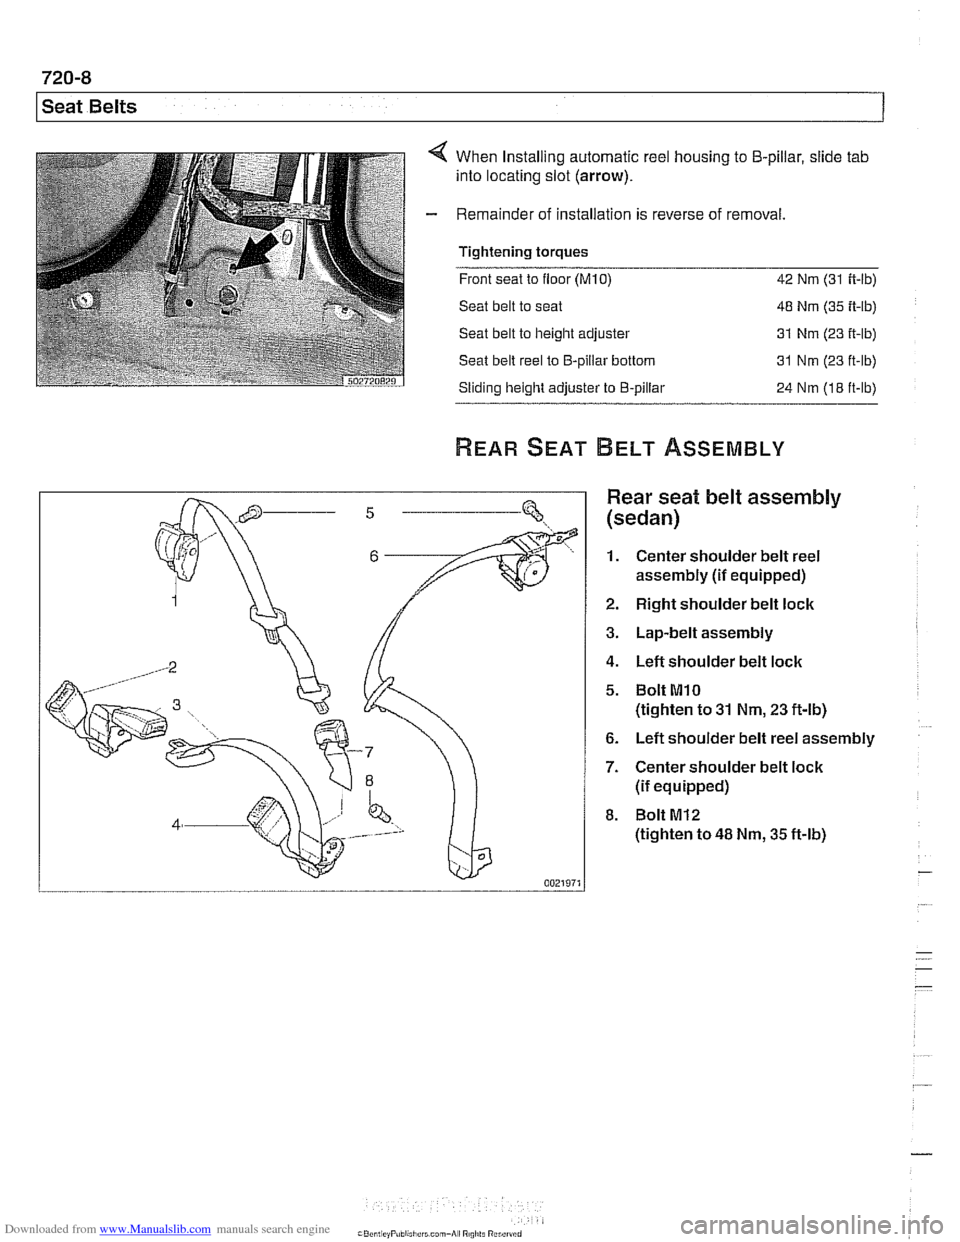
When Installing automatic reel housing to 5-pillar, slide tab
into locating slot (arrow).
Remainder of installation is reverse of removal
Tightening torques
- -.
Front seat to floor (M10) 42 Nm (31 ft-lb)
Seat belt to seat 48 Nm (35 ft-lb)
Seat belt to height adjuster 31 Nm
(23 it-lb)
Seat belt reel to €3-pillar bottom 31 Nm (23 ft-lb)
Sliding height adjuster to €3-pillar
24 Nm (18 ft-lb)
Rear seat belt assembly
(sedan)
1. Center shoulder belt reel
assembly
(if equipped)
2. Right shoulder belt lock
3. Lap-belt assembly
4. Left shoulder belt lock
5. Bolt MlO
(tighten to 31 Nm, 23 ft-lb)
6. Left shoulder belt reel assembly
7. Center shoulder belt lock
(if equipped)
8. Bolt M12
(tighten to 48 Nm, 35 ft-lb)
Page 957 of 1002
Downloaded from www.Manualslib.com manuals search engine
721 -9
Airbaq System ~SRS)~
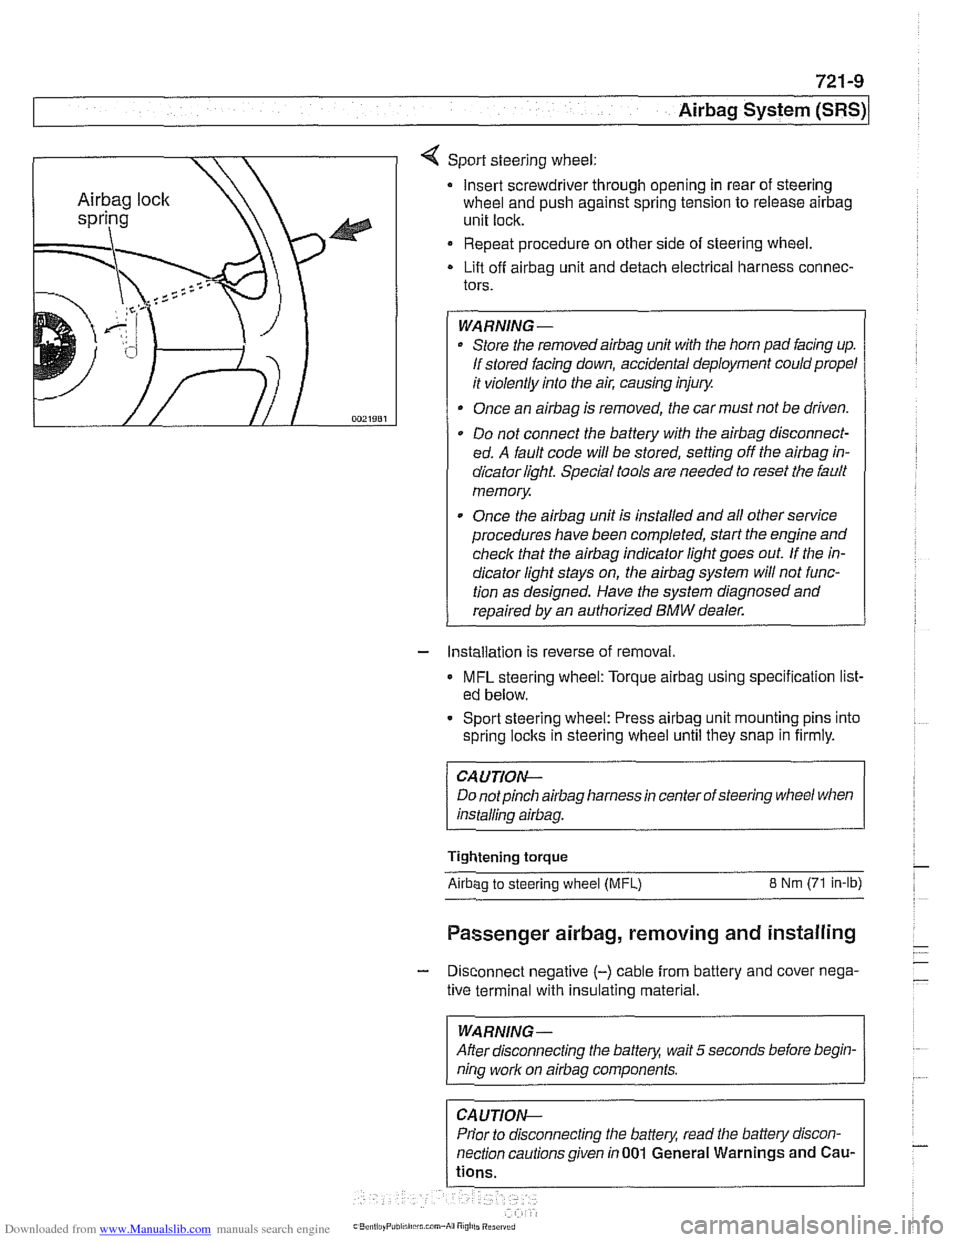
4 Sport steering wheel:
Insert screwdriver through opening in rear of steering
wheel and push against spring tension to release
airbag
unit lock.
Repeat procedure on other side of steering wheel.
Lift off
airbag unit and detach electrical harness connec-
tors.
WARNING-
Store the removedairbag unit with the horn pad facing up.
If stored facing down, accidental deployment could propel
it violently into the air, causing injury.
Once an
airbag is removed, the car must not be driven.
Do not connect the battery with the
airbag disconnect-
ed. A fault code will be stored, setting off the
airbag in-
dicator light Special tools are needed to reset the fault
memory
Once the
airbag unit is installed and all other service
procedures have been completed, start the engine and
check that the
airbag indicator light goes out. If the in-
dicator light stays on, the
airbag system will not func-
tion as designed. Have the system diagnosed and
repaired by an authorized
BMW dealer.
- Installation is reverse of removal.
MFL steering wheel: Torque airbag using specification list-
ed below.
- Sport steering wheel: Press airbag unit mounting pins into
spring
loclts in steering wheel until they snap in firmly.
CAUTION--
Do notpinch airbag harness in center of steering wheel when
installino
airbaa.
Tightening torque
Airbao to steerino wheel IMFL) 8 Nm (71 in-lb)
Passenger airbag, removing and installing
- Disconnect negative (-) cable from battery and cover nega-
tive terminal with insulating material.
--
WARNING -
After disconnecting the batteg wait 5 seconds before begin-
nina work on airbaa components.
Prior to disconnecting the battery, read the battery discon-
nection cautionsgiven in001 General Warnings and
Cau-
Page 958 of 1002
Downloaded from www.Manualslib.com manuals search engine
721 -1 0
/Airbag System (SRS)
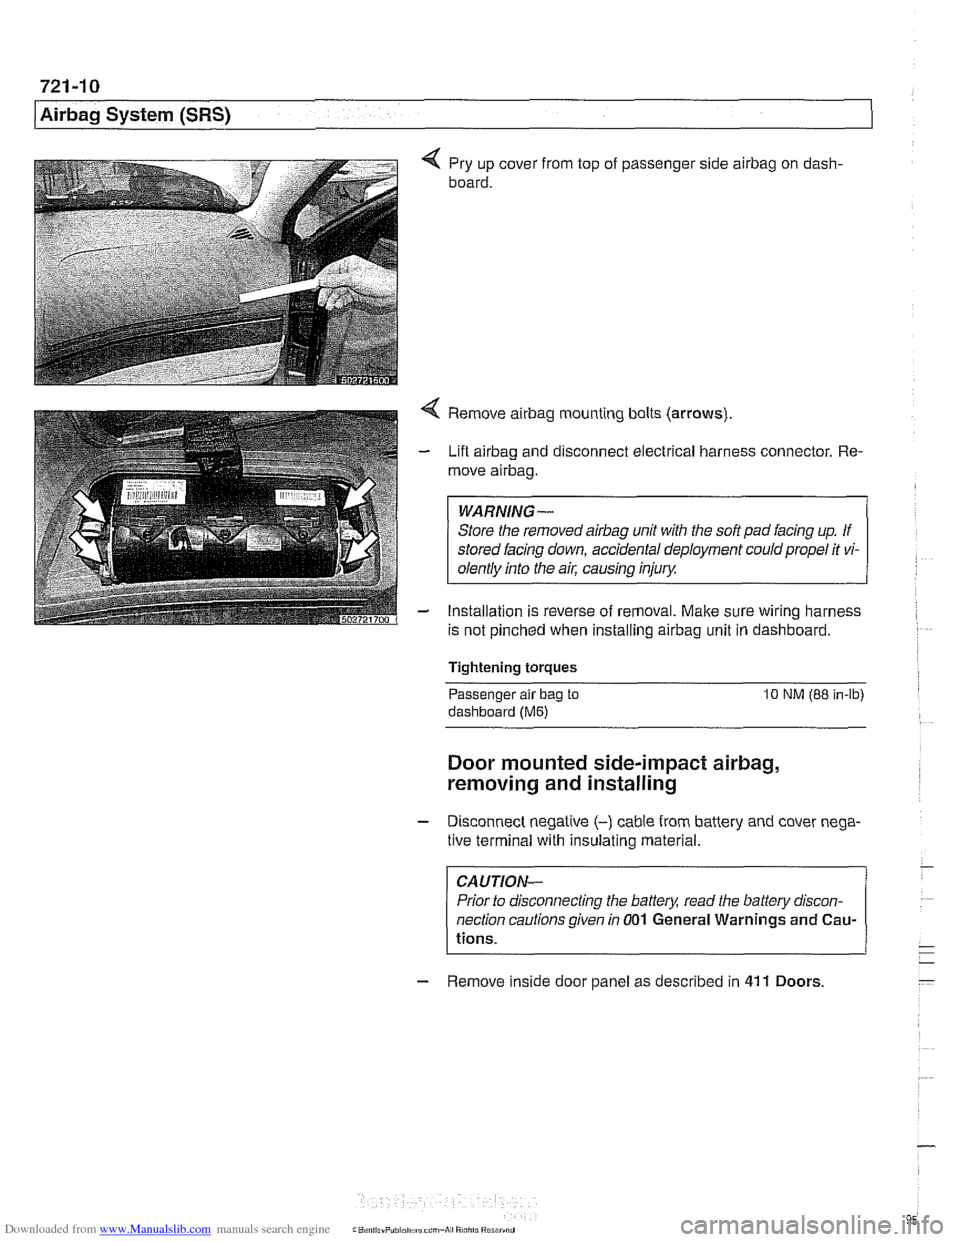
4 Pry up cover from top of passenger side airbag on dash-
board.
4 Remove airbag mounting bolts (arrows)
- Lift airbag and disconnect electrical harness connector. Re-
move
airbag.
WARNING-
Store the removed airbag unit with the soft pad facing up. If
stored facing down, accidental deployment could propel it vi-
olentlv into the
ail: causino inium
- Installation is reverse of removal. Make sure wiring harness
is not pinched when installing
airbag unit in dashboard.
Tightening torques
-
Passenger alr bag to 10 NM (88 in-lb)
dashboard (Me)
Door mounted side-impact airbag,
removing and installing
- Disconnect negatlve (-) cable from battery and cover nega-
tive terminal with insulating material.
CAUTION-
Prior to disconnecting the battea read the battery discon-
nection cautions given
in 001 General Warnings and Cau-
tions.
- Remove inside door panel as described in 41 1 Doors
Page 959 of 1002
Downloaded from www.Manualslib.com manuals search engine
721 -1 1
Airbag System (SRS)~
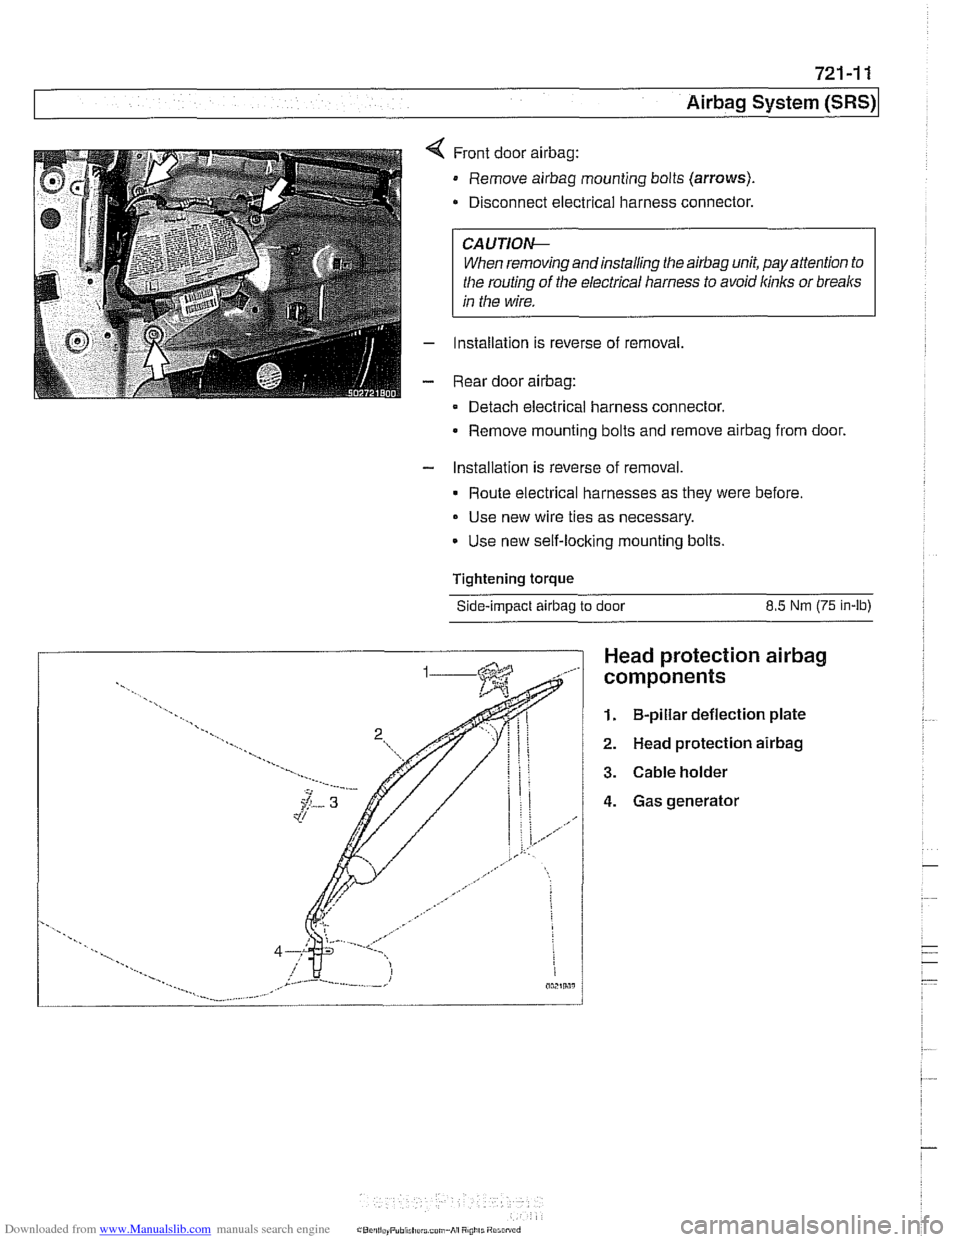
Front door airbag:
Remove airbag mounting bolts (arrows).
Disconnect electrical harness connector.
CAUTIOI\C
When removing andinstalling the airbag unit, pay attention to
the routing
of the electrical harness to avoid kinks or breaks
in the wire.
Installation is reverse of removal,
Rear door
airbag:
Detach electrical harness connector.
Remove mounting bolts and remove
airbag from door.
- Installation is reverse of removal.
Route electrical harnesses as they were before.
Use new wire ties as necessary.
Use new self-locking mounting bolts.
Tightening
torque
Side-impact airbag to door 8.5 Nm (75 in-lb)
Head protection airbag
components
1. B-pillar deflection plate
2. Head protection airbag
3. Cable holder
4. Gas generator
Page 960 of 1002
Downloaded from www.Manualslib.com manuals search engine
721-12
Airbag System (SRS)
Head protection airbag (HPS)
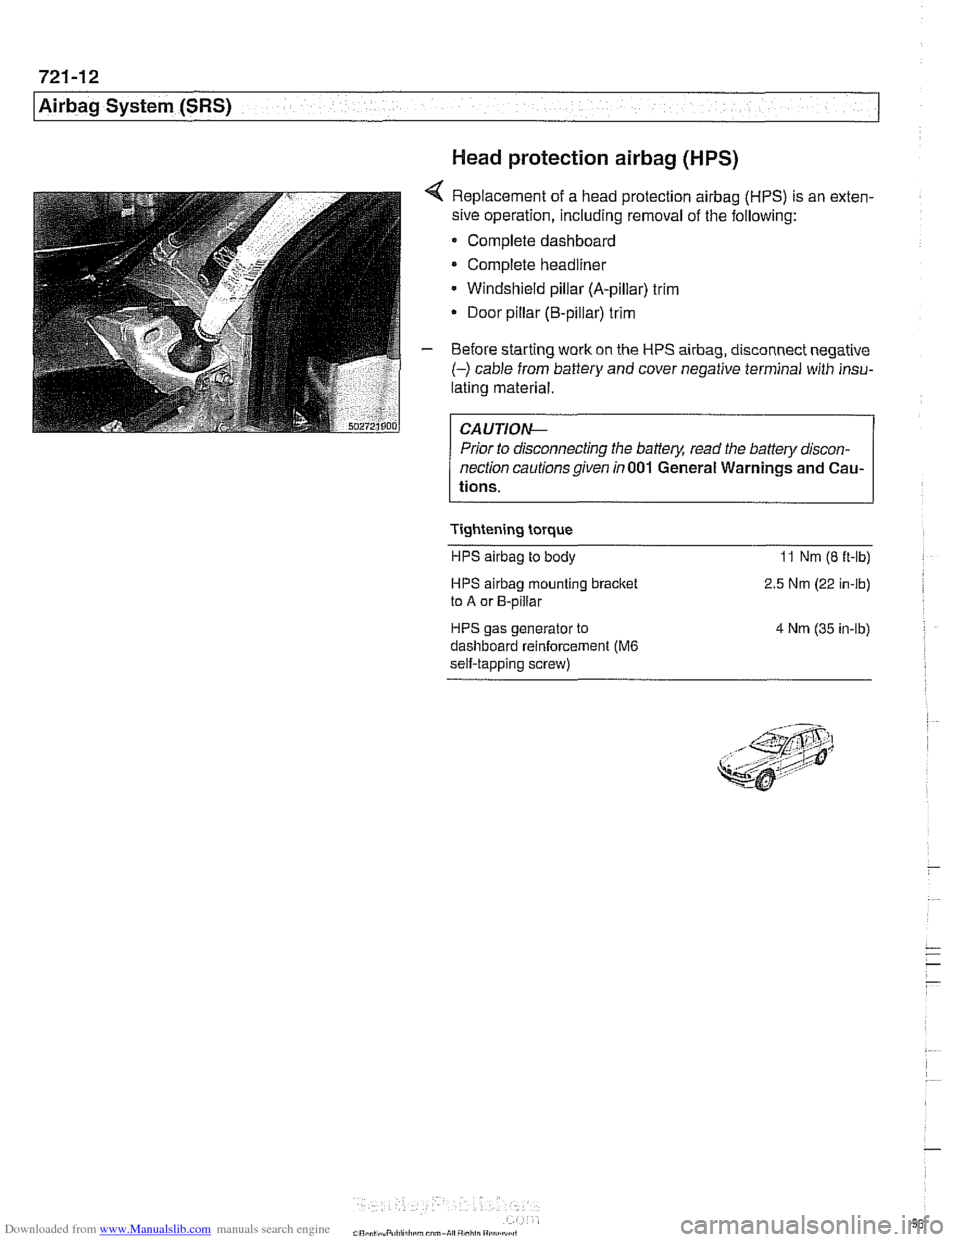
4 Replacement of a head protection airbag (HPS) is an exten-
sive operation, including removal of the following:
Complete dashboard
Complete headliner
Windshield pillar (A-pillar) trim
Door pillar (B-pillar) trim
- Before starting work on the HPS airbag, disconnect negative
(-) cable from battery and cover negative terminal with insu-
lating material.
Prior to disconnecting the battery, read the battery discon-
nection cautionsgiven in001 General Warnings and Cau-
tions.
Tightening torque HPS
airbag to body 11 Nm (8 ft-lb)
HPS airbag mounting bracket
to A or B-pillar
HPS gas generator to
dashboard reinforcement
(M6
self-tapping screw) 2.5
Nm (22 in-lb)
4 Nm (35 in-lb)