engine BMW 525i 1998 E39 Workshop Manual
[x] Cancel search | Manufacturer: BMW, Model Year: 1998, Model line: 525i, Model: BMW 525i 1998 E39Pages: 1002
Page 891 of 1002
Downloaded from www.Manualslib.com manuals search engine
Interior ~riml
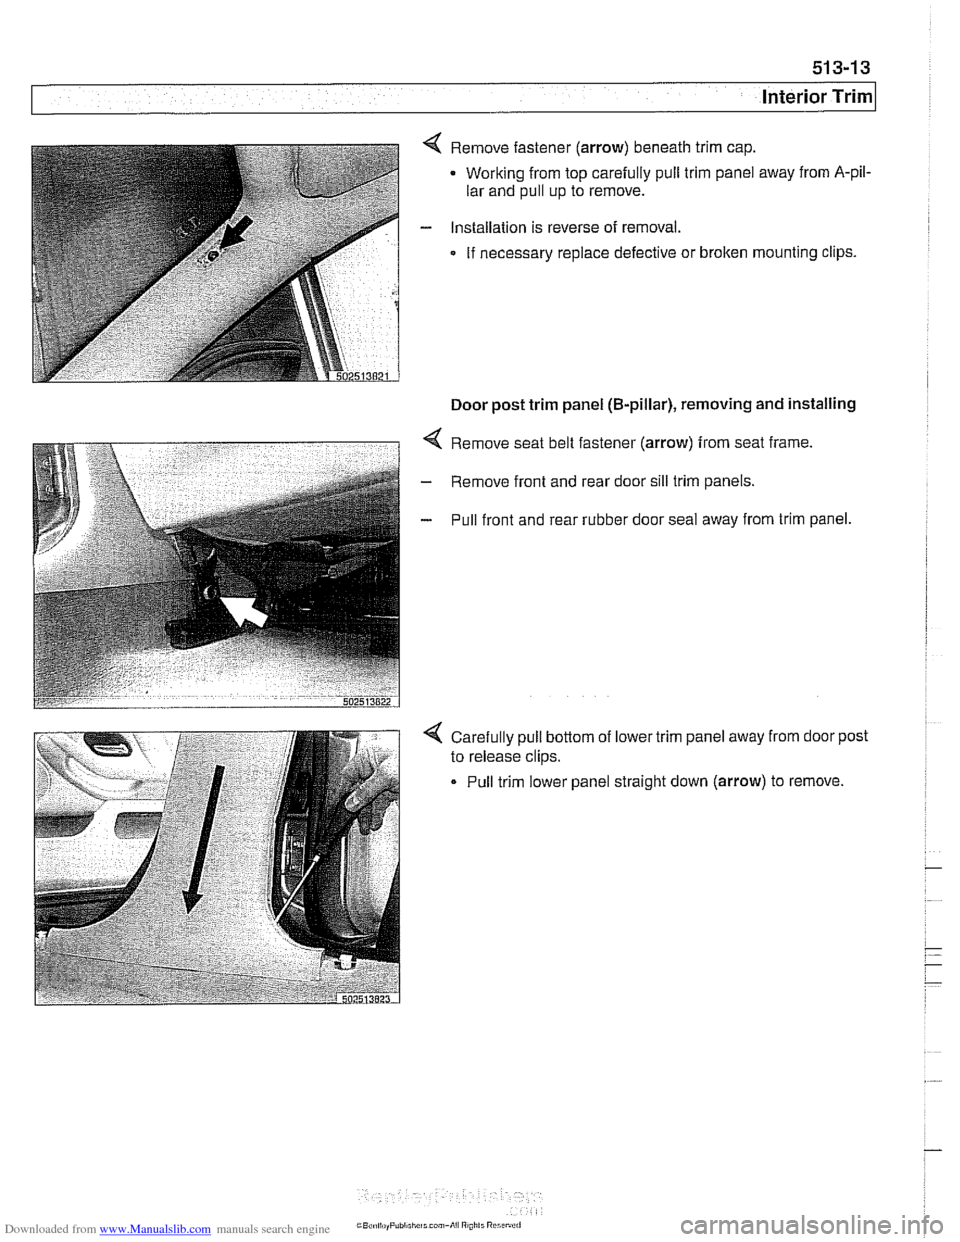
4 Remove fastener (arrow) beneath trim cap.
Working from top carefully pull trim panel away from
A-pil-
lar and pull up to remove.
- Installation is reverse of removal.
If necessary replace defective or broken mounting clips.
Door post trim panel (B-pillar), removing and installing
4 Remove seat belt fastener (arrow) from seat frame.
- Remove front and rear door sill trim panels.
- Pull front and rear rubber door seal away from trim panel.
4 Carefully pull bottom of lower trim panel away from door post
to release clips.
Pull trim lower panel straight down (arrow) to remove.
Page 892 of 1002
Downloaded from www.Manualslib.com manuals search engine
51 3-1 4
llnterior Trim
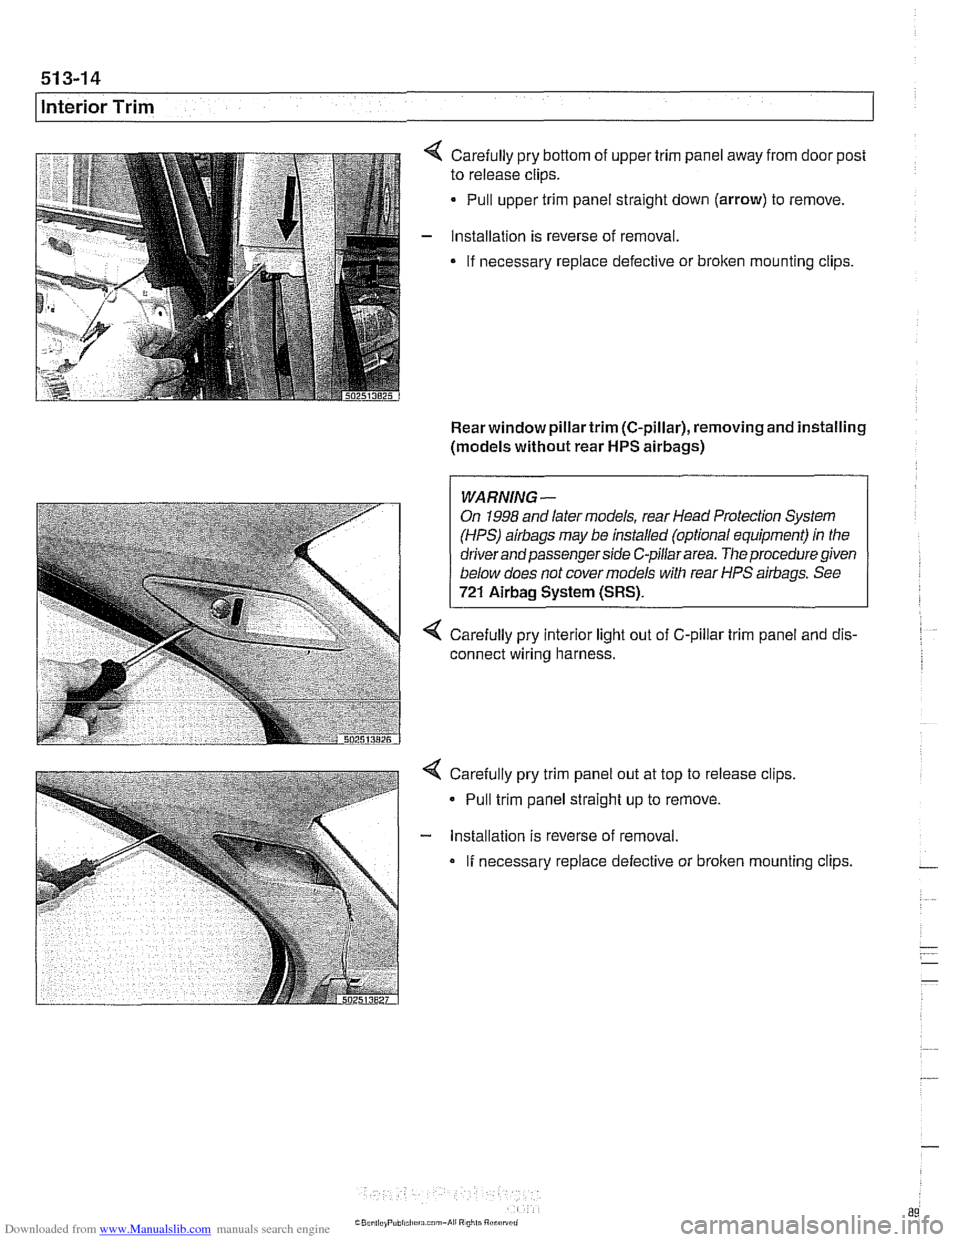
Carefully pry bottom of upper trim panel away from door post
to release clips.
Pull upper trim panel straight down (arrow) to remove.
Installation is reverse of removal.
If necessary replace defective or
broken mounting clips.
Rear window pillartrim (C-pillar), removing and installing
(models without rear
HPS airbags)
1 I
WARNING-
On 1998 and later models, rear Head Protection System
(HPS)
airbags may be installed (optional equipment) in the
driver and passenger side C-pillar area.
The procedure given
below does not cover models with rear HPS airbags. See
721 Airbag System (SRS).
4 Carefully pry interior light out of C-pillar trim panel and dis-
connect wiring harness.
Carefully pry trim panel out at top to release clips,
- Pull trim panel straight up to remove.
- lnstallation is reverse of removal.
If necessary replace defective or broken mounting clips.
Page 893 of 1002
Downloaded from www.Manualslib.com manuals search engine
51 3-1 5
I Interior Trim
Dash panel support, removing and
installing
- Remove lower dash panel. See Lower dash panel assem-
bly, removing and installing.
- Remove upper dash panel. See Upper dash assembly, re-
moving and installing.
- Remove upper steering column fasteners. See 320 Steering
and Wheel Alignment.
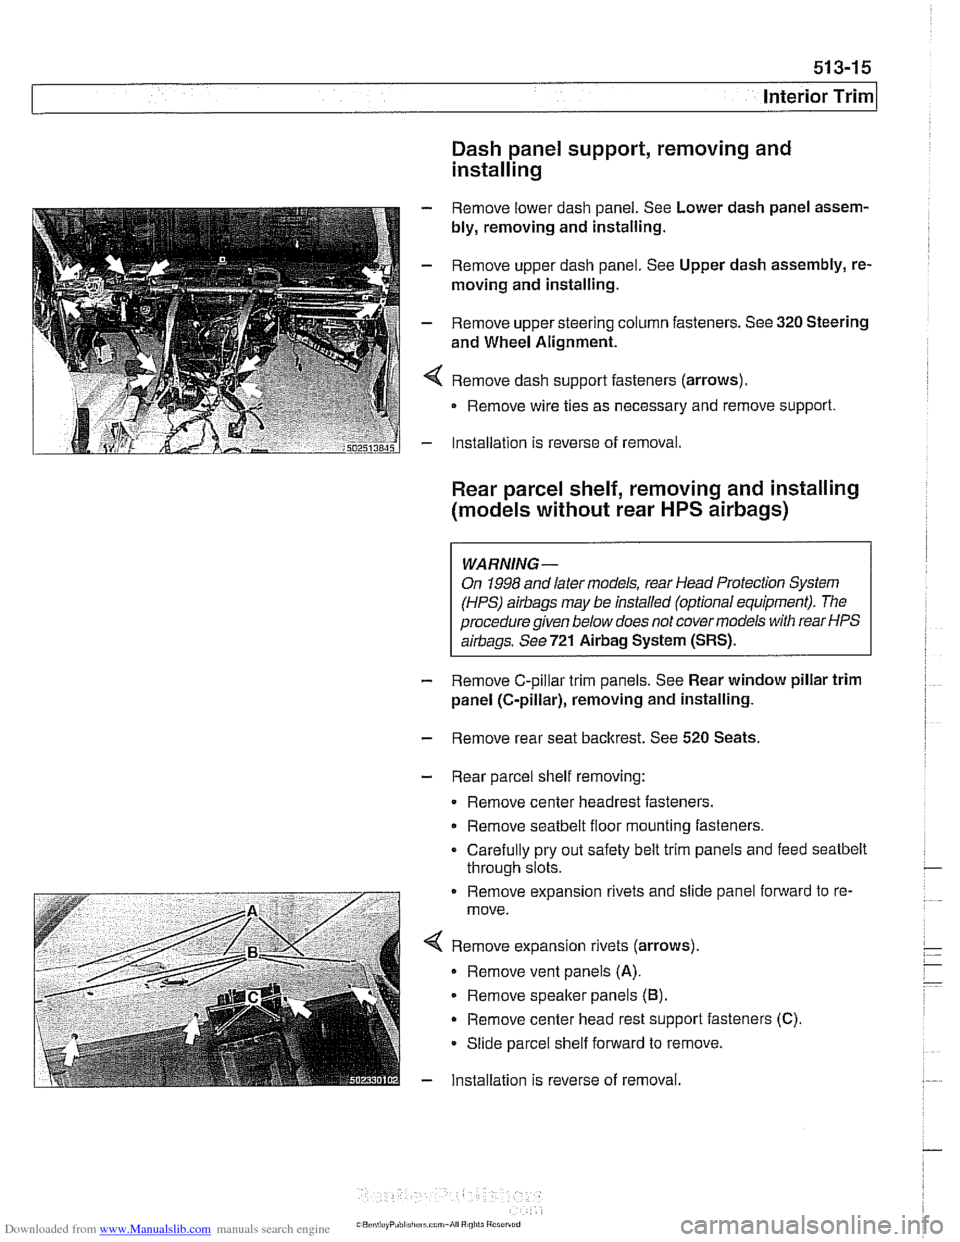
4 Remove dash support fasteners (arrows).
Remove wire ties as necessary and remove support.
- Installation is reverse of removal.
Rear parcel shelf, removing and installing
(models without rear
HPS airbags)
WARNING-
On 1998 and later models, rear Head Protection System
(HPS)
airbags may be installed (optional equipment). The
procedure given below does not covermodels with rear HPS
airbags. See721
Airbag System (SRS).
- Remove C-pillar trim panels. See Rear window pillar trim
panel (C-pillar), removing and installing.
- Remove rear seat backrest. See 520 Seats.
- Rear parcel shelf removing:
Remove center headrest fasteners.
Remove
seatbelt floor mounting fasteners.
Carefully pry out safety belt trim panels and feed
seatbelt
through slots.
. . . - -. . . . . . . . . Remove expansion rivets and slide pane fonvard to re-
move.
< Remove expanson r:vets (arrows).
Remove vent panels (A).
Remove speafter pane s (B).
Remove center head rest s-pporl fasteners (C).
Slioe parcel shelf forward lo remove.
- lnsta lation s reverse of removal.
Page 894 of 1002
Downloaded from www.Manualslib.com manuals search engine
51 3-1 6
Interior Trim
Glove compartment, removing and
installing
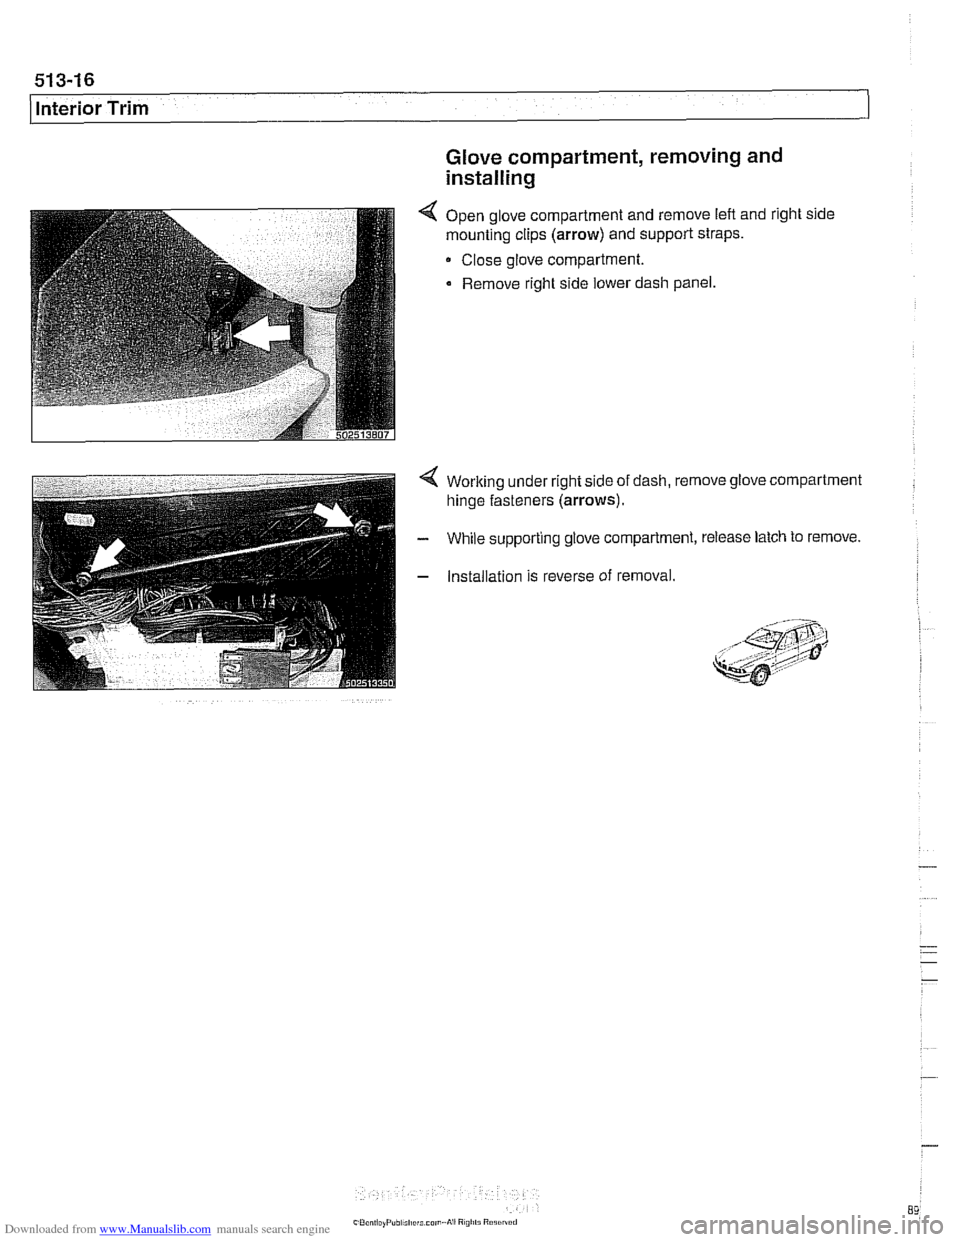
4 Open glove compartment and remove lefl and right side
mounting clips
(arrow) and support straps.
Close glove compartment.
Remove right side lower dash panel.
4 Working under right side of dash, remove glove compartment
hinge fasteners
(arrows).
- While supporting glove compartment, release latch to remove.
- Installation is reverse of removal.
, &j?i 8 .: ,,,, < I;; ,..9;:*?:4 *-,;: ,,
Page 895 of 1002
Downloaded from www.Manualslib.com manuals search engine
51 5 Central Locking and Anti-Theft
........................... General .51 5.2
Central Locking ................... .51 5.2
General Module
..................... .51 5.2
Central locking inputs and outputs
....... .51 5.3
Doorlocks
........................... 515-5
Trunklock
........................... 515-7
Remote entry (FZV)
.................. .51 5.7
Remote entry (FZV) inputs and outputs ... .51 5.8
Car Memory I Key Memory ............ .51 5.12
Trunk lid soft close (SCA)
............. .51 5.13
SCA subsystem
.................... .51 5.14
........ Tailgate and rear window locks
.51 5.14
Sport Wagon tailgate and rear
window
lock schematic ............... .51 5.15
Door Handles and Locks .......... .51 5.16
Door handle (outer), removing
and installing
....................... .51 5.16
Door latch, removing and installing
..... .51 5.17
Outer door lock cylinder, removing
and installing
....................... .51 5.18
Trunk Lock Assembly ............. 515-1 9
Trunk lock. removing and installing
...... 515-19
Trunk lock striker plate. removing
and installing
....................... 515-20
Tailgate lock. emergency release
....... 515-21
... Electronic Immobilization (EWS) 515-21
EWS variations
..................... 515-22
......... EWS control module. replacing 515-23
Transmitter
1 receiver module .......... 515-23
....................... Ring antenna 515-23
Anti-theft System (DWA) ........... 51 5-24
DWA LED Status
.................... 51 5-24
Tilt sensor
......................... 515-24
Interior protection .................... 51 5-25
Glass breakage sensors
.............. 515-26
Emergency disarming
................ 51 5-26
Page 896 of 1002
Downloaded from www.Manualslib.com manuals search engine
51 5-2
/Central Locking and Anti-Theft
This section covers repair information for door, trunk and car-
go compartment locks, central locking, electronic
immob~liza-
tion (EWS) and anti-theft alarm (DWA).
€39 cars are equipped with sophisticated self-diagnostic elec-
trical systems. When experiencing malfunctions relating to
central locking. EWS or anti-theft systems, start the diagnosis
process using the
BMW service tester DIS, GT 1, MoDiC or
equivalent scan tool. An advanced diagnostic scan tool can
usually pinpoint electrical faults quickly and safely.
Additional electrical information can be found in:
610 Electrical Component Locations
ELE Electrical Wiring Diagrams
Central locking in E39 vehicles controls the door
locks, trunk
or tailgate lock and fuel filler flap lock. The control module for
the Central Body Electronics system (ZKE
Ill), lknown as the
General Module (GM
Ill), controls central locking.
ZKE
Ill manages the following central locking related func-
tions:
Central locking
* Keyless entry
Key memory
Power trunk release
Electric opening of tailgate
DWA alarm system
Diagnosis
General Module
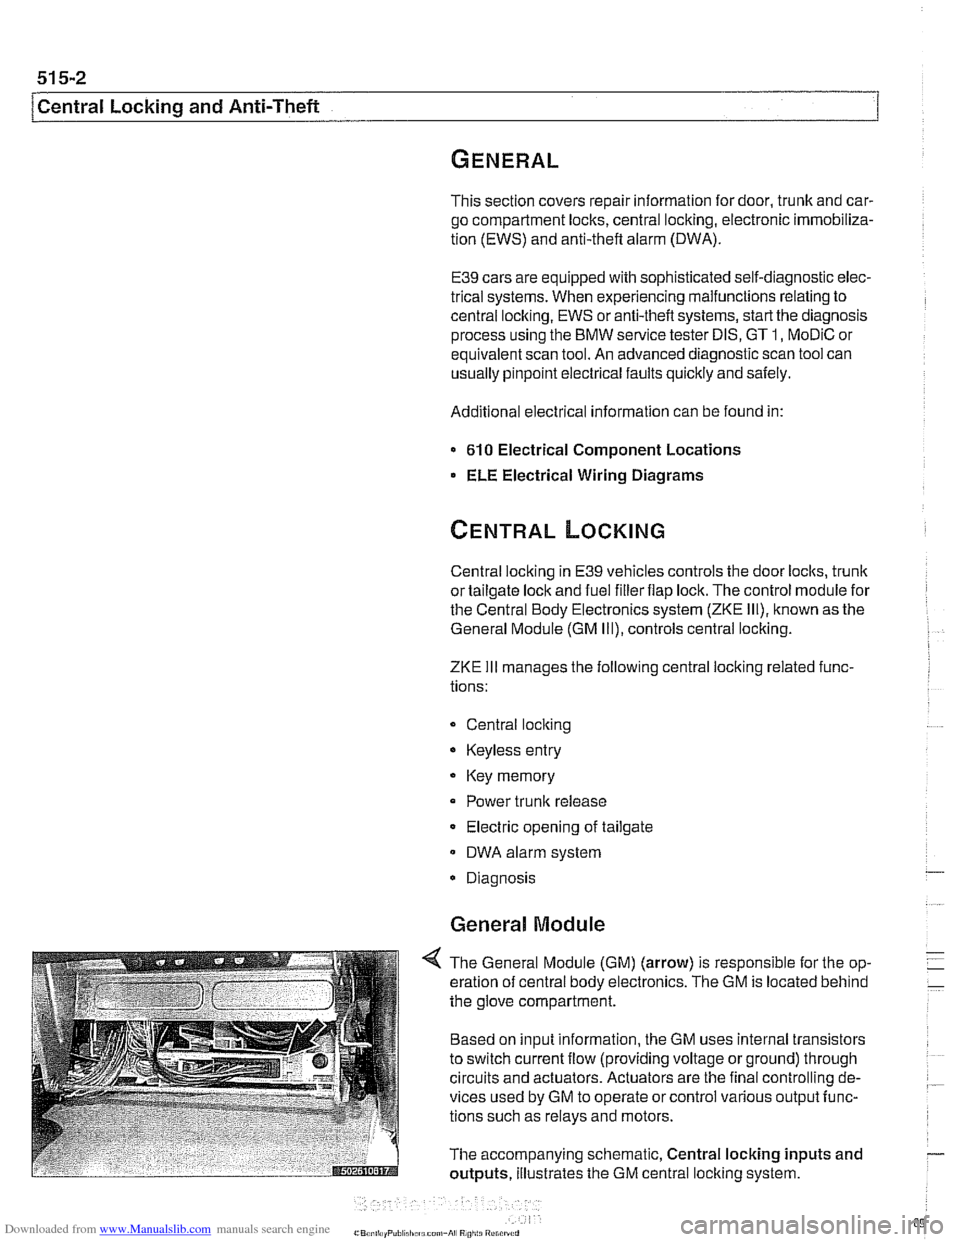
4 The General Module (GM) (arrow) is responsible for the op-
eration of central body electronics. The GM is located behind
the glove compartment.
Based on input information, the GM uses internal transistors
to switch current flow (providing voltage or ground) through
circuits and actuators. Actuators are the final controlling de-
vices used by GM to operate or control various output func-
tions such as relays and motors.
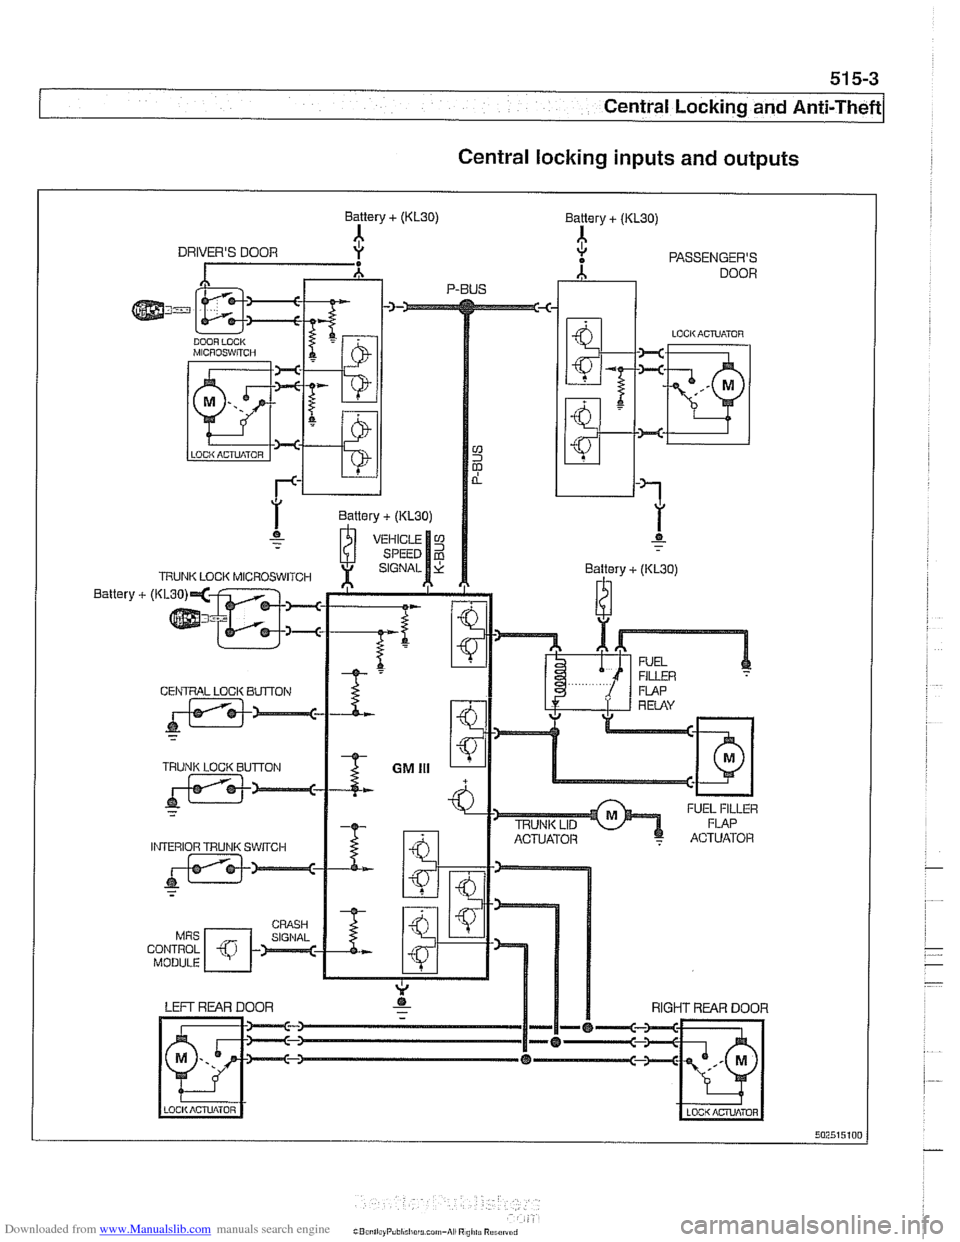
The accompanying schematic, Central locking inputs and
outputs, illustrates the GM central locking system.
Page 897 of 1002
Downloaded from www.Manualslib.com manuals search engine
51 5-3
Central Locking and ~nti- heft
Central locking inputs and outputs
iBzi~ilziPobi~~lic~u~uin-Ai Rnl>ir Rum
Page 898 of 1002
Downloaded from www.Manualslib.com manuals search engine
51 5-4
I Central Locking and Anti-Theft
Driver's door lock
The
lock/unlock signals are sent as input to the door module
from two microswitches on the lockcylinder. The driver's door
module carries out the locking
/ unlocking functions of the
driver's door through its final stage control.
The signal to lock the remaining doors, trunk or tailgate and
fuel flap is sent over the P-Bus to the GM and the passenger
door module. Activation of the passengers door
loclt is carried
out by the passenger door module. The rear doors, trunlt or
tailgate and fuel flap are
locked by the f~nal stage in the GM.
When
locked from the outside, all doors are set to the double
lock position and the GM will not carry out any unlock com-
mands from the central
loclc button or remote trunk release
button.
Selective unlocking
When unlocking with the key or the remote transmitter, the
first unloclcrequestwill only unlock the driver'sdoor. A second
unlock request will unlock the remaining doors, trunk or tail-
gate and fuel flap.
Trunk locking
I
The vehicle can be locked/unlocked from the trunlc loclc cylin-
der. The GM locks the trunk or tailgate, rear doors and fuel fill-
er. The locking command is passed over the P-Bus to the
respective door modules to lock the driver's and passengers
doors.
Locking the trunk and removing the key in the
hor~zontal posi-
tion will set the valet lock and prevent opening of the trunlt
with the central locking system.
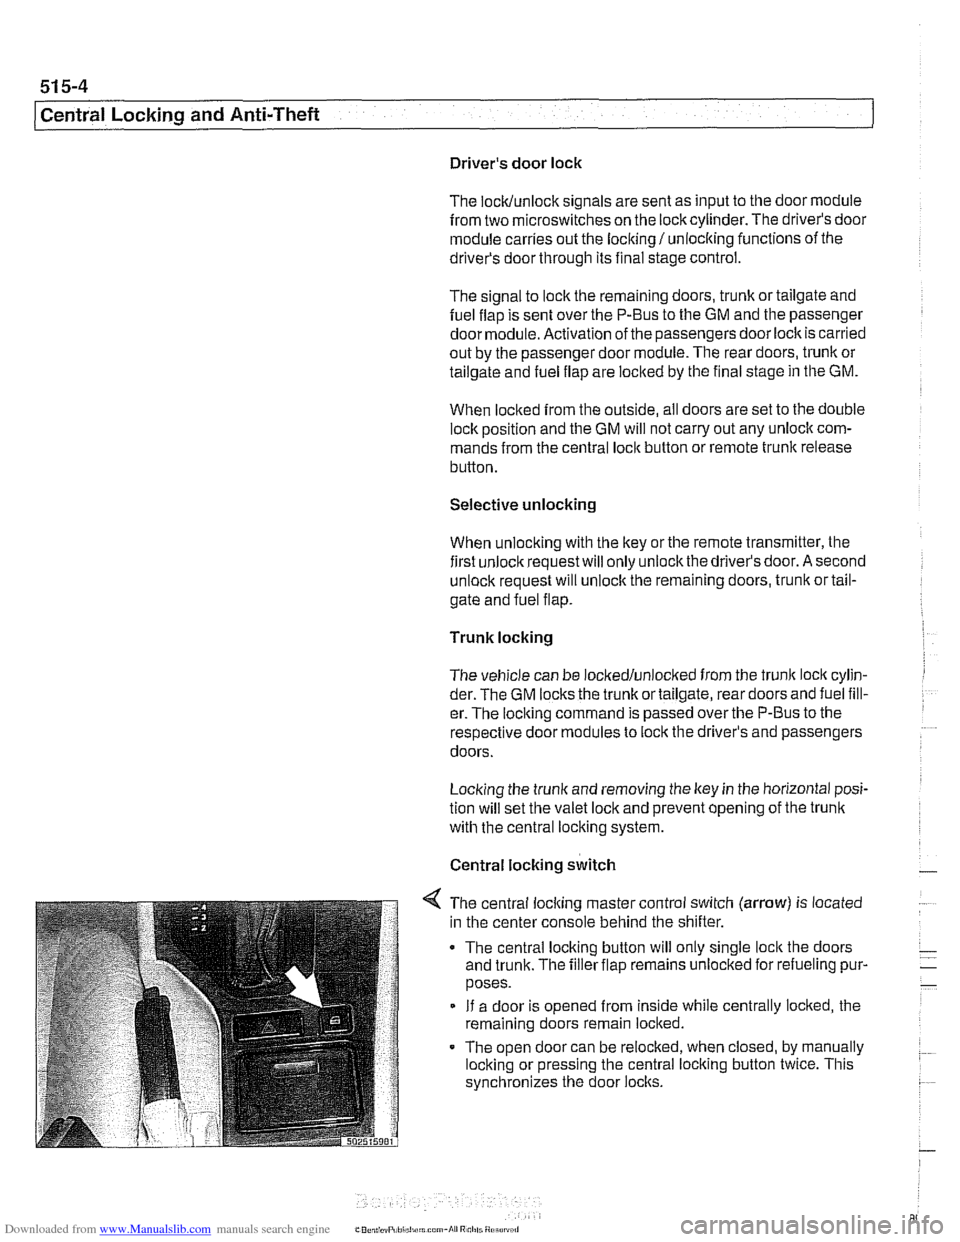
Central locking switch
-
< The central locking master control switch (arrow) is located
in the center console behind the shifter.
The central locking button will only single
loclt the doors
and trunk. The filler flap remains unloclted for refueling pur-
poses.
If a door is opened from inside while centrally locked, the
remaining doors remain locked.
The open door can be relocked, when closed, by manually
locking or pressing the central locking button twice. This
synchronizes the door
locks.
Page 899 of 1002
Downloaded from www.Manualslib.com manuals search engine
Central Locking and Anti-Theft
DWA alarm
The DWA alarm system is
armedldisarmed when thevehicle
is locked / unlocked from either the door or trunk.
Convenience closing
I opening
The windows and sun roof can be closed or opened by hold-
ing the key in the
loclc I unlock position.
Crash sensor
The crash sensor is located in the left front
kick panel. It func-
tions by unlocking all doors in the event of an accident.
NOTE-
Continuous and repeated locliing / unlocking may cause
timedarrest of
the locliing system. When activated, the timed
arrest lasts for two minutes. The timed arrest does not affect
the crash sensor
unlocliing the doors in case of an accident.
Door locks
The driver's door lock location is the only point outside of the
vehicle where the ltey can mechanically control all of the cen-
tral locking system functions.
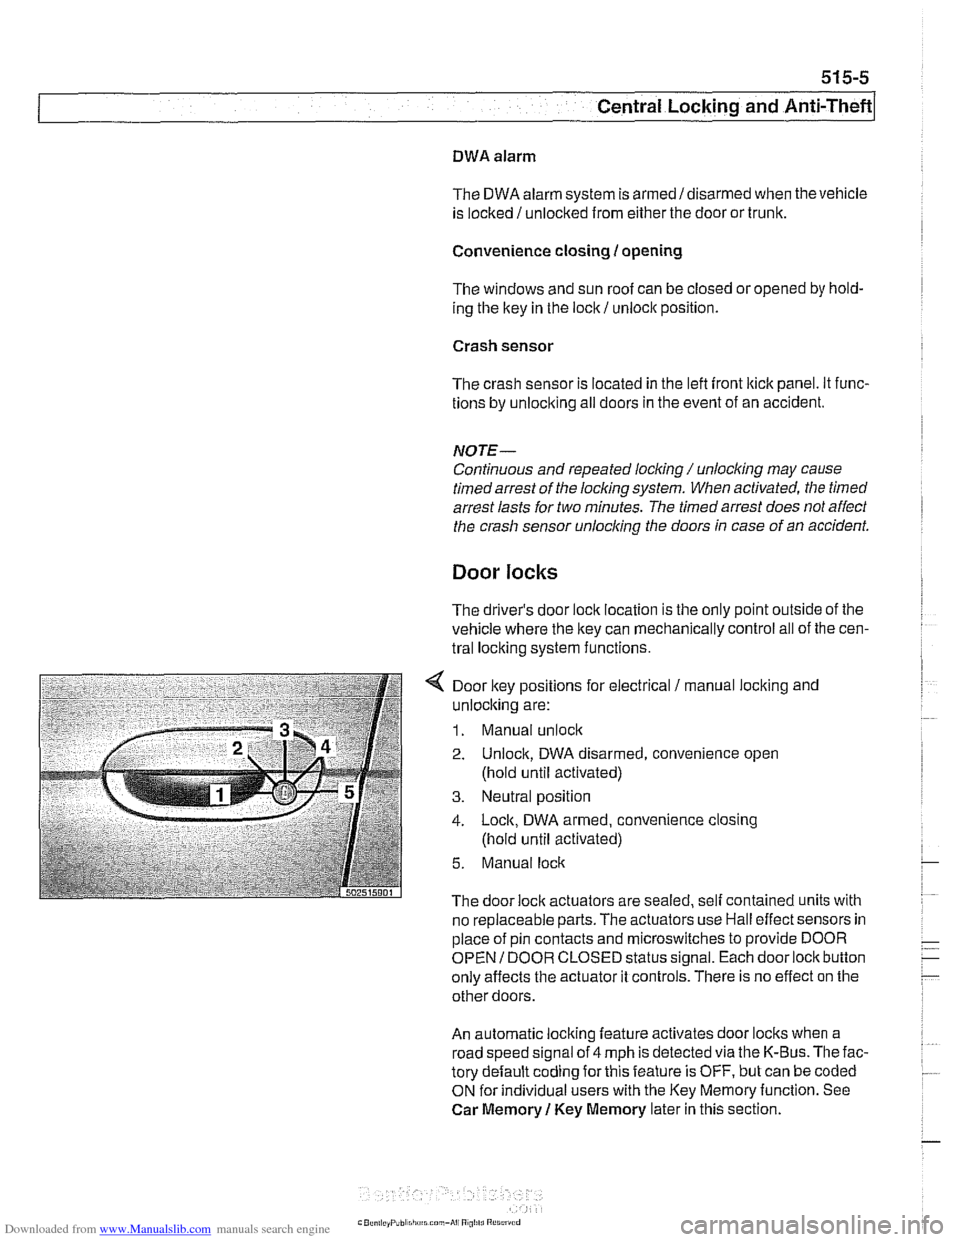
4 Door key positions for electrical / manual loclting and
unlocking are:
1. Manual unlock
2. Unlock, DWA disarmed, convenience open
(hold until activated)
3. Neutral position
4. Lock, DWA armed, convenience closing
(hold until activated)
5. Manual lock
The door lock actuators are sealed. self contained units with
no replaceable parts. The
actuators use Hall effect sensors in
place of pin contacts and microswitches to provide DOOR
OPEN
I DOOR CLOSED status signal. Each door lock button
only affects the actuator it controls. There is no effect on the
other doors.
An automatic locking feature activates door locks when a
road speed signal of 4 mph is detected via the K-Bus. The fac-
tory default coding for this feature is OFF, but can be coded
ON for individual users with the Key Memoryfunction. See
Car Memory
1 Key Memory later in this section.
Page 900 of 1002
Downloaded from www.Manualslib.com manuals search engine
51 5-6
(Central Locking and Anti-Theft
Each rear door is equipped with the child lock-out lever, pre-
venting the door from being opened from the inside regard-
less of loclc button position.
Starting with models produced afler
911997, the General
Module and electronic immobilizer (EWS) interface via the
K-
Bus to monitor double lock status and to initiate double loclc
override. This feature allows the doors to be opened from the
inside if a key accepted by EWS is switched on in the ignition.
See Single lock and double lock function.
The door loclc buttons are mechanically uncoupled from the
actuators when locked. The remote keyless entry system
(FZV) is standard equipment. This allows for elimination of
the passengers side door
loclt cylinder.
Another function of the locking system is the
sofl close trunk
(SCA) system, where applicable.
Single lock and double lock function
(2000 and later models)
On models produced after
911999, each door lock actuator in-
corporates two motors:
Single lock motor controls the mechanical loclc mechanism
when the central lock switch is pressed to single loclc the
vehicle. The loclc mechanism is fully locked at this point but
can stil. be openeo from
the interor by pulng the appropri-
are interior door nandle lwce or by pressing rhe central
lock switch again. When single
lock'function is activated,
the fuel filler flap actuator is not locked.
Double lock motor, also known as central arrest, is activat-
ed only when the vehicle is locked from the outside at the
driver's door lock with a key or when the GM receives a
lock request from the remote entry (FZV) system. In this
case the double lock motor is activated simultaneously
with the single lock motor. The function of the double loclc
motor is to mechanically offset an internal rod in the loclc
actuator, disabling it from unlocking the vehicle from the in-
terior. This prevents the doors from being unloclted by any
means except from an unlock request at the driver's door
or via the FZV remote key.
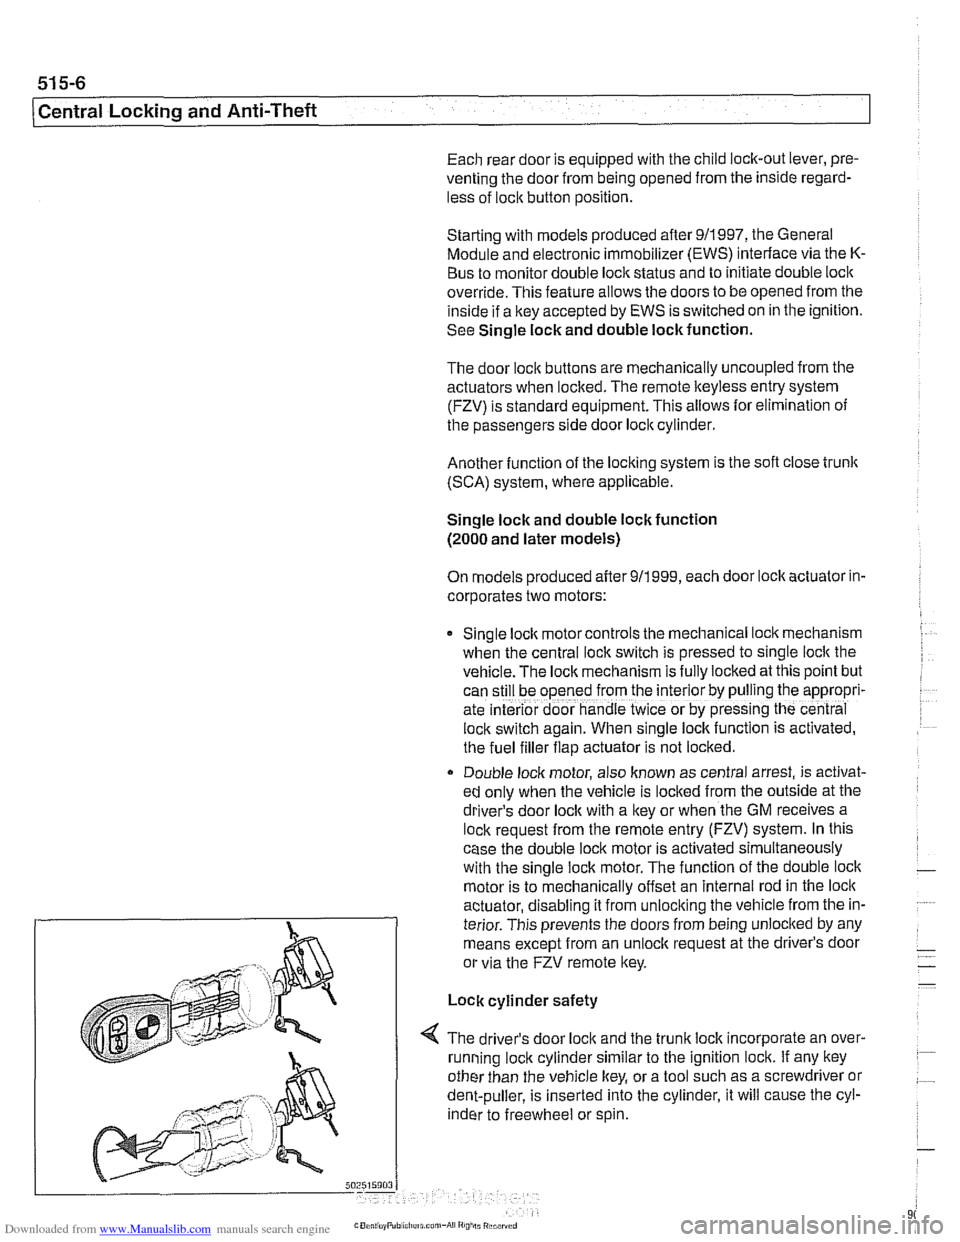
Lock cylinder safety
4 The driver's door loclc and the trunk loclc incorporate an over-
running loclc cylinder similar to the ignition lock. If any key
other than the vehicle key, or a tool such as a screwdriver or
dent-puller, is inserted into the cylinder, it will cause the cyl-
inder to freewheel or spin.