wheel torque BMW 525I 2007 Owners Manual
[x] Cancel search | Manufacturer: BMW, Model Year: 2007, Model line: 525I, Model: BMW 525I 2007Pages: 273, PDF Size: 8.96 MB
Page 91 of 273

Controls
89Reference
At a glance
Driving tips
Communications
Navigation
Entertainment
Mobility
Deactivating DTC
Press the button again; the DTC indicator lamp
in the instrument cluster goes out.
xDrive on 525xi, 530xi
xDrive is the 4-wheel drive system of your
BMW. The combined effects of xDrive and DSC
further optimize the traction and dynamic driv-
ing characteristics. The 4-wheel drive system
xDrive variably distributes the drive torque to
the front and rear axle depending on the driving
situation and prevailing road conditions.
HDC Hill Descent Control on 525xi,
530xi
The concept
HDC is a system for driving downhill in steep
terrain. This system reduces vehicle speed on
steep downhill gradients, thus allowing you to
maintain even better control of your BMW
under these conditions. The vehicle moves at
approximately twice walking speed without
active intervention from the driver.
HDC is available for activation at vehicle speeds
below approx. 22 mph/35 km/h. When driving
down steep hills with a speed below approx.
22 mph/35 km/h, the vehicle reduces speed
automatically down to approximately double
walking speed, approx. 7 mph/12 km/h, and
then maintains this speed at a constant.
You can use the accelerator or brakes to vary
this automatically controlled speed within a
range extending from approx. 3 mph/5 km/h to
15 mph/25 km/h.
You can specify a target speed within the same
range by using the lever of the cruise control.
Activating HDC
You can activate HDC:
>with the programmable buttons on the
steering wheel, refer to page53
>using iDrive
iDrive, for explanation of principle, refer to
page16.1.Press the button.
This opens the start menu.
2.Press the controller to open the menu.
3.Select "Settings" and press the controller.
4.Select "Vehicle / Tires" and press the con-
troller.
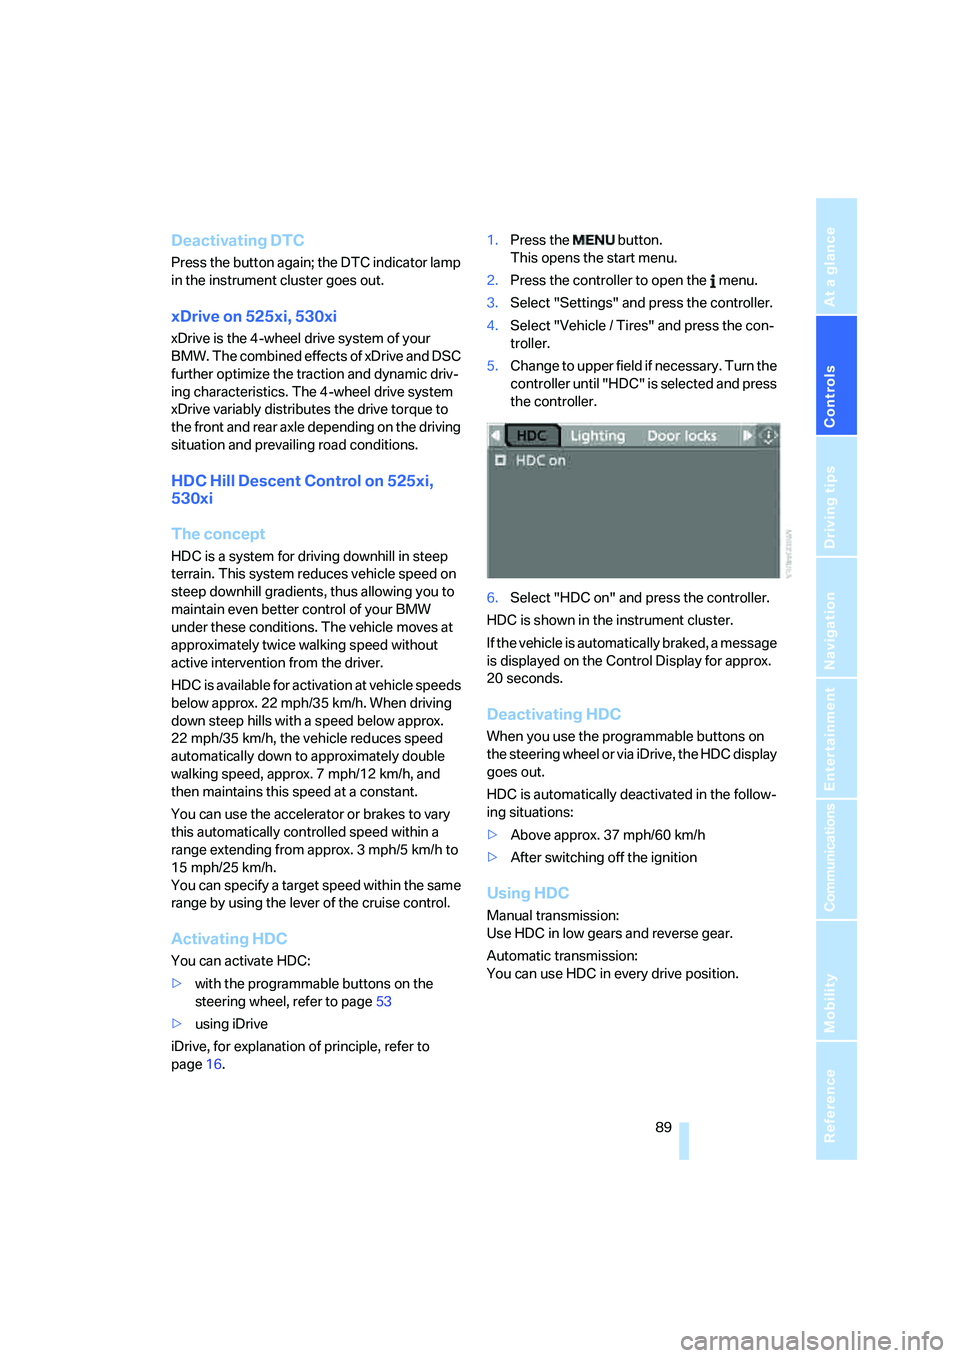
5.Change to upper field if necessary. Turn the
controller until "HDC" is selected and press
the controller.
6.Select "HDC on" and press the controller.
HDC is shown in the instrument cluster.
If the vehicle is automatically braked, a message
is displayed on the Control Display for approx.
20 seconds.
Deactivating HDC
When you use the programmable buttons on
the steering wheel or via iDrive, the HDC display
goes out.
HDC is automatically deactivated in the follow-
ing situations:
>Above approx. 37 mph/60 km/h
>After switching off the ignition
Using HDC
Manual transmission:
Use HDC in low gears and reverse gear.
Automatic transmission:
You can use HDC in every drive position.
Page 230 of 273

Replacing components
228
Compact wheel*
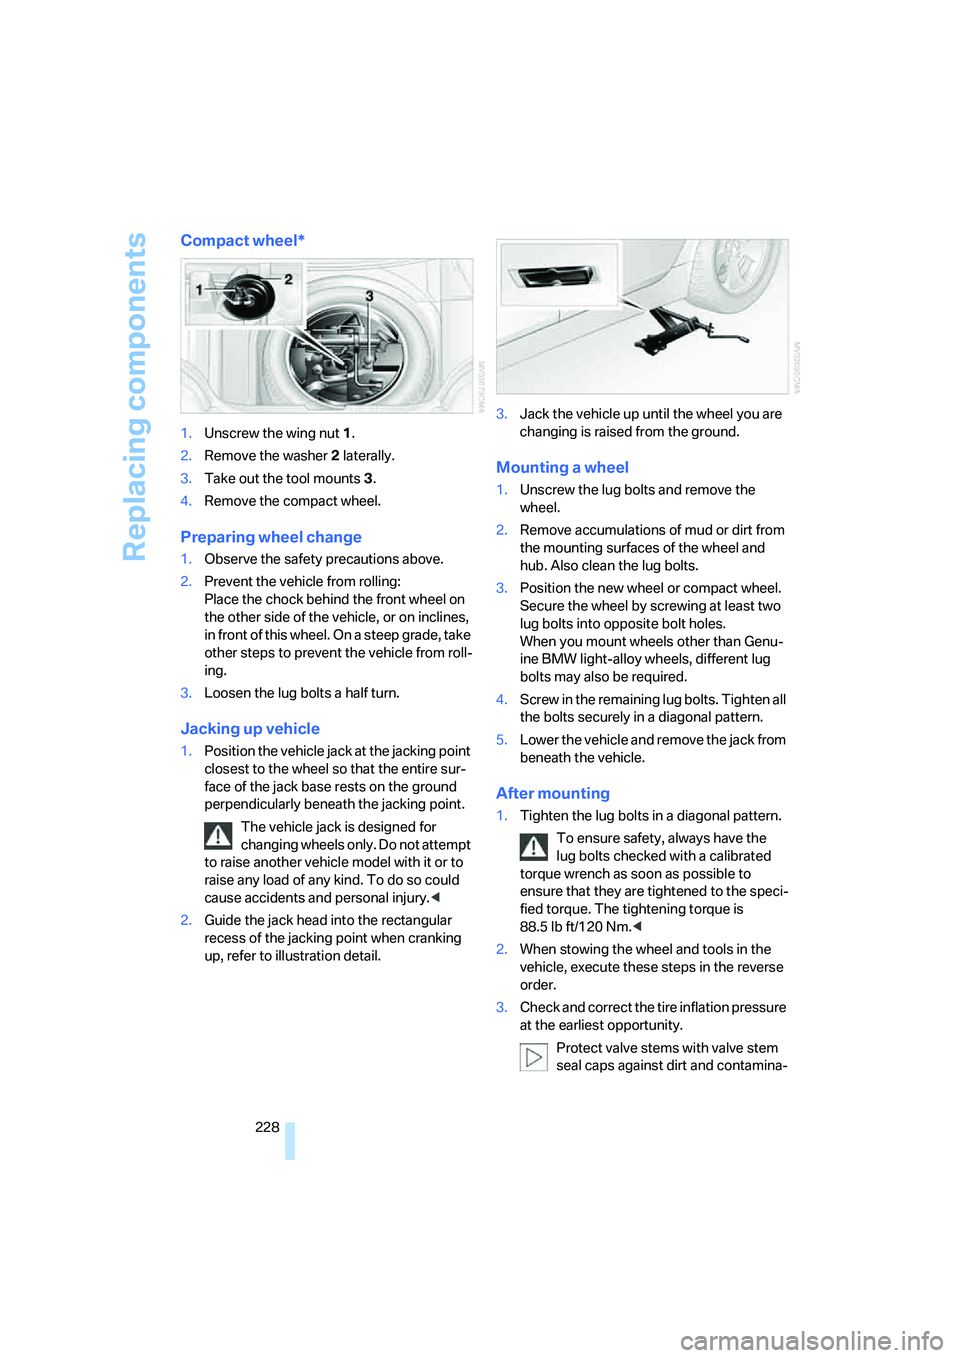
1.Unscrew the wing nut 1.
2.Remove the washer 2 laterally.
3.Take out the tool mounts 3.
4.Remove the compact wheel.
Preparing wheel change
1.Observe the safety precautions above.
2.Prevent the vehicle from rolling:
Place the chock behind the front wheel on
the other side of the vehicle, or on inclines,
in front of this wheel. On a steep grade, take
other steps to prevent the vehicle from roll-
ing.
3.Loosen the lug bolts a half turn.
Jacking up vehicle
1.Position the vehicle jack at the jacking point
closest to the wheel so that the entire sur-
face of the jack base rests on the ground
perpendicularly beneath the jacking point.
The vehicle jack is designed for
changing wheels only. Do not attempt
to raise another vehicle model with it or to
raise any load of any kind. To do so could
cause accidents and personal injury.<
2.Guide the jack head into the rectangular
recess of the jacking point when cranking
up, refer to illustration detail.3.Jack the vehicle up until the wheel you are
changing is raised from the ground.
Mounting a wheel
1.Unscrew the lug bolts and remove the
wheel.
2.Remove accumulations of mud or dirt from
the mounting surfaces of the wheel and
hub. Also clean the lug bolts.
3.Position the new wheel or compact wheel.
Secure the wheel by screwing at least two
lug bolts into opposite bolt holes.
When you mount wheels other than Genu-
ine BMW light-alloy wheels, different lug
bolts may also be required.
4.Screw in the remaining lug bolts. Tighten all
the bolts securely in a diagonal pattern.
5.Lower the vehicle and remove the jack from
beneath the vehicle.
After mounting
1.Tighten the lug bolts in a diagonal pattern.
To ensure safety, always have the
lug bolts checked with a calibrated
torque wrench as soon as possible to
ensure that they are tightened to the speci-
fied torque. The tightening torque is
88.5 lb ft/120 Nm.<
2.When stowing the wheel and tools in the
vehicle, execute these steps in the reverse
order.
3.Check and correct the tire inflation pressure
at the earliest opportunity.
Protect valve stems with valve stem
seal caps against dirt and contamina-
Page 260 of 273

Everything from A to Z
258
L
Lamps, refer to Parking lamps/
low beams103
Lamps and bulbs223
"Language / Units"85
"Language / Units" for
navigation150
"Languages"85
"Languages" for
navigation150
Lashing eyes, refer to
Securing cargo130
Last destinations, refer to
Destination list141
"Last seat pos."48
LATCH child restraint fixing
system57
LEDs light-emitting
diodes223
Length, refer to
Dimensions239
License plate lamp, replacing
bulbs226
Light-emitting diodes
LEDs223
Lighter117
"Lighting"66,104
Lighting
– instruments105
– lamps and bulbs223
– of the vehicle, refer to
Lamps103
Light switch103
"Limit"82
Loading
– securing cargo130
– stowing cargo129
– vehicle128
Load securing equipment,
refer to Securing cargo130
"Lock after driving"33
Lock buttons in the doors,
refer to Locking33Locking31
– confirmation signals31
– from inside33
– from outside31
– without key, refer to Comfort
access38
Locking and unlocking doors
– confirmation signals31
– from inside33
– from outside30
LOGIC 7162
Low beams103
– automatic103
– replacing bulbs223
Lower back support, refer to
Lumbar support47
Lug bolts228
– tightening torque, refer to
After mounting228
– wrench226
Luggage compartment, refer
to Cargo bay
Luggage compartment lid34
– emergency operation, refer
to Manual operation34
– emergency release35
– locking separately34
– opening from inside34
– opening from outside34
– unlocking and locking from
inside33
– unlocking manually34
Luggage compartment lid/
tailgate
– comfort access39
Luggage net, refer to
Separation net120
Luggage rack, refer to Roof-
mounted luggage rack130
Lumbar support47
LW, waveband164
M
M+S tires, refer to Winter
tires214
Maintenance220
– refer to Service and
Warranty Information
Booklet for US models220
– refer to Service
requirements78
– refer to Warranty and
Service Guide Booklet for
Canadian models220
Maintenance system220
Malfunction warnings, refer to
Check Control80
Manual air distribution109
Manual mode
– automatic transmission with
Steptronic65
– SMG Sequential Manual
Transmission63
Manual operation
– door lock32
– driver's door32
– fuel filler door206
– glass sunroof43
– luggage compartment lid34
– panorama glass sunroof44
– selector lever interlock,
automatic transmission65
Manual transmission62
"Manual" with radio165
"Map direction of travel"149
Map display148
"Map facing north"149
Map for navigation
– changing scale149
– destination entry140
Map view facing north148
Master key, refer to Keys/
remote control28
Maximum cooling109
Maximum speed
– with compact wheel229
Maximum speed with winter
tires215
Page 267 of 273

Reference 265
At a glance
Controls
Driving tips
Communications
Navigation
Entertainment
Mobility
Storing current position143
Storing radio stations166
Storing sitting position, refer
to Seat, mirror and steering
wheel memory47
Storing tires215
"Street" for destination
entry137
Summer tires, refer to Wheels
and tires208
Sun blinds114
"Surround Settings", refer to
Tone control162
SW, waveband164
Swinging up floor panel,
Sports Wagon121
Switches, refer to Cockpit10
Switching off engine61
Switching on
– audio160
– CD changer160
– CD player160
– radio160
Switching on hour signal84
Swiveling headlamps, refer to
Adaptive Head Light104
Symbols4
– indicator/warning lamps13
– navigation system153
– status information20
– traffic information with
navigation system151
T
Tachometer75
"Tailgate"36
Tailgate34
– automatic operation36
– emergency operation, refer
to Opening manually36
– locking and unlocking from
inside33
– opening from inside35
Tail lamps225
– replacing bulbs225
Tank contents, refer to
Capacities242Target cursor for
navigation140
Technical alterations, refer to
For your own safety5
Technical data238
– capacities242
– dimensions239
Telematics, refer to
BMW Assist196
Telephone
– installation location, refer to
Center armrest115
– refer to Mobile phone182
"Telephone list"54
TeleService198
Temperature
– adjusting in upper body
region108
– adjusting with automatic
climate control108
– changing units of
measure85
– refer to Coolant
temperature75
Temperature display
– changing units of
measure85
– outside temperature75
– outside temperature
warning75
Tempomat, refer to Cruise
control68
"Terminate services"201
"Text language"85
"Theater", refer to Tone
control163
The individual vehicle5
Third brake lamp, refer to
Center brake lamp225
Through-loading system119
Tightening torque of the lug
bolts, refer to After
mounting228
Tilt alarm sensor38
– switching off38
Tilting down passenger-side
exterior mirror52
"Time"83"Time / Date"
83
"Time format"84
Timer, refer to Preselecting
activation times111
"Timer 1" for parked car
ventilation112
"Timer 2" for parked car
ventilation112
Tire inflation pressures208
Tire pressure loss92,93
Tire Pressure Monitor
TPM92
Tire Quality Grading212
Tire replacement, new wheels
and tires214
Tires
– age212
– air loss92,94
– breaking-in126
– changing214
– condition213
– damage213
– flat tire, refer to Changing
wheels226
– inflation pressure208
– new wheels and tires214
– pressure monitoring, refer to
Flat Tire Monitor91
– pressure monitoring, refer to
TPM Tire Pressure
Monitor92
– replacing226
– retreaded tires214
– run-flat tires213
– size211
– tread213
– wear indicators213
– wheel/tire combination214
– winter tires214
"Tires, FTM"91
Tire trouble
– changing wheels226
– compact wheel228
"Tone"161
Tone dialing method190
Tone in audio mode
– adjusting161
– middle setting163