sensor BMW 525I SEDAN 2005 E60 Owner's Manual
[x] Cancel search | Manufacturer: BMW, Model Year: 2005, Model line: 525I SEDAN, Model: BMW 525I SEDAN 2005 E60Pages: 221, PDF Size: 8.19 MB
Page 12 of 221
At a glance
11Reference
Controls
Driving tips
Communication
Navigation
Entertainment
Mobility
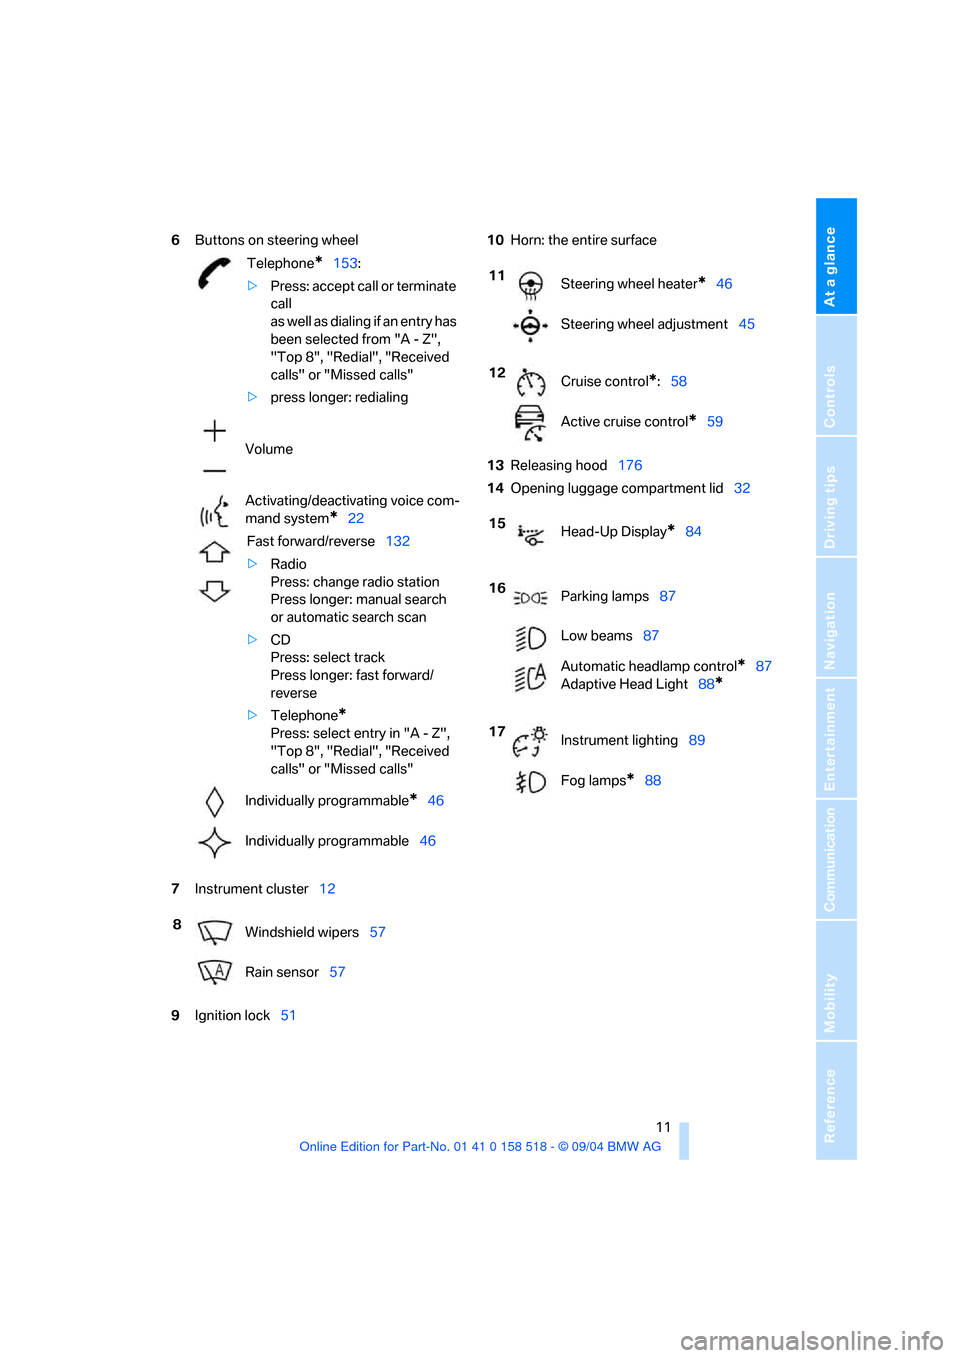
6Buttons on steering wheel
7Instrument cluster12
9Ignition lock5110Horn: the entire surface
13Releasing hood176
14Opening luggage compartment lid32
Telephone*153:
>Press: accept call or terminate
call
as well as dialing if an entry has
been selected from "A - Z",
"Top 8", "Redial", "Received
calls" or "Missed calls"
>press longer: redialing
Volume
Activating/deactivating voice com-
mand system
*22
Fast forward/reverse132
>Radio
Press: change radio station
Press longer: manual search
or automatic search scan
>CD
Press: select track
Press longer: fast forward/
reverse
>Telephone
*
Press: select entry in "A - Z",
"Top 8", "Redial", "Received
calls" or "Missed calls"
Individually programmable
*46
Individually programmable46
8
Windshield wipers57
Rain sensor57
11
Steering wheel heater*46
Steering wheel adjustment45
12
Cruise control
*:58
Active cruise control
*59
15
Head-Up Display
*84
16
Parking lamps87
Low beams87
Automatic headlamp control
*87
Adaptive Head Light88
*
17
Instrument lighting89
Fog lamps
*88
Page 34 of 221
Controls
33Reference
At a glance
Driving tips
Communication
Navigation
Entertainment
Mobility
Locking separately
Turn the master key with remote control in the
lock of the luggage compartment lid beyond a
resistance point to the right and withdraw it in
the horizontal position.
This locks the luggage compartment lid and
disconnects it from the central locking system.
If you then only hand over the spare key, refer to
page28, no access is possible via the luggage
compartment lid. This is an advantage when
valet parking, for example.
Unlocking again and opening manually
Turn master key toward the left until the resis-
tance point: the luggage compartment lid
opens.
If you use the key to unlock the luggage
compartment lid while the alarm system
is armed, the alarm will be triggered. You should
therefore unlock the vehicle ahead of time.
If the alarm is inadvertently triggered: switch off
the alarm, refer to page34.<
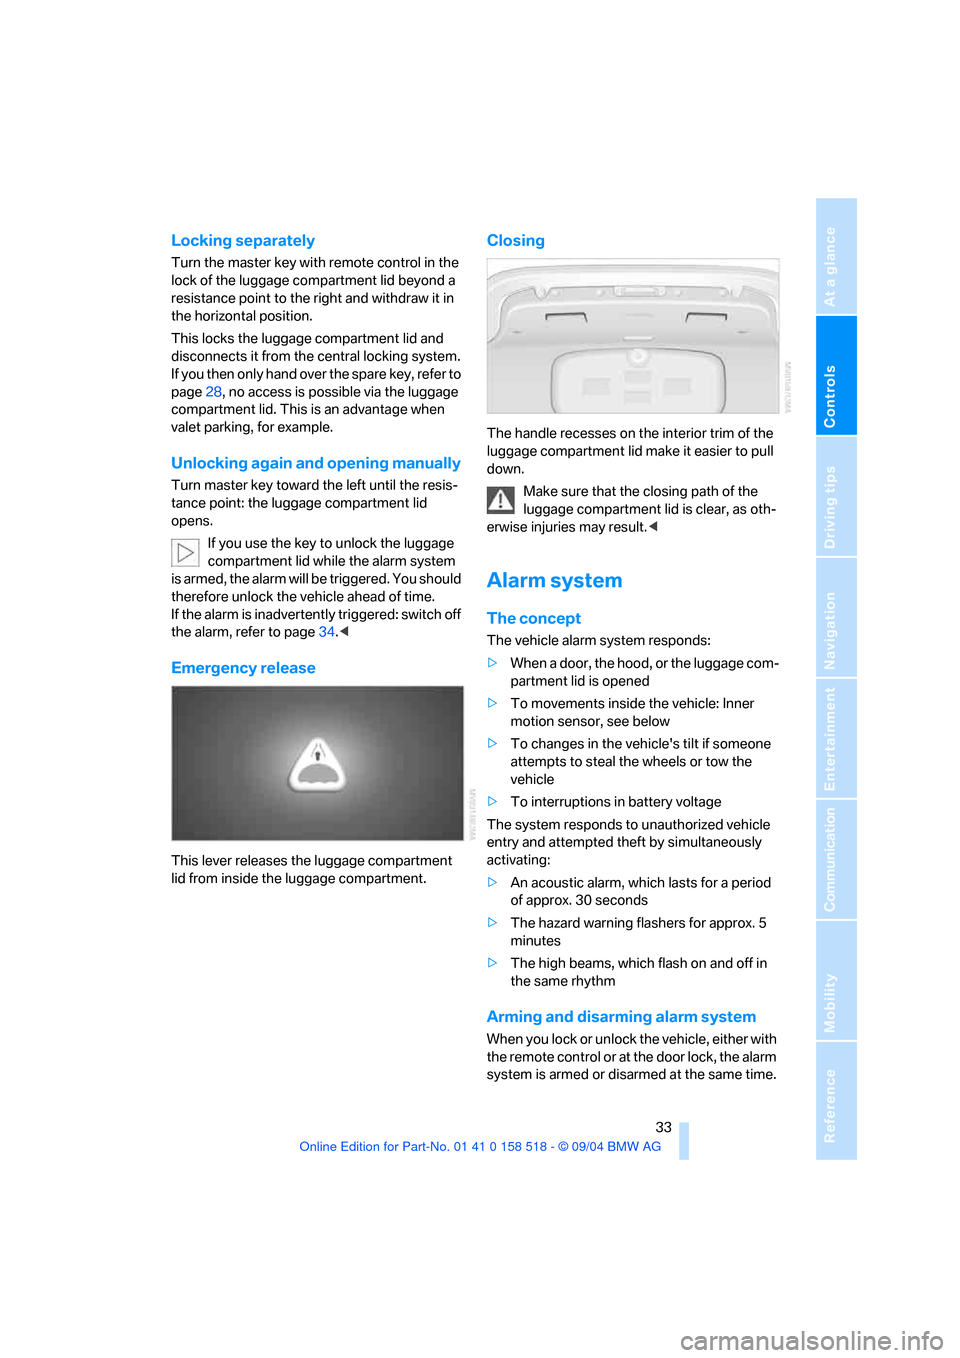
Emergency release
This lever releases the luggage compartment
lid from inside the luggage compartment.
Closing
The handle recesses on the interior trim of the
luggage compartment lid make it easier to pull
down.
Make sure that the closing path of the
luggage compartment lid is clear, as oth-
erwise injuries may result.<
Alarm system
The concept
The vehicle alarm system responds:
>When a door, the hood, or the luggage com-
partment lid is opened
>To movements inside the vehicle: Inner
motion sensor, see below
>To changes in the vehicle's tilt if someone
attempts to steal the wheels or tow the
vehicle
>To interruptions in battery voltage
The system responds to unauthorized vehicle
entry and attempted theft by simultaneously
activating:
>An acoustic alarm, which lasts for a period
of approx. 30 seconds
>The hazard warning flashers for approx. 5
minutes
>The high beams, which flash on and off in
the same rhythm
Arming and disarming alarm system
When you lock or unlock the vehicle, either with
the remote control or at the door lock, the alarm
system is armed or disarmed at the same time.
Page 35 of 221
Opening and closing
34 The system indicates that it has been correctly
armed by switching on the hazard warning
flashers for a single cycle and by emitting an
acoustic signal.
You can also open the luggage compartment lid
with the system armed using the button on
the remote control, refer to page30. When the
luggage compartment lid is closed, it is locked
again and monitored.
Switching off alarm
>Unlock the vehicle using the remote control,
refer to page29
>or turn the ignition key to position 1, refer to
page51.
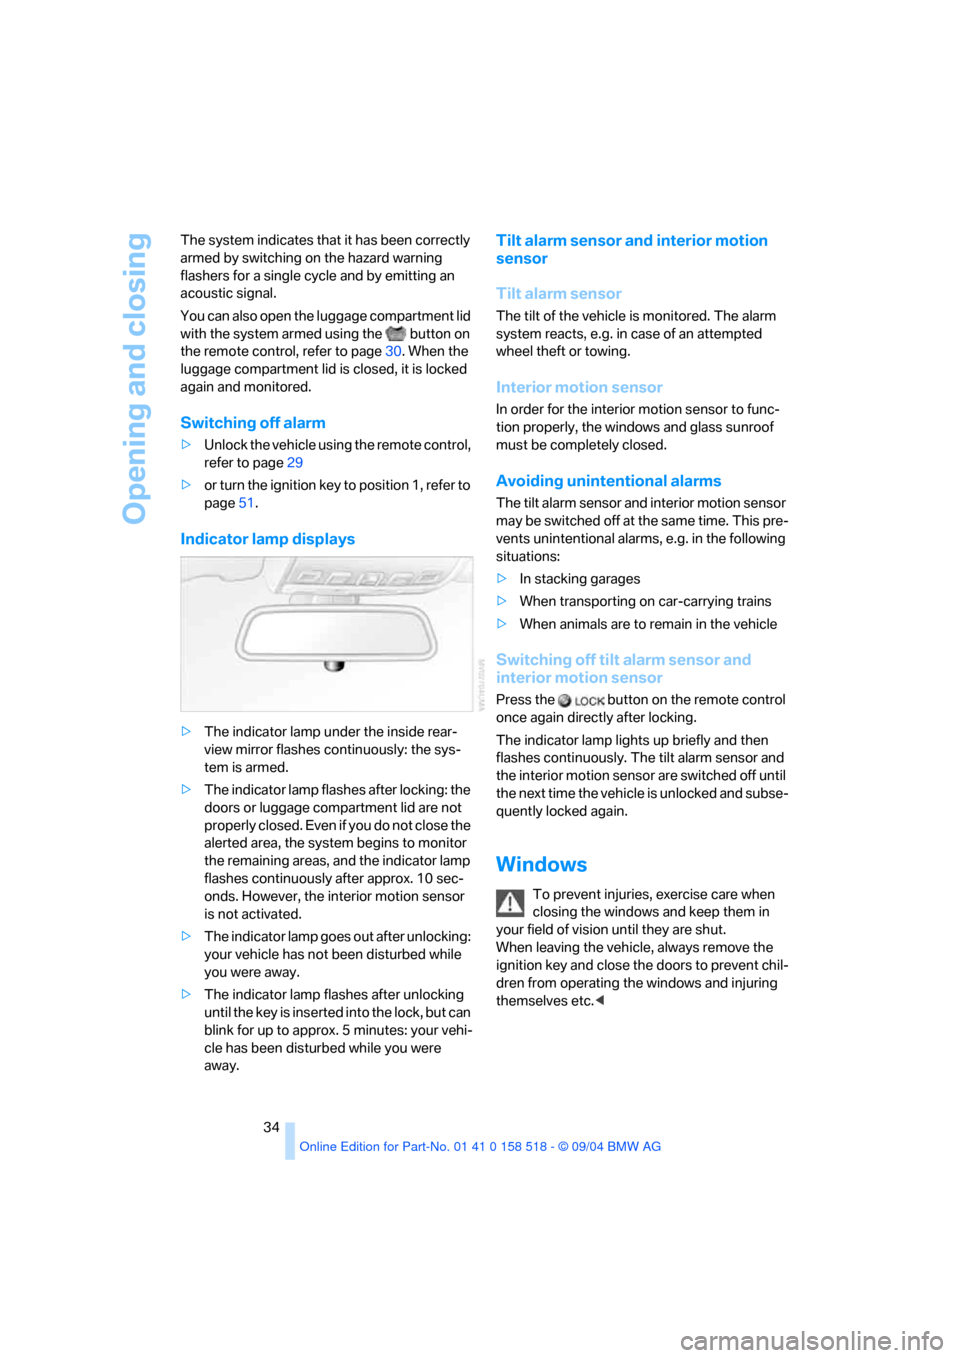
Indicator lamp displays
>The indicator lamp under the inside rear-
view mirror flashes continuously: the sys-
tem is armed.
>The indicator lamp flashes after locking: the
doors or luggage compartment lid are not
properly closed. Even if you do not close the
alerted area, the system begins to monitor
the remaining areas, and the indicator lamp
flashes continuously after approx. 10 sec-
onds. However, the interior motion sensor
is not activated.
>The indicator lamp goes out after unlocking:
your vehicle has not been disturbed while
you were away.
>The indicator lamp flashes after unlocking
until the key is inserted into the lock, but can
blink for up to approx. 5 minutes: your vehi-
cle has been disturbed while you were
away.
Tilt alarm sensor and interior motion
sensor
Tilt alarm sensor
The tilt of the vehicle is monitored. The alarm
system reacts, e.g. in case of an attempted
wheel theft or towing.
Interior motion sensor
In order for the interior motion sensor to func-
tion properly, the windows and glass sunroof
must be completely closed.
Avoiding unintentional alarms
The tilt alarm sensor and interior motion sensor
may be switched off at the same time. This pre-
vents unintentional alarms, e.g. in the following
situations:
>In stacking garages
>When transporting on car-carrying trains
>When animals are to remain in the vehicle
Switching off tilt alarm sensor and
interior motion sensor
Press the button on the remote control
once again directly after locking.
The indicator lamp lights up briefly and then
flashes continuously. The tilt alarm sensor and
the interior motion sensor are switched off until
the next time the vehicle is unlocked and subse-
quently locked again.
Windows
To prevent injuries, exercise care when
closing the windows and keep them in
your field of vision until they are shut.
When leaving the vehicle, always remove the
ignition key and close the doors to prevent chil-
dren from operating the windows and injuring
themselves etc.<
Page 58 of 221
Controls
57Reference
At a glance
Driving tips
Communication
Navigation
Entertainment
Mobility
4.Select "Triple turn signal activation" and
press the controller.
Triple turn signaling is activated.
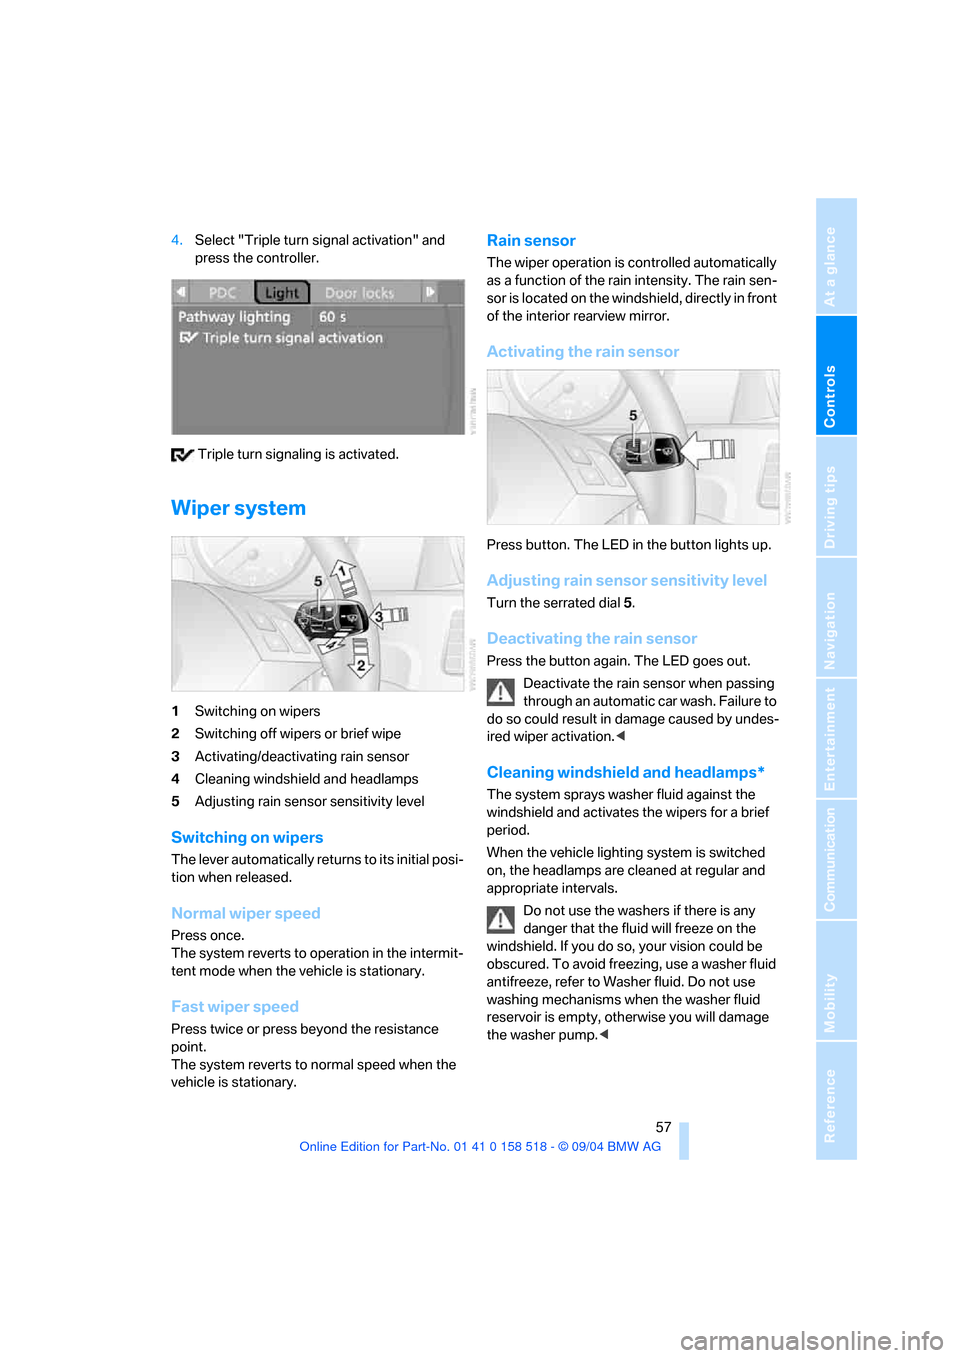
Wiper system
1Switching on wipers
2Switching off wipers or brief wipe
3Activating/deactivating rain sensor
4Cleaning windshield and headlamps
5Adjusting rain sensor sensitivity level
Switching on wipers
The lever automatically returns to its initial posi-
tion when released.
Normal wiper speed
Press once.
The system reverts to operation in the intermit-
tent mode when the vehicle is stationary.
Fast wiper speed
Press twice or press beyond the resistance
point.
The system reverts to normal speed when the
vehicle is stationary.
Rain sensor
The wiper operation is controlled automatically
as a function of the rain intensity. The rain sen-
sor is located on the windshield, directly in front
of the interior rearview mirror.
Activating the rain sensor
Press button. The LED in the button lights up.
Adjusting rain sensor sensitivity level
Turn the serrated dial 5.
Deactivating the rain sensor
Press the button again. The LED goes out.
Deactivate the rain sensor when passing
through an automatic car wash. Failure to
do so could result in damage caused by undes-
ired wiper activation.<
Cleaning windshield and headlamps*
The system sprays washer fluid against the
windshield and activates the wipers for a brief
period.
When the vehicle lighting system is switched
on, the headlamps are cleaned at regular and
appropriate intervals.
Do not use the washers if there is any
danger that the fluid will freeze on the
windshield. If you do so, your vision could be
obscured. To avoid freezing, use a washer fluid
antifreeze, refer to Washer fluid. Do not use
washing mechanisms when the washer fluid
reservoir is empty, otherwise you will damage
the washer pump.<
Page 65 of 221
Driving
64
Driver interventions
Anytime the driver presses down on the
accelerator pedal, any automatic braking
action by the system is interrupted until the
pedal is fully released. After doing this, release
the accelerator and the system again controls
your cruising speed and distance setting. While
driving with activated system, resting your foot
on the accelerator pedal will cause the system
not to brake even if necessary. Be certain that
floormats or other objects on the vehicle floor
do not interfere with movement of the accelera-
tor pedal.<
While active cruise control is capable of
braking your vehicle automatically when
you approach a slower vehicle ahead, it is
important to be aware that the ability of the sys-
tem to apply the brakes is also limited, particu-
larly if you are driving down a steep grade or
when you reduce your desired speed sharply.
The system cannot stop your vehicle. It uses
only a portion of braking system capacity and
does not utilize the full capacity of the vehicle
braking system. Therefore, the system cannot
decrease your speed for large differences in
speed between your vehicle and the vehicle
ahead. Examples: during emergency braking,
when you approach a vehicle traveling at a
much lower speed than your own speed such as
approaching a toll booth or when a much slower
vehicle cuts in front of you at close range.<
Whenever active cruise control
recognizes a situation that requires
driver braking because the system
capacity has been reached or has
been exceeded, the system alerts
the driver by flashing this symbol in the instru-
ment cluster and sounding a signal.
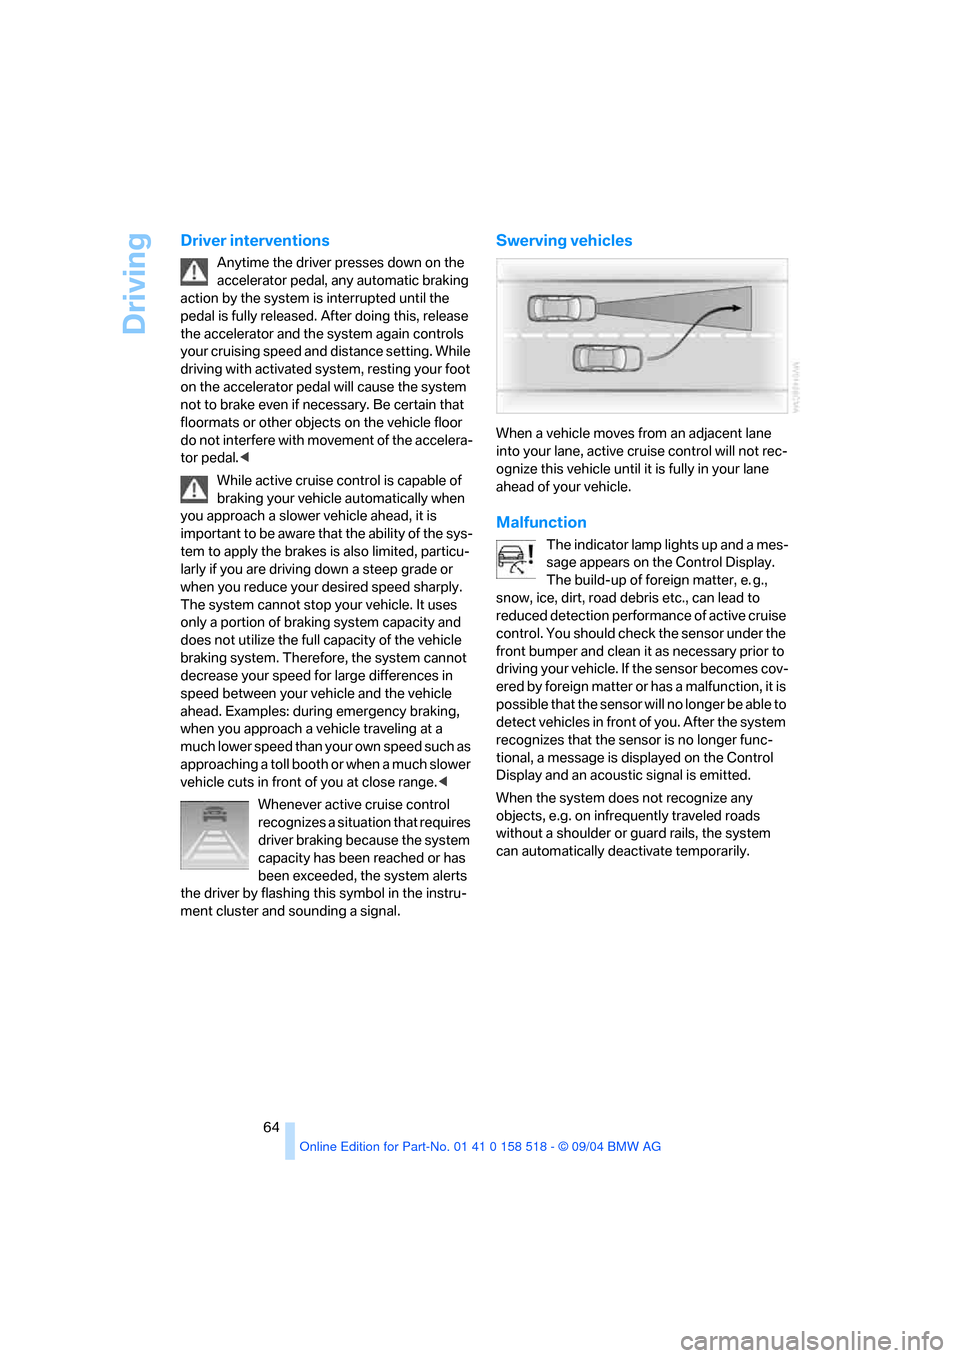
Swerving vehicles
When a vehicle moves from an adjacent lane
into your lane, active cruise control will not rec-
ognize this vehicle until it is fully in your lane
ahead of your vehicle.
Malfunction
The indicator lamp lights up and a mes-
sage appears on the Control Display.
The build-up of foreign matter, e. g.,
snow, ice, dirt, road debris etc., can lead to
reduced detection performance of active cruise
control. You should check the sensor under the
front bumper and clean it as necessary prior to
driving your vehicle. If the sensor becomes cov-
ered by foreign matter or has a malfunction, it is
possible that the sensor will no longer be able to
detect vehicles in front of you. After the system
recognizes that the sensor is no longer func-
tional, a message is displayed on the Control
Display and an acoustic signal is emitted.
When the system does not recognize any
objects, e.g. on infrequently traveled roads
without a shoulder or guard rails, the system
can automatically deactivate temporarily.
Page 77 of 221
Technology for comfort, convenience and safety
76
Technology for comfort, convenience and
safety
PDC Park Distance Control*
The concept
The PDC assists you when you are parking.
Acoustic signals and an optical display
* alert
you to the approach of an object from behind
your vehicle. To measure the distance, there
are four ultrasonic sensors in each bumper. The
sensors at the front and at the two rear corners
have a range of approx. 24 in/60 cm; the rear
middle sensors have approx. 5 ft/1.50 m.
PDC is a parking aid that can indicate
objects when they are approached
slowly, as is usually the case when parking.
Avoid approaching an object at high speed, as
otherwise the physical circumstances would
mean that the system warning was too late.<
Automatic mode
When the ignition key is in position 2, the sys-
tem automatically assumes operational status
after a few seconds each time you shift into
reverse or move the selector lever into the R
position.
Wait this short period before driving. The sys-
tem switches itself off when you shift out of
reverse.
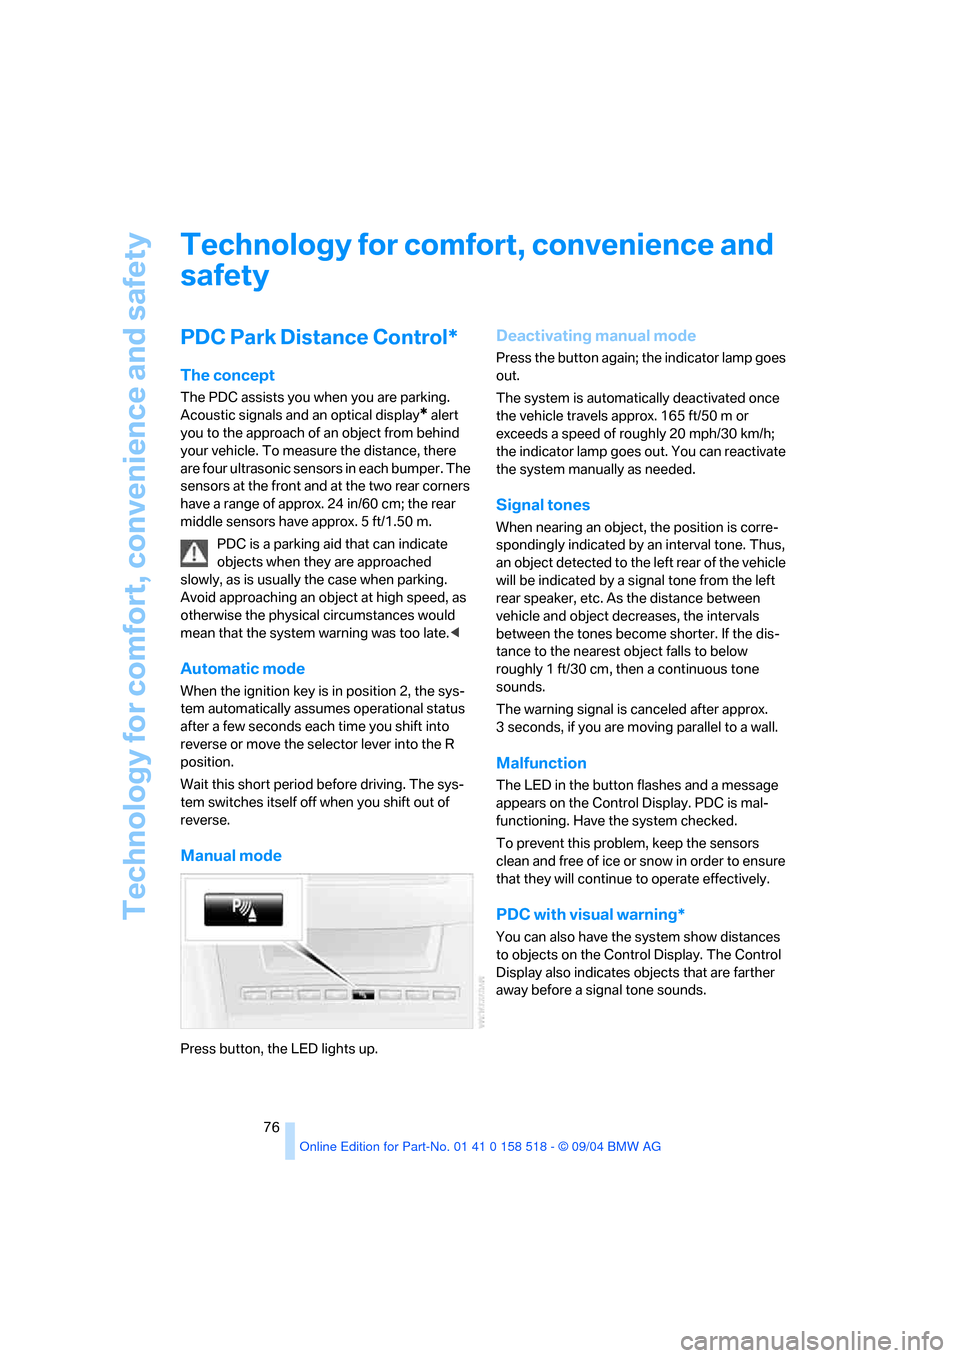
Manual mode
Press button, the LED lights up.
Deactivating manual mode
Press the button again; the indicator lamp goes
out.
The system is automatically deactivated once
the vehicle travels approx. 165 ft/50 m or
exceeds a speed of roughly 20 mph/30 km/h;
the indicator lamp goes out. You can reactivate
the system manually as needed.
Signal tones
When nearing an object, the position is corre-
spondingly indicated by an interval tone. Thus,
an object detected to the left rear of the vehicle
will be indicated by a signal tone from the left
rear speaker, etc. As the distance between
vehicle and object decreases, the intervals
between the tones become shorter. If the dis-
tance to the nearest object falls to below
roughly 1 ft/30 cm, then a continuous tone
sounds.
The warning signal is canceled after approx.
3 seconds, if you are moving parallel to a wall.
Malfunction
The LED in the button flashes and a message
appears on the Control Display. PDC is mal-
functioning. Have the system checked.
To prevent this problem, keep the sensors
clean and free of ice or snow in order to ensure
that they will continue to operate effectively.
PDC with visual warning*
You can also have the system show distances
to objects on the Control Display. The Control
Display also indicates objects that are farther
away before a signal tone sounds.
Page 78 of 221
Controls
77Reference
At a glance
Driving tips
Communication
Navigation
Entertainment
Mobility
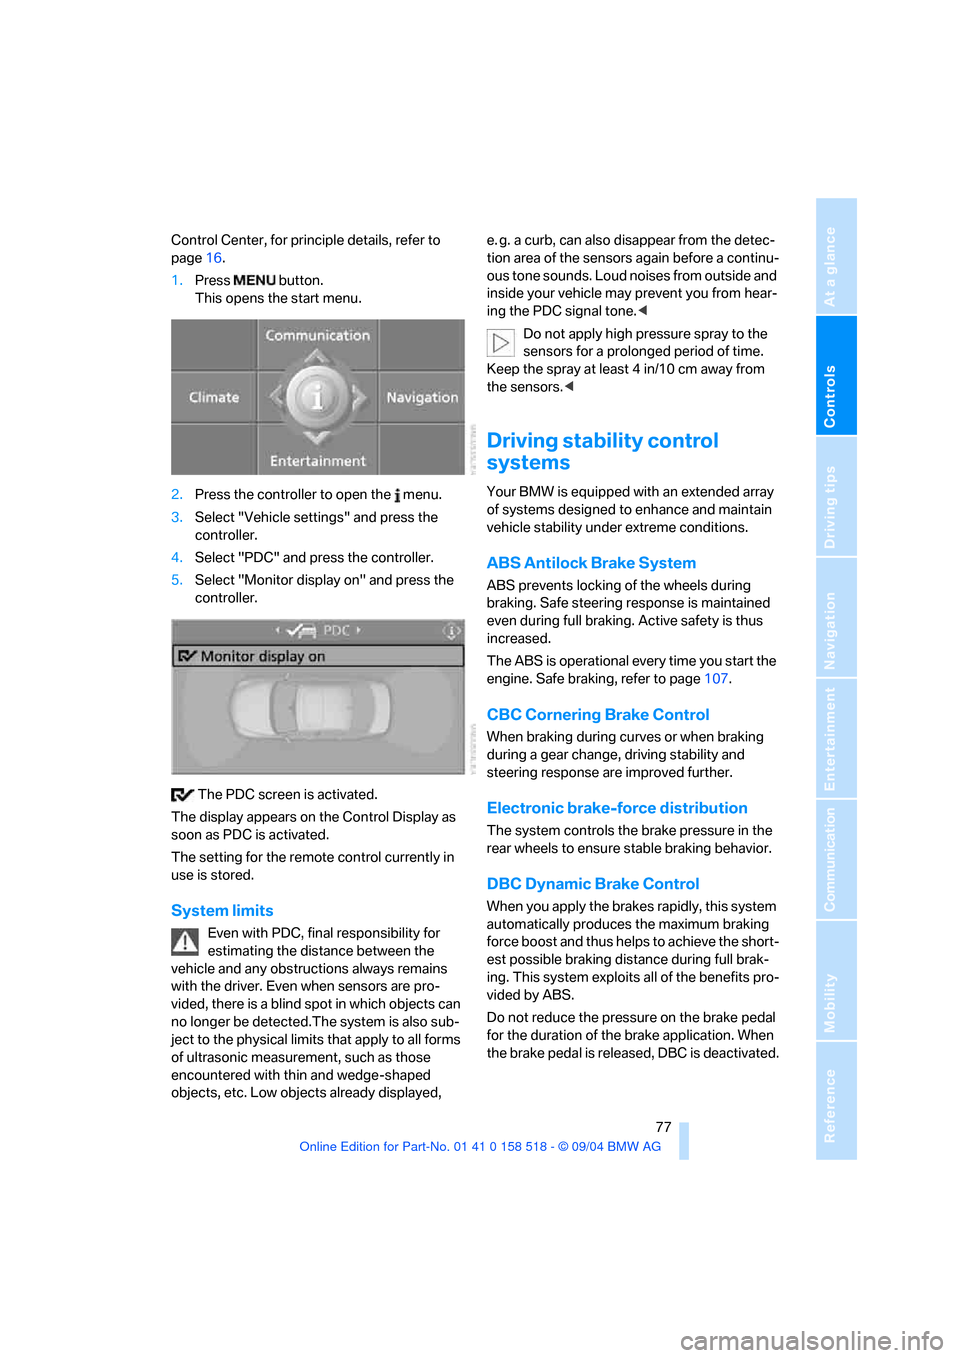
Control Center, for principle details, refer to
page16.
1.Press button.
This opens the start menu.
2.Press the controller to open the menu.
3.Select "Vehicle settings" and press the
controller.
4.Select "PDC" and press the controller.
5.Select "Monitor display on" and press the
controller.
The PDC screen is activated.
The display appears on the Control Display as
soon as PDC is activated.
The setting for the remote control currently in
use is stored.
System limits
Even with PDC, final responsibility for
estimating the distance between the
vehicle and any obstructions always remains
with the driver. Even when sensors are pro-
vided, there is a blind spot in which objects can
no longer be detected.The system is also sub-
ject to the physical limits that apply to all forms
of ultrasonic measurement, such as those
encountered with thin and wedge-shaped
objects, etc. Low objects already displayed, e. g. a curb, can also disappear from the detec-
tion area of the sensors again before a continu-
ous tone sounds. Loud noises from outside and
inside your vehicle may prevent you from hear-
ing the PDC signal tone.<
Do not apply high pressure spray to the
sensors for a prolonged period of time.
Keep the spray at least 4 in/10 cm away from
the sensors.<
Driving stability control
systems
Your BMW is equipped with an extended array
of systems designed to enhance and maintain
vehicle stability under extreme conditions.
ABS Antilock Brake System
ABS prevents locking of the wheels during
braking. Safe steering response is maintained
even during full braking. Active safety is thus
increased.
The ABS is operational every time you start the
engine. Safe braking, refer to page107.
CBC Cornering Brake Control
When braking during curves or when braking
during a gear change, driving stability and
steering response are improved further.
Electronic brake-force distribution
The system controls the brake pressure in the
rear wheels to ensure stable braking behavior.
DBC Dynamic Brake Control
When you apply the brakes rapidly, this system
automatically produces the maximum braking
force boost and thus helps to achieve the short-
est possible braking distance during full brak-
ing. This system exploits all of the benefits pro-
vided by ABS.
Do not reduce the pressure on the brake pedal
for the duration of the brake application. When
the brake pedal is released, DBC is deactivated.
Page 91 of 221
A congenial climate
90
A congenial climate
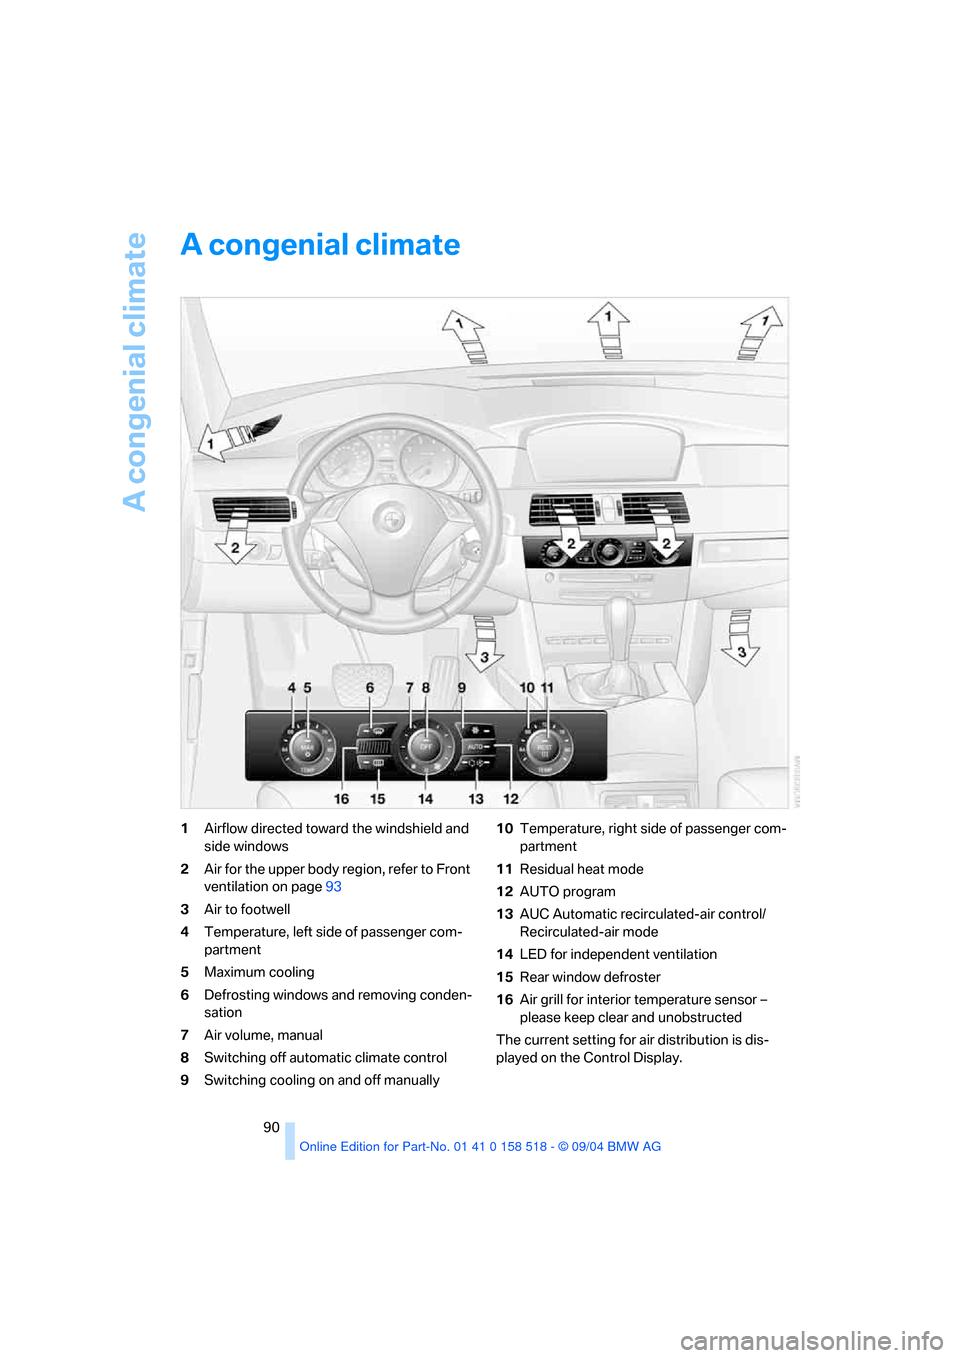
1Airflow directed toward the windshield and
side windows
2Air for the upper body region, refer to Front
ventilation on page93
3Air to footwell
4Temperature, left side of passenger com-
partment
5Maximum cooling
6Defrosting windows and removing conden-
sation
7Air volume, manual
8Switching off automatic climate control
9Switching cooling on and off manually10Temperature, right side of passenger com-
partment
11Residual heat mode
12AUTO program
13AUC Automatic recirculated-air control/
Recirculated-air mode
14LED for independent ventilation
15Rear window defroster
16Air grill for interior temperature sensor –
please keep clear and unobstructed
The current setting for air distribution is dis-
played on the Control Display.
Page 92 of 221
Controls
91Reference
At a glance
Driving tips
Communication
Navigation
Entertainment
Mobility
A congenial climate
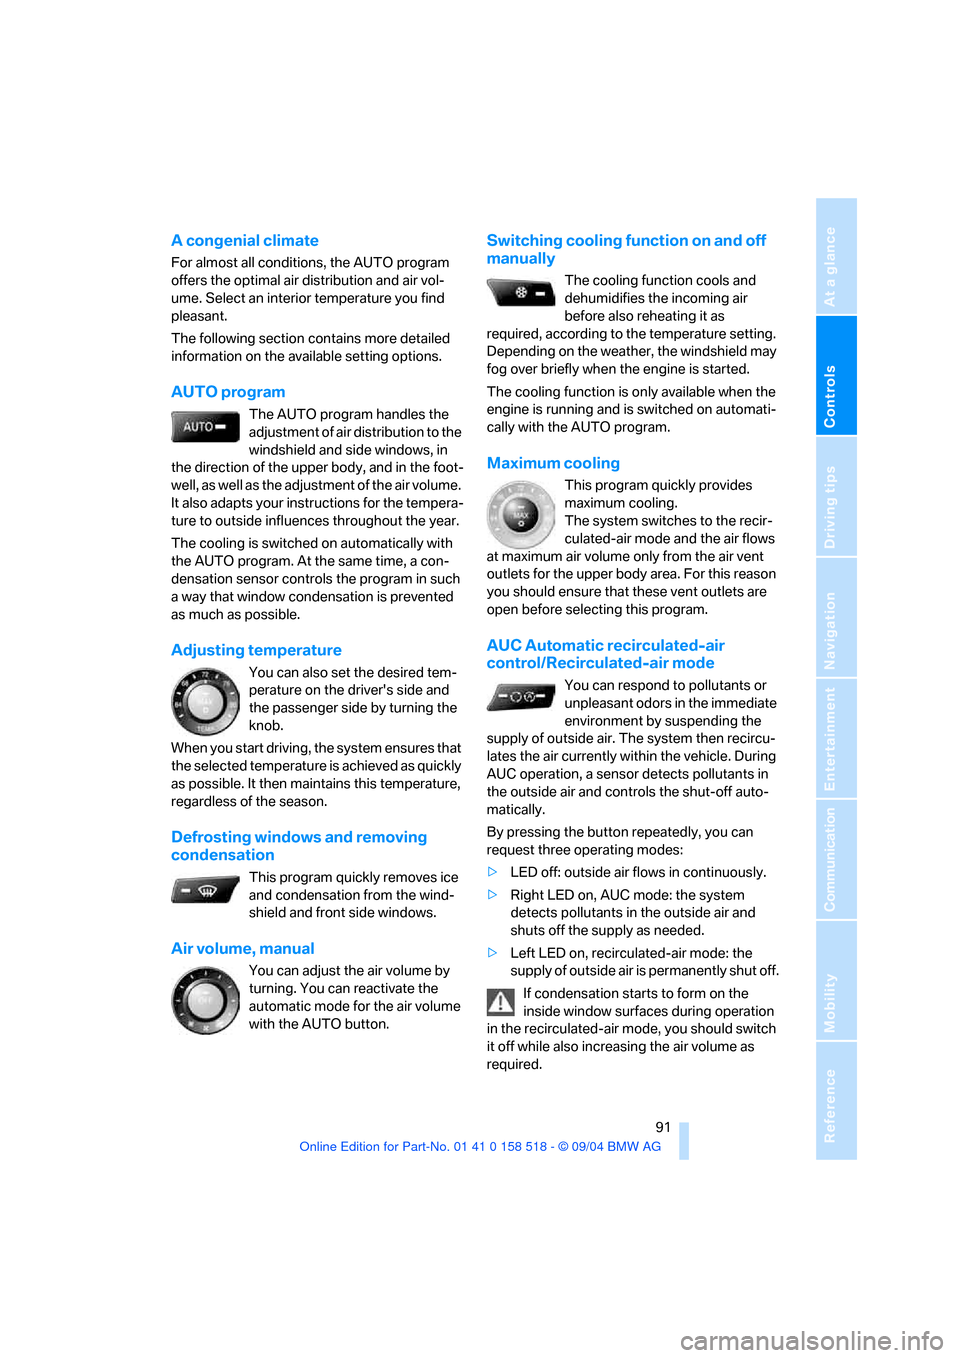
For almost all conditions, the AUTO program
offers the optimal air distribution and air vol-
ume. Select an interior temperature you find
pleasant.
The following section contains more detailed
information on the available setting options.
AUTO program
The AUTO program handles the
adjustment of air distribution to the
windshield and side windows, in
the direction of the upper body, and in the foot-
well, as well as the adjustment of the air volume.
It also adapts your instructions for the tempera-
ture to outside influences throughout the year.
The cooling is switched on automatically with
the AUTO program. At the same time, a con-
densation sensor controls the program in such
a way that window condensation is prevented
as much as possible.
Adjusting temperature
You can also set the desired tem-
perature on the driver's side and
the passenger side by turning the
knob.
When you start driving, the system ensures that
the selected temperature is achieved as quickly
as possible. It then maintains this temperature,
regardless of the season.
Defrosting windows and removing
condensation
This program quickly removes ice
and condensation from the wind-
shield and front side windows.
Air volume, manual
You can adjust the air volume by
turning. You can reactivate the
automatic mode for the air volume
with the AUTO button.
Switching cooling function on and off
manually
The cooling function cools and
dehumidifies the incoming air
before also reheating it as
required, according to the temperature setting.
Depending on the weather, the windshield may
fog over briefly when the engine is started.
The cooling function is only available when the
engine is running and is switched on automati-
cally with the AUTO program.
Maximum cooling
This program quickly provides
maximum cooling.
The system switches to the recir-
culated-air mode and the air flows
at maximum air volume only from the air vent
outlets for the upper body area. For this reason
you should ensure that these vent outlets are
open before selecting this program.
AUC Automatic recirculated-air
control/Recirculated-air mode
You can respond to pollutants or
unpleasant odors in the immediate
environment by suspending the
supply of outside air. The system then recircu-
lates the air currently within the vehicle. During
AUC operation, a sensor detects pollutants in
the outside air and controls the shut-off auto-
matically.
By pressing the button repeatedly, you can
request three operating modes:
>LED off: outside air flows in continuously.
>Right LED on, AUC mode: the system
detects pollutants in the outside air and
shuts off the supply as needed.
>Left LED on, recirculated-air mode: the
supply of outside air is permanently shut off.
If condensation starts to form on the
inside window surfaces during operation
in the recirculated-air mode, you should switch
it off while also increasing the air volume as
required.
Page 181 of 221
Maintenance
180
Maintenance
The BMW maintenance
system
The BMW maintenance system supports the
preservation of the traffic and operating safety
of your BMW. The service schedule also
includes operations related to the vehicle's
comfort and convenience features, such as
replacement of the filters for the inside air. The
ultimate objective is to ensure economical
maintenance by providing the ideal service for
your vehicle.
Should the day come when you decide to sell
your BMW, you will find that a complete dealer
service history is an asset of inestimable value.
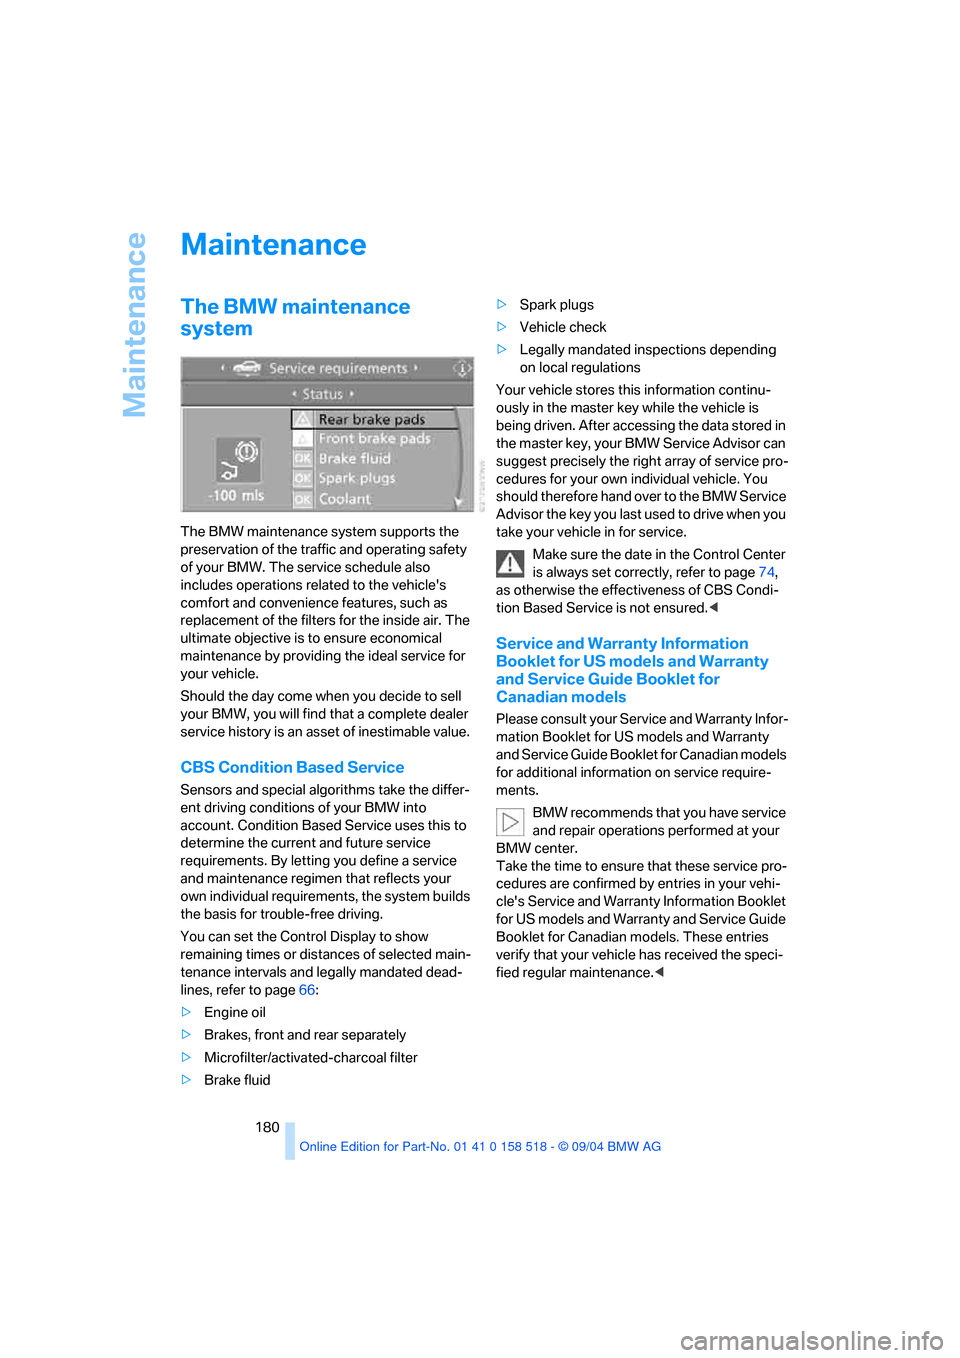
CBS Condition Based Service
Sensors and special algorithms take the differ-
ent driving conditions of your BMW into
account. Condition Based Service uses this to
determine the current and future service
requirements. By letting you define a service
and maintenance regimen that reflects your
own individual requirements, the system builds
the basis for trouble-free driving.
You can set the Control Display to show
remaining times or distances of selected main-
tenance intervals and legally mandated dead-
lines, refer to page66:
>Engine oil
>Brakes, front and rear separately
>Microfilter/activated-charcoal filter
>Brake fluid>Spark plugs
>Vehicle check
>Legally mandated inspections depending
on local regulations
Your vehicle stores this information continu-
ously in the master key while the vehicle is
being driven. After accessing the data stored in
the master key, your BMW Service Advisor can
suggest precisely the right array of service pro-
cedures for your own individual vehicle. You
should therefore hand over to the BMW Service
Advisor the key you last used to drive when you
take your vehicle in for service.
Make sure the date in the Control Center
is always set correctly, refer to page74,
as otherwise the effectiveness of CBS Condi-
tion Based Service is not ensured.<
Service and Warranty Information
Booklet for US models and Warranty
and Service Guide Booklet for
Canadian models
Please consult your Service and Warranty Infor-
mation Booklet for US models and Warranty
and Service Guide Booklet for Canadian models
for additional information on service require-
ments.
BMW recommends that you have service
and repair operations performed at your
BMW center.
Take the time to ensure that these service pro-
cedures are confirmed by entries in your vehi-
cle's Service and Warranty Information Booklet
for US models and Warranty and Service Guide
Booklet for Canadian models. These entries
verify that your vehicle has received the speci-
fied regular maintenance.<