buttons BMW 525XI 2006 Owners Manual
[x] Cancel search | Manufacturer: BMW, Model Year: 2006, Model line: 525XI, Model: BMW 525XI 2006Pages: 248, PDF Size: 8.58 MB
Page 10 of 248
At a glance
This overview of buttons, switches and displays
is intended to familiarize you with your vehicle's
operating environment. The section will also
assist you in becoming acquainted with the
control concepts and options available
for operating the various systems.
At a glance
Page 12 of 248
At a glance
11Reference
Controls
Driving tips
Communications
Navigation
Entertainment
Mobility
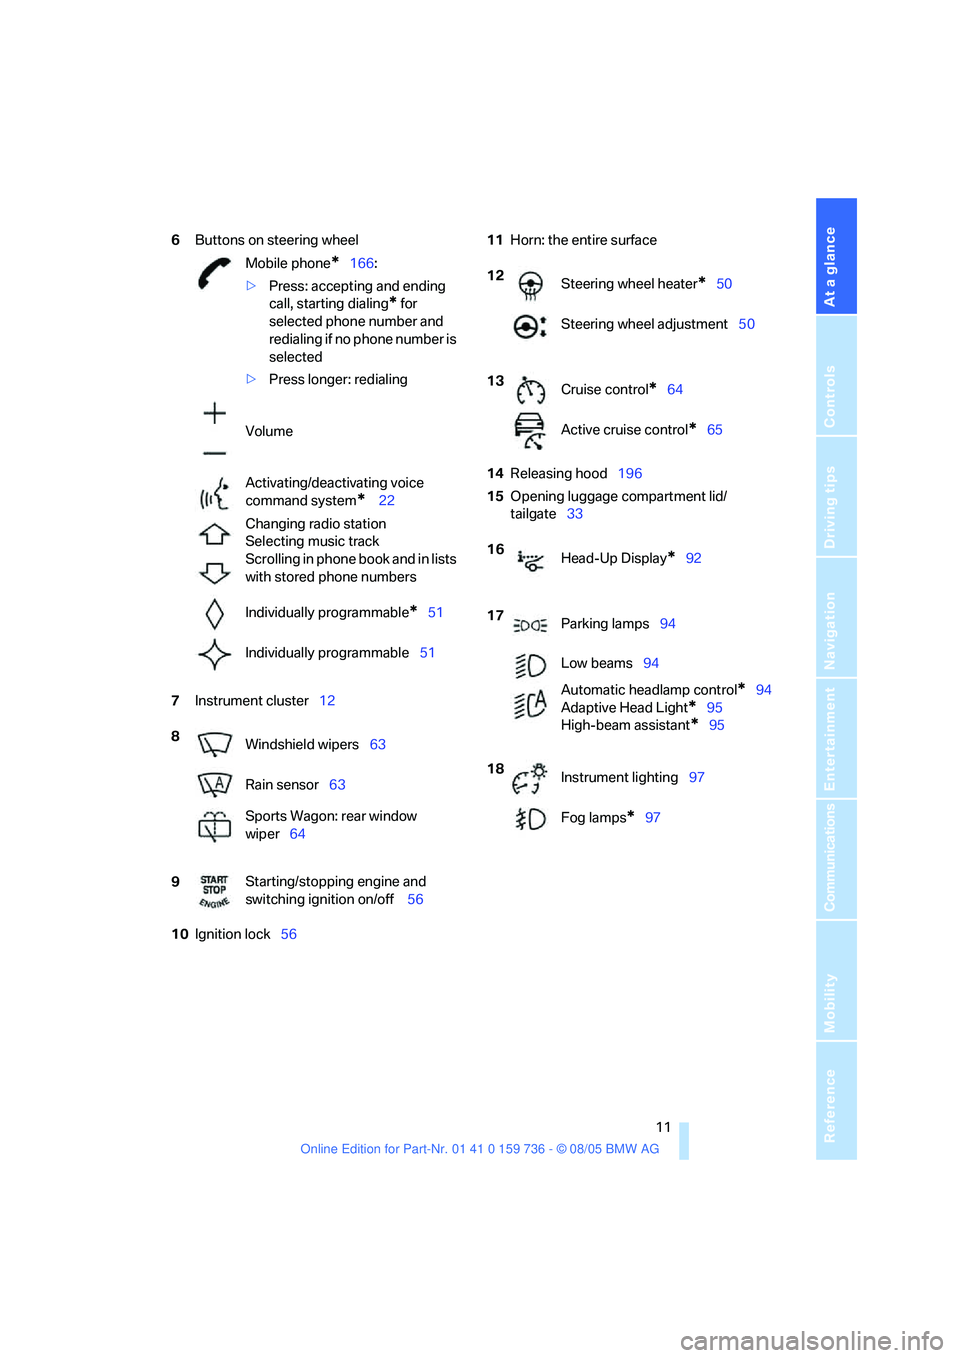
6Buttons on steering wheel
7Instrument cluster12
10Ignition lock5611Horn: the entire surface
14Releasing hood196
15Opening luggage compartment lid/
tailgate33 Mobile phone
*166:
>Press: accepting and ending
call, starting dialing
* for
selected phone number and
redialing if no phone number is
selected
>Press longer: redialing
Volume
Activating/deactivating voice
command system
* 22
Changing radio station
Selecting music track
Scrolling in phone book and in lists
with stored phone numbers
Individually programmable
*51
Individually programmable51
8
Windshield wipers63
Rain sensor63
Sports Wagon: rear window
wiper64
9Starting/stopping engine and
switching ignition on/off 56
12
Steering wheel heater*50
Steering wheel adjustment50
13
Cruise control
*64
Active cruise control
*65
16
Head-Up Display
*92
17
Parking lamps94
Low beams94
Automatic headlamp control
*94
Adaptive Head Light
*95
High-beam assistant
*95
18
Instrument lighting97
Fog lamps
*97
Page 30 of 248
Controls
29Reference
At a glance
Driving tips
Communications
Navigation
Entertainment
Mobility
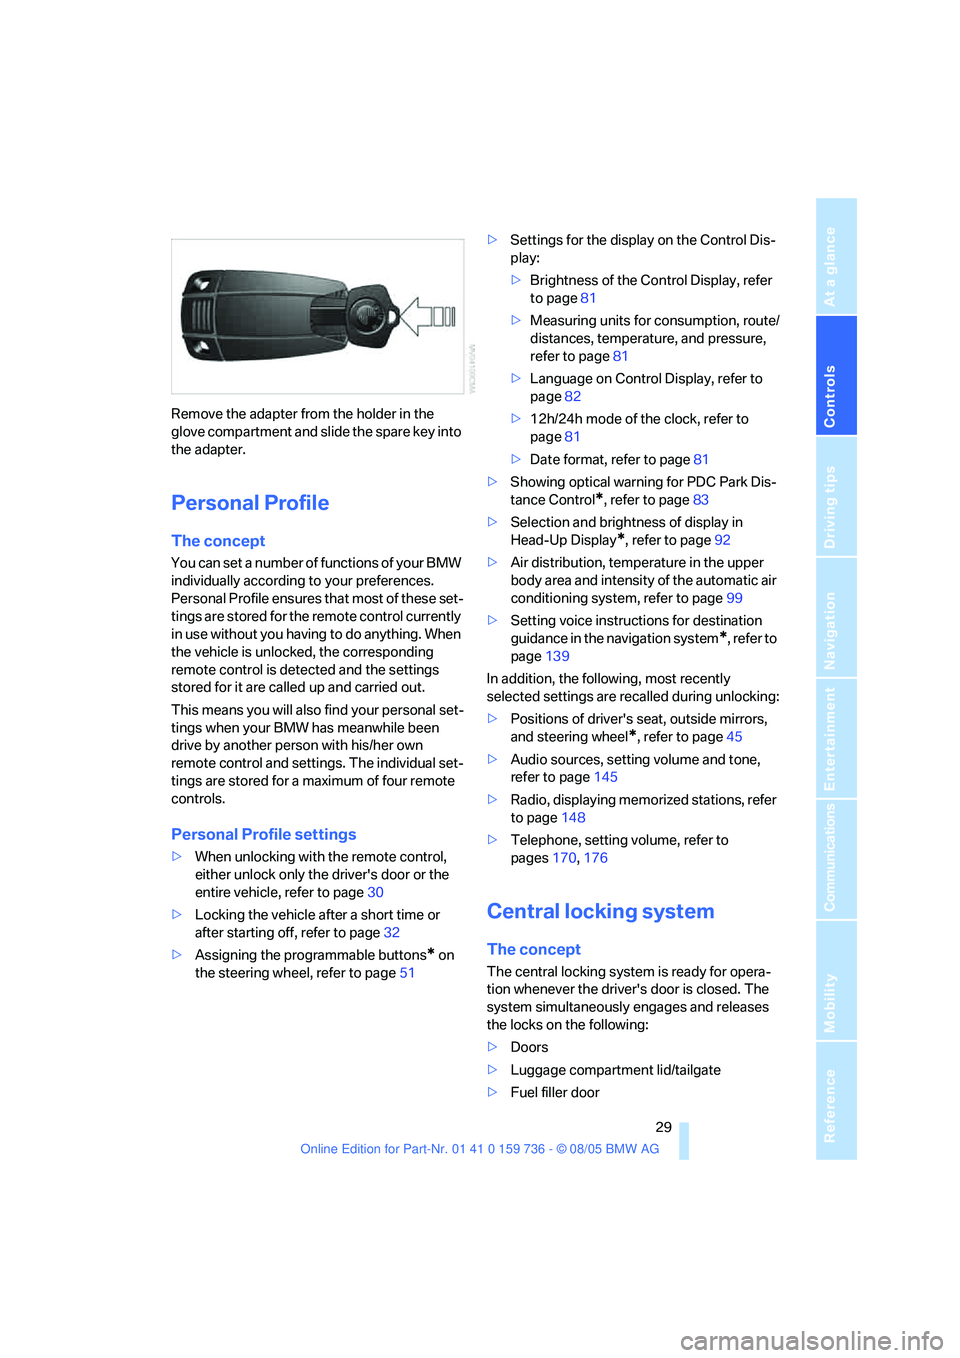
Remove the adapter from the holder in the
glove compartment and slide the spare key into
the adapter.
Personal Profile
The concept
You can set a number of functions of your BMW
individually according to your preferences.
Personal Profile ensures that most of these set-
tings are stored for the remote control currently
in use without you having to do anything. When
the vehicle is unlocked, the corresponding
remote control is detected and the settings
stored for it are called up and carried out.
This means you will also find your personal set-
tings when your BMW has meanwhile been
drive by another person with his/her own
remote control and settings. The individual set-
tings are stored for a maximum of four remote
controls.
Personal Profile settings
>When unlocking with the remote control,
either unlock only the driver's door or the
entire vehicle, refer to page30
>Locking the vehicle after a short time or
after starting off, refer to page32
>Assigning the programmable buttons
* on
the steering wheel, refer to page51>Settings for the display on the Control Dis-
play:
>Brightness of the Control Display, refer
to page81
>Measuring units for consumption, route/
distances, temperature, and pressure,
refer to page81
>Language on Control Display, refer to
page82
>12h/24h mode of the clock, refer to
page81
>Date format, refer to page81
>Showing optical warning for PDC Park Dis-
tance Control
*, refer to page83
>Selection and brightness of display in
Head-Up Display
*, refer to page92
>Air distribution, temperature in the upper
body area and intensity of the automatic air
conditioning system, refer to page99
>Setting voice instructions for destination
guidance in the navigation system
*, refer to
page139
In addition, the following, most recently
selected settings are recalled during unlocking:
>Positions of driver's seat, outside mirrors,
and steering wheel
*, refer to page45
>Audio sources, setting volume and tone,
refer to page145
>Radio, displaying memorized stations, refer
to page148
>Telephone, setting volume, refer to
pages170,176
Central locking system
The concept
The central locking system is ready for opera-
tion whenever the driver's door is closed. The
system simultaneously engages and releases
the locks on the following:
>Doors
>Luggage compartment lid/tailgate
>Fuel filler door
Page 31 of 248
Opening and closing
30
Operation from outside
>via the remote control
>via the door lock
>with comfort access
* via the door handles
At the same time, the anti-theft system is also
operated. It prevents the doors from being
unlocked using the lock buttons or door han-
dles. The alarm system
is armed/disarmed at
the same time. The interior lamps and the cour-
tesy lamps
* are also switched on and off with
the remote control.
You can find more detailed information on the
alarm system
on page36.
Operating from inside
Via the button for central locking, refer to
page32. The fuel filler door is not locked.
In an accident of sufficient severity, the central
locking system automatically unlocks the vehi-
cle. In addition, the hazard warning flashers and
interior lamps come on.
Opening and closing: from
outside
Using remote control
Persons or animals left unattended in a
parked vehicle could lock the doors from
the inside. you should always keep the remote
control with you; this precaution ensures that
you will remain able to unlock the vehicle from
the outside at all times.<
Unlocking
Use the button to unlock the vehicle accord-
ing to current settings.
iDrive, for principle details, refer to page16.
1.Press the button.
This opens the start menu.
2.Press the controller to open the menu.
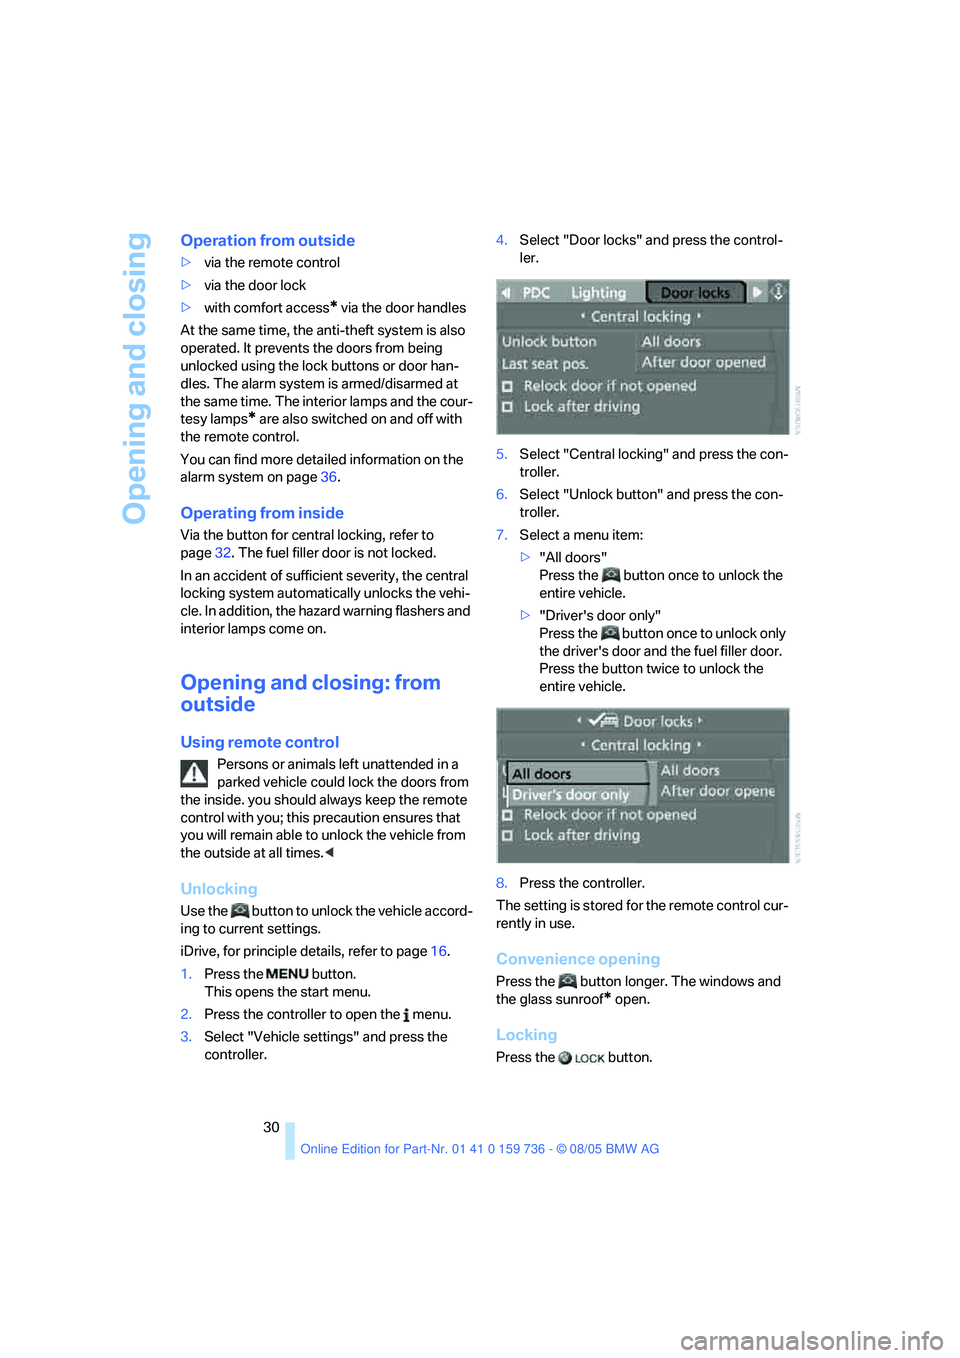
3.Select "Vehicle settings" and press the
controller.4.Select "Door locks" and press the control-
ler.
5.Select "Central locking" and press the con-
troller.
6.Select "Unlock button" and press the con-
troller.
7.Select a menu item:
>"All doors"
Press the button once to unlock the
entire vehicle.
>"Driver's door only"
Press the button once to unlock only
the driver's door and the fuel filler door.
Press the button twice to unlock the
entire vehicle.
8.Press the controller.
The setting is stored for the remote control cur-
rently in use.
Convenience opening
Press the button longer. The windows and
the glass sunroof
* open.
Locking
Press the button.
Page 39 of 248
Opening and closing
38 remote control with you, e.g. in your jacket
pocket. The vehicle automatically detects the
related remote control in the immediate vicinity
or in the interior.
Comfort access supports the following func-
tions:
>Unlocking/locking vehicle
>Starting engine
>Comfort locking
Functional requirement
>The vehicle can only be unlocked if the
vehicle detects that the remote control car-
ried is located outside the vehicle.
>The next unlocking and locking cycle is not
possible until after approx. 2 seconds.
>The engine can only be started if the vehicle
detects that the remote control carried is
located in the vehicle.
Special features in contrast to ordinary
remote control
It is basically irrelevant whether you operate the
functions mentioned previously with the com-
fort access feature or by pressing the buttons
on the remote control. Therefore, please famil-
iarize yourself with the information on opening
and closing beginning on page28 beforehand.
The special features when using comfort
access are described in the following.
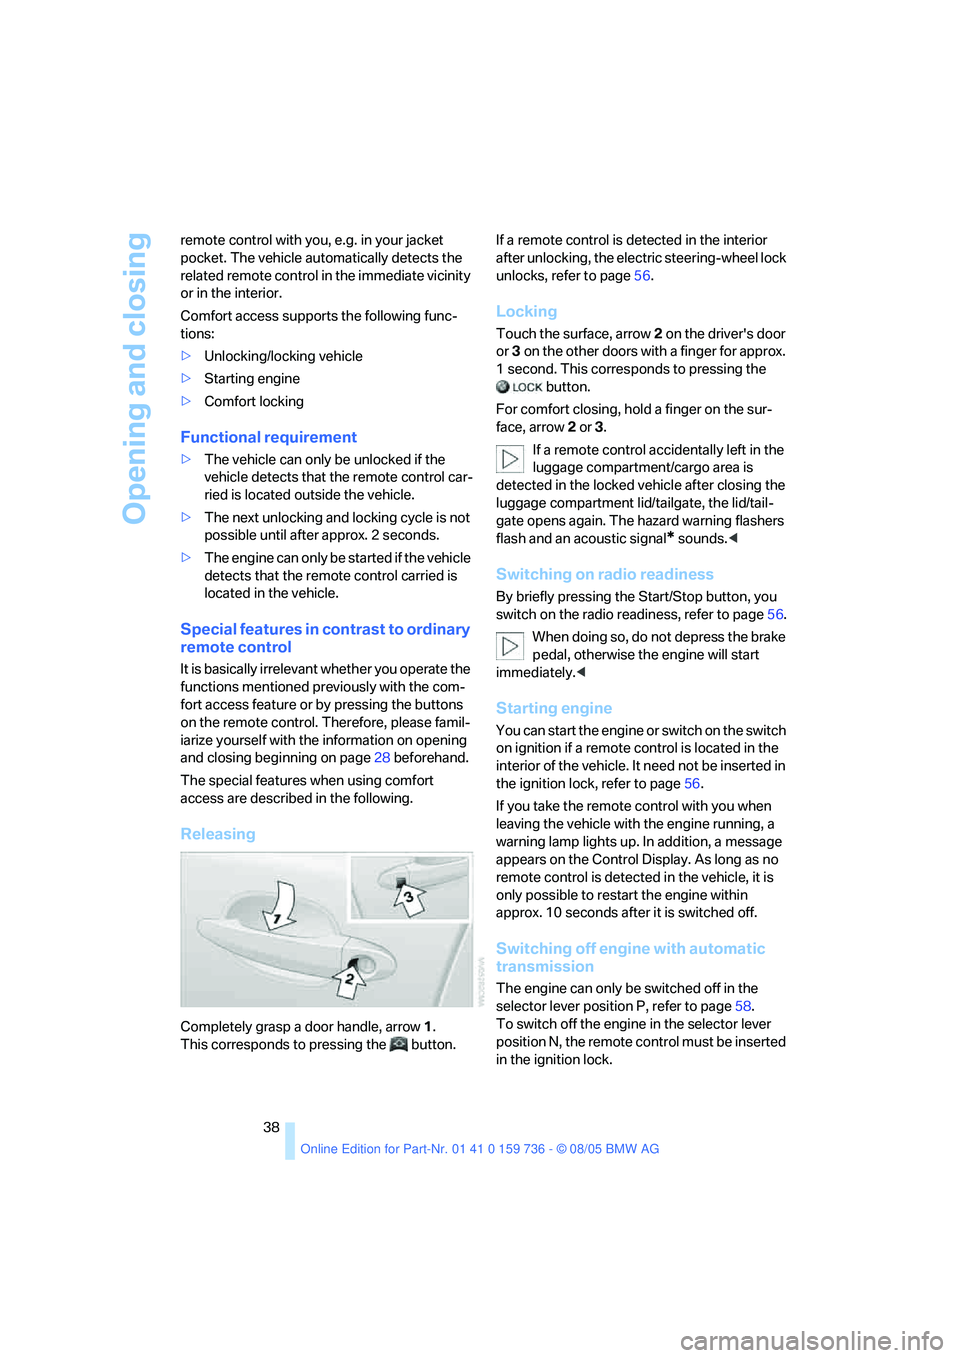
Releasing
Completely grasp a door handle, arrow1.
This corresponds to pressing the button.If a remote control is detected in the interior
after unlocking, the electric steering-wheel lock
unlocks, refer to page56.
Locking
Touch the surface, arrow2 on the driver's door
or3 on the other doors with a finger for approx.
1 second. This corresponds to pressing the
button.
For comfort closing, hold a finger on the sur-
face, arrow2 or 3.
If a remote control accidentally left in the
luggage compartment/cargo area is
detected in the locked vehicle after closing the
luggage compartment lid/tailgate, the lid/tail-
gate opens again. The hazard warning flashers
flash and an acoustic signal
* sounds.<
Switching on radio readiness
By briefly pressing the Start/Stop button, you
switch on the radio readiness, refer to page56.
When doing so, do not depress the brake
pedal, otherwise the engine will start
immediately.<
Starting engine
You can start the engine or switch on the switch
on ignition if a remote control is located in the
interior of the vehicle. It need not be inserted in
the ignition lock, refer to page56.
If you take the remote control with you when
leaving the vehicle with the engine running, a
warning lamp lights up. In addition, a message
appears on the Control Display. As long as no
remote control is detected in the vehicle, it is
only possible to restart the engine within
approx. 10 seconds after it is switched off.
Switching off engine with automatic
transmission
The engine can only be switched off in the
selector lever position P, refer to page58.
To switch off the engine in the selector lever
position N, the remote control must be inserted
in the ignition lock.
Page 40 of 248
Controls
39Reference
At a glance
Driving tips
Communications
Navigation
Entertainment
Mobility
Before driving into a car wash with
automatic transmission
1.Insert the remote control into the ignition
lock.
2.Depress brake pedal.
3.Place selector lever in position N.
4.Switch off the engine.
The vehicle can roll.
Malfunction
The comfort access function may malfunction
due to local radio waves. Then open or close the
vehicle with the buttons on the remote control
or with a key. To start the engine following this,
insert the remote control in the ignition lock.
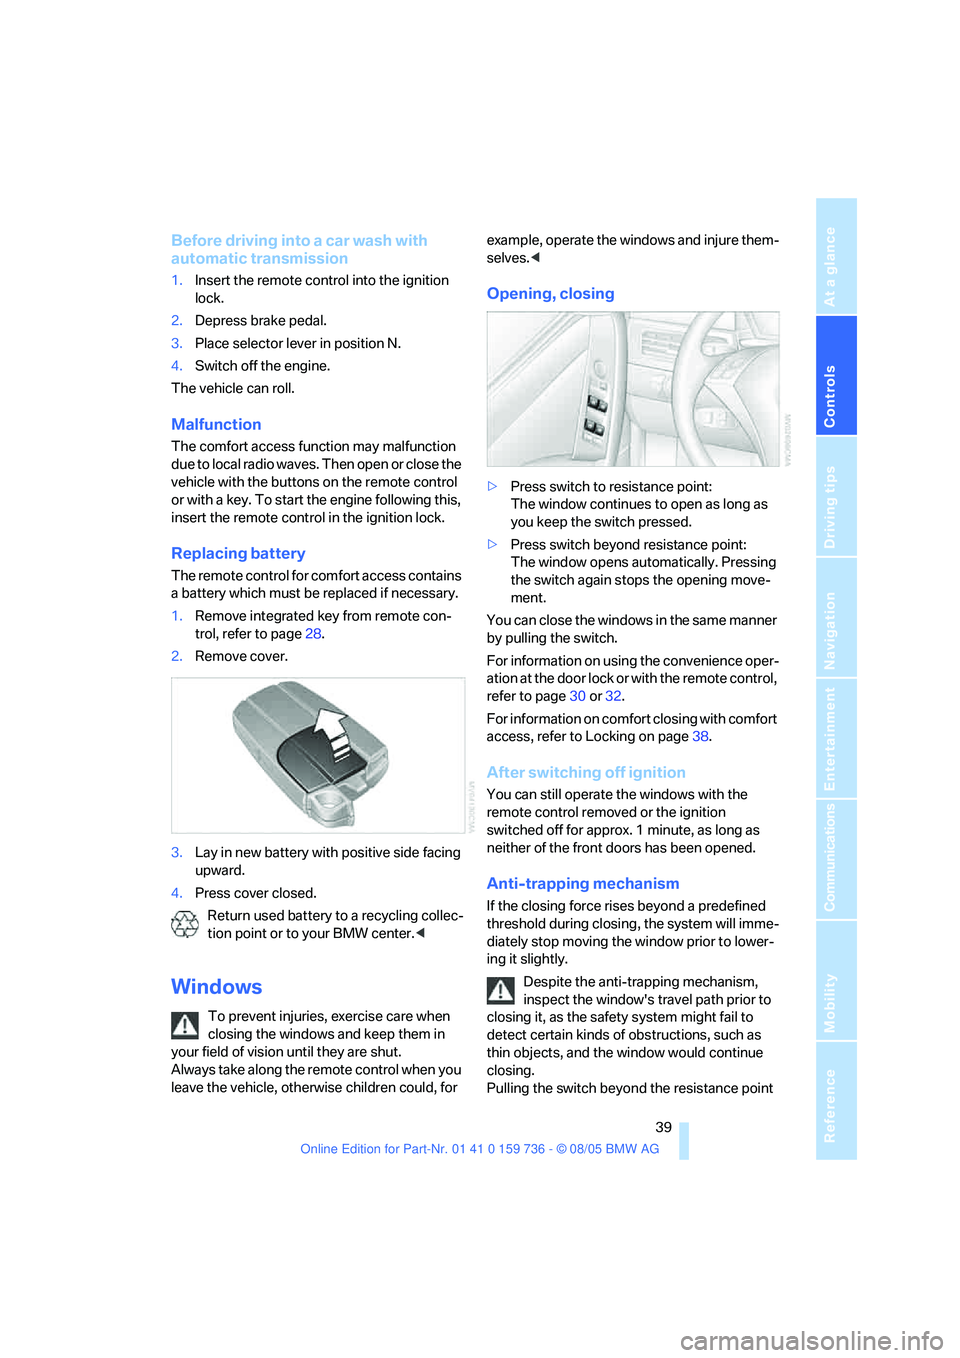
Replacing battery
The remote control for comfort access contains
a battery which must be replaced if necessary.
1.Remove integrated key from remote con-
trol, refer to page28.
2.Remove cover.
3.Lay in new battery with positive side facing
upward.
4.Press cover closed.
Return used battery to a recycling collec-
tion point or to your BMW center.<
Windows
To prevent injuries, exercise care when
closing the windows and keep them in
your field of vision until they are shut.
Always take along the remote control when you
leave the vehicle, otherwise children could, for example, operate the windows and injure them-
selves.<
Opening, closing
>Press switch to resistance point:
The window continues to open as long as
you keep the switch pressed.
>Press switch beyond resistance point:
The window opens automatically. Pressing
the switch again stops the opening move-
ment.
You can close the windows in the same manner
by pulling the switch.
For information on using the convenience oper-
ation at the door lock or with the remote control,
refer to page30 or32.
For information on comfort closing with comfort
access, refer to Locking on page38.
After switching off ignition
You can still operate the windows with the
remote control removed or the ignition
switched off for approx. 1 minute, as long as
neither of the front doors has been opened.
Anti-trapping mechanism
If the closing force rises beyond a predefined
threshold during closing, the system will imme-
diately stop moving the window prior to lower-
ing it slightly.
Despite the anti-trapping mechanism,
inspect the window's travel path prior to
closing it, as the safety system might fail to
detect certain kinds of obstructions, such as
thin objects, and the window would continue
closing.
Pulling the switch beyond the resistance point
Page 46 of 248
Controls
45Reference
At a glance
Driving tips
Communications
Navigation
Entertainment
Mobility
The upper hips and spinal column receive sup-
plementary support to help you maintain a
relaxed, upright sitting position.
>Increase or decrease curvature: push
switch forward or back.
>Shift curvature up or down: push switch up
or down.
Adjusting active backrest width*
First set a comfortable backrest width, see
above. Based on the backrest width set, the lat-
eral support is automatically adapted to the cur-
rent driving situation.
The adaptation of the backrest width and the
speed of the adjustment vary depending on the
program. You can select from among three pro-
grams from comfort to sport.
Press program button once:
>"Comfort" program: one LED
>"Normal" program: two LEDs
>"Sport" program: three LEDs
To switch off: press button longer.
Easy entry/exit*
To facilitate entry and exit, the backrest width
temporarily opens all the way.
Seat, mirror and steering
wheel memory*
You can store and request two different posi-
tions for the driver's seat and passenger seat
*,
external rearview mirrors, and steering wheel.
The adjustment of the lumbar support is not
stored in the memory.
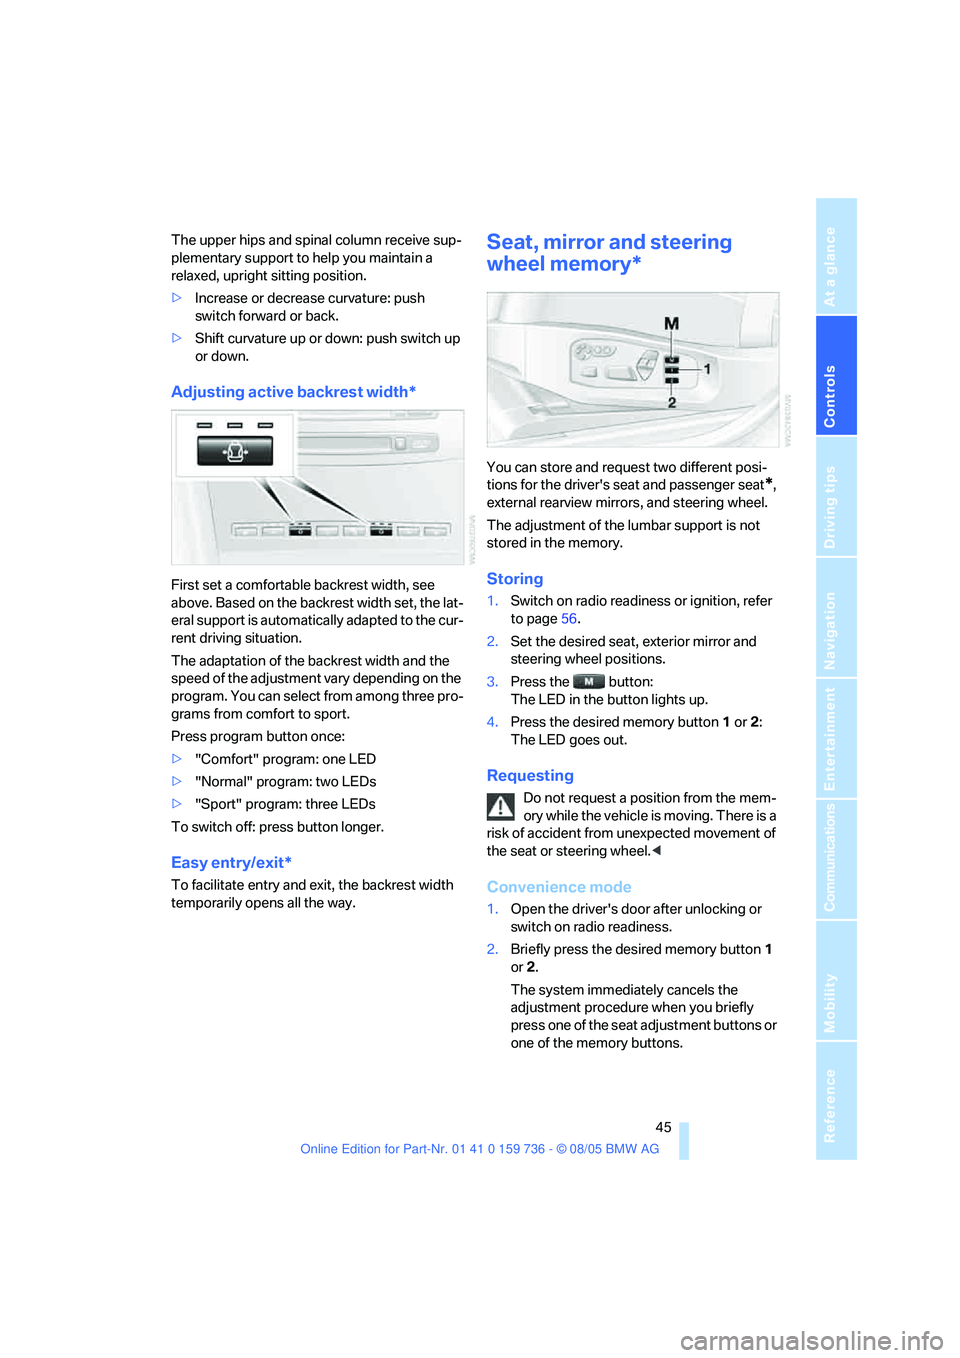
Storing
1.Switch on radio readiness or ignition, refer
to page56.
2.Set the desired seat, exterior mirror and
steering wheel positions.
3.Press the button:
The LED in the button lights up.
4.Press the desired memory button1 or2:
The LED goes out.
Requesting
Do not request a position from the mem-
ory while the vehicle is moving. There is a
risk of accident from unexpected movement of
the seat or steering wheel.<
Convenience mode
1.Open the driver's door after unlocking or
switch on radio readiness.
2.Briefly press the desired memory button1
or2.
The system immediately cancels the
adjustment procedure when you briefly
press one of the seat adjustment buttons or
one of the memory buttons.
Page 52 of 248
Controls
51Reference
At a glance
Driving tips
Communications
Navigation
Entertainment
Mobility
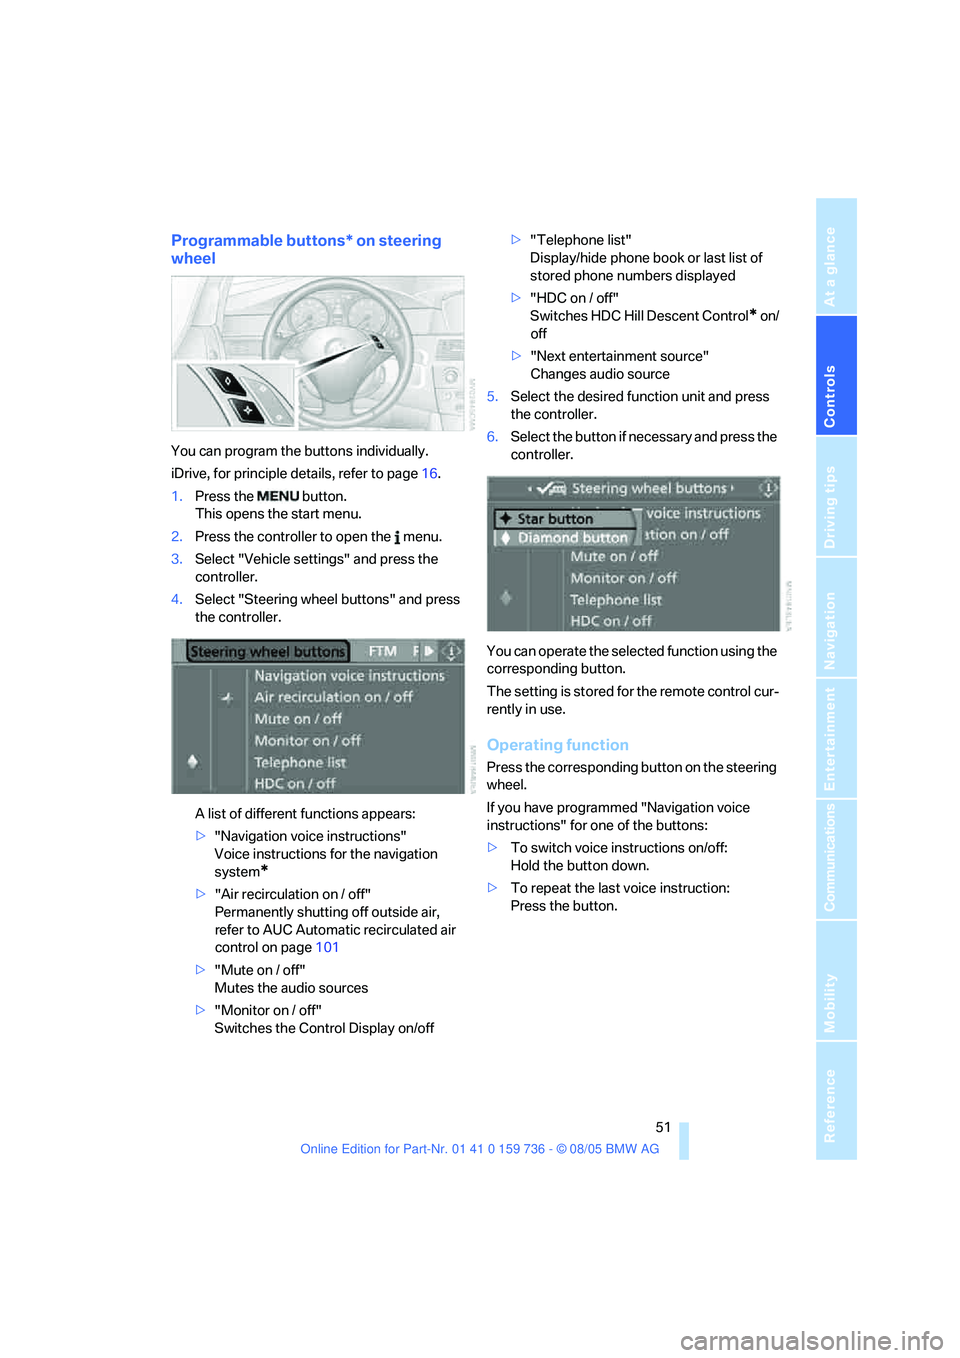
Programmable buttons* on steering
wheel
You can program the buttons individually.
iDrive, for principle details, refer to page16.
1.Press the button.
This opens the start menu.
2.Press the controller to open the menu.
3.Select "Vehicle settings" and press the
controller.
4.Select "Steering wheel buttons" and press
the controller.
A list of different functions appears:
>"Navigation voice instructions"
Voice instructions for the navigation
system
*
>"Air recirculation on / off"
Permanently shutting off outside air,
refer to AUC Automatic recirculated air
control on page101
>"Mute on / off"
Mutes the audio sources
>"Monitor on / off"
Switches the Control Display on/off>"Telephone list"
Display/hide phone book or last list of
stored phone numbers displayed
>"HDC on / off"
Switches HDC Hill Descent Control
* on/
off
>"Next entertainment source"
Changes audio source
5.Select the desired function unit and press
the controller.
6.Select the button if necessary and press the
controller.
You can operate the selected function using the
corresponding button.
The setting is stored for the remote control cur-
rently in use.
Operating function
Press the corresponding button on the steering
wheel.
If you have programmed "Navigation voice
instructions" for one of the buttons:
>To switch voice instructions on/off:
Hold the button down.
>To repeat the last voice instruction:
Press the button.
Page 87 of 248
Technology for comfort, convenience and safety
86
HDC Hill Descent Control on 525xi,
530xi
The concept
HDC is a system for driving downhill in steep
terrain. This system reduces vehicle speed on
steep downhill gradients, thus allowing you to
maintain even better control of your BMW
under these conditions. The vehicle moves at
approximately twice walking speed without
active intervention from the driver.
HDC is available for activation at vehicle speeds
below approx. 22 mph/35 km/h. When driving
down steep hills with a speed below approx.
22 mph/35 km/h, the vehicle reduces speed
automatically down to approximately double
walking speed, approx. 7 mph/12 km/h, and
then maintains this speed at a constant.
You can use the accelerator or brakes to vary
this automatically controlled speed within a
range extending from approx. 3 mph/5 km/h to
15 mph/25 km/h.
You can specify a target speed within the same
range by using the lever of the cruise control.
Activating HDC
You can activate HDC:
>with the programmable buttons on the
steering wheel, refer to page51
>or via iDrive
iDrive, for principle details, refer to page16.
1.Open the start menu.
2.Press the controller to open the menu.
3.Select "Vehicle settings" and press the
controller.
4.Select "HDC" and press the controller.5.Select "HDC on" and press the controller.
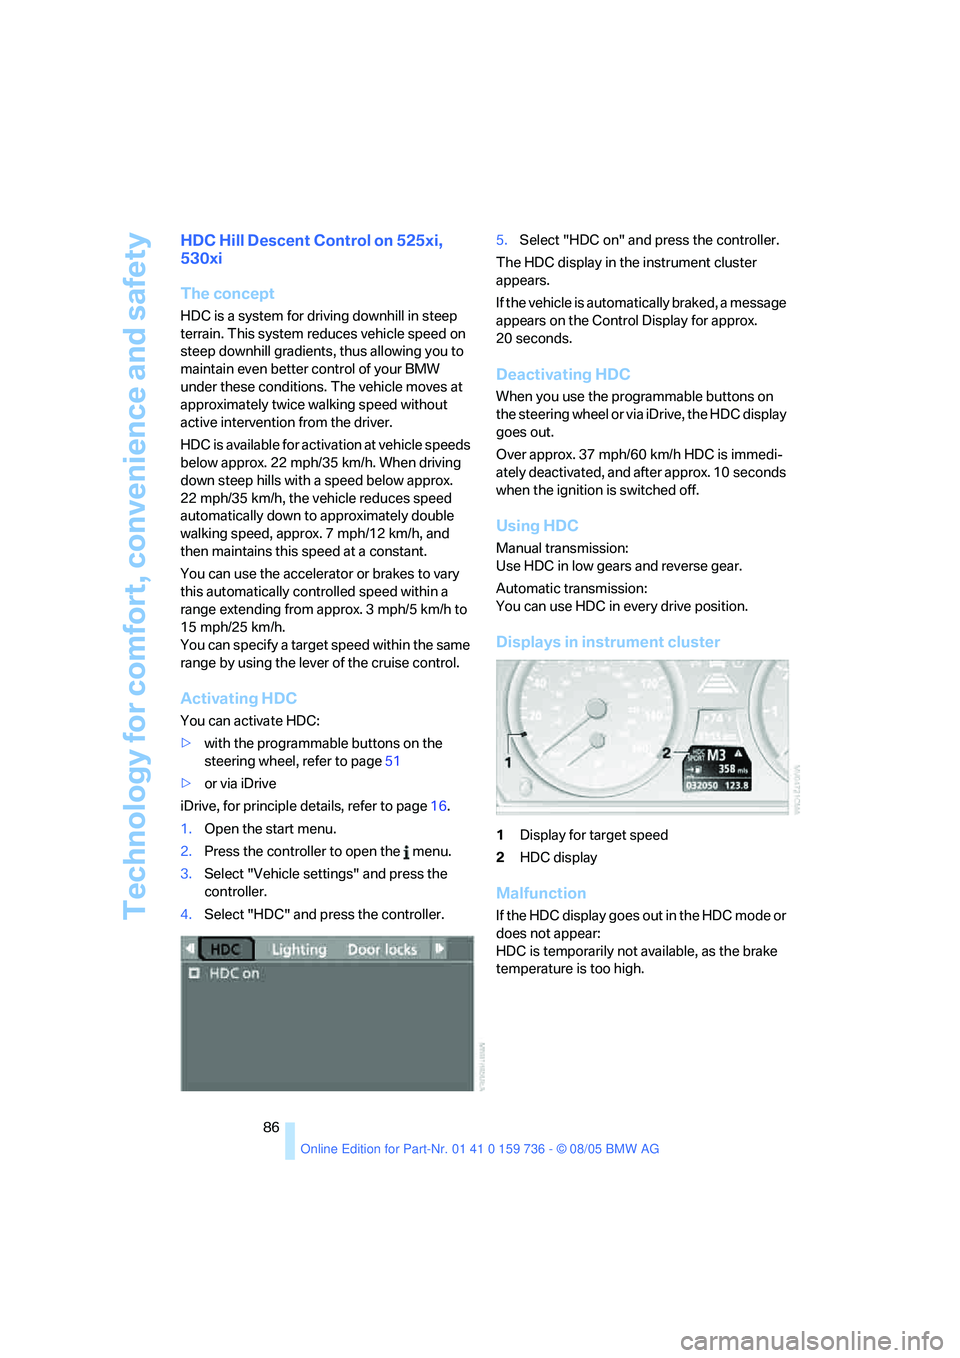
The HDC display in the instrument cluster
appears.
If the vehicle is automatically braked, a message
appears on the Control Display for approx.
20 seconds.
Deactivating HDC
When you use the programmable buttons on
the steering wheel or via iDrive, the HDC display
goes out.
Over approx. 37 mph/60 km/h HDC is immedi-
ately deactivated, and after approx. 10 seconds
when the ignition is switched off.
Using HDC
Manual transmission:
Use HDC in low gears and reverse gear.
Automatic transmission:
You can use HDC in every drive position.
Displays in instrument cluster
1Display for target speed
2HDC display
Malfunction
If the HDC display goes out in the HDC mode or
does not appear:
HDC is temporarily not available, as the brake
temperature is too high.
Page 102 of 248
Controls
101Reference
At a glance
Driving tips
Communications
Navigation
Entertainment
Mobility
body. Therefore, open these vents for maxi-
mum cooling.
AUC Automatic recirculated-air
control/recirculated-air mode
You can respond to pollutants or
unpleasant odors in the immediate
environment by suspending the
supply of outside air. The system then recircu-
lates the air currently within the vehicle. During
AUC operation, a sensor detects pollutants in
the outside air and controls the shut-off auto-
matically.
By pressing the button repeatedly, you can
request three operating modes:
>LED off: outside air flows in continuously.
>Right LED on, AUC mode: the system
detects pollutants in the outside air and
shuts off the supply as needed.
>Left LED on, recirculated-air mode: the
supply of outside air is permanently shut off.
If condensation starts to form on the
inside window surfaces during operation
in the recirculated-air mode, you should switch
it off while also increasing the air volume as
required.
The recirculated-air mode should not be used
over an extended period of time, as the air qual-
ity inside the vehicle deteriorates continu-
ously.<
Residual heat
The heat stored in the engine is
used to heat the passenger com-
partment, e.g. while stopped at a
school to pick up a child.
The function can be switched on when the fol-
lowing conditions are met:
>up to 15 minutes after switching off the
engine
>with engine at operating temperature
>with sufficient battery voltage
>at an outside temperature below 777/
256The LED lights up when the function is
switched on.
From radio readiness the interior temperature,
the air volume and the air distribution can be
set.
Switching off automatic climate control
The air volume, the heater and the
cooling function are all switched
off.
You can restart the automatic
climate control by pressing any of its buttons
except the REST button.
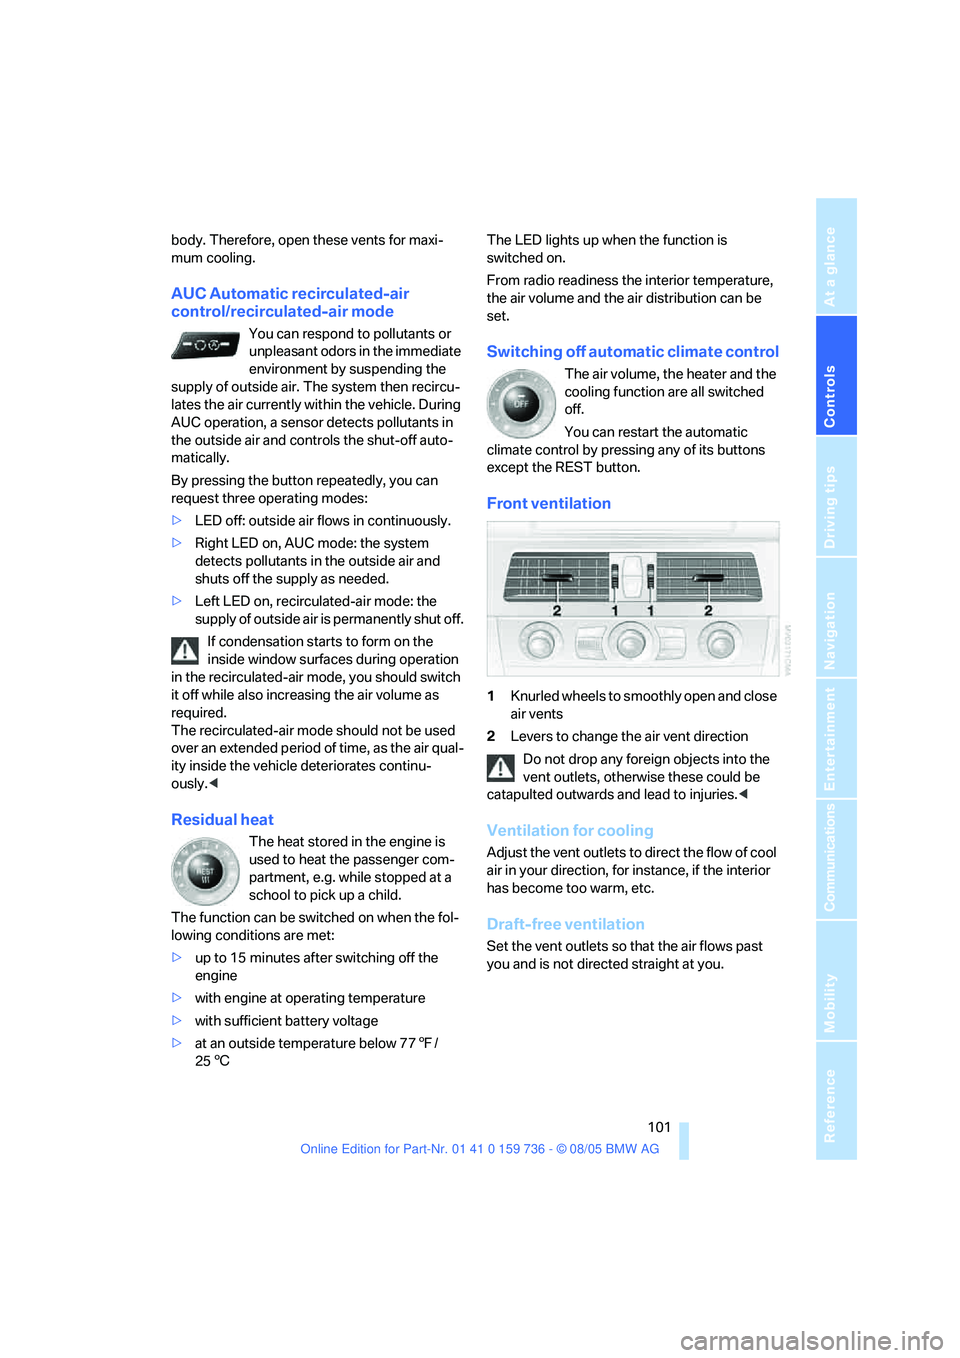
Front ventilation
1Knurled wheels to smoothly open and close
air vents
2Levers to change the air vent direction
Do not drop any foreign objects into the
vent outlets, otherwise these could be
catapulted outwards and lead to injuries.<
Ventilation for cooling
Adjust the vent outlets to direct the flow of cool
air in your direction, for instance, if the interior
has become too warm, etc.
Draft-free ventilation
Set the vent outlets so that the air flows past
you and is not directed straight at you.