ESP BMW 525XI TOURING 2008 E61 User Guide
[x] Cancel search | Manufacturer: BMW, Model Year: 2008, Model line: 525XI TOURING, Model: BMW 525XI TOURING 2008 E61Pages: 292, PDF Size: 9.33 MB
Page 46 of 292
Opening and closing
44
Following interruptions in electrical
power supply
After a power loss, the sunroof may only
respond to the raise command. Then have the
system initialized. BMW recommends having
this work done by your BMW center.
Moving manually*
In the event of an electrical malfunction, you can
move the sunroof manually.
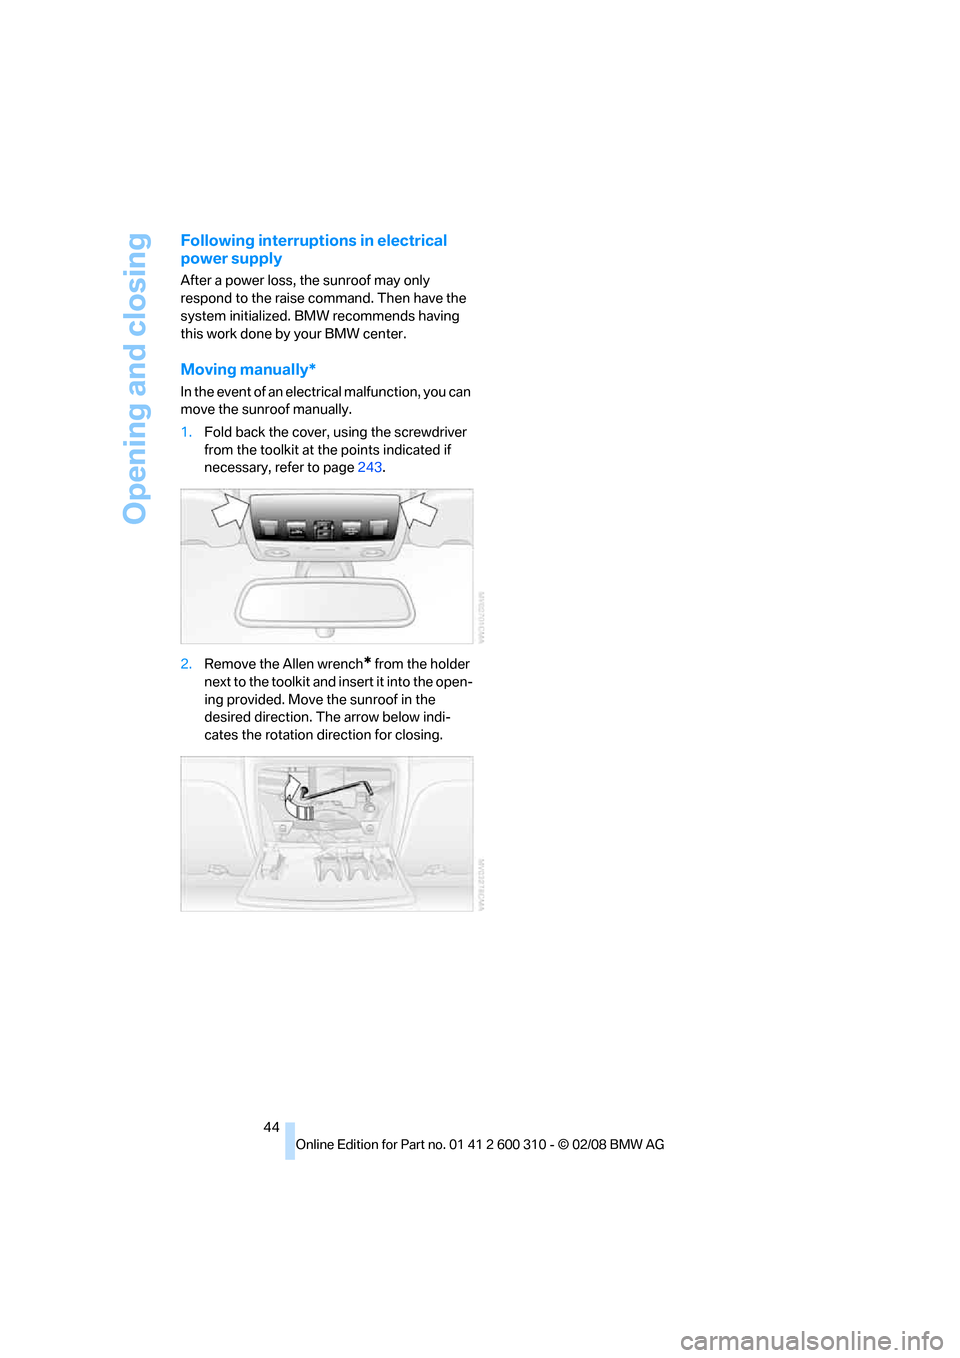
1.Fold back the cover, using the screwdriver
from the toolkit at the points indicated if
necessary, refer to page243.
2.Remove the Allen wrench
* from the holder
next to the toolkit and insert it into the open-
ing provided. Move the sunroof in the
desired direction. The arrow below indi-
cates the rotation direction for closing.
Page 48 of 292
Adjusting
46
Seats
Note before adjusting
Never attempt to adjust your seat while
the vehicle is moving. The seat could
respond with unexpected movement, and the
ensuing loss of vehicle control could lead to an
accident.
Also on the passenger side, do not incline the
backrest too far to the rear while the vehicle is
being driven, otherwise there is a danger in the
event of an accident of sliding under the safety
belt, eliminating the protection normally pro-
vided by the belt.<
Please follow the instructions on damage to
safety belts provided on page51 and the infor-
mation on the active front head restraints
on
page49.
Adjusting seat
To ensure that the safety systems con-
tinue to provide optimized protection,
please observe the adjustment instructions on
page45.<
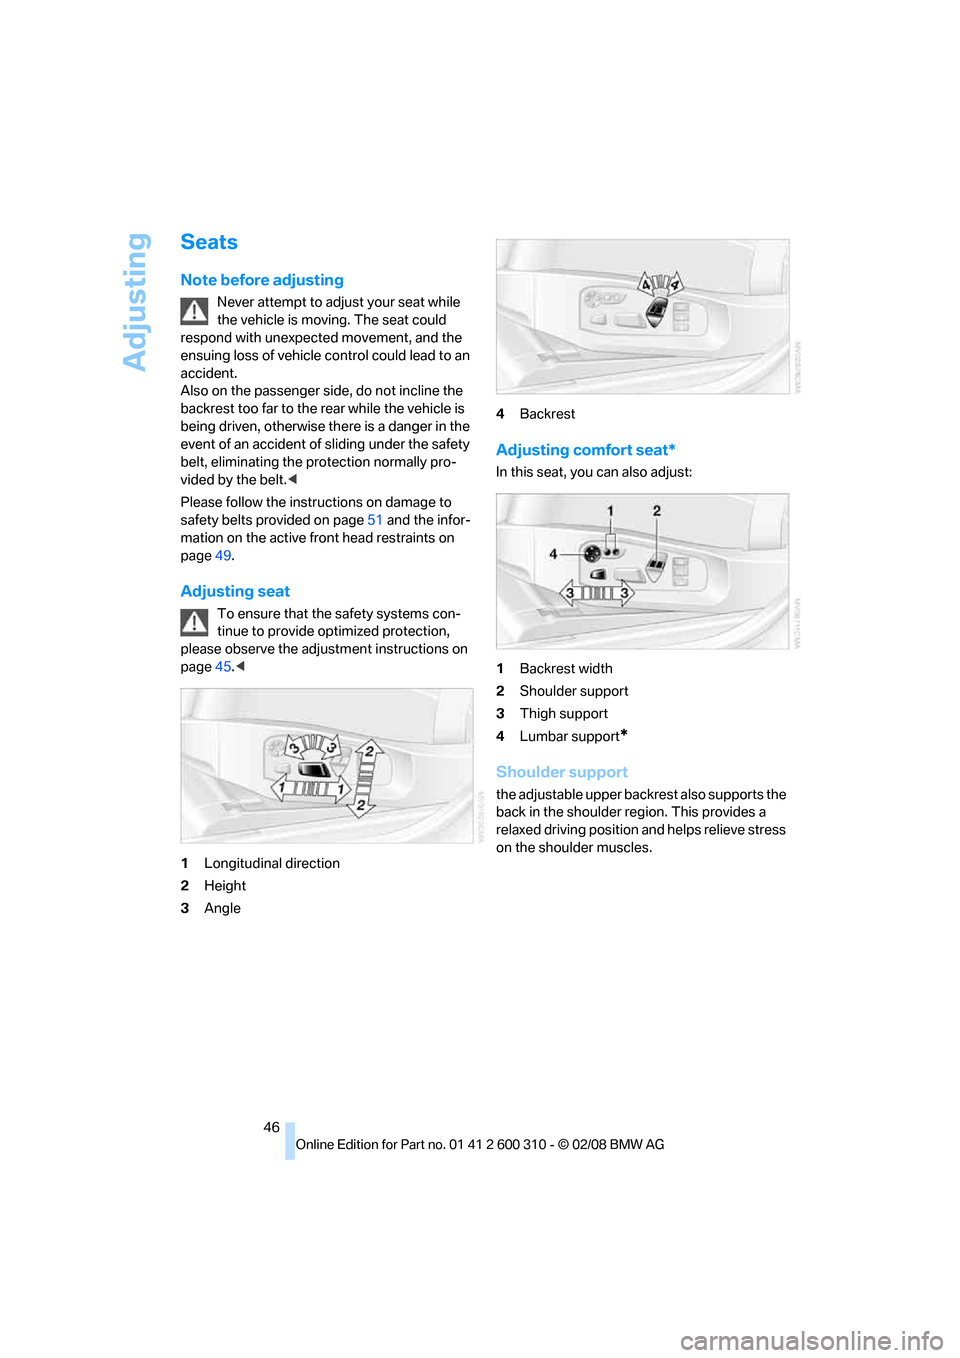
1Longitudinal direction
2Height
3Angle4Backrest
Adjusting comfort seat*
In this seat, you can also adjust:
1Backrest width
2Shoulder support
3Thigh support
4Lumbar support
*
Shoulder support
the adjustable upper backrest also supports the
back in the shoulder region. This provides a
relaxed driving position and helps relieve stress
on the shoulder muscles.
Page 51 of 292
Controls
49Reference
At a glance
Driving tips
Communications
Navigation
Entertainment
Mobility
To cancel the request:
Select "Deactivated" and press the controller.
Head restraints
A correctly adjusted head restraint reduces the
risk of spinal injury in the event of an accident.
Adjust the head restraint so that its center
is approximately at ear level. Otherwise
there is increased danger of injury in the event
of an accident. Only remove the head restraints
if no one will be sitting on the seat in question.
Reinstall the head restraints before transport-
ing passengers, as otherwise the head restraint
cannot provide its protective function.<
Active front head restraints
In the event of a rear-end collision of sufficient
severity, the active head restraint reduces the
distance to the head.
Do not use seat covers or head restraint
covers that could impede the proper
functioning of the active head restraint. Other-
wise, there is no assurance that the active head
restraint will perform its protective function and
it is not possible to take advantage of its injury-
reducing potential in the event of a rear-end
collision.
Have the active head restraints reset after they
are triggered in a rear-end collision. Only have
this work carried out by a BMW center or a
workshop that works according to BMW repair
procedures with correspondingly trained per-
sonnel. Otherwise, this safety equipment will
not function properly.<
Please contact a BMW center if you wish
to have the front head restraints removed
and installed.<
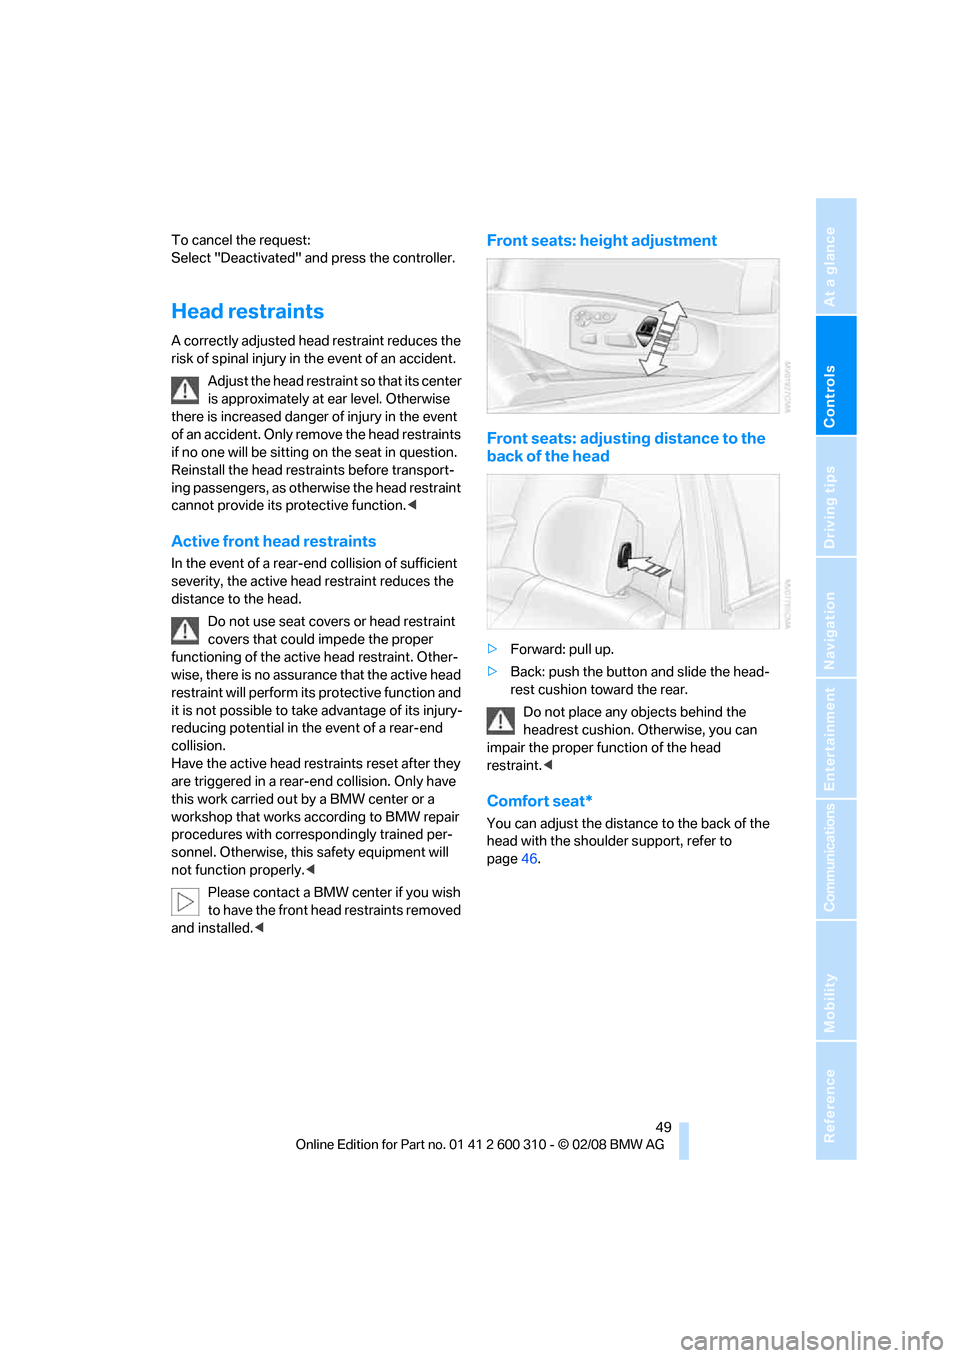
Front seats: height adjustment
Front seats: adjusting distance to the
back of the head
>Forward: pull up.
>Back: push the button and slide the head-
rest cushion toward the rear.
Do not place any objects behind the
headrest cushion. Otherwise, you can
impair the proper function of the head
restraint.<
Comfort seat*
You can adjust the distance to the back of the
head with the shoulder support, refer to
page46.
Page 53 of 292
Controls
51Reference
At a glance
Driving tips
Communications
Navigation
Entertainment
Mobility
the word CENTER is intended exclusively for
use by passengers riding in the center position.
Damage to safety belts
When subjected to strain due to an acci-
dent or in the event of damage, replace
the safety belts, the belt tensioners, and any
child restraint systems and have the belt anchor
points checked. Only have this work carried out
at a BMW center or at a workshop that works
according to BMW repair procedures with cor-
respondingly trained personnel. Otherwise cor-
rect operation of this safety equipment is not
guaranteed.<
Seat heating*
Front
The appearance and arrangement of the but-
tons may vary depending on the equipment.
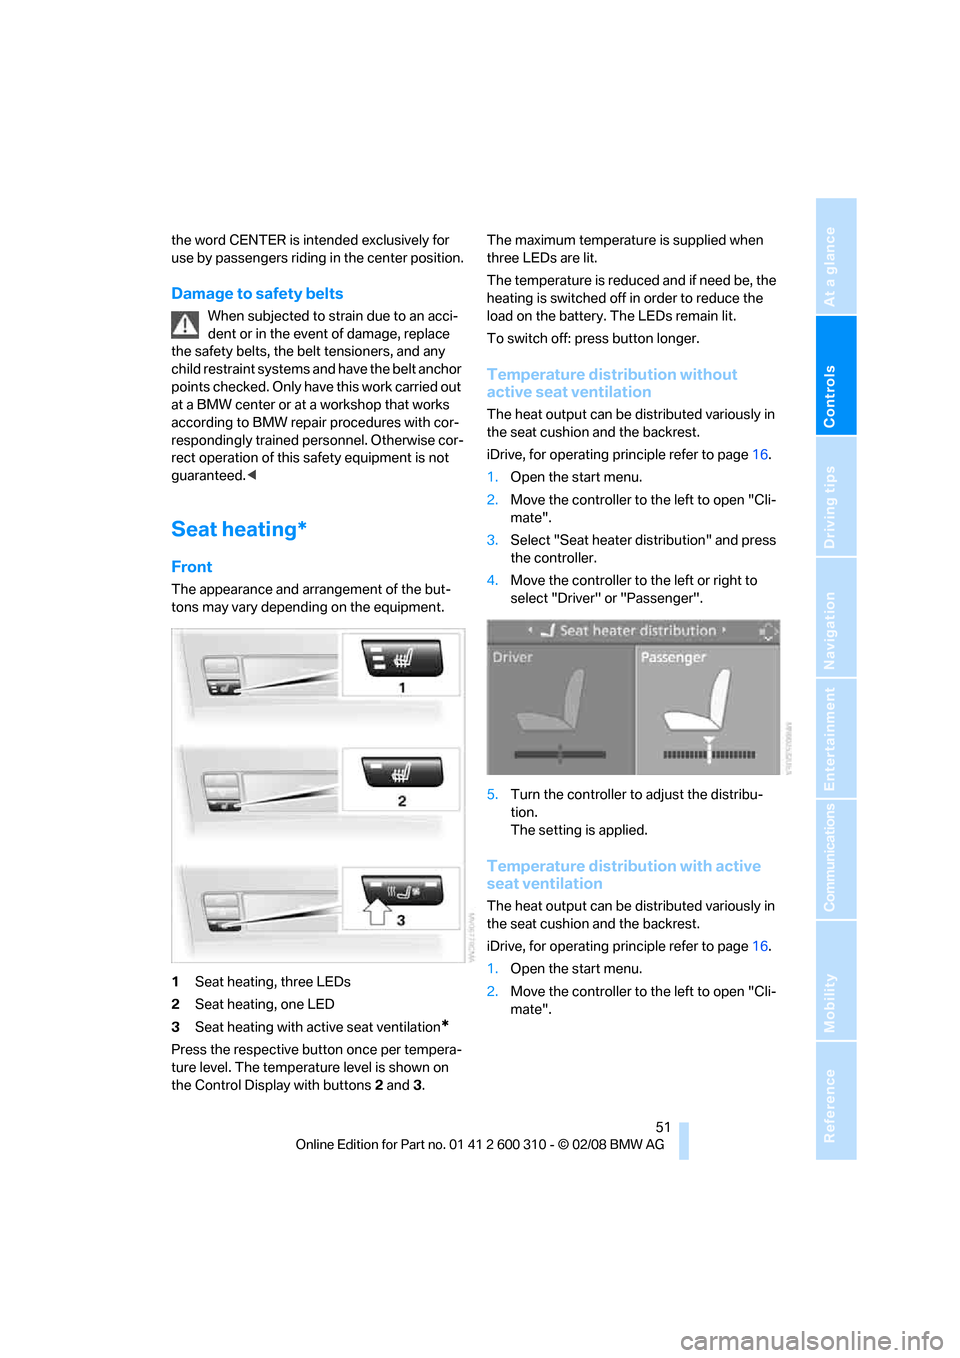
1Seat heating, three LEDs
2Seat heating, one LED
3Seat heating with active seat ventilation
*
Press the respective button once per tempera-
ture level. The temperature level is shown on
the Control Display with buttons2 and3. The maximum temperature is supplied when
three LEDs are lit.
The temperature is reduced and if need be, the
heating is switched off in order to reduce the
load on the battery. The LEDs remain lit.
To switch off: press button longer.
Temperature distribution without
active seat ventilation
The heat output can be distributed variously in
the seat cushion and the backrest.
iDrive, for operating principle refer to page16.
1.Open the start menu.
2.Move the controller to the left to open "Cli-
mate".
3.Select "Seat heater distribution" and press
the controller.
4.Move the controller to the left or right to
select "Driver" or "Passenger".
5.Turn the controller to adjust the distribu-
tion.
The setting is applied.
Temperature distribution with active
seat ventilation
The heat output can be distributed variously in
the seat cushion and the backrest.
iDrive, for operating principle refer to page16.
1.Open the start menu.
2.Move the controller to the left to open "Cli-
mate".
Page 54 of 292
Adjusting
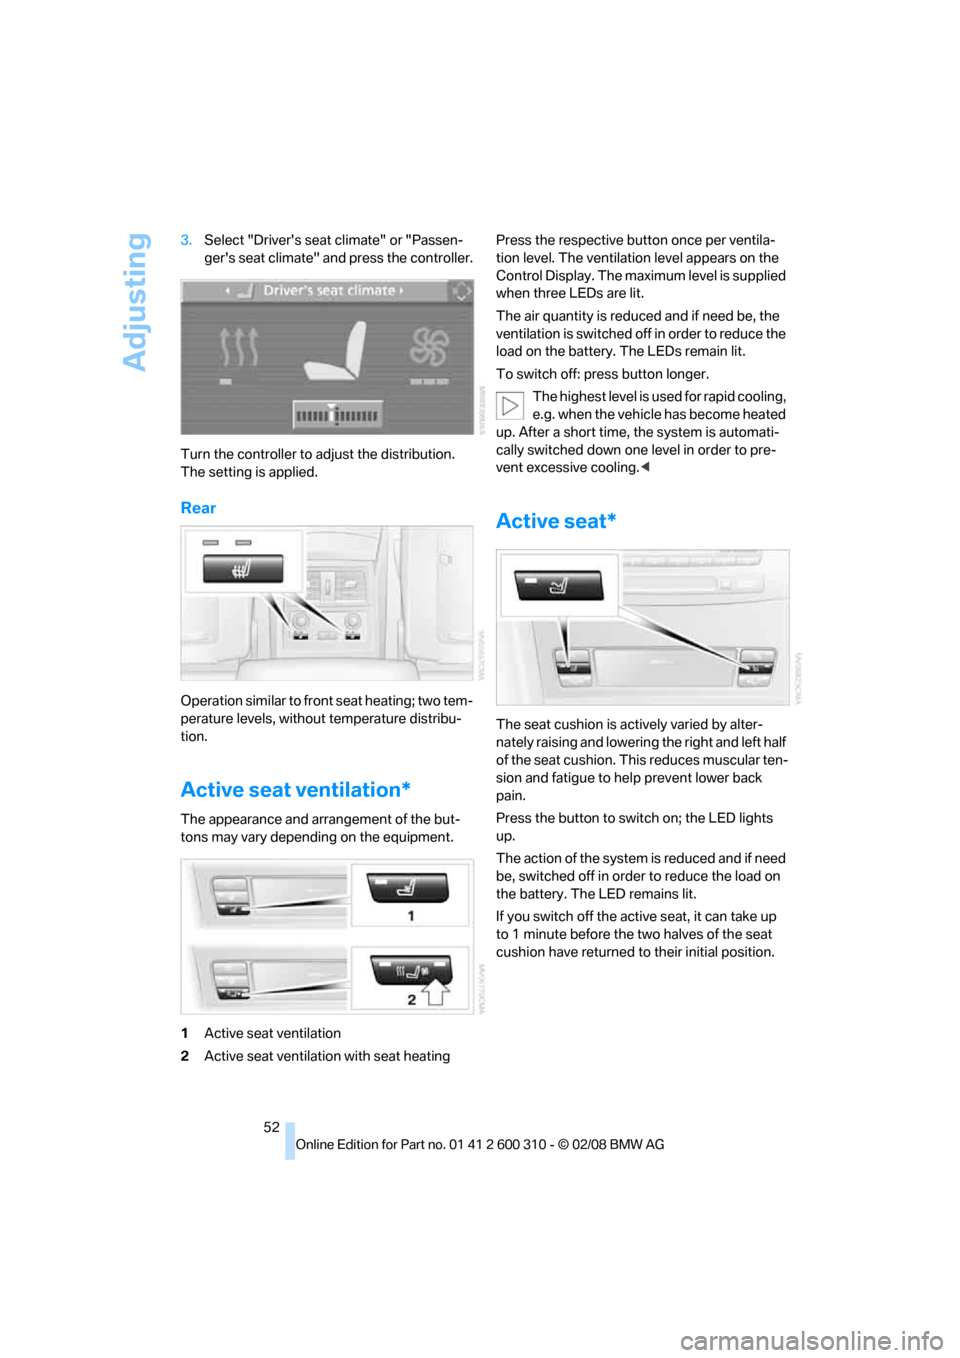
52 3.Select "Driver's seat climate" or "Passen-
ger's seat climate" and press the controller.
Turn the controller to adjust the distribution.
The setting is applied.
Rear
Operation similar to front seat heating; two tem-
perature levels, without temperature distribu-
tion.
Active seat ventilation*
The appearance and arrangement of the but-
tons may vary depending on the equipment.
1Active seat ventilation
2Active seat ventilation with seat heatingPress the respective button once per ventila-
tion level. The ventilation level appears on the
Control Display. The maximum level is supplied
when three LEDs are lit.
The air quantity is reduced and if need be, the
ventilation is switched off in order to reduce the
load on the battery. The LEDs remain lit.
To switch off: press button longer.
The highest level is used for rapid cooling,
e.g. when the vehicle has become heated
up. After a short time, the system is automati-
cally switched down one level in order to pre-
vent excessive cooling.<
Active seat*
The seat cushion is actively varied by alter-
nately raising and lowering the right and left half
of the seat cushion. This reduces muscular ten-
sion and fatigue to help prevent lower back
pain.
Press the button to switch on; the LED lights
up.
The action of the system is reduced and if need
be, switched off in order to reduce the load on
the battery. The LED remains lit.
If you switch off the active seat, it can take up
to 1 minute before the two halves of the seat
cushion have returned to their initial position.
Page 57 of 292
Controls
55Reference
At a glance
Driving tips
Communications
Navigation
Entertainment
Mobility
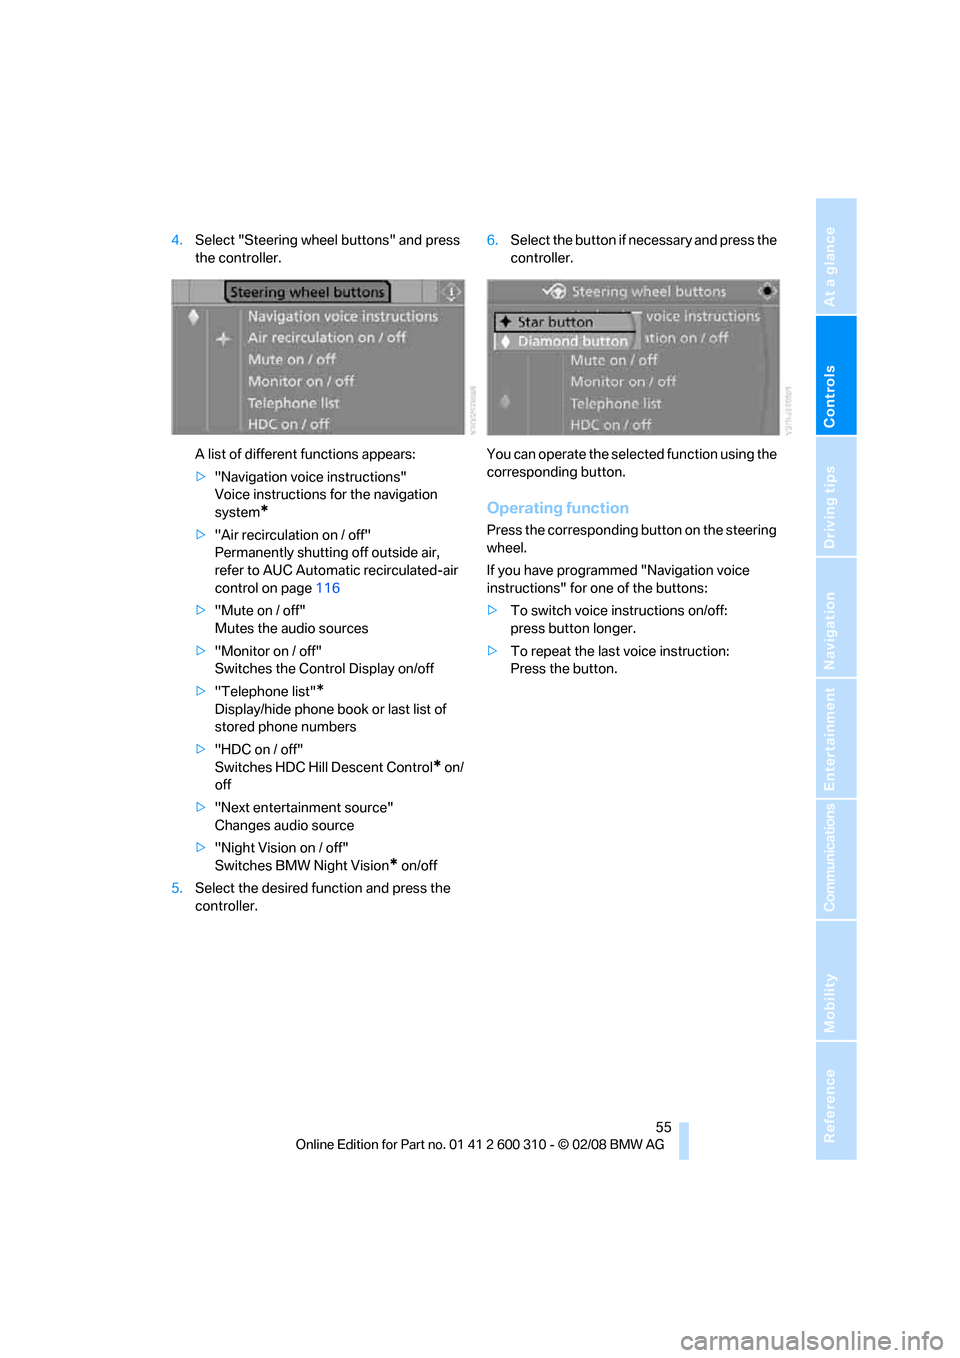
4.Select "Steering wheel buttons" and press
the controller.
A list of different functions appears:
>"Navigation voice instructions"
Voice instructions for the navigation
system
*
>"Air recirculation on / off"
Permanently shutting off outside air,
refer to AUC Automatic recirculated-air
control on page116
>"Mute on / off"
Mutes the audio sources
>"Monitor on / off"
Switches the Control Display on/off
>"Telephone list"
*
Display/hide phone book or last list of
stored phone numbers
>"HDC on / off"
Switches HDC Hill Descent Control
* on/
off
>"Next entertainment source"
Changes audio source
>"Night Vision on / off"
Switches BMW Night Vision
* on/off
5.Select the desired function and press the
controller.6.Select the button if necessary and press the
controller.
You can operate the selected function using the
corresponding button.
Operating function
Press the corresponding button on the steering
wheel.
If you have programmed "Navigation voice
instructions" for one of the buttons:
>To switch voice instructions on/off:
press button longer.
>To repeat the last voice instruction:
Press the button.
Page 58 of 292
Transporting children safely
56
Transporting children safely
The right place for children
Do not leave children unattended in the
vehicle, otherwise they could endanger
themselves and other persons, e.g. by opening
the doors.<
Children always in the rear
Accident research shows that the safest place
for children is on the rear seat.
Children younger than 13 years of age or
with a height under 5 ft/150 cm may only
be transported in the rear in child restraint sys-
tems which correspond to the age, weight and
height of the child. Otherwise there is an
increased danger of injury in an accident.<
Children 13 years of age or older must wear a
safety belt as soon as a suitable child restraint
system can no longer be used due to their age,
size and weight.
Exception for front passenger seat
Should it ever be necessary to use a child
restraint system on the front passenger
seat, the front and side airbags on the passen-
ger side must first be deactivated. Otherwise,
there is an increased risk of injury for the child if
the airbags are triggered, even with a child
restraint system.<
For more information on automatic deactivation
of the front passenger airbags, refer to
page100.
Installing child restraint
systems
Observe the child restraint system manu-
facturer's instructions for selection,
installation and use of the child restraint sys-
tems. Otherwise the degree of protection may
be reduced.<
Backrest width* on front passenger
seat
Open the backrest width setting of the
front passenger seat all the way. After
mounting the child's seat, deactivate the active
backrest width adjustment and do not call up
any memory position. Otherwise this limits the
stability of the child's seat on the front passen-
ger seat.<
1.After unlocking the vehicle, sit on the front
passenger seat and close the door to call up
the memory position.
2.Completely open the backrest width adjust-
ment, refer to page46.
3.Deactivate active backrest width adjust-
ment, refer to page47.
4.Install child's seat.
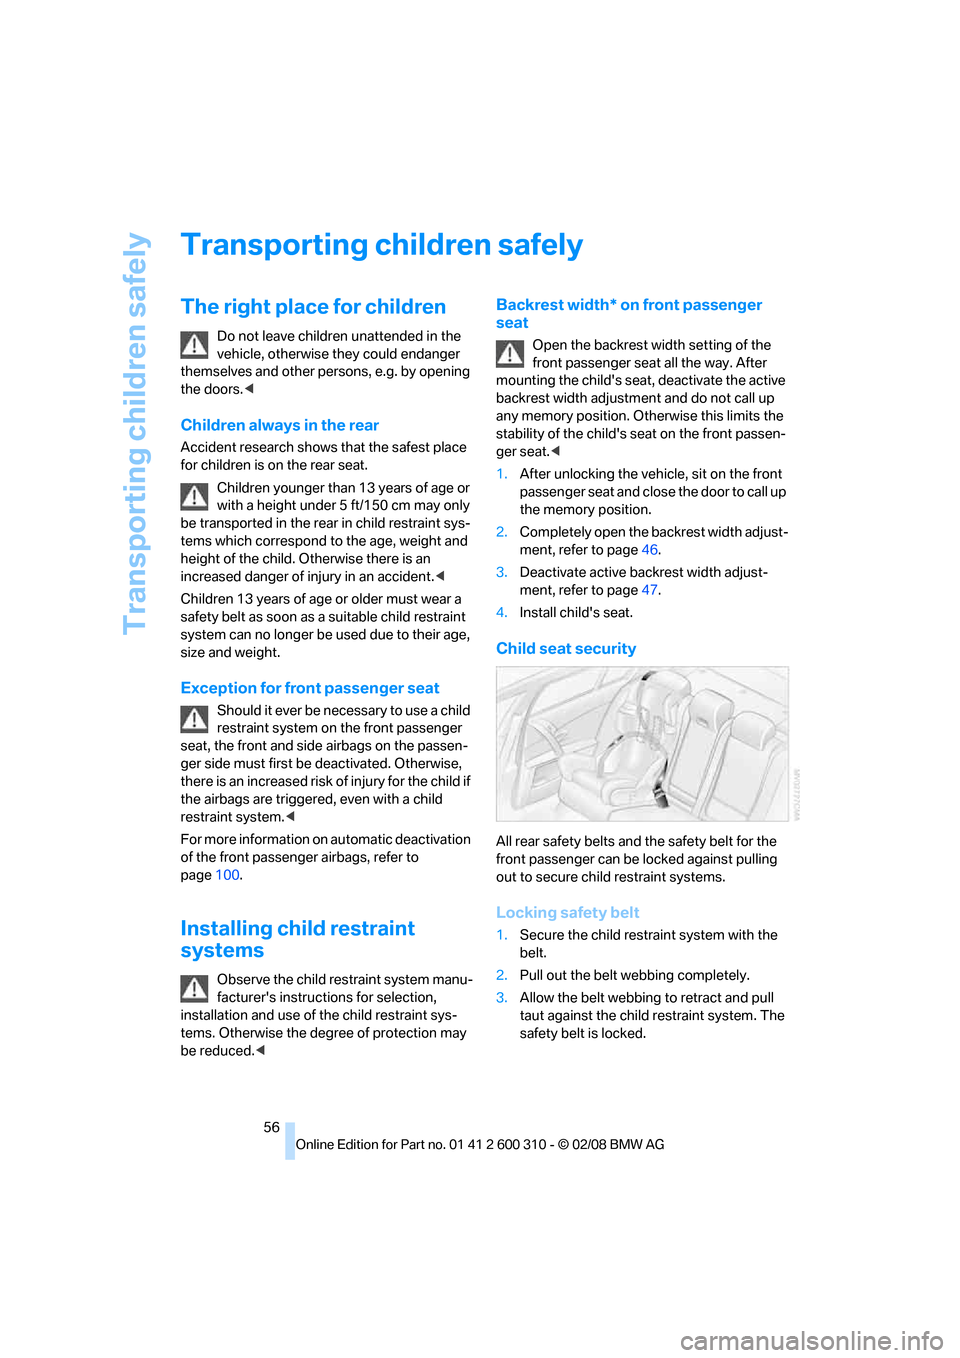
Child seat security
All rear safety belts and the safety belt for the
front passenger can be locked against pulling
out to secure child restraint systems.
Locking safety belt
1.Secure the child restraint system with the
belt.
2.Pull out the belt webbing completely.
3.Allow the belt webbing to retract and pull
taut against the child restraint system. The
safety belt is locked.
Page 60 of 292
Transporting children safely
58
Child restraint system with tether strap
Only use the tether-strap mounting
points to secure child restraint systems,
otherwise the mounting points could be dam-
aged.<
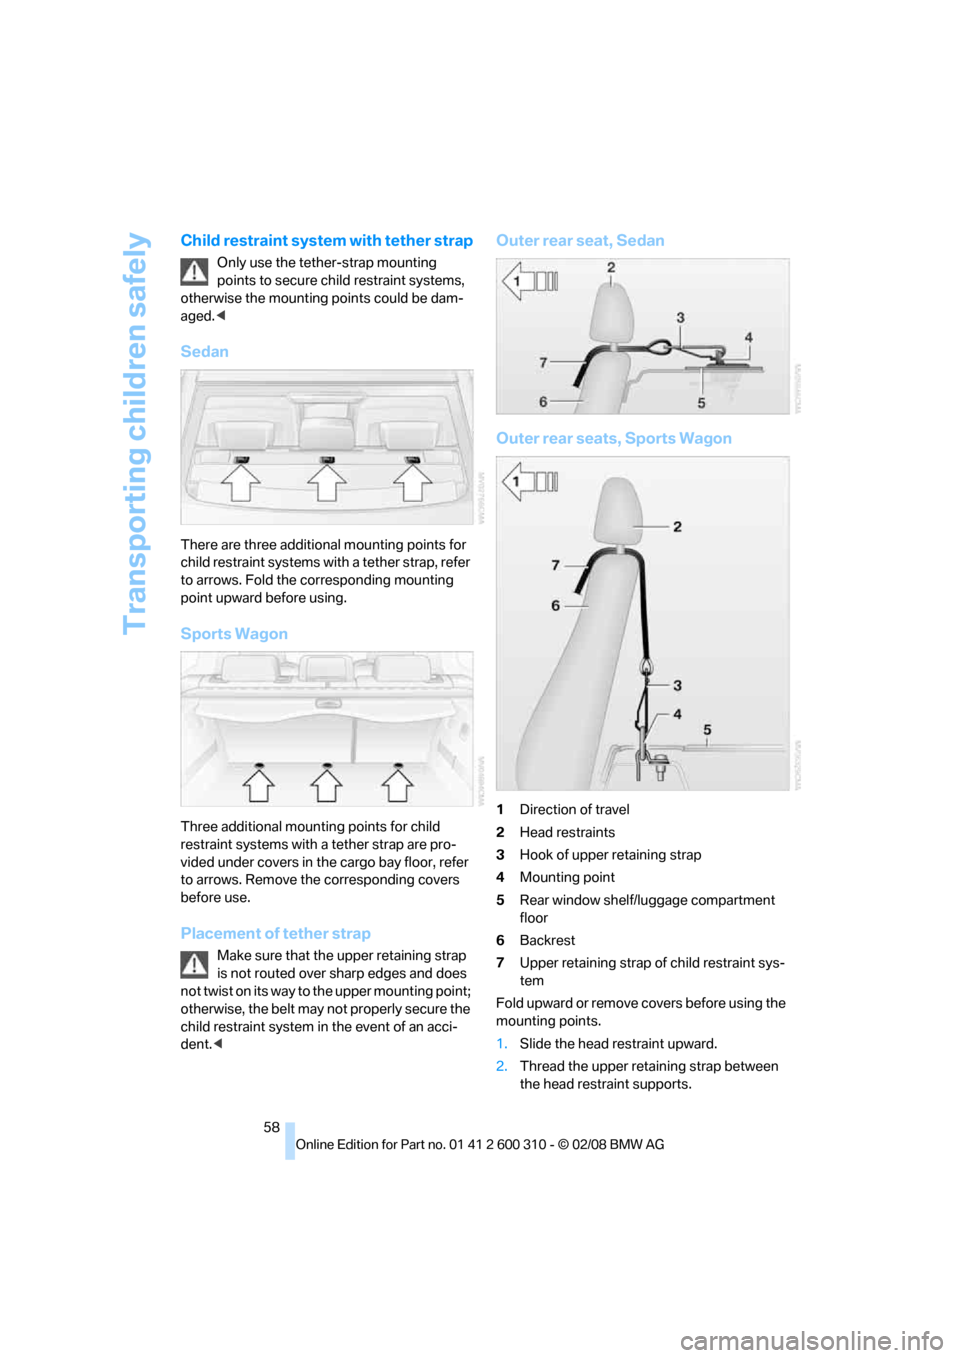
Sedan
There are three additional mounting points for
child restraint systems with a tether strap, refer
to arrows. Fold the corresponding mounting
point upward before using.
Sports Wagon
Three additional mounting points for child
restraint systems with a tether strap are pro-
vided under covers in the cargo bay floor, refer
to arrows. Remove the corresponding covers
before use.
Placement of tether strap
Make sure that the upper retaining strap
is not routed over sharp edges and does
not twist on its way to the upper mounting point;
otherwise, the belt may not properly secure the
child restraint system in the event of an acci-
dent.<
Outer rear seat, Sedan
Outer rear seats, Sports Wagon
1Direction of travel
2Head restraints
3Hook of upper retaining strap
4Mounting point
5Rear window shelf/luggage compartment
floor
6Backrest
7Upper retaining strap of child restraint sys-
tem
Fo ld upward or remo ve covers before us ing the
mounting points.
1.Slide the head restraint upward.
2.Thread the upper retaining strap between
the head restraint supports.
Page 68 of 292
Driving
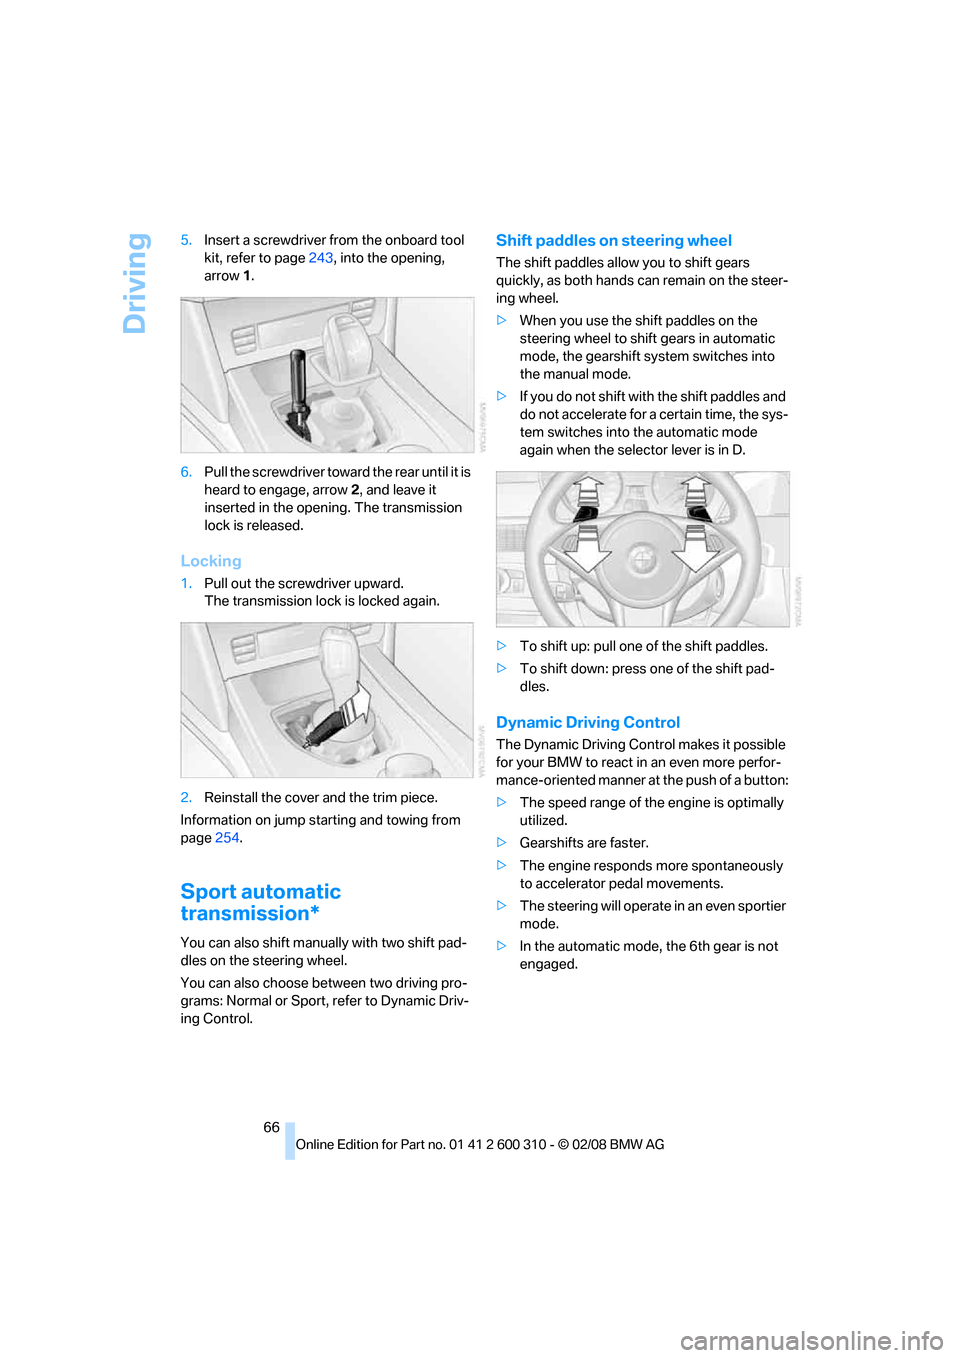
66 5.Insert a screwdriver from the onboard tool
kit, refer to page243, into the opening,
arrow1.
6.Pull the screwdriver toward the rear until it is
heard to engage, arrow2, and leave it
inserted in the opening. The transmission
lock is released.
Locking
1.Pull out the screwdriver upward.
The transmission lock is locked again.
2.Reinstall the cover and the trim piece.
Information on jump starting and towing from
page254.
Sport automatic
transmission*
You can also shift manually with two shift pad-
dles on the steering wheel.
You can also choose between two driving pro-
grams: Normal or Sport, refer to Dynamic Driv-
ing Control.
Shift paddles on steering wheel
The shift paddles allow you to shift gears
quickly, as both hands can remain on the steer-
ing wheel.
>When you use the shift paddles on the
steering wheel to shift gears in automatic
mode, the gearshift system switches into
the manual mode.
>If you do not shift with the shift paddles and
do not accelerate for a certain time, the sys-
tem switches into the automatic mode
again when the selector lever is in D.
>To shift up: pull one of the shift paddles.
>To shift down: press one of the shift pad-
dles.
Dynamic Driving Control
The Dynamic Driving Control makes it possible
for your BMW to react in an even more perfor-
mance-oriented manner at the push of a button:
>The speed range of the engine is optimally
utilized.
>Gearshifts are faster.
>The engine responds more spontaneously
to accelerator pedal movements.
>The steering will operate in an even sportier
mode.
>In the automatic mode, the 6th gear is not
engaged.
Page 73 of 292
Controls
71Reference
At a glance
Driving tips
Communications
Navigation
Entertainment
Mobility
Active cruise control*
With active cruise control you can select a
desired speed which is then automatically
maintained when driving on open roadways and
is varied to maintain a selected distance setting
to slower moving vehicles ahead.
Active cruise control represents a technological
advance over the familiar cruise control and is a
welcome relief from the constant adjustment of
speed that can accompany driving in traffic on
freeways or other high-speed thoroughfares.
Especially on longer trips and in traffic conges-
tion, the system can reduce fatigue and tension,
while increasing your enjoyment of driving.
Please use it safely and responsibly.
In addition to holding a steady cruising speed, if
you encounter slower vehicles ahead, active
cruise control will, within limits, adjust your
vehicle's speed automatically so that you can
flow with the traffic without having to make con-
stant adjustments. If, for example, while cruis-
ing at the selected speed, you begin to
approach a slower vehicle ahead of you in the
same lane, the system will reduce your vehicle's
speed to the same as that of the vehicle ahead
to maintain your selected distance setting. You
can vary the following distance, which will vary
with speed. Based on your selected distance
setting, the system automatically decreases the
throttle setting and lightly applies the brakes if
necessary. In addition, if the vehicle ahead of
you slows to a complete stop, the system can
follow this action within the given scope and
can also accelerate from a complete stop if the
vehicle ahead of you drives off again shortly
thereafter. During braking, your vehicle brake
lamps will automatically illuminate to alert a fol-
lowing driver to take action. In addition, it may
be necessary for your vehicle to downshift the
automatic transmission to maintain the dis-
tance setting selected. As soon as the road in
front of you has no moving vehicles, the system
will accelerate to your desired speed. This set
speed is also maintained on downhill grades,
however the vehicle speed can drop below the
set speed when driving uphill if the engine out-
put is not sufficient.Active cruise control cannot detect stop
signs, red lights, or any object that is
stopped or is blocking the road.
Active cruise control is not and must not be
used as a collision avoidance/warning system.
Since this active cruise control system is a new
technology and operates differently from con-
ventional cruise control systems which you may
be accustomed to, it is necessary that you read
all of the pages relating to this system before
use. Carefully read and observe the information
on the system limitations beginning on page75
to obtain a good command of the system and its
range of applications.<
Brake pedal feel
When the system brakes and you also depress
the brake pedal, a somewhat different braking
feel results.
Professional* navigation system
If a navigation DVD is in the drive, refer to
page142, within limits the system adjusts the
accelerating and braking behavior of the vehicle
to the road you are driving on.
To ensure that the system is informed of
the current course of the road, always use
the latest navigation DVD if possible.<
When the vehicle position is unknown, e. g.
when you leave the map area, this influence of
the navigation system is not available.
Applications
Please try the system first during sparse traffic
and clear road conditions so that you can get
used to the system. After you have experience
and understand the system, only then use it
during normal traffic.
As with conventional cruise control systems,
active cruise control in no way reduces or sub-
stitutes for the driver's own personal experi-
ence, responsibility, alertness and awareness in
adjusting speed, braking or otherwise control-
ling the vehicle. The driver should decide when
to use the system on the basis of road, traffic,
visibility, and weather conditions. Active cruise
control is intended for use on highway-type