Torque Converter BMW 528i 2000 E39 Workshop Manual
[x] Cancel search | Manufacturer: BMW, Model Year: 2000, Model line: 528i, Model: BMW 528i 2000 E39Pages: 1002
Page 42 of 1002
Downloaded from www.Manualslib.com manuals search engine
020-1 0
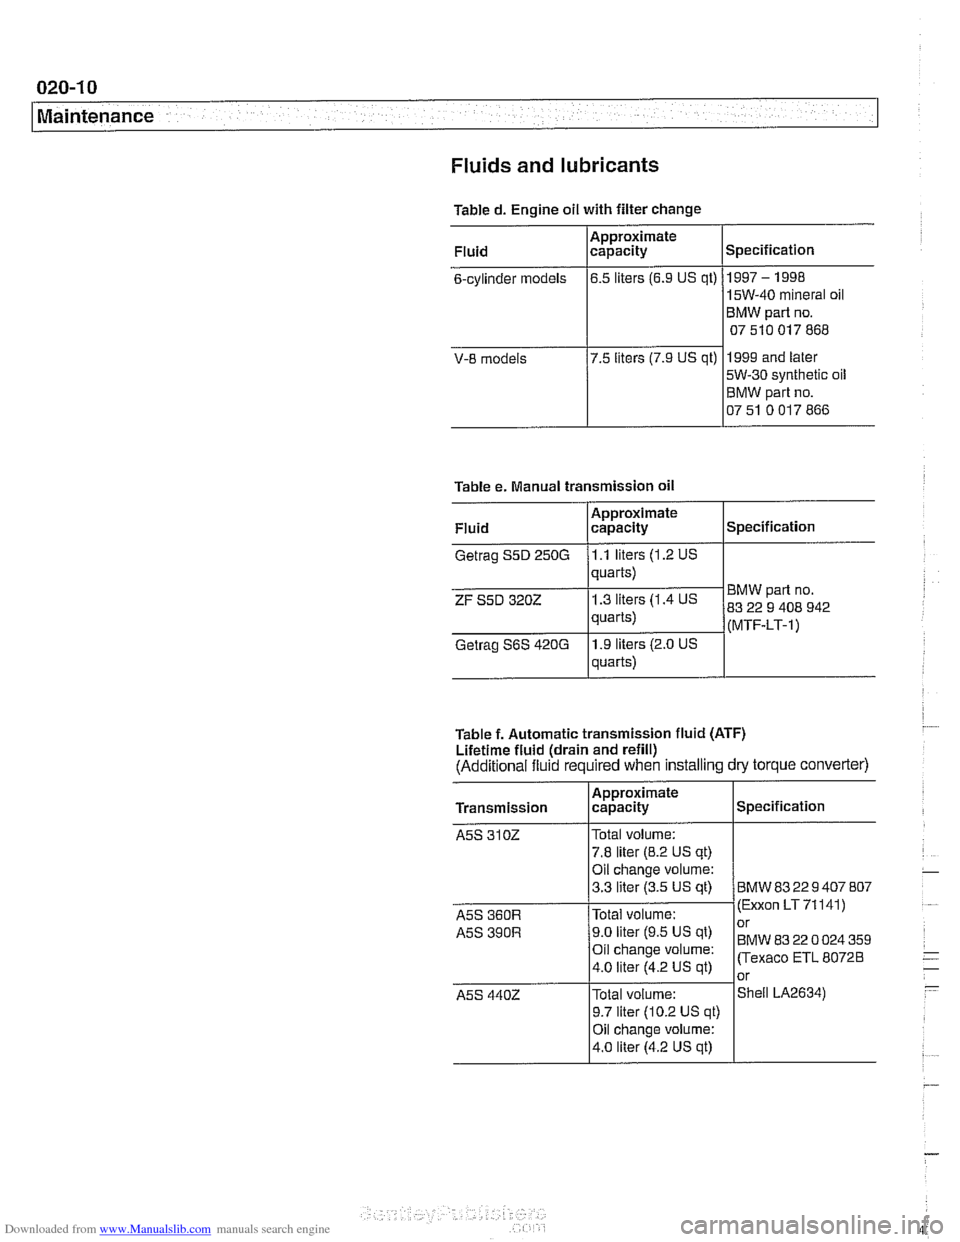
Maintenance Fluids and lubricants
Table d. Engine oil with filter change
V-8
models
BMW part no.
07 510 017 868
5W-30 synthetic oil
BMW part no.
07 51 0 017 866
Specification
1997
- 1998
15W-40 mineral oil
Fluid
6-cylinder models
Table e. Manual transmission oil
Approximate
capacity
6.5
liters (6.9 US qt)
Specification
Fluid
I I
Approximate
capacity
Getrag S5D 250G 1 .I liters (1.2 US
quarts) BMW
part no.
83 22 408 942
I
quarts)
Getrao
S6S 420G 11.9
liters (2.0 US
Table f. Automatic transmission fluid
(ATF)
Lifetime fluid (drain and refill)
(Additional fluid required when installing dry torque converter)
ZF S5D
3202
(MTF-LT-1)
u
Approximate I , , . Transmission Icapacity Spec~flcatlon
1.3 liters (1.4 US . .
quarts)
A5S 31 02
Trell~~2634) Total 9.7 liter volume: (10.2 US qt)
A5S
4402
Oil change volume:
4.0 liter (4.2 US qt)
I
A5S 360R /~otal volume:
Total
volume:
7.8 liter (8.2 US qt)
Oil change volume:
3.3 liter (3.5 US
qt)
(Exxon LT 71141) -.
BMW 83229407 807
Page 51 of 1002
Downloaded from www.Manualslib.com manuals search engine
Maintenance
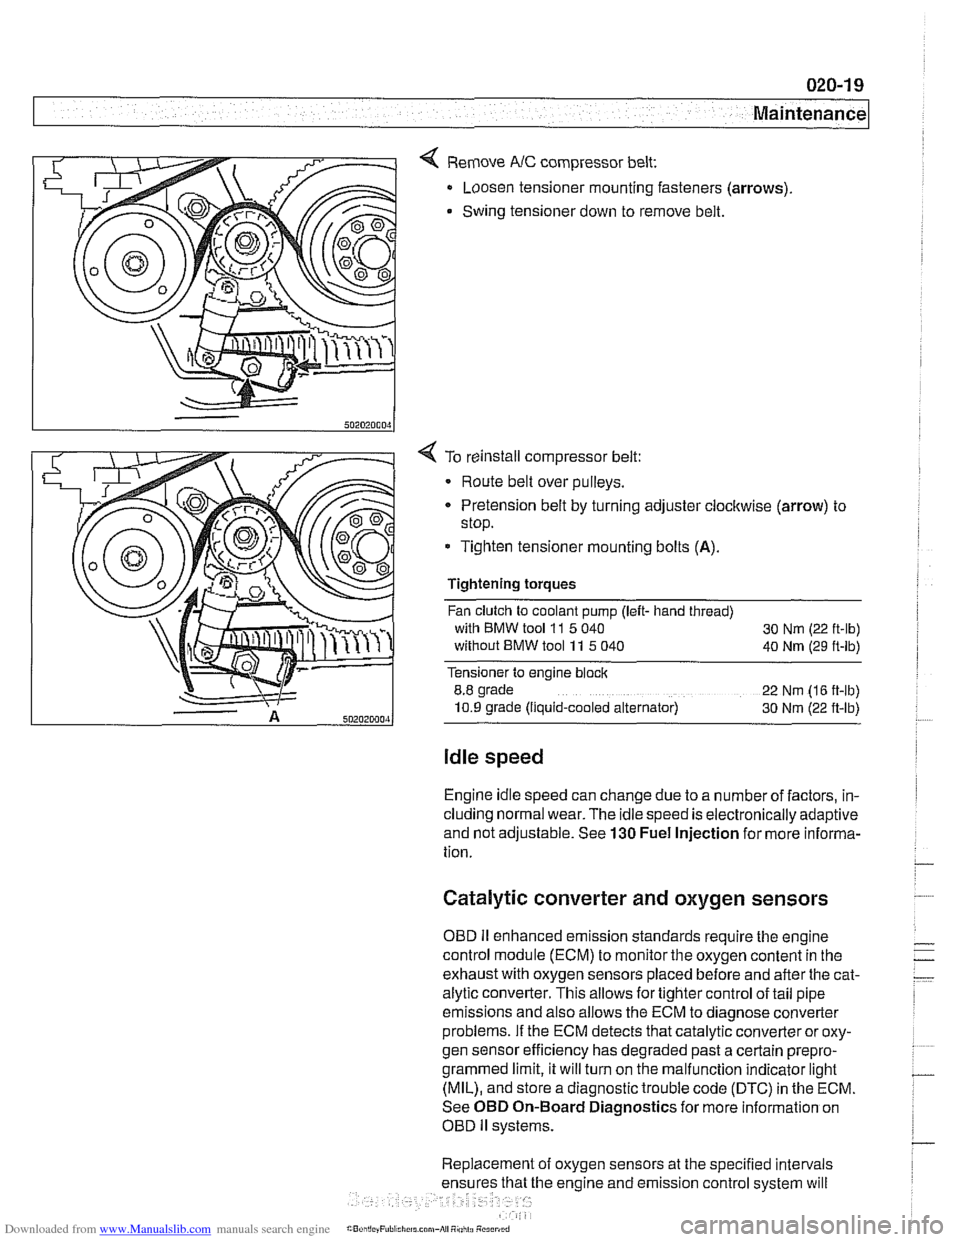
< Remove NC compressor belt:
Loosen tensioner mounting fasteners (arrows)
Swing tensioner down to remove belt.
4 To reinstall compressor belt:
Route belt over pulleys.
* Pretension belt by turning adjuster clockwise (arrow) to
stop.
- Tighten tensioner mounting bolts (A).
Tightening torques
Fan clutch to coolant pump (left- hand thread)
with BMW tool
11 5 040
30 Nm (22 ft-lb)
without BMW tool 11 5 040
40 Nm (29 ft-lb)
Tensioner to engine block
8.8 grade
22 Nm (16 ft-lb)
10.9 grade (Ilquid-cooled alternator) 30 Nm (22 ft-lb)
Idle speed
Engine idle speed can change due to a number of factors, in-
cluding normal wear. The idle speed is electronically adaptive
and not adjustable. See
130 Fuel Injection for more informa-
tion.
Catalytic converter and oxygen sensors
OBD II enhanced emission standards require the engine
control module (ECM) to monitor the oxygen content in the
exhaust with oxygen sensors placed before and after the cat-
alytic converter. This allows for tighter control of tail pipe
emissions and also allows the ECM to diagnose converter
problems. If the ECM detects that catalytic converter or oxy-
gen sensor efficiency has degraded past a certain
prepro-
grammed limit, it will turn on the malfunction indicator light
(MIL), and store a diagnostic trouble code (DTC) in the ECM.
See OBD On-Board Diagnostics for more information on
OBD
ll systems.
Replacement of oxygen sensors at the specified intervals
he engine and emission control system will
Page 328 of 1002
Downloaded from www.Manualslib.com manuals search engine
I Lubrication System -
- Remainder of assembly is reverse of disassembly.
Install flywheel, clutch or torque converter and
transmission.
Fill engine with oil.
- Run engine and check for leaks.
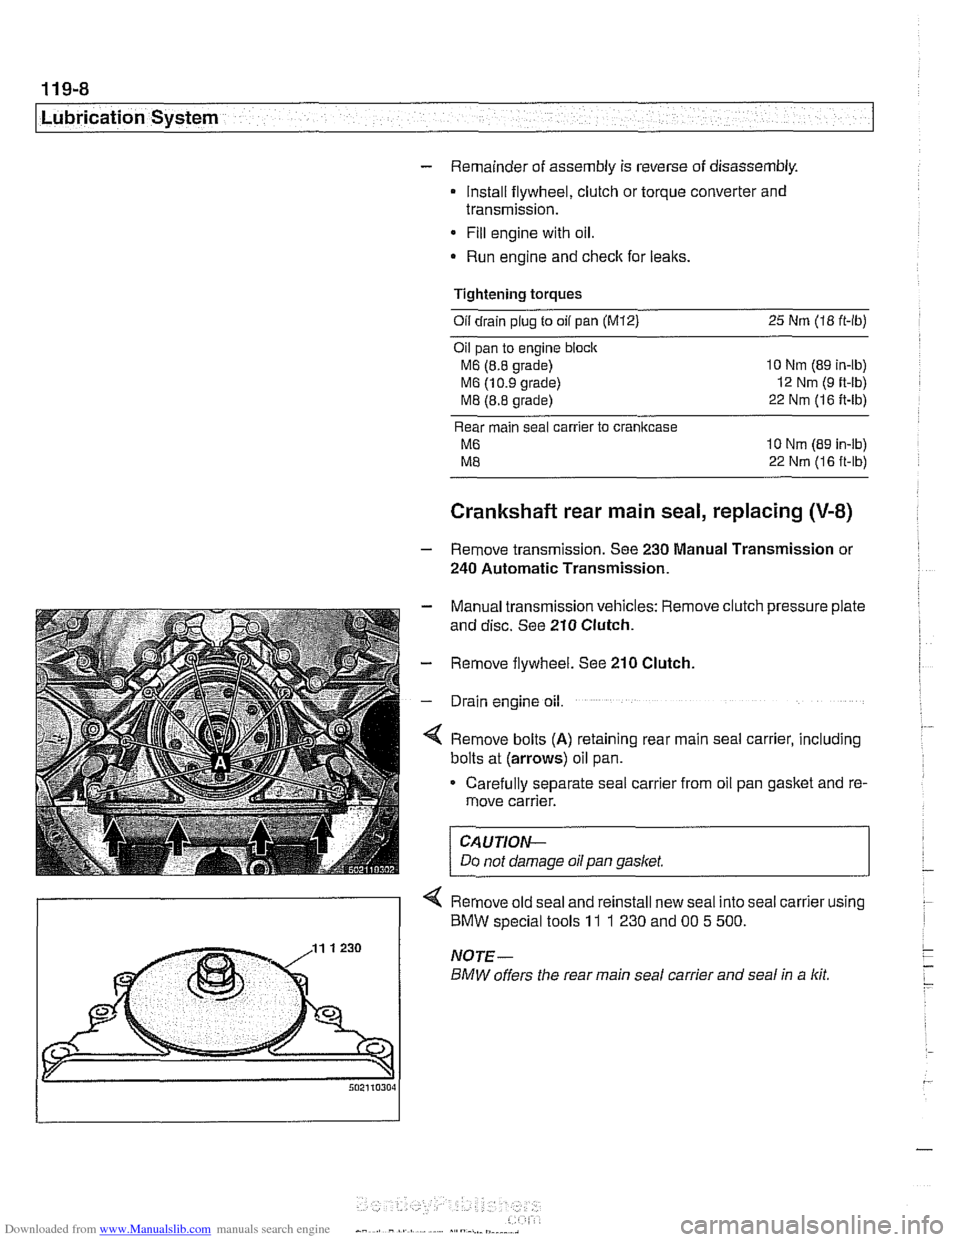
Tightening torques
Oil
drain plug fo oil pan (MI21 25 Nm (18 ft-lb)
Oil pan to engine
block
M6 (8.8 grade) 10 Nm (89 in-ib)
M6 (1 0.9 grade) 12 Nm (9 ft-lb)
M8 (8.8 grade) 22 Nm (1 6 it-lb)
Rear main seal carrier to crankcase
M6 10 Nm (89 in-lb)
ME 22 Nm (16 ft-lb)
Crankshaft rear main seal, replacing (V-8)
- Remove transmission. See 230 Manual Transmission or
240 Automatic Transmission.
- Manual transmission vehicles: Remove clutch pressure plate
and disc. See
210 Clutch.
- Remove flywheel. See 210 Clutch.
- Drain engine oil.
4 Remove bolts (A) retaining rear main seal carrier, including
bolts at (arrows) oil pan.
Carefully separate seal carrier from oil pan gasket and re-
move carrier.
CAUTION-
Do not damage oil pan gasket.
< Remove old seal and reinstall new seal into seal carrier using
) BMW special tools 11 1 230 and 00 5 500.
Page 329 of 1002
Downloaded from www.Manualslib.com manuals search engine
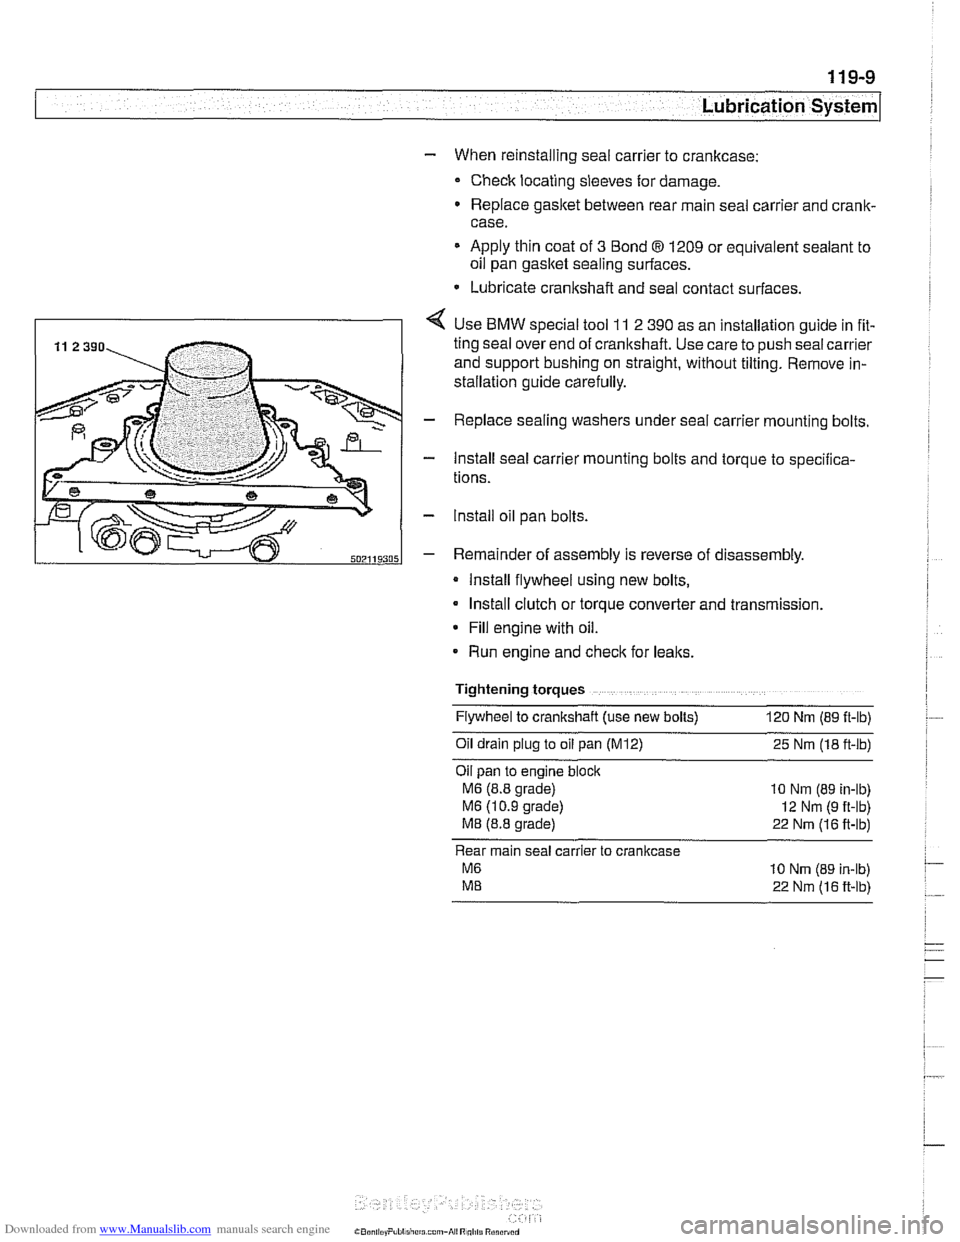
- When reinstalling seal carrier to crankcase:
Check locating sleeves for damage.
Replace gasitet between rear main seal carrier and
cranlt-
case.
Apply thin coat of
3 Bond 8 1209 or equivalent sealant to
oil pan
gasltet sealing surfaces.
* Lubricate crankshaft and seal contact surfaces.
4 Use BMW special tool 11 2 390 as an installation guide in fit-
ting seal over end of cranltshaft. Use care to push seal carrier
and support bushing on straight, without tilting. Remove in-
stallation guide carefully.
- Replace sealing washers under seal carrier mounting bolts.
- Install seal carrier mounting bolts and torque to specilica-
tions.
- lnstall oil pan bolts.
- Remainder of assembly is reverse of disassembly.
Install flywheel using new bolts,
Install clutch or torque converter and transmission.
* Fill engine with oil.
Run engine and
checlt for leaks.
Tightening torques Flywheel to crankshaft (use new bolts)
120 Nm (89 ft-lb)
011 dra~n plug to 011 pan (M12) 25 Nm (18 ft-lb)
Oil pan to
eng~ne block
M6 (8.8 grade) 10 Nm (89 in-lb)
M6 (1 0 9 grade) 12 Nm (9 ft-lb)
M8 (8.8 grade) 22 Nm (16 ft-lb)
Rear main seal carrier to crankcase
M6 10 Nrn (89 in-lb)
ME 22 Nm (16 ft-lb)
Page 462 of 1002
Downloaded from www.Manualslib.com manuals search engine
130-72
Fuel Injection
I Oxygen sensors, replacing
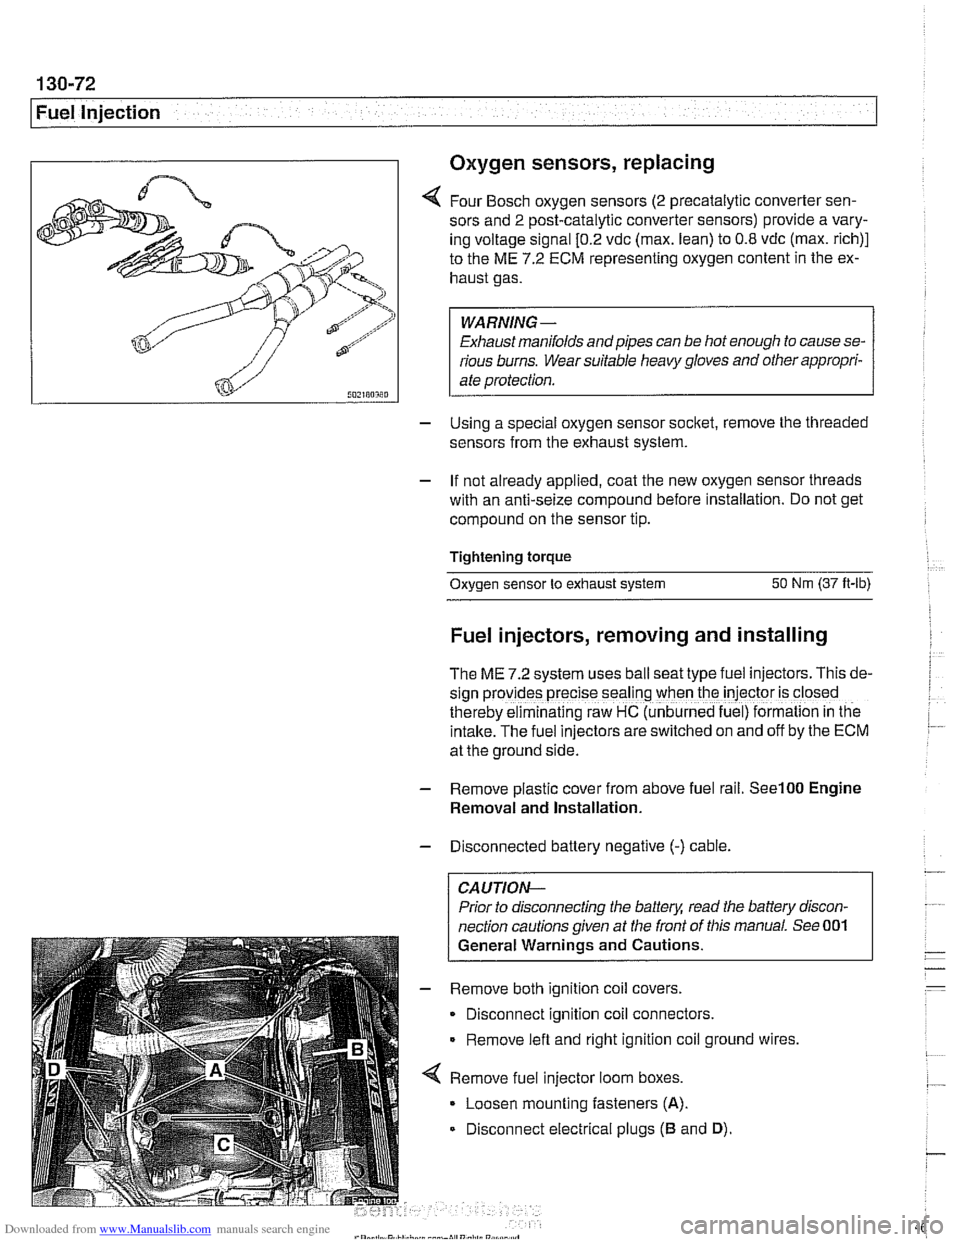
4 Four Bosch oxygen sensors (2 precatalytic converter sen-
sors and
2 post-catalytic converter sensors) provide a vary-
ing voltage signal
[0.2 vdc (max. lean) to 0.8 vdc (max. rich)]
to the ME
7.2 ECM representing oxygen content in the ex-
haust gas.
WARNING-
Exhaust manifolds and pipes can be hot enough to cause se-
rious burns. Wear suitable heavy gloves and other appropri-
ate protection.
- Using a special oxygen sensor socltet, remove the threaded
sensors from the exhaust system.
- If not already applied, coat the new oxygen sensor threads
with an anti-seize compound before installation. Do not get
compound on the sensor tip.
Tightening torque
Oxygen sensor to exhaust system
50 Nm (37 ft-lb)
Fuel injectors, removing and installing
The ME 7.2 system uses ball seat type fuel injectors. This de-
sign
prov:des precise seal'ng when the iniector is closed
therebv eiminalinq raw HC (unb~rned fue ) formalion in tne
intake.-~he fuel inkctors areswitched on and off by the ECM
at the ground side.
- Remove plastic cover from above fuel rail. See100 Engine
Removal and Installation.
- Disconnected battery negative (-) cable.
CAUTION-
Prior to disconnecting the battea read the battery discon-
nection cautions given at the front of this manual. See 001
General Warnings and Cautions.
- Remove both ignition coil covers.
Disconnect ignition coil connectors.
Remove left and right ignition coil ground wires,
4 Remove fuel injector loom boxes.
Loosen mounting fasteners
(A).
Disconnect electrical plugs (B and D).
Page 525 of 1002
Downloaded from www.Manualslib.com manuals search engine
... .
Exhaust System
- With exhaust system fully cold, raise and support car for ac-
cess to exhaust system.
WARNING -
Do not worlc under a lifted car unless it is solidly supported on
jack stands designed for that purpose. Never work under a
car that is supported solely by a
jack.
- Disconnect oxygen sensor connector(s).
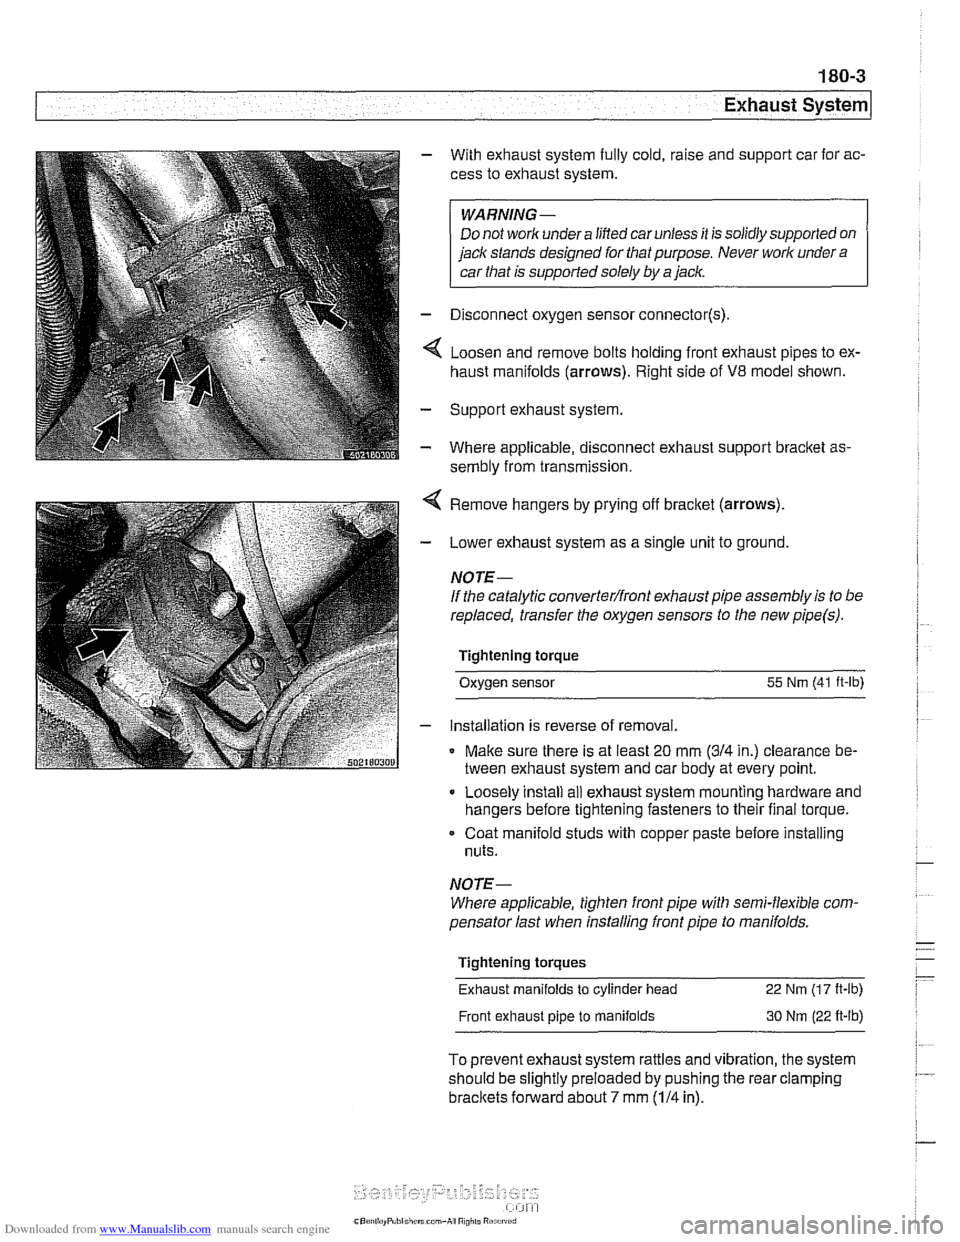
4 Loosen and remove bolts holding front exhaust pipes to ex-
haust manifolds (arrows). Right side of
V8 model shown.
- Support exhaust system
- Where applicable, disconnect exhaust support bracket as-
sembly from transmission.
< Remove hangers by prying off bracket (arrows).
- Lower exhaust system as a single unit to ground.
NOTE-
If the catalytic converterlfront exhaust pipe assembly is to be
replaced, transfer the oxygen sensors to the new
pipe(s).
Tightening torque
Oxygen sensor
55 Nm (41 ft-lb)
- installation is reverse of removal.
* Make sure there is at least 20 mm (314 in.) clearance be-
tween exhaust system and car body at every point.
Loosely install
ail exhaust system mounting hardware and
hangers before tightening fasteners to their final torque.
Coat manifold studs with copper paste before installing
nuts.
NOTE-
Where applicable, tighten front pipe with semi-flexible com-
pensator last when installing front pipe to
manifolds.
Tightening torques
Exhaust manifolds
to cylinder head 22 Nm (1 7 It-lb)
Front exhaust pipe to manifolds 30 Nm (22 ft-lb)
To prevent exhaust system rattles and vibration, the system
should be slightly preloaded by pushing the rear clamping
brackets forward about 7 mm (114 in).
Page 531 of 1002
Downloaded from www.Manualslib.com manuals search engine
-- -
Exhaust System
Oxygen sensors (precatalyst), replacing
(M52 TU and M54)
The precatalyst oxygen sensors are installed at the top of the
exhaust manifolds.
WARNING-
Allow components to cool before servicing.
- Using BMW scan tool DlSplus (Diagnostic Information Sys-
tem) or equivalent, read out and clear ECM fault codes.
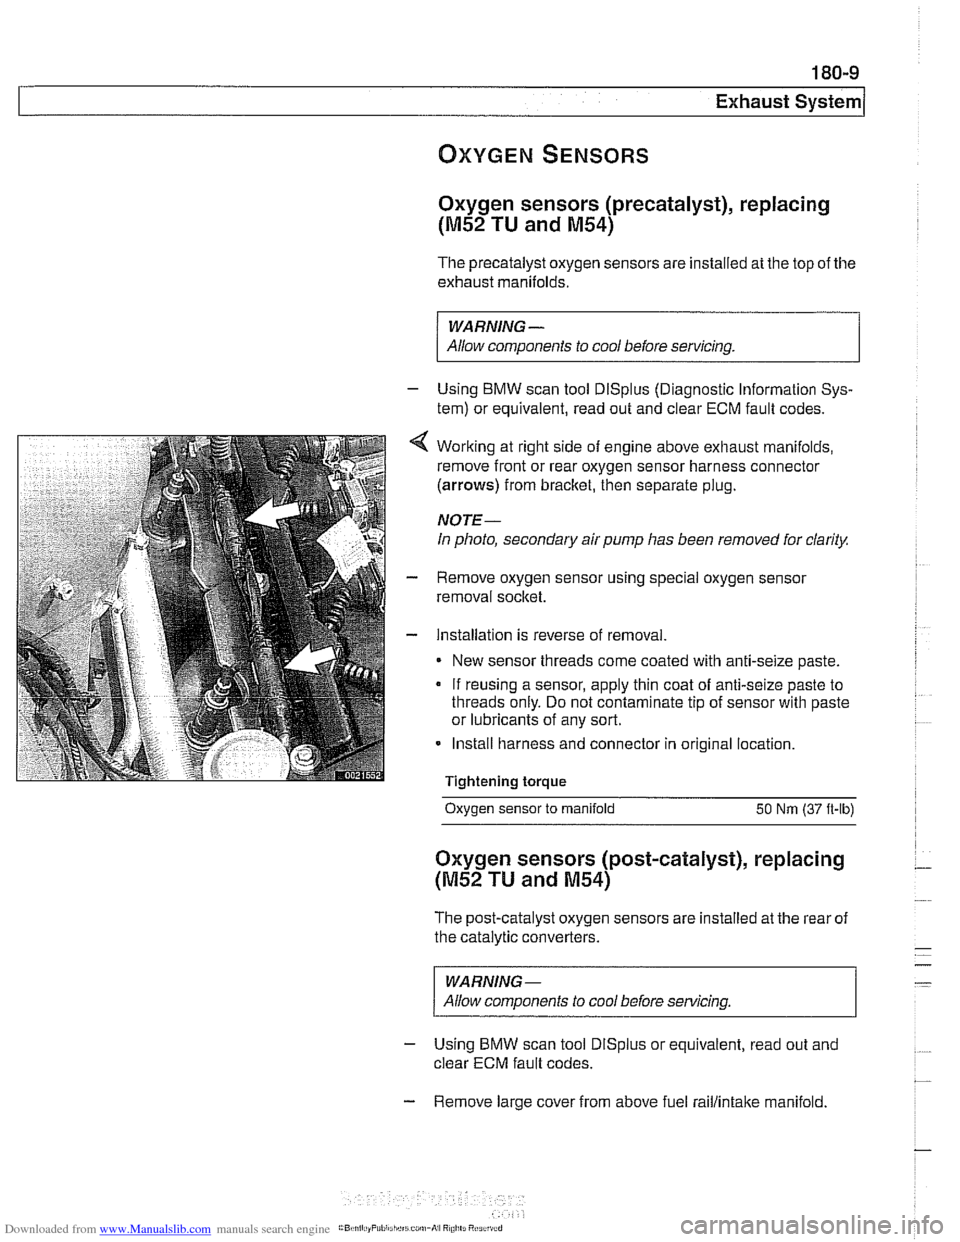
Working at right side of engine above exhaust manifolds,
remove front or rear oxygen sensor harness connector
(arrows) from bracket, then separate plug.
NOTE-
In photo, secondary air pump has been removed for clarity.
Remove oxygen sensor using special oxygen sensor
removal socket.
Installation is reverse of removal
New sensor threads come coated with anti-seize paste.
If reusing a sensor, apply thin coat of anti-seize paste to
threads only. Do not contaminate tip of sensor with paste
or lubricants of any sort.
Install harness and connector in original location.
Tightening torque
- -.
Oxygen sensor to manifold 50 Nm (37 ft-lb)
Oxygen sensors (post-catalyst), replacing
(M52 TU and M54)
The post-catalyst oxygen sensors are installed at the rear of
the catalytic converters.
WARNING-
Allow components to cool before servicing
- Using BMW scan tool DlSplus or equivalent, read out and
clear ECM fault codes.
- Remove large cover from above fuel raillintake manifold.
Page 532 of 1002
Downloaded from www.Manualslib.com manuals search engine
Exhaust System
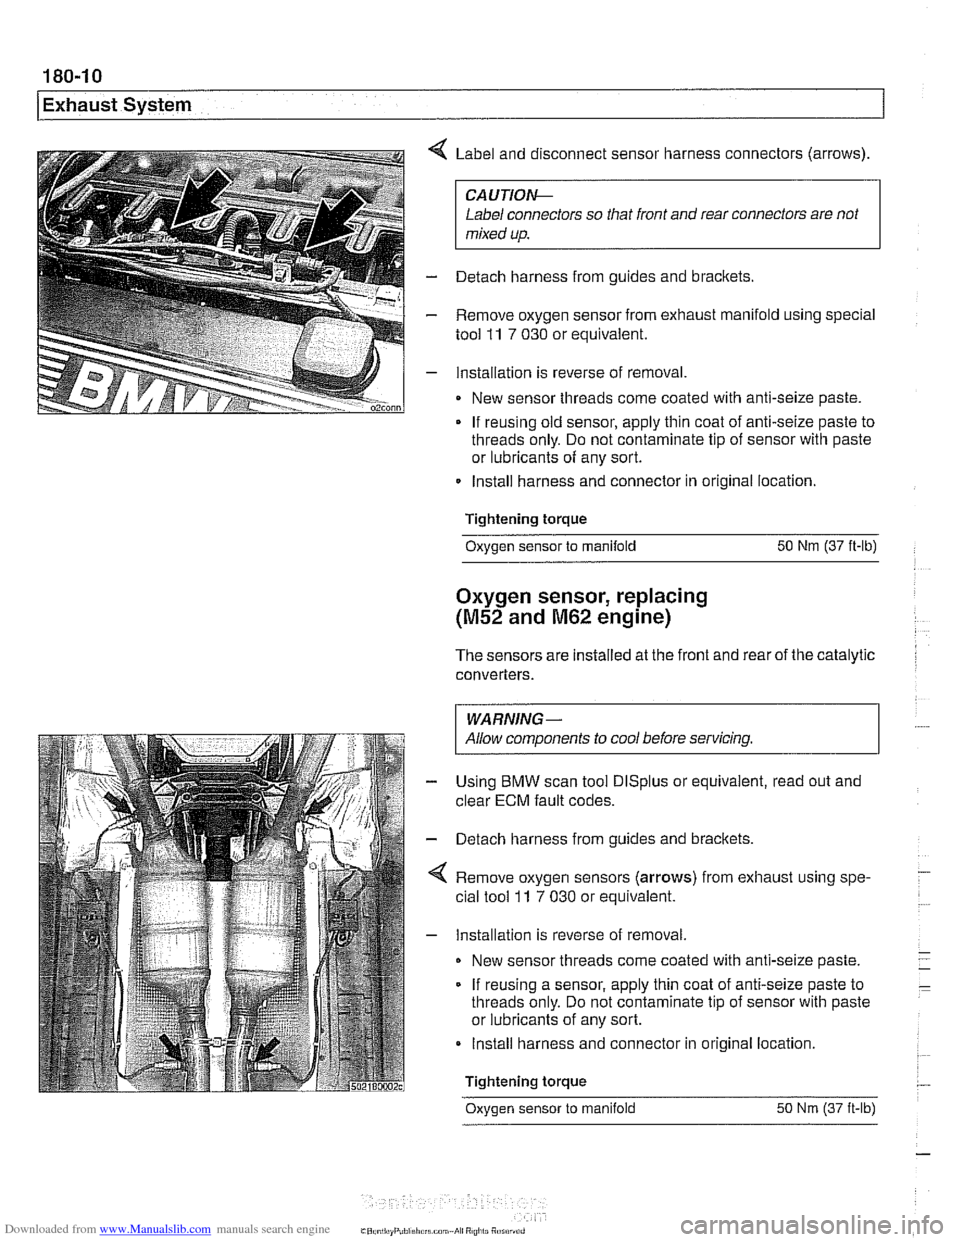
Label and disconnect sensor harness connectors (arrows).
CAUTlOI\C
Label connectors so that front and rear connectors are not
mixed up.
- Detach harness from guides and brackets.
- Remove oxygen sensor from exhaust manifold using special
tool
11 7 030 or equivalent.
- Installation is reverse of removal
New sensor threads come coated with anti-seize paste.
If reusing old sensor, apply thin coat of anti-seize paste to
threads only. Do not contaminate tip of sensor with paste
or lubricants of any sort.
Install harness and connector in original location.
Tightening torque
Oxygen sensor to manifold 50 Nm (37 ft-lb)
Oxygen sensor, replacing
(M52 and M62 engine)
The sensors are installed at the front and rear of the catalytic
converters.
I WARNING- I
I Allow components to cool before servicing. I
Using BMW scan tool DlSplus or equivalent, read out and
clear
ECM fault codes.
Detach harness from guides and brackets.
Remove oxygen sensors (arrows) from exhaust using spe-
cial tool
ll 7 030 or equivalent.
Installation is reverse of removal
New sensor threads come coated with anti-seize paste.
If reusing a sensor, apply thin coat of anti-seize paste to
threads only. Do not contaminate tip of sensor with paste
or lubricants of any sort.
Install harness and connector in original location.
Tightening torque
Oxvaen sensor to manifold 50 Nm (37 it-lb)
Page 586 of 1002
Downloaded from www.Manualslib.com manuals search engine
240-2
/ ~utomatic Transmission
This section covers maintenance and replacement of the
automatic transmission for
E39 models.
Automatic transmission internal repairs are not covered.
Such repairs require special service equipment and knowl-
edge. If it is determined that transmission internal
sewice is
required, consult an authorized BMW dealer about a factory
reconditioned unit or a transmission rebuild.
CAUTION-
ATF does not circulate unless the engine is running. When
towing an automatic transmission vehicle, use a flat bed truck
or raise the rear wheels off the ground.
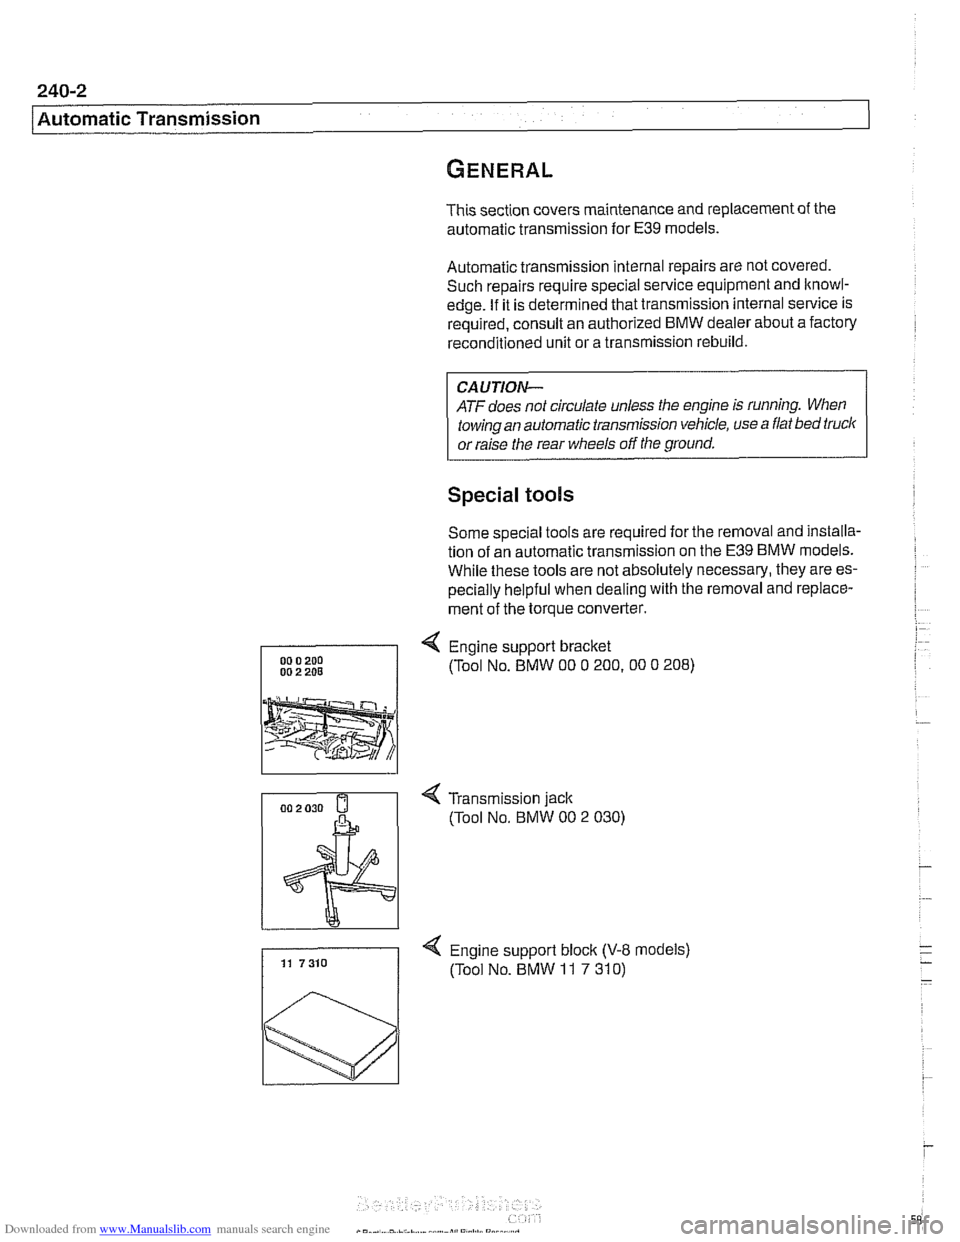
Special tools
Some special tools are required for the removal and installa-
tion of an automatic transmission on the
E39 BMW models.
While these tools are not absolutely necessary, they are es-
pecially helpful when dealing with the removal and replace-
ment of the torque converter.
4 Engine support bracket
(Tool No. BMW
00 0 200.00 0 208)
4 Transmission jack
(Tool No.
BMW 00 2 030)
4 Engine support block (V-8 models) 11 7310 (Tool No. BMW 11 7 310)
Page 587 of 1002
Downloaded from www.Manualslib.com manuals search engine
240-3
Automatic Transmission
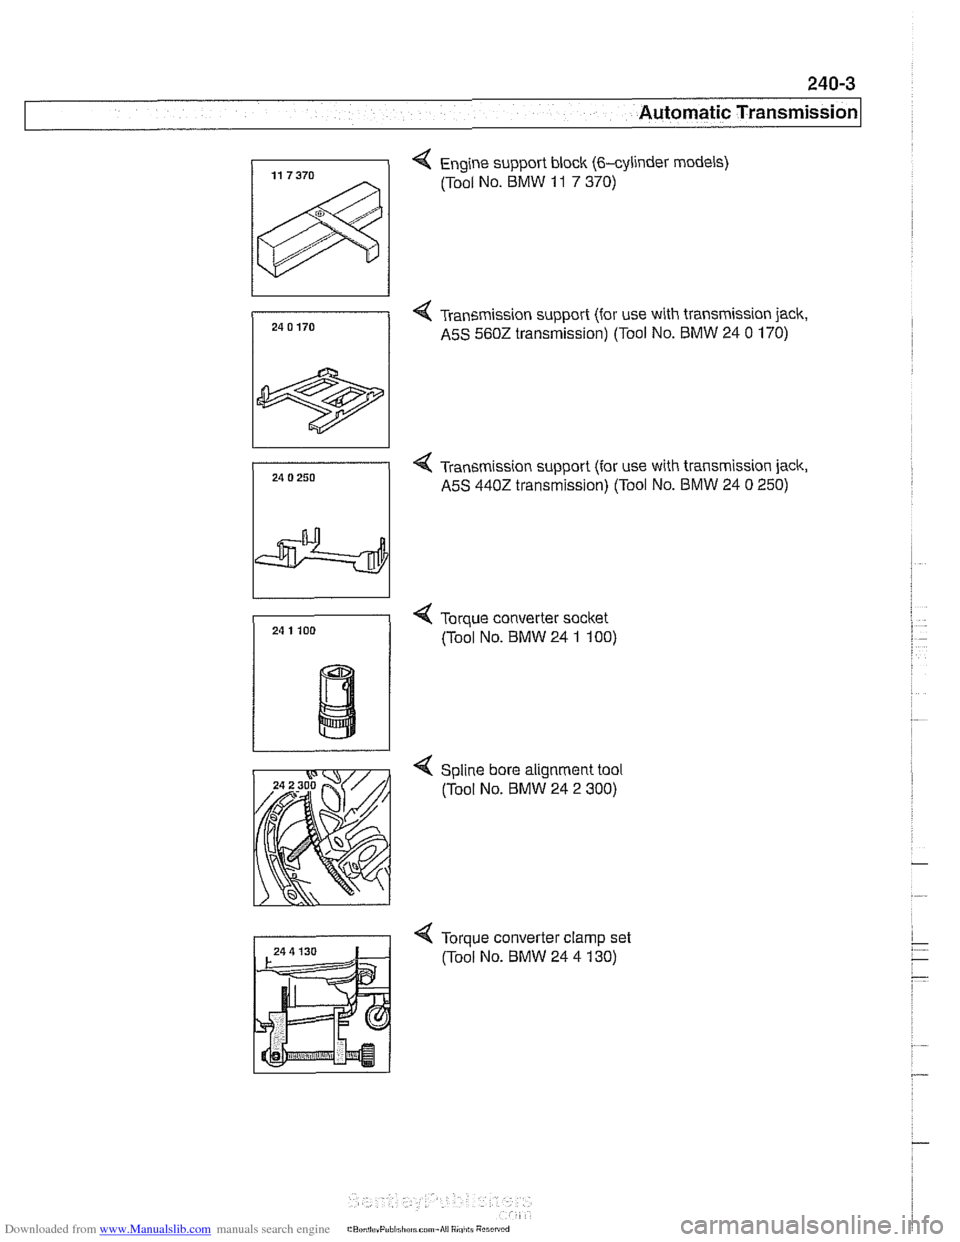
4 Engine support block (&cylinder models)
(Tool No. BMW
11 7 370)
4 Tran5mission support (for use with transmission jack,
A5S 560Z transmission) (Tool No. BMW 24
0 170)
4 Transmission support (for use with transmission jack,
A5S
4402 transmission) (Tool No. BMW 24 0 250)
4 Torque converter socket
(Tool No. BMW 24 1 100)
< Spline bore alignment tool
(Tool No.
BMW 24 2 300)