Displays BMW 528I 2011 F10 Owner's Manual
[x] Cancel search | Manufacturer: BMW, Model Year: 2011, Model line: 528I, Model: BMW 528I 2011 F10Pages: 304, PDF Size: 10.18 MB
Page 5 of 304
Contents
The fastest way to find information on a partic‐
ular topic or item is by using the index, refer to
page
294.
Using this Owner's Manual
6 Notes
At a glance
12 Cockpit
16 iDrive
22 Voice activation system
24 Integrated Owner's Manual in the vehicle
Controls
28 Opening and closing
44 Adjusting
54 Transporting children safely
58 Driving
67 Displays
80 Lamps
85 Safety
95 Driving stability control systems
102 Driving comfort
126 Climate control
132 Interior equipment
138 Storage compartments
Driving tips
146 Things to remember when driving
Navigation
154 Navigation
Entertainment
172 Tone
174 Radio
181 CD/multimedia
201 Rear entertainment Communication
210
Telephone
221 Office
230 Contacts
232 BMW ConnectedDrive
Mobility
240 Refueling
241 Fuel
242 Wheels and tires
255 Engine compartment
257 Engine oil
260 Maintenance
262 Replacing components
269 Breakdown assistance
274 Care
Reference
280 Technical data
285 Short commands of the voice activation
system
294 Everything from A to Z
Seite 5
Online Edition for Part no. 01 40 2 606 469 - 03 11 490 Reference Mobility Communication Entertainment Navigation Driving tips Controls At a glance
Page 11 of 304
At a glance
These overviews of buttons, switches and
displays are intended to familiarize you with your
vehicle. You will also become quickly acquainted with the available control concepts and options.
Online Edition for Part no. 01 40 2 606 469 - 03 11 490
Page 17 of 304
3.
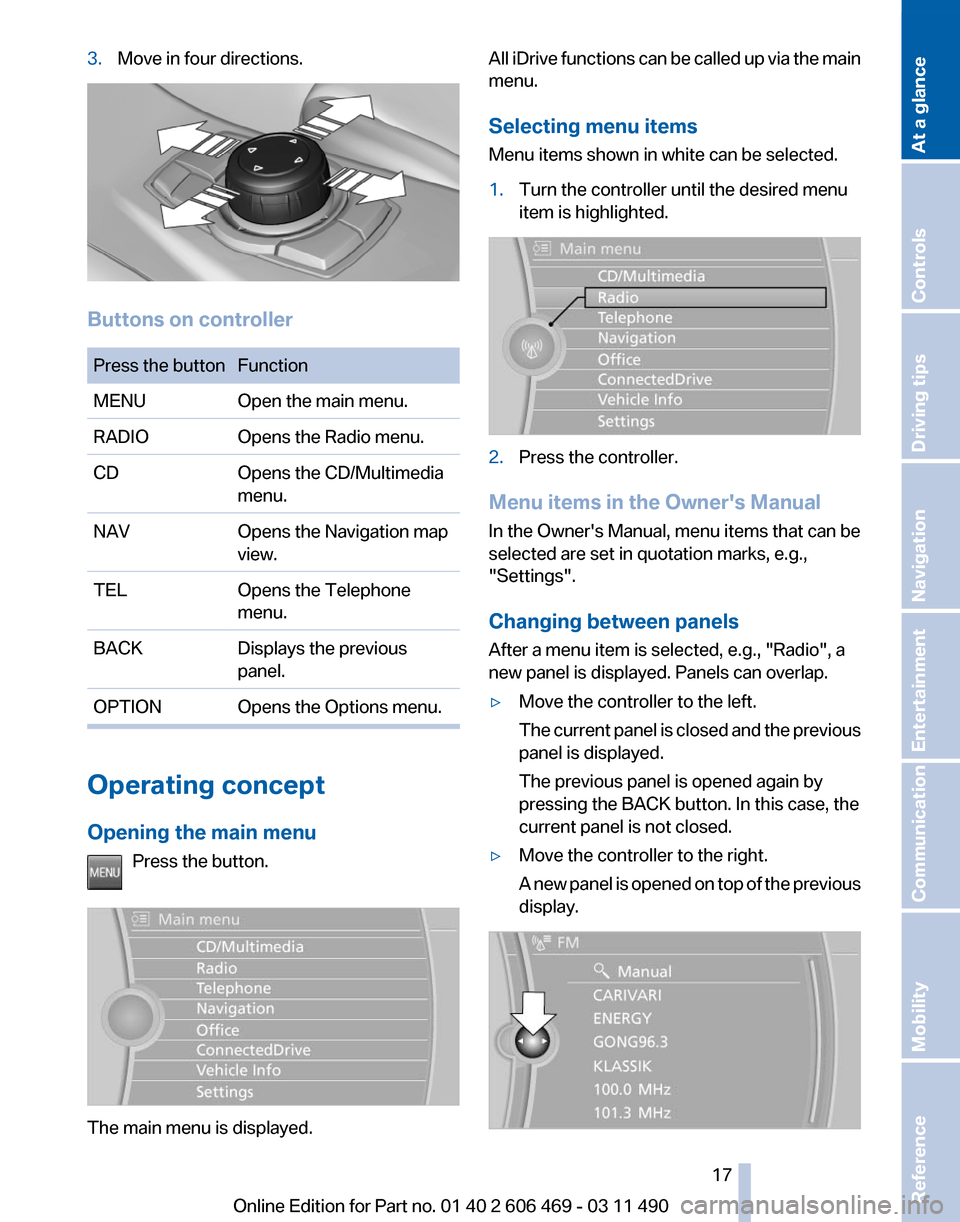
Move in four directions. Buttons on controller
Press the button Function
MENU
Open the main menu.
RADIO Opens the Radio menu.
CD Opens the CD/Multimedia
menu.
NAV Opens the Navigation map
view.
TEL Opens the Telephone
menu.
BACK Displays the previous
panel.
OPTION Opens the Options menu. Operating concept
Opening the main menu
Press the button. The main menu is displayed. All iDrive functions can be called up via the main
menu.
Selecting menu items
Menu items shown in white can be selected.
1.
Turn the controller until the desired menu
item is highlighted. 2.
Press the controller.
Menu items in the Owner's Manual
In the Owner's Manual, menu items that can be
selected are set in quotation marks, e.g.,
"Settings".
Changing between panels
After a menu item is selected, e.g.,
"Radio", a
new panel is displayed. Panels can overlap.
▷ Move the controller to the left.
The
current panel is closed and the previous
panel is displayed.
The previous panel is opened again by
pressing the BACK button. In this case, the
current panel is not closed.
▷ Move the controller to the right.
A
new panel is opened on top of the previous
display. Seite 17
17Online Edition for Part no. 01 40 2 606 469 - 03 11 490
Reference Mobility Communication Entertainment Navigation Driving tips Controls
At a glance
Page 25 of 304
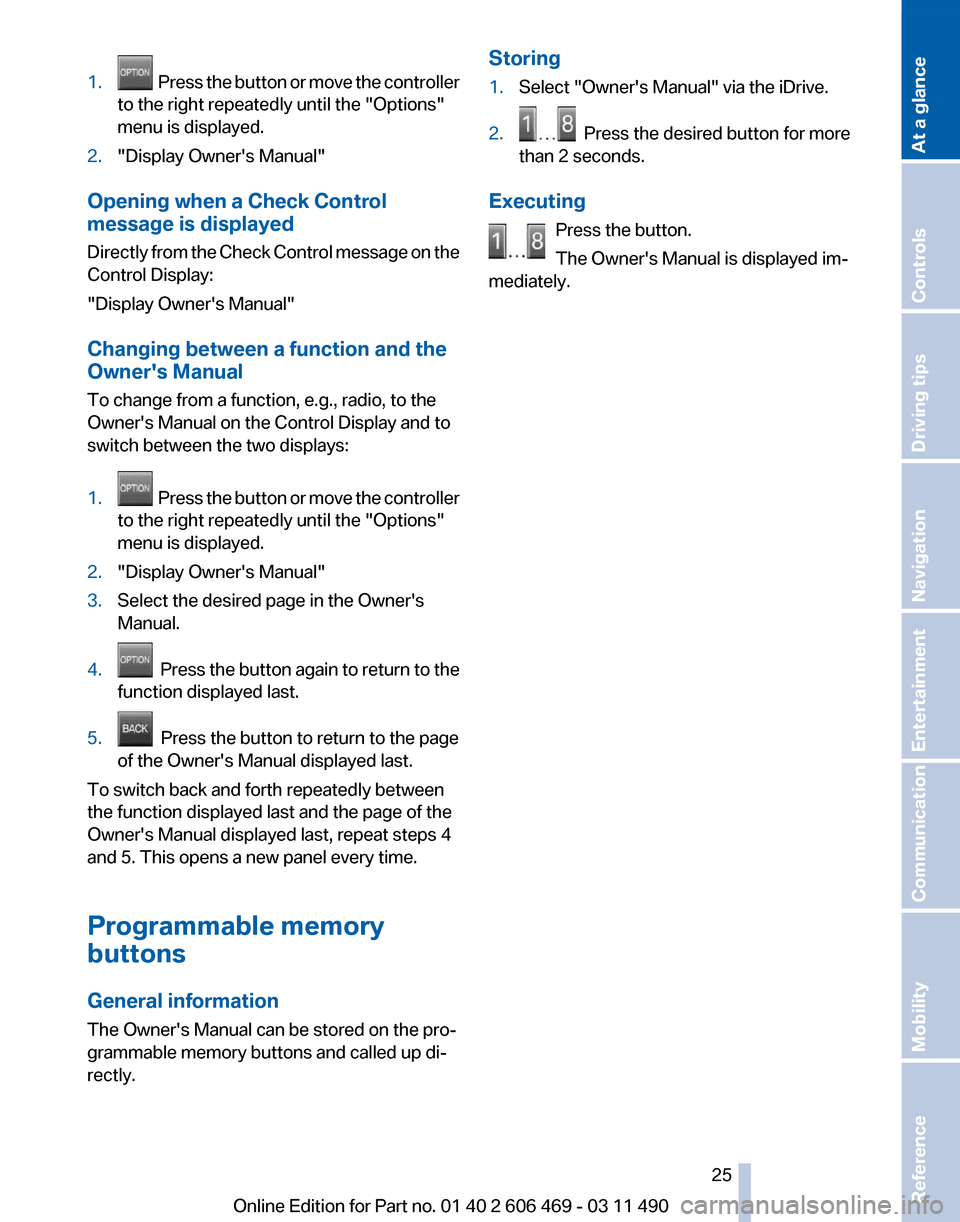
1. Press the button or move the controller
to the right repeatedly until the "Options"
menu is displayed.
2. "Display Owner's Manual"
Opening when a Check Control
message is displayed
Directly
from the Check Control message on the
Control Display:
"Display Owner's Manual"
Changing between a function and the
Owner's Manual
To change from a function, e.g., radio, to the
Owner's Manual on the Control Display and to
switch between the two displays:
1. Press the button or move the controller
to the right repeatedly until the
"Options"
menu is displayed.
2. "Display Owner's Manual"
3. Select the desired page in the Owner's
Manual.
4. Press
the button again to return to the
function displayed last.
5. Press the button to return to the page
of the Owner's Manual displayed last.
To switch back and forth repeatedly between
the function displayed last and the page of the
Owner's Manual displayed last, repeat steps 4
and 5. This opens a new panel every time.
Programmable memory
buttons
General information
The Owner's Manual can be stored on the pro‐
grammable memory buttons and called up di‐
rectly. Storing
1.
Select "Owner's Manual" via the iDrive.
2. Press the desired button for more
than 2 seconds.
Executing Press the button.
The Owner's Manual is displayed im‐
mediately. Seite 25
25Online Edition for Part no. 01 40 2 606 469 - 03 11 490
Reference Mobility Communication Entertainment Navigation Driving tips Controls
At a glance
Page 66 of 304
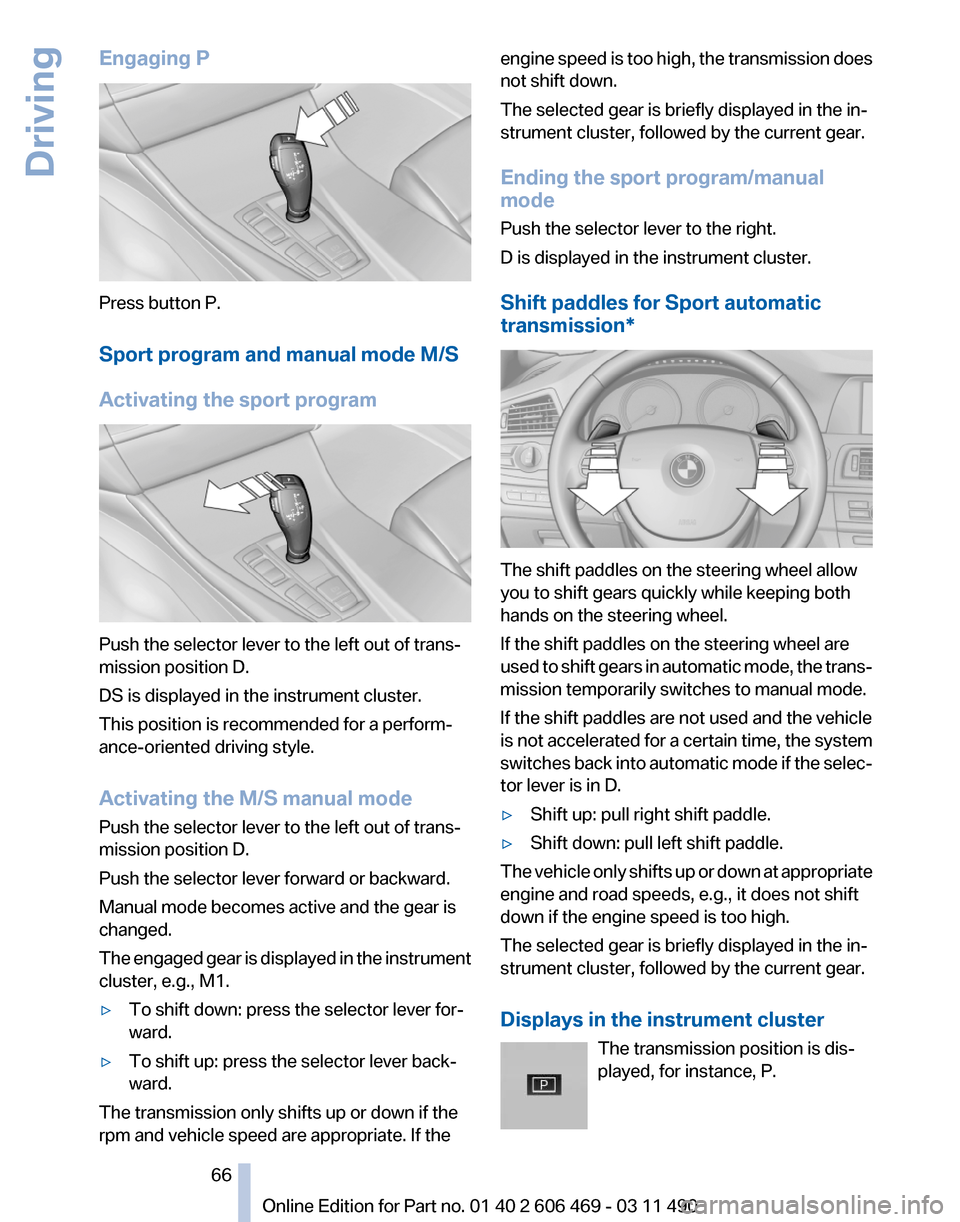
Engaging P
Press button P.
Sport program and manual mode M/S
Activating the sport program
Push the selector lever to the left out of trans‐
mission position D.
DS is displayed in the instrument cluster.
This position is recommended for a perform‐
ance-oriented driving style.
Activating the M/S manual mode
Push the selector lever to the left out of trans‐
mission position D.
Push the selector lever forward or backward.
Manual mode becomes active and the gear is
changed.
The
engaged gear is displayed in the instrument
cluster, e.g., M1.
▷ To shift down: press the selector lever for‐
ward.
▷ To shift up: press the selector lever back‐
ward.
The transmission only shifts up or down if the
rpm and vehicle speed are appropriate. If the engine speed is too high, the transmission does
not shift down.
The selected gear is briefly displayed in the in‐
strument cluster, followed by the current gear.
Ending the sport program/manual
mode
Push the selector lever to the right.
D is displayed in the instrument cluster.
Shift paddles for Sport automatic
transmission*
The shift paddles on the steering wheel allow
you to shift gears quickly while keeping both
hands on the steering wheel.
If the shift paddles on the steering wheel are
used
to shift gears in automatic mode, the trans‐
mission temporarily switches to manual mode.
If the shift paddles are not used and the vehicle
is not accelerated for a certain time, the system
switches back into automatic mode if the selec‐
tor lever is in D.
▷ Shift up: pull right shift paddle.
▷ Shift down: pull left shift paddle.
The vehicle only shifts up or down at appropriate
engine and road speeds, e.g., it does not shift
down if the engine speed is too high.
The selected gear is briefly displayed in the in‐
strument cluster, followed by the current gear.
Displays in the instrument cluster The transmission position is dis‐
played, for instance, P. Seite 66
66 Online Edition for Part no. 01 40 2 606 469 - 03 11 490
Driving
Page 67 of 304
Displays
Instrument cluster
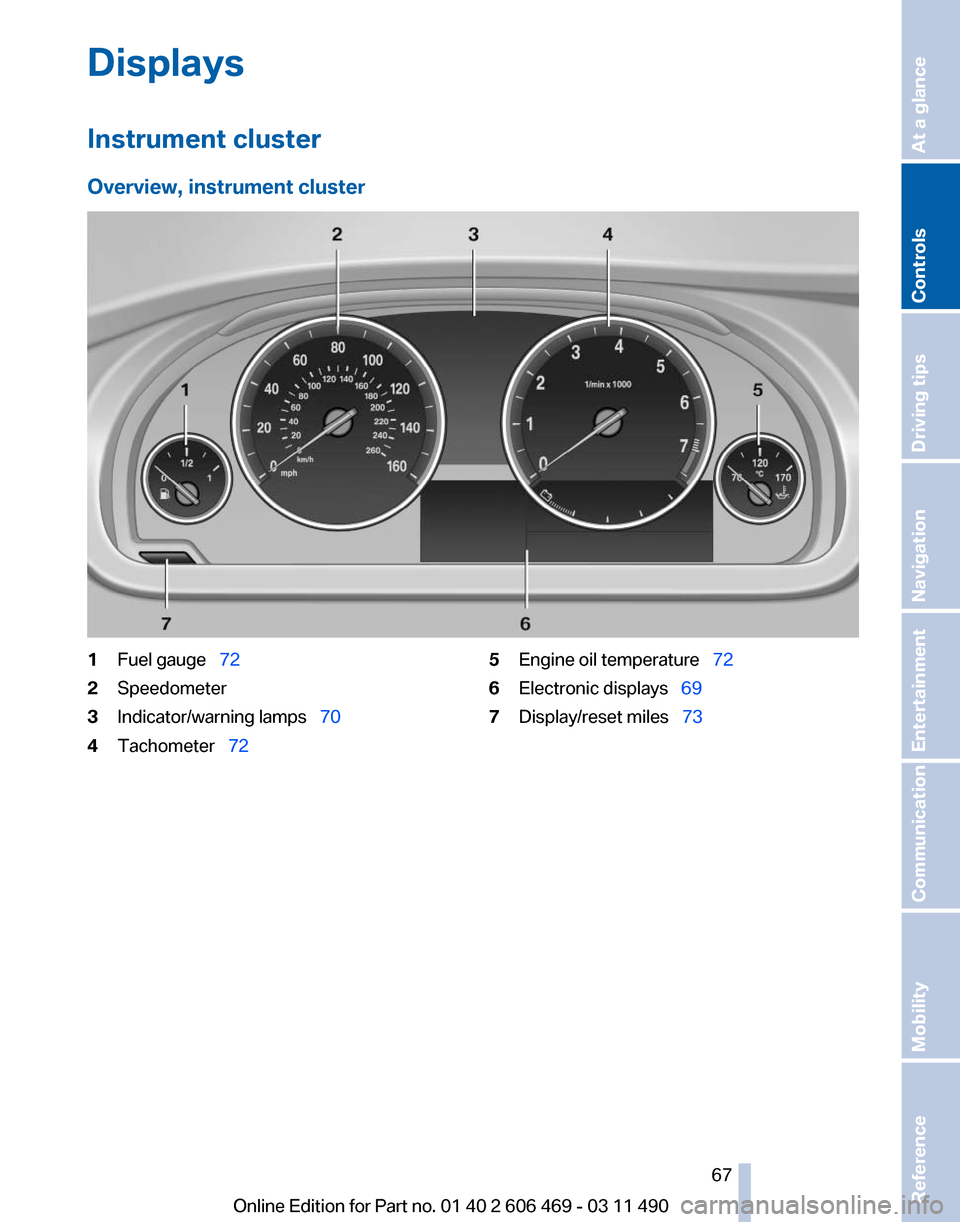
Overview, instrument cluster
1
Fuel gauge 72
2 Speedometer
3 Indicator/warning lamps 70
4 Tachometer 72 5
Engine oil temperature 72
6 Electronic displays 69
7 Display/reset miles 73
Seite 67
67Online Edition for Part no. 01 40 2 606 469 - 03 11 490
Reference Mobility Communication Entertainment Navigation Driving tips
Controls At a glance
Page 68 of 304
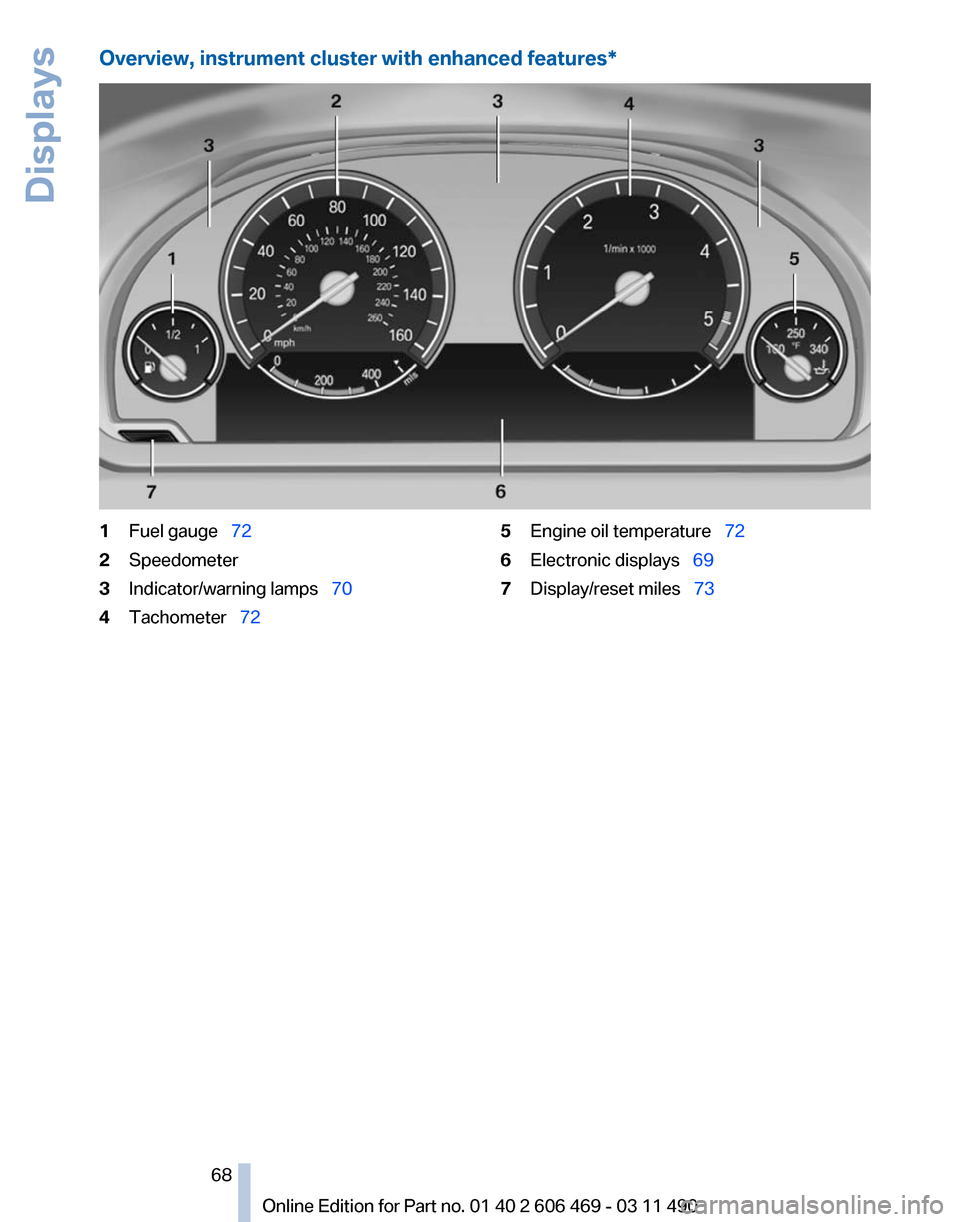
Overview, instrument cluster with enhanced features*
1
Fuel gauge 72
2 Speedometer
3 Indicator/warning lamps 70
4 Tachometer 72 5
Engine oil temperature 72
6 Electronic displays 69
7 Display/reset miles 73
Seite 68
68 Online Edition for Part no. 01 40 2 606 469 - 03 11 490Displays
Page 69 of 304
Instrument cluster, electronic displays
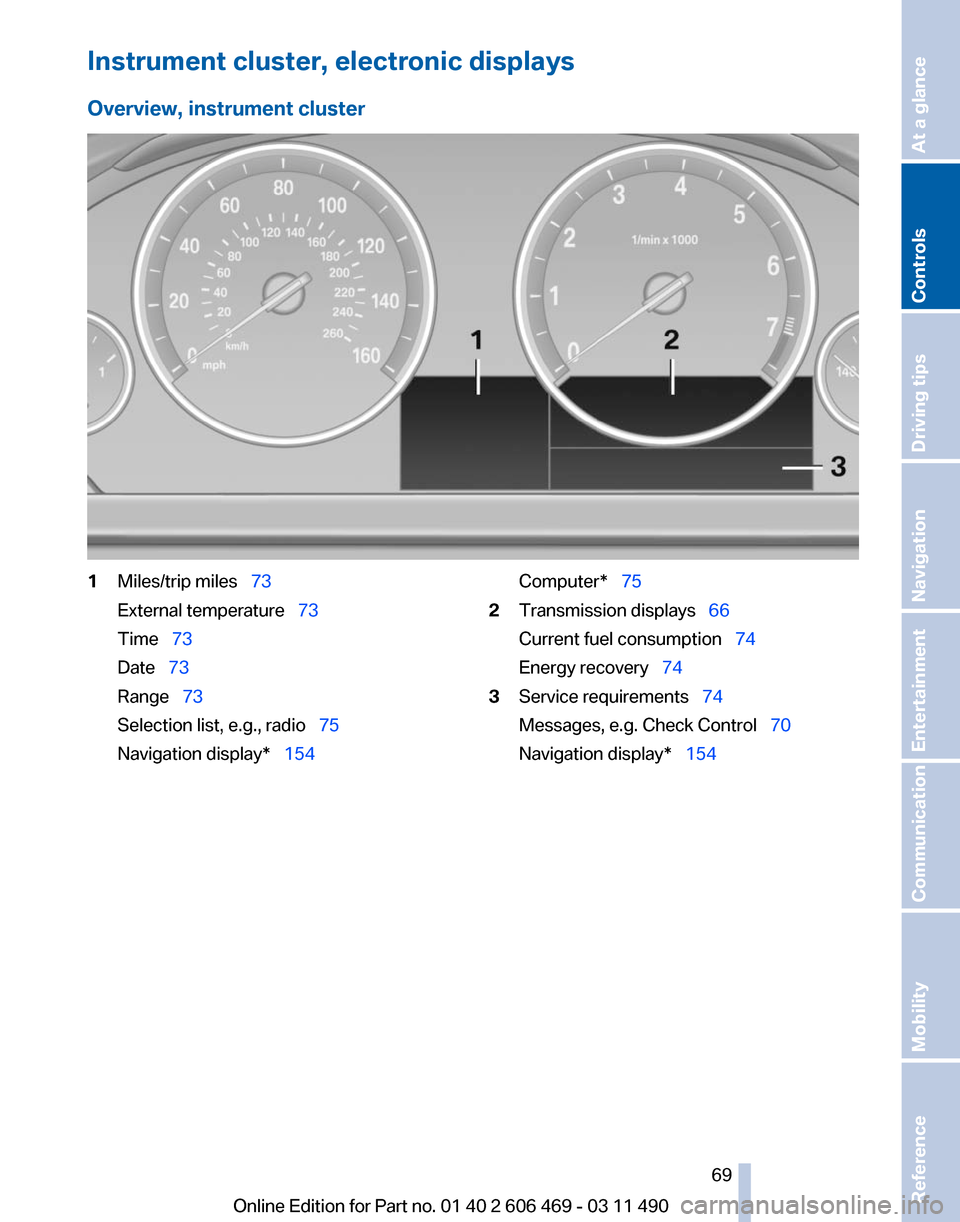
Overview, instrument cluster
1
Miles/trip miles 73
External temperature 73
Time 73
Date 73
Range 73
Selection list, e.g., radio
75
Navigation display* 154 Computer* 75
2 Transmission displays 66
Current fuel consumption 74
Energy recovery 74
3 Service requirements 74
Messages, e.g. Check Control 70
Navigation display
* 154
Seite 69
69Online Edition for Part no. 01 40 2 606 469 - 03 11 490
Reference Mobility Communication Entertainment Navigation Driving tips
Controls At a glance
Page 70 of 304
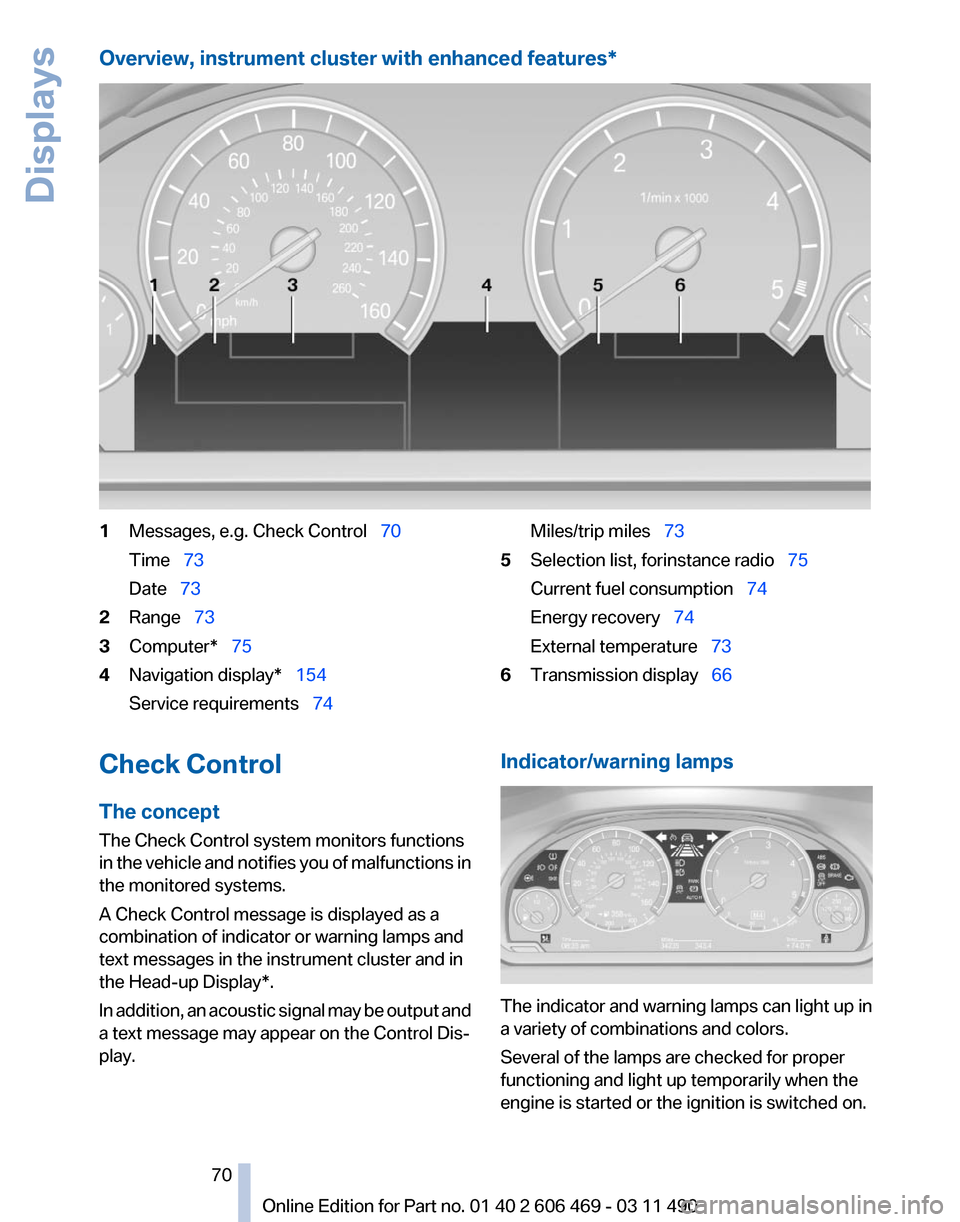
Overview, instrument cluster with enhanced features*
1
Messages, e.g. Check Control 70
Time 73
Date 73
2 Range 73
3 Computer* 75
4 Navigation display* 154
Service requirements 74 Miles/trip miles
73
5 Selection list, for instance radio 75
Current fuel consumption 74
Energy recovery 74
External temperature 73
6 Transmission display 66
Check Control
The concept
The Check Control system monitors functions
in
the vehicle and notifies you of malfunctions in
the monitored systems.
A Check Control message is displayed as a
combination of indicator or warning lamps and
text messages in the instrument cluster and in
the Head-up Display*.
In addition, an acoustic signal may be output and
a text message may appear on the Control Dis‐
play. Indicator/warning lamps
The indicator and warning lamps can light up in
a variety of combinations and colors.
Several of the lamps are checked for proper
functioning and light up temporarily when the
engine is started or the ignition is switched on.
Seite 70
70 Online Edition for Part no. 01 40 2 606 469 - 03 11 490
Displays
Page 72 of 304
▷ "Service request"
Contact the service partner.
▷ "Roadside Assistance"
Contact Roadside Assistance.
Hiding Check Control messages Press the computer button on the turn signal
lever.
▷
Some Check Control messages are dis‐
played
continuously and are not cleared un‐
til the malfunction is eliminated. If several
malfunctions occur at once, the messages
are displayed consecutively.
These messages can be hidden for approx.
8 seconds. After this time, they are dis‐
played again automatically.
▷ Other Check Control messages are hidden
automatically after approx. 20 seconds.
They
are stored and can be displayed again
later.
Displaying stored Check Control
messages
1. "Vehicle Info"
2. "Vehicle status"
3. "Check Control"
4. Select the text message.
Messages after trip completion
Malfunctions indicated during a trip are dis‐
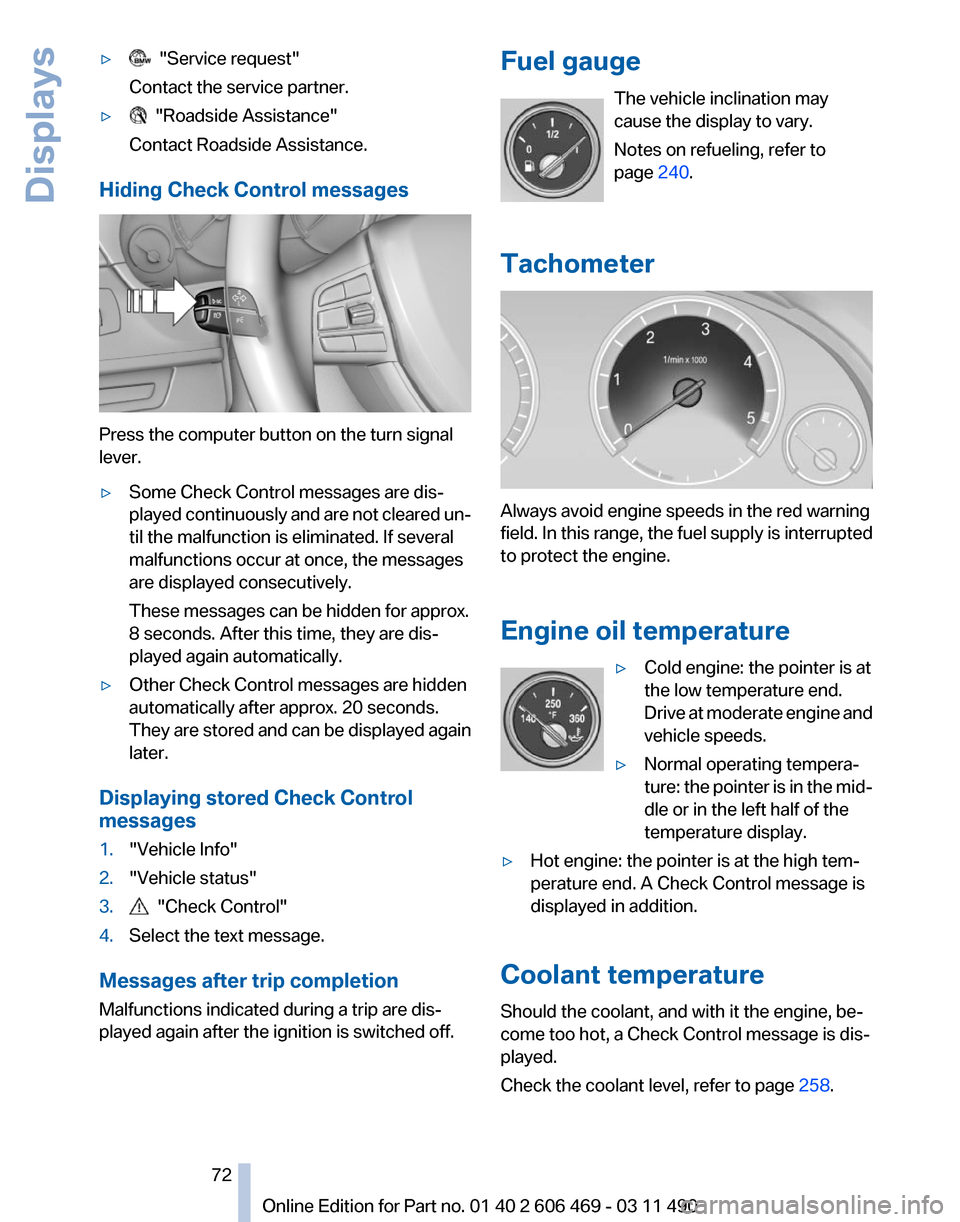
played again after the ignition is switched off. Fuel gauge
The vehicle inclination may
cause the display to vary.
Notes on refueling, refer to
page 240.
Tachometer Always avoid engine speeds in the red warning
field.
In this range, the fuel supply is interrupted
to protect the engine.
Engine oil temperature
▷Cold engine: the pointer is at
the low temperature end.
Drive
at moderate engine and
vehicle speeds.
▷ Normal operating tempera‐
ture:
the pointer is in the mid‐
dle or in the left half of the
temperature display.
▷ Hot engine: the pointer is at the high tem‐
perature end. A Check Control message is
displayed in addition.
Coolant temperature
Should the coolant, and with it the engine, be‐
come too hot, a Check Control message is dis‐
played.
Check the coolant level, refer to page 258. Seite 72
72 Online Edition for Part no. 01 40 2 606 469 - 03 11 490
Displays