radio controls BMW 528I 2012 User Guide
[x] Cancel search | Manufacturer: BMW, Model Year: 2012, Model line: 528I, Model: BMW 528I 2012Pages: 335, PDF Size: 13.16 MB
Page 98 of 335
A change in the tire inflation pressure during
driving is taken into account.
A correction is only necessary if this is indicated
by the TPM
Wheels, green
The tire inflation pressure is equal to the target
state.
One wheel is yellow
A flat tire or major drop in inflation pressure in
the indicated tire.
All wheels are yellow▷A flat tire or major drop in inflation pressure
in several tires.▷The system was not reset after a wheel
change and thus warns based on the infla‐
tion pressures initialized last.▷A flat tire in one or more tires while the sys‐
tem is being reset.
Wheels, gray
The system cannot detect a flat tire. Reasons for
this may be:
▷TPM is being reset.▷Disturbance by systems or devices with the
same radio frequency.▷Malfunction.
For Canadian models: additional
information
The status display additionally shows the cur‐
rent tire inflation pressures and tire tempera‐
tures.
When correcting the tire inflation pressures,
note the following:
The tire pressure increases as the tire temper‐
ature increases.
Therefore, only correct the tire inflation pres‐
sure when the tire is at the ambient temperature.
Compare the displayed tire temperature with
the external temperature in the instrument clus‐
ter.
Resetting the system
Reset the system after each correction of the
tire inflation pressure and after every tire or
wheel change.1."Vehicle Info"2."Vehicle status"3. "Reset"4.Start the engine - do not drive away.5.Reset the tire pressure using "Reset".6.Drive away.
The tires are shown in gray and "Resetting
TPM..." is displayed.
After driving for a few minutes, the set tire infla‐
tion pressures are applied as set values. The re‐
setting process is completed automatically dur‐
ing driving. The tires are shown in green and
"TPM active" is shown on the Control Display.
The trip can be interrupted at any time. If you
drive away again, the process resumes auto‐
matically.
If a flat tire is detected during a reset, all tires are
displayed in yellow.
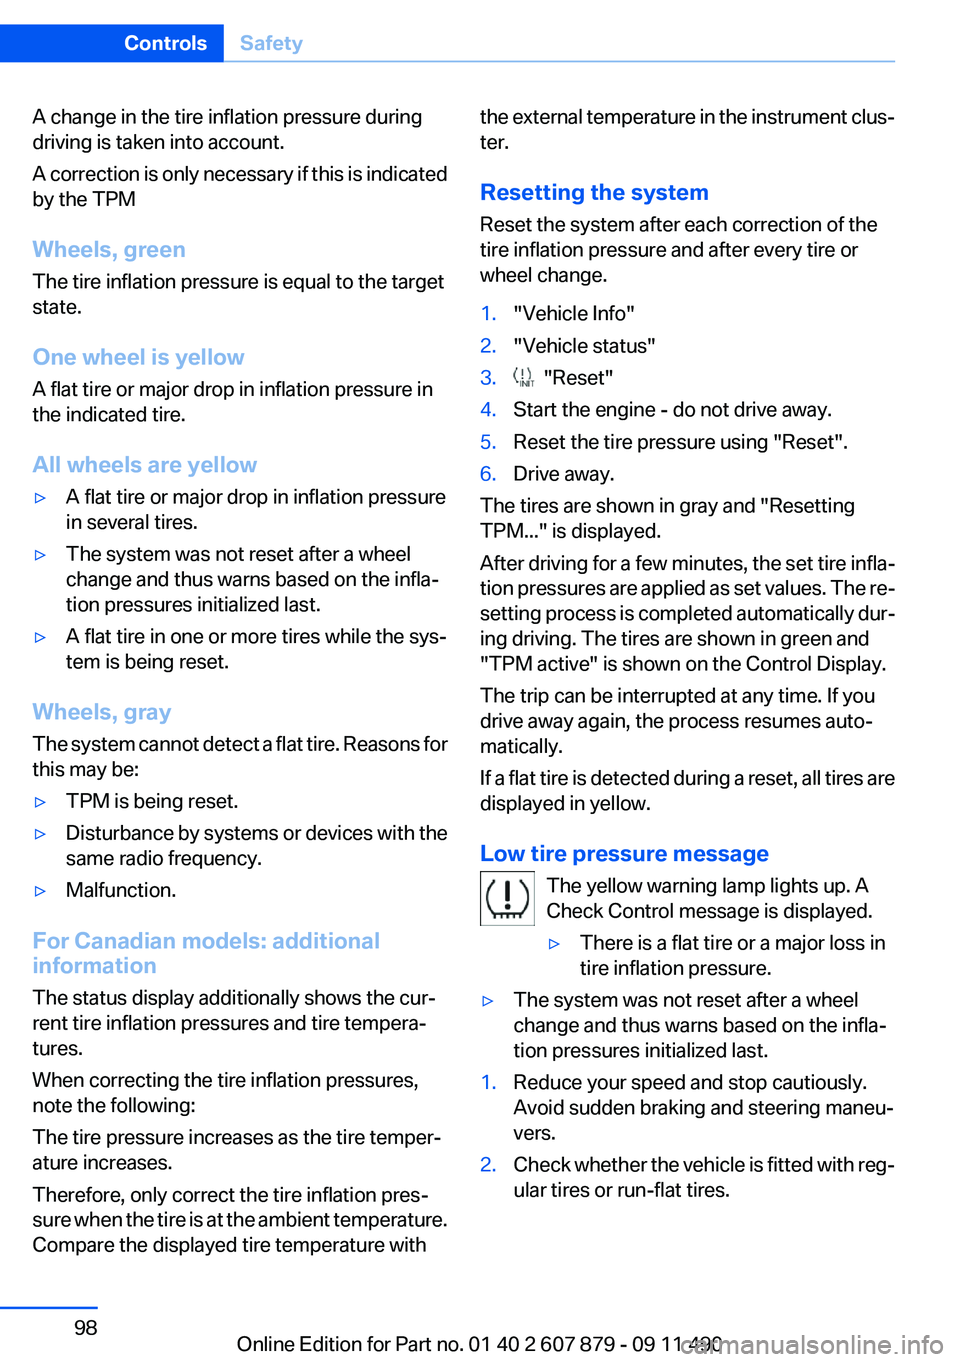
Low tire pressure message The yellow warning lamp lights up. A
Check Control message is displayed.
▷There is a flat tire or a major loss in
tire inflation pressure.▷The system was not reset after a wheel
change and thus warns based on the infla‐
tion pressures initialized last.1.Reduce your speed and stop cautiously.
Avoid sudden braking and steering maneu‐
vers.2.Check whether the vehicle is fitted with reg‐
ular tires or run-flat tires.Seite 98ControlsSafety98
Online Edition for Part no. 01 40 2 607 879 - 09 11 490
Page 100 of 335
Message when the system was not
reset
A Check Control message is displayed.
The system detected a wheel change but was
not reset.
Warnings regarding the current tire inflation
pressure are not reliable.
Check the tire inflation pressure and reset the
system.
Malfunction The yellow warning lamp flashes and
then lights up continuously. A Check
Control message is displayed. No flat
tire can be detected.
Display in the following situations:▷A wheel without TPM electronics is fitted:
have the service center check it if necessary.▷Malfunction: have the system checked by
your service center.▷TPM could not be fully reset. Reset the sys‐
tem again.▷Disturbance by systems or devices with the
same radio frequency: after leaving the area
of the disturbance, the system automatically
becomes active again.
Declaration according to NHTSA/
FMVSS 138 Tire Pressure Monitoring
System
Each tire, including the spare (if provided)
should be checked monthly when cold and in‐
flated to the inflation pressure recommended by
the vehicle manufacturer on the vehicle placard
or tire inflation pressure label. (If your vehicle has
tires of a different size than the size indicated on
the vehicle placard or tire inflation pressure la‐
bel, you should determine the proper tire infla‐
tion pressure for those tires.) As an added safety
feature, your vehicle has been equipped with a
tire pressure monitoring system (TPMS) that il‐
luminates a low tire pressure telltale when one
or more of your tires is significantly under-in‐
flated. Accordingly, when the low tire pressure
telltale illuminates, you should stop and check
your tires as soon as possible, and inflate them
to the proper pressure. Driving on a significantly
under-inflated tire causes the tire to overheat
and can lead to tire failure. Under-inflation also
reduces fuel efficiency and tire tread life, and
may affect the vehicle's handling and stopping
ability. Please note that the TPMS is not a sub‐
stitute for proper tire maintenance, and it is the
driver's responsibility to maintain correct tire
pressure, even if under-inflation has not reached
the level to trigger illumination of the TPMS low
tire pressure telltale. Your vehicle has also been
equipped with a TPMS malfunction indicator to
indicate when the system is not operating prop‐
erly. The TPMS malfunction indicator is com‐
bined with the low tire pressure telltale. When
the system detects a malfunction, the telltale will
flash for approximately one minute and then re‐
main continuously illuminated. This sequence
will continue upon subsequent vehicle start-ups
as long as the malfunction exists. When the mal‐
function indicator is illuminated, the system may
not be able to detect or signal low tire pressure
as intended. TPMS malfunctions may occur for
a variety of reasons, including the installation of
replacement or alternate tires or wheels on the
vehicle that prevent the TPMS from functioning
properly. Always check the TPMS malfunction
telltale after replacing one or more tires or
wheels on your vehicle to ensure that the re‐
placement or alternate tires and wheels allow
the TPMS to continue to function properly.
FTM Flat Tire Monitor
The concept
The system does not measure the actual infla‐
tion pressure in the tires.
It detects a pressure loss in a tire by comparing
the rotational speeds of the individual wheels
while moving.Seite 100ControlsSafety100
Online Edition for Part no. 01 40 2 607 879 - 09 11 490
Page 119 of 335
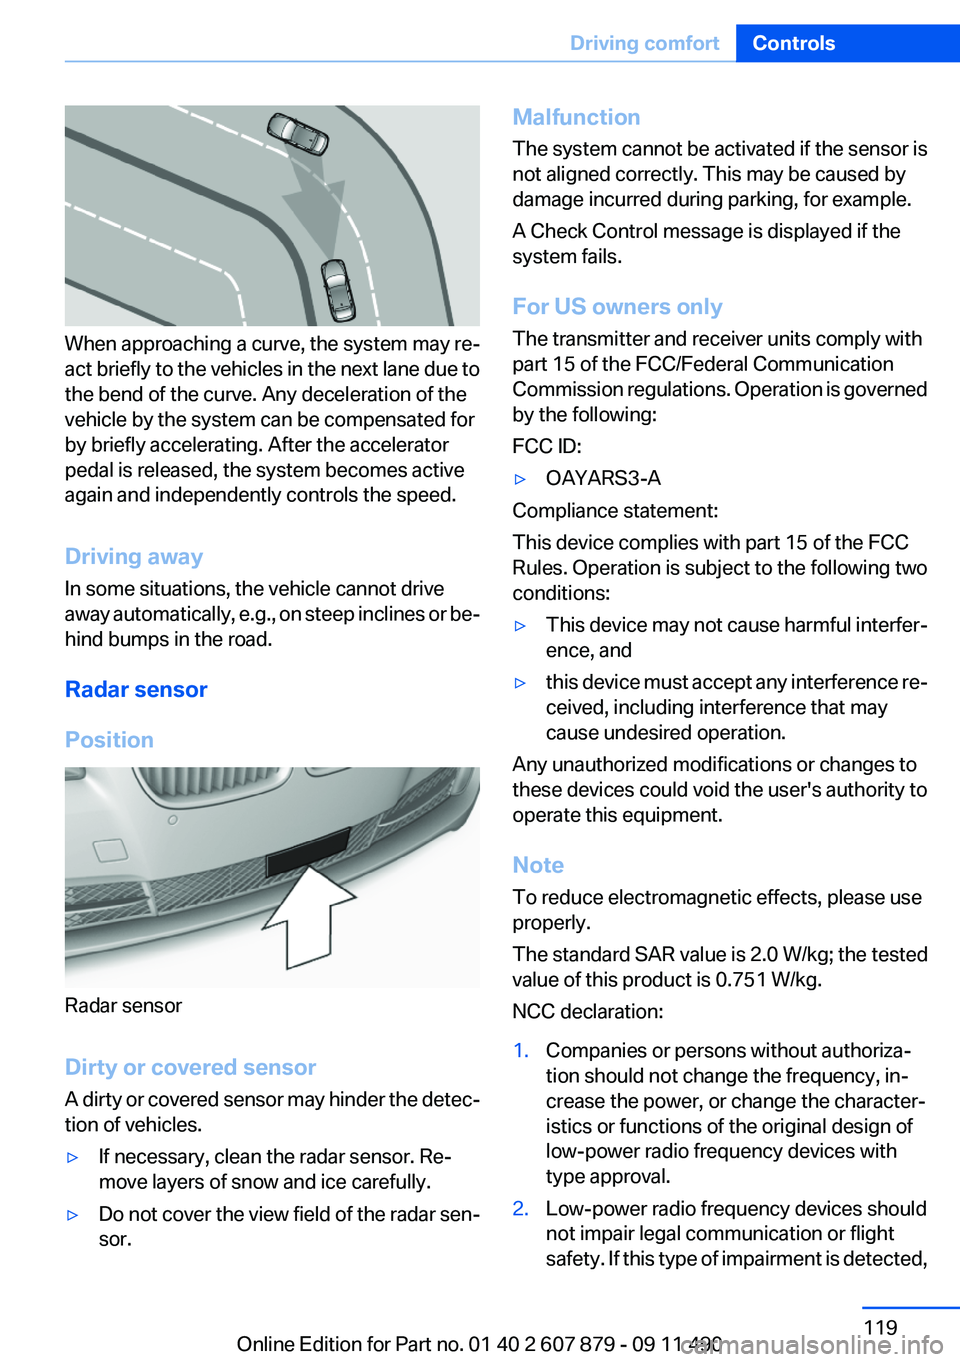
When approaching a curve, the system may re‐
act briefly to the vehicles in the next lane due to
the bend of the curve. Any deceleration of the
vehicle by the system can be compensated for
by briefly accelerating. After the accelerator
pedal is released, the system becomes active
again and independently controls the speed.
Driving away
In some situations, the vehicle cannot drive
away automatically, e.g., on steep inclines or be‐
hind bumps in the road.
Radar sensor
Position
Radar sensor
Dirty or covered sensor
A dirty or covered sensor may hinder the detec‐
tion of vehicles.
▷If necessary, clean the radar sensor. Re‐
move layers of snow and ice carefully.▷Do not cover the view field of the radar sen‐
sor.Malfunction
The system cannot be activated if the sensor is
not aligned correctly. This may be caused by
damage incurred during parking, for example.
A Check Control message is displayed if the
system fails.
For US owners only
The transmitter and receiver units comply with
part 15 of the FCC/Federal Communication
Commission regulations. Operation is governed
by the following:
FCC ID:▷OAYARS3-A
Compliance statement:
This device complies with part 15 of the FCC
Rules. Operation is subject to the following two
conditions:
▷This device may not cause harmful interfer‐
ence, and▷this device must accept any interference re‐
ceived, including interference that may
cause undesired operation.
Any unauthorized modifications or changes to
these devices could void the user's authority to
operate this equipment.
Note
To reduce electromagnetic effects, please use
properly.
The standard SAR value is 2.0 W/kg; the tested
value of this product is 0.751 W/kg.
NCC declaration:
1.Companies or persons without authoriza‐
tion should not change the frequency, in‐
crease the power, or change the character‐
istics or functions of the original design of
low-power radio frequency devices with
type approval.2.Low-power radio frequency devices should
not impair legal communication or flight
safety. If this type of impairment is detected,Seite 119Driving comfortControls119
Online Edition for Part no. 01 40 2 607 879 - 09 11 490
Page 192 of 335
RadioVehicle equipment
All standard, country-specific and optional
equipment that is offered in the model series is
described in this chapter. Therefore, equipment
is also described that is not available in a vehicle,
e. g., because of the selected optional equip‐
ment or country variant. This also applies for
safety-related functions and systems.
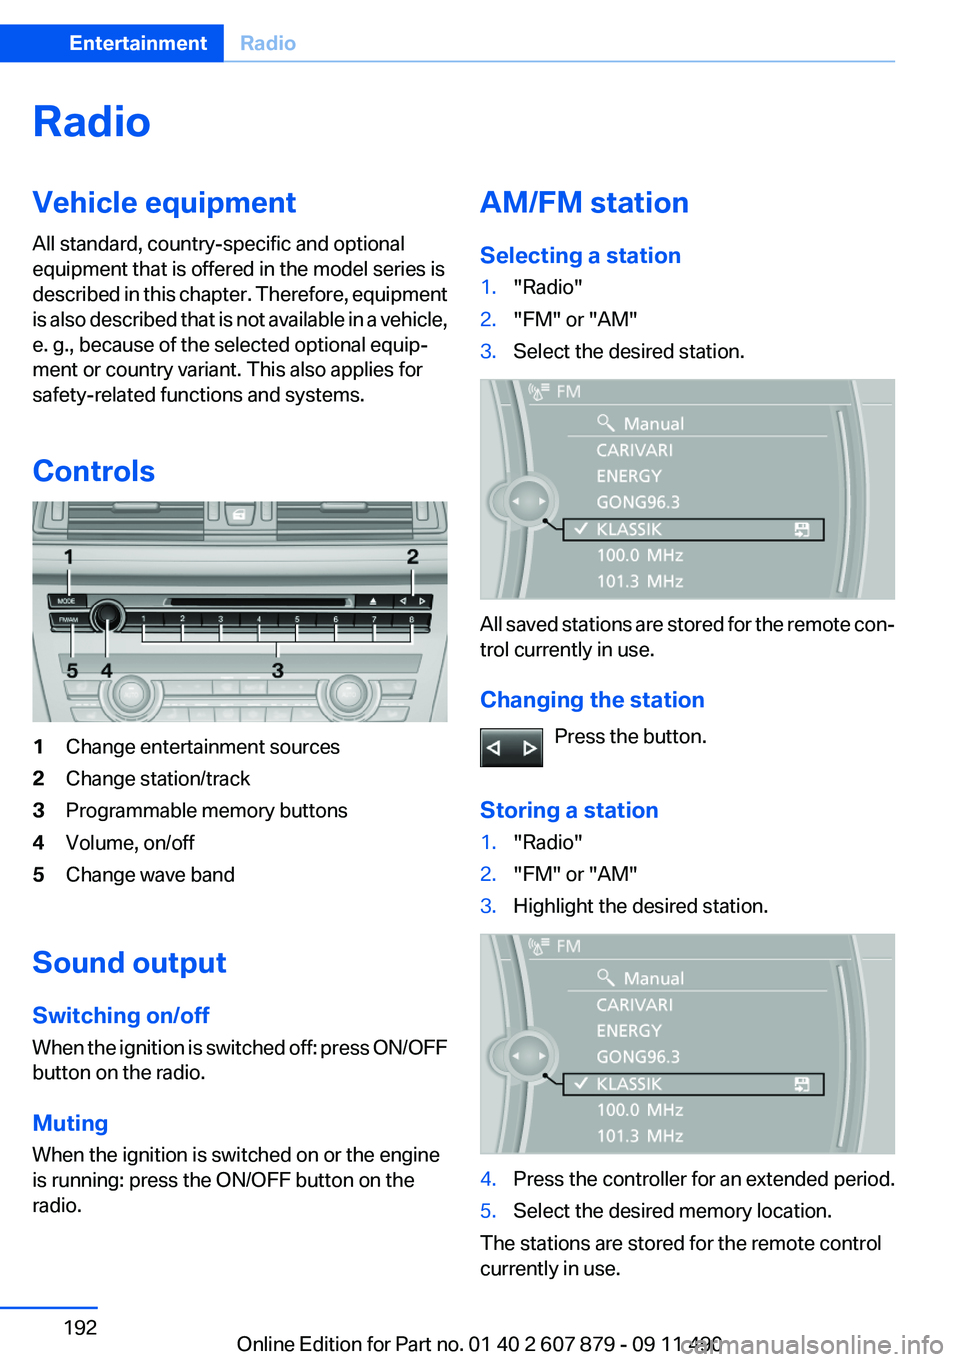
Controls1Change entertainment sources2Change station/track3Programmable memory buttons4Volume, on/off5Change wave band
Sound output
Switching on/off
When the ignition is switched off: press ON/OFF
button on the radio.
Muting
When the ignition is switched on or the engine
is running: press the ON/OFF button on the
radio.
AM/FM station
Selecting a station1."Radio"2."FM" or "AM"3.Select the desired station.
All saved stations are stored for the remote con‐
trol currently in use.
Changing the station Press the button.
Storing a station
1."Radio"2."FM" or "AM"3.Highlight the desired station.4.Press the controller for an extended period.5.Select the desired memory location.
The stations are stored for the remote control
currently in use.
Seite 192EntertainmentRadio192
Online Edition for Part no. 01 40 2 607 879 - 09 11 490
Page 200 of 335
CD/multimediaVehicle equipment
All standard, country-specific and optional
equipment that is offered in the model series is
described in this chapter. Therefore, equipment
is also described that is not available in a vehicle,
e. g., because of the selected optional equip‐
ment or country variant. This also applies for
safety-related functions and systems.
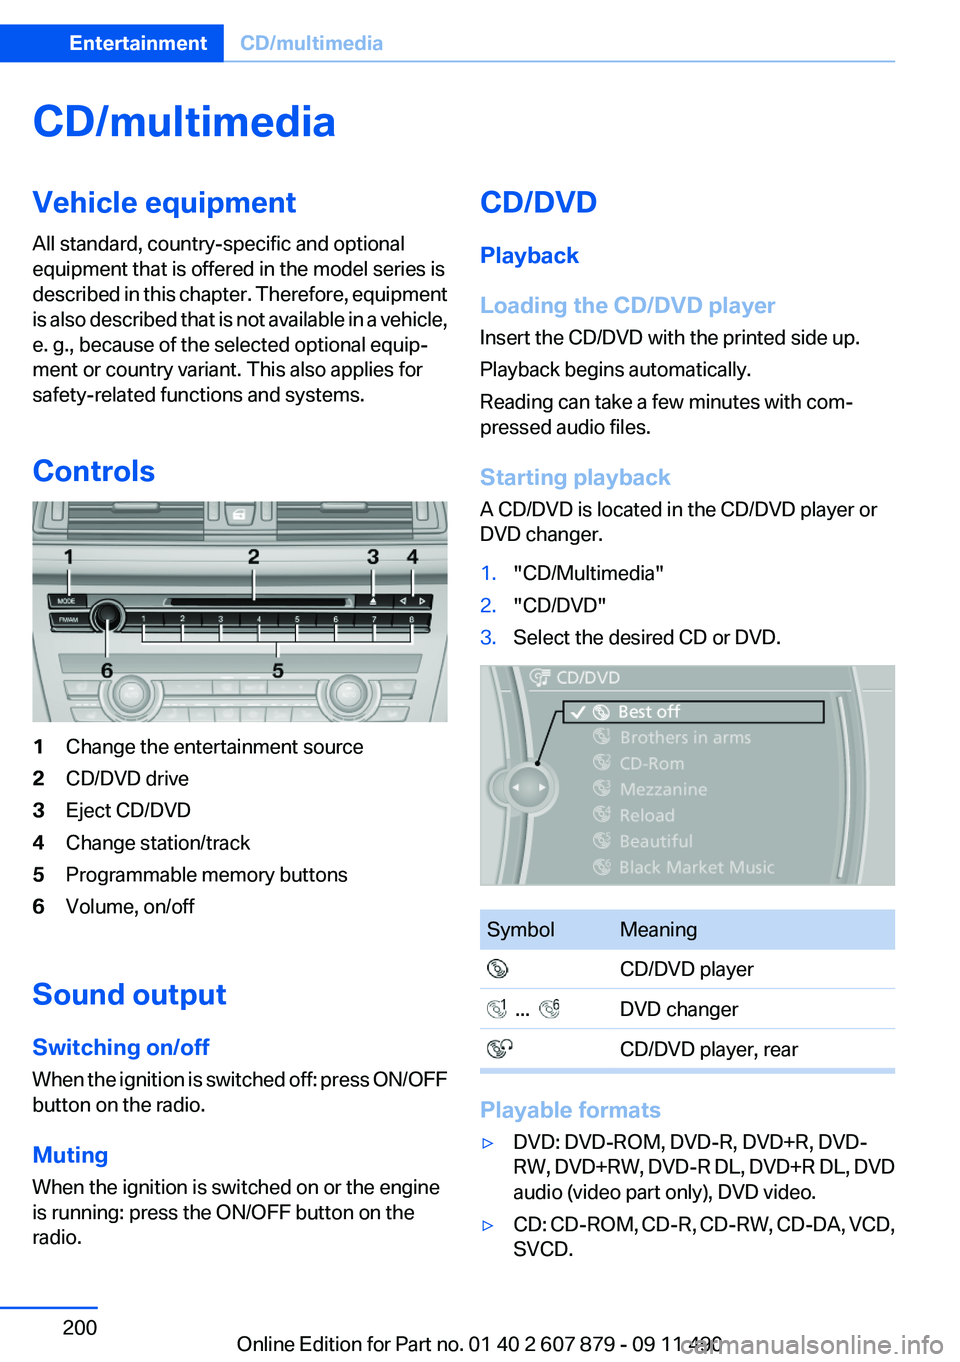
Controls1Change the entertainment source2CD/DVD drive3Eject CD/DVD4Change station/track5Programmable memory buttons6Volume, on/off
Sound output
Switching on/off
When the ignition is switched off: press ON/OFF
button on the radio.
Muting
When the ignition is switched on or the engine
is running: press the ON/OFF button on the
radio.
CD/DVD
Playback
Loading the CD/DVD player
Insert the CD/DVD with the printed side up.
Playback begins automatically.
Reading can take a few minutes with com‐
pressed audio files.
Starting playback
A CD/DVD is located in the CD/DVD player or
DVD changer.1."CD/Multimedia"2."CD/DVD"3.Select the desired CD or DVD.SymbolMeaning CD/DVD player ... DVD changer CD/DVD player, rear
Playable formats
▷DVD: DVD-ROM, DVD-R, DVD+R, DVD-
RW, DVD+RW, DVD-R DL, DVD+R DL, DVD
audio (video part only), DVD video.▷CD: CD-ROM, CD-R, CD-RW, CD-DA, VCD,
SVCD.Seite 200EntertainmentCD/multimedia200
Online Edition for Part no. 01 40 2 607 879 - 09 11 490
Page 223 of 335
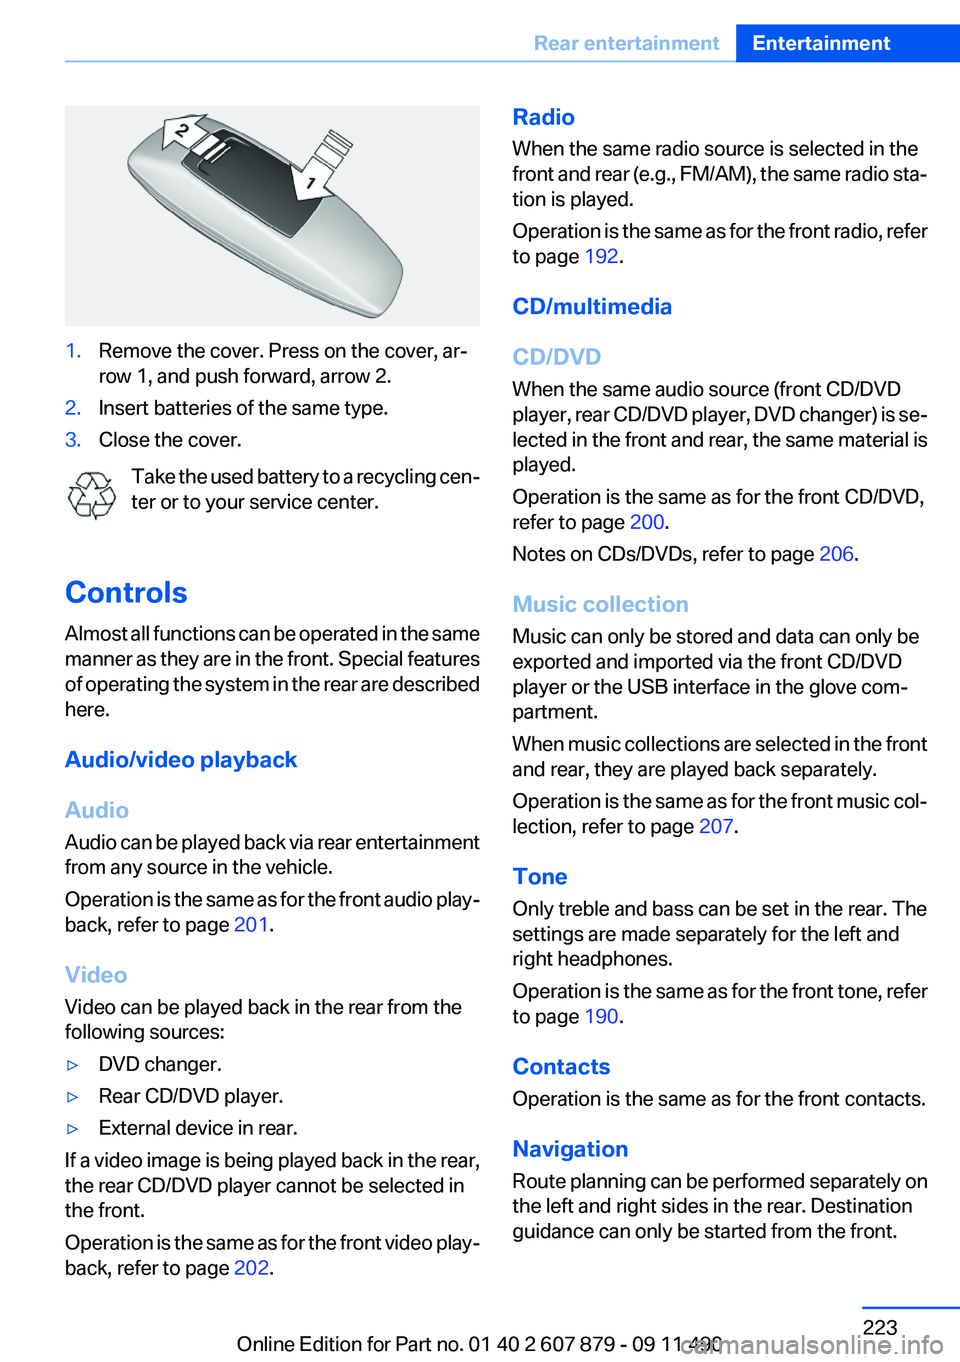
1.Remove the cover. Press on the cover, ar‐
row 1, and push forward, arrow 2.2.Insert batteries of the same type.3.Close the cover.
Take the used battery to a recycling cen‐
ter or to your service center.
Controls
Almost all functions can be operated in the same
manner as they are in the front. Special features
of operating the system in the rear are described
here.
Audio/video playback
Audio
Audio can be played back via rear entertainment
from any source in the vehicle.
Operation is the same as for the front audio play‐
back, refer to page 201.
Video
Video can be played back in the rear from the
following sources:
▷DVD changer.▷Rear CD/DVD player.▷External device in rear.
If a video image is being played back in the rear,
the rear CD/DVD player cannot be selected in
the front.
Operation is the same as for the front video play‐
back, refer to page 202.
Radio
When the same radio source is selected in the
front and rear (e.g., FM/AM), the same radio sta‐
tion is played.
Operation is the same as for the front radio, refer
to page 192.
CD/multimedia
CD/DVD
When the same audio source (front CD/DVD
player, rear CD/DVD player, DVD changer) is se‐
lected in the front and rear, the same material is
played.
Operation is the same as for the front CD/DVD,
refer to page 200.
Notes on CDs/DVDs, refer to page 206.
Music collection
Music can only be stored and data can only be
exported and imported via the front CD/DVD
player or the USB interface in the glove com‐
partment.
When music collections are selected in the front
and rear, they are played back separately.
Operation is the same as for the front music col‐
lection, refer to page 207.
Tone
Only treble and bass can be set in the rear. The
settings are made separately for the left and
right headphones.
Operation is the same as for the front tone, refer
to page 190.
Contacts
Operation is the same as for the front contacts.
Navigation
Route planning can be performed separately on
the left and right sides in the rear. Destination
guidance can only be started from the front.Seite 223Rear entertainmentEntertainment223
Online Edition for Part no. 01 40 2 607 879 - 09 11 490