fold BMW 528I SEDAN 2008 E60 Owner's Manual
[x] Cancel search | Manufacturer: BMW, Model Year: 2008, Model line: 528I SEDAN, Model: BMW 528I SEDAN 2008 E60Pages: 288, PDF Size: 7.03 MB
Page 12 of 288

Cockpit
10
Cockpit
Around the steering wheel: controls and displays
1Rear window safety switch41
2Sedan: sun blind
* for rear window122
3Opening and closing windows40
4Adjusting exterior mirrors53
Automatic curb monitor
*53
5Folding exterior mirrors in and out
*53
6
Turn signals67
High beams,
headlamp flasher110
High-beam assistant
*110
Roadside parking lamps110
Check Control83
Computer79
Page 44 of 288
Opening and closing
42 In a similar manner, the glass sunroof closes
when you slide the switch forward. The sliding
visor remains open and can be closed by hand.
For information on using the convenient opera-
tion at the door lock or with the remote control,
refer to page30 or32.
For information on comfort closing with comfort
access, refer to page39.
Opening and closing automatically
Briefly press the switch beyond the resistance
point.
The following movements are also automatic:
>Press the switch with the sunroof open: the
sunroof is raised all the way.
>When the sunroof is raised, briefly press the
switch in the opening direction: the sunroof
is opened all the way.
Briefly pressing the switch stops the motion.
Pinch protection system
If the glass sunroof encounters resistance when
closing from roughly the center of the roof
opening or when closing from the raised posi-
tion, the closing action is interrupted and the
glass sunroof reopens a short way.
Despite the pinch protection system,
inspect the sunroof's travel path prior to
closing it, as the safety system might fail to
detect certain kinds of obstructions, such as
very thin objects, and the sunroof would con-
tinue closing.<
Closing without pinch protection
system
In case of danger from outside, slide the switch
forward beyond the resistance point and hold.
The roof closes without the pinch protection
system.
Following interruptions in electrical
power supply
After a power loss, the sunroof may only
respond to the raise command. Then have the
system initialized. BMW recommends having
this work done by your BMW center.
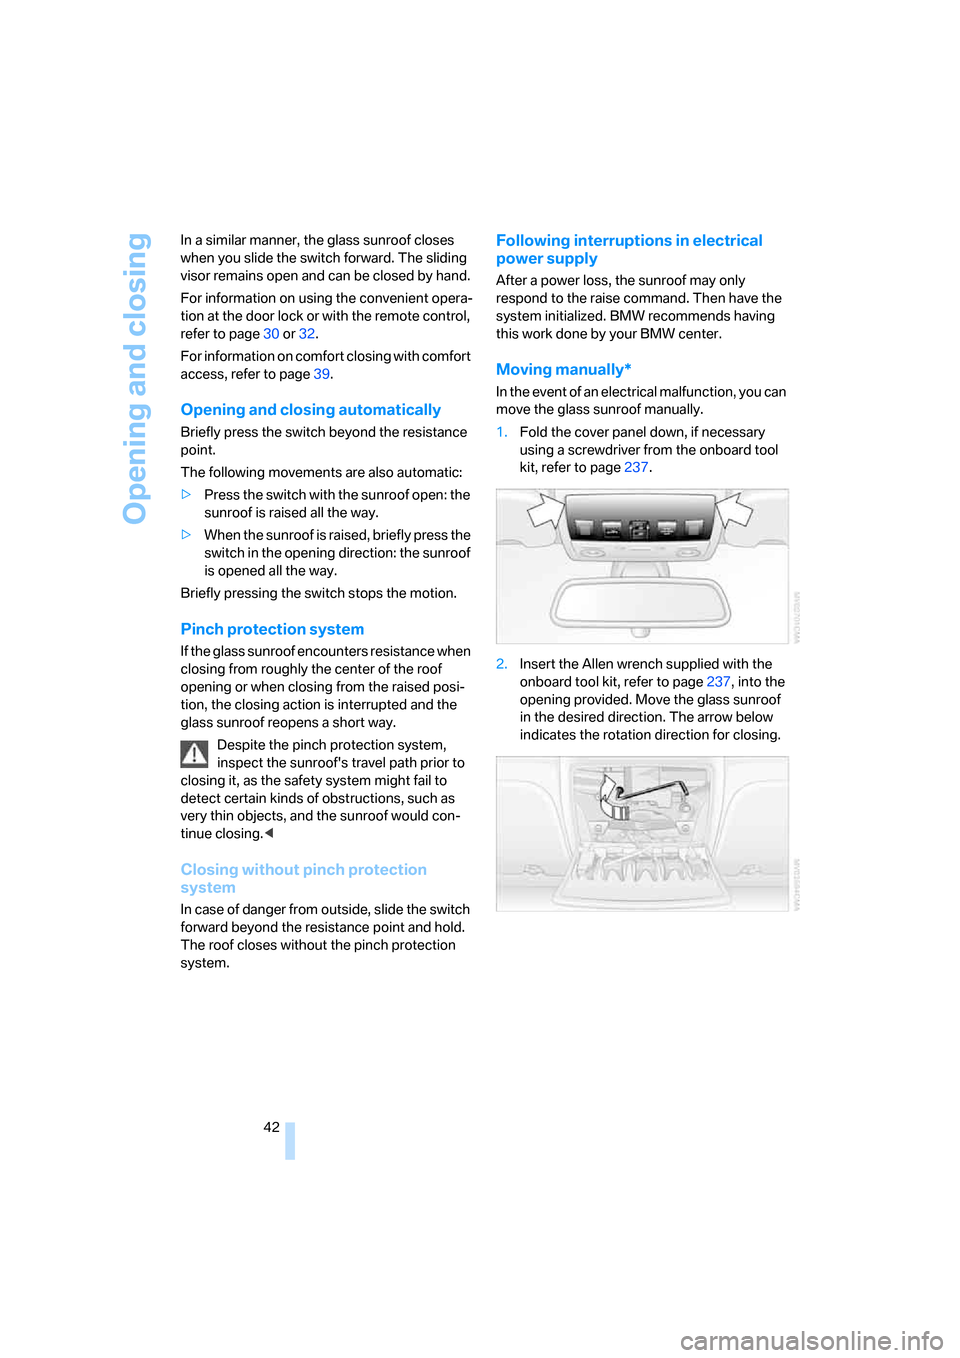
Moving manually*
In the event of an electrical malfunction, you can
move the glass sunroof manually.
1.Fold the cover panel down, if necessary
using a screwdriver from the onboard tool
kit, refer to page237.
2.Insert the Allen wrench supplied with the
onboard tool kit, refer to page237, into the
opening provided. Move the glass sunroof
in the desired direction. The arrow below
indicates the rotation direction for closing.
Page 46 of 288
Opening and closing
44 very thin objects, and the sunroof would con-
tinue closing.<
Closing without pinch protection
system
In case of danger from outside, slide the switch
forward beyond the resistance point and hold.
The roof closes without the pinch protection
system.
Following interruptions in electrical
power supply
After a power loss, the sunroof may only
respond to the raise command. Then have the
system initialized. BMW recommends having
this work done by your BMW center.
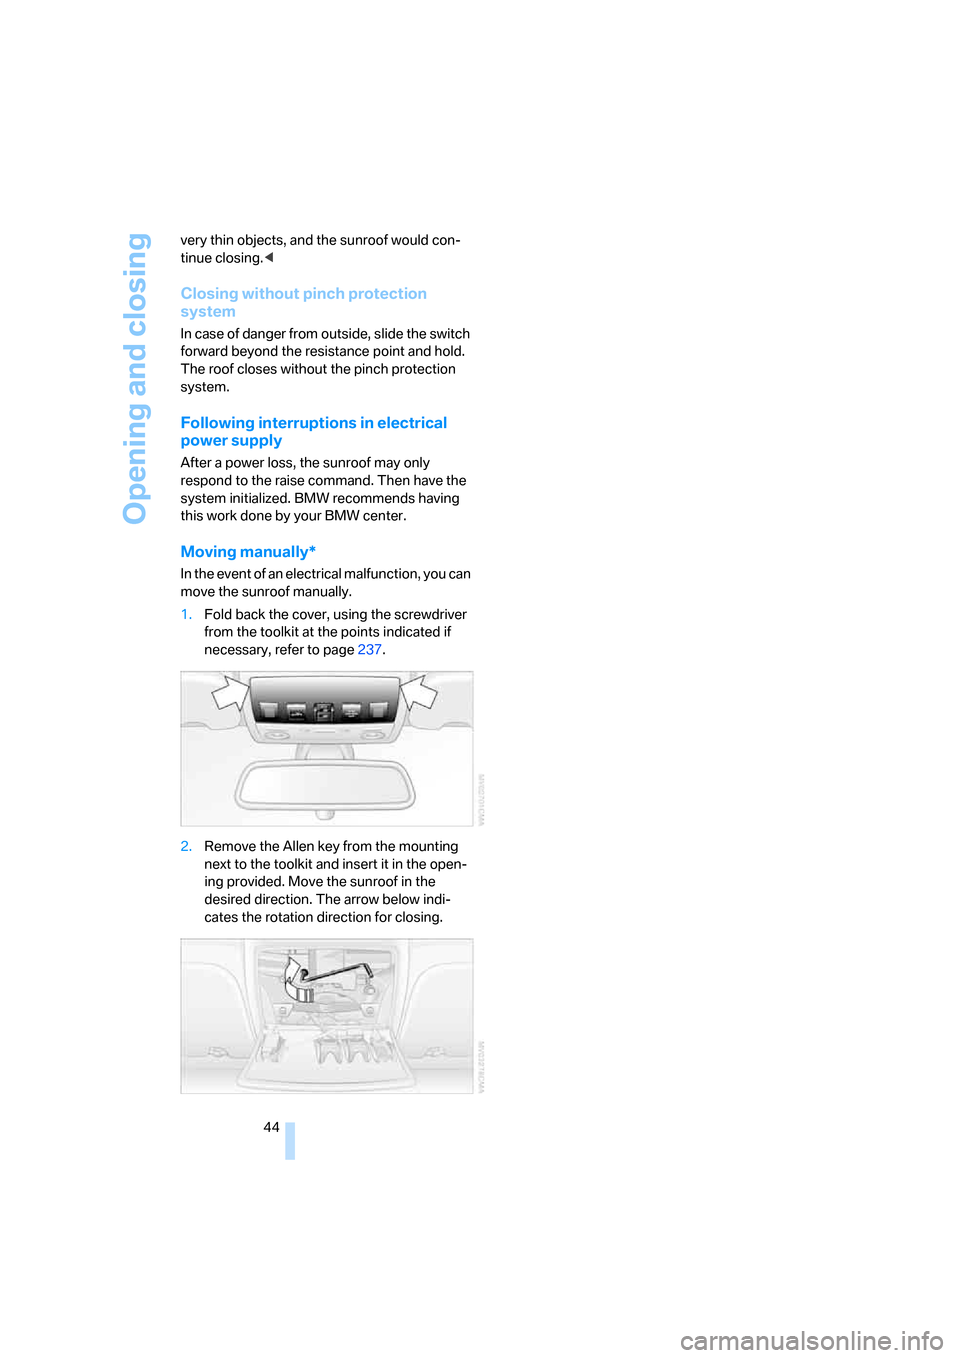
Moving manually*
In the event of an electrical malfunction, you can
move the sunroof manually.
1.Fold back the cover, using the screwdriver
from the toolkit at the points indicated if
necessary, refer to page237.
2.Remove the Allen key from the mounting
next to the toolkit and insert it in the open-
ing provided. Move the sunroof in the
desired direction. The arrow below indi-
cates the rotation direction for closing.
Page 52 of 288
Adjusting
50
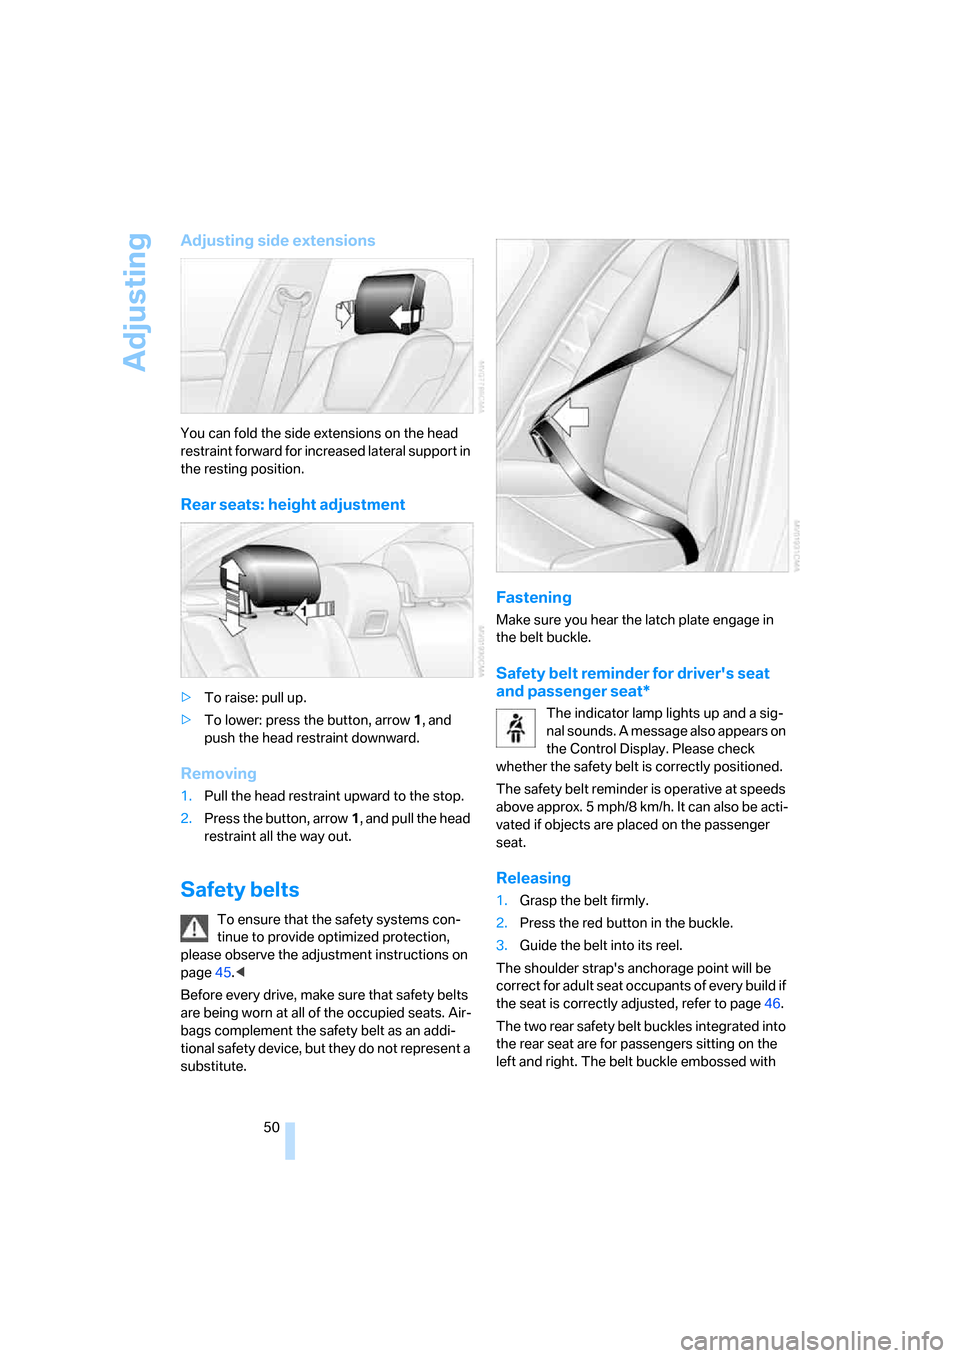
Adjusting side extensions
You can fold the side extensions on the head
restraint forward for increased lateral support in
the resting position.
Rear seats: height adjustment
>To raise: pull up.
>To lower: press the button, arrow1, and
push the head restraint downward.
Removing
1.Pull the head restraint upward to the stop.
2.Press the button, arrow1, and pull the head
restraint all the way out.
Safety belts
To ensure that the safety systems con-
tinue to provide optimized protection,
please observe the adjustment instructions on
page45.<
Before every drive, make sure that safety belts
are being worn at all of the occupied seats. Air-
bags complement the safety belt as an addi-
tional safety device, but they do not represent a
substitute.
Fastening
Make sure you hear the latch plate engage in
the belt buckle.
Safety belt reminder for driver's seat
and passenger seat*
The indicator lamp lights up and a sig-
nal sounds. A message also appears on
the Control Display. Please check
whether the safety belt is correctly positioned.
The safety belt reminder is operative at speeds
above approx. 5 mph/8 km/h. It can also be acti-
vated if objects are placed on the passenger
seat.
Releasing
1.Grasp the belt firmly.
2.Press the red button in the buckle.
3.Guide the belt into its reel.
The shoulder strap's anchorage point will be
correct for adult seat occupants of every build if
the seat is correctly adjusted, refer to page46.
The two rear safety belt buckles integrated into
the rear seat are for passengers sitting on the
left and right. The belt buckle embossed with
Page 55 of 288
Controls
53Reference
At a glance
Driving tips
Communications
Navigation
Entertainment
Mobility
Mirrors
Exterior mirrors
The mirror on the passenger's side is
more curved than the driver's mirror.
Objects reflected in the mirror are closer than
they appear. Do not estimate the distance of
following traffic based on what you see in the
mirrors, otherwise there is an increased acci-
dent risk.<
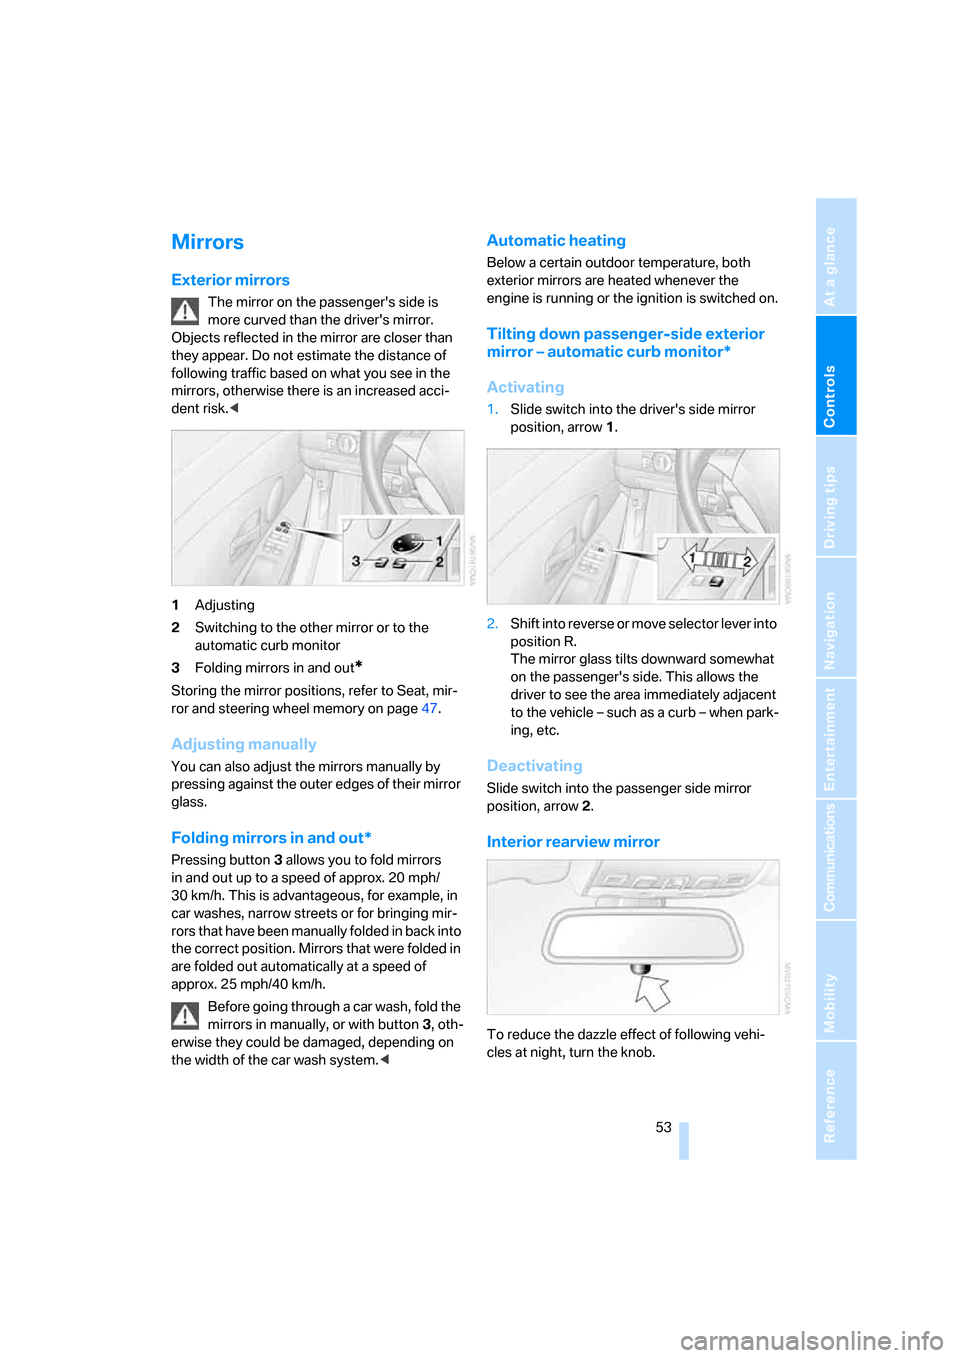
1Adjusting
2Switching to the other mirror or to the
automatic curb monitor
3Folding mirrors in and out
*
Storing the mirror positions, refer to Seat, mir-
ror and steering wheel memory on page47.
Adjusting manually
You can also adjust the mirrors manually by
pressing against the outer edges of their mirror
glass.
Folding mirrors in and out*
Pressing button3 allows you to fold mirrors
in and out up to a speed of approx. 20 mph/
30 km/h. This is advantageous, for example, in
car washes, narrow streets or for bringing mir-
r o rs t h a t h a v e b e e n m a n u a l ly f o l d e d in b a c k i n t o
the correct position. Mirrors that were folded in
are folded out automatically at a speed of
approx. 25 mph/40 km/h.
Before going through a car wash, fold the
mirrors in manually, or with button 3, oth-
erwise they could be damaged, depending on
the width of the car wash system.<
Automatic heating
Below a certain outdoor temperature, both
exterior mirrors are heated whenever the
engine is running or the ignition is switched on.
Tilting down passenger-side exterior
mirror – automatic curb monitor*
Activating
1.Slide switch into the driver's side mirror
position, arrow 1.
2.Shift into reverse or move selector lever into
position R.
The mirror glass tilts downward somewhat
on the passenger's side. This allows the
driver to see the area immediately adjacent
to the vehicle – such as a curb – when park-
ing, etc.
Deactivating
Slide switch into the passenger side mirror
position, arrow 2.
Interior rearview mirror
To reduce the dazzle effect of following vehi-
cles at night, turn the knob.
Page 60 of 288

Transporting children safely
58
Sedan
There are three additional mounting points for
child restraint systems with a tether strap, refer
to arrows. Fold the corresponding mounting
point upward before using.
Sports Wagon
Three additional mounting points for child
restraint systems with a tether strap are pro-
vided under covers in the cargo bay floor, refer
to arrows. Remove the corresponding covers
before use.
Placement of tether strap
Make sure that the upper retaining strap
is not routed over sharp edges and does
not twist on its way to the upper mounting point;
otherwise, the belt may not properly secure the
child restraint system in the event of an acci-
dent.<
Outer rear seat, Sedan
Outer rear seats, Sports Wagon
1Direction of travel
2Head restraints
3Hook of upper retaining strap
4Mounting point
5Rear window shelf/luggage compartment
floor
6Backrest
7Upper retaining strap of child restraint sys-
tem
Page 61 of 288
Controls
59Reference
At a glance
Driving tips
Communications
Navigation
Entertainment
Mobility
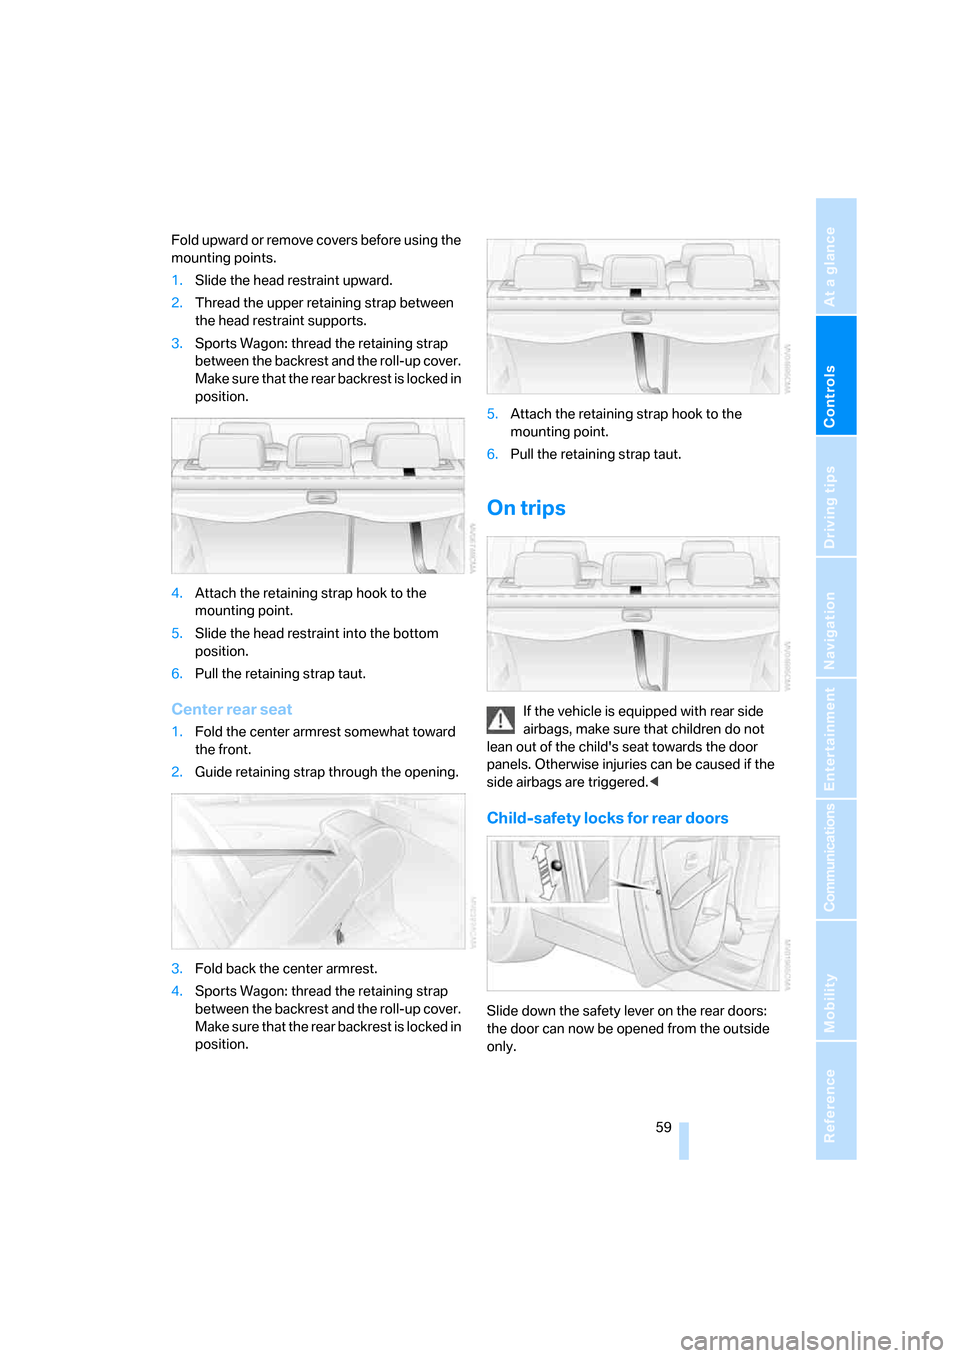
Fold upward or remove co vers befo re using the
mounting points.
1.Slide the head restraint upward.
2.Thread the upper retaining strap between
the head restraint supports.
3.Sports Wagon: thread the retaining strap
between the backrest and the roll-up cover.
M a k e s u r e t h a t t h e r e a r b a c k r e s t i s l o c k e d i n
position.
4.Attach the retaining strap hook to the
mounting point.
5.Slide the head restraint into the bottom
position.
6.Pull the retaining strap taut.
Center rear seat
1.Fold the center armrest somewhat toward
the front.
2.Guide retaining strap through the opening.
3.Fold back the center armrest.
4.Sports Wagon: thread the retaining strap
between the backrest and the roll-up cover.
M a k e s u r e t h a t t h e r e a r b a c k r e s t i s l o c k e d i n
position.5.Attach the retaining strap hook to the
mounting point.
6.Pull the retaining strap taut.
On trips
If the vehicle is equipped with rear side
airbags, make sure that children do not
lean out of the child's seat towards the door
panels. Otherwise injuries can be caused if the
side airbags are triggered.<
Child-safety locks for rear doors
Slide down the safety lever on the rear doors:
the door can now be opened from the outside
only.
Page 125 of 288
Controls
123Reference
At a glance
Driving tips
Communications
Navigation
Entertainment
Mobility
Sun blinds for rear side windows
Pull the loop of the roller sun blind and hook
onto bracket.
Do not open the window with the roller
sun blind deployed. Otherwise, there is a
risk of damage and injury at higher speeds.<
Glove compartment
Opening
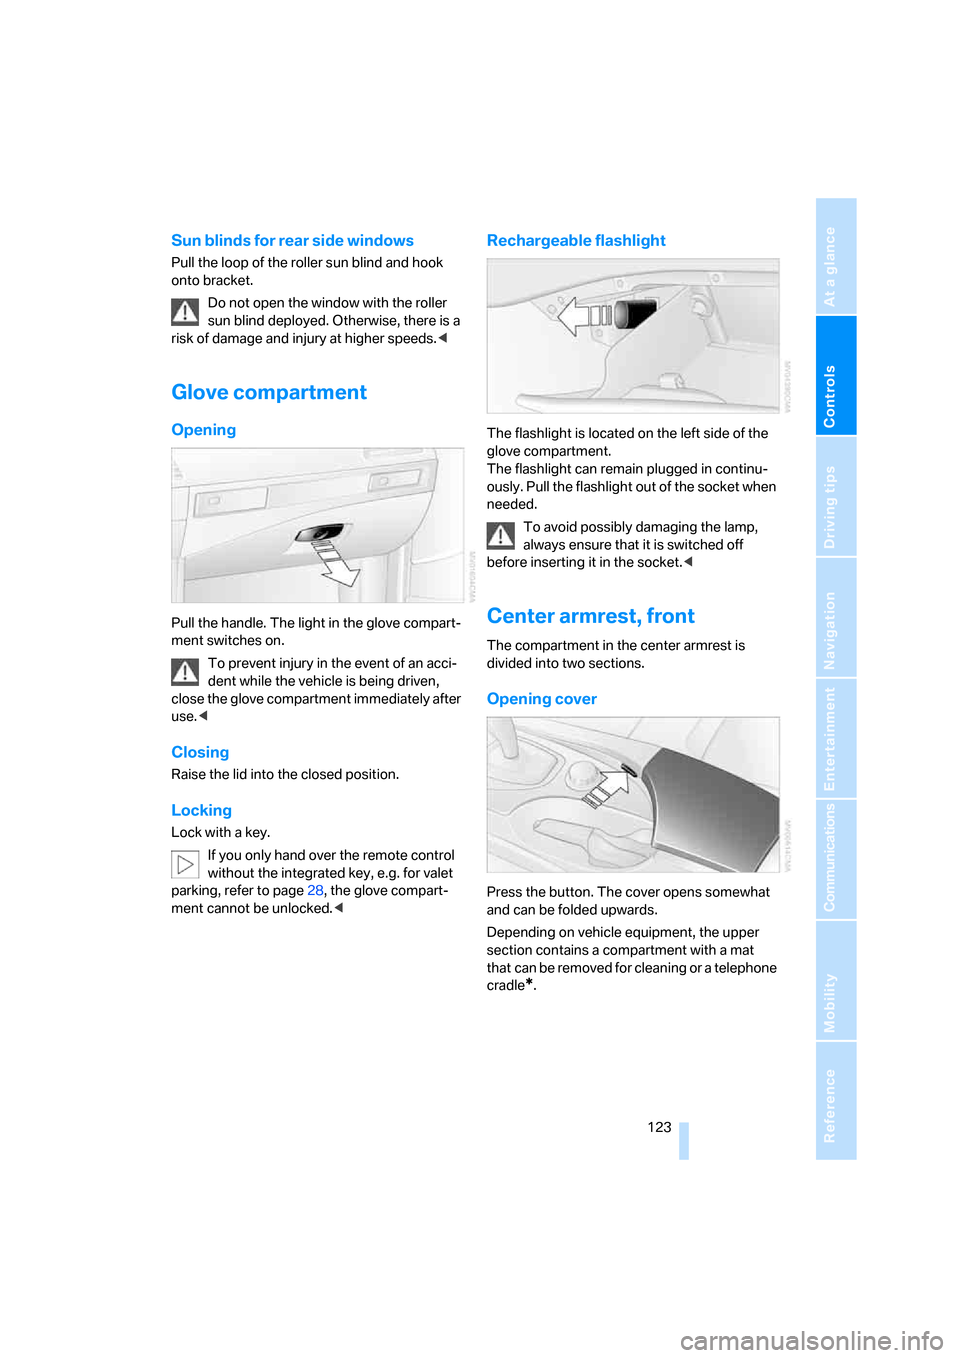
Pull the handle. The light in the glove compart-
ment switches on.
To prevent injury in the event of an acci-
dent while the vehicle is being driven,
close the glove compartment immediately after
use.<
Closing
Raise the lid into the closed position.
Locking
Lock with a key.
If you only hand over the remote control
without the integrated key, e.g. for valet
parking, refer to page28, the glove compart-
ment cannot be unlocked.<
Rechargeable flashlight
The flashlight is located on the left side of the
glove compartment.
The flashlight can remain plugged in continu-
ously. Pull the flashlight out of the socket when
needed.
To avoid possibly damaging the lamp,
always ensure that it is switched off
before inserting it in the socket.<
Center armrest, front
The compartment in the center armrest is
divided into two sections.
Opening cover
Press the button. The cover opens somewhat
and can be folded upwards.
Depending on vehicle equipment, the upper
section contains a compartment with a mat
that can be removed for cleaning or a telephone
cradle
*.
Page 126 of 288
Practical interior accessories
124
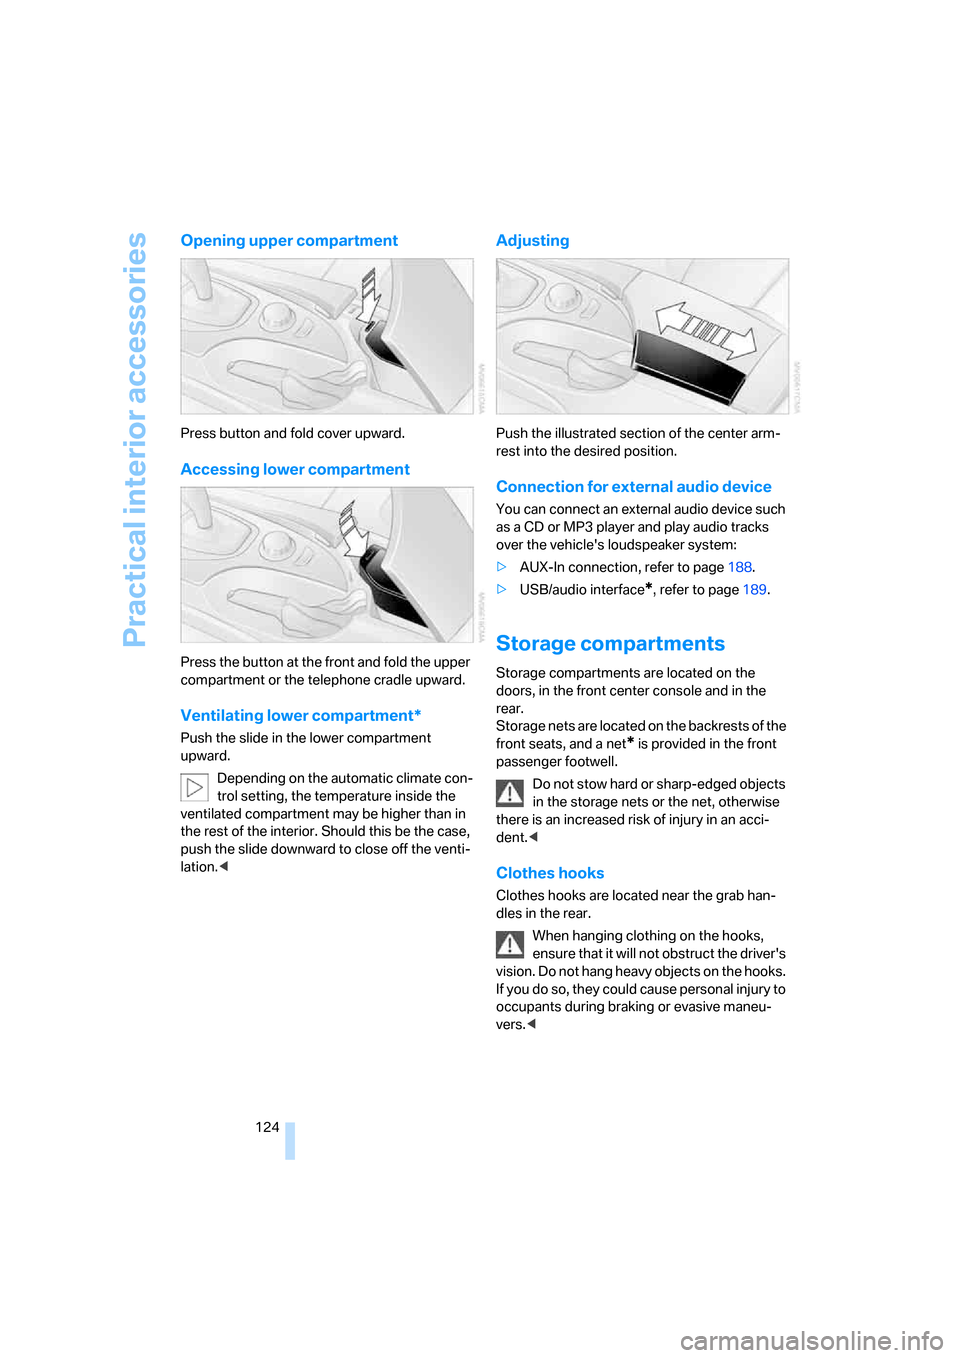
Opening upper compartment
Press button and fold cover upward.
Accessing lower compartment
Press the button at the front and fold the upper
compartment or the telephone cradle upward.
Ventilating lower compartment*
Push the slide in the lower compartment
upward.
Depending on the automatic climate con-
trol setting, the temperature inside the
ventilated compartment may be higher than in
the rest of the interior. Should this be the case,
push the slide downward to close off the venti-
lation.<
Adjusting
Push the illustrated section of the center arm-
rest into the desired position.
Connection for external audio device
You can connect an external audio device such
as a CD or MP3 player and play audio tracks
over the vehicle's loudspeaker system:
>AUX-In connection, refer to page188.
>USB/audio interface
*, refer to page189.
Storage compartments
Storage compartments are located on the
doors, in the front center console and in the
rear.
Storage nets are located on the backrests of the
front seats, and a net
* is provided in the front
passenger footwell.
Do not stow hard or sharp-edged objects
in the storage nets or the net, otherwise
there is an increased risk of injury in an acci-
dent.<
Clothes hooks
Clothes hooks are located near the grab han-
dles in the rear.
When hanging clothing on the hooks,
ensure that it will not obstruct the driver's
vision. Do not hang heavy objects on the hooks.
If you do so, they could cause personal injury to
occupants during braking or evasive maneu-
vers.<
Page 128 of 288

Practical interior accessories
126
Ashtray, rear
Emptying
Press the entire cover down. The ashtray rises
and can be removed.
Cigarette lighter, rear
Refer to Cigarette lighter, front.
Connecting electrical devices
Sockets
With the engine running or the ignition switched
on, the cigarette lighter socket can be used as a
power outlet for hand flashlights, car vacuum
cleaners, etc., with power ratings of up to
approx. 200 W at 12 V. Avoid damaging the
socket due to inserting plugs of different
shapes or sizes. The same is true for all power
outlets in the vehicle.
In front passenger footwell
Access to socket:
Fold open the cover.
Sedan:
In cargo bay
Access to socket:
Fold open the cover.
Sports Wagon:
In cargo bay
Access to socket:
Fold open the cover.