power steering BMW 528I SEDAN 2012 Owners Manual
[x] Cancel search | Manufacturer: BMW, Model Year: 2012, Model line: 528I SEDAN, Model: BMW 528I SEDAN 2012Pages: 335, PDF Size: 13.16 MB
Page 12 of 335
CockpitVehicle equipment
All standard, country-specific and optional
equipment that is offered in the model series is
described in this chapter. Therefore, equipmentis also described that is not available in a vehicle,
e. g., because of the selected optional equip‐
ment or country variant. This also applies for
safety-related functions and systems.
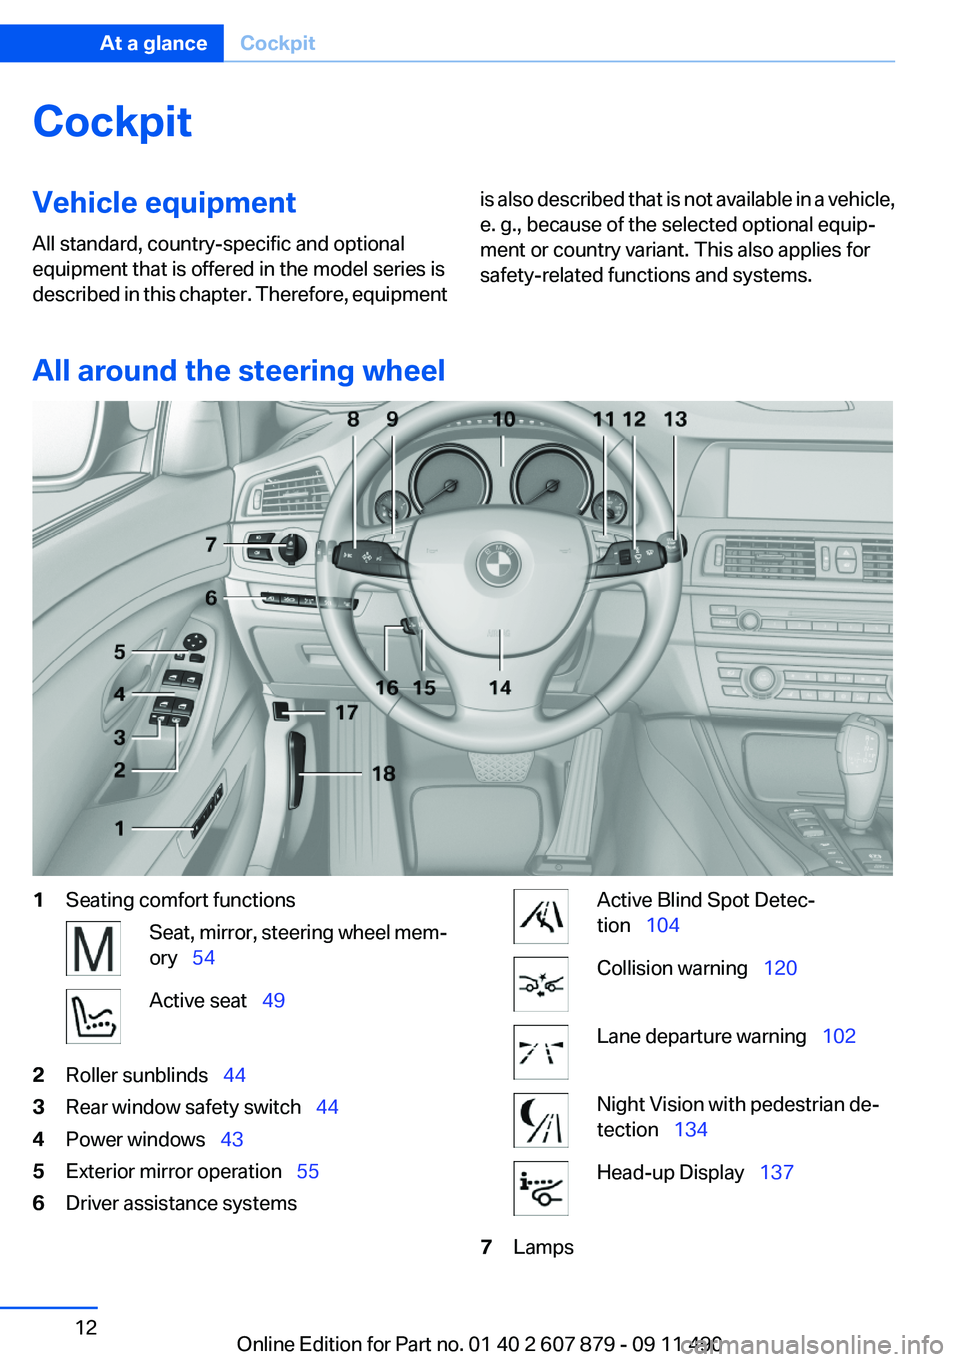
All around the steering wheel
1Seating comfort functionsSeat, mirror, steering wheel mem‐
ory 54Active seat 492Roller sunblinds 443Rear window safety switch 444Power windows 435Exterior mirror operation 556Driver assistance systemsActive Blind Spot Detec‐
tion 104Collision warning 120Lane departure warning 102Night Vision with pedestrian de‐
tection 134Head-up Display 1377LampsSeite 12At a glanceCockpit12
Online Edition for Part no. 01 40 2 607 879 - 09 11 490
Page 41 of 335
Locking
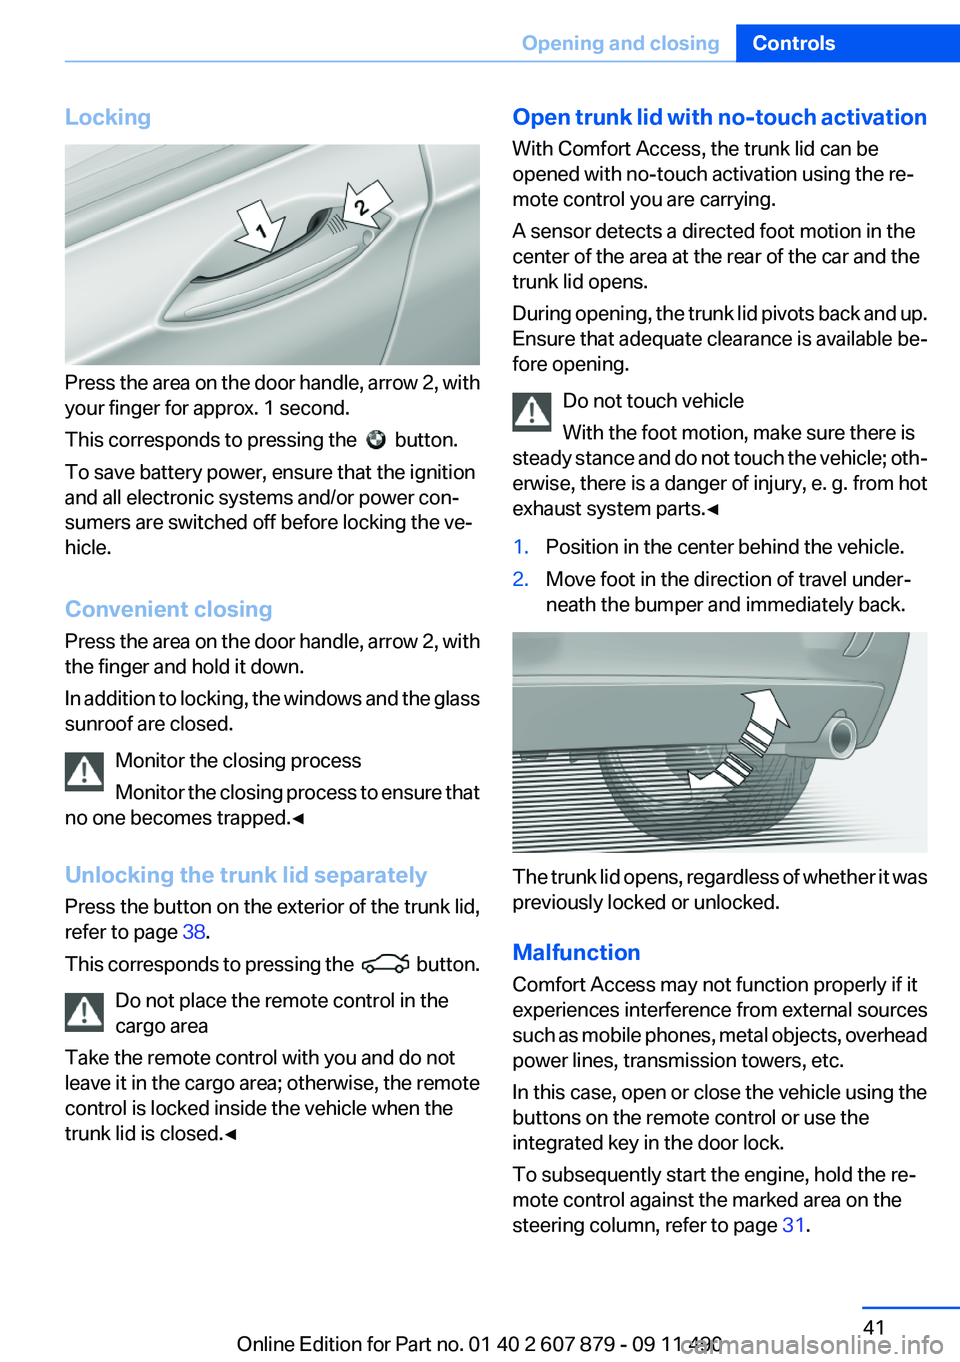
Press the area on the door handle, arrow 2, with
your finger for approx. 1 second.
This corresponds to pressing the
button.
To save battery power, ensure that the ignition
and all electronic systems and/or power con‐
sumers are switched off before locking the ve‐
hicle.
Convenient closing
Press the area on the door handle, arrow 2, with
the finger and hold it down.
In addition to locking, the windows and the glass
sunroof are closed.
Monitor the closing process
Monitor the closing process to ensure that
no one becomes trapped.◀
Unlocking the trunk lid separately
Press the button on the exterior of the trunk lid,
refer to page 38.
This corresponds to pressing the
button.
Do not place the remote control in the
cargo area
Take the remote control with you and do not
leave it in the cargo area; otherwise, the remote
control is locked inside the vehicle when the
trunk lid is closed.◀
Open trunk lid with no-touch activation
With Comfort Access, the trunk lid can be
opened with no-touch activation using the re‐
mote control you are carrying.
A sensor detects a directed foot motion in the
center of the area at the rear of the car and the
trunk lid opens.
During opening, the trunk lid pivots back and up.
Ensure that adequate clearance is available be‐
fore opening.
Do not touch vehicle
With the foot motion, make sure there is
steady stance and do not touch the vehicle; oth‐
erwise, there is a danger of injury, e. g. from hot
exhaust system parts.◀1.Position in the center behind the vehicle.2.Move foot in the direction of travel under‐
neath the bumper and immediately back.
The trunk lid opens, regardless of whether it was
previously locked or unlocked.
Malfunction
Comfort Access may not function properly if it
experiences interference from external sources
such as mobile phones, metal objects, overhead
power lines, transmission towers, etc.
In this case, open or close the vehicle using the
buttons on the remote control or use the
integrated key in the door lock.
To subsequently start the engine, hold the re‐
mote control against the marked area on the
steering column, refer to page 31.
Seite 41Opening and closingControls41
Online Edition for Part no. 01 40 2 607 879 - 09 11 490
Page 55 of 335
Calling up settingsDo not retrieve the memory while driving
Do not retrieve the memory setting while
driving, as an unexpected movement of the seat
or steering wheel could result in an accident.◀
Comfort function1.Open the driver's door.2.Switch off the ignition.3.Briefly press the desired button 1 or 2.
The corresponding seat position is performed
automatically.
The procedure stops when a switch for adjust‐
ing the seat or one of the buttons is pressed.
Safety mode
1.Close the driver's door or switch on the ig‐
nition.2.Press and hold the desired button 1 or 2 until
the adjustment procedure is completed.
Calling up of a seat position
deactivated
After a brief period, the calling up of stored seat
positions is deactivated to save battery power.
To reactivate calling up of a seat position:
▷Open or close the door or trunk lid.▷Press a button on the remote control.▷Press the Start/Stop button.Mirrors
Exterior mirrors
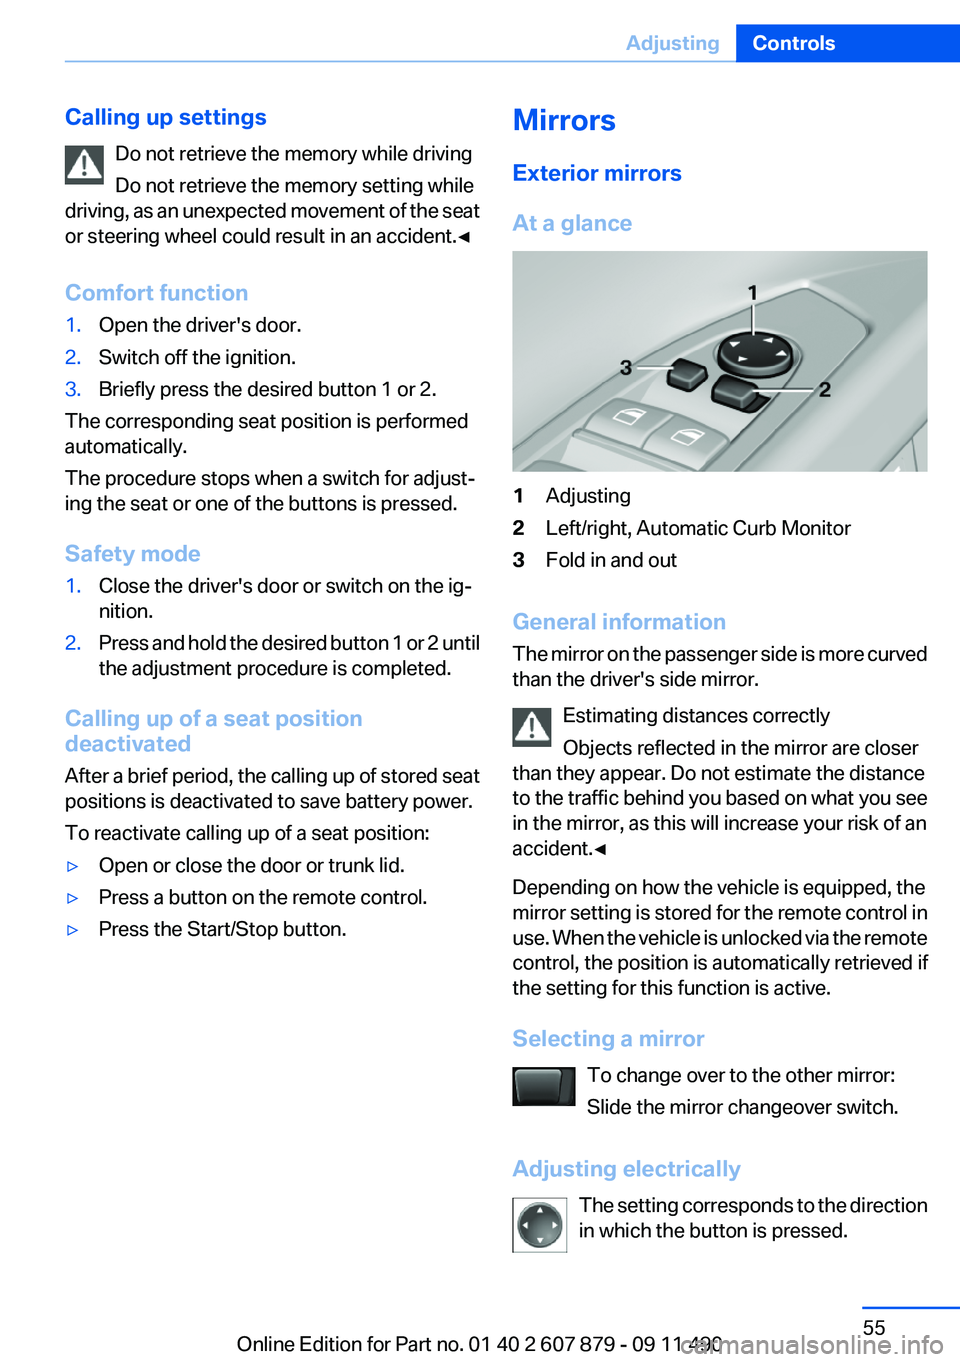
At a glance1Adjusting2Left/right, Automatic Curb Monitor3Fold in and out
General information
The mirror on the passenger side is more curved
than the driver's side mirror.
Estimating distances correctly
Objects reflected in the mirror are closer
than they appear. Do not estimate the distance
to the traffic behind you based on what you see
in the mirror, as this will increase your risk of an
accident.◀
Depending on how the vehicle is equipped, the
mirror setting is stored for the remote control in
use. When the vehicle is unlocked via the remote
control, the position is automatically retrieved if
the setting for this function is active.
Selecting a mirror To change over to the other mirror:
Slide the mirror changeover switch.
Adjusting electrically The setting corresponds to the direction
in which the button is pressed.
Seite 55AdjustingControls55
Online Edition for Part no. 01 40 2 607 879 - 09 11 490
Page 57 of 335
▷Keep the photocells clean.▷Do not cover the area between the inside
rearview mirror and the windshield.
Steering wheel
General information Do not adjust while driving
Do not adjust the steering wheel while
driving; otherwise, an unexpected movement
could result in an accident.◀
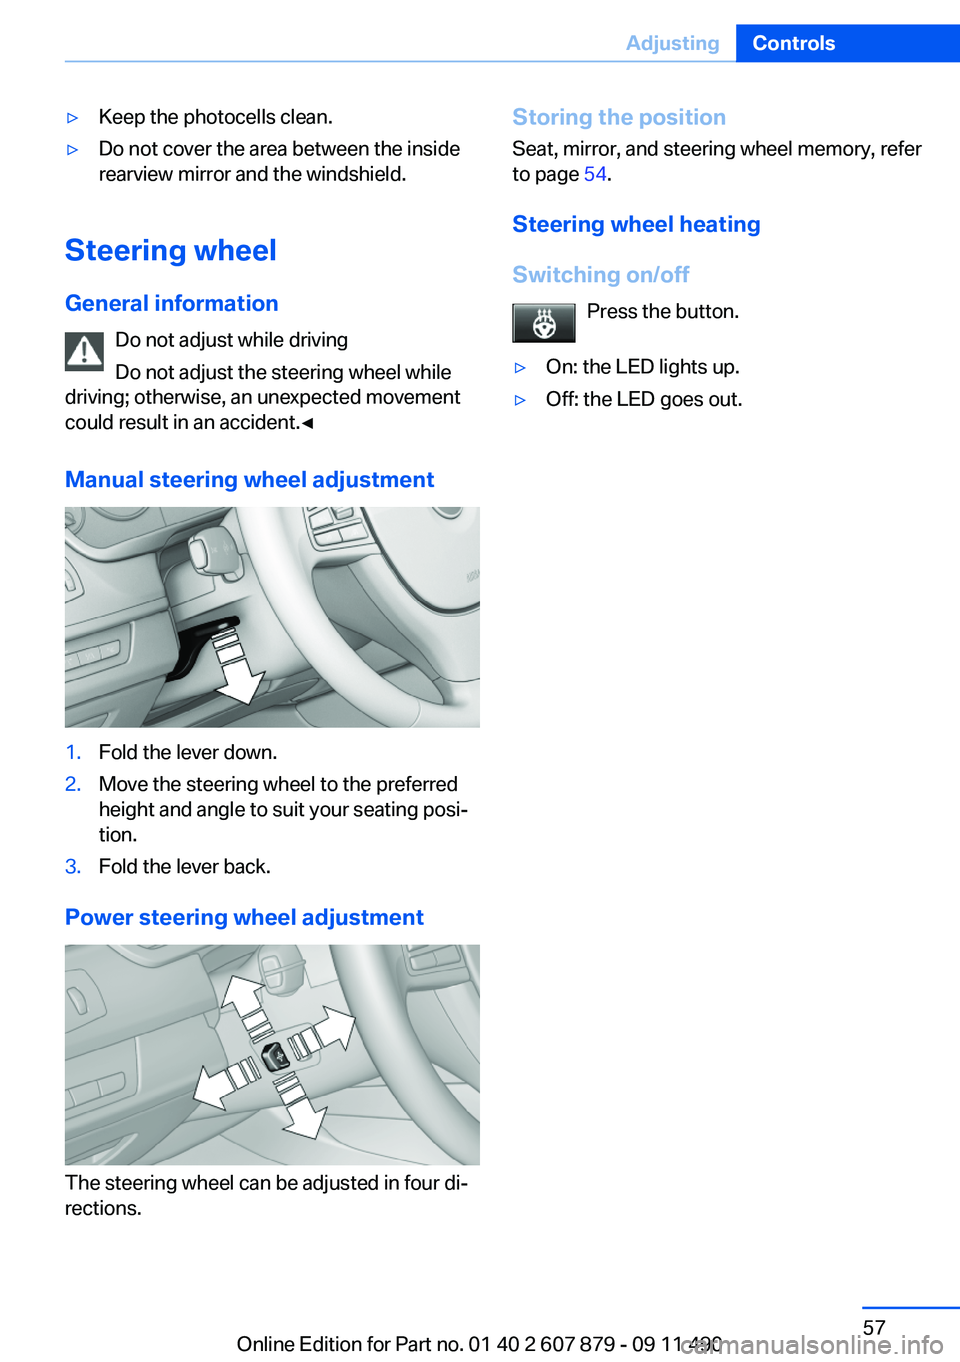
Manual steering wheel adjustment
1.Fold the lever down.2.Move the steering wheel to the preferred
height and angle to suit your seating posi‐
tion.3.Fold the lever back.
Power steering wheel adjustment
The steering wheel can be adjusted in four di‐
rections.
Storing the position
Seat, mirror, and steering wheel memory, refer
to page 54.
Steering wheel heating
Switching on/off Press the button.▷On: the LED lights up.▷Off: the LED goes out.Seite 57AdjustingControls57
Online Edition for Part no. 01 40 2 607 879 - 09 11 490
Page 114 of 335
Driving comfortVehicle equipment
All standard, country-specific and optional
equipment that is offered in the model series is
described in this chapter. Therefore, equipment
is also described that is not available in a vehicle,
e. g., because of the selected optional equip‐
ment or country variant. This also applies for
safety-related functions and systems.
Active Cruise Control with
Stop & Go function, ACC
The concept
This system can be used to select a desired
speed that the vehicle will maintain automati‐
cally on clear roads.
To the extent possible, the system automatically
adjusts the speed to a slower vehicle ahead of
you.
The distance that the vehicle maintains to the
vehicle ahead of you can be varied.
For safety reasons, it depends on the speed.
To maintain a certain distance, the system au‐
tomatically decelerates, applies the brakes
lightly, or accelerates again if the vehicle ahead
begins moving faster.
If the vehicle ahead of you brakes to a halt, the
system is able to detect this within the given
system limits. If the vehicle ahead of your drives
away again from a halt, your vehicle is able to
accelerate if operated accordingly.
Even if some time passes before the vehicle
drives away again, the BMW can still be accel‐
erated automatically and simply.
As soon as the road is clear, it accelerates to the
desired speed.
The speed is also maintained on downhill gra‐
dients, but may not be maintained on uphill
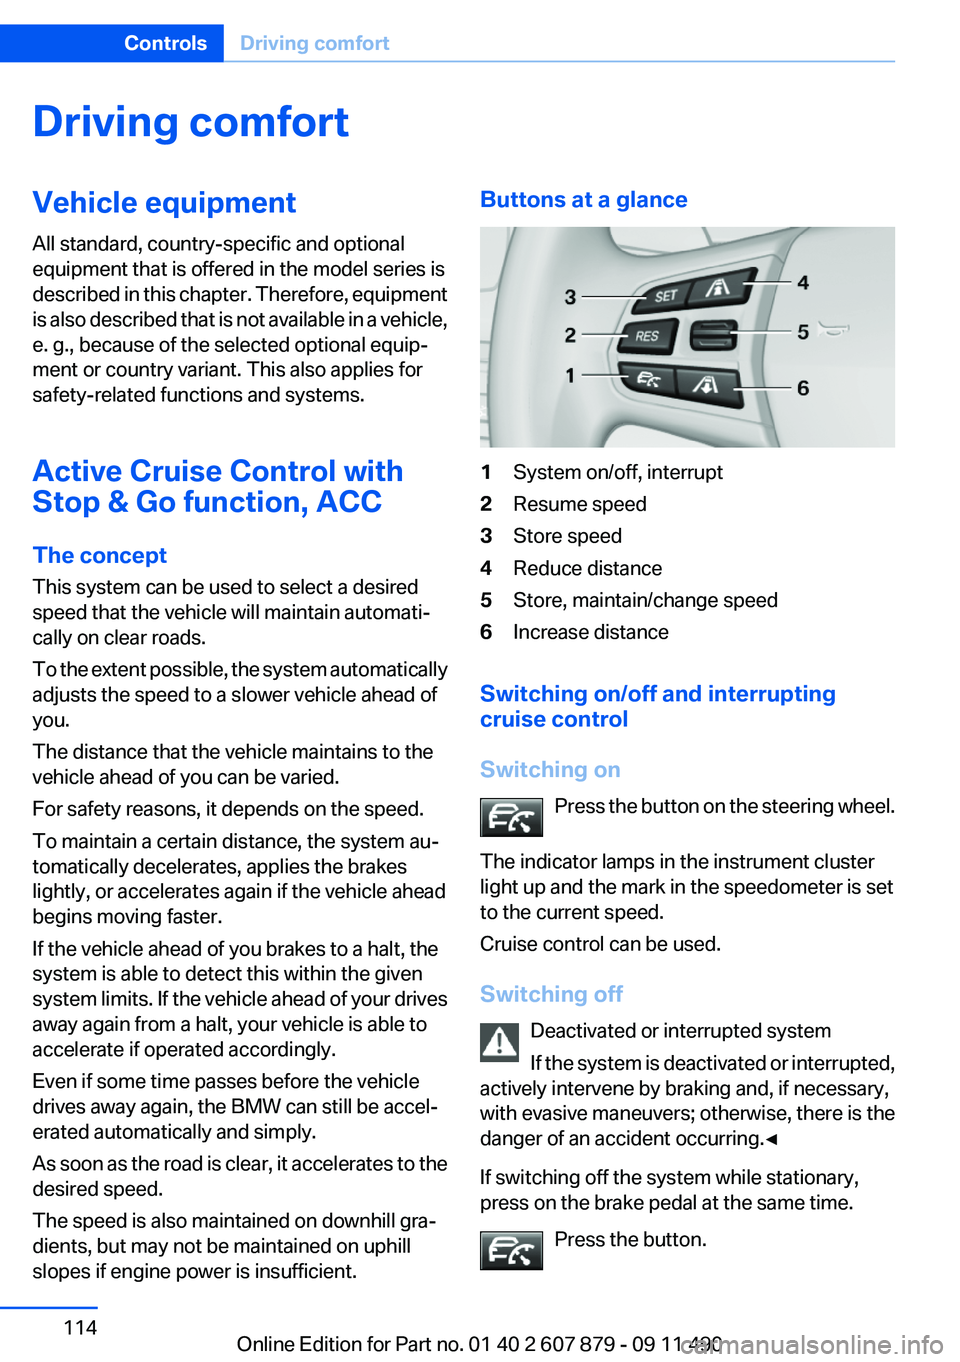
slopes if engine power is insufficient.Buttons at a glance1System on/off, interrupt2Resume speed3Store speed4Reduce distance5Store, maintain/change speed6Increase distance
Switching on/off and interrupting
cruise control
Switching on Press the button on the steering wheel.
The indicator lamps in the instrument cluster
light up and the mark in the speedometer is set
to the current speed.
Cruise control can be used.
Switching off Deactivated or interrupted system
If the system is deactivated or interrupted,
actively intervene by braking and, if necessary,
with evasive maneuvers; otherwise, there is the
danger of an accident occurring.◀
If switching off the system while stationary,
press on the brake pedal at the same time.
Press the button.
Seite 114ControlsDriving comfort114
Online Edition for Part no. 01 40 2 607 879 - 09 11 490
Page 120 of 335
the device should be switched off immedi‐
ately. In this case, please contact the man‐
ufacturer and only use the product after the
problem has been corrected.3.The "legal communication" specified above
refers to communication in accordance with
telecommunication regulations. Low-power
devices should withstand interference from
legal communication and ISM devices.
Collision warning with
braking function
The concept
The system issues a two-phase warning of a
danger of collision at speeds above approx.
10 mph/15 km/h. The time of these warnings
may vary depending on the current driving sit‐
uation.
The collision warning is available even if cruise
control has been deactivated.
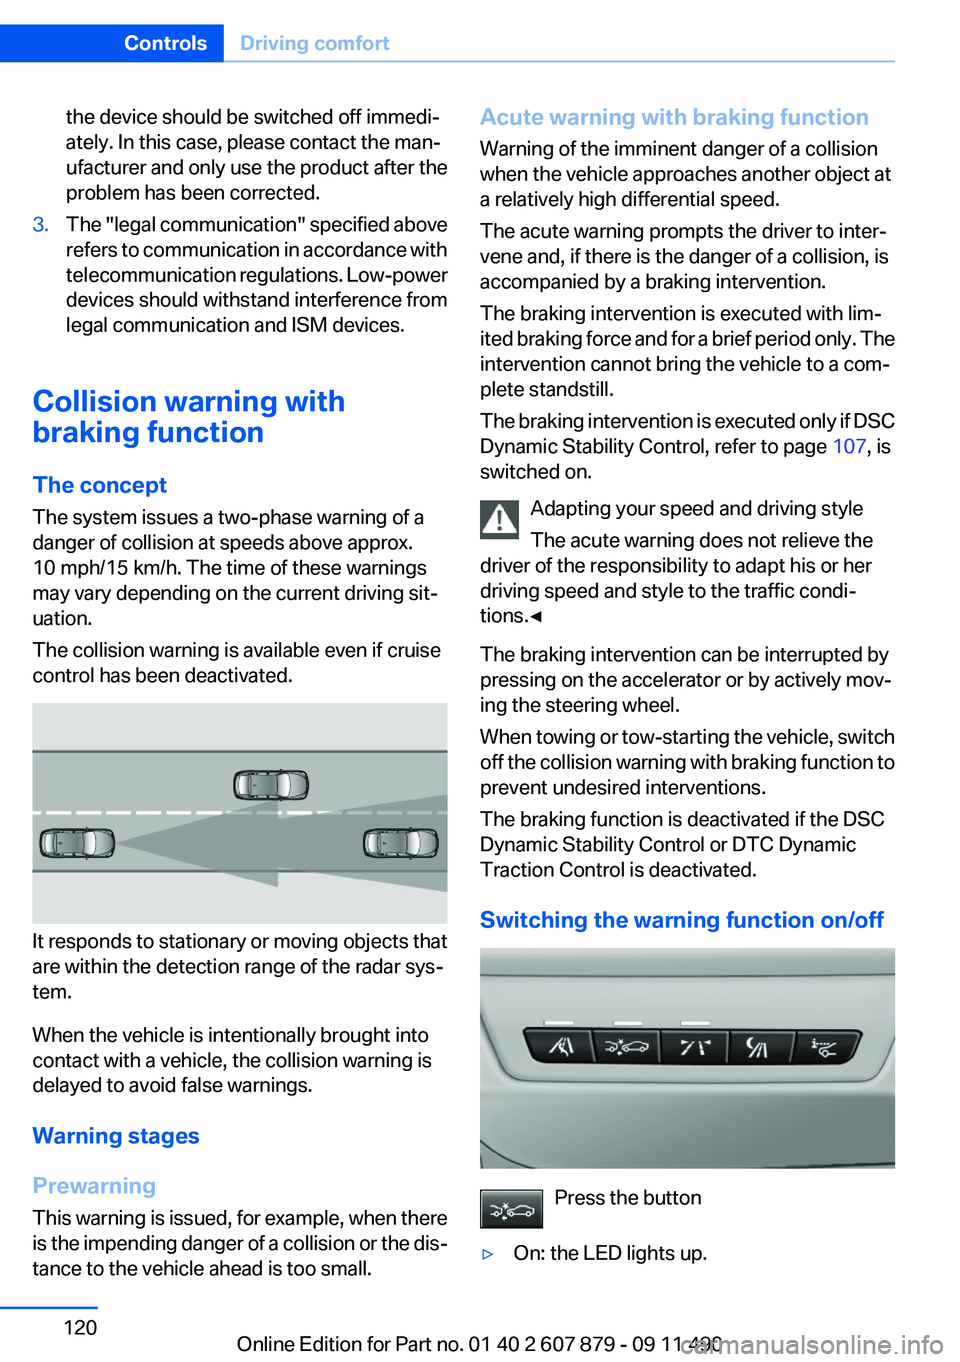
It responds to stationary or moving objects that
are within the detection range of the radar sys‐
tem.
When the vehicle is intentionally brought into
contact with a vehicle, the collision warning is
delayed to avoid false warnings.
Warning stages
Prewarning
This warning is issued, for example, when there
is the impending danger of a collision or the dis‐
tance to the vehicle ahead is too small.
Acute warning with braking function
Warning of the imminent danger of a collision
when the vehicle approaches another object at
a relatively high differential speed.
The acute warning prompts the driver to inter‐
vene and, if there is the danger of a collision, is
accompanied by a braking intervention.
The braking intervention is executed with lim‐
ited braking force and for a brief period only. The
intervention cannot bring the vehicle to a com‐
plete standstill.
The braking intervention is executed only if DSC
Dynamic Stability Control, refer to page 107, is
switched on.
Adapting your speed and driving style
The acute warning does not relieve the
driver of the responsibility to adapt his or her
driving speed and style to the traffic condi‐
tions.◀
The braking intervention can be interrupted by
pressing on the accelerator or by actively mov‐
ing the steering wheel.
When towing or tow-starting the vehicle, switch
off the collision warning with braking function to
prevent undesired interventions.
The braking function is deactivated if the DSC
Dynamic Stability Control or DTC Dynamic
Traction Control is deactivated.
Switching the warning function on/off
Press the button
▷On: the LED lights up.Seite 120ControlsDriving comfort120
Online Edition for Part no. 01 40 2 607 879 - 09 11 490
Page 296 of 335
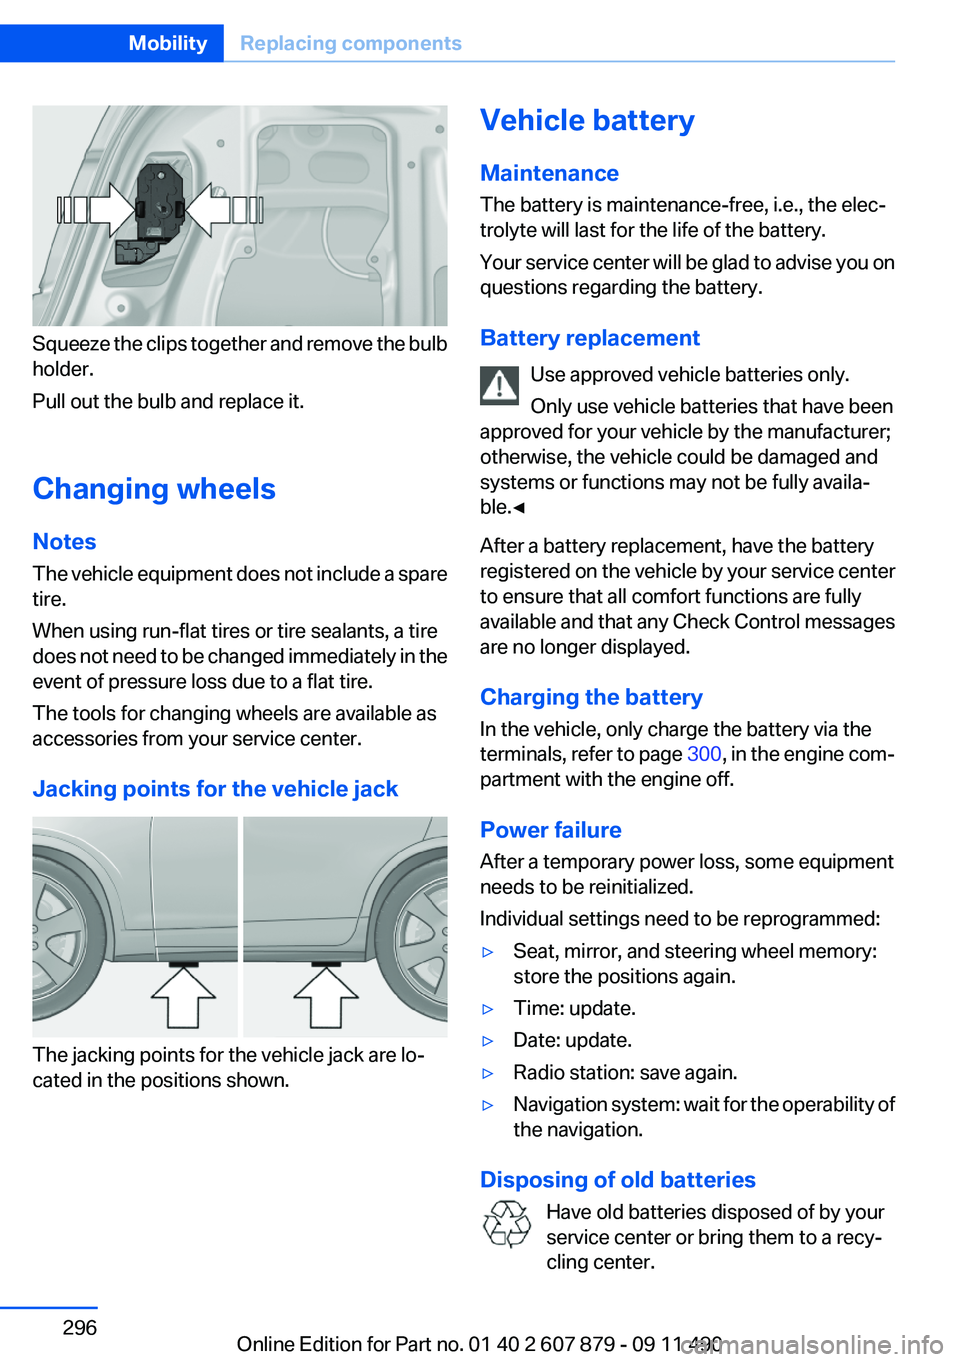
Squeeze the clips together and remove the bulb
holder.
Pull out the bulb and replace it.
Changing wheels
Notes
The vehicle equipment does not include a spare
tire.
When using run-flat tires or tire sealants, a tire
does not need to be changed immediately in the
event of pressure loss due to a flat tire.
The tools for changing wheels are available as
accessories from your service center.
Jacking points for the vehicle jack
The jacking points for the vehicle jack are lo‐
cated in the positions shown.
Vehicle battery
Maintenance
The battery is maintenance-free, i.e., the elec‐
trolyte will last for the life of the battery.
Your service center will be glad to advise you on
questions regarding the battery.
Battery replacement Use approved vehicle batteries only.
Only use vehicle batteries that have been
approved for your vehicle by the manufacturer;
otherwise, the vehicle could be damaged and
systems or functions may not be fully availa‐
ble.◀
After a battery replacement, have the battery
registered on the vehicle by your service center
to ensure that all comfort functions are fully
available and that any Check Control messages
are no longer displayed.
Charging the battery
In the vehicle, only charge the battery via the
terminals, refer to page 300, in the engine com‐
partment with the engine off.
Power failure
After a temporary power loss, some equipment
needs to be reinitialized.
Individual settings need to be reprogrammed:▷Seat, mirror, and steering wheel memory:
store the positions again.▷Time: update.▷Date: update.▷Radio station: save again.▷Navigation system: wait for the operability of
the navigation.
Disposing of old batteries
Have old batteries disposed of by your
service center or bring them to a recy‐
cling center.
Seite 296MobilityReplacing components296
Online Edition for Part no. 01 40 2 607 879 - 09 11 490
Page 301 of 335
attempt in order to allow the discharged bat‐
tery to recharge.3.Let both engines run for several minutes.4.Disconnect the jumper cables in the reverse
order.
Check the battery and recharge if necessary.
Tow-starting and towing
Automatic transmission: transporting
your vehicle
Note
Your vehicle is not permitted to be towed.
Therefore, contact a service center in the event
of a breakdown.
Do not have the vehicle towed
Have your vehicle transported on a loading
platform only; otherwise, damage may occur.◀
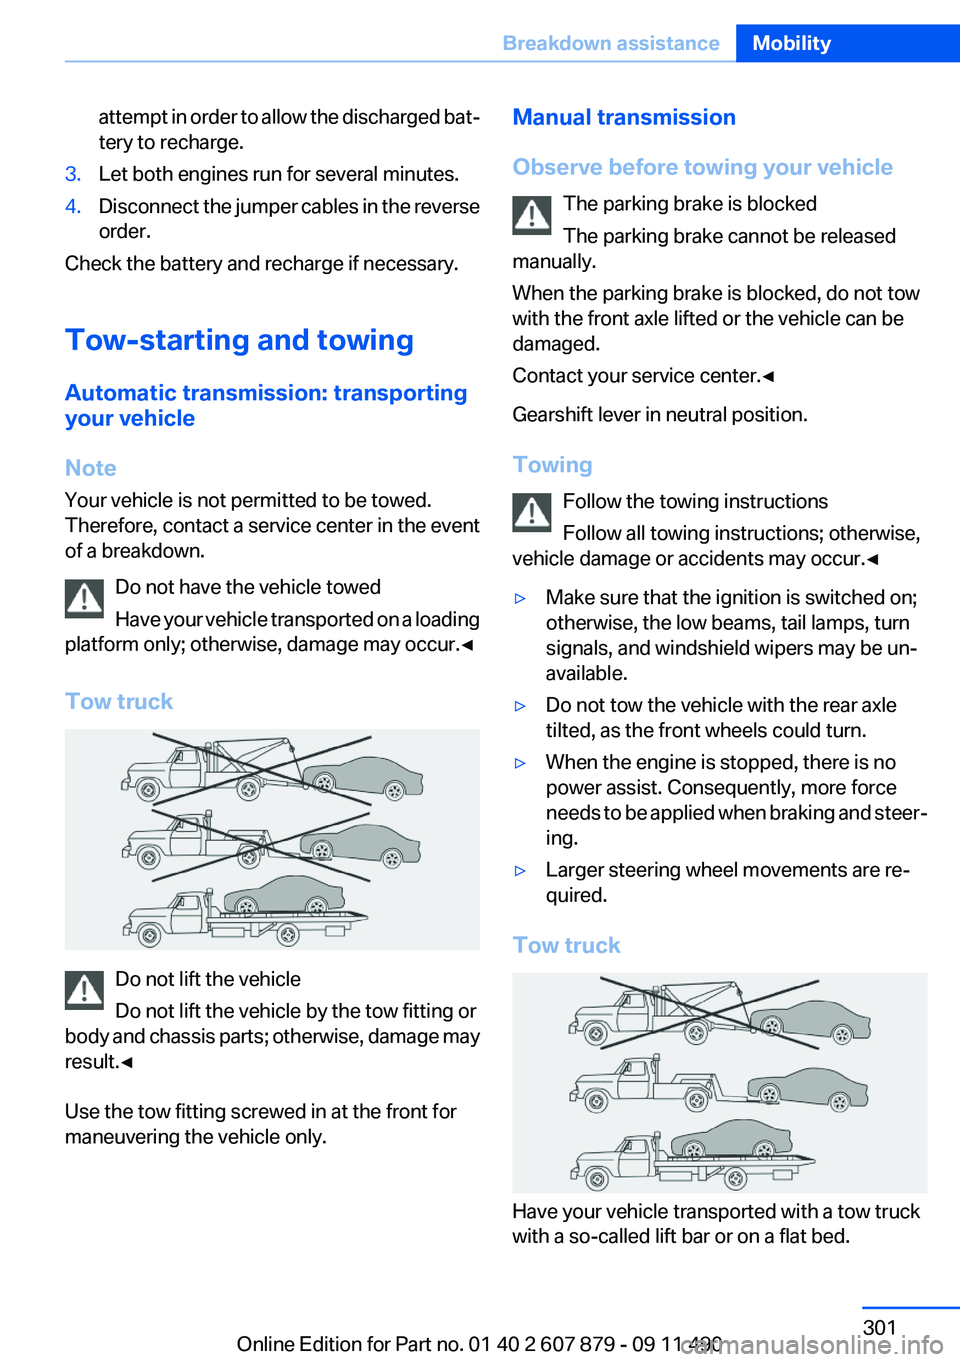
Tow truck
Do not lift the vehicle
Do not lift the vehicle by the tow fitting or
body and chassis parts; otherwise, damage may
result.◀
Use the tow fitting screwed in at the front for
maneuvering the vehicle only.
Manual transmission
Observe before towing your vehicle The parking brake is blocked
The parking brake cannot be released
manually.
When the parking brake is blocked, do not tow
with the front axle lifted or the vehicle can be
damaged.
Contact your service center.◀
Gearshift lever in neutral position.
Towing Follow the towing instructions
Follow all towing instructions; otherwise,
vehicle damage or accidents may occur.◀▷Make sure that the ignition is switched on;
otherwise, the low beams, tail lamps, turn
signals, and windshield wipers may be un‐
available.▷Do not tow the vehicle with the rear axle
tilted, as the front wheels could turn.▷When the engine is stopped, there is no
power assist. Consequently, more force
needs to be applied when braking and steer‐
ing.▷Larger steering wheel movements are re‐
quired.
Tow truck
Have your vehicle transported with a tow truck
with a so-called lift bar or on a flat bed.
Seite 301Breakdown assistanceMobility301
Online Edition for Part no. 01 40 2 607 879 - 09 11 490
Page 329 of 335
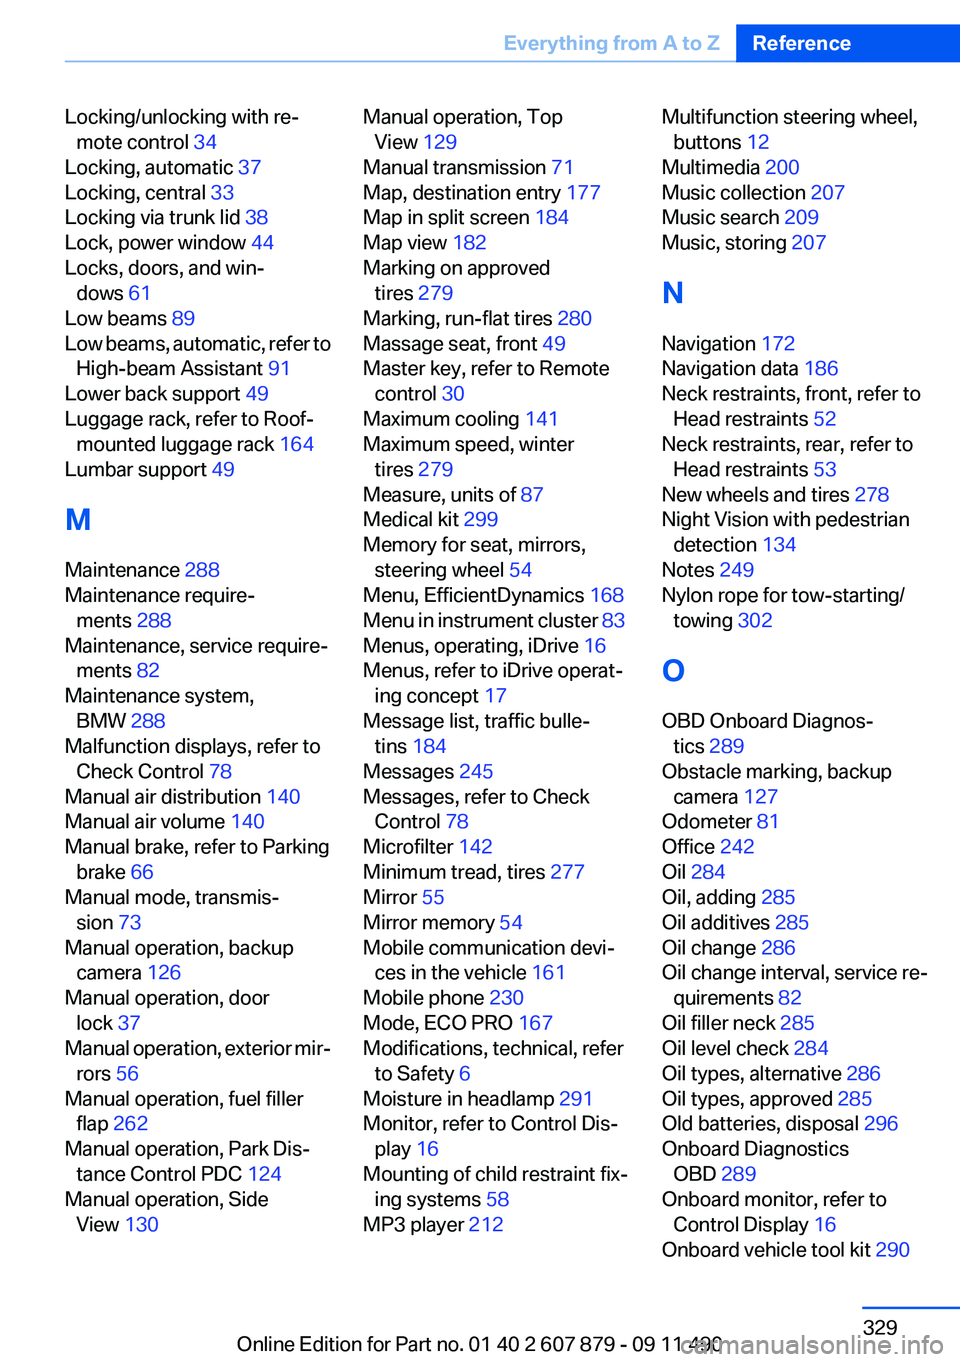
Locking/unlocking with re‐mote control 34
Locking, automatic 37
Locking, central 33
Locking via trunk lid 38
Lock, power window 44
Locks, doors, and win‐ dows 61
Low beams 89
Low beams, automatic, refer to High-beam Assistant 91
Lower back support 49
Luggage rack, refer to Roof- mounted luggage rack 164
Lumbar support 49
M
Maintenance 288
Maintenance require‐ ments 288
Maintenance, service require‐ ments 82
Maintenance system, BMW 288
Malfunction displays, refer to Check Control 78
Manual air distribution 140
Manual air volume 140
Manual brake, refer to Parking brake 66
Manual mode, transmis‐ sion 73
Manual operation, backup camera 126
Manual operation, door lock 37
Manual operation, exterior mir‐ rors 56
Manual operation, fuel filler flap 262
Manual operation, Park Dis‐ tance Control PDC 124
Manual operation, Side View 130 Manual operation, Top
View 129
Manual transmission 71
Map, destination entry 177
Map in split screen 184
Map view 182
Marking on approved tires 279
Marking, run-flat tires 280
Massage seat, front 49
Master key, refer to Remote control 30
Maximum cooling 141
Maximum speed, winter tires 279
Measure, units of 87
Medical kit 299
Memory for seat, mirrors, steering wheel 54
Menu, EfficientDynamics 168
Menu in instrument cluster 83
Menus, operating, iDrive 16
Menus, refer to iDrive operat‐ ing concept 17
Message list, traffic bulle‐ tins 184
Messages 245
Messages, refer to Check Control 78
Microfilter 142
Minimum tread, tires 277
Mirror 55
Mirror memory 54
Mobile communication devi‐ ces in the vehicle 161
Mobile phone 230
Mode, ECO PRO 167
Modifications, technical, refer to Safety 6
Moisture in headlamp 291
Monitor, refer to Control Dis‐ play 16
Mounting of child restraint fix‐ ing systems 58
MP3 player 212 Multifunction steering wheel,
buttons 12
Multimedia 200
Music collection 207
Music search 209
Music, storing 207
N
Navigation 172
Navigation data 186
Neck restraints, front, refer to Head restraints 52
Neck restraints, rear, refer to Head restraints 53
New wheels and tires 278
Night Vision with pedestrian detection 134
Notes 249
Nylon rope for tow-starting/ towing 302
O
OBD Onboard Diagnos‐ tics 289
Obstacle marking, backup camera 127
Odometer 81
Office 242
Oil 284
Oil, adding 285
Oil additives 285
Oil change 286
Oil change interval, service re‐ quirements 82
Oil filler neck 285
Oil level check 284
Oil types, alternative 286
Oil types, approved 285
Old batteries, disposal 296
Onboard Diagnostics OBD 289
Onboard monitor, refer to Control Display 16
Onboard vehicle tool kit 290 Seite 329Everything from A to ZReference329
Online Edition for Part no. 01 40 2 607 879 - 09 11 490
Page 330 of 335
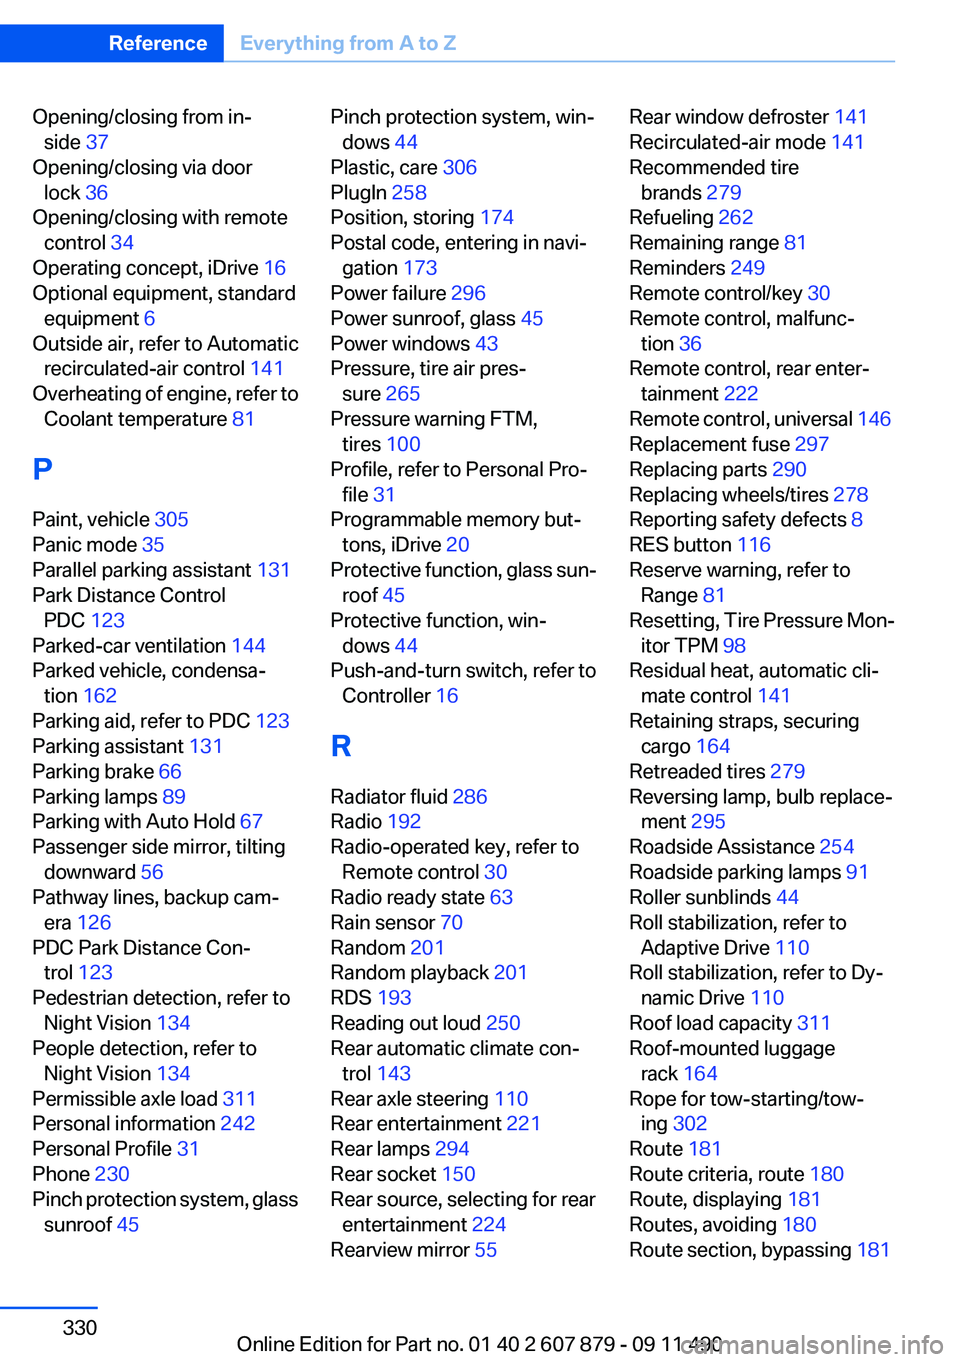
Opening/closing from in‐side 37
Opening/closing via door lock 36
Opening/closing with remote control 34
Operating concept, iDrive 16
Optional equipment, standard equipment 6
Outside air, refer to Automatic recirculated-air control 141
Overheating of engine, refer to Coolant temperature 81
P
Paint, vehicle 305
Panic mode 35
Parallel parking assistant 131
Park Distance Control PDC 123
Parked-car ventilation 144
Parked vehicle, condensa‐ tion 162
Parking aid, refer to PDC 123
Parking assistant 131
Parking brake 66
Parking lamps 89
Parking with Auto Hold 67
Passenger side mirror, tilting downward 56
Pathway lines, backup cam‐ era 126
PDC Park Distance Con‐ trol 123
Pedestrian detection, refer to Night Vision 134
People detection, refer to Night Vision 134
Permissible axle load 311
Personal information 242
Personal Profile 31
Phone 230
Pinch protection system, glass sunroof 45 Pinch protection system, win‐
dows 44
Plastic, care 306
PlugIn 258
Position, storing 174
Postal code, entering in navi‐ gation 173
Power failure 296
Power sunroof, glass 45
Power windows 43
Pressure, tire air pres‐ sure 265
Pressure warning FTM, tires 100
Profile, refer to Personal Pro‐ file 31
Programmable memory but‐ tons, iDrive 20
Protective function, glass sun‐ roof 45
Protective function, win‐ dows 44
Push-and-turn switch, refer to Controller 16
R
Radiator fluid 286
Radio 192
Radio-operated key, refer to Remote control 30
Radio ready state 63
Rain sensor 70
Random 201
Random playback 201
RDS 193
Reading out loud 250
Rear automatic climate con‐ trol 143
Rear axle steering 110
Rear entertainment 221
Rear lamps 294
Rear socket 150
Rear source, selecting for rear entertainment 224
Rearview mirror 55 Rear window defroster 141
Recirculated-air mode 141
Recommended tire brands 279
Refueling 262
Remaining range 81
Reminders 249
Remote control/key 30
Remote control, malfunc‐ tion 36
Remote control, rear enter‐ tainment 222
Remote control, universal 146
Replacement fuse 297
Replacing parts 290
Replacing wheels/tires 278
Reporting safety defects 8
RES button 116
Reserve warning, refer to Range 81
Resetting, Tire Pressure Mon‐ itor TPM 98
Residual heat, automatic cli‐ mate control 141
Retaining straps, securing cargo 164
Retreaded tires 279
Reversing lamp, bulb replace‐ ment 295
Roadside Assistance 254
Roadside parking lamps 91
Roller sunblinds 44
Roll stabilization, refer to Adaptive Drive 110
Roll stabilization, refer to Dy‐ namic Drive 110
Roof load capacity 311
Roof-mounted luggage rack 164
Rope for tow-starting/tow‐ ing 302
Route 181
Route criteria, route 180
Route, displaying 181
Routes, avoiding 180
Route section, bypassing 181 Seite 330ReferenceEverything from A to Z330
Online Edition for Part no. 01 40 2 607 879 - 09 11 490