lug BMW 530i 1997 E39 Workshop Manual
[x] Cancel search | Manufacturer: BMW, Model Year: 1997, Model line: 530i, Model: BMW 530i 1997 E39Pages: 1002
Page 15 of 1002
Downloaded from www.Manualslib.com manuals search engine
General
Much of the necessary maintenance and minor repairthat an
automobile will need can be done with ordinary tools. Below
you'll find important information on how to work safely, a dis-
cussion of what tools will be needed and how to use them.
Safety
Although an automobile presents many hazards, common
sense and good equipment can help ensure safety. Many ac-
cidents happen because of carelessness. Pay attention and
stick to the safety rules in this manual.
Lifting the car
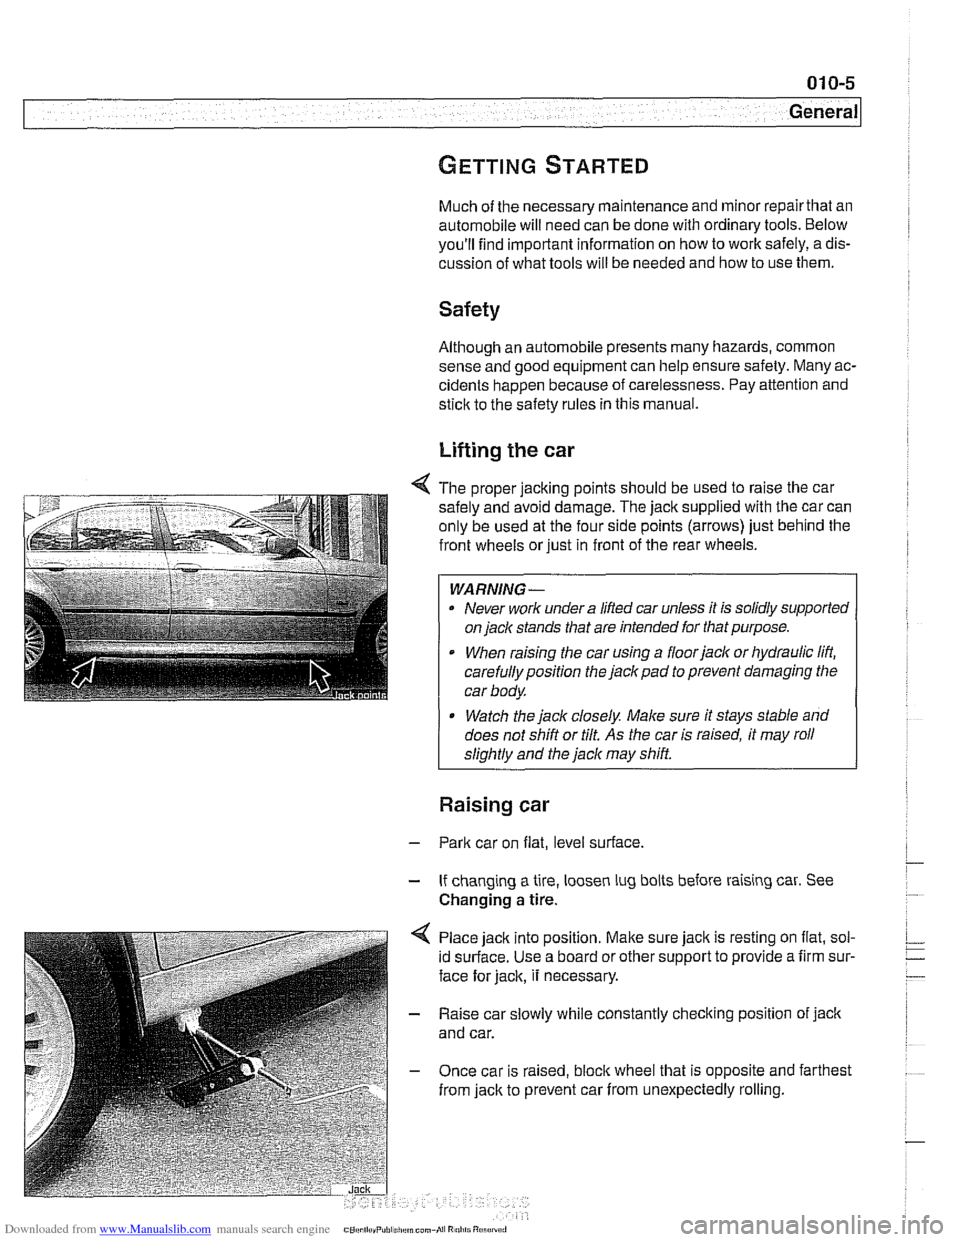
4 The proper jacking points should be used to raise the car
safely and avoid damage. The
jack supplied with the car can
only be used at the four side points (arrows) just behind the
front wheels or just in front of the rear wheels.
WARNING-
. Never work under a lifted car unless it is solidly supported
on
jack stands that are intended for that purpose.
When raising the car using a floorjack or hydraulic lift,
carefully position the jack pad to prevent damaging the
car body.
* Watch the jack closely. Male sure it stays stable and
does not shift or tilt.
As the car is raised, it may roll
sliahtlv and the
jack mav shift.
Raising car
- Park car on flat, level surface.
- If changing a tire, loosen lug bolts before raising car. See
Changing
a tire.
Place jack into position.
Malte sure jack is resting on flat, sol-
id surface. Use a board or other support to provide a firm sur-
face for jack, it necessary.
- Raise car slowly while constantly checking position of jack
and car.
- Once car is raised, bloclc wheel that is opposite and farthest
from jack to prevent car from unexpectedly rolling.
Page 25 of 1002
Downloaded from www.Manualslib.com manuals search engine
Sockets Socltets are used with a ratchet handle for speed and conve-
nience and can be combined with extensions and universal
joints (swivels) to reach fasteners more easily. The most
common socket drive sizes are
114 inch, 318 inch and 112 inch.
Sockets come in
6 point and 12 point styles. The 6 point offers
a better grip on tight nuts and bolts.
6 mm to 19 mm socltets
are the most needed sizes. Below is a list of typical bolt
diarn-
eters and the corresponding wrench sizes.
Common bolt diameters and wrench sizes
M5 8 rnrn
M6
10 rnm
M8 12rnrnor13rnrn
MI 0 17 rnrn
MI2 19 rnrn
M14 22 mm
Spark plug socket
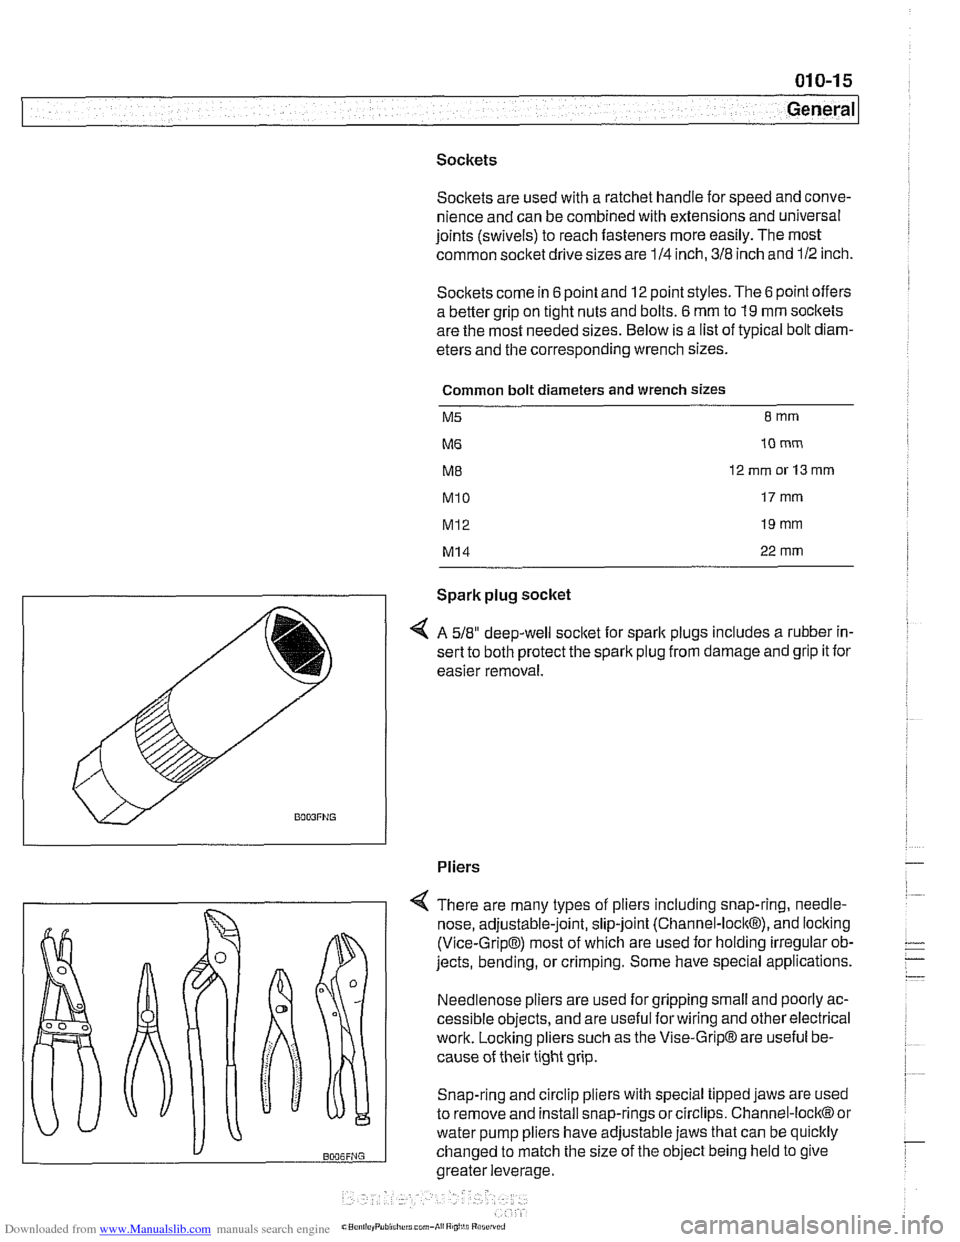
4 A 518" deep-well socket for sparlt plugs includes a rubber in-
sert to both protect the spark plug from damage and grip it for
easier removal.
Pliers
There are many types of pliers including snap-ring,
needle-
nose, adjustable-joint, slip-joint (Channel-lock@), and locking
(Vice-Grip@) most of which are used for holding irregular ob-
jects, bending, or crimping. Some have special applications.
Needlenose pliers are used for gripping small and poorly ac-
cessible objects, and are useful forwiring and other electrical
work. Locking pliers such as the Vise-Grip@ are useful be-
cause of their tight grip.
Snap-ring and circlip pliers with special tipped jaws are used
to remove and install snap-rings or circlips. Channel-lock@ or
water pump pliers have adjustable jaws that can be quicltly
changed to match the size of the object being held to give
greater leverage,
Page 26 of 1002
Downloaded from www.Manualslib.com manuals search engine
.-
General
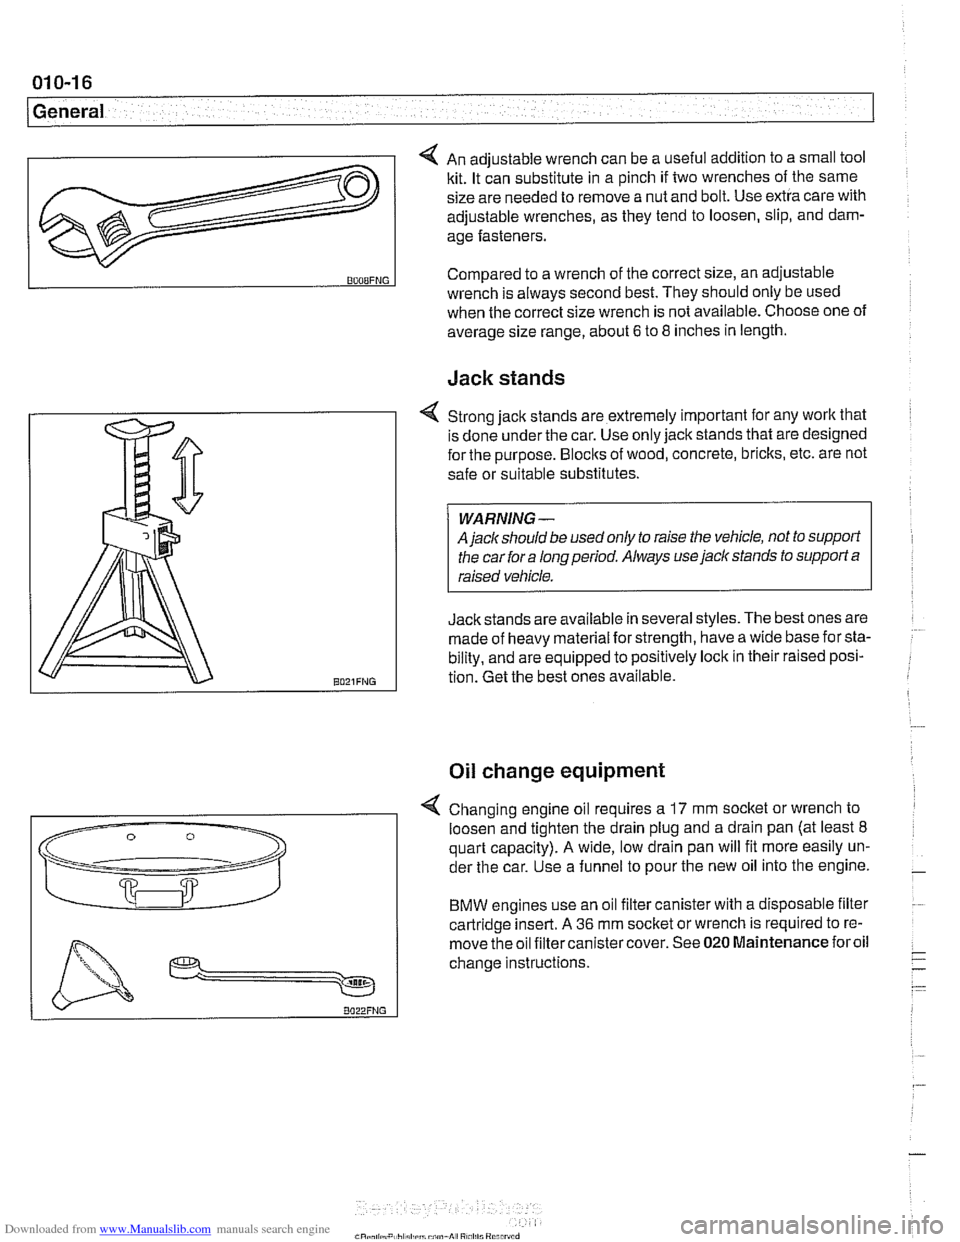
4 An adjustable wrench can be a useful addition to a small tool
kit. It can substitute in a pinch if two wrenches of the same
size are needed to remove a nut and bolt. Use extra care with
adjustable wrenches, as they tend to loosen, slip, and dam-
age fasteners.
Jack stands
v
BOOBFNG
4 Strong jack stands are extremely important for any work that
is done under the car. Use only jack stands that are designed
for the purpose.
Blocks of wood, concrete, bricks, etc. are not
safe or suitable substitutes.
A
jaclc should be used only to raise the vehicle, not to support
the car for a long period. Always use
jack stands to support a
Jackstands are available in several styles. The best ones are
:
made of heavy material for strength, have a wide base for sta-
bility, and are equipped to positively lock in their raised posi-
tion. Get the best ones available.
Compared to
a wrench of the correct size, an adjustable
Oil change equipment
wrench is always second best. They should only be used
when the correct size wrench is not available. Choose one of
average size range, about
6 to 8 inches in length.
4 Changing engine oil requires a 17 mm socket or wrench to
loosen and tighten the drain plug and a drain pan (at least
8
quart capacity). A wide, low drain pan will fit more easily un-
der the car. Use a funnel to pour the new oil into the engine.
BMW engines use an oil filter canister with a disposable filter
cartridge insert. A
36 mm socket or wrench is required to re-
move the oil filtercanistercover. See
020 Maintenance foroil
change instructions.
Page 28 of 1002
Downloaded from www.Manualslib.com manuals search engine
-
General
BMW special tools
Many repairs covered in this manual call for the use of BMW
special tools. Many of the BMW special tools mentioned in
this manual are simply the best thing to use to do the job cor-
rectly. In these cases, the tool is identified with a
BMW parl
number. See your authorized BMW dealer parts department
for information on how to order special tools.
There are some jobs for which expensive special tools are es-
sential, and not a cost-effective purchase for a one time repair
by the do-it-yourself owner. This manual includes such re-
pairs for the benefit of those with the necessary experience
and access to tools. For the do-it-yourselfer, the need for spe-
cial tools is noted in the text, and whether or not BMW dealer
service is recommended.
Changing a tire
- Stop car on as flat a surface as possible, in a place where you
can be easily seen by other drivers. Avoid stopping just over
the crest of a hill.
WARNING -
If a tire goes flat while driving, pull well off the road. Changing
a tire on a busy slreet or liigliway is very dangerous. If
nec-
essag drive a short distance on the flat tire to get to a safe
place. It is much better to ruin a tire or rim than to
risk being
hit.
-
- Turn on emergency flashers, and set out flares or emergency
markers well behind car.
Choclc wheel (wheel chock located
in trunk) diagonally opposite to the one being changed. Pas-
sengers should get out of car and stand well away from road.
- Take jaclc and tools from tool area beneath trunk mat. Re-
move spare tire from tire storage tray.
- Loosen wheel bolts while car is on ground, but leave them a
little snug.
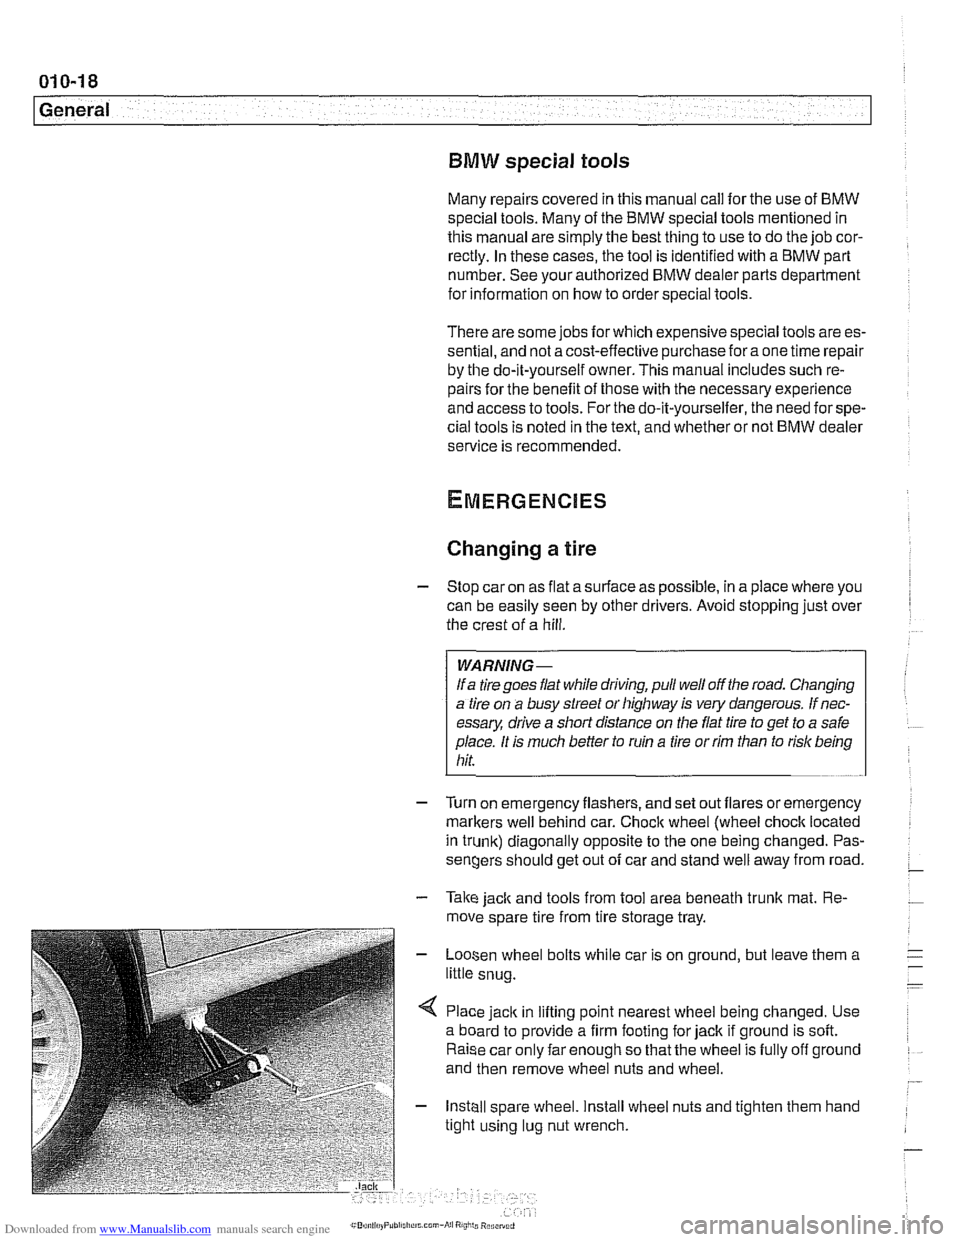
< Place jack in lifting point nearest wheel being changed. Use
a board to provide a firm footing for jack if ground is soft.
Raise car only far enough so that the wheel is fully off ground
and then remove wheel nuts and wheel.
- Install spare wheel. Install wheel nuts and tighten them hand
tight using lug nut wrench.
Page 30 of 1002
Downloaded from www.Manualslib.com manuals search engine
01 0-20
General
more information on the Check Engine Light and the on-
board diagnostic system.
Towing
The cars covered by this manual should be towed with a tow
truck using wheel lift or flat bed equipment. Do not tow the car
on all four wheels except
forvery short distances to move it to
a safe place.
CA U JION-
Do not tow with sling-type equipment The front spoilers and
b~m~er covers may sustain damage.
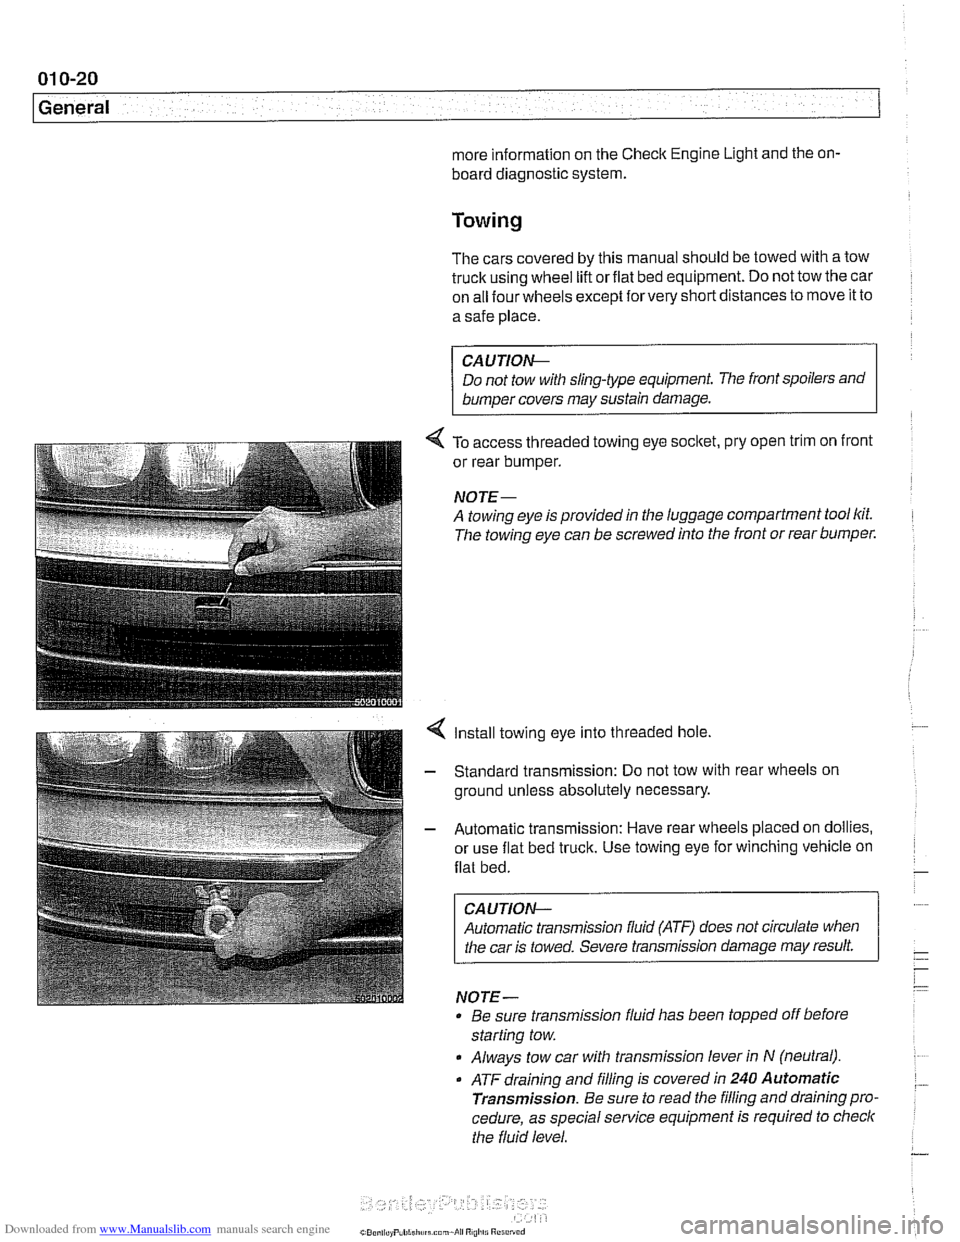
4 To access threaded towing eye socltet, pry open trim on front
or rear bumper.
NOJE-
A towing eye is provided in the luggage compartment tool lcit.
The towing eye can be screwed into the front or rear bumper.
4 Install towing eye into threaded hole.
- Standard transmission: Do not tow with rear wheels on
ground unless absolutely necessary.
- Automatic transmission: Have rear wheels placed on dollies,
or use flat bed truck. Use towing eye for winching vehicle on
flat bed.
CAUTION-
Automatic transmission fluid (ATF) does not circulate when
I the car is towed. Severe transmission damage may result.
NOTE-
Be sure transrnission fluid has been topped off before
starting tow.
Always tow car with transrnission lever in
N (neutral).
. ATF draining and filling is covered in 240 Automatic
Transmission.
Be sure to read the filling and draining pro.
cedure, as special service equipment is required to
checlc
the fluid level.
Page 33 of 1002
Downloaded from www.Manualslib.com manuals search engine
020 Maintenance
General ........................... .02 0.2
Special tools ........................ .02 0.2
Service Interval Indicator (Sll) ........... .02 0.3
Service Interval Indicator (Sll), resetting ... .02 0.3
Inspection I, Inspection 11 ............... .02 0.5
Maintenance Tables ................ .02 0.6
Fluid and Lubricant Specifications .. .02 0.9
Fluids and lubricants ................. .02 0.10
Engine Oil Service ................ .02 0.1 I
Engine oil. checking level ............. .02 0.12
Engine oil and filter. changing .......... .02 0-13
Engine Compartment Maintenance . .02 0.14
Accelerator and linkage ............... .02 0.14
Air filter. replacing ................... .02 0.1 4
Cooling system service ............... .02 0.15
Engine drive belt service .............. .02 0.16
Idlespeed .......................... 020-19
Catalytic converter and oxygen sensors .. .02 0.19
Power steering fluid, checking level ..... .02 0.20
Spark plugs ........................ .02 0.20
Spark plugs, replacing ................ .02 0.21
Interior ventilation microfilter, replacing ... .02 0.22
Other Mechanical Maintenance ..... .02 0.22
Battery, checking. cleaning. and replacing .02 0-22
Brake fluid. replacing ................. .02 0-24
Brake pad 1 rotor wear. checking ........ .02 0.24
Brake system, inspecting ............. .02 0.25
Parking brake. checking ............... 020-25
Clutch fluid. checking ................. 020-26
Differential oil level. checking ........... 020-26
Drive axle joint (CV joint) boots. inspecting 020-27
Exhaust system. inspecting ............ 020-27
Fuel filter. replacing .................. 020-27
Fuel tank and fuel lines. inspecting ...... 020-28
Suspension. front. inspecting ........... 020-29
Suspension. rear. inspecting ........... 020-29
Tires. checking inflation pressure ........ 020-29
Tires. rotating ....................... 020-29
Transmission service. automatic ........ 020-29
Transmission service. manual .......... 020-30
Transmission fluid. checking and filling
(manual transmission)
................ 020-30
Wheels. aligning ..................... 020-30
Body and Interior Maintenance ..... 020-31
Body and hinges. lubricating ........... 020-31
Exterior washing ..................... 020-31
Interior care ........................ 020-31
Leather upholstery and trim ............ 020-31
Polishing ........................... 020-32
Seat belts .......................... 020-32
Special cleaning ..................... 020-32
Washing chassis ..................... 020-32
Waxing ............................ 020-32
Windshield wiper blade maintenance ..... 020-33
Page 36 of 1002
Downloaded from www.Manualslib.com manuals search engine
020-4
Maintenance
1997 to 2000 models
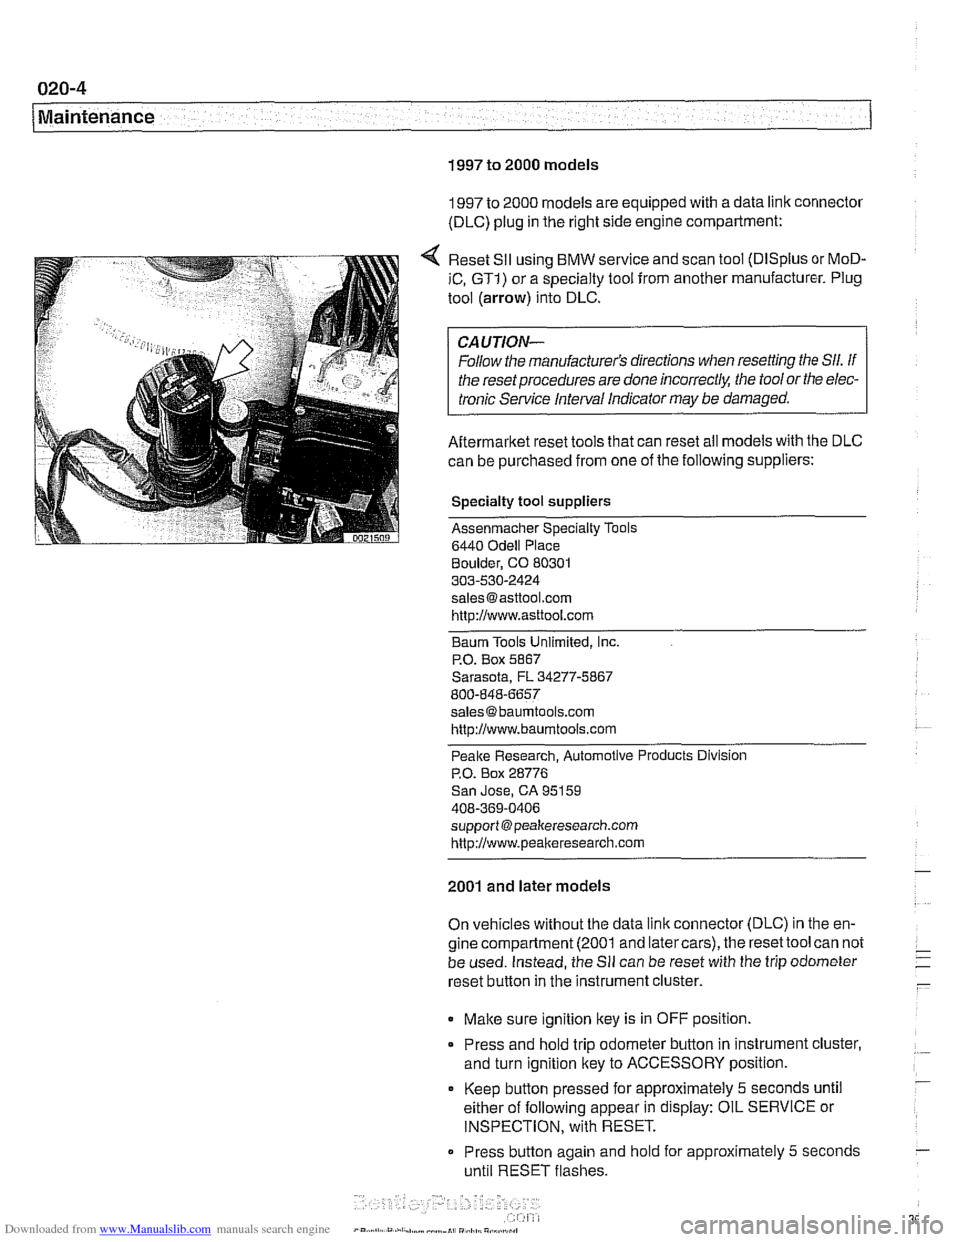
1997 to 2000 models are equipped with a data link connector
(DLC) plug in the right side engine compartment:
Reset
SII using BMW service and scan tool (DISplus or MoD-
iC, GTI) or a specialty tool from another manufacturer. Plug
tool (arrow) into DLC.
CAUTION-
Follow the manufacturer's directions when resetting the Sll. If
the reset procedures are done
incorrect& the tool or the elec-
tronic Service Interval Indicator
may be damaged.
Aftermarket reset tools that can reset all models with the DLC
can be purchased from one of the following suppliers:
Specialty tool suppliers
Assenmacher Specialty Tools
6440
Odell Place
Boulder, CO 80301
303-530-2424
[email protected] http://www.asttool.com
Baum Tools Unlimited,
Inc.
P.O. Box 5867
Sarasota, FL 34277-5867
800-848-6657
[email protected]
http://www.baumtools.com
Peake Research. Automotive Products Division
P.O. Box 28776
San Jose, CA 95159
408-369-0406
support @peakeresearch.com
http://www.peal~eresearch.com
2001 and later models
On vehicles without the data link connector (DLC) in the en-
gine compartment (2001 and latercars), the reset tool can not
be used. Instead, the
Sll can be reset with the trip odometer
reset button in the instrument cluster.
Make sure ignition key is in OFF position.
* Press and hold trip odometer button in instrument cluster,
and turn ignition key to ACCESSORY position.
Keep
button pressed for approximately 5 seconds until
either of following appear in display: OIL SERVICE or
INSPECTION, with RESET.
Press button again and
hold for approximately 5 seconds
until RESET flashes.
Page 41 of 1002
Downloaded from www.Manualslib.com manuals search engine
--- -
Maintenance
Table c. Inspection II Service
Additional
New parts Warm engine Dealer service repair
Tools required required required recommended information
Engine compartment maintenance
Replace air filter element. (Note: reduce
replacement intervals in dusty operating
conditions).
Replace brake
fluid every 2 years (time
interval begins from vehicle production
date).
Cooling system service
Spark plug service
Brake
system maintenance
:j:
*
Replace coolant every 3 years (time
interval begins from vehicle production
date).
Replace oxygen sensor every 160,000
itm
(1 00,000 miles).
020
FLUID AND LUBRICANT
SPECIFICATIONS
:I:
Oxygen sensor service
*
x:
Spark plugs:
M52
1 M62 engine:
Replace every 60,000 itm (48.000 miles).
M52
TU I M54 1 M62 TU engine:
Replace every 160,000
ltm (100.000
miles).
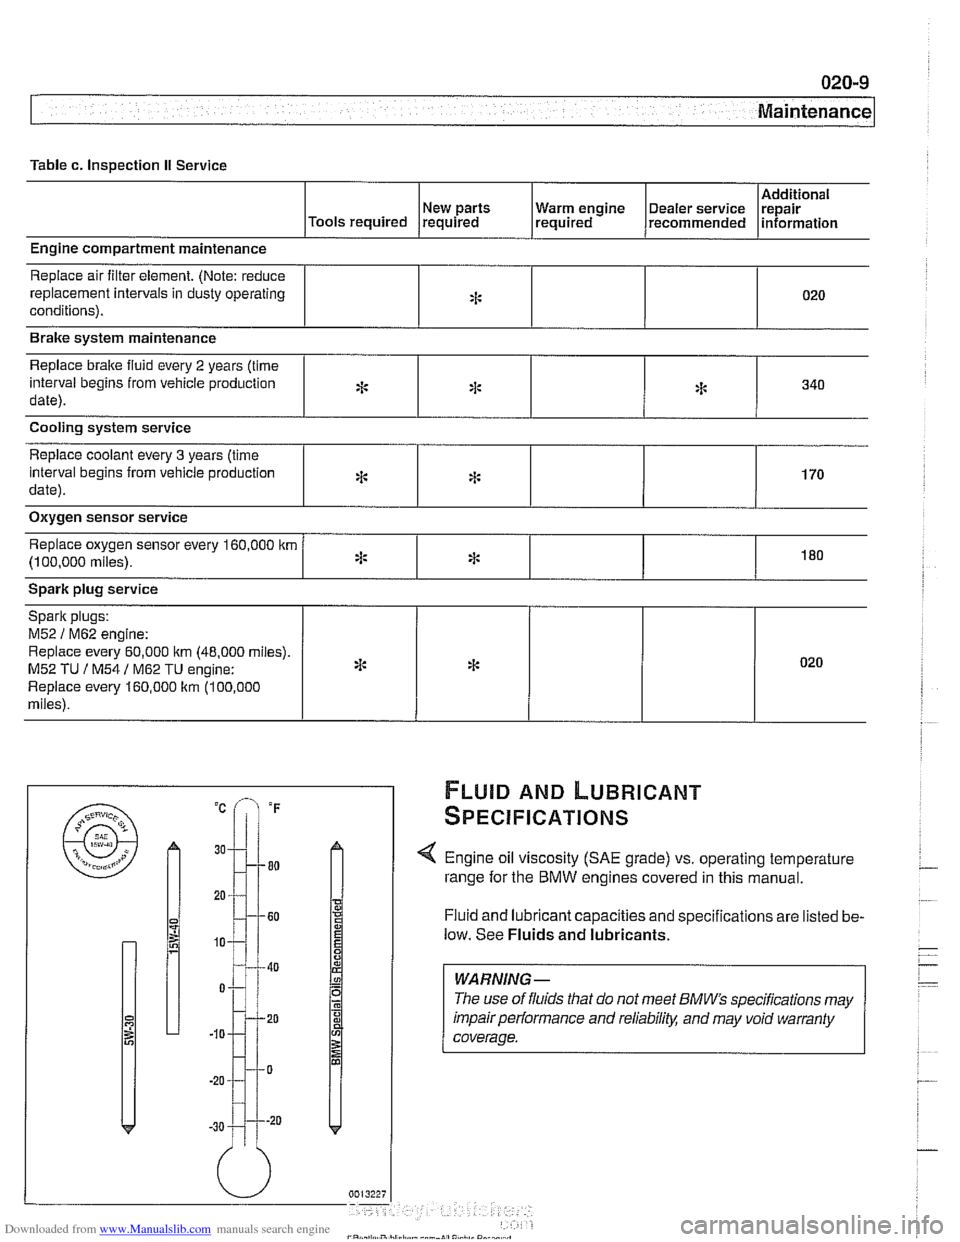
< Engine oil viscosity (SAE grade) vs. operating temperature
range for the BMW engines covered in this manual.
Fluid and lubricant capacities and specifications are listed be-
low. See
Fluids and lubricants.
:I:
*
*
*
WARNING -
The use of fluids that do not meet BMW" specifications may
impair performance and
reliabilitl: and may void warranty
coverage.
340
170
180
* 020
Page 45 of 1002
Downloaded from www.Manualslib.com manuals search engine
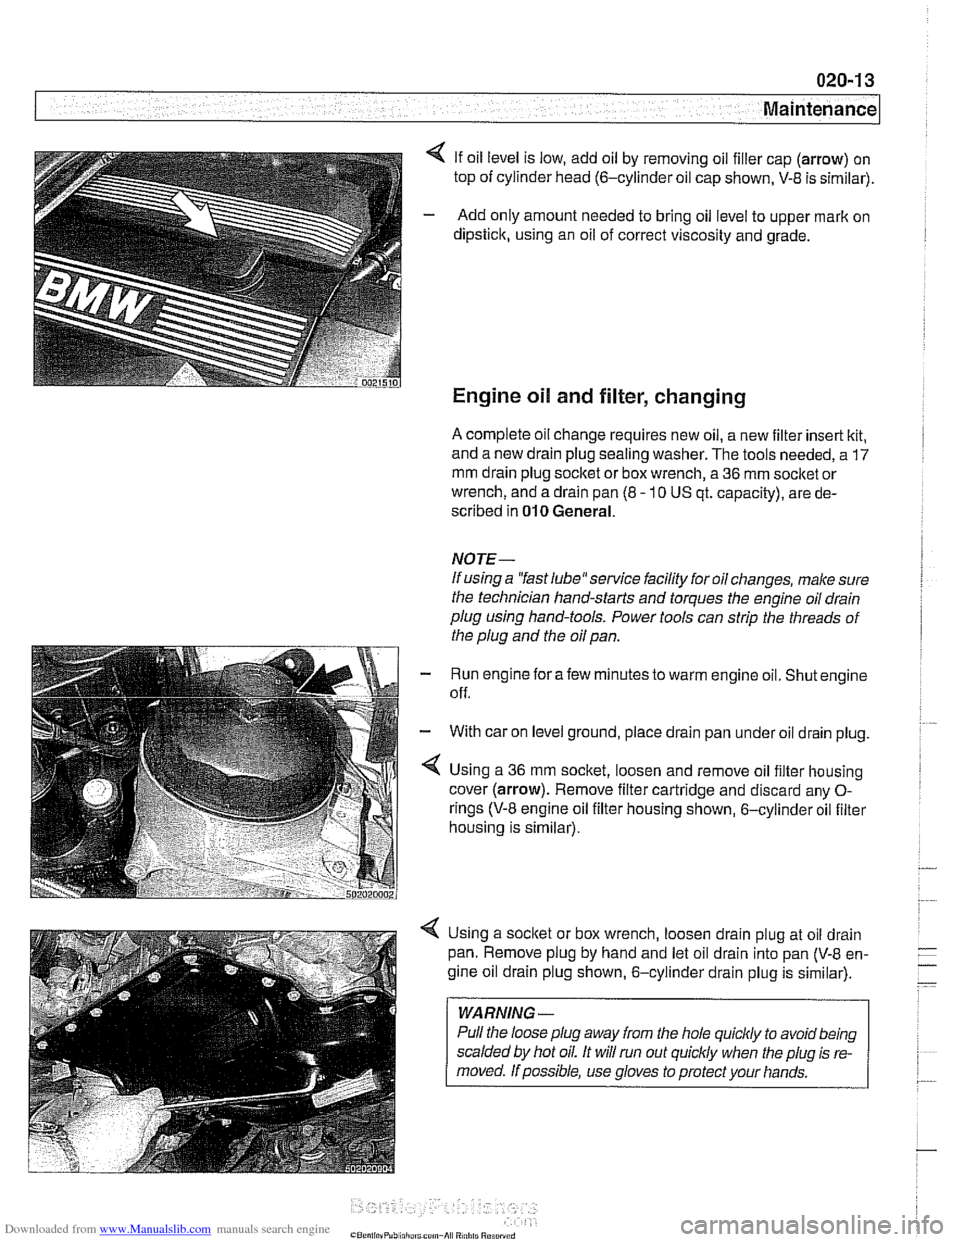
4 If oil level is low, add oil by removing oil filler cap (arrow) on
top of cylinder head
(6-cylinder oil cap shown, V-8 is sirnilar).
- Add only amount needed to bring oil level to upper mark on
dipstick, using an oil of correct viscosity and grade.
Engine oil and filter, changing
A complete oil change requires new oil, a new filter insert kit,
and a new drain plug sealing washer. The tools needed, a
17
mm drain plug socket or box wrench, a 36 mm socket or
wrench, and a drain pan (8
- 10 US qt. capacity), are de-
scribed in
010 General.
NOTE-
If using a "fast 1ube"service facility for oil changes, make sure
the technician hand-starts and torques the engine oil drain
plug using hand-tools. Power tools can strip the threads of
the plug and the oil pan.
Run engine for afew minutes to warm engine oil. Shut engine
off.
With car on level ground, place drain pan under oil drain plug.
Using a
36 mm socket, loosen and remove oil filter housing
cover (arrow). Remove filter cartridge and discard any
0-
rings (V-8 engine oil filter housing shown, 6-cylinder oil filter
housing is sirnilar).
Using a socket or box wrench, loosen drain plug at oil drain
pan. Remove plug by hand and let oil drain into pan
(V-8 en-
gine oil drain plug shown, 6-cylinder drain plug is similar).
WARNING -
Pull the loose plug away from the hole quicldy to avoid being
scalded by hot oil. It will run out
quiclcly when the plug is re-
Page 46 of 1002
Downloaded from www.Manualslib.com manuals search engine
020-1 4
Maintenance
- When oil flow has diminished to an occasional drip, reinstall
drain plug with a new metal sealing washer and torque plug.
Tightening torque Engine oil drain plug to oil pan
25 Nrn (1.8 ft-lb)
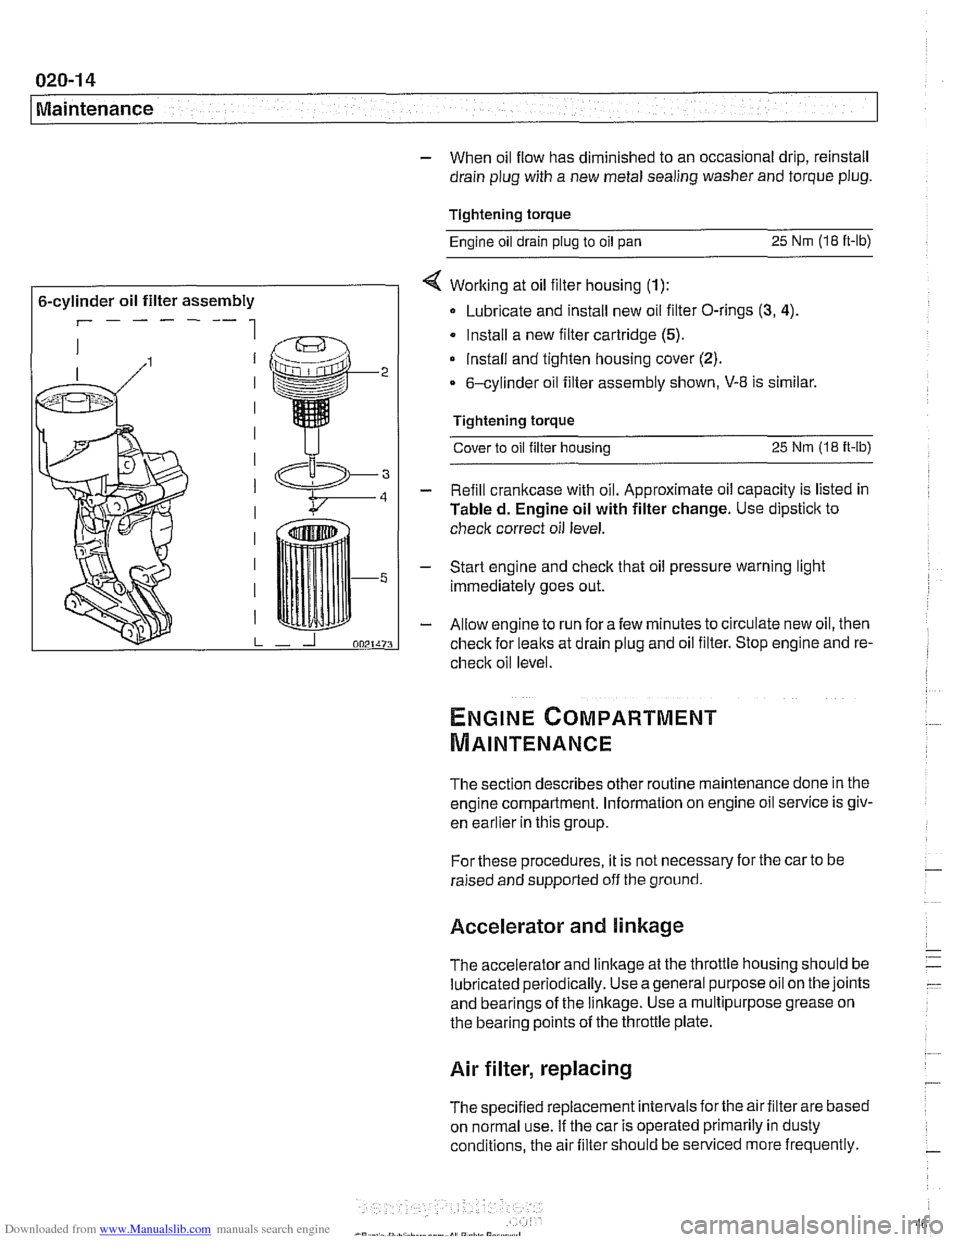
6-cylinder oil filter assembly
r------ 1
< Working at oil filter housing (1):
Lubricate and install new oil filter O-rings (3, 4).
Install a new filter cartridge (5).
lnstall and tighten housing cover (2).
6-cylinder oil filter assembly shown, V-8 is similar.
Tightening torque Cover to oil filter housing
25 Nm (1.8 it-lb)
- Refill crankcase with oil. Approximate oil capacity is listed in
Tabled. Engine oil with filter change. Use dipstick to
check correct oil level.
- Start engine and check that oil pressure warning light
immediately goes out.
- Allow engine to run fora few minutes to circulate new oil, then
check for leaks at drain plug and oil filter. Stop engine and re-
check oil level
The section describes other routine maintenance done in the
engine compartment. Information on engine oil service is
giv-
enkar~ier inthis group.
For these procedures, it is not necessary for the car to be
raised and supported off the ground.
Accelerator and linkage
The accelerator and linkage at the throttle housing should be
lubricated periodically. Use ageneral purposeoil on the joints
and bearings of the linkage. Use a multipurpose grease on
the bearing points of the throttle plate.
Air filter, replacing
The specified replacement intervals forthe air filter are based
on normal use. If the car is operated primarily in dusty
conditions, the air filter should be serviced more frequently.