BMW 530i 2000 E39 Workshop Manual
Manufacturer: BMW, Model Year: 2000, Model line: 530i, Model: BMW 530i 2000 E39Pages: 1002
Page 271 of 1002
Downloaded from www.Manualslib.com manuals search engine
Camshaft Timing Chain
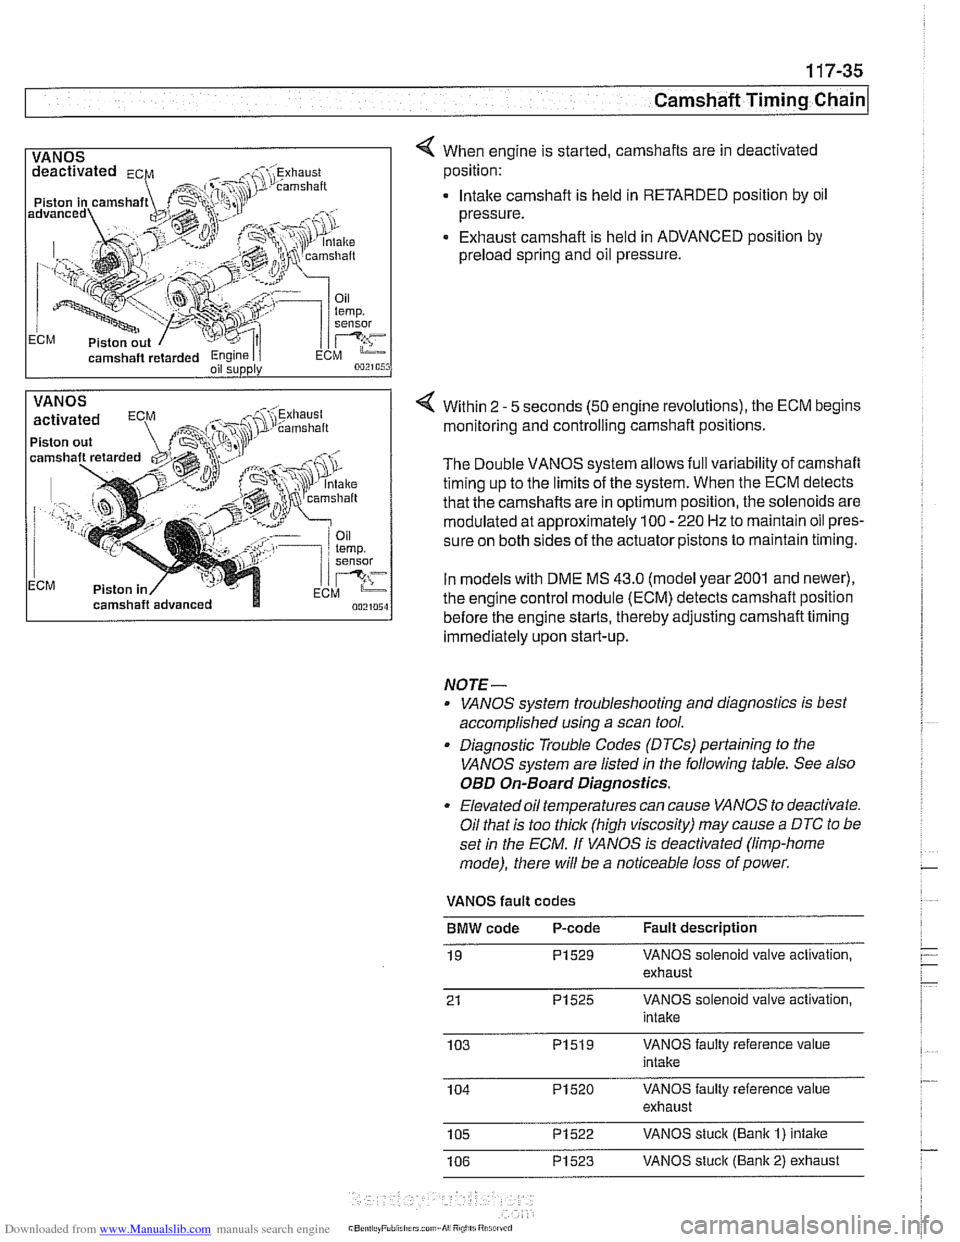
1 VANOS I 4 When engine is started, camshafts are in deactivated
camshaft
retarded Engine I i oil supply
position:
. lntalte camshaft is held in RETARDED position by oil
pressure.
Exhaust camshaft is held in ADVANCED position by
preload spring and oil pressure.
VANOS
Piston out
ECM Piston in Within 2
- 5
seconds (50 engine revolutions), the ECM begins
monitoring and controlling camshaft positions.
The Double VANOS system allows full variability of camshaft
timing up to the limits of the system. When the ECM detects
that the camshafts are in optimum position, the solenoids are
modulated at approximately 100
- 220 Hz to maintain oil pres-
sure on both sides of the actuator pistons to maintain timing.
In models with DME
MS 43.0 (model year2001 and newer),
the engine control module (ECM) detects camshaft position
before the engine starts, thereby adjusting camshaft timing
immediately upon start-up.
NOTE-
. VANOS system troubleshooting and diagnostics is best
accomplished using a scan tool.
. Diagnostic Trouble Codes (DTCs) pertaining to the
VANOS system are listed
in the following table. See also
OED On-Board Diagnostics.
Elevated oil temperatures can cause VANOS to deactivate.
Oil that is too thick (high viscosity) may cause
a DTC to be
set
in the ECM. If VANOS is deactivated (limp-home
mode), there will be a noticeable loss of power.
VANOS fault codes
BMW code P-code Fault description
19
PI529 VANOS solenoid valve activation,
exhaust
21
PI525 VANOS solenoid valve activation,
intake
103
PI519 VANOS faulty reference value
intake
104
PI520 VANOS faulty reference value
exhaust
105
PI522 VANOS stuck (Bank I) intake
106
PI523 VANOS stuck (Bank 2) exhaust
Page 272 of 1002
Downloaded from www.Manualslib.com manuals search engine
1 17-36
Camshaft Timing Chain
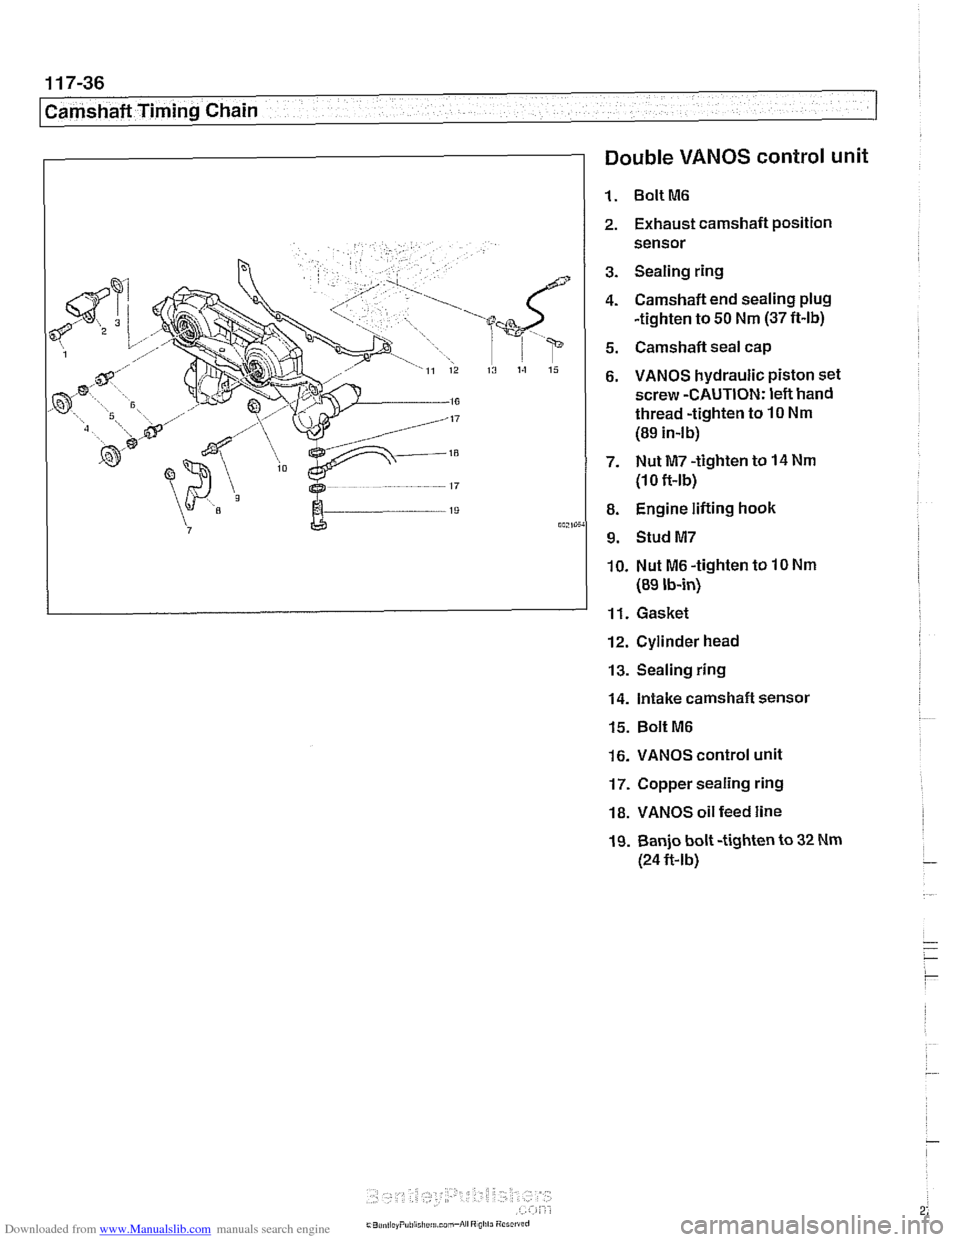
1 Double VANOS control unit
1. BoltM6
2. Exhaust camshaft position
sensor
3. Sealing ring
4. Camshaft end sealing plug
-tighten to 50 Nm (37 ft-lb)
5. Camshaft seal cap
6. VANOS hydraulic piston set
screw -CAUTION: left hand
thread -tighten to
10 Nm
(89 in-lb)
7. Nut M7 -tighten to
14 Nm
(1 0 ft-lb)
8. Engine lifting hook
9. Stud M7
10. Nut
M6 -tighten to 10 Nm
(89 lb-in)
11. Gasket
12. Cylinder head
13. Sealing ring
14. Intake camshaft sensol
15. Bolt M6
16. VANOS control unit
17. Copper sealing ring
18. VANOS oil feed line
19. Banjo bolt -tighten to 32 Nm
(24ft-lb)
Page 273 of 1002
Downloaded from www.Manualslib.com manuals search engine
Camshaft Timing Chain
VANOS control unit, removing
(M52 TU and M54 engines)
This procedure includes removal of the Double VANOS con-
trol unit.
NOTE-
If the Double VANOS control unit is being replaced, camshaft
timing must be checked. This procedure requires multiple
special tools. Be sure to read the procedures through before
beginning the repair.
- Working inside luggage compartment, disconnect negative
(-) battery cable.
Prior to disconnecting the
batteg read the battery discon-
nection cautions given in
001 General Cautions and
Remove engine cooling fan assembly. See 170 Radiator
and Cooling System.
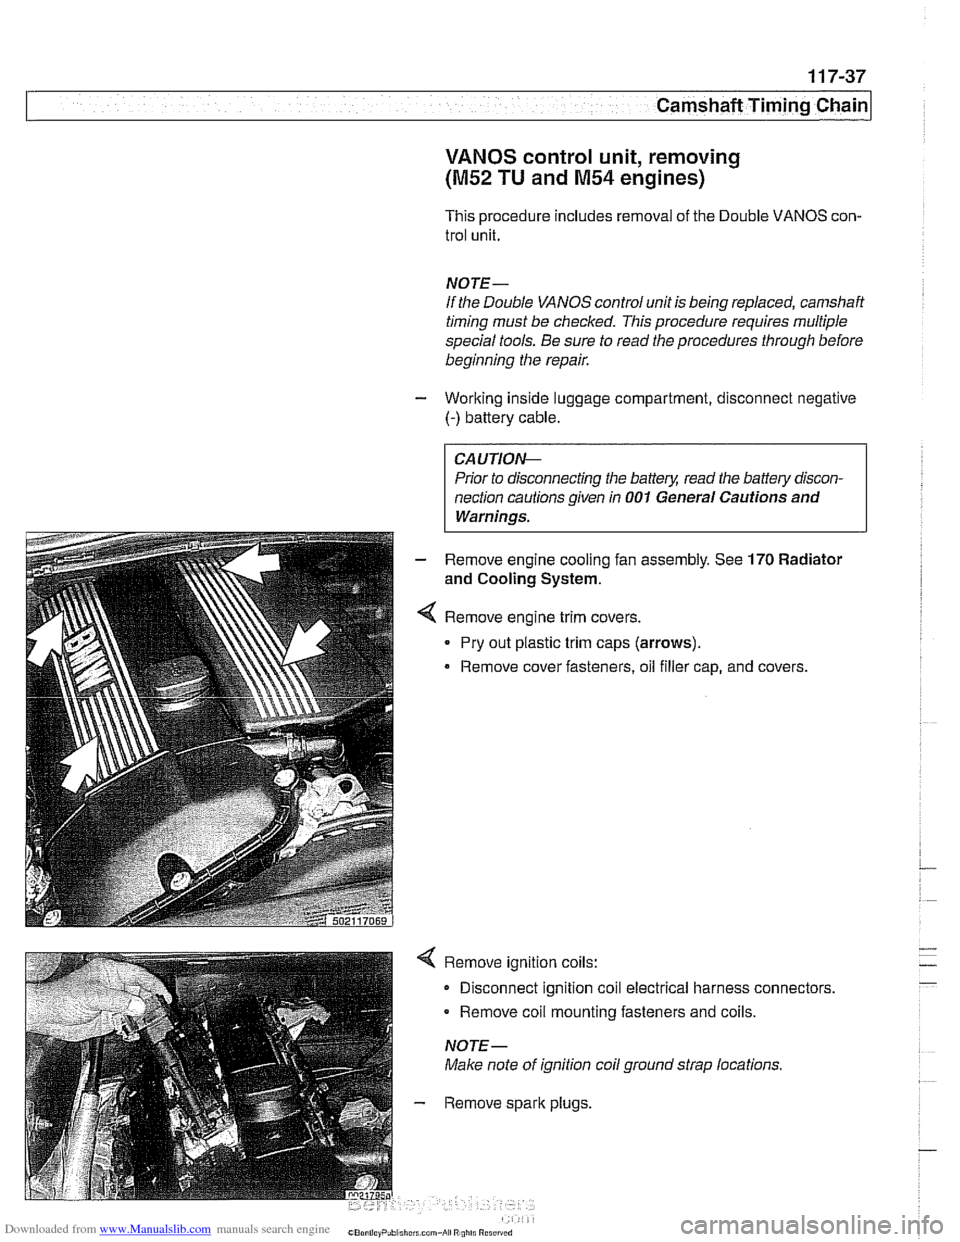
Remove engine trim covers.
Pry out plastic trim caps (arrows).
Remove cover fasteners, oil filler cap, and covers.
Remove ignition coils:
Disconnect ignition coil electrical harness connectors.
Remove coil mounting fasteners and coils.
NOTE-
Make note of ignition coil ground strap locations.
Remove spark plugs,
Page 274 of 1002
Downloaded from www.Manualslib.com manuals search engine
11 7-38
[Camshaft Timing Chain
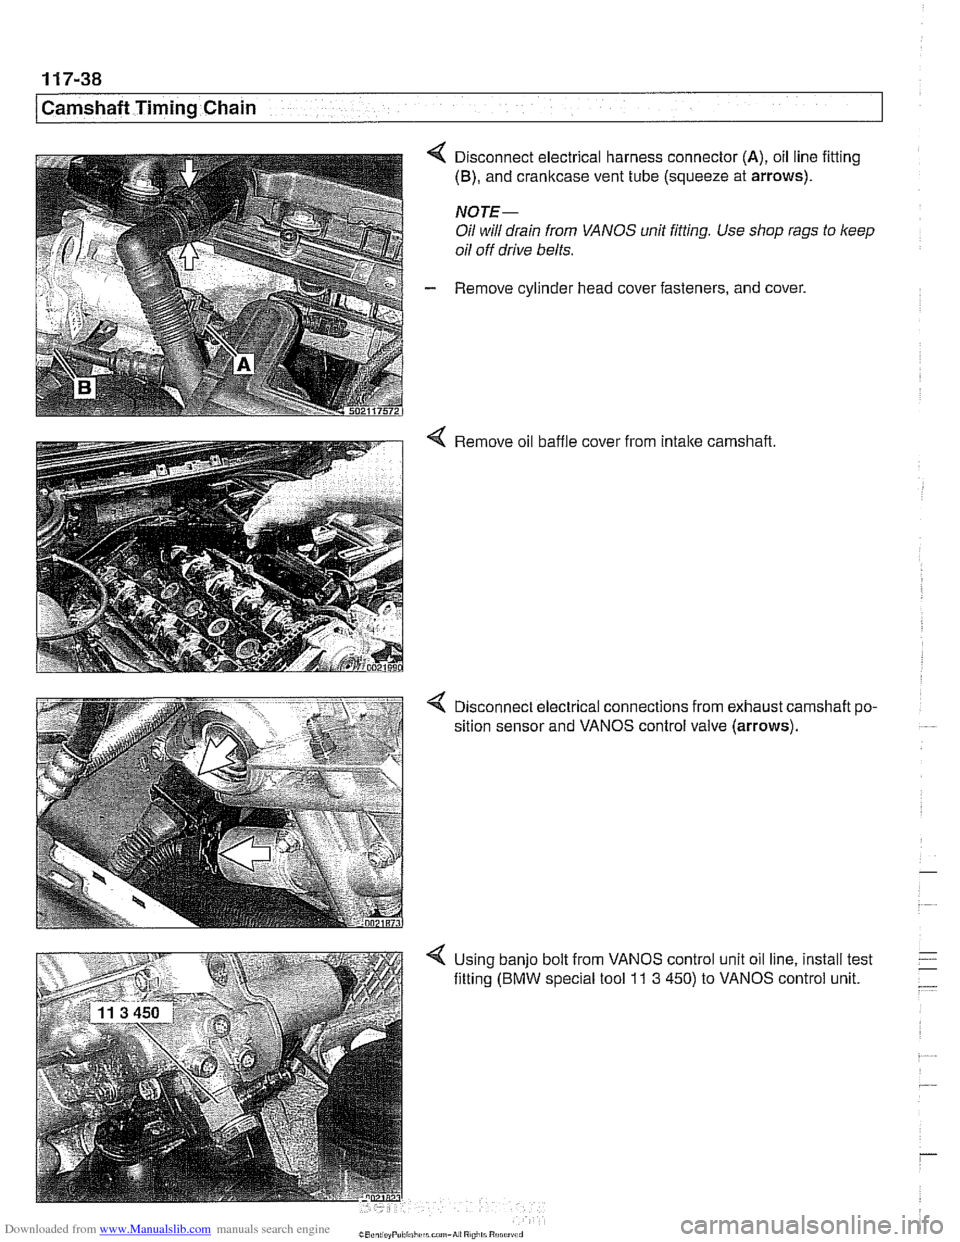
4 Disconnect electrical harness connector (A), oil line fitting
(B), and cranltcase vent tube (squeeze at arrows).
NOJE-
Oil will drain from VANOS unit fitting. Use shop rags to keep
oil off drive belts.
- Remove cylinder head cover fasteners, and cover.
4 Remove oil baffle cover from intake camshaft
4 D~sconnect electrical connections from exhaust camshaft po-
sition sensor and VANOS control valve (arrows).
4 Using banjo bolt from VANOS control unit oil line, install test
fitting
(BMW special tool 11 3 450) to VANOS control unit.
Page 275 of 1002
Downloaded from www.Manualslib.com manuals search engine
11 7-39
Camshaft Timing Chain
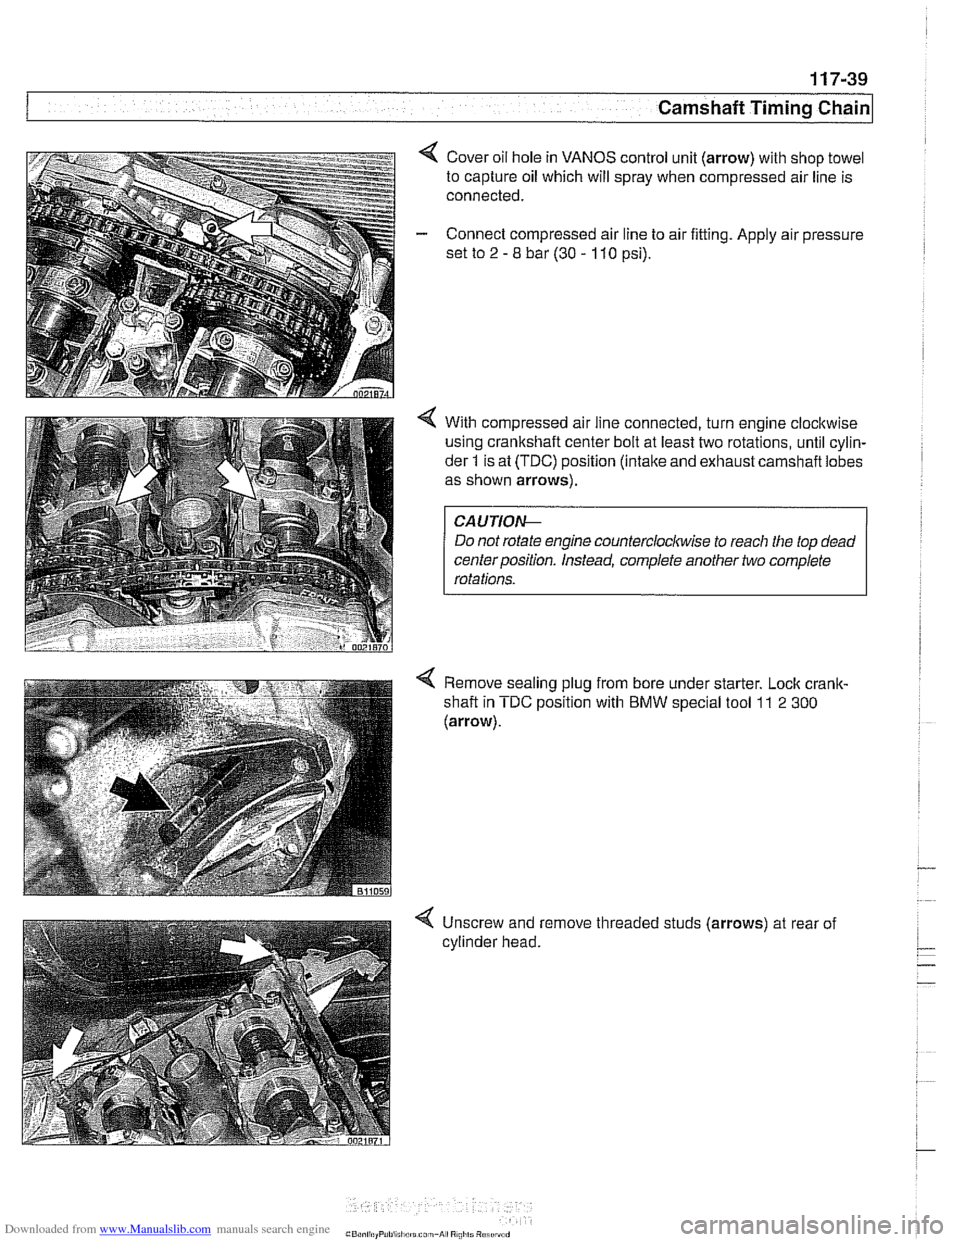
4 Cover oil hole in VANOS control unit (arrow) with shop towel
to capture oil which will spray when compressed air line is
connected.
- Connect compressed air line to air fitting. Apply air pressure
set to
2 - 8 bar (30 - 110 psi).
4 With compressed air line connected, turn engine clocltwise
using crankshaft center bolt at least two rotations, until cylin-
der
1 is at (TDC) position (intake and exhaust carnshafl lobes
as shown arrows).
Do not rotate engine
countercloclwise to reach the top dead
centerposition. Instead, complete another two complete
Remove sealing plug from bore under starter. Lock
crank-
shafl in TDC position with BMW special tool 11 2 300
(arrow).
-
4 Unscrew and remove threaded studs (arrows) at rear of
cylinder head.
Page 276 of 1002
Downloaded from www.Manualslib.com manuals search engine
. .. ~-
Camshaft Timing Chain -
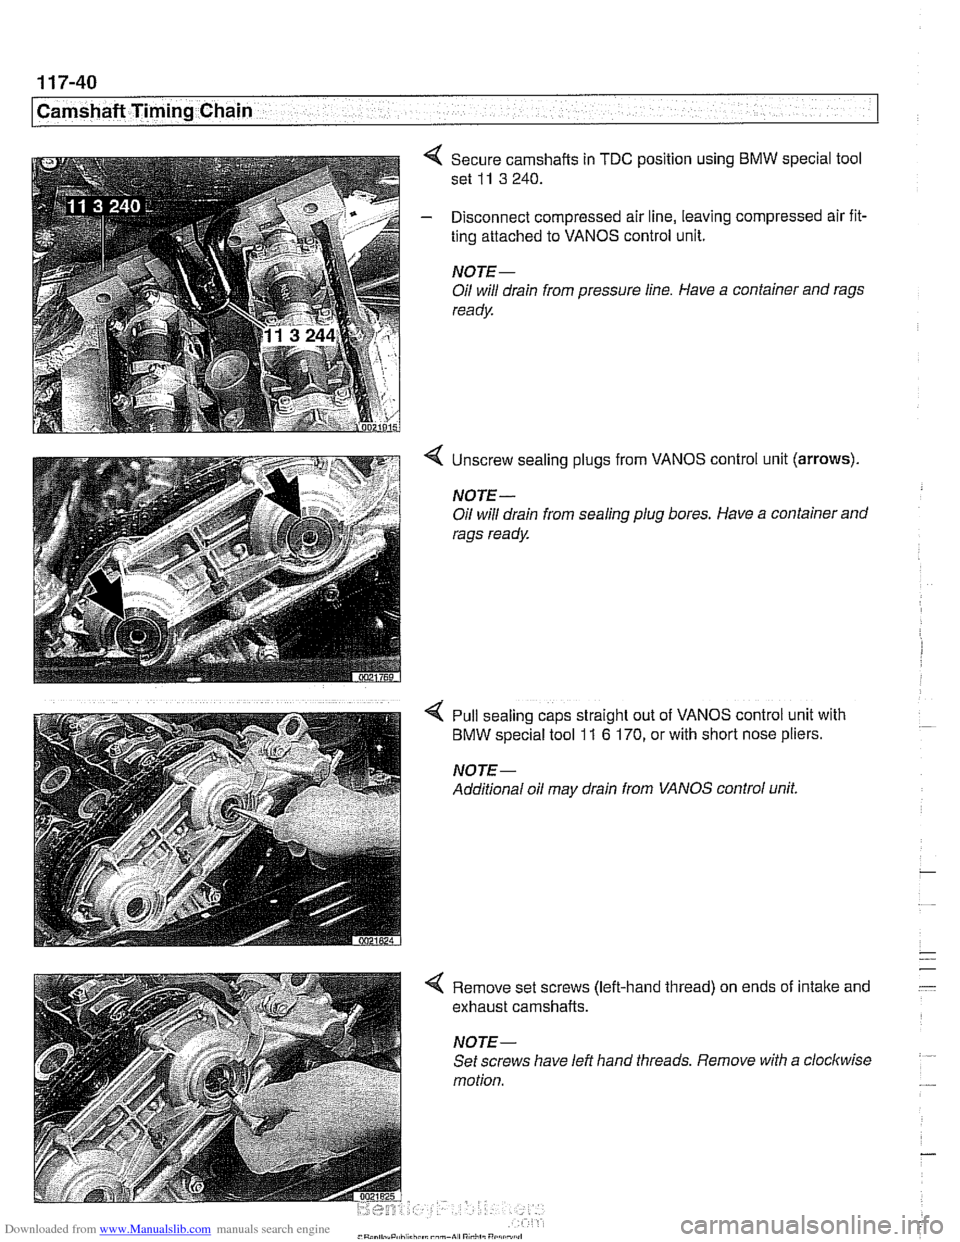
4 Secure camshafts in TDC position using BMW special tool
set
11 3 240.
- Disconnect compressed air line, leaving compressed air fit-
ting attached to VANOS control unit.
NOTE -
Oil will drain from pressure line. Have a container and rags
ready
4 Unscrew sealing plugs from VANOS control unit (arrows).
NOTE-
Oil will drain from sealing plug bores. Have a container and
rags ready
4 Pull sealing caps straight out of VANOS control unit with
BMW special tool 11 6 170, or with short nose pliers.
NOTE-
Additional oil may drain from VANOS control unit.
4 Remove set screws (left-hand thread) on ends of intake and
exhaust camshafts.
NOTE-
Set screws have left hand threads. Remove with a clockwise
motion.
Page 277 of 1002
Downloaded from www.Manualslib.com manuals search engine
Camshaft Timing Chain
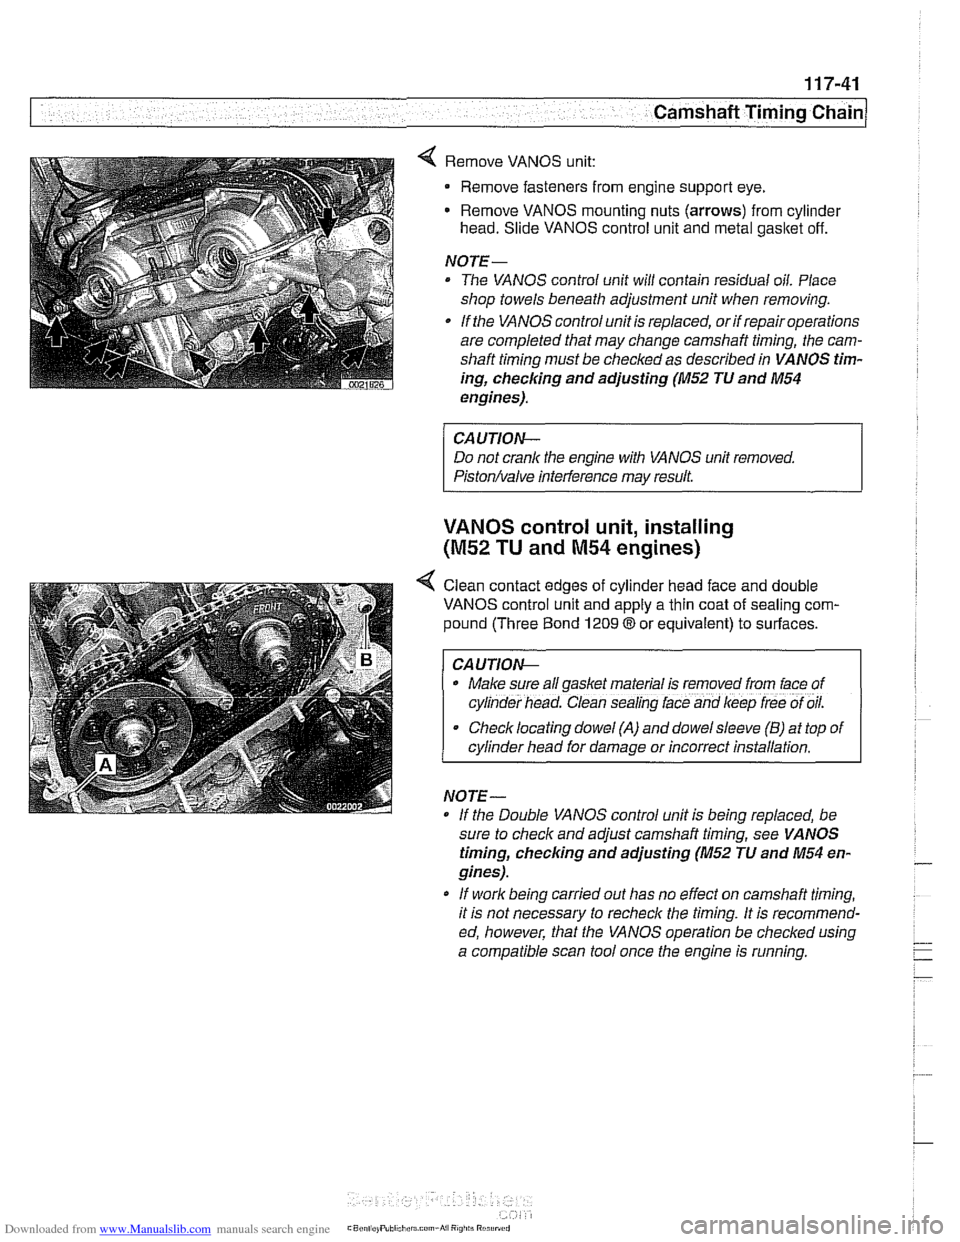
4 Remove VANOS unit:
Remove fasteners from engine support eye.
Remove VANOS mounting nuts (arrows) from cylinder
head. Slide VANOS control unit and metal gasltet off.
NOJE-
The VANOS control unit will contain residual oil. Place
shop towels beneath adjustment unit when removing.
If the VANOS control unit is replaced, or if repair operations
are completed that may change camshaft timing, the cam-
shaft timing must be checked as described in VANOS tim-
ing,
checlcing and adjusting (M52 JU and M54
engines).
CAUJION-
Do not crank the engine with VANOS unit removed.
Piston/valve interference may result.
VANOS control unit, installing
(M52 TU and M54 engines)
< Clean contact edges of cylinder head face and double
VANOS control unit and apply a thin coat of sealing com-
pound (Three Bond
1209 8 or equivalent) to surfaces.
I CAUJION-
. Make sure all gaskel material is removed from lace of
cyl~nder head. Clean sealing lace and keep lree of oil.
Checklocating dowel (A) and dowelsleeve (B) at top of
cylinder head for damage or incorrect installation.
NO
JE -
If the Double VANOS control unit is beino reolaced. be -.
sure to check and adjust camshaft timing, see VA NOS
timing, checking and adjusting (M52 JU and M54 en-
gines).
* If work being carried out has no effect on camshaft timing,
it is not necessary to recheck the timing. It is recommend-
ed, however, that the VANOS operation be checked using
a compatible scan tool once the engine is running.
Page 278 of 1002
Downloaded from www.Manualslib.com manuals search engine
I Camshaft Timing Chain
- Using new gasket, install VANOS control unit to cylinde~
head.
Reinstall engine support eye.
Tightening torques VANOS control unit to cylinder head
M6 nut 10 Nm (89 in-lb)
M7 nut 14 Nm (10 ft-ib)
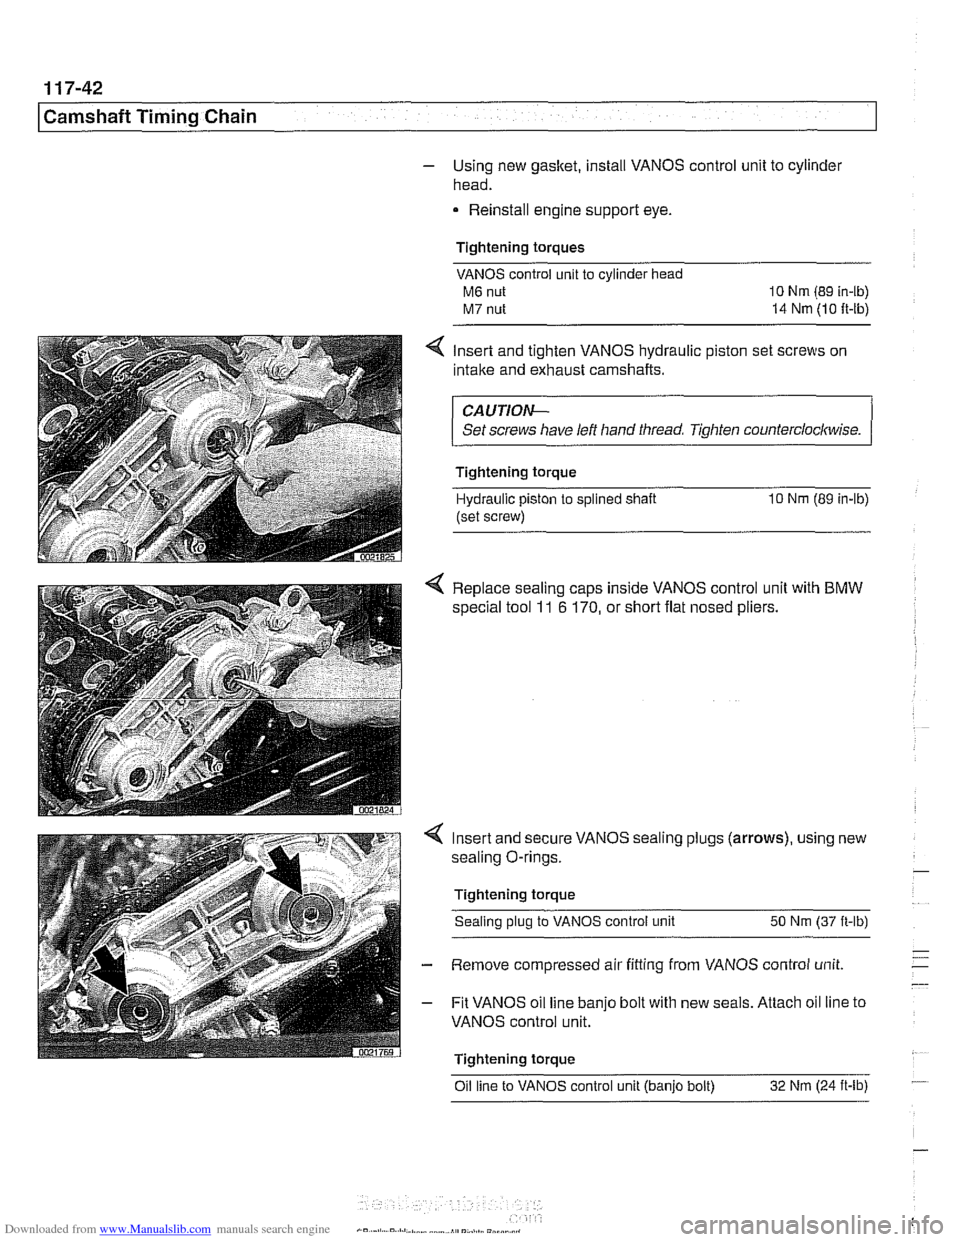
4 Insert and tighten VANOS hydraulic piston set screws on
intake and exhaust camshafts.
CAUTIOI\C
Set screws have left hand thread Tighten counterclocltwise.
Tightening torque
Hydraulic piston
to splined shaft 10 Nm (89 in-lb)
(set screw)
4 Replace sealing caps inside VANOS control unit with BMW
special tool 11 6 170, or short flat nosed pliers.
Insert and secure VANOS sealing plugs (arrows), using new
sealing O-rings.
Tightening torque Sealing plug to VANOS control unit 50 Nm (37
it-lb)
Remove compressed air fitting from VANOS control unit
Fit VANOS oil line banjo bolt with new seals. Attach oil line to
VANOS control unit.
Tightening torque Oil line to VANOS control unit (banjo bolt) 32
Nm (24
it-lb) -
Page 279 of 1002
Downloaded from www.Manualslib.com manuals search engine
Camshaft Timing Chain
- Connect electrical harness connectors to camshaft position
sensors and VANOS solenoid valves.
- Remove BMW special locking tools from rear of cylinder
head.
- Remove cranltshaft locking tool and replace sealing plug.
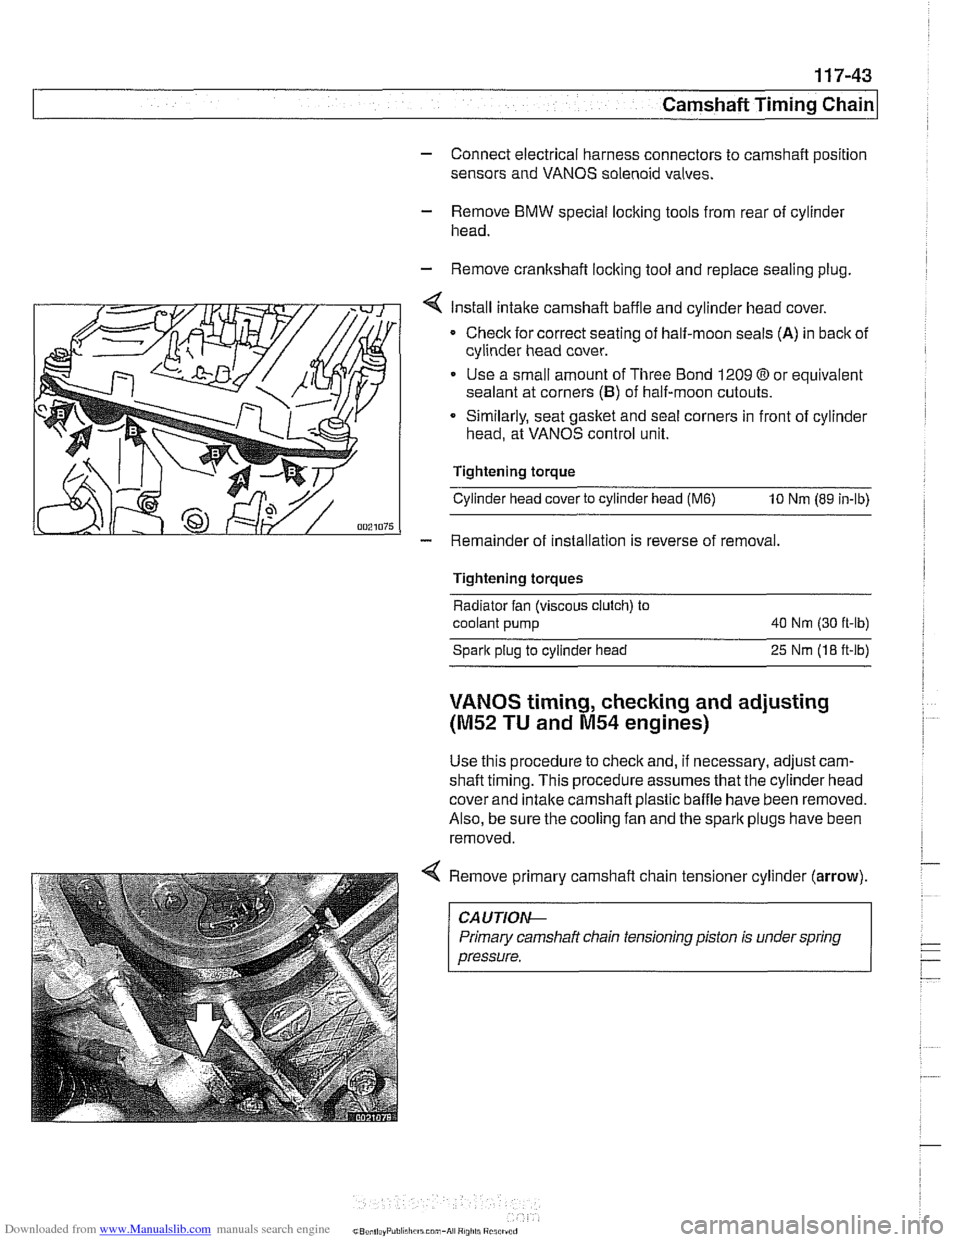
Install intake camshaft baffle and cylinder head cover.
Checlc for correct seating of half-moon seals (A) in back of
cylinder head cover.
Use a small amount of Three Bond 1209
O or equivalent
sealant at corners
(B) of half-moon cutouts.
Similarly, seat gasket and
seal corners in front of cylinder
head, at VANOS control unit.
Tightening torque
Cylinder head cover to cylinder head
(M6) 10 Nm (89 in-lb)
- Remainder of installation is reverse of removal.
Tightening torques
Radiator fan (viscous clutch) to
coolant pump 40
Nm (30 ft-lb)
Spark plug to cylinder head
25 Nrn (18 ft-lb)
VANOS timing, checking and adjusting
(M52 TU and M54 engines)
Use this procedure to check and, if necessary, adjust cam-
shaft timing. This procedure assumes that the cylinder head
cover and intake
camshaft plastic baffle have been removed.
Also, be sure the cooling fan and the spark plugs have been
removed.
Remove primary camshaft chain tensioner cylinder
(arrow).
~~ ~ ~~ ~--~
CA UTlOAC
Primary camshaft chain tensioning piston is under spring
pressure.
Page 280 of 1002
Downloaded from www.Manualslib.com manuals search engine
Camshaft Timing Chain
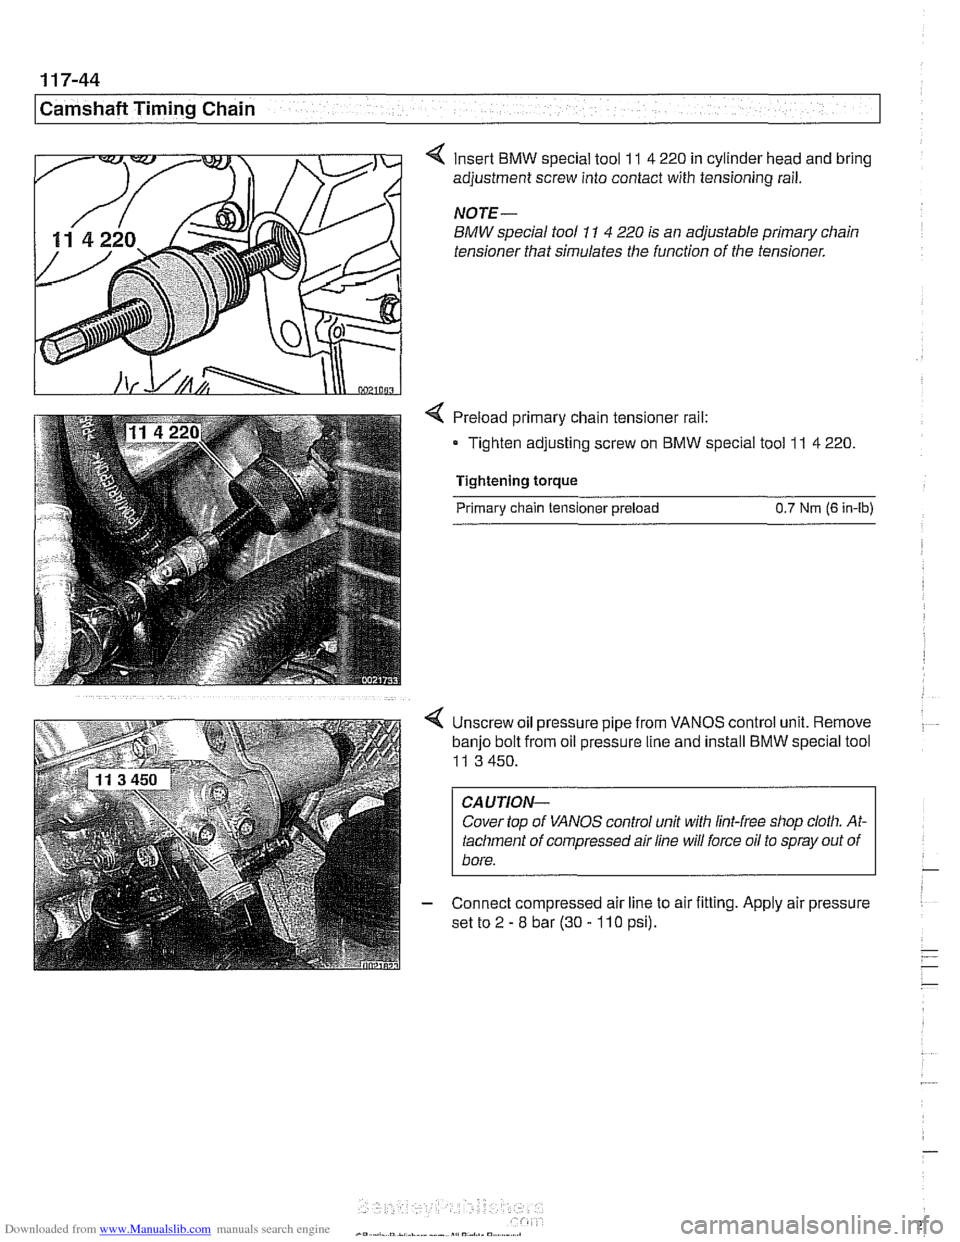
Insert BMW special tool 11 4 220 in cylinder head and bring
adjustment screw into contact with tensioning rail.
NOTE-
BMW special tool 11 4 220 is an adjustable primary chain
tensioner that simulates the function of the tensioner.
Preload primary chain tensioner rail:
Tighten adjusting screw on
BMW special tool 11 4 220.
Tightening torque
Primary chain tensioner preload 0.7 Nm (6 in-lb)
4 Unscrew oil pressure pipe from VANOS control unit. Remove
banjo bolt from oil pressure line and install BMW special tool
11 3 450.
CA UTIOPI-
Cover top of VANOS control unit with lint-free shop cloth. At-
tachment of compressed air line will force oil to spray out of
- Connect compressed air line to air fitting. Apply air pressure
set to
2 - 8 bar (30 - 110 psi).