Glove BMW 530I SEDAN 2006 E60 Owner's Manual
[x] Cancel search | Manufacturer: BMW, Model Year: 2006, Model line: 530I SEDAN, Model: BMW 530I SEDAN 2006 E60Pages: 259, PDF Size: 8.9 MB
Page 30 of 259
Opening and closing
28
Opening and closing
Keys/remote control
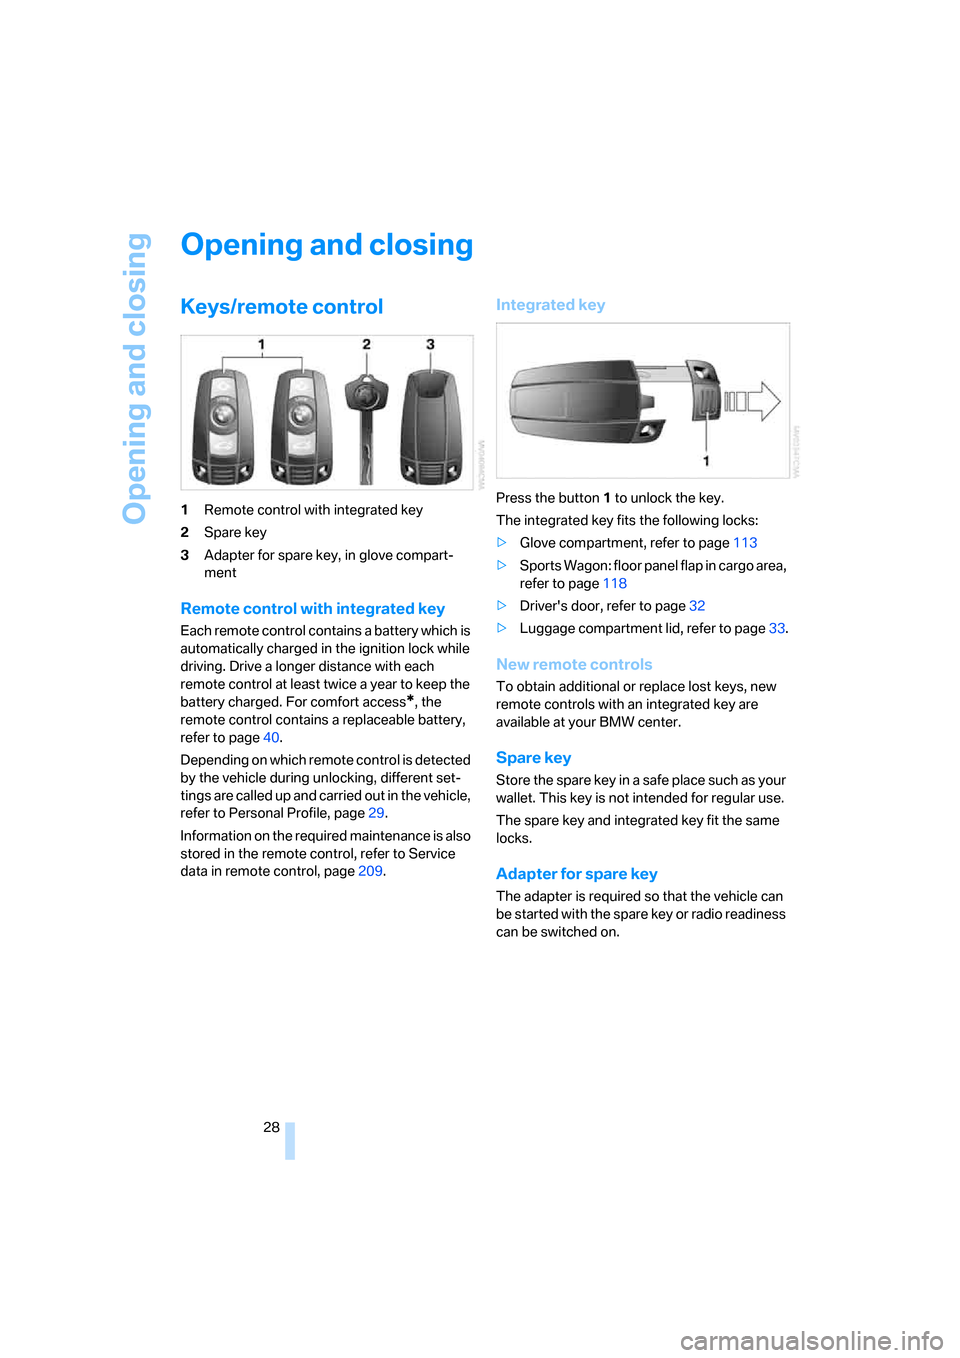
1Remote control with integrated key
2Spare key
3Adapter for spare key, in glove compart-
ment
Remote control with integrated key
Each remote control contains a battery which is
automatically charged in the ignition lock while
driving. Drive a longer distance with each
remote control at least twice a year to keep the
battery charged. For comfort access
*, the
remote control contains a replaceable battery,
refer to page40.
Depending on which remote control is detected
by the vehicle during unlocking, different set-
tings are called up and carried out in the vehicle,
refer to Personal Profile, page29.
Information on the required maintenance is also
stored in the remote control, refer to Service
data in remote control, page209.
Integrated key
Press the button1 to unlock the key.
The integrated key fits the following locks:
>Glove compartment, refer to page113
>Sports Wagon: floor panel flap in cargo area,
refer to page118
>Driver's door, refer to page32
>Luggage compartment lid, refer to page33.
New remote controls
To obtain additional or replace lost keys, new
remote controls with an integrated key are
available at your BMW center.
Spare key
Store the spare key in a safe place such as your
wallet. This key is not intended for regular use.
The spare key and integrated key fit the same
locks.
Adapter for spare key
The adapter is required so that the vehicle can
be started with the spare key or radio readiness
can be switched on.
Page 31 of 259
Controls
29Reference
At a glance
Driving tips
Communications
Navigation
Entertainment
Mobility
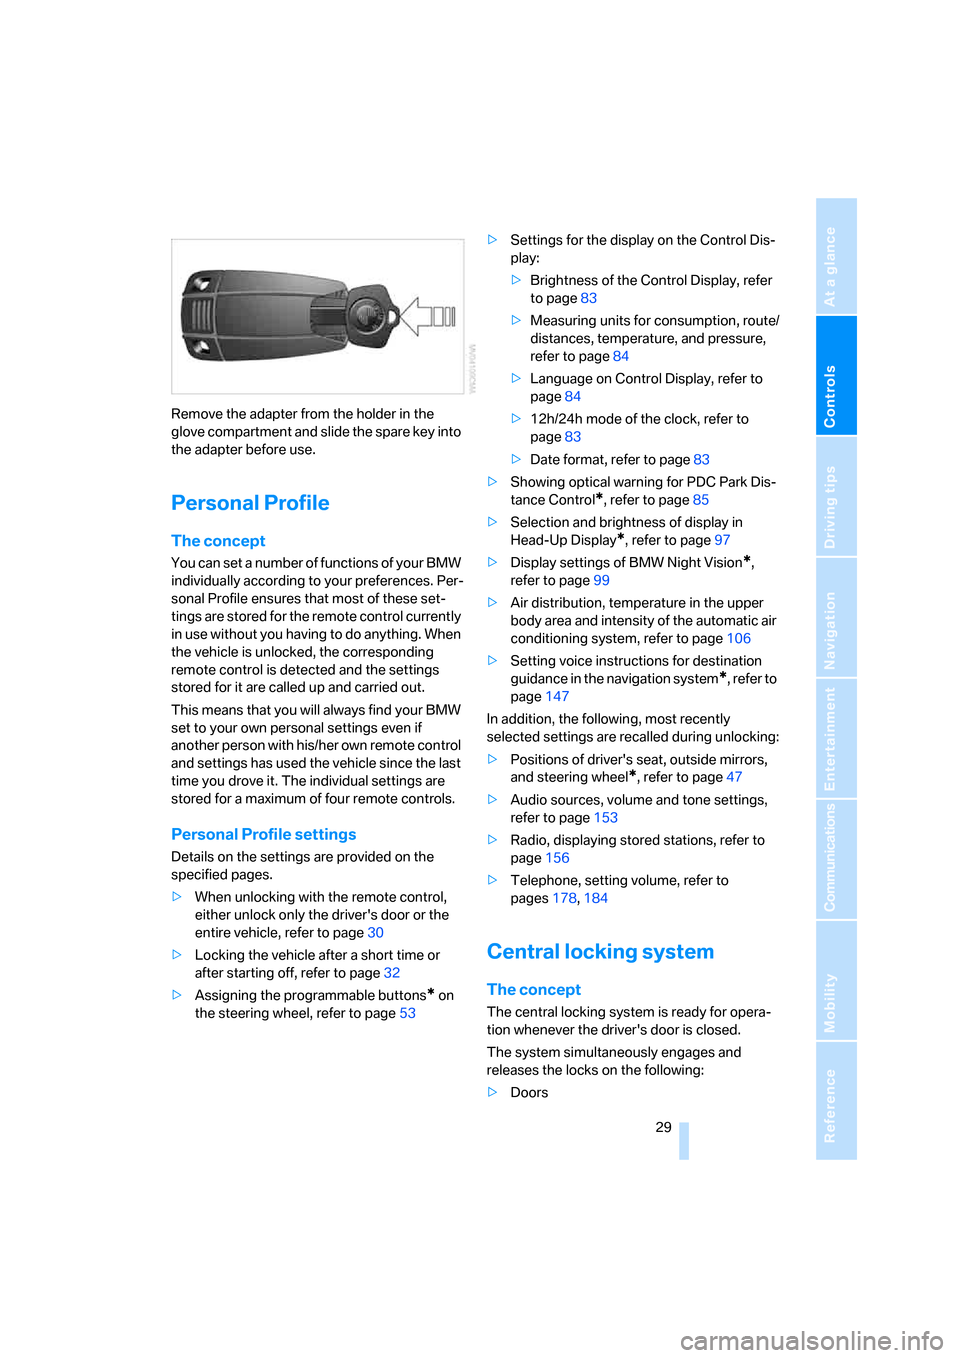
Remove the adapter from the holder in the
glove compartment and slide the spare key into
the adapter before use.
Personal Profile
The concept
You can set a number of functions of your BMW
individually according to your preferences. Per-
sonal Profile ensures that most of these set-
tings are stored for the remote control currently
in use without you having to do anything. When
the vehicle is unlocked, the corresponding
remote control is detected and the settings
stored for it are called up and carried out.
This means that you will always find your BMW
set to your own personal settings even if
another person with his/her own remote control
and settings has used the vehicle since the last
time you drove it. The individual settings are
stored for a maximum of four remote controls.
Personal Profile settings
Details on the settings are provided on the
specified pages.
>When unlocking with the remote control,
either unlock only the driver's door or the
entire vehicle, refer to page30
>Locking the vehicle after a short time or
after starting off, refer to page32
>Assigning the programmable buttons
* on
the steering wheel, refer to page53>Settings for the display on the Control Dis-
play:
>Brightness of the Control Display, refer
to page83
>Measuring units for consumption, route/
distances, temperature, and pressure,
refer to page84
>Language on Control Display, refer to
page84
>12h/24h mode of the clock, refer to
page83
>Date format, refer to page83
>Showing optical warning for PDC Park Dis-
tance Control
*, refer to page85
>Selection and brightness of display in
Head-Up Display
*, refer to page97
>Display settings of BMW Night Vision
*,
refer to page99
>Air distribution, temperature in the upper
body area and intensity of the automatic air
conditioning system, refer to page106
>Setting voice instructions for destination
guidance in the navigation system
*, refer to
page147
In addition, the following, most recently
selected settings are recalled during unlocking:
>Positions of driver's seat, outside mirrors,
and steering wheel
*, refer to page47
>Audio sources, volume and tone settings,
refer to page153
>Radio, displaying stored stations, refer to
page156
>Telephone, setting volume, refer to
pages178,184
Central locking system
The concept
The central locking system is ready for opera-
tion whenever the driver's door is closed.
The system simultaneously engages and
releases the locks on the following:
>Doors
Page 115 of 259
Controls
113Reference
At a glance
Driving tips
Communications
Navigation
Entertainment
Mobility
Glove compartment
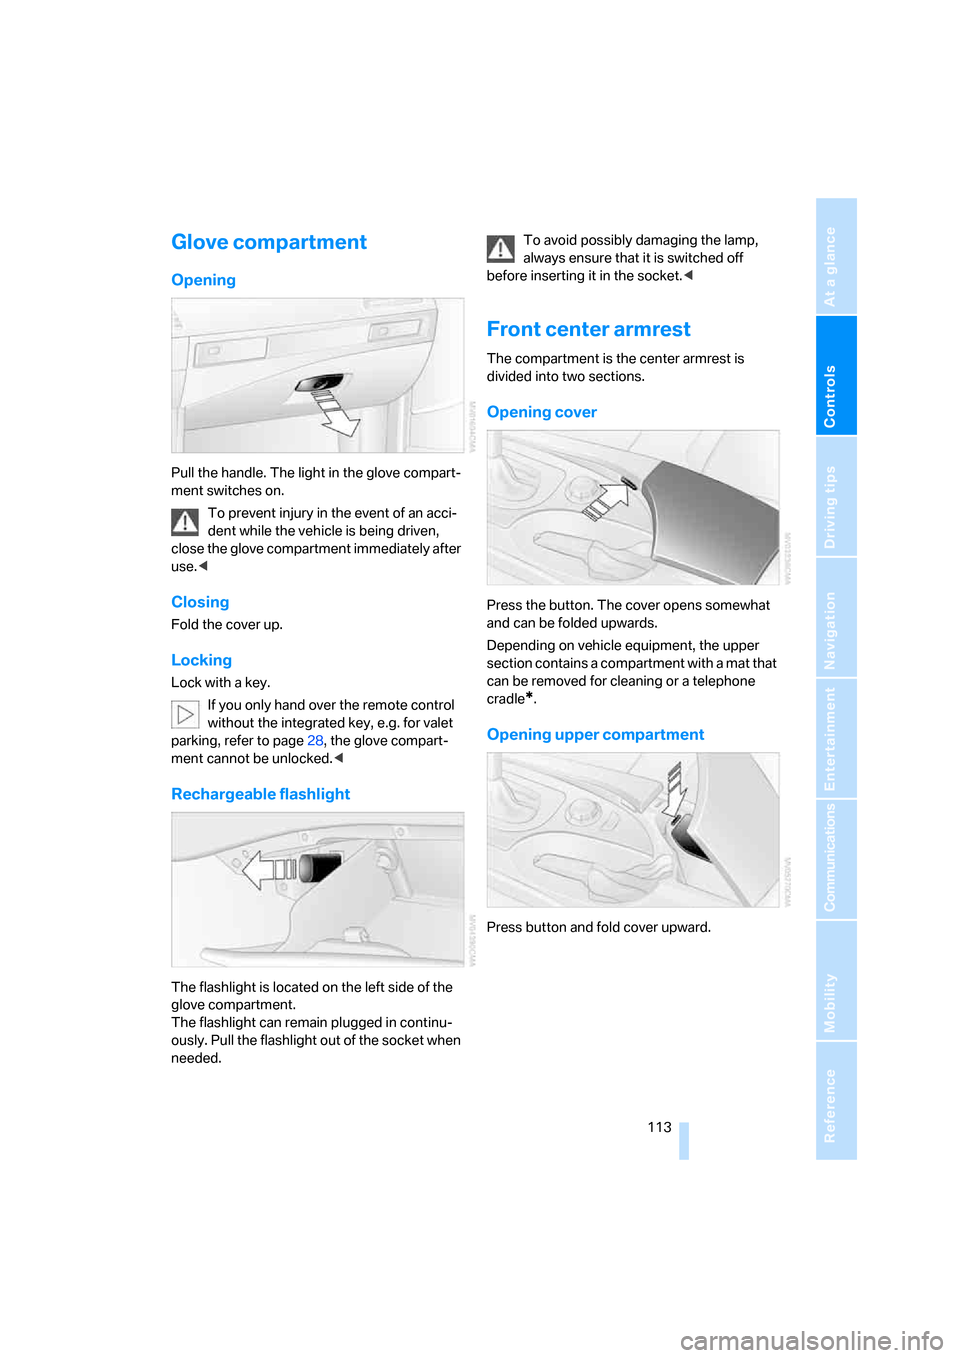
Opening
Pull the handle. The light in the glove compart-
ment switches on.
To prevent injury in the event of an acci-
dent while the vehicle is being driven,
close the glove compartment immediately after
use.<
Closing
Fold the cover up.
Locking
Lock with a key.
If you only hand over the remote control
without the integrated key, e.g. for valet
parking, refer to page28, the glove compart-
ment cannot be unlocked.<
Rechargeable flashlight
The flashlight is located on the left side of the
glove compartment.
The flashlight can remain plugged in continu-
ously. Pull the flashlight out of the socket when
needed.To avoid possibly damaging the lamp,
always ensure that it is switched off
before inserting it in the socket.<
Front center armrest
The compartment is the center armrest is
divided into two sections.
Opening cover
Press the button. The cover opens somewhat
and can be folded upwards.
Depending on vehicle equipment, the upper
section contains a compartment with a mat that
can be removed for cleaning or a telephone
cradle
*.
Opening upper compartment
Press button and fold cover upward.
Page 171 of 259
Navigation
Entertainment
Driving tips
169Reference
At a glance
Controls
Communications
Mobility
Compressed audio files*
1.Select the current track and press the con-
troller.
2.Select the desired menu item:
>To play all tracks of the current directory
in random order, select "Random direc-
tory" and press the controller.
>To play all tracks of the CD in random
order, select "Random all" and press the
controller.
Stop random function:
1.Press the controller.
2.Select "Random directory" or "Random all"
and press the controller.
Fast forward/reverse
Buttons next to CD player:
Press and hold the button for the corre-
sponding direction.
CD magazine
The BMW CD changer for six CDs is installed in
the glove compartment.
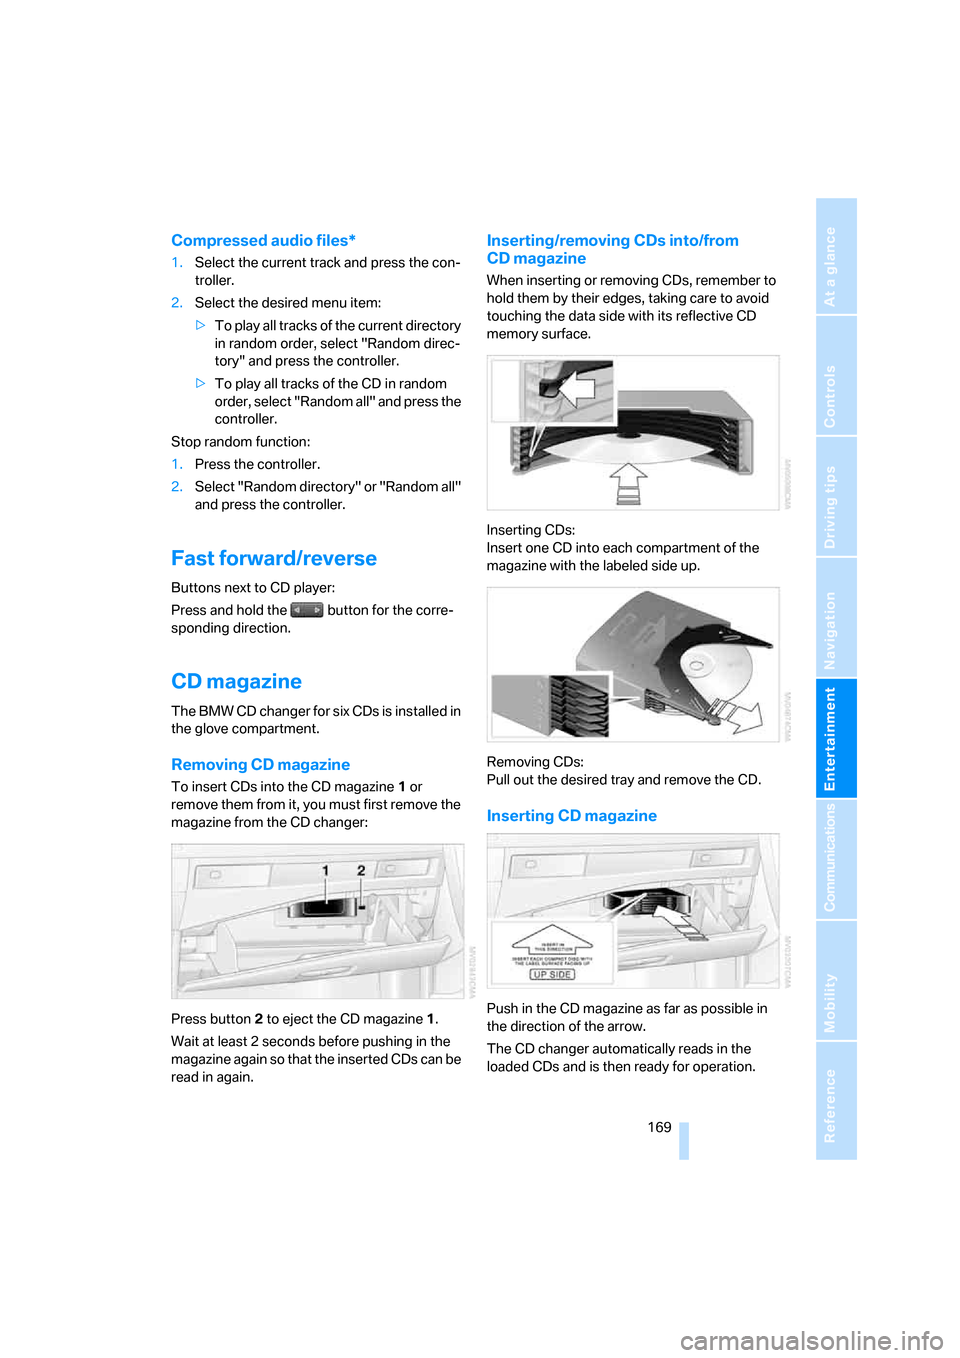
Removing CD magazine
To insert CDs into the CD magazine 1 or
remove them from it, you must first remove the
magazine from the CD changer:
Press button2 to eject the CD magazine1.
Wait at least 2 seconds before pushing in the
magazine again so that the inserted CDs can be
read in again.
Inserting/removing CDs into/from
CD magazine
When inserting or removing CDs, remember to
hold them by their edges, taking care to avoid
touching the data side with its reflective CD
memory surface.
Inserting CDs:
Insert one CD into each compartment of the
magazine with the labeled side up.
Removing CDs:
Pull out the desired tray and remove the CD.
Inserting CD magazine
Push in the CD magazine as far as possible in
the direction of the arrow.
The CD changer automatically reads in the
loaded CDs and is then ready for operation.
Page 214 of 259
Replacing components
212
Lamps and bulbs
Lamps and bulbs make an essential contribu-
tion to vehicle safety. You must be duly diligent
in replacing them. BMW recommends having
your BMW center perform any work that you do
not feel competent to perform yourself or that is
not described here.
Never touch the glass of new bulbs with
your bare fingers, as even minute
amounts of contamination will burn into the
bulb's surface and reduce its service life. Use a
clean cloth, napkin, etc., or hold the bulb by its
metal socket.<
A selection of replacement bulbs is available at
your BMW center.
Whenever you perform any work on the
electrical system, turn off the consumers
involved to prevent short circuits from occur-
ring. To avoid possible injury or equipment
damage when replacing bulbs, observe any
instructions provided by the bulb manufac-
turer.<
For care and maintenance of the headlamps,
please follow the instructions in the separate
Caring for your vehicle brochure.
For bulbs for which changing is not
described, and for checking and adjusting
headlamp aim, please contact your BMW cen-
ter.<
Light-emitting diodes LEDs
Light-emitting diodes installed behind translu-
cent lenses serve as the light source for many of
the controls and displays in your vehicle. These
light-emitting diodes, which operate using a
concept similar to that applied in conventional
lasers, are officially designated as Class 1 light-
emitting diodes.
Do not remove the covers, and never
stare into the unfiltered light for several
hours, as irritation of the retina could result.<
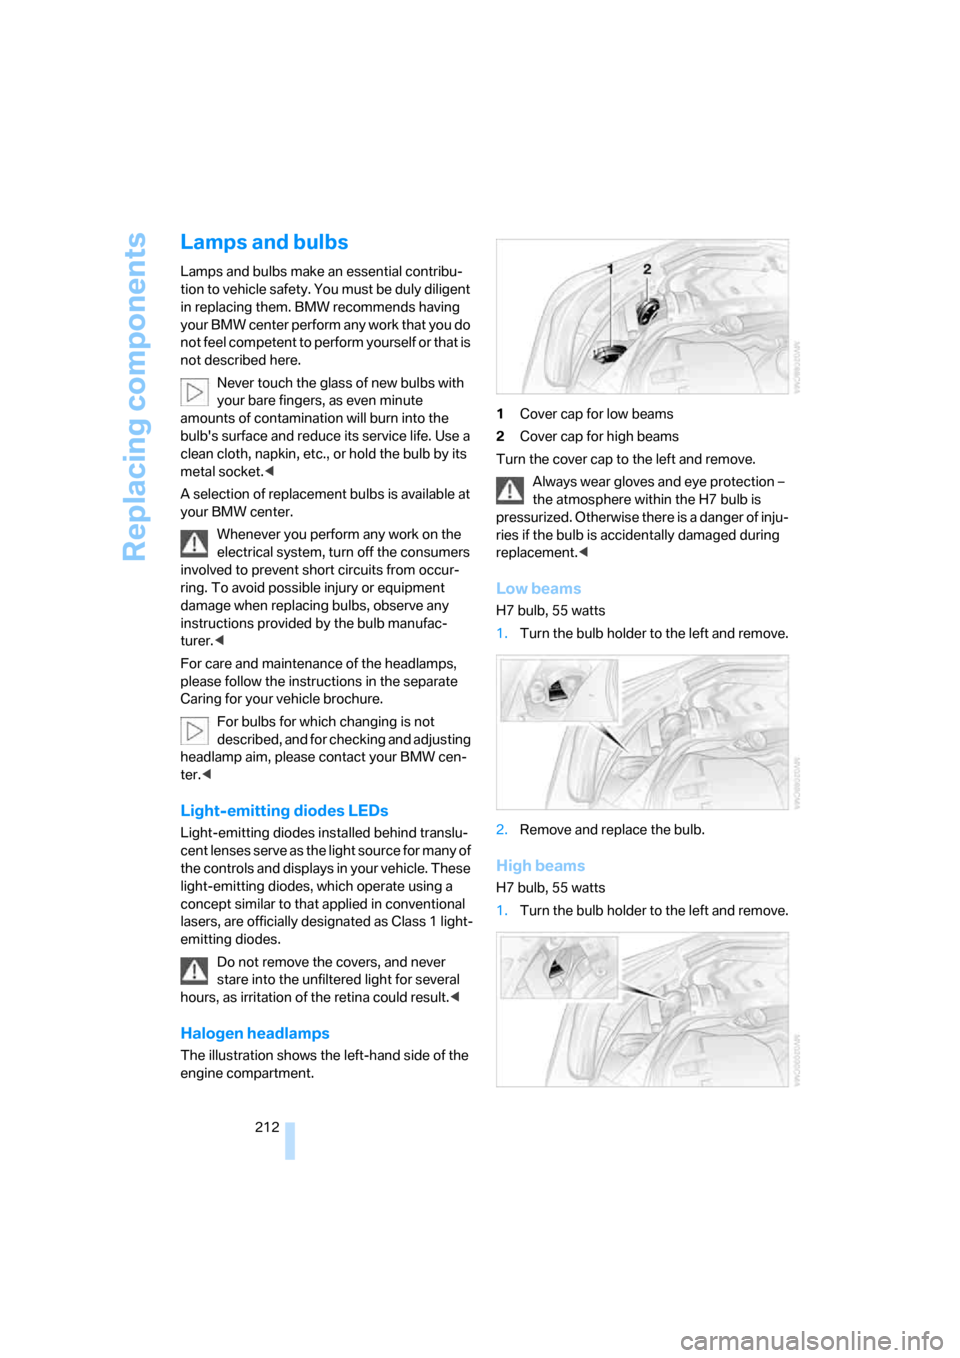
Halogen headlamps
The illustration shows the left-hand side of the
engine compartment.1Cover cap for low beams
2Cover cap for high beams
Turn the cover cap to the left and remove.
Always wear gloves and eye protection –
the atmosphere within the H7 bulb is
pressurized. Otherwise there is a danger of inju-
ries if the bulb is accidentally damaged during
replacement.<
Low beams
H7 bulb, 55 watts
1.Turn the bulb holder to the left and remove.
2.Remove and replace the bulb.
High beams
H7 bulb, 55 watts
1.Turn the bulb holder to the left and remove.
Page 220 of 259
Replacing components
218
Disposal
Have old batteries disposed of by your
BMW center or hand them in to a recy-
cling center. Maintain the battery in an upright
position for transport and storage. Always
restrain the battery to prevent it from tipping
over during transport.<
Power failure
After a temporary power loss, the functioning of
some equipment may be limited and require
reinitialization. Individual settings are also lost
and must be updated:
>Seat, mirror and steering wheel memory
The positions must be stored again, refer to
page47.
>Time and Date
The values must be updated, refer to
page82.
>Radio
Stations must be stored again if necessary,
refer to page158.
>Navigation system
Wait until the system starts, refer to
page149.
Fuses
Never attempt to repair a blown fuse and
do not replace a defective fuse with a sub-
stitute of another color or amperage rating, as
this could lead to a circuit overload, ultimately
resulting in a fire in the vehicle.<
Sedan
Spare fuses, plastic tweezers and fuse alloca-
tion diagram are located in the compartment for
the onboard tool kit, refer to page211.
Sports Wagon
Reserve fuses and a pair of plastic tweezers are
contained in the onboard tool kit, refer to
page211. A fuse allocation diagram is located
in the cargo area behind the right-hand side
panel.
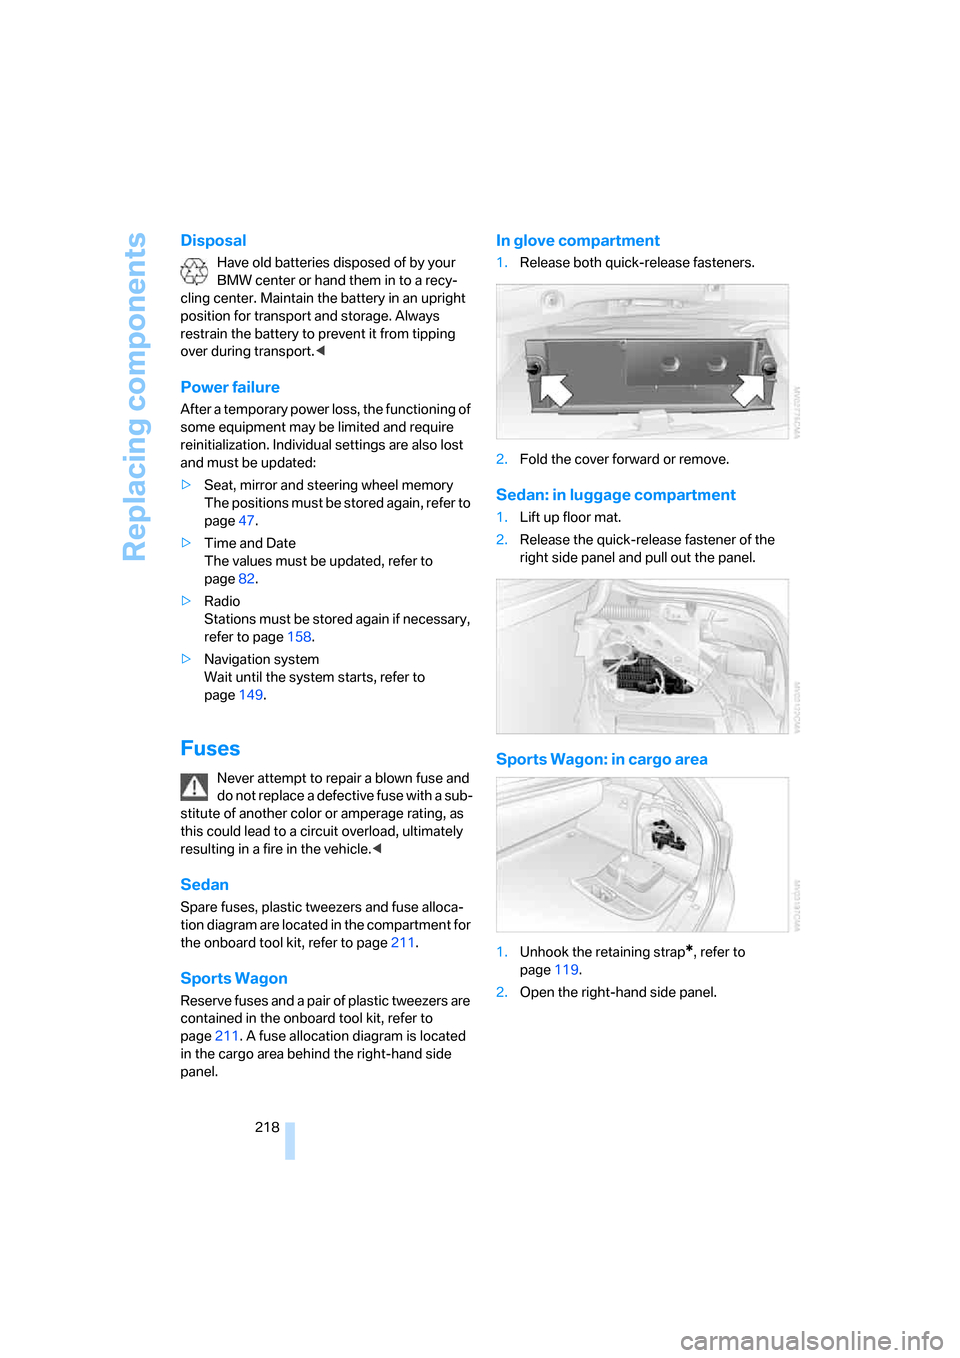
In glove compartment
1.Release both quick-release fasteners.
2.Fold the cover forward or remove.
Sedan: in luggage compartment
1.Lift up floor mat.
2.Release the quick-release fastener of the
right side panel and pull out the panel.
Sports Wagon: in cargo area
1.Unhook the retaining strap*, refer to
page119.
2.Open the right-hand side panel.
Page 245 of 259
Reference 243
At a glance
Controls
Driving tips
Communications
Navigation
Entertainment
Mobility
Gear changes
– automatic transmission with
Steptronic63
– SMG Sequential Manual
Transmission62
Gear display
– automatic transmission with
Steptronic63
– SMG Sequential Manual
Transmission61
Gearshift lever, manual
transmission60
Gearshift lever positions,
manual transmission60
General driving notes124
Glass sunroof, electric41
– auto-remote operation from
outside32
– comfort operation with
comfort access39
– moving manually42
– remote control31
Glove compartment113
– lighting113
– rechargeable flashlight113
GPS navigation, refer to
Navigation system132
Grills, refer to Ventilation108
Grills of the automatic climate
control105
Gross vehicle weight, refer to
Weights229
H
Halogen lamps212
Handbrake60
– indicator lamp13,60
Hand lamp, refer to
Rechargeable flashlight113
Hands-free system, refer to
Microphone14
Hazard warning flashers15
HD, refer to High Definition
Radio160
"HDC"88
HDC Hill Descent Control88
"HDC on"88
"HDC on / off"53Head airbags94
Headlamp control,
automatic101
Headlamp flasher64
Headlamps101
– care, refer to Caring for your
vehicle brochure
– cleaning, refer to Wiper
system66
– replacing bulbs212
Head Light, refer to Adaptive
Head Light102
Head restraints48
– front head restraints,
active49
– sitting safely45
"Head-Up Display"97
Head-Up Display96
Heated
– mirrors51
– rear window107
– seats50
– steering wheel52
Heating105
– exterior mirrors51
– interior105
– rear window107
– residual heat108
– seats50
– steering wheel52
Heating with engine switched
off, refer to Residual
heat108
Heavy cargo, refer to Securing
cargo128
Height, refer to
Dimensions227
Height adjustment
– seats46
– steering wheel52
High-beam assistant103
High beams102
– headlamp flasher102
– indicator lamp13
– replacing bulbs212
High Definition Radio160
High water, refer to Driving
through water125
Hill Descent Control HDC88Hills126
Holder for cups114
"Home address" for
navigation system142
Homepage4
Hood204
Horn10
Hot exhaust system124
"Hour memo"83
"House number" for desti-
nation entry136
Hydraulic brake assistant,
refer to DBC Dynamic Brake
Control86
Hydroplaning125
I
IBOC, refer to High Definition
Radio160
Ice, refer to Outside temper-
ature warning74
ID3 tag, refer to Information on
track167
iDrive16
– assistance window20
– automatic climate control
with expanded scope106
– changing date and time82
– changing language84
– changing menu page19
– changing settings82
– changing units of measure
and display type84
– confirming selection or
entry19
– controller16
– controls16
– displays, menus17
– selecting menu item19
– setting brightness83
– start menu17
– status information20
– symbols18
Ignition58
– switched off58
– switched on58
Ignition key, refer to Keys/
remote control28