brake BMW 535I GRAN TURISMO 2011 Owner's Manual
[x] Cancel search | Manufacturer: BMW, Model Year: 2011, Model line: 535I GRAN TURISMO, Model: BMW 535I GRAN TURISMO 2011Pages: 297, PDF Size: 8.59 MB
Page 113 of 297
Display
The collision warning can be issued in the in‐
strument cluster, in the Head-up Display*, and
acoustically.
Instrument cluster
The vehicle lights up in red: prewarning
The vehicle flashes red and an acoustic
signal sounds: acute warning
You
are requested to intervene by brak‐
ing or making an evasive maneuver.
Adapting your speed and driving style
The display does not relieve the driver of
the responsibility to adapt his or her driving
speed and style to the traffic conditions.◀
System limits
Be alert
Due to system limitations, warnings may
be not be issued at all, or may be issued late or
improperly. Therefore, always be alert and ready
to intervene; otherwise, there is the danger of an
accident occurring.◀
Detection range
The detection capacity of the radar sensor and
the collision warning has limitations.
This may result in the warning not being issued
or being issued late.
For example, the following situations may not be
detected:
▷ Slow moving objects when you approach
them at high speed.
▷ Vehicles that suddenly swerve in front of
your vehicle.
▷ Two-wheeled vehicles ahead of you.
▷ Pedestrians.
Functional limitations
The system may not be fully functional in the
following situations: ▷
In heavy fog, rain or snowfall.
▷ In tight curves.
▷ If the radar sensor is dirty or covered.
Prewarning sensitivity
If the prewarning setting is too sensitive, there
may be an excess of false warnings.
Cruise control
The concept
The
system is functional at speeds beginning at
approx. 20 mph/30 km/h.
It maintains the speed that was set using the
control elements on the steering wheel.
The system brakes on downhill gradients if en‐
gine braking action is insufficient.
Unfavorable conditions
Do not use the system if unfavorable con‐
ditions make it impossible to drive at a constant
speed, for instance:
▷ On curvy roads.
▷ In heavy traffic.
▷ On slippery roads, in fog, snow or rain, or on
a loose road surface.
Otherwise, you could lose control of the vehicle
and cause an accident.◀
Controls
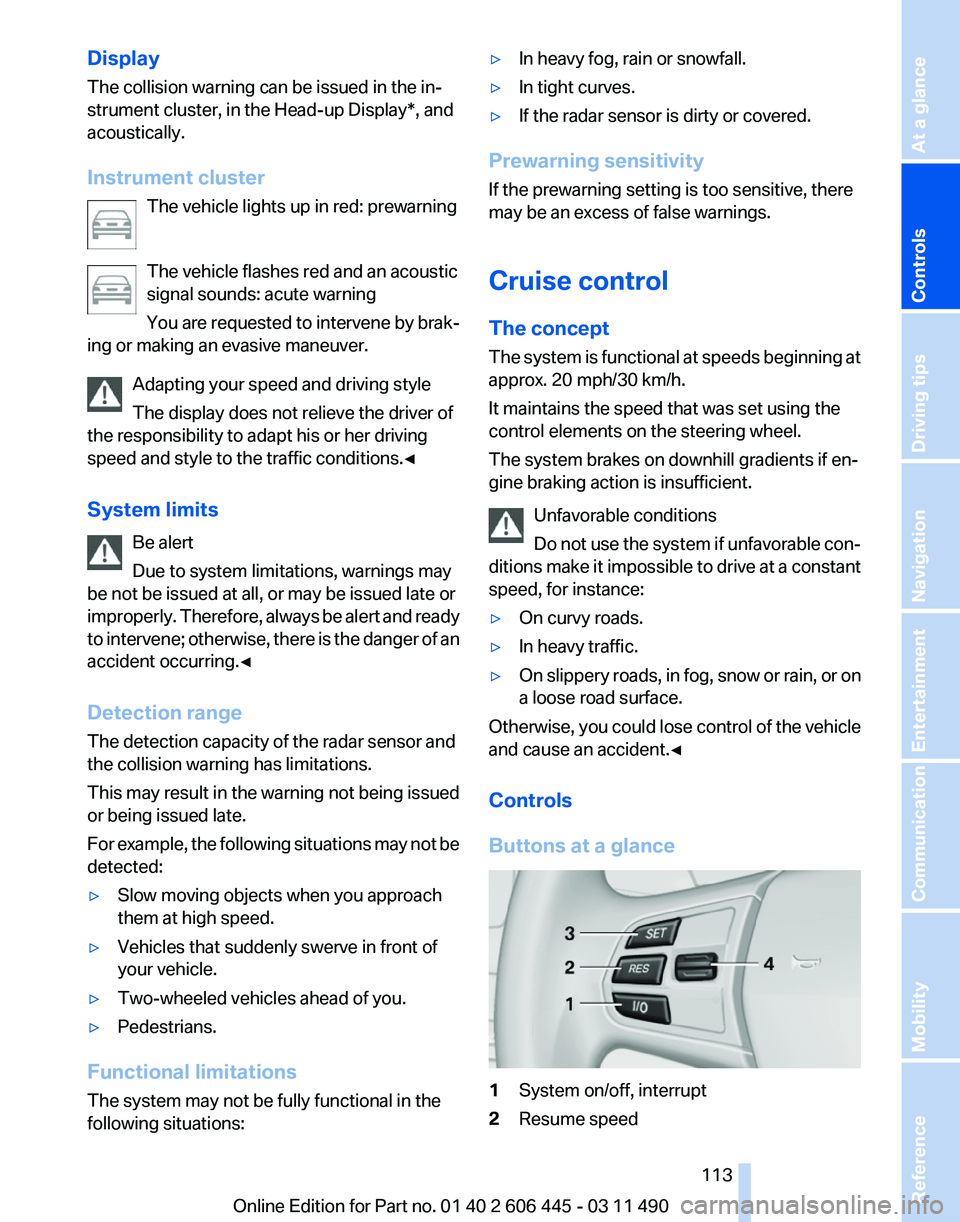
Buttons at a glance 1
System on/off, interrupt
2 Resume speed Seite 113
113Online Edition for Part no. 01 40 2 606 445 - 03 11 490
Reference Mobility Communication Entertainment Navigation Driving tips
Controls At a glance
Page 114 of 297
3
Store speed*
4 Store, maintain/change speed
Switching on Press the button on the steering wheel.
The marking in the speedometer is set to the
current speed.
Cruise control can be used.
Switching off Deactivated or interrupted system
If the system is deactivated or interrupted,
actively intervene by braking and, if necessary,
with evasive maneuvers; otherwise, there is the
danger of an accident occurring.◀
Press the button.
▷ If active: press twice.
▷ If interrupted: press once.
The displays go out. The stored desired speed
is deleted.
Interrupting When active, press the button.
The system is automatically interrupted if:
▷ The brakes are applied.
▷ The clutch pedal is depressed.
▷ Transmission position D is disengaged.
▷ DTC Dynamic Traction Control is activated
or DSC is deactivated.
▷ DSC is actively controlling stability.
▷ HDC is activated.
Maintaining/storing the current speed Press the button.
When the system is switched on, the current
speed is maintained and stored as the desired
speed. It is displayed in the speedometer and briefly
displayed in the instrument cluster, Displays in
the speedometer, refer to page
115.
When cruise control is maintained or stored,
DSC
Dynamic Stability Control is switched on, if
necessary.
Change, maintain speed
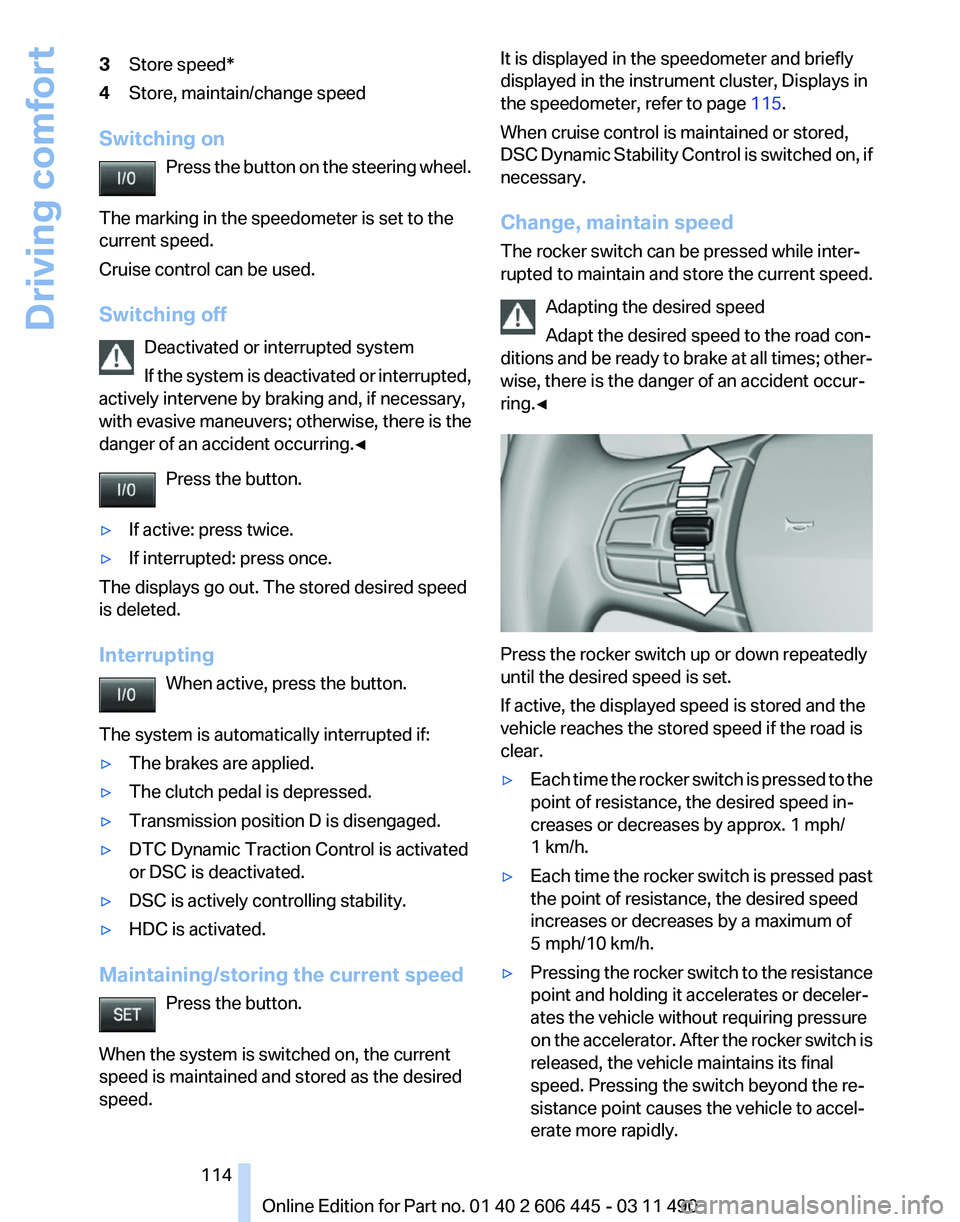
The rocker switch can be pressed while inter‐
rupted to maintain and store the current speed.
Adapting the desired speed
Adapt the desired speed to the road con‐
ditions and be ready to brake at all times; other‐
wise, there is the danger of an accident occur‐
ring.◀ Press the rocker switch up or down repeatedly
until the desired speed is set.
If active, the displayed speed is stored and the
vehicle reaches the stored speed if the road is
clear.
▷
Each time the rocker switch is pressed to the
point of resistance, the desired speed in‐
creases or decreases by approx. 1 mph/
1 km/h.
▷ Each time the rocker switch is pressed past
the point of resistance, the desired speed
increases or decreases by a maximum of
5 mph/10 km/h.
▷ Pressing the rocker switch to the resistance
point and holding it accelerates or deceler‐
ates the vehicle without requiring pressure
on
the accelerator. After the rocker switch is
released, the vehicle maintains its final
speed. Pressing the switch beyond the re‐
sistance point causes the vehicle to accel‐
erate more rapidly. Seite 114
114 Online Edition for Part no. 01 40 2 606 445 - 03 11 490
Driving comfort
Page 146 of 297
Things to remember when driving
Breaking-in period
General information
Moving parts need to be broken in to adjust to
each other.
The following instructions will help achieve a
long vehicle life and good economy.
Engine and differential
Always obey the official speed limit.
Up to 1,200 miles/2,000 km
Do not exceed the maximum engine and road
speed:
▷
For gasoline engine, 4500 rpm and
100 mph/160 km/h.
Avoid full-throttle operation and use of the
transmission's kickdown mode for the initial
miles.
From 1,200 miles/2,000 km
The engine and vehicle speed can gradually be
increased.
Tires
Due to technical factors associated with their
manufacture,
tires do not achieve their full trac‐
tion potential until after an initial breaking-in pe‐
riod.
Drive conservatively for the first 200 miles/
300 km.
Brake system
Brakes require an initial break-in period of ap‐
prox. 300 miles/500 km to achieve optimized
contact and wear patterns between brake pads
and discs. Drive moderately during this break-in
period.
Following part replacement
The same breaking in procedures should be ob‐
served if any of the components mentioned above have to be renewed in the course of the
vehicle's operating life.
General driving notes
Closing the tailgate
Drive with the tailgate closed
Only drive with the tailgate closed; other‐
wise, in the event of an accident or braking or
evasive maneuvers, passengers or other road
users
may be injured or the vehicle may be dam‐
aged. In addition, exhaust fumes may enter the
passenger compartment.◀
If driving with the tailgate open cannot be
avoided:
▷ Close all windows and the glass sunroof*.
▷ Greatly increase the blower speed.
▷ Drive moderately.
Hot exhaust system Hot exhaust system
High temperatures are generated in the
exhaust system.
Do not remove the heat shields installed and
never apply undercoating to them. When driv‐
ing,
standing at idle and while parking, take care
to avoid possible contact between the hot ex‐
haust system and any highly flammable materi‐
als such as hay, leaves, grass, etc. Such contact
could lead to a fire, and with it the risk of serious
personal injury as well as property damage.
Do not touch hot exhaust pipes; otherwise, there
is the danger of getting burned.◀ Seite 146
146 Online Edition for Part no. 01 40 2 606 445 - 03 11 490Things to remember when driving
Page 147 of 297
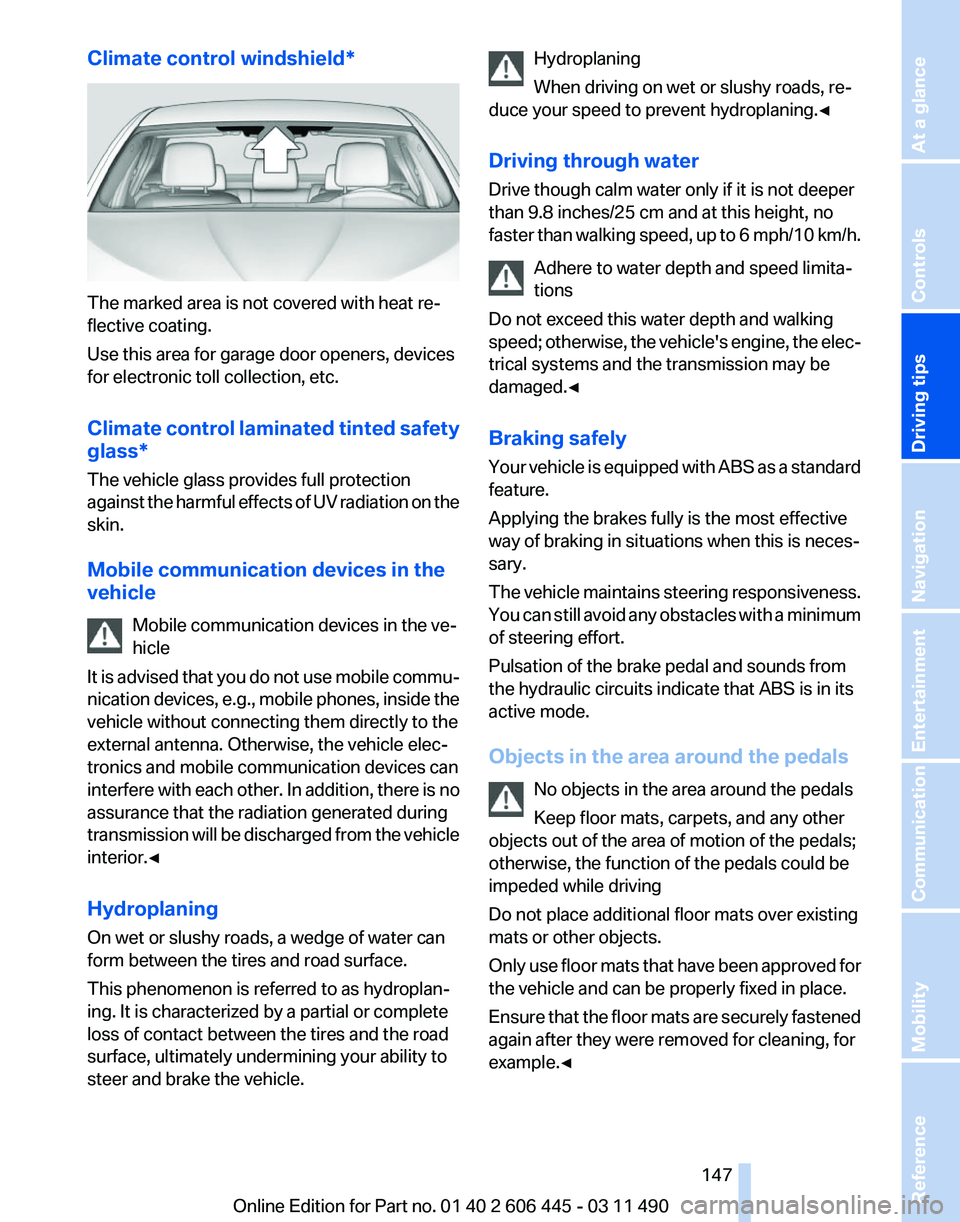
Climate control windshield*
The marked area is not covered with heat re‐
flective coating.
Use this area for garage door openers, devices
for electronic toll collection, etc.
Climate
control laminated tinted safety
glass*
The vehicle glass provides full protection
against the harmful effects of UV radiation on the
skin.
Mobile communication devices in the
vehicle
Mobile communication devices in the ve‐
hicle
It is advised that you do not use mobile commu‐
nication devices, e.g., mobile phones, inside the
vehicle without connecting them directly to the
external antenna. Otherwise, the vehicle elec‐
tronics and mobile communication devices can
interfere with each other. In addition, there is no
assurance that the radiation generated during
transmission will be discharged from the vehicle
interior.◀
Hydroplaning
On wet or slushy roads, a wedge of water can
form between the tires and road surface.
This phenomenon is referred to as hydroplan‐
ing. It is characterized by a partial or complete
loss of contact between the tires and the road
surface, ultimately undermining your ability to
steer and brake the vehicle. Hydroplaning
When driving on wet or slushy roads, re‐
duce your speed to prevent hydroplaning.
◀
Driving through water
Drive though calm water only if it is not deeper
than 9.8 inches/25 cm and at this height, no
faster than walking speed, up to 6 mph/10 km/h. Adhere to water depth and speed limita‐
tions
Do not exceed this water depth and walking
speed; otherwise, the vehicle's engine, the elec‐
trical systems and the transmission may be
damaged.◀
Braking safely
Your vehicle is equipped with ABS as a standard
feature.
Applying the brakes fully is the most effective
way of braking in situations when this is neces‐
sary.
The vehicle maintains steering responsiveness.
You can still avoid any obstacles with a minimum
of steering effort.
Pulsation of the brake pedal and sounds from
the hydraulic circuits indicate that ABS is in its
active mode.
Objects in the area around the pedals
No objects in the area around the pedals
Keep floor mats, carpets, and any other
objects out of the area of motion of the pedals;
otherwise, the function of the pedals could be
impeded while driving
Do not place additional floor mats over existing
mats or other objects.
Only use floor mats that have been approved for
the vehicle and can be properly fixed in place.
Ensure that the floor mats are securely fastened
again after they were removed for cleaning, for
example.◀ Seite 147
147Online Edition for Part no. 01 40 2 606 445 - 03 11 490
Reference Mobility Communication Entertainment Navigation
Driving tips Controls At a glance
Page 148 of 297
Driving in wet conditions
When
roads are wet or there is heavy rain, briefly
exert gentle pressure on the brake pedal every
few miles.
Ensure that this action does not endanger other
road users.
The heat generated in this process helps dry the
brake discs and pads.
In this way braking efficiency will be available
when you need it.
Hills
Drive long or steep downhill gradients in the gear
in which the least braking is required. Otherwise,
the brake system may overheat, resulting in a
reduction in the brake system efficiency.
You can increase the engine's braking effect by
shifting down in the manual mode of the auto‐
matic transmission, refer to page 73.
Avoid load on the brakes
Avoid placing excessive load on the brake
system. Light but consistent brake pressure can
lead to high temperatures, brake wear and pos‐
sibly even brake failure.◀
Do not drive in neutral
Do not drive in neutral or with the engine
stopped, as doing so disables engine braking. In
addition, steering and brake assist is unavailable
with the engine stopped.◀
Brake disc corrosion
Corrosion on the brake discs and contamination
on the brake pads are furthered by:
▷ Low mileage.
▷ Extended periods when the vehicle is not
used at all.
▷ Infrequent use of the brakes.
Corrosion occurs when the minimum pressure
that must be exerted by the pads during brake
applications to clean the discs is not reached.
Should corrosion form on the brake discs, the
brakes will tend to respond with a pulsating ef‐
fect that generally cannot be corrected. Condensation under the parked vehicle
When
using the automatic climate control, con‐
densation water develops that exits underneath
the vehicle.
Therefore, traces of condensed water under the
vehicle are normal.
Loading
Overloading the vehicle
To avoid exceeding the approved carrying
capacity of the tires, never overload the vehicle.
Overloading can lead to overheating and in‐
creases the rate at which damage develops in‐
side the tires. This could result in a sudden loss
of tire inflation pressure.◀
No fluids in the trunk
Make sure that fluids do not leak into the
trunk; otherwise, the vehicle may be damaged.◀
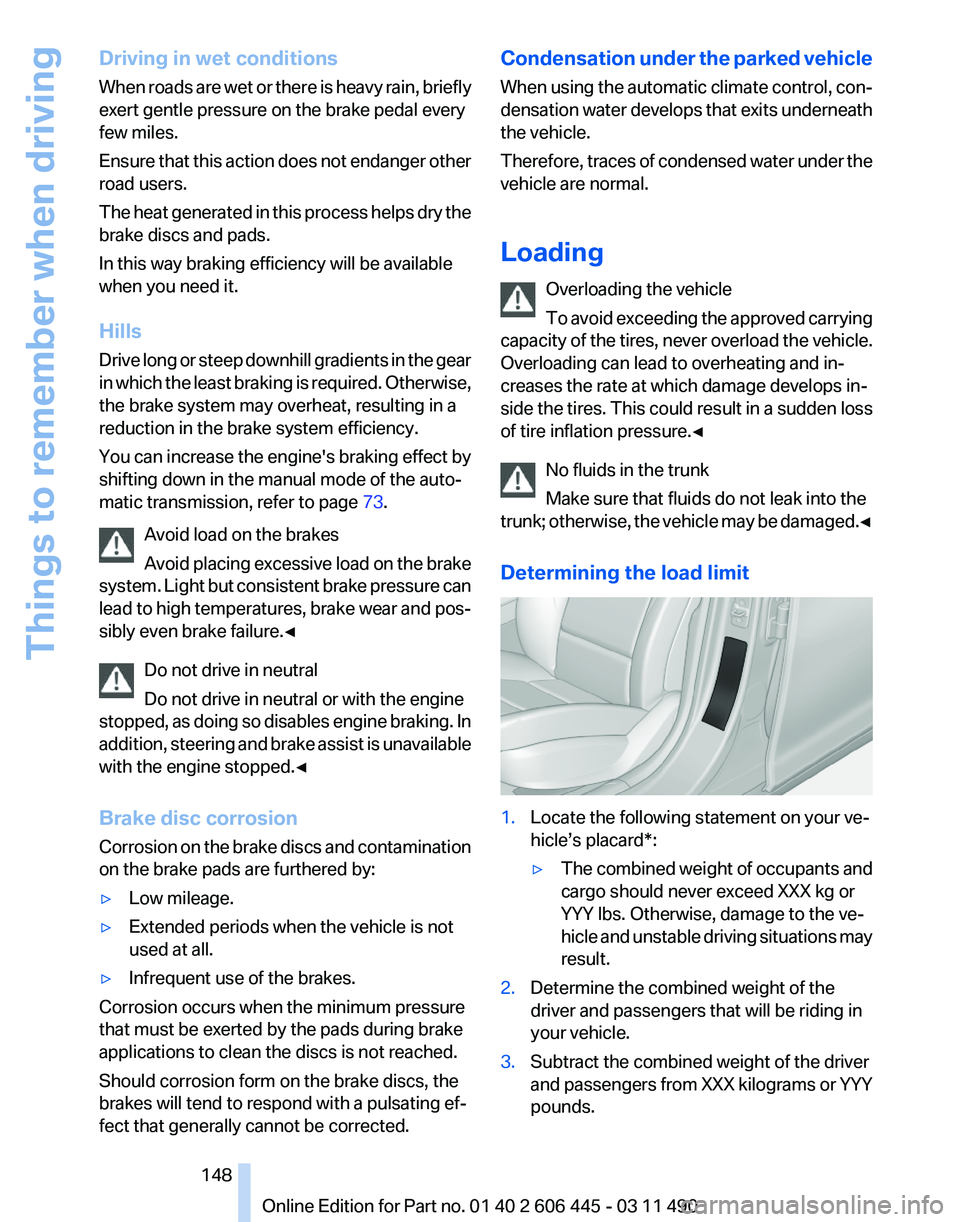
Determining the load limit 1.
Locate the following statement on your ve‐
hicle’s placard*:
▷The combined weight of occupants and
cargo should never exceed XXX kg or
YYY lbs. Otherwise, damage to the ve‐
hicle
and unstable driving situations may
result.
2. Determine the combined weight of the
driver and passengers that will be riding in
your vehicle.
3. Subtract the combined weight of the driver
and
passengers from XXX kilograms or YYY
pounds. Seite 148
148 Online Edition for Part no. 01 40 2 606 445 - 03 11 490
Things to remember when driving
Page 183 of 297
Automatic repeat*
The selected CDs or DVDs are repeated auto‐
matically.
Video playback*
Country codes
Only
DVDs with the code of the home region can
be played back; also refer to the information on
the DVD. Code Region
1 USA, Canada
2 Japan, Europe, Middle East, South Af‐
rica
3 Southeast Asia
4 Australia, Central and South America, New Zealand
5 Northwest Asia, North Africa
6 China
0 All regions Playback
The video image is displayed on the front Con‐
trol
Display up to a speed of approx. 2 mph/3 km/
h; in some countries, it is only displayed if the
parking brake is set or if the automatic trans‐
mission is in position P.
DVD video
1. "CD/Multimedia"
2. "CD/DVD" 3.
Select a DVD with video content.
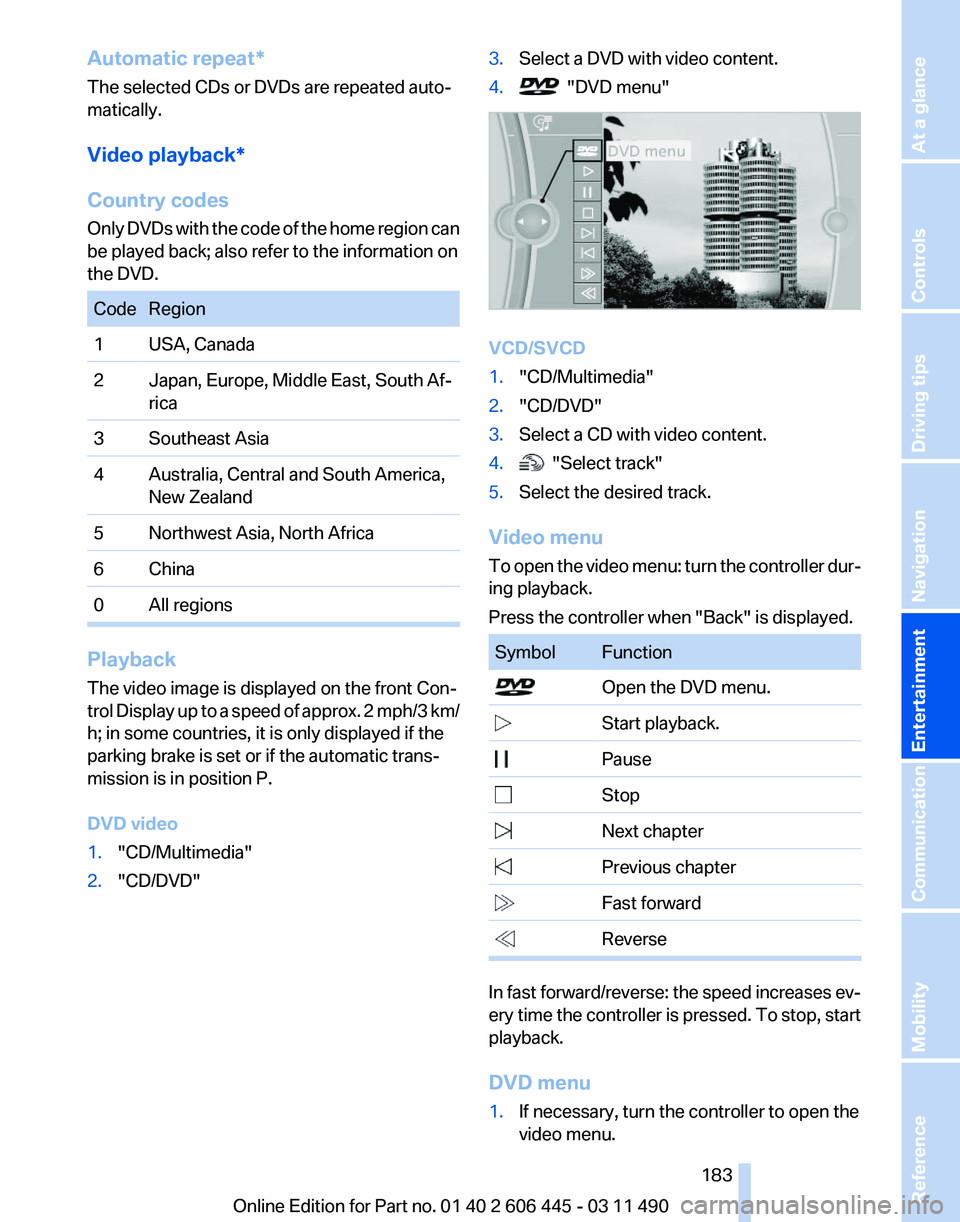
4. "DVD menu"
VCD/SVCD
1.
"CD/Multimedia"
2. "CD/DVD"
3. Select a CD with video content.
4. "Select track"
5. Select the desired track.
Video menu
To
open the video menu: turn the controller dur‐
ing playback.
Press the controller when "Back" is displayed. Symbol Function
Open the DVD menu.
Start playback.
Pause Stop
Next chapter
Previous chapter
Fast forward
Reverse
In fast forward/reverse: the speed increases ev‐
ery
time the controller is pressed. To stop, start
playback.
DVD menu
1. If necessary, turn the controller to open the
video menu.
Seite 183
183Online Edition for Part no. 01 40 2 606 445 - 03 11 490
Reference Mobility Communication
Entertainment Navigation Driving tips Controls At a glance
Page 195 of 297
all results that contain that sequence are
displayed.
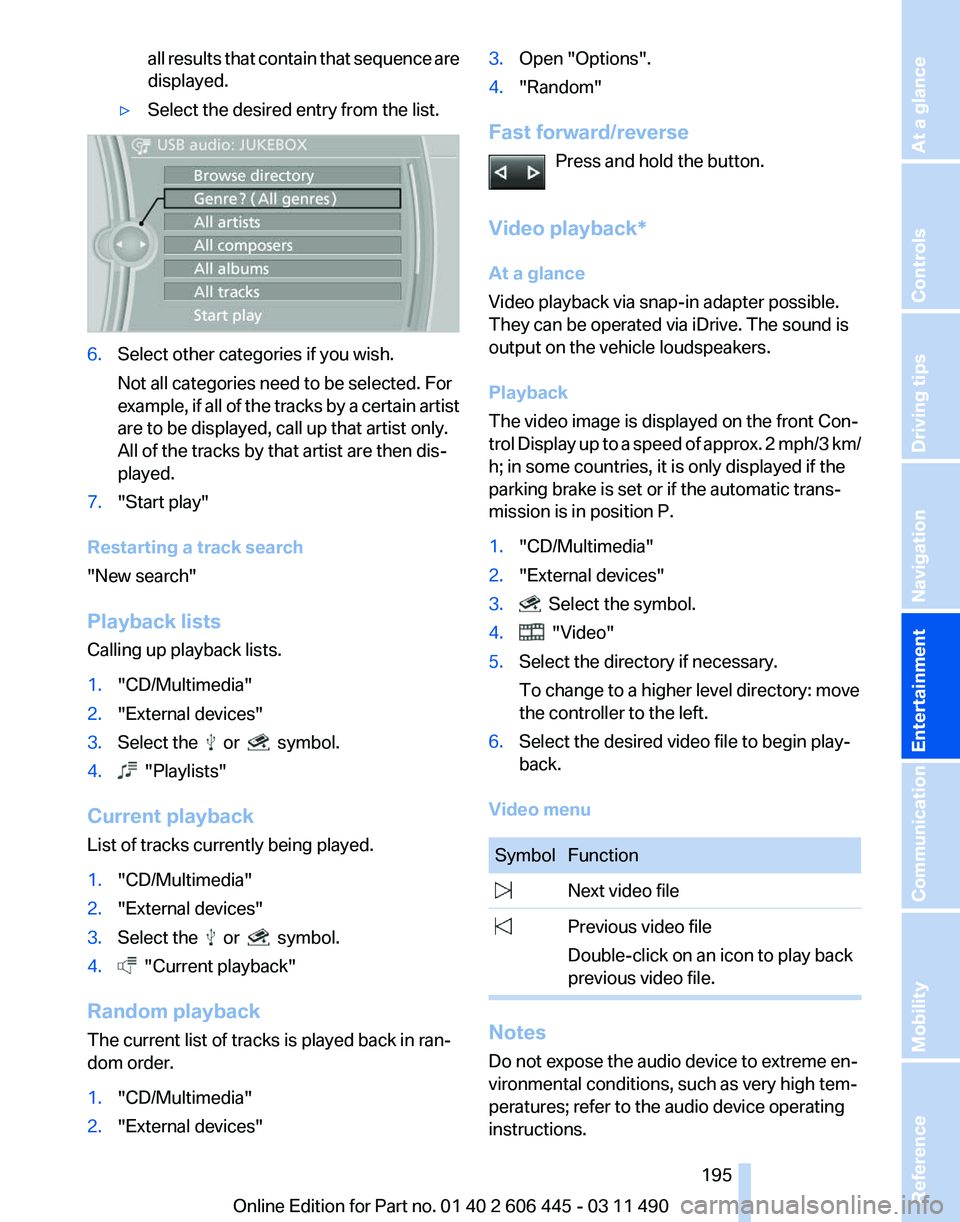
▷ Select the desired entry from the list. 6.
Select other categories if you wish.
Not all categories need to be selected. For
example,
if all of the tracks by a certain artist
are to be displayed, call up that artist only.
All of the tracks by that artist are then dis‐
played.
7. "Start play"
Restarting a track search
"New search"
Playback lists
Calling up playback lists.
1. "CD/Multimedia"
2. "External devices"
3. Select the or symbol.
4. "Playlists"
Current playback
List of tracks currently being played.
1. "CD/Multimedia"
2. "External devices"
3. Select the or symbol.
4. "Current playback"
Random playback
The current list of tracks is played back in ran‐
dom order.
1. "CD/Multimedia"
2. "External devices" 3.
Open "Options".
4. "Random"
Fast forward/reverse Press and hold the button.
Video playback*
At a glance
Video playback via snap-in adapter possible.
They can be operated via iDrive. The sound is
output on the vehicle loudspeakers.
Playback
The video image is displayed on the front Con‐
trol
Display up to a speed of approx. 2 mph/3 km/
h; in some countries, it is only displayed if the
parking brake is set or if the automatic trans‐
mission is in position P.
1. "CD/Multimedia"
2. "External devices"
3. Select the symbol.
4. "Video"
5. Select the directory if necessary.
To change to a higher level directory: move
the controller to the left.
6. Select the desired video file to begin play‐
back.
Video menu Symbol Function
Next video file
Previous video file
Double-click on an icon to play back
previous video file. Notes
Do not expose the audio device to extreme en‐
vironmental conditions, such as very high tem‐
peratures; refer to the audio device operating
instructions. Seite 195
195Online Edition for Part no. 01 40 2 606 445 - 03 11 490
Reference Mobility Communication
Entertainment Navigation Driving tips Controls At a glance
Page 234 of 297
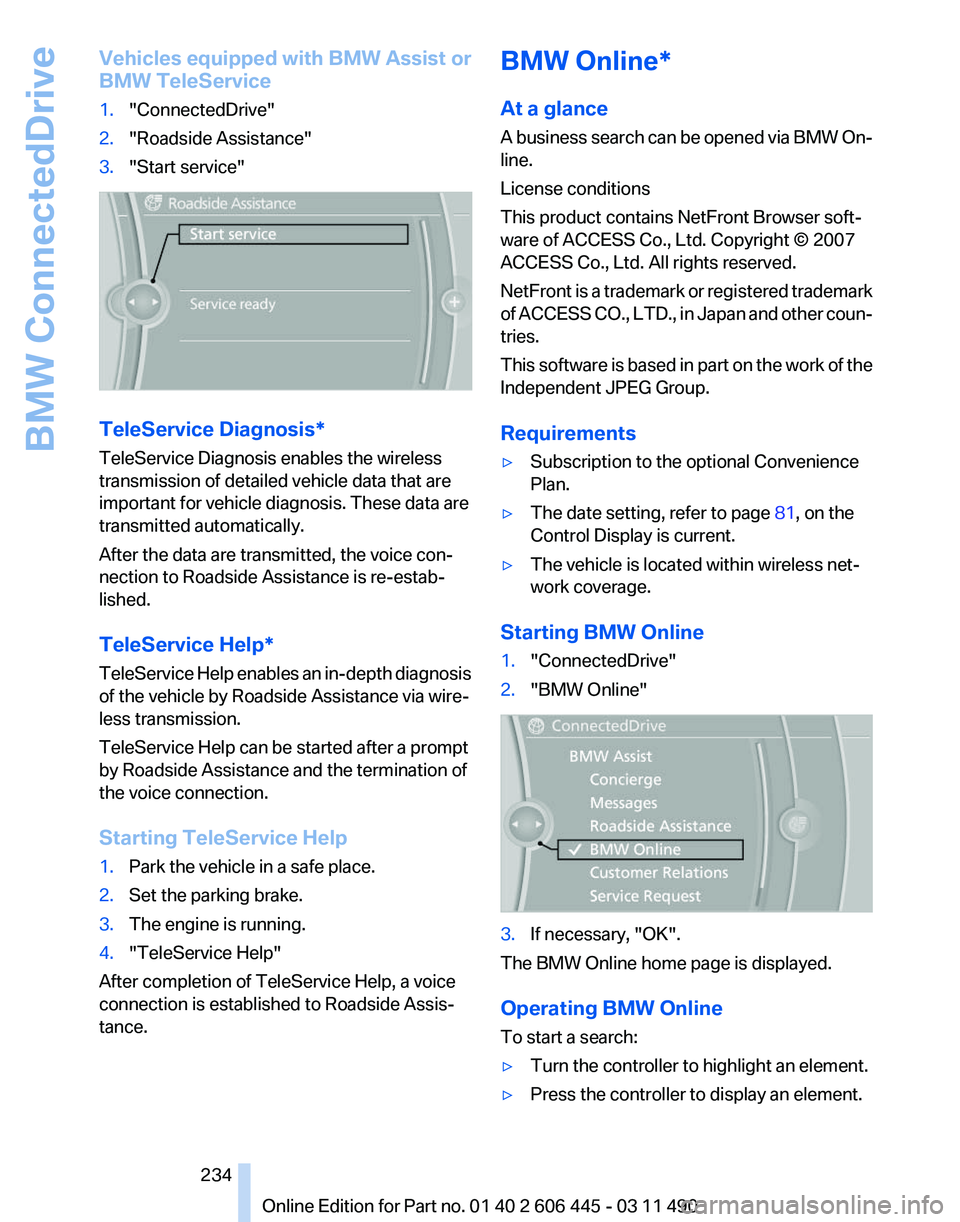
Vehicles equipped with BMW Assist or
BMW TeleService
1.
"ConnectedDrive"
2. "Roadside Assistance"
3. "Start service" TeleService Diagnosis*
TeleService Diagnosis enables the wireless
transmission of detailed vehicle data that are
important for vehicle diagnosis. These data are
transmitted automatically.
After the data are transmitted, the voice con‐
nection to Roadside Assistance is re-estab‐
lished.
TeleService Help
*
TeleService Help enables an in-depth diagnosis
of the vehicle by Roadside Assistance via wire‐
less transmission.
TeleService Help can be started after a prompt
by Roadside Assistance and the termination of
the voice connection.
Starting TeleService Help
1. Park the vehicle in a safe place.
2. Set the parking brake.
3. The engine is running.
4. "TeleService Help"
After completion of TeleService Help, a voice
connection is established to Roadside Assis‐
tance. BMW Online*
At a glance
A
business search can be opened via BMW On‐
line.
License conditions
This product contains NetFront Browser soft‐
ware of ACCESS Co., Ltd. Copyright © 2007
ACCESS Co., Ltd. All rights reserved.
NetFront is a trademark or registered trademark
of ACCESS CO., LTD., in Japan and other coun‐
tries.
This software is based in part on the work of the
Independent JPEG Group.
Requirements
▷ Subscription to the optional Convenience
Plan.
▷ The date setting, refer to page 81, on the
Control Display is current.
▷ The vehicle is located within wireless net‐
work coverage.
Starting BMW Online
1. "ConnectedDrive"
2. "BMW Online" 3.
If necessary, "OK".
The BMW Online home page is displayed.
Operating BMW Online
To start a search:
▷ Turn the controller to highlight an element.
▷ Press the controller to display an element.
Seite 234
234 Online Edition for Part no. 01 40 2 606 445 - 03 11 490
BMW ConnectedDrive
Page 256 of 297
Maintenance
BMW Maintenance System
The maintenance system directs you to re‐
quired
maintenance measures and thereby sup‐
ports you in maintaining road safety and the op‐
erational reliability of the vehicle.
Condition Based Service CBS
Sensors and special algorithms take into ac‐
count the driving conditions of your vehicle.
Based on this, Condition Based Service deter‐
mines the maintenance requirements.
The system makes it possible to adapt the
amount of maintenance you need to your user
profile.
Details on the service requirements, refer to
page 82, can be displayed on the Control Dis‐
play.
Service data in the remote control
Information on the required maintenance is con‐
tinuously stored in the remote control. Your
service center will read out this data and suggest
the right array of service procedures for your ve‐
hicle.
Therefore, hand your service specialist the re‐
mote control that you used most recently.
Storage periods
Storage periods during which the vehicle bat‐
tery was disconnected are not taken into ac‐
count.
If this occurs, have a service center update the
time-dependent maintenance procedures,
such as checking brake fluid and, if necessary,
changing the engine oil and the microfilter/acti‐
vated-charcoal filter. Service and Warranty
Information Booklet for US
models and Warranty and
Service Guide Booklet for
Canadian models
Please
consult your Service and Warranty Infor‐
mation Booklet for US models and Warranty and
Service Guide Booklet for Canadian models for
additional information on service requirements.
Maintenance and repair should be performed by
your service center. Make sure to have regular
maintenance procedures recorded in the vehi‐
cle's Service and Warranty Information Booklet
for US models, and in the Warranty and Service
Guide Booklet for Canadian models. These en‐
tries are proof of regular maintenance.
Socket for OBD Onboard
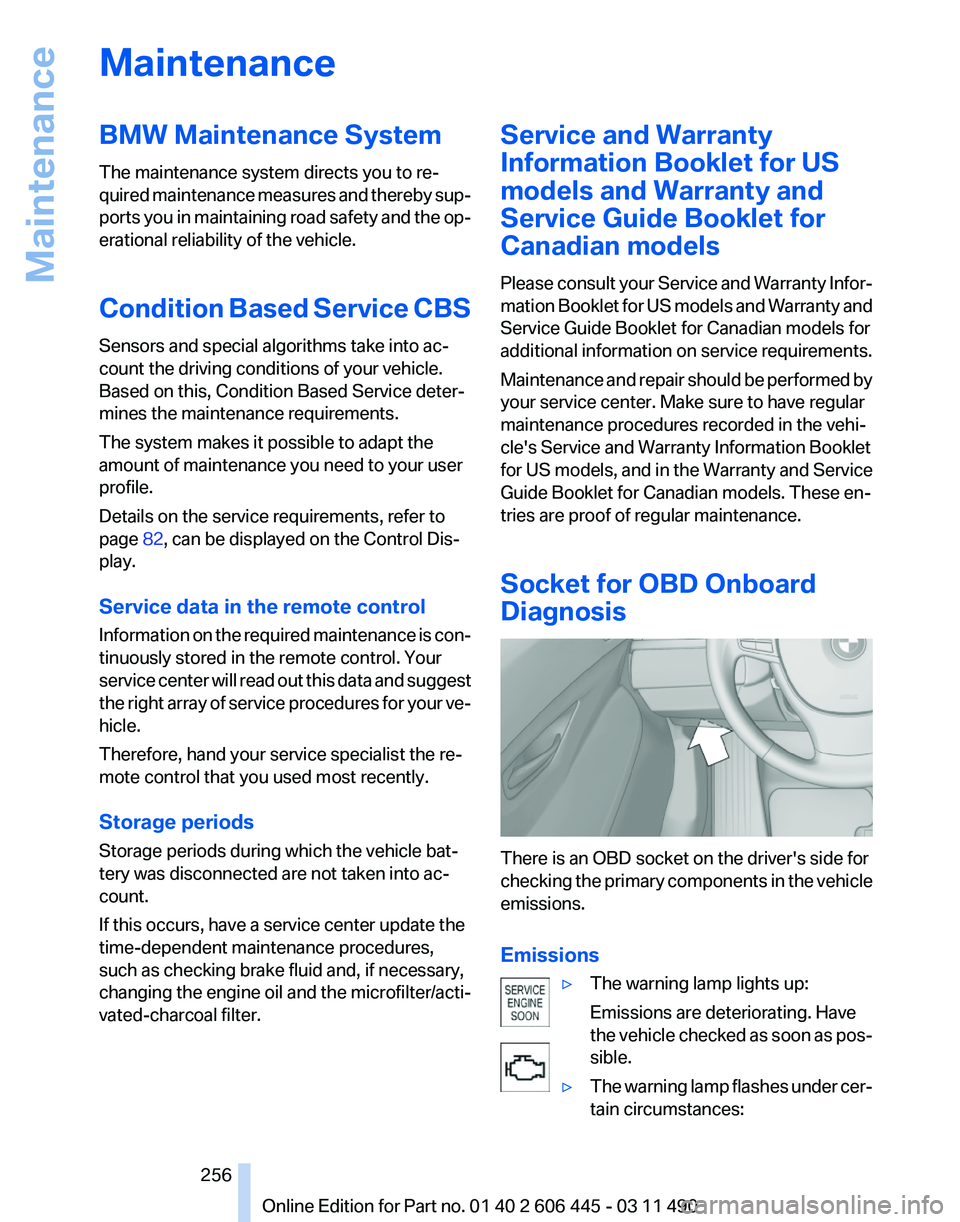
Diagnosis There is an OBD socket on the driver's side for
checking
the primary components in the vehicle
emissions.
Emissions
▷The warning lamp lights up:
Emissions are deteriorating. Have
the
vehicle checked as soon as pos‐
sible.
▷ The warning lamp flashes under cer‐
tain circumstances: Seite 256
256 Online Edition for Part no. 01 40 2 606 445 - 03 11 490
Maintenance
Page 261 of 297
3
Inside brake lamp*
4 Backup lamp
5 Outside brake lamp
Turn signal, brake, tail, and license
plate lamps
Follow the general instructions on lamps and
bulbs., refer to page 258
These lights are made using LED technology.
Contact your service center in the event of a
malfunction.
Lamps in the tailgate
Follow the general instructions on lamps and
bulbs., refer to page 258
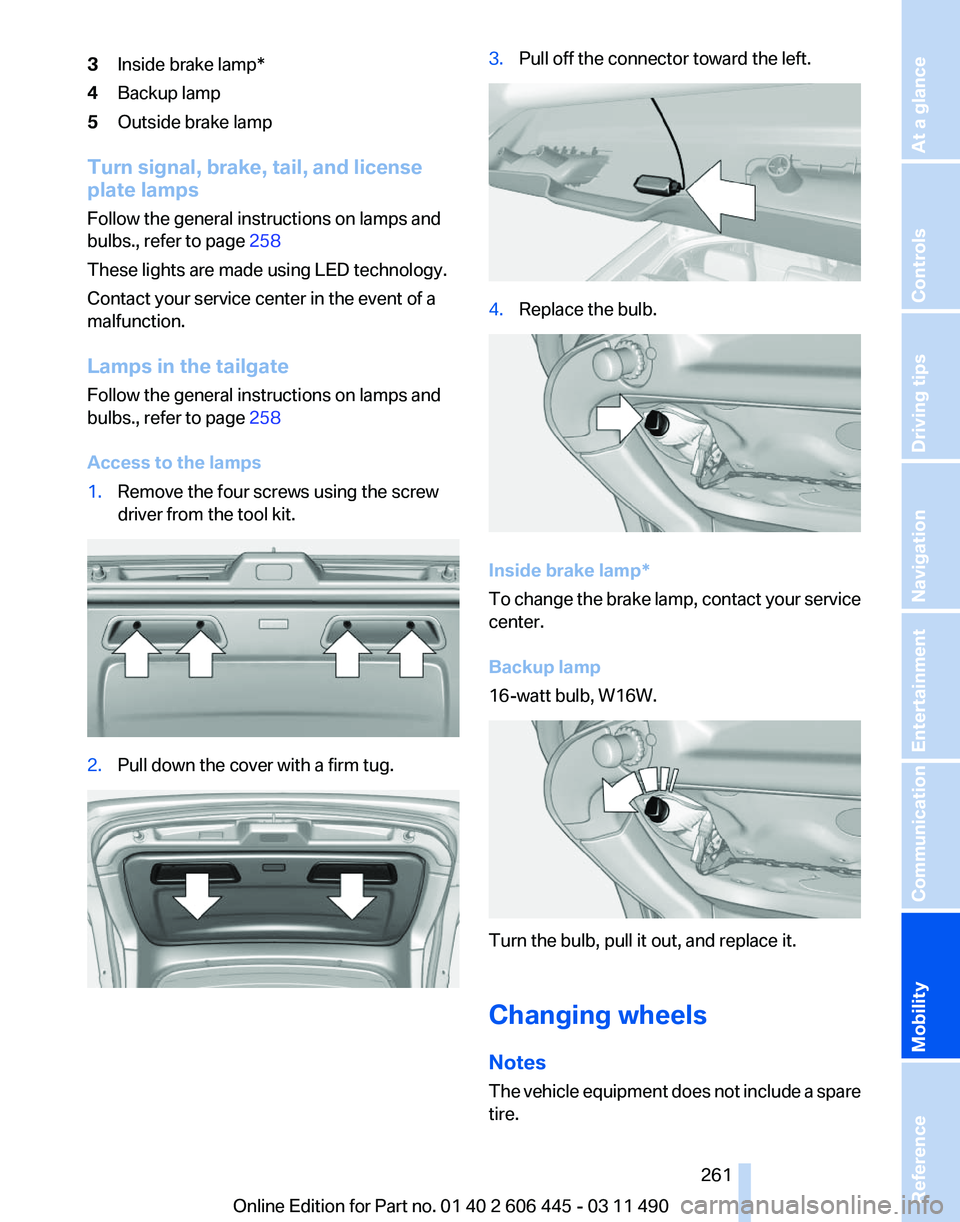
Access to the lamps
1. Remove the four screws using the screw
driver from the tool kit. 2.
Pull down the cover with a firm tug. 3.
Pull off the connector toward the left. 4.
Replace the bulb. Inside brake lamp*
To
change the brake lamp, contact your service
center.
Backup lamp
16-watt bulb, W16W. Turn the bulb, pull it out, and replace it.
Changing wheels
Notes
The
vehicle equipment does not include a spare
tire.
Seite 261
261Online Edition for Part no. 01 40 2 606 445 - 03 11 490
Reference
Mobility Communication Entertainment Navigation Driving tips Controls At a glance