change time BMW 535I SEDAN 2007 E60 Owner's Guide
[x] Cancel search | Manufacturer: BMW, Model Year: 2007, Model line: 535I SEDAN, Model: BMW 535I SEDAN 2007 E60Pages: 286, PDF Size: 9.31 MB
Page 154 of 286
Destination entry
152 3.Select "Use current location as address", or
"Save current destination" during the desti-
nation guidance, and press the controller.
4.Select "Store in address book" and press
the controller.
Adopting home address as destination
1.Select "Home address" and press the con-
troller.
2.Select "Start guidance" and press the con-
troller.
Changing home address
1.Select "Home address" and press the con-
troller.
2.Select "Edit address" and press the con-
troller. For operation, refer to Entering a
destination manually, page142.
Selecting route
You can influence the calculated route by
choosing certain route criteria. You can change
the route criteria as often as you like while
entering the destination and whenever the des-
tination guidance is active.
The route is planned according to fixed rules.
The type of road is taken into account, e.g.
whether it is a highway or a winding road. The
road types are stored on the navigation DVD.
As a result, the routes recommended by the
navigation system may not always be the same
ones that you would choose based on personal
experience.
Changing route criteria
1.Select "Navigation" and press the control-
ler.
2.Change into the third field from the top.
Turn the controller until "Route preference"
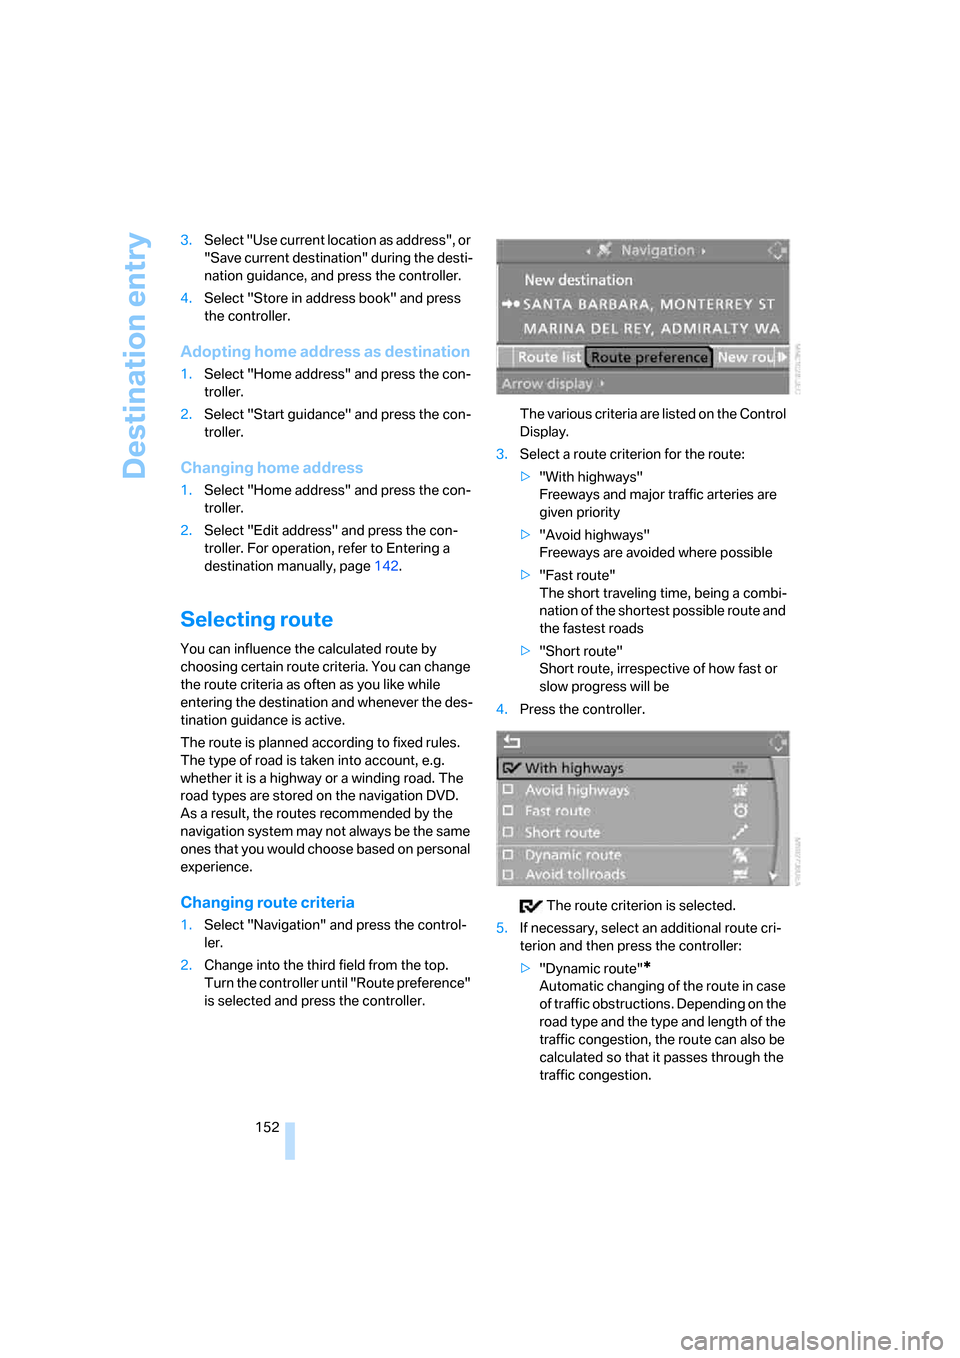
is selected and press the controller.The various criteria are listed on the Control
Display.
3.Select a route criterion for the route:
>"With highways"
Freeways and major traffic arteries are
given priority
>"Avoid highways"
Freeways are avoided where possible
>"Fast route"
The short traveling time, being a combi-
nation of the shortest possible route and
the fastest roads
>"Short route"
Short route, irrespective of how fast or
slow progress will be
4.Press the controller.
The route criterion is selected.
5.If necessary, select an additional route cri-
terion and then press the controller:
>"Dynamic route"
*
Automatic changing of the route in case
of traffic obstructions. Depending on the
road type and the type and length of the
traffic congestion, the route can also be
calculated so that it passes through the
traffic congestion.
Page 156 of 286
Destination guidance
154
Destination guidance
Starting destination
guidance
Via iDrive
iDrive, for explanation of principle, refer to
page16.
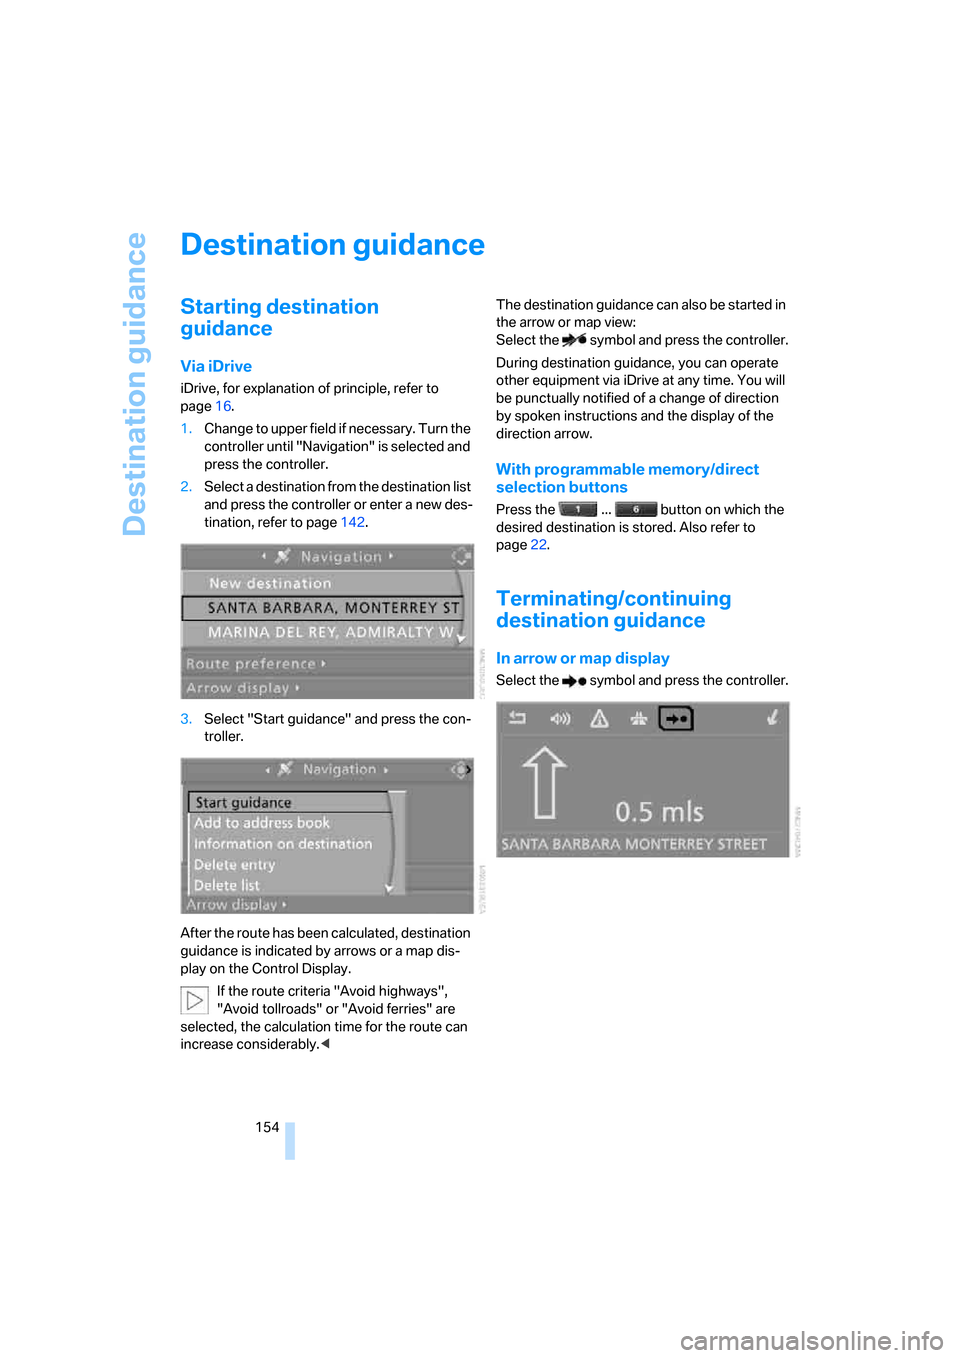
1.Change to upper field if necessary. Turn the
controller until "Navigation" is selected and
press the controller.
2.Select a destination from the destination list
and press the controller or enter a new des-
tination, refer to page142.
3.Select "Start guidance" and press the con-
troller.
After the route has been calculated, destination
guidance is indicated by arrows or a map dis-
play on the Control Display.
If the route criteria "Avoid highways",
"Avoid tollroads" or "Avoid ferries" are
selected, the calculation time for the route can
increase considerably.
Select the symbol and press the controller.
During destination guidance, you can operate
other equipment via iDrive at any time. You will
be punctually notified of a change of direction
by spoken instructions and the display of the
direction arrow.
With programmable memory/direct
selection buttons
Press the ... button on which the
desired destination is stored. Also refer to
page22.
Terminating/continuing
destination guidance
In arrow or map display
Select the symbol and press the controller.
Page 157 of 286
Navigation
Driving tips
155Reference
At a glance
Controls
Communications
Entertainment
Mobility
In destination list
This symbol indicates the current destina-
tion.
1.Select the current destination and press the
controller.
2.Select "Stop guidance" and press the con-
troller.
When you park the vehicle before reaching the
entered destination, the following question is
displayed before beginning the next trip:
"Continue guidance to destination?".
The destination guidance starts automatically
after a short time.
To start the destination guidance:
Select "Yes" and press the controller.
Displaying route
You have the option of displaying various views
of the route during destination guidance.
From another menu, you can change
directly to the screen last displayed,
refer to Comfort opening of menu items,
page18.<
Displaying arrow display
1.Select "Navigation" and press the control-
ler.
2.Change into the fourth field from the top.
Turn the controller until "Arrow display" is
selected and press the controller.
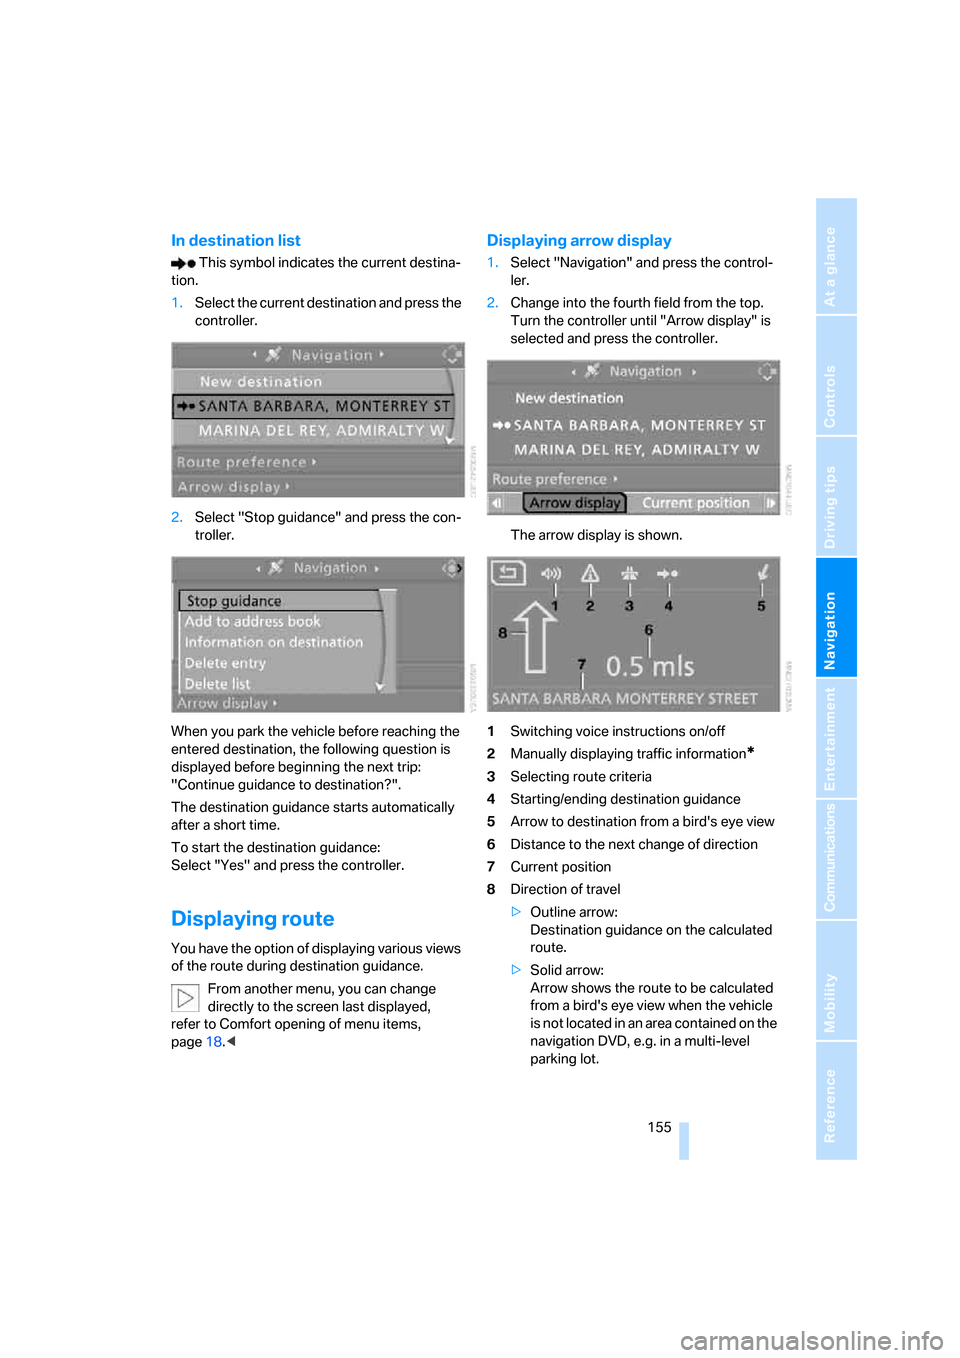
The arrow display is shown.
1Switching voice instructions on/off
2Manually displaying traffic information
*
3Selecting route criteria
4Starting/ending destination guidance
5Arrow to destination from a bird's eye view
6Distance to the next change of direction
7Current position
8Direction of travel
>Outline arrow:
Destination guidance on the calculated
route.
>Solid arrow:
Arrow shows the route to be calculated
from a bird's eye view when the vehicle
is not located in an area contained on the
navigation DVD, e.g. in a multi-level
parking lot.
Page 158 of 286
Destination guidance
156 Depending on the equipment, the estimated
time of arrival and the distance to the destina-
tion are displayed in the top or bottom line of the
Control Display.
Before a change in direction, the representation
of the arrow changes.
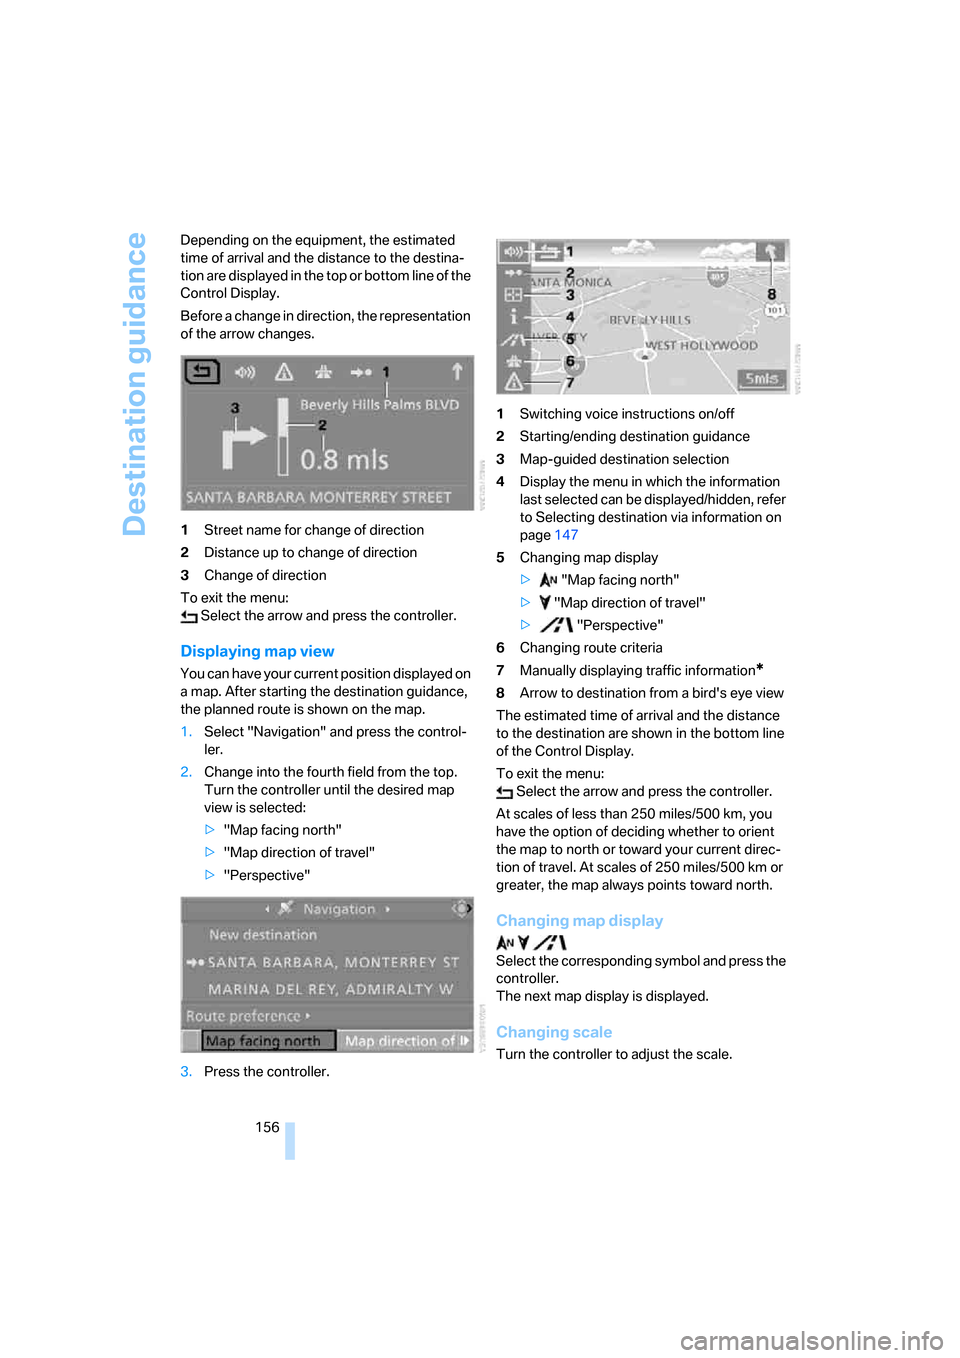
1Street name for change of direction
2Distance up to change of direction
3Change of direction
To exit the menu:
Select the arrow and press the controller.
Displaying map view
You can have your current position displayed on
a map. After starting the destination guidance,
the planned route is shown on the map.
1.Select "Navigation" and press the control-
ler.
2.Change into the fourth field from the top.
Turn the controller until the desired map
view is selected:
>"Map facing north"
>"Map direction of travel"
>"Perspective"
3.Press the controller.1Switching voice instructions on/off
2Starting/ending destination guidance
3Map-guided destination selection
4Display the menu in which the information
last selected can be displayed/hidden, refer
to Selecting destination via information on
page147
5Changing map display
> "Map facing north"
> "Map direction of travel"
> "Perspective"
6Changing route criteria
7Manually displaying traffic information*
8Arrow to destination from a bird's eye view
The estimated time of arrival and the distance
to the destination are shown in the bottom line
of the Control Display.
To exit the menu:
Select the arrow and press the controller.
At scales of less than 250 miles/500 km, you
have the option of deciding whether to orient
the map to north or toward your current direc-
tion of travel. At scales of 250 miles/500 km or
greater, the map always points toward north.
Changing map display
Select the corresponding symbol and press the
controller.
The next map display is displayed.
Changing scale
Turn the controller to adjust the scale.
Page 159 of 286
Navigation
Driving tips
157Reference
At a glance
Controls
Communications
Entertainment
Mobility
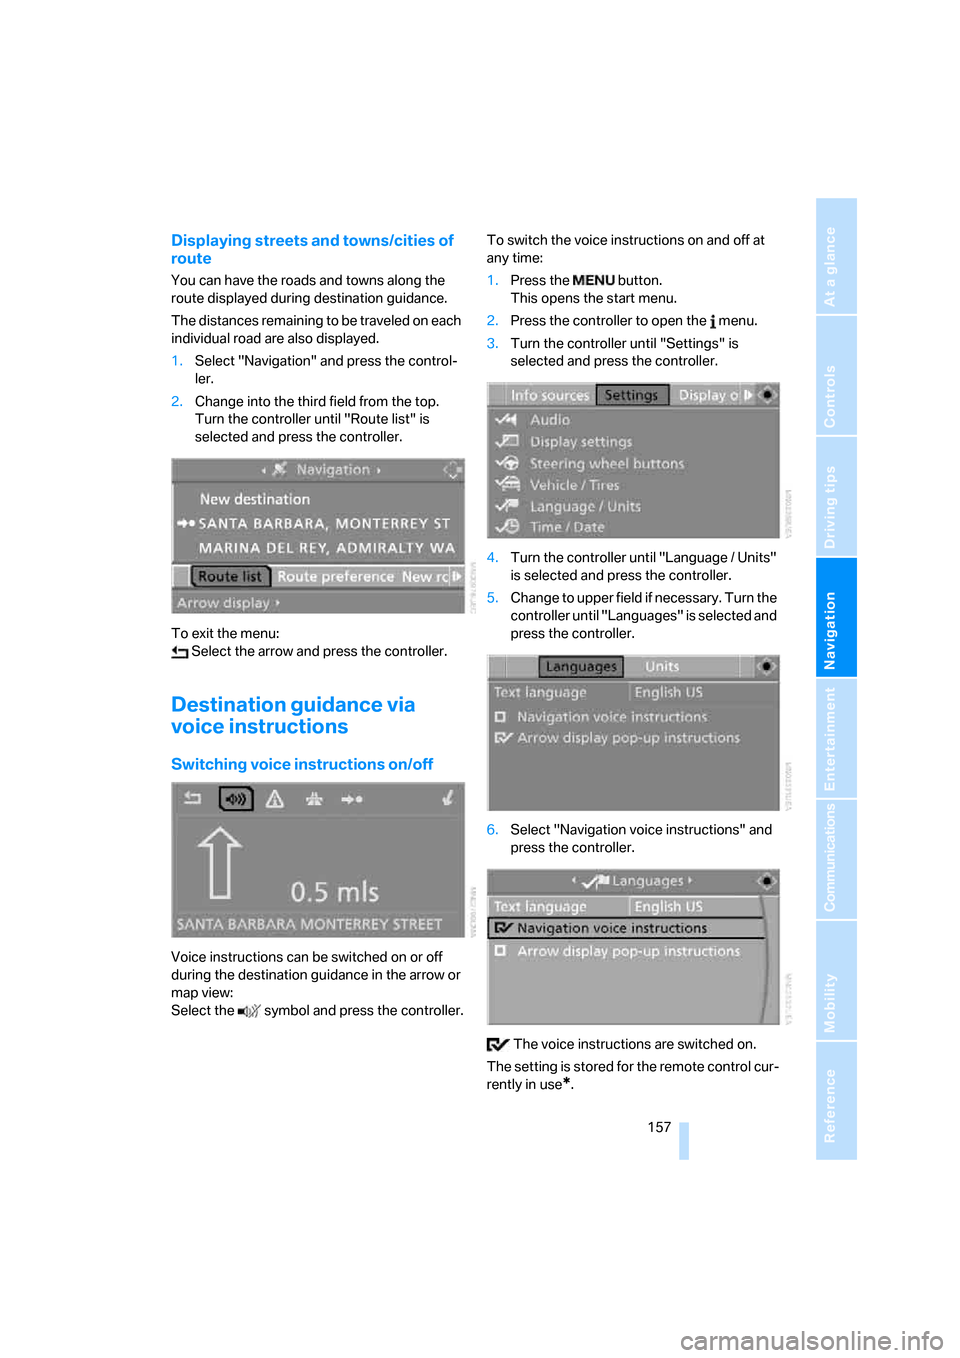
Displaying streets and towns/cities of
route
You can have the roads and towns along the
route displayed during destination guidance.
The distances remaining to be traveled on each
individual road are also displayed.
1.Select "Navigation" and press the control-
ler.
2.Change into the third field from the top.
Turn the controller until "Route list" is
selected and press the controller.
To exit the menu:
Select the arrow and press the controller.
Destination guidance via
voice instructions
Switching voice instructions on/off
Voice instructions can be switched on or off
during the destination guidance in the arrow or
map view:
Select the symbol and press the controller.To switch the voice instructions on and off at
any time:
1.Press the button.
This opens the start menu.
2.Press the controller to open the menu.
3.Turn the controller until "Settings" is
selected and press the controller.
4.Turn the controller until "Language / Units"
is selected and press the controller.
5.Change to upper field if necessary. Turn the
controller until "Languages" is selected and
press the controller.
6.Select "Navigation voice instructions" and
press the controller.
The voice instructions are switched on.
The setting is stored for the remote control cur-
rently in use
*.
Page 180 of 286
Radio
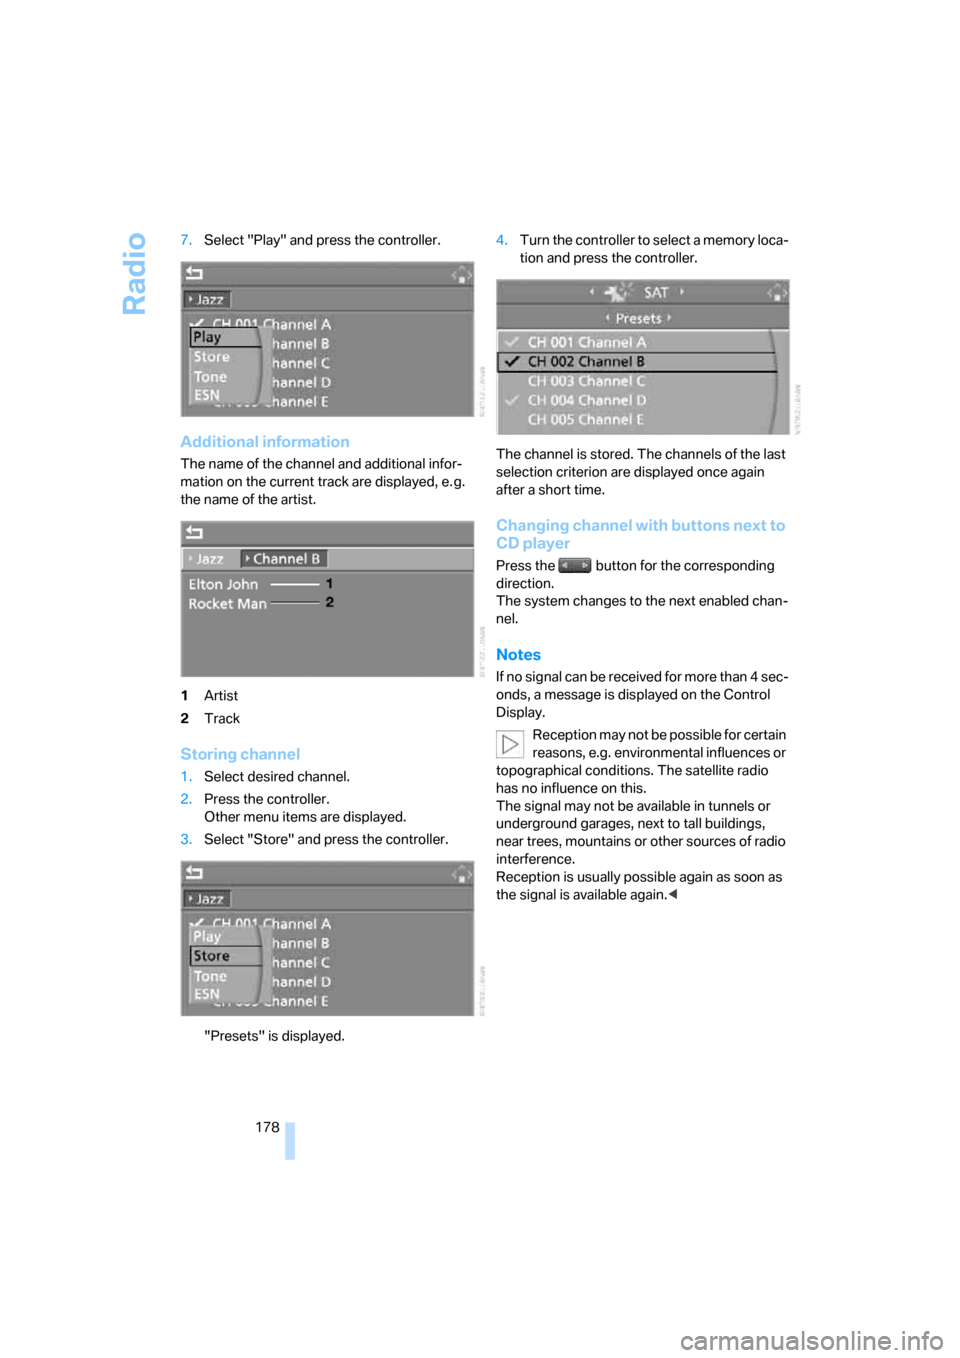
178 7.Select "Play" and press the controller.
Additional information
The name of the channel and additional infor-
mation on the current track are displayed, e. g.
the name of the artist.
1Artist
2Track
Storing channel
1.Select desired channel.
2.Press the controller.
Other menu items are displayed.
3.Select "Store" and press the controller.
"Presets" is displayed.4.Turn the controller to select a memory loca-
tion and press the controller.
The channel is stored. The channels of the last
selection criterion are displayed once again
after a short time.
Changing channel with buttons next to
CD player
Press the button for the corresponding
direction.
The system changes to the next enabled chan-
nel.
Notes
If no signal can be received for more than 4 sec-
onds, a message is displayed on the Control
Display.
Reception may not be possible for certain
reasons, e.g. environmental influences or
topographical conditions. The satellite radio
has no influence on this.
The signal may not be available in tunnels or
underground garages, next to tall buildings,
near trees, mountains or other sources of radio
interference.
Reception is usually possible again as soon as
the signal is available again.<
Page 188 of 286
USB/audio interface
186
USB/audio interface
You can connect audio devices to the USB/
audio interface, e.g. an iPod or a USB device
(MP3 player, USB memory stick). You can then
operate these with iDrive.
The common audio files, e.g. MP3, WMA, WAV
(PCM) and AAC, as well as playback lists in the
M3U format can be played back.
Due to the large number of audio devices avail-
able on the market, operation via the vehicle
cannot be ensured for every audio device.
Ask your BMW center which audio devices are
suitable.
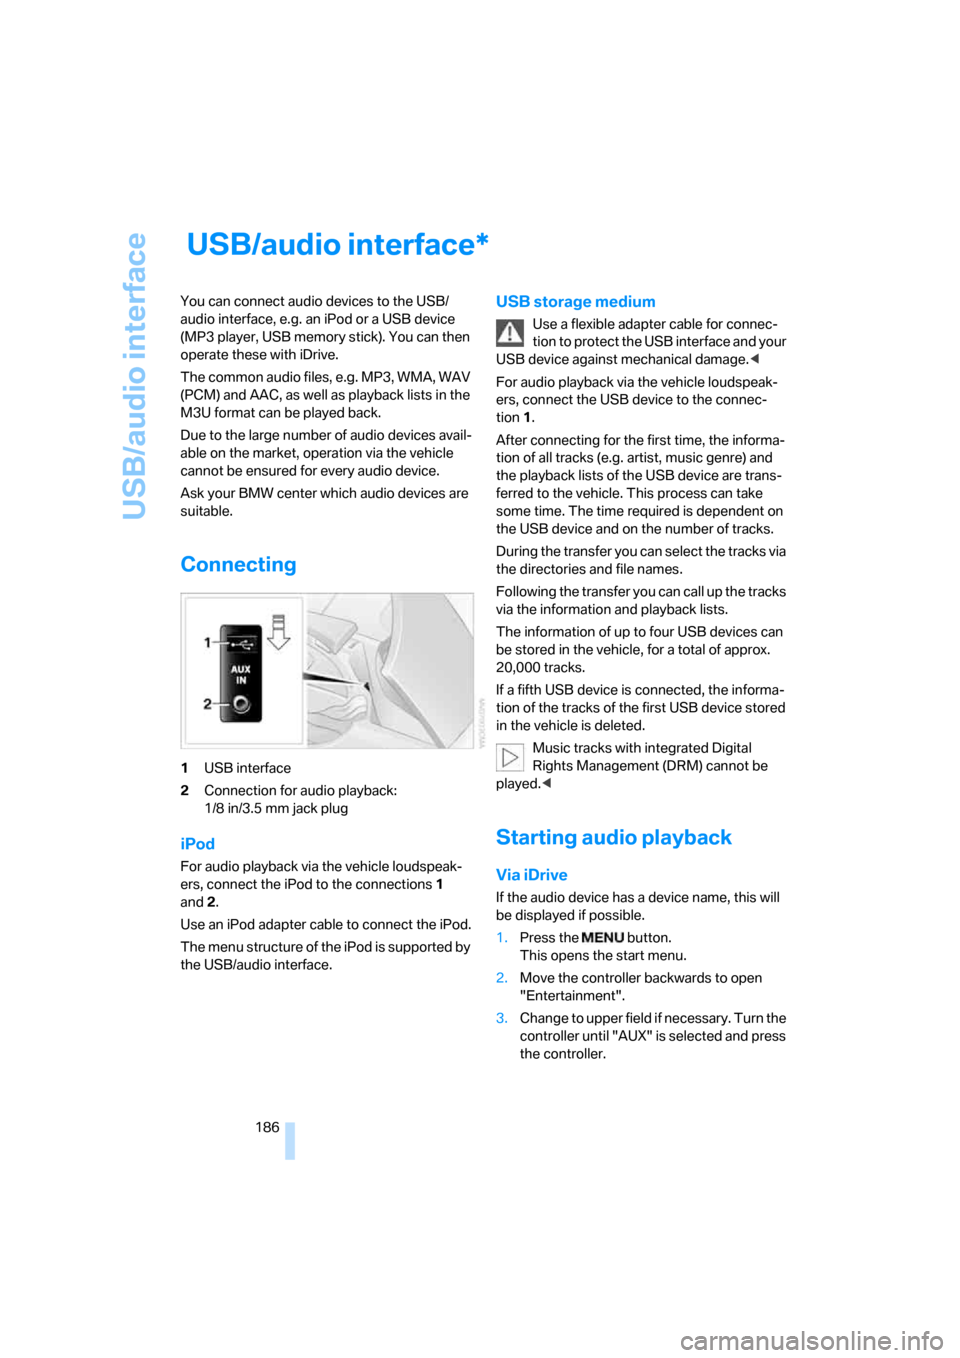
Connecting
1USB interface
2Connection for audio playback:
1/8 in/3.5 mm jack plug
iPod
For audio playback via the vehicle loudspeak-
ers, connect the iPod to the connections1
and2.
Use an iPod adapter cable to connect the iPod.
The menu structure of the iPod is supported by
the USB/audio interface.
USB storage medium
Use a flexible adapter cable for connec-
tion to protect the USB interface and your
USB device against mechanical damage.<
For audio playback via the vehicle loudspeak-
ers, connect the USB device to the connec-
tion 1.
After connecting for the first time, the informa-
tion of all tracks (e.g. artist, music genre) and
the playback lists of the USB device are trans-
ferred to the vehicle. This process can take
some time. The time required is dependent on
the USB device and on the number of tracks.
During the transfer you can select the tracks via
the directories and file names.
Following the transfer you can call up the tracks
via the information and playback lists.
The information of up to four USB devices can
be stored in the vehicle, for a total of approx.
20,000 tracks.
If a fifth USB device is connected, the informa-
tion of the tracks of the first USB device stored
in the vehicle is deleted.
Music tracks with integrated Digital
Rights Management (DRM) cannot be
played.<
Starting audio playback
Via iDrive
If the audio device has a device name, this will
be displayed if possible.
1.Press the button.
This opens the start menu.
2.Move the controller backwards to open
"Entertainment".
3.Change to upper field if necessary. Turn the
controller until "AUX" is selected and press
the controller.
*
Page 244 of 286
Replacing components
242 3.Check and correct the tire inflation pressure
at the earliest opportunity.
Protect valve stems with valve stem
seal caps against dirt and contamina-
tion. Dirt in valve stems is a frequent source
of gradual air loss.<
4.Initialize the Flat Tire Monitor, refer to
page94, or reset the Tire Pressure Monitor,
refer to page96.
5.Replace the damaged tire as soon as possi-
ble and have the new wheel/tire balanced.
Driving with compact wheel
Drive reservedly and do not exceed a speed of
50 mph/80 km/h.
The driving characteristics change, for example
reduced track stability on braking, extended
braking distance, and altered self-steering
characteristics in the limit range. In conjunction
with winter tires, these characteristics are more
pronounced.
Only one compact wheel may be
mounted. You should re-equip with
wheels and tires of the original size as quickly as
possible.<
Vehicle battery
Battery care
The battery is 100 % maintenance-free, i.e., the
electrolyte will last for the life of the battery
when the vehicle is operated in a temperate cli-
ma te. Your BM W center will be glad to advise in
all matters concerning the battery.
Charging battery
Only charge the battery in the vehicle via the
terminals in the engine compartment with the
engine switched off. Connections, refer to
Jump starting on page246.
Disposal
Have old batteries disposed of by your
BMW center or hand them in to a recy-
cling center. Maintain the battery in an upright
position for transport and storage. Always
restrain the battery to prevent it from tipping
over during transport.<
Power failure
After a temporary power loss, the functioning of
some equipment may be limited and require
reinitialization. Individual settings are also lost
and must be updated:
>Seat, mirror and steering wheel memory
The positions must be stored again, refer to
page48.
>Time and Date
The values must be updated, refer to
page85.
>Radio
Stations must be stored again if necessary,
refer to page172.
>Navigation system
Wait until the system starts, refer to
page140.
Fuses
Never attempt to repair a blown fuse and
do not replace a defective fuse with a sub-
stitute of another color or amperage rating, as
this could lead to a circuit overload, ultimately
resulting in a fire in the vehicle.<
Sedan
Spare fuses, plastic tweezers and fuse alloca-
tion diagram are located in the compartment for
the onboard tool kit, refer to page234.
Sports Wagon
Spare fuses and a pair of plastic tweezers are
contained in the onboard tool kit, refer to
page234. A fuse allocation diagram is located
in the cargo bay behind the right-hand side
panel.
Page 267 of 286
Reference 265
At a glance
Controls
Driving tips
Communications
Navigation
Entertainment
Mobility
Cargo bay cover, refer to Roll-
up cover124
Caring for artificial leather,
refer to Caring for your
vehicle brochure
Caring for leather, refer to
Caring for your vehicle
brochure
Caring for light-alloy wheels,
refer to Caring for your
vehicle brochure
Caring for plastic, refer to the
Caring for your vehicle
brochure
Caring for the carpet, refer to
Caring for your vehicle
brochure
Caring for the vehicle finish,
refer to Caring for your
vehicle brochure
Car key, refer to Keys/remote
control28
Car phone192
– installation location, refer to
Center armrest120
– refer to Mobile phone192
– refer to separate operating
instructions
Car radio, refer to Radio170
Car wash61,134
– also refer to Caring for your
vehicle brochure
– with comfort access40
Catalytic converter, refer to
Hot exhaust system132
"Categories"177
CBC Cornering Brake
Control90
CBS Condition Based
Service232
"CD"166,179CD changer179
– controls166
– fast forward/reverse183
– installation location183
– random sequence182
– repeating a track182
– sampling tracks181
– selecting a CD180
– selecting a track180
– switching on/off166
– tone control167
– volume167
CD player179
– controls166
– fast forward/reverse183
– random sequence182
– repeating a track182
– sampling a track181
– selecting a track180
– switching on/off166
– tone control167
– volume
167
Center armrest
– front120
– rear123
Center brake lamp238
Center console14
"Central locking"30
Central locking
– from inside33
– from outside30
Central locking system30
– comfort access39
Changes, technical
– refer to For your own
safety5
– refer to Parts and
accessories6
Changing language on
Control Display87
Changing scale for
navigation156
Changing units of measure on
Control Display87
Changing wheels226,239
CHECK button83
Check Control82
"Check Control
messages"83Check Gas Cap217
Checking the air pressure,
refer to Tire inflation
pressure218
Child restraint fixing system
LATCH58
Child restraints56
Child restraint systems56
Child-safety lock59
Child seats, refer to
Transporting children
safely56
Chime, refer to Check
Control82
Chock240
Chrome parts, refer to Caring
for your vehicle brochure
Cigarette lighter122
Cigarette lighter socket, refer
to Connecting electrical
devices122
Cleaning, refer to Caring for
your vehicle brochure
"Climate"51,112
Clock77
– 12h/24h mode86
– hour signal86
– setting time and date85
Closing
– from inside33
– from outside30
Closing fuel filler cap217
Clothes hooks121
Cockpit10
Cold start, refer to Starting
engine61
Comfort access39
– observe in car wash40
– replacing battery, remote
control40
Comfort area, refer to Around
the center console14
Comfort operation
– glass sunroof31
– windows31
– windows with comfort
access39
– with comfort access39
Comfort seat46
Page 268 of 286
Everything from A to Z
266 "Communication"198,208
Compact Disc
– refer to CD changer179
– refer to CD player179
Compact wheel
– inflation pressure219,220
– wheel change241
Compartment for remote
control, refer to Ignition
lock60
Compartments
– in cargo bay, Sports
Wagon126
– refer to Storage area
package, Sports Wagon126
– refer to Storage
compartments121
Compressed audio files179
Computer78
– displays on Control
Display79
– hour signal86
"Concert hall", refer to Tone
control169
"Concierge"210
Condensation, refer to When
vehicle is parked134
Condition Based Service
CBS232
"Confirmation"32
Confirmation signals for
locking and unlocking31
Connecting car vacuum
cleaner, refer to Connecting
electrical devices122
Consumption, refer to
Average fuel
consumption79
Consumption indicator,
Energy Control78
Consumption statistics, refer
to Average fuel
consumption79
"Continue guidance to
destination?"155
"Contrast" with BMW Night
Vision105Control Center, refer to
iDrive16
Control Display, refer to
iDrive16
– setting brightness87
– switching off/on21
Controller, refer to iDrive16
Controls, refer to Cockpit10
Coolant231
– checking level231
– temperature77
Cooling, maximum114
Cooling fluid, refer to
Coolant231
Cooling function, automatic
climate control
114
Cooling system, refer to
Coolant231
Copyright2
Cornering Brake Control
CBC90
Country of destination for
navigation143
Courtesy lamps110
Cover, roll-up cover,
Sports Wagon124
Cradle for telephone or mobile
phone120
Cruise control68
– active cruise control69
Cruising range78
Cup holders121
Curb weight, refer to
Weights255
Current consumption, refer to
Energy Control78
"Current position"162
Current position
– displaying162
– entering150
– storing150
"Curve mode" with
BMW Night Vision105
"Customer
Relations"202,210
Cylinders, refer to Engine
data252
D
Dashboard, refer to
Cockpit10
Data, technical252
– dimensions253
– engine252
– weights255
"Date"86
Date77
– display format86
– retrieval77
– setting86
"Date format"86
"Daytime running lamps"108
Daytime running lamps108
DBC Dynamic Brake Control,
warning lamp93
"Deactivated"49
Decommissioning the vehicle,
refer to Caring for your
vehicle brochure
Defect
– door lock32
– fuel filler door216
– glass sunroof43
– luggage compartment lid34
– panorama glass sunroof44
– tailgate36
Defrosting windows113
Defrosting windows and
removing condensation113
Defrosting windshield, refer to
Defrosting windows113
Defrost position, refer to
Defrosting windows113
"Delete address book" for
navigation system151
"Delete all numbers" for
mobile phone201
"Delete data" for navigation
system151
"Delete" for mobile
phone201
Destination address
– deleting151
– entering142,145