air BMW 535I SEDAN 2008 E60 Owner's Guide
[x] Cancel search | Manufacturer: BMW, Model Year: 2008, Model line: 535I SEDAN, Model: BMW 535I SEDAN 2008 E60Pages: 288, PDF Size: 7.03 MB
Page 104 of 288
Technology for comfort, convenience and safety
102
Operational readiness of airbag system
From radio readiness, refer to page61, the
warning lamp lights up briefly, indicating the
operational readiness of the entire airbag sys-
tem and the safety belt tensioners.
Airbag system malfunction
>Warning lamp does not light up from radio
readiness.
>Warning lamp lights up continuously.
Have the airbag system checked immedi-
ately in case of a malfunction, otherwise
there is a danger that the airbag system may not
respond in the expected manner in an accident
despite an impact of corresponding intensity.<
Head-Up Display*
The concept
With the Head-Up Display important informa-
tion is projected into the driver's field of view,
e.g. navigation instructions. This enables you to
take in this information without looking away
from the road.
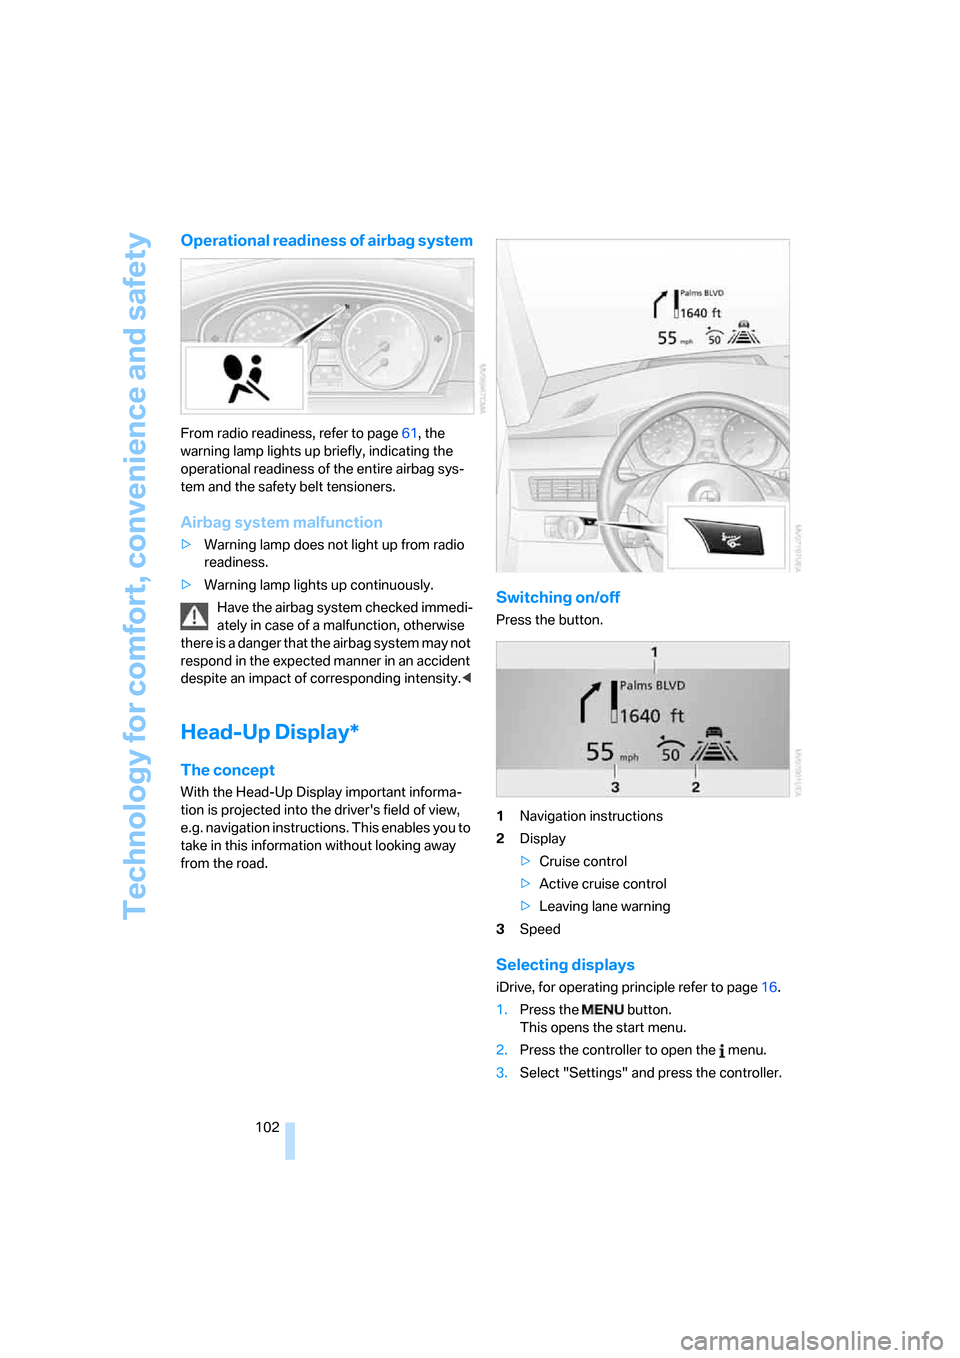
Switching on/off
Press the button.
1Navigation instructions
2Display
>Cruise control
>Active cruise control
>Leaving lane warning
3Speed
Selecting displays
iDrive, for operating principle refer to page16.
1.Press the button.
This opens the start menu.
2.Press the controller to open the menu.
3.Select "Settings" and press the controller.
Page 105 of 288
Controls
103Reference
At a glance
Driving tips
Communications
Navigation
Entertainment
Mobility
4.Select "Display settings" and press the
controller.
5.Change to upper field if necessary. Turn the
controller until "Head-Up Display" is
selected and press the controller.
6.Change into the second field from the top.
Turn the controller until "Head-Up Display"
is selected and press the controller.
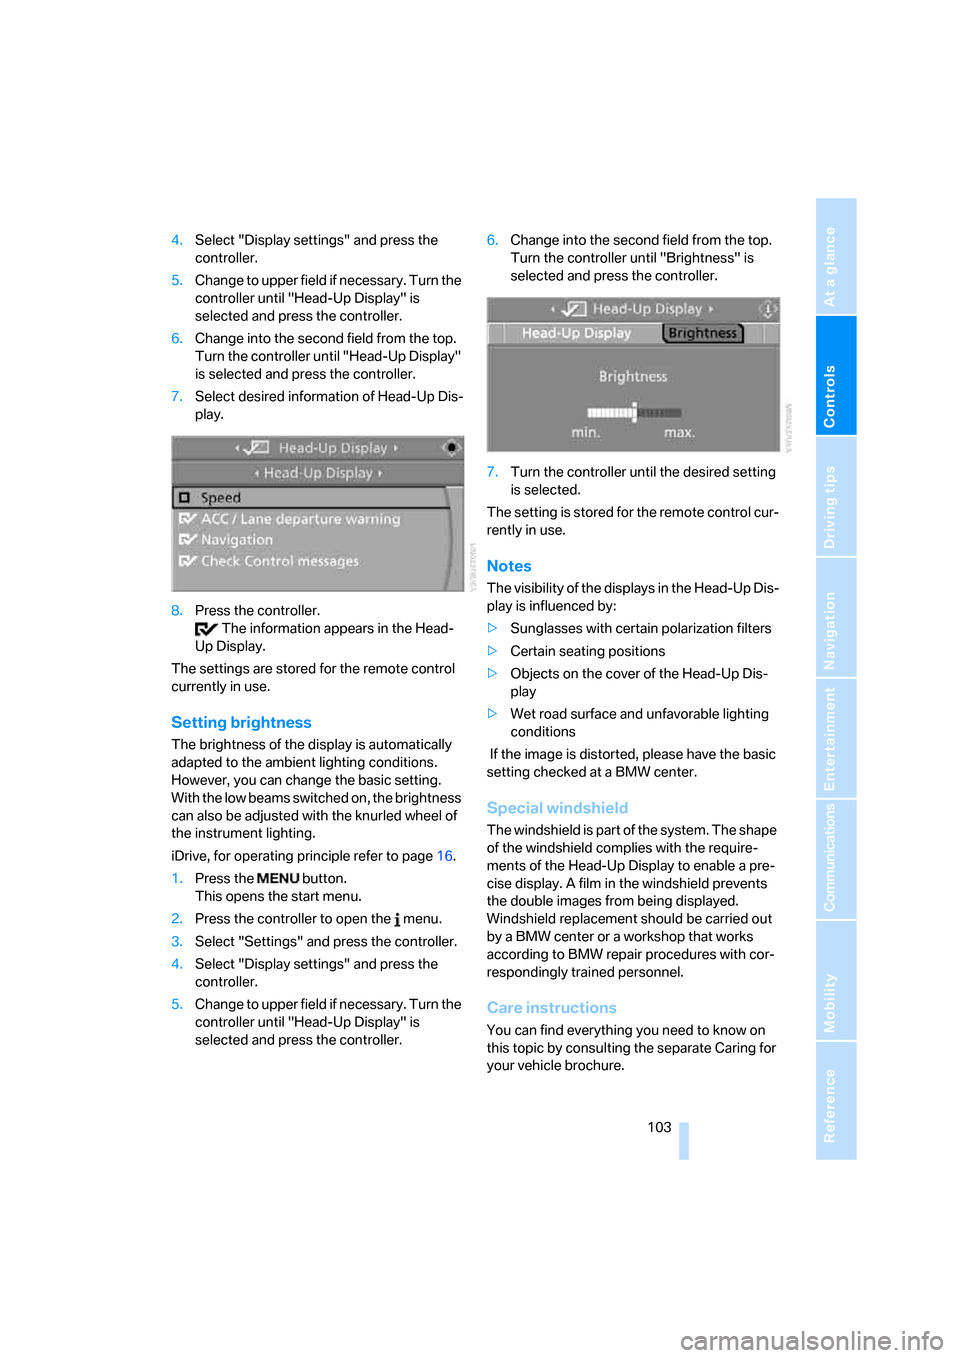
7.Select desired information of Head-Up Dis-
play.
8.Press the controller.
The information appears in the Head-
Up Display.
The settings are stored for the remote control
currently in use.
Setting brightness
The brightness of the display is automatically
adapted to the ambient lighting conditions.
However, you can change the basic setting.
With the low beams switched on, the brightness
can also be adjusted with the knurled wheel of
the instrument lighting.
iDrive, for operating principle refer to page16.
1.Press the button.
This opens the start menu.
2.Press the controller to open the menu.
3.Select "Settings" and press the controller.
4.Select "Display settings" and press the
controller.
5.Change to upper field if necessary. Turn the
controller until "Head-Up Display" is
selected and press the controller.6.Change into the second field from the top.
Turn the controller until "Brightness" is
selected and press the controller.
7.Turn the controller until the desired setting
is selected.
The setting is stored for the remote control cur-
rently in use.
Notes
The visibility of the displays in the Head-Up Dis-
play is influenced by:
>Sunglasses with certain polarization filters
>Certain seating positions
>Objects on the cover of the Head-Up Dis-
play
>Wet road surface and unfavorable lighting
conditions
If the image is distorted, please have the basic
setting checked at a BMW center.
Special windshield
The windshield is part of the system. The shape
of the windshield complies with the require-
ments of the Head-Up Display to enable a pre-
cise display. A film in the windshield prevents
the double images from being displayed.
Windshield replacement should be carried out
by a BMW center or a workshop that works
according to BMW repair procedures with cor-
respondingly trained personnel.
Care instructions
You can find everything you need to know on
this topic by consulting the separate Caring for
your vehicle brochure.
Page 116 of 288
Climate
114
Climate
Automatic climate control
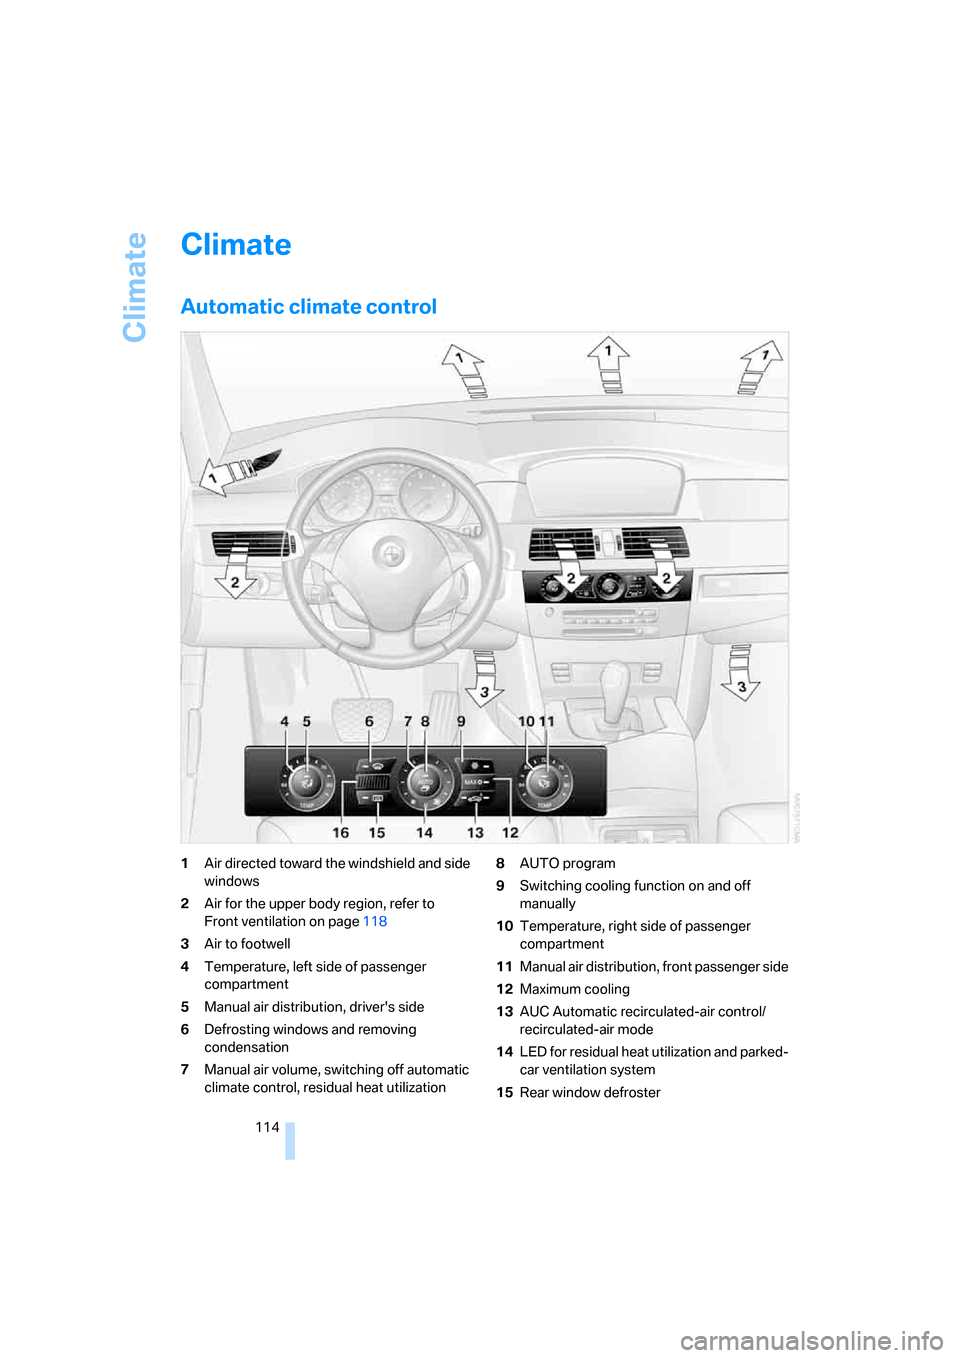
1Air directed toward the windshield and side
windows
2Air for the upper body region, refer to
Front ventilation on page118
3Air to footwell
4Temperature, left side of passenger
compartment
5Manual air distribution, driver's side
6Defrosting windows and removing
condensation
7Manual air volume, switching off automatic
climate control, residual heat utilization8AUTO program
9Switching cooling function on and off
manually
10Temperature, right side of passenger
compartment
11Manual air distribution, front passenger side
12Maximum cooling
13AUC Automatic recirculated-air control/
recirculated-air mode
14LED for residual heat utilization and parked-
car ventilation system
15Rear window defroster
Page 117 of 288
Controls
115Reference
At a glance
Driving tips
Communications
Navigation
Entertainment
Mobility
16Air grill for interior temperature sensor –
please keep clear and unobstructed
The current setting for air distribution is dis-
played on the Control Display.
A congenial climate
The AUTO program offers the optimum air dis-
tribution and air volume for virtually all condi-
tions, refer to AUTO program below. Now you
only need to select an interior temperature
pleasant to you.
The following sections contain more detailed
information on the available setting options.
Most settings are stored for the remote control
currently in use, also refer to Personal Profile
settings on page29.
AUTO program
The AUTO program handles the
adjustment of air volume and air
distribution to the windshield and
side windows, in the direction of
the upper body and in the footwell.
It also adapts your instructions for the tempera-
ture to outside influences throughout the year.
The cooling is switched on automatically with
the AUTO program. At the same time, a con-
densation sensor controls the program in such
a way that window condensation is prevented
as much as possible.
Intensity of AUTO program
You can adjust the intensity of the AUTO pro-
gram by repeatedly pressing the AUTO button.
The respective current setting is briefly dis-
played on the Control Display when the button
is pressed.
You can also adjust the intensity of the AUTO
program via iDrive.
iDrive, for operating principle refer to page16.
1.Press the button.
This opens the start menu.
2.Move the controller to the left to open "Cli-
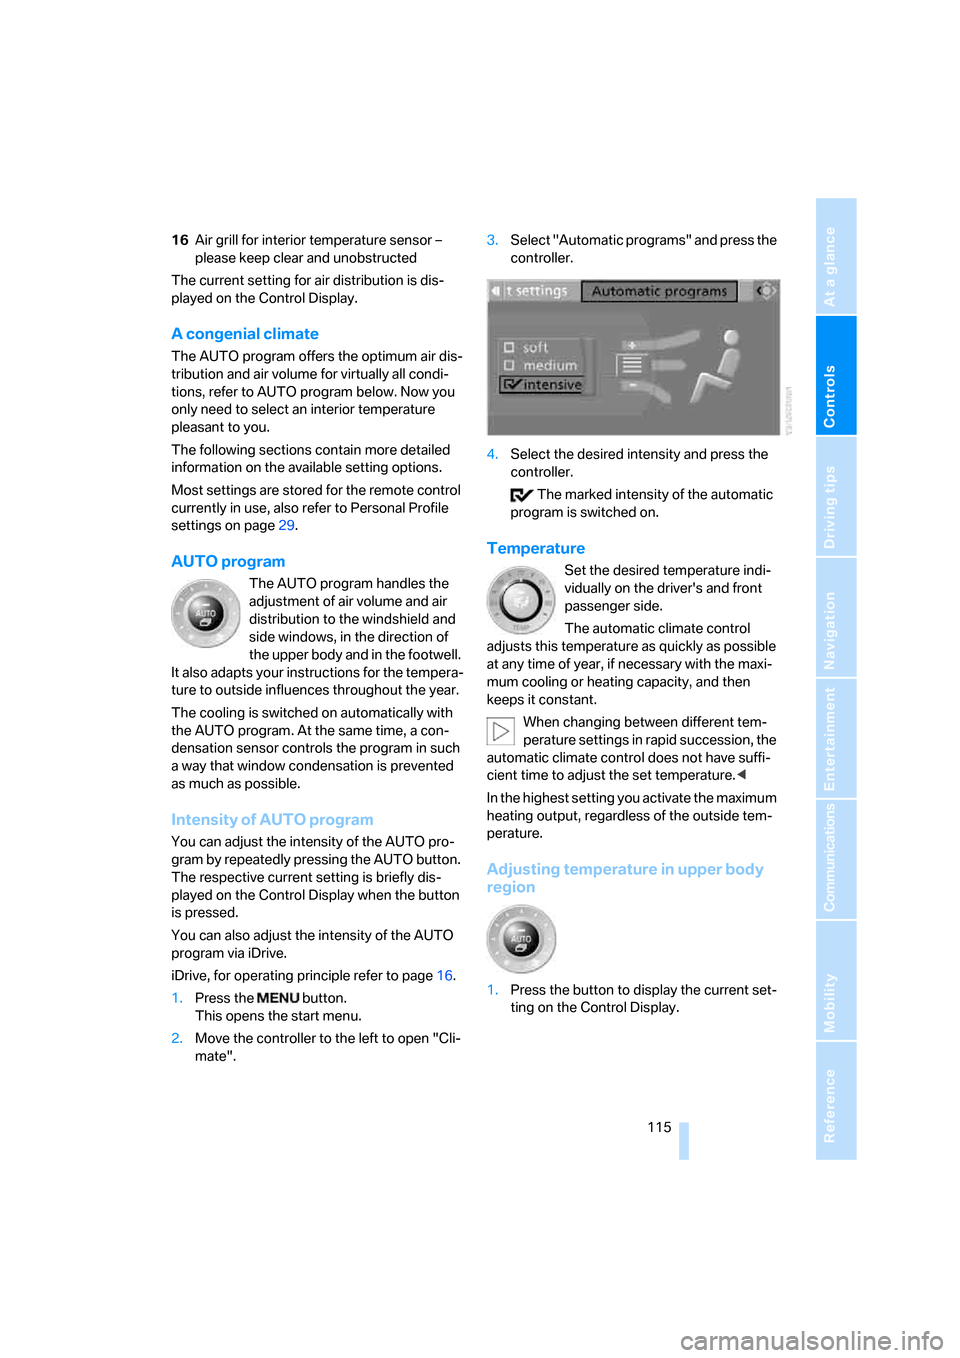
mate".3.Select "Automatic programs" and press the
controller.
4.Select the desired intensity and press the
controller.
The marked intensity of the automatic
program is switched on.
Temperature
Set the desired temperature indi-
vidually on the driver's and front
passenger side.
The automatic climate control
adjusts this temperature as quickly as possible
at any time of year, if necessary with the maxi-
mum cooling or heating capacity, and then
keeps it constant.
When changing between different tem-
perature settings in rapid succession, the
automatic climate control does not have suffi-
cient time to adjust the set temperature.<
In the highest setting you activate the maximum
heating output, regardless of the outside tem-
perature.
Adjusting temperature in upper body
region
1.Press the button to display the current set-
ting on the Control Display.
Page 118 of 288
Climate
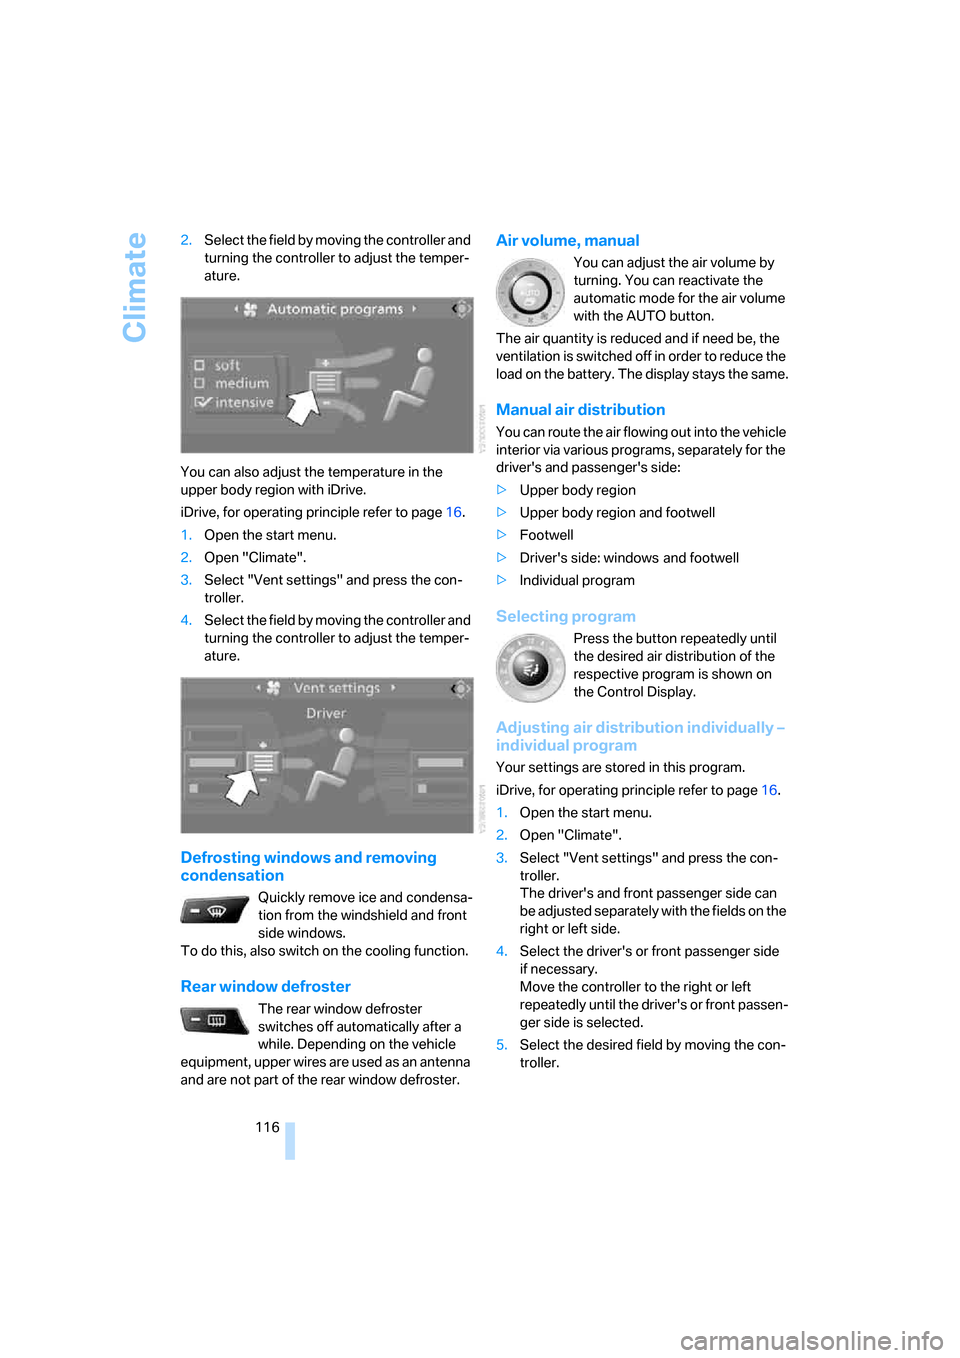
116 2.Select the field by moving the controller and
turning the controller to adjust the temper-
ature.
You can also adjust the temperature in the
upper body region with iDrive.
iDrive, for operating principle refer to page16.
1.Open the start menu.
2.Open "Climate".
3.Select "Vent settings" and press the con-
troller.
4.Select the field by moving the controller and
turning the controller to adjust the temper-
ature.
Defrosting windows and removing
condensation
Quickly remove ice and condensa-
tion from the windshield and front
side windows.
To do this, also switch on the cooling function.
Rear window defroster
The rear window defroster
switches off automatically after a
while. Depending on the vehicle
equipment, upper wires are used as an antenna
and are not part of the rear window defroster.
Air volume, manual
You can adjust the air volume by
turning. You can reactivate the
automatic mode for the air volume
with the AUTO button.
The air quantity is reduced and if need be, the
ventilation is switched off in order to reduce the
load on the battery. The display stays the same.
Manual air distribution
You can route the air flowing out into the vehicle
interior via various programs, separately for the
driver's and passenger's side:
>Upper body region
>Upper body region and footwell
>Footwell
>Driver's side: windows and footwell
>Individual program
Selecting program
Press the button repeatedly until
the desired air distribution of the
respective program is shown on
the Control Display.
Adjusting air distribution individually –
individual program
Your settings are stored in this program.
iDrive, for operating principle refer to page16.
1.Open the start menu.
2.Open "Climate".
3.Select "Vent settings" and press the con-
troller.
The driver's and front passenger side can
be adjusted separately with the fields on the
right or left side.
4.Select the driver's or front passenger side
if necessary.
Move the controller to the right or left
repeatedly until the driver's or front passen-
ger side is selected.
5.Select the desired field by moving the con-
troller.
Page 119 of 288
Controls
117Reference
At a glance
Driving tips
Communications
Navigation
Entertainment
Mobility
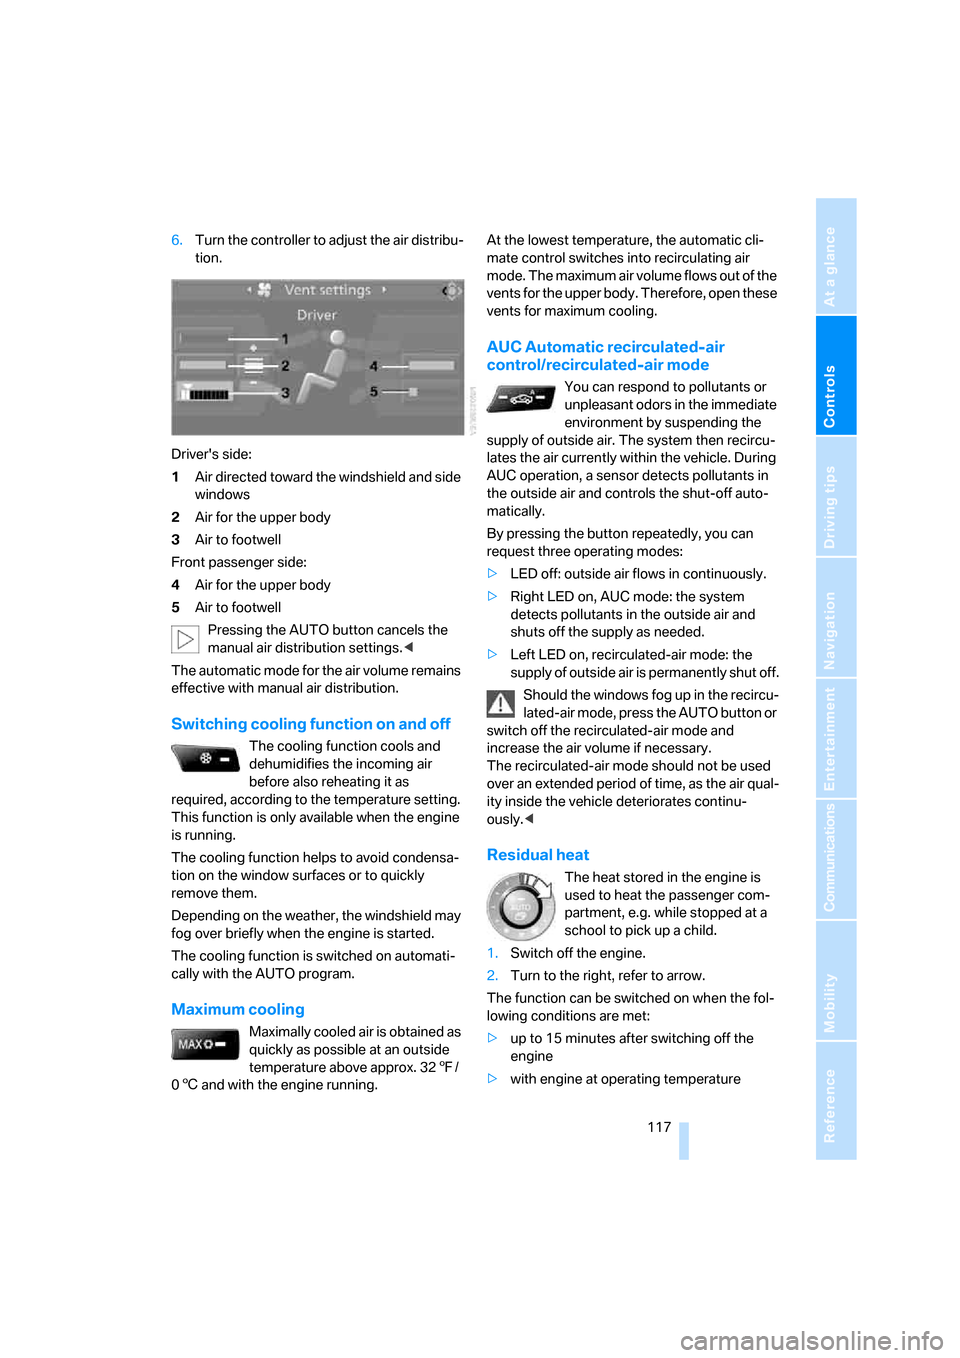
6.Turn the controller to adjust the air distribu-
tion.
Driver's side:
1Air directed toward the windshield and side
windows
2Air for the upper body
3Air to footwell
Front passenger side:
4Air for the upper body
5Air to footwell
Pressing the AUTO button cancels the
manual air distribution settings.<
The automatic mode for the air volume remains
effective with manual air distribution.
Switching cooling function on and off
The cooling function cools and
dehumidifies the incoming air
before also reheating it as
required, according to the temperature setting.
This function is only available when the engine
is running.
The cooling function helps to avoid condensa-
tion on the window surfaces or to quickly
remove them.
Depending on the weather, the windshield may
fog over briefly when the engine is started.
The cooling function is switched on automati-
cally with the AUTO program.
Maximum cooling
Maximally cooled air is obtained as
quickly as possible at an outside
temperature above approx. 327/
06 and with the engine running.At the lowest temperature, the automatic cli-
mate control switches into recirculating air
mode. The maximum air volume flows out of the
vents for the upper body. Therefore, open these
vents for maximum cooling.
AUC Automatic recirculated-air
control/recirculated-air mode
You can respond to pollutants or
unpleasant odors in the immediate
environment by suspending the
supply of outside air. The system then recircu-
lates the air currently within the vehicle. During
AUC operation, a sensor detects pollutants in
the outside air and controls the shut-off auto-
matically.
By pressing the button repeatedly, you can
request three operating modes:
>LED off: outside air flows in continuously.
>Right LED on, AUC mode: the system
detects pollutants in the outside air and
shuts off the supply as needed.
>Left LED on, recirculated-air mode: the
supply of outside air is permanently shut off.
Should the windows fog up in the recircu-
lated-air mode, press the AUTO button or
switch off the recirculated-air mode and
increase the air volume if necessary.
The recirculated-air mode should not be used
over an extended period of time, as the air qual-
ity inside the vehicle deteriorates continu-
ously.<
Residual heat
The heat stored in the engine is
used to heat the passenger com-
partment, e.g. while stopped at a
school to pick up a child.
1.Switch off the engine.
2.Turn to the right, refer to arrow.
The function can be switched on when the fol-
lowing conditions are met:
>up to 15 minutes after switching off the
engine
>with engine at operating temperature
Page 120 of 288
Climate
118 >with sufficient battery voltage
>at an outside temperature below 777/
256
From radio readiness the interior temperature,
the air volume and the air distribution can be
set.
Switching automatic climate control
on and off
1.Turn to the left to minimum air volume.
2.After approx. 1 second, turn to the left
again.
You switch on the system again by pressing any
button of the automatic climate control.
Front ventilation
1Knurled wheels to smoothly open and close
vent outlets
2Levers to change the vent outlet direction
Do not drop any foreign objects into the
vent outlets, otherwise these could be
catapulted outwards and lead to injuries.<
Ventilation for cooling
Adjust the vent outlets to direct the flow of cool
air in your direction, for instance, if the interior
has become too warm, etc.
Draft-free ventilation
Set the vent outlets so that the air flows past
you and is not directed straight at you.
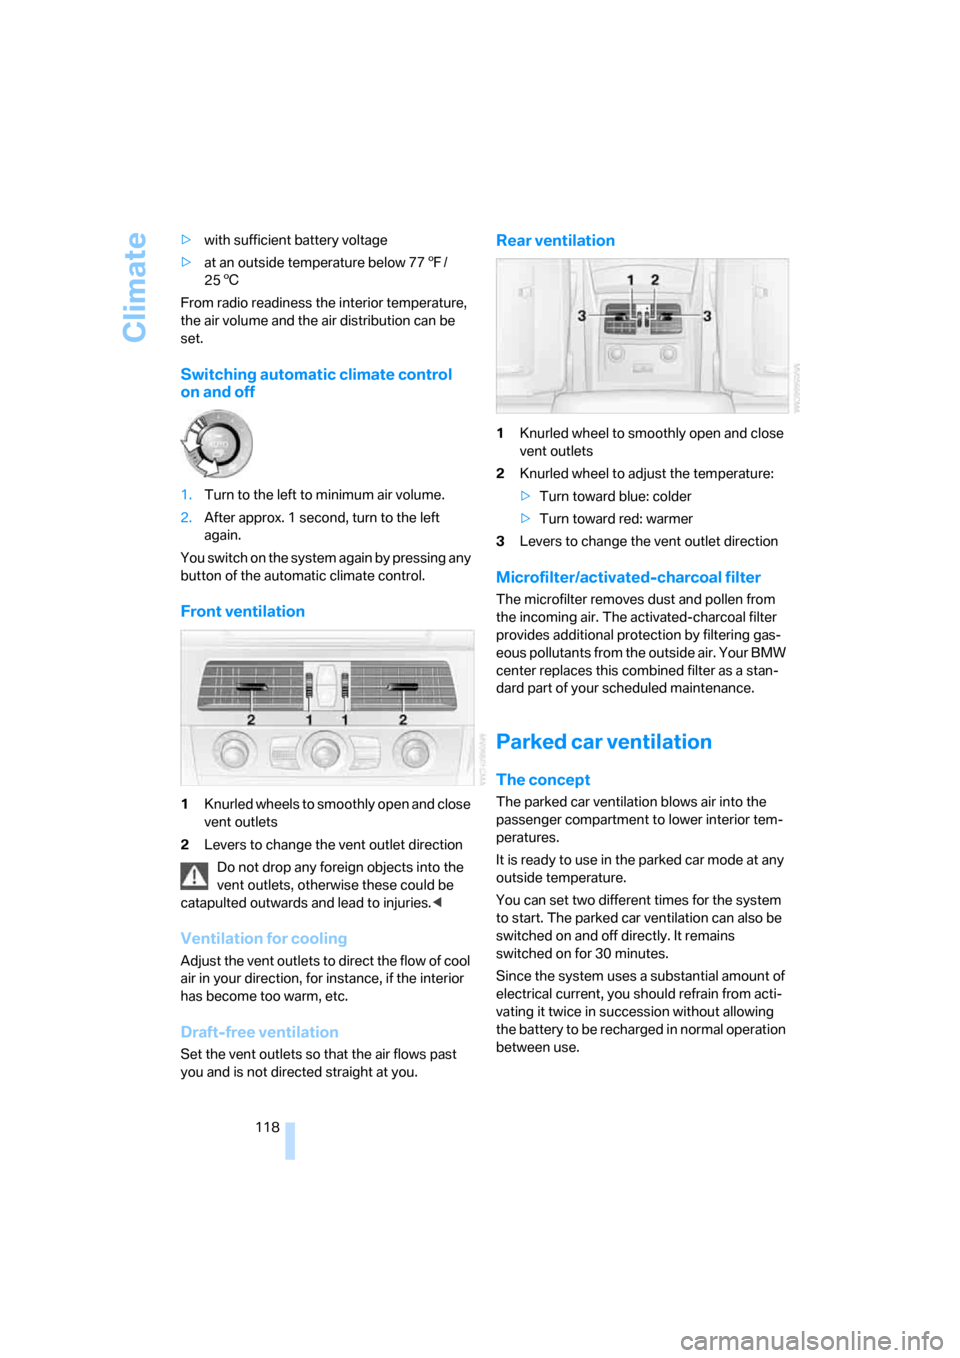
Rear ventilation
1Knurled wheel to smoothly open and close
vent outlets
2Knurled wheel to adjust the temperature:
>Turn toward blue: colder
>Turn toward red: warmer
3Levers to change the vent outlet direction
Microfilter/activated-charcoal filter
The microfilter removes dust and pollen from
the incoming air. The activated-charcoal filter
provides additional protection by filtering gas-
eous pollutants from the outside air. Your BMW
center replaces this combined filter as a stan-
dard part of your scheduled maintenance.
Parked car ventilation
The concept
The parked car ventilation blows air into the
passenger compartment to lower interior tem-
peratures.
It is ready to use in the parked car mode at any
outside temperature.
You can set two different times for the system
to start. The parked car ventilation can also be
switched on and off directly. It remains
switched on for 30 minutes.
Since the system uses a substantial amount of
electrical current, you should refrain from acti-
vating it twice in succession without allowing
the battery to be recharged in normal operation
between use.
Page 121 of 288
Controls
119Reference
At a glance
Driving tips
Communications
Navigation
Entertainment
Mobility
The air emerges through the upper body region
vent outlets in the instrument panel. These vent
outlets must be open for the system to operate.
The parked car ventilation is operated via iDrive.
Switching on and off directly
iDrive, for operating principle refer to page16.
1.Open the start menu.
2.Move the controller to the left to open "Cli-
mate".
3.Select "Parked car operation" and press the
controller.
4.Select "Automatic ventilation" and press
the controller.
5.Select "Parked car ventilation" and press
the controller.
The parked-car ventilation is switched on.
The symbol on the display of the automatic
climate control flashes.
Preselecting activation times
1.Open the start menu.
2.Move the controller to the left to open "Cli-
mate".
3.Select "Parked car operation" and press the
controller.
4.Select "Activation time" and press the con-
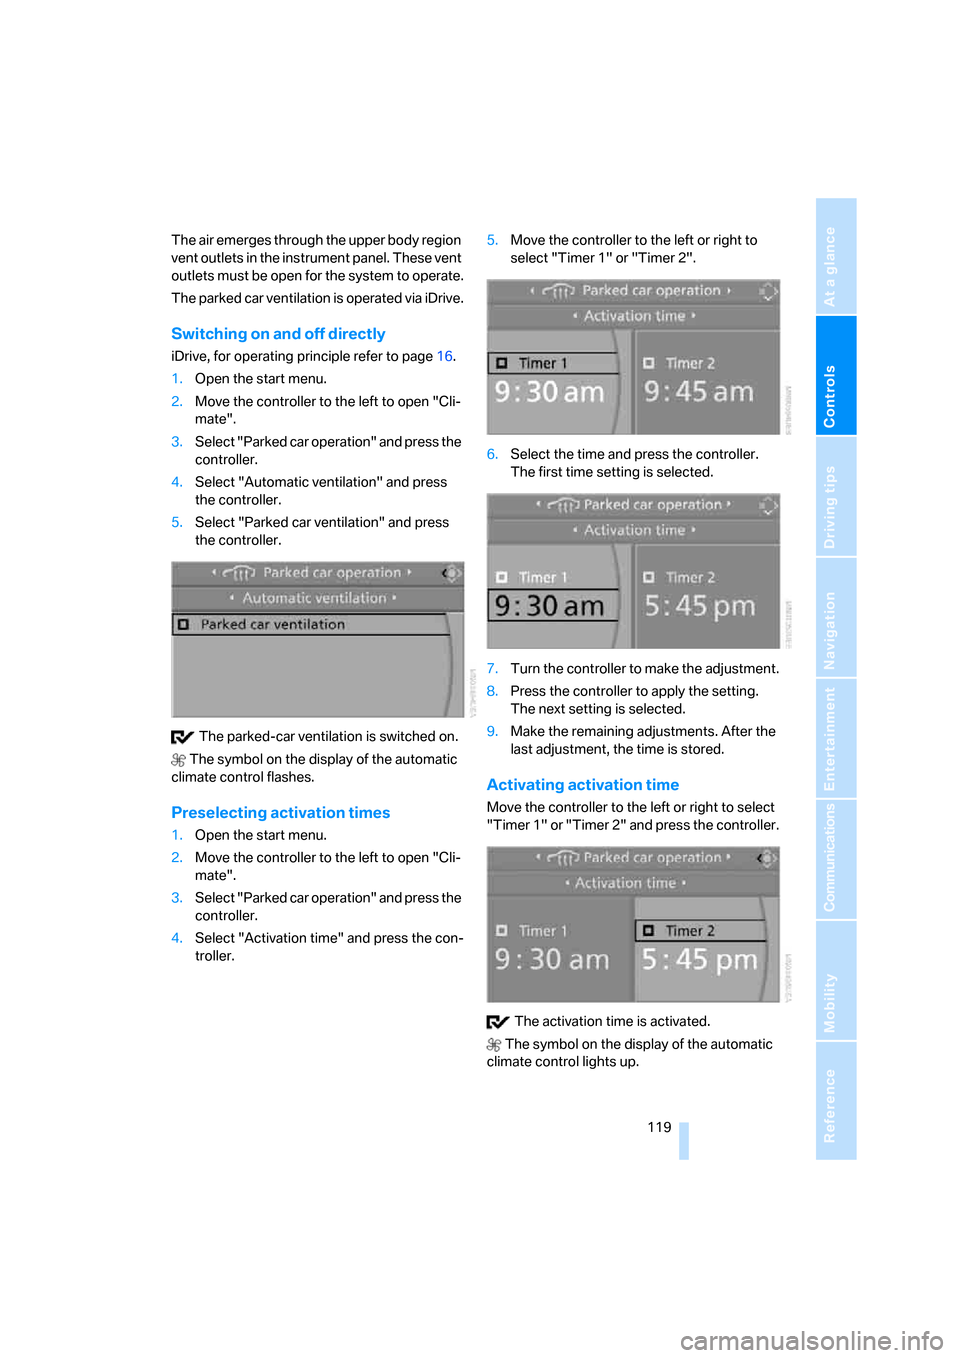
troller.5.Move the controller to the left or right to
select "Timer 1" or "Timer 2".
6.Select the time and press the controller.
The first time setting is selected.
7.Turn the controller to make the adjustment.
8.Press the controller to apply the setting.
The next setting is selected.
9.Make the remaining adjustments. After the
last adjustment, the time is stored.
Activating activation time
Move the controller to the left or right to select
"Timer 1" or "Timer 2" and press the controller.
The activation time is activated.
The symbol on the display of the automatic
climate control lights up.
Page 137 of 288
Driving tips
135Reference
At a glance
Controls
Communications
Navigation
Entertainment
Mobility
Thinking ahead when driving
Avoid unnecessary acceleration and braking.
To do so, maintain the appropriate distance
from the vehicle in front of you. An anticipatory
and smooth driving style reduces fuel con-
sumption.
Avoiding high engine speeds
Use 1st gear only for starting off. Accelerate
rapidly in 2nd gear and above. Avoid high
engine speeds in doing so and shift into the
next gear early.
When you have reached the desired speed,
shift into the highest possible gear and drive
with the lowest possible engine speed while
maintaining a constant a vehicle speed.
In general: driving at a low engine speed
reduces fuel consumption and minimizes wear.
Taking advantage of coasting
When approaching a red light, let off the gas
and allow the vehicle to coast to a stop in the
highest possible gear.
On steep roadways, let off the gas and allow the
vehicle to roll in the appropriate gear.
The flow of fuel is interrupted when coasting.
Switching off engine during longer
stops
Switch off the engine at longer stops such as
traffic signals, railroad crossings, or in traffic
jams. Even having the engine switched off for
approx. 4 seconds results in fuel savings.
Switching off functions currently not
required
Functions such as air conditioning, seat heat-
ing, or rear window defrosting consume a lot of
energy and require additional fuel. Their influ-
ence is particularly pronounced in city traffic
and stop & go operation. For this reason, it is a
good idea to switch these functions off when
they are not really needed.
Having maintenance carried out
Have the vehicle serviced regularly in order to
achieve the optimum economy and service life
of your vehicle. BMW recommends having the
maintenance performed by a BMW center. Also
please pay attention to the BMW maintenance
system, refer to page235.
General driving notes
Closing luggage compartment lid/
tailgate
Operate the vehicle only when the lug-
gage compartment lid/tailgate is com-
pletely closed. Otherwise, exhaust fumes could
enter the interior of the vehicle.<
If it is absolutely necessary to drive with the lug-
gage compartment lid open:
1.Close all windows and the glass sunroof or
panorama glass sunroof.
2.Increase the air volume of the automatic cli-
mate control to a high level, refer to
page116.
Hot exhaust system
As in all vehicles, extremely high temper-
atures are generated on the exhaust sys-
tem. Do not remove the heat shields installed
adjacent to it, and never apply undercoating to
them. When driving, standing at idle and while
parking take care to avoid possible contact
between the hot exhaust system and any highly
flammable materials such as hay, leaves, grass,
etc. Such contact could lead to a fire, and with it
the risk of serious property damage as well as
personal injury. Do not touch hot exhaust tail
pipes. Otherwise there is a risk of burns.<
Hydroplaning
When driving on wet or slushy roads,
reduce road speed. If you do not, a wedge
of water can form between tires and road sur-
face. This phenomenon is referred to as hydro-
planing, and is characterized by a partial or
complete loss of contact between the tires and
Page 138 of 288
Things to remember when driving
136 the road surface, ultimately undermining your
ability to steer and brake the vehicle.<
The risk of hydroplaning increases as the tread
depth of the tires decreases, refer also to Mini-
mum tire tread on page227.
Driving through water
Do not drive through water on the road if it
is deeper than 1 ft/30 cm, and then only at
walking speed at the most. Otherwise, the vehi-
cle's engine, the electrical systems and the
transmission may be damaged.<
Using handbrake on inclines
On inclines, do not hold the vehicle in
place for a long time by riding the clutch;
use the handbrake. Otherwise greater clutch
wear will result.<
Braking safely
Your BMW is equipped with ABS as a standard
feature. In situations that require it, it is best to
brake with full force. Since the vehicle maintains
steering responsiveness, you can still avoid
possible obstacles with a minimum of steering
effort.
Pulsation of the brake pedal, combined with
sounds from the hydraulic circuits, indicate that
ABS is in its active mode.
Do not drive with your foot resting on the
brake pedal. Even light but consistent
pedal pressure can lead to high temperatures,
brake wear and possibly even brake failure.<
Driving in wet conditions
When roads are wet or there is heavy rain,
briefly exert gentle pressure on the brake pedal
every few miles. Monitor traffic conditions to
ensure that this maneuver does not endanger
other road users. The heat generated in this
process helps dry the pads and rotors to ensure
that full braking efficiency will then be available
when you need it.
Hills
To prevent overheating and the resulting
reduced efficiency of the brake system,
drive long or steep downhill gradients in the
gear in which the least braking is required. Even
light but consistent pressure on the brake pedal
can lead to high temperatures, brake wear and
possibly even brake failure.<
The braking effect of the engine can be further
increased by downshifting, if necessary all the
way down into first gear. This strategy helps
you avoid placing excessive loads on the brake
system. For information on downshifting in the
manual mode of the automatic transmission,
refer to page64.
Do not drive with the clutch depressed, in
idle or with the engine switched off, other-
wise there will be no engine braking action or
support of the braking force and steering.
Never allow floor mats, carpets or any other
objects to protrude into the area of movement
of the pedals and impair their operation.<
Corrosion on brake rotors
When the vehicle is driven only occasionally,
during extended periods when the vehicle is not
used at all, and in operating conditions where
brake applications are less frequent, there is an
increased tendency for corrosion to form on
rotors, while contaminants accumulate on the
brake pads. This occurs because the minimum
pressure which must be exerted by the pads
during brake applications to clean the rotors is
not reached.
Should corrosion form on the brake rotors, the
brakes will tend to respond with a pulsating
effect that even extended application will fail to
cure.
When vehicle is parked
Condensation forms in the air conditioner sys-
tem during operation, and then exits under the
vehicle. Traces of condensed water under the
vehicle are therefore normal.