buttons BMW 535I XDRIVE 2010 Owners Manual
[x] Cancel search | Manufacturer: BMW, Model Year: 2010, Model line: 535I XDRIVE, Model: BMW 535I XDRIVE 2010Pages: 271, PDF Size: 8.83 MB
Page 11 of 271
At a glance
This overview of buttons, switches and displays
is intended to familiarize you with your vehicle's
operating environment. The section will also
assist you in becoming acquainted with the
control concepts and options available for
operating the various systems.
At a glance
Page 13 of 271
At a glance
11Reference
Controls
Driving tips
Communications
Navigation
Entertainment
Mobility
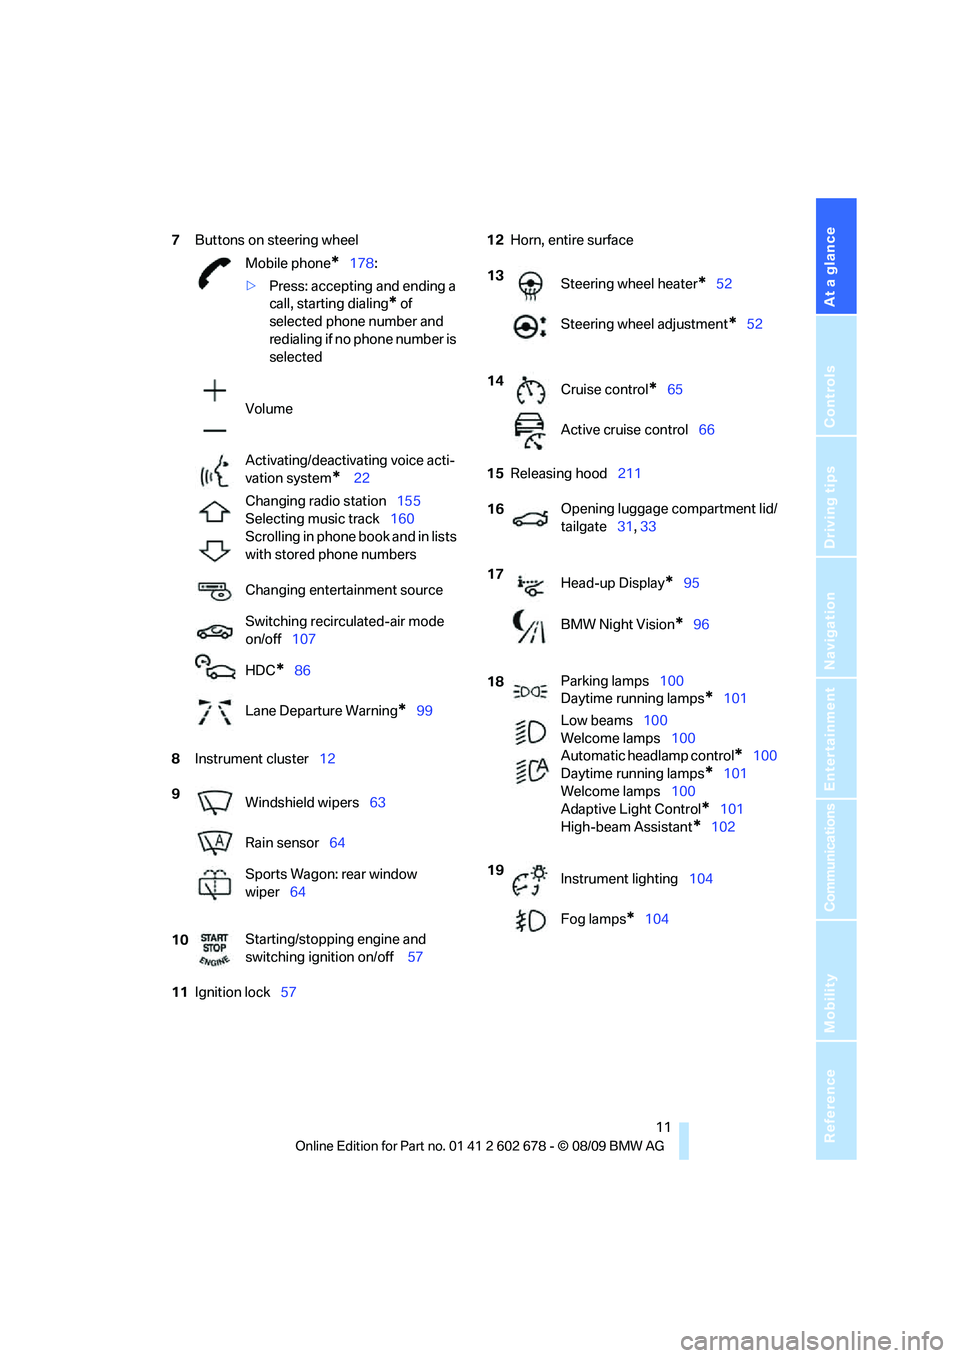
7Buttons on steering wheel
8Instrument cluster12
11Ignition lock5712Horn, entire surface
15Releasing hood211 Mobile phone
*178:
>Press: accepting and ending a
call, starting dialing
* of
selected phone number and
redialing if no phone number is
selected
Volume
Activating/deactivating voice acti-
vation system
* 22
Changing radio station155
Selecting music track160
Scrolling in phone book and in lists
with stored phone numbers
Changing entertainment source
Switching recirculated-air mode
on/off107
HDC
*86
Lane Departure Warning
*99
9
Windshield wipers63
Rain sensor64
Sports Wagon: rear window
wiper64
10Starting/stopping engine and
switching ignition on/off 57
13
Steering wheel heater*52
Steering wheel adjustment
*52
14
Cruise control
*65
Active cruise control66
16Opening luggage compartment lid/
tailgate31, 33
17
Head-up Display
*95
BMW Night Vision
*96
18Parking lamps100
Daytime running lamps
*101
Low beams100
Welcome lamps100
Automatic headlamp control
*100
Daytime running lamps
*101
Welcome lamps100
Adaptive Light Control
*101
High-beam Assistant
*102
19
Instrument lighting104
Fog lamps
*104
Page 17 of 271
At a glance
15Reference
Controls
Driving tips
Communications
Navigation
Entertainment
Mobility
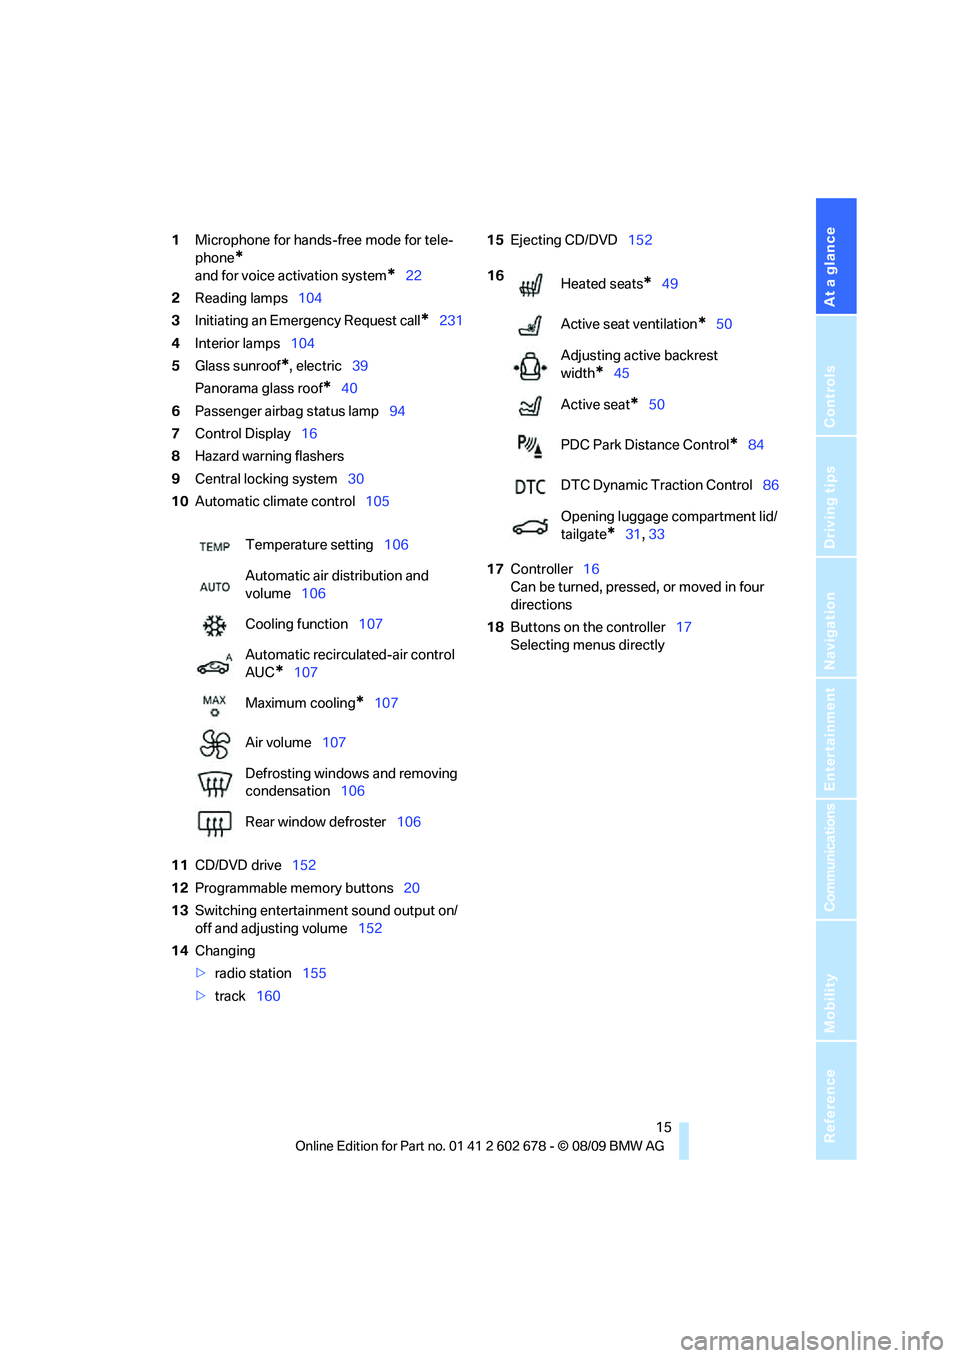
1Microphone for hands-free mode for tele-
phone
*
and for voice activation system*22
2Reading lamps104
3Initiating an Emergency Request call
*231
4Interior lamps104
5Glass sunroof
*, electric39
Panorama glass roof
*40
6Passenger airbag status lamp94
7Control Display16
8Hazard warning flashers
9Central locking system30
10Automatic climate control105
11CD/DVD drive152
12Programmable memory buttons20
13Switching entertainment sound output on/
off and adjusting volume152
14Changing
>radio station155
>track16015Ejecting CD/DVD152
17Controller16
Can be turned, pressed, or moved in four
directions
18Buttons on the controller17
Selecting menus directly Temperature setting106
Automatic air distribution and
volume106
Cooling function107
Automatic recirculated-air control
AUC
*107
Maximum cooling
*107
Air volume107
Defrosting windows and removing
condensation106
Rear window defroster106
16
Heated seats*49
Active seat ventilation
*50
Adjusting active backrest
width
*45
Active seat
*50
PDC Park Distance Control
*84
DTC Dynamic Traction Control86
Opening luggage compartment lid/
tailgate
*31, 33
Page 18 of 271
iDrive
16
iDrive
iDrive combines the functions of a large number
of switches. This allows these functions to be
operated from a central position. The following
section provides an introduction to basic menu navigation. The control of the individual func-
tions is described in connection with the rele-
vant equipment.
Controls
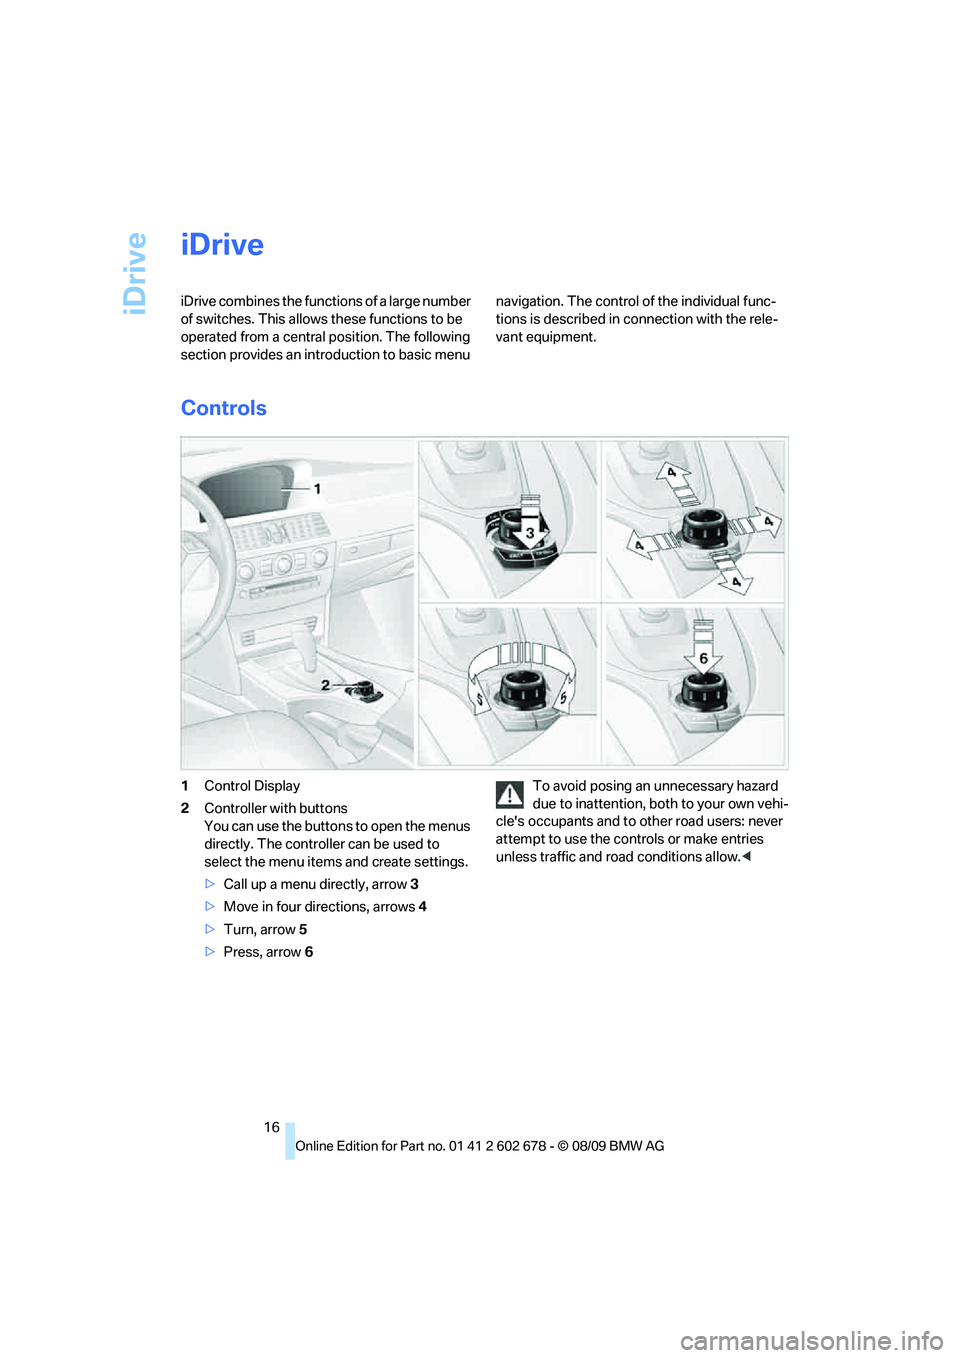
1Control Display
2Controller with buttons
You can use the buttons to open the menus
directly. The controller can be used to
select the menu items and create settings.
>Call up a menu directly, arrow3
>Move in four directions, arrows4
>Turn, arrow5
>Press, arrow6To avoid posing an unnecessary hazard
due to inattention, both to your own vehi-
cle's occupants and to other road users: never
attempt to use the controls or make entries
unless traffic and road conditions allow.<
Page 19 of 271
At a glance
17Reference
Controls
Driving tips
Communications
Navigation
Entertainment
Mobility
Operating principle
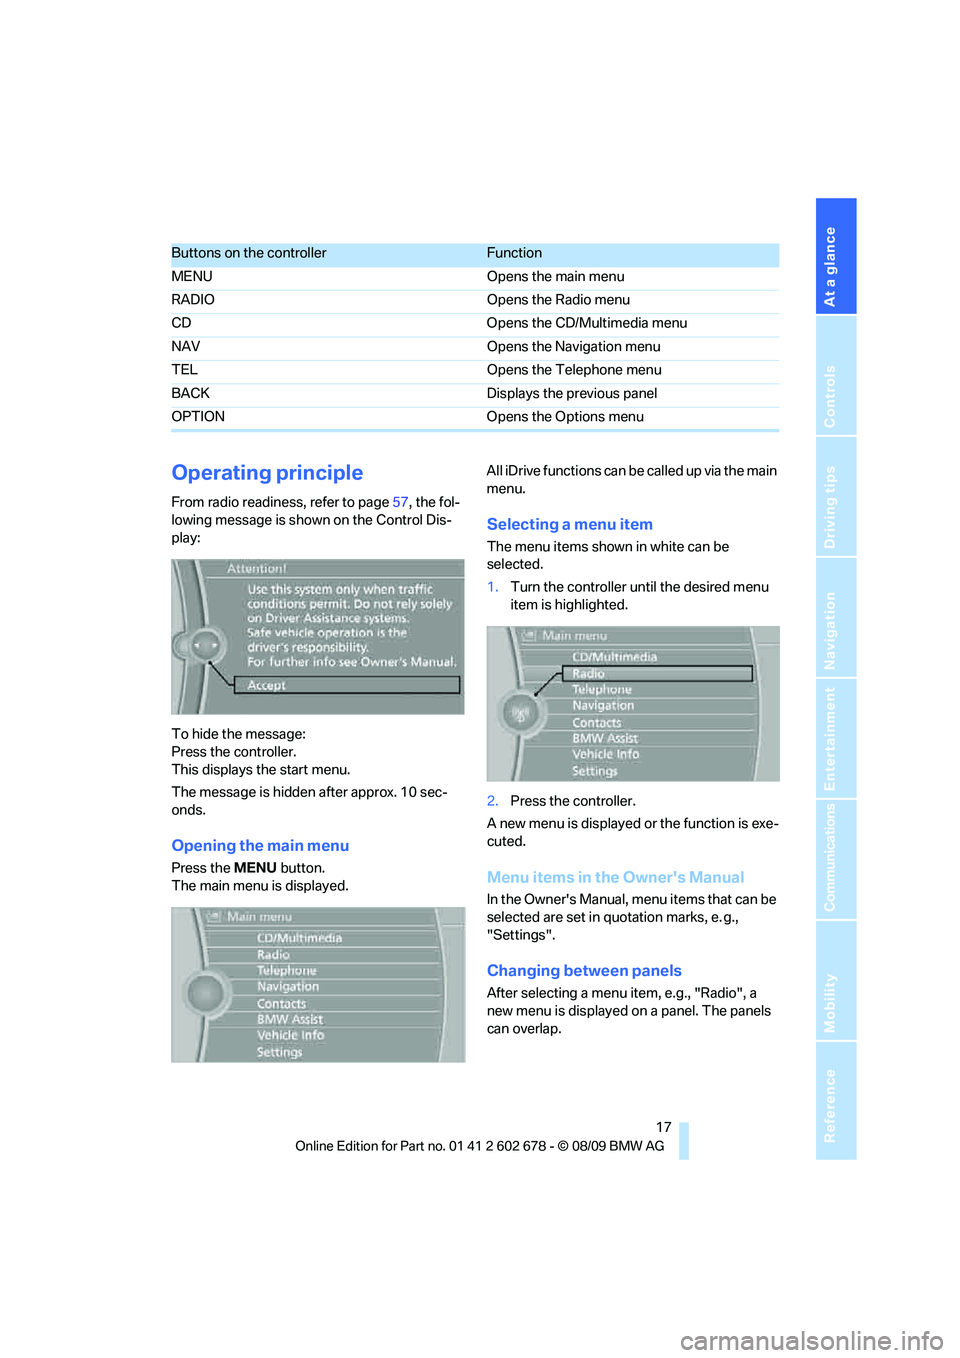
From radio readiness, refer to page57, the fol-
lowing message is shown on the Control Dis-
play:
To hide the message:
Press the controller.
This displays the start menu.
The message is hidden after approx. 10 sec-
onds.
Opening the main menu
Press the MENU button.
The main menu is displayed.All iDrive functions can be called up via the main
menu.
Selecting a menu item
The menu items shown in white can be
selected.
1.Turn the controller until the desired menu
item is highlighted.
2.Press the controller.
A new menu is displayed or the function is exe-
cuted.
Menu items in the Owner's Manual
In the Owner's Manual, menu items that can be
selected are set in quotation marks, e. g.,
"Settings".
Changing between panels
After selecting a menu item, e.g., "Radio", a
new menu is displayed on a panel. The panels
can overlap.
Buttons on the controllerFunction
MENU Opens the main menu
RADIO Opens the Radio menu
CD Opens the CD/Multimedia menu
NAV Opens the Navigation menu
TEL Opens the Telephone menu
BACK Displays the previous panel
OPTION Opens the Options menu
Page 22 of 271
iDrive
20
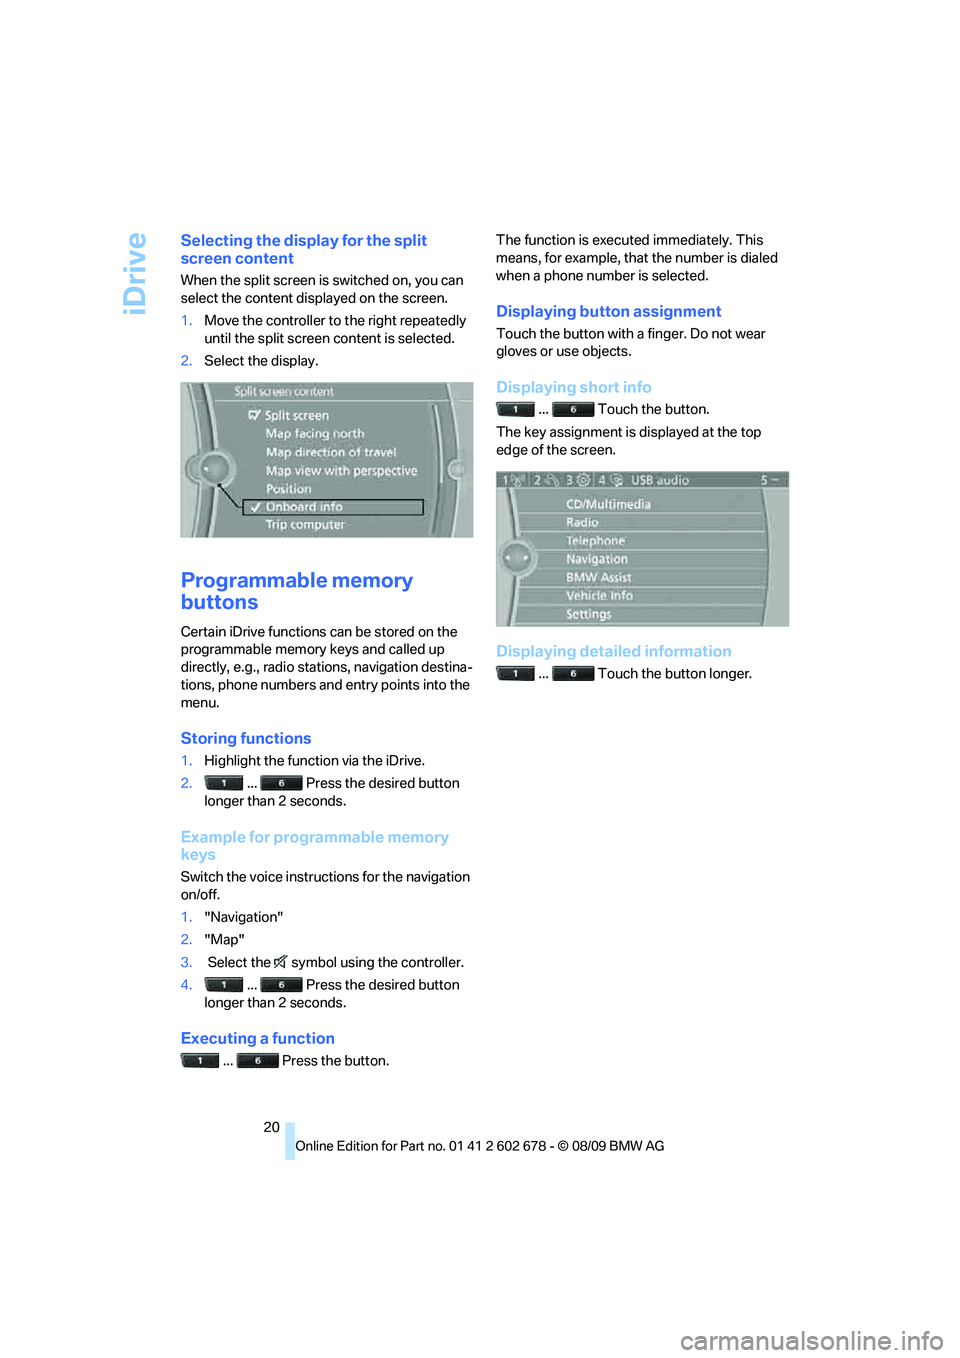
Selecting the display for the split
screen content
When the split screen is switched on, you can
select the content displayed on the screen.
1.Move the controller to the right repeatedly
until the split screen content is selected.
2.Select the display.
Programmable memory
buttons
Certain iDrive functions can be stored on the
programmable memory keys and called up
directly, e.g., radio stations, navigation destina-
tions, phone numbers and entry points into the
menu.
Storing functions
1.Highlight the function via the iDrive.
2.... Press the desired button
longer than 2 seconds.
Example for programmable memory
keys
Switch the voice instructions for the navigation
on/off.
1."Navigation"
2."Map"
3. Select the symbol using the controller.
4.... Press the desired button
longer than 2 seconds.
Executing a function
... Press the button.The function is executed immediately. This
means, for example, that the number is dialed
when a phone number is selected.
Displaying button assignment
Touch the button with a finger. Do not wear
gloves or use objects.
Displaying short info
... Touch the button.
The key assignment is displayed at the top
edge of the screen.
Displaying detailed information
... Touch the button longer.
Page 29 of 271
Controls
27Reference
At a glance
Driving tips
Communications
Navigation
Entertainment
Mobility
sonal Profile ensures that most of these set-
tings are stored for the remote control currently
in use without you having to do anything. When
the vehicle is unlocked, the corresponding
remote control is detected and the settings
stored for it are called up and carried out.
This means that you will always find your BMW
set to your own personal settings even if
another person with his/her own remote control
and settings has used the vehicle since the last
time you drove it. The individual settings are
stored for a maximum of four remote controls,
for two with Comfort Access
*.
Personal Profile settings
Details on the settings are provided on the
specified pages.
>Behavior of the central locking system
when unlocking vehicle, refer to page28
>Automatic locking of the vehicle, refer to
page30
>Displays on Control Display:
>Brightness of the Control Display, refer
to page83
>Measuring units for consumption, route/
distances, temperature, and pressure,
refer to page76
>12h/24h clock format, refer to page79
>Date format, refer to page79
>Language on Control Display, refer to
page82
>Lighting settings:
>Triple turn signal activation, refer to
page63
>Welcome lamps, refer to page100
>Pathway lighting, refer to page101
>Daytime running lamps
*, refer to
page101
>High-beam Assistant
*, refer to
page102
>PDC Park Distance Control
*: optical warn-
ing, refer to page84
>Head-up Display
*: selection and brightness
of display, refer to page96>BMW Night Vision
*: display settings, refer
to page98
>Automatic climate control: AUTO program
and intensity, cooling function, and auto-
matic recirculated air control/recirculated-
air mode, temperature, air distribution, tem-
perature in the upper body region, refer to
text starting on page106
>Navigation system
*: voice instructions for
destination guidance, refer to page143
In addition, the following, most recently
selected settings are recalled during unlocking:
>Programmable memory buttons: selecting
stored functions, refer to page20
>Positions of driver's seat, outside mirrors,
and steering wheel
*, refer to page45
>Audio sources: volume and tone settings,
refer to page152
>Radio:
>Display of stored stations, refer to
page157
>Switching RDS Radio Data System on/
off
*, refer to page156
>Phone: volume setting, refer to page181
Central locking system
The concept
The central locking system functions when the
driver's door is closed.
The system simultaneously engages and
releases the locks on the following:
>Doors
>Luggage compartment lid or tailgate and
rear window
>Fuel filler flap
Operating from outside
>Via the remote control
>Using door lock
>With Comfort Access
* via the door handles
Page 38 of 271
Opening and closing
36
Tilt alarm sensor
The tilt of the vehicle is monitored. The alarm
system reacts, e.g., in case of an attempted
wheel theft or towing.
Interior motion sensor
In order for the interior motion sensor to func-
tion properly, the windows and glass sunroof
*
must be completely closed.
Avoiding unintentional alarms
The tilt alarm sensor and interior motion sensor
may be switched off at the same time. This pre-
vents unintentional alarms, e.g., in the following
situations:
>In two-level garages
>When transporting on car-carrying trains,
by sea or on a trailer
>When animals are to remain in the vehicle
Switching off tilt alarm sensor and
interior motion sensor
Press the button on the remote control
again as soon as the vehicle is locked.
The indicator lamp lights up briefly and then
flashes continuously. The tilt alarm sensor and
the interior motion sensor are switched off until
the next time the vehicle is unlocked and subse-
quently locked again.
Comfort Access*
Comfort Access allows you to access your vehi-
cle without having to hold the remote control in
your hand. It is sufficient to carry the remote
control with you, e.g., in your jacket pocket. The
vehicle automatically detects the associated
remote control in the immediate vicinity or in
the interior.
Comfort Access supports the following func-
tions:
>Unlocking/locking vehicle
>Comfort closing
>Opening luggage compartment lid/tailgate
separately>Sports Wagon: opening rear window sepa-
rately
>Starting engine
Functional requirement
>The vehicle or the luggage compartment
lid/tailgate can only be locked if the vehicle
detects that the remote control you are car-
rying is outside the vehicle.
>The next unlocking and locking cycle is not
possible until after approx. 2 seconds.
>The engine can only be started if the vehicle
detects that the remote control is located in
the vehicle.
Comparison with ordinary remote
control
You can control the functions mentioned previ-
ously with the Comfort Access or by pressing
the buttons on the remote control. Therefore,
please familiarize yourself with the information
on opening and closing beginning on page26
beforehand.
The special features when using Comfort
Access are described in the following.
Should a short delay occur when opening
or closing the windows or the glass sun-
roof, the system is checking whether a remote
control is located in the vehicle. Please repeat
opening or closing if necessary.<
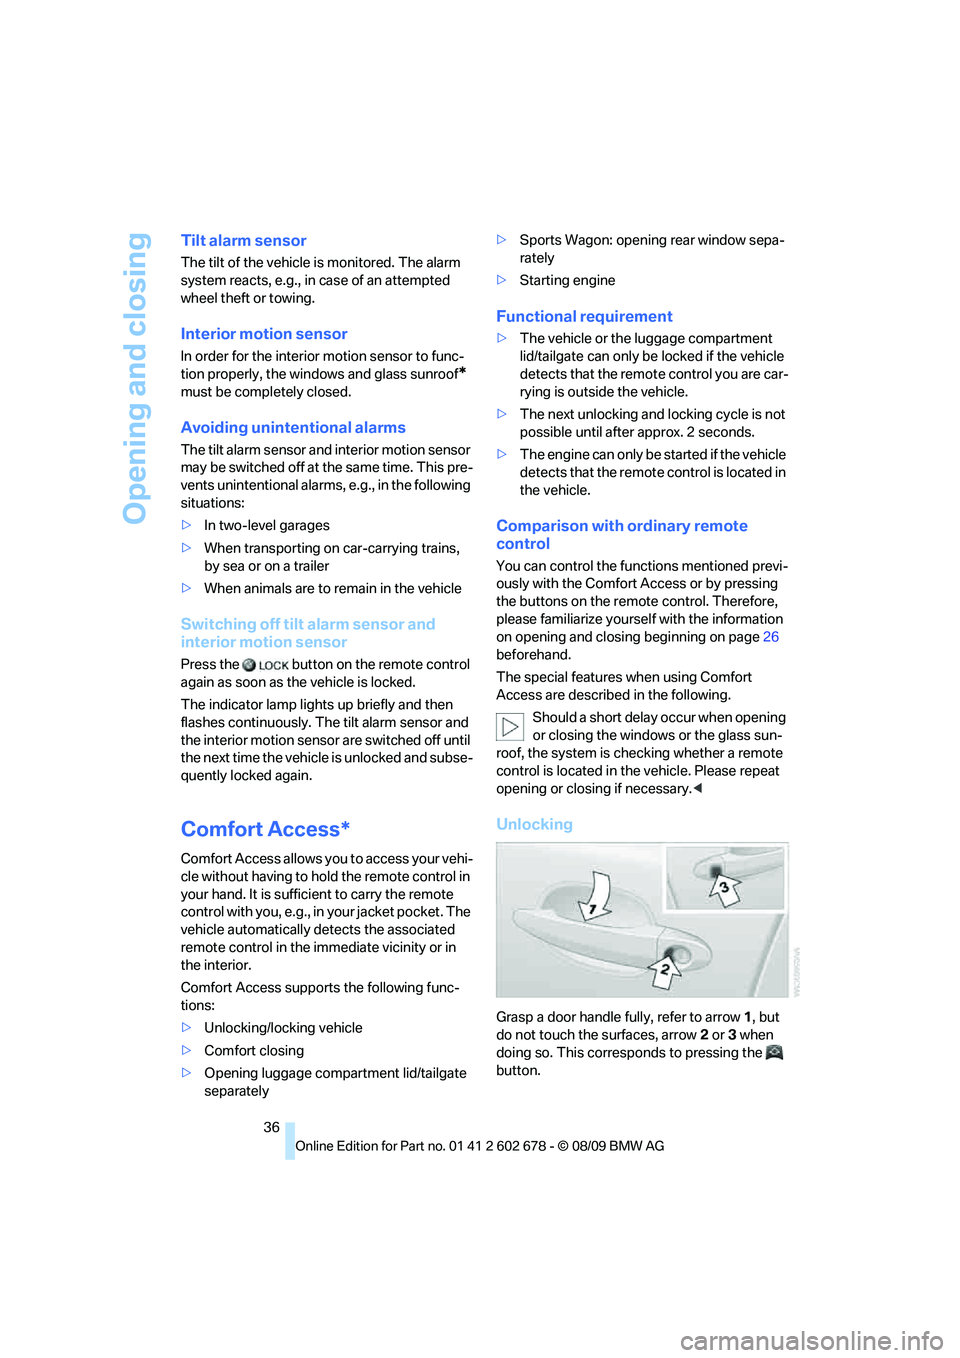
Unlocking
Grasp a door handle fully, refer to arrow1, but
do not touch the surfaces, arrow2 or 3 when
doing so. This corresponds to pressing the
button.
Page 39 of 271
Controls
37Reference
At a glance
Driving tips
Communications
Navigation
Entertainment
Mobility
Locking
>On the driver's door, touch the highlighted
surface, arrow2, with a finger for approx.
1 second, but do not grasp the door handle.
>On the remaining doors, touch the high-
lighted surface, arrow3, with the back of
your hand for approx. 1 second, but do not
grasp the door handle.
This corresponds to pressing the but-
ton.
To preserve the battery, please make
sure that the ignition and all electrical
consumers are switched off before locking the
vehicle.<
Comfort closing
Hold a finger or the back of your hand against
the surface, arrow2 or 3, but do not grasp the
door handle while doing so.
The windows and the glass sunroof
* are
closed.
Watch during the closing process to be
sure that no one is injured. Removing the
hand from the door handle stops the closing
process immediately.<
Opening luggage compartment lid/
tailgate separately
Press the button on the luggage compartment
lid/tailgate. This corresponds to pressing the
button.
If a remote control accidentally left in the
cargo bay is detected in the locked vehi-
cle after closing the luggage compartment lid/
tailgate or the rear window, the lid or rear win-
dow opens again. The hazard warning flashers
flash and a signal
* sounds.<
Sports Wagon: opening rear window
separately
Press the button on the rear window, refer to
page32.
Switching on radio readiness
By pressing the Start/Stop button, you switch
on the radio readiness, refer to page57.When doing so, do not depress the brake
or clutch pedal, otherwise the engine will
start immediately.<
Starting engine
You can start the engine or switch on the igni-
tion if a remote control is located in the interior
of the vehicle. It need not be inserted in the igni-
tion lock, refer to page57.
If you take the remote control with you when
leaving the vehicle with the engine running, a
warning lamp lights up. In addition, a message
appears on the Control Display. As long as no
remote control is detected, it is only possible to
restart the engine within approx. 10 seconds
after it is switched off.
Switching off engine with automatic
and sport automatic transmission
The engine can only be switched off in trans-
mission position P, refer to page58.
To switch off the engine in transmission posi-
tion N, the remote control must be inserted in
the ignition lock.
Before driving into a car wash with
automatic and sport automatic
transmission
1.Insert remote control into ignition lock.
2.Depress brake pedal.
3.Engage transmission position N.
4.Switch off the engine.
The vehicle can roll.
Malfunction
The Comfort Access function may malfunction
due to local radio waves. Then open or close the
vehicle with the buttons on the remote control
or with a key. To start the engine following this,
insert the remote control in the ignition lock.
When unlocking or locking/comfort closing do
not simultaneously grasp the door handle and
touch the surfaces, arrow2 or 3. Otherwise, you
may limit the function.
Page 48 of 271
Adjusting
46 The adjustment of the lumbar support is not
stored in the memory.
Storing
1.Switch on radio readiness or ignition, refer
to page57.
2.Set the desired seat, exterior mirror and
steering wheel positions.
3.Press the button:
The LED in the button lights up.
4.Press the desired memory button 1 or 2:
The LED goes out.
Requesting
Do not request a position from the mem-
ory while the vehicle is moving. There is a
risk of accident from unexpected movement of
the seat or steering wheel.<
Comfort mode
1.Open the driver's door after unlocking or
switch on radio readiness.
2.Briefly press the desired memory button1
or2.
The system cancels the adjustment procedure
when you briefly press one of the seat adjust-
ment switches or one of the memory buttons.
Safety feature
1.Close the driver's door and switch the igni-
tion on or off.
2.Press the desired memory button1 or2
and keep it pressed until the adjustment
process has been completed.
If the button was pressed inadvertently:
press the button again; the LED goes out.
Requesting with remote control
The last positions of the driver's seat, the exte-
rior rearview mirrors, and steering wheel are
stored for the remote control currently in use.
You can choose when the position is requested:
>Request when unlocking vehicle
>Request when opening driver's doorWhen using this feature, always make
sure that the footwell behind the driver's
seat is empty and unobstructed. Failure to do
so could cause injury to persons or damage to
objects behind the seat as a result of a rearward
movement of the seat.<
The system cancels the adjustment procedure
when you briefly press one of the seat adjust-
ment switches or one of the memory buttons.
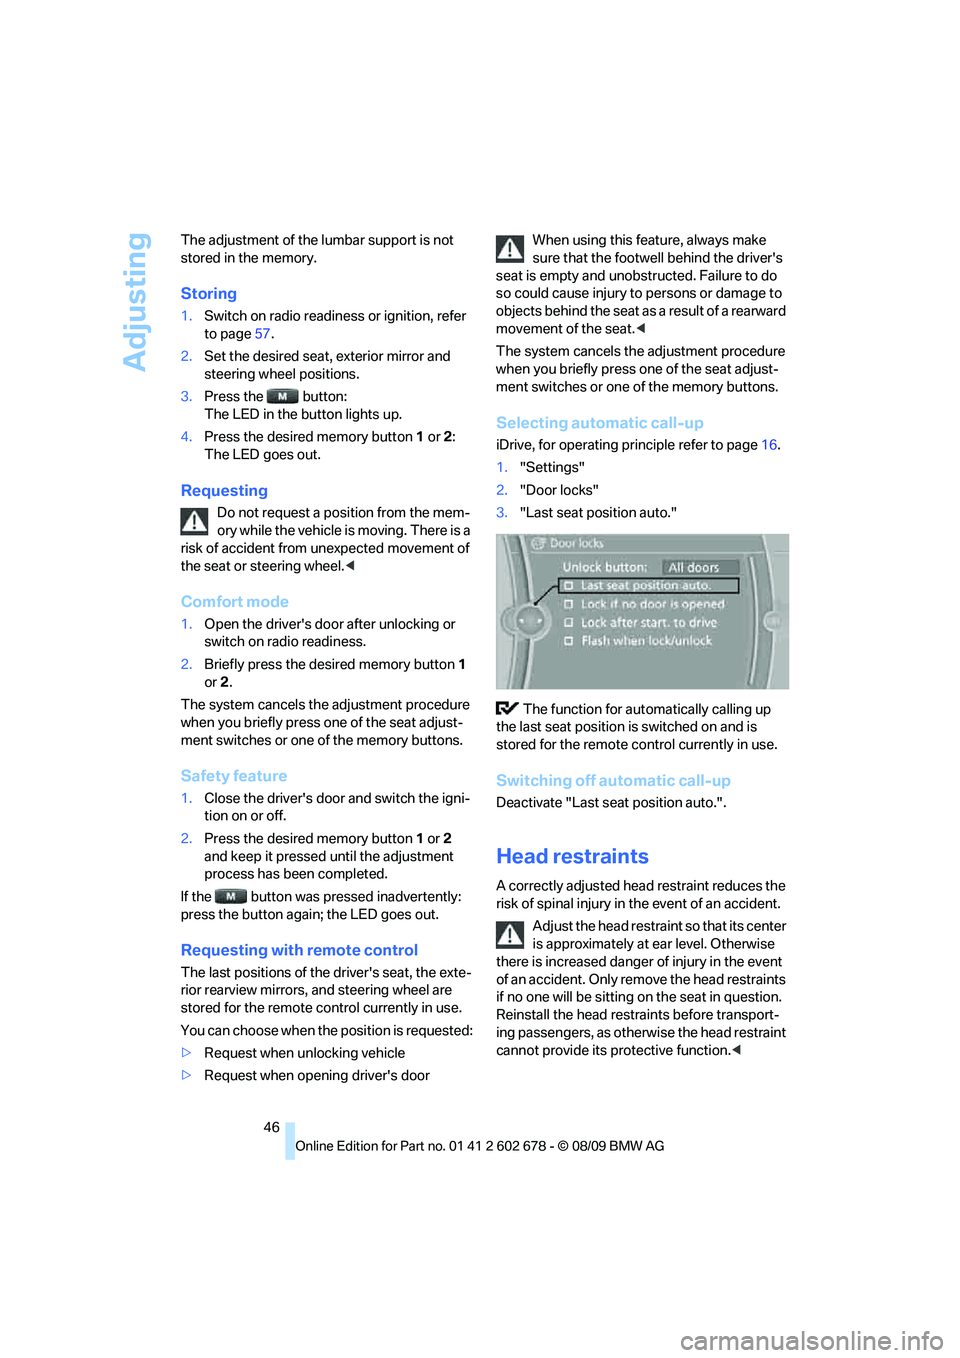
Selecting automatic call-up
iDrive, for operating principle refer to page16.
1."Settings"
2."Door locks"
3."Last seat position auto."
The function for automatically calling up
the last seat position is switched on and is
stored for the remote control currently in use.
Switching off automatic call-up
Deactivate "Last seat position auto.".
Head restraints
A correctly adjusted head restraint reduces the
risk of spinal injury in the event of an accident.
Adjust the head restraint so that its center
is approximately at ear level. Otherwise
there is increased danger of injury in the event
of an accident. Only remove the head restraints
if no one will be sitting on the seat in question.
Reinstall the head restraints before transport-
ing passengers, as otherwise the head restraint
cannot provide its protective function.<