heater BMW 540i 1998 E39 Owner's Manual
[x] Cancel search | Manufacturer: BMW, Model Year: 1998, Model line: 540i, Model: BMW 540i 1998 E39Pages: 1002
Page 441 of 1002
Downloaded from www.Manualslib.com manuals search engine
130-51
Fuel Injection
Oxygen sensors, checking
The oxygen sensor provides an input voltage signal [0.2 vdc
(lean) to 0.8 vdc (rich)] to the
ECM based on the oxygen con-
tent in the exhaust gas. To generate voltage, the sensor tem-
perature must exceed 575"
F (300" C). Therefore the sensor
is electrically heated.
NO JE -
The test given below is not a conclusive test of oxygen sen-
sor efficiency and does not test how the oxygen sensor re-
acts to changing conditions. Pin numbers and wire colors
can vary Always check the wiring diagrams to confirm wire
color and pin assignment.
0 The oxygen sensorconnectorplugs are locatednext to the
catalytic converters.
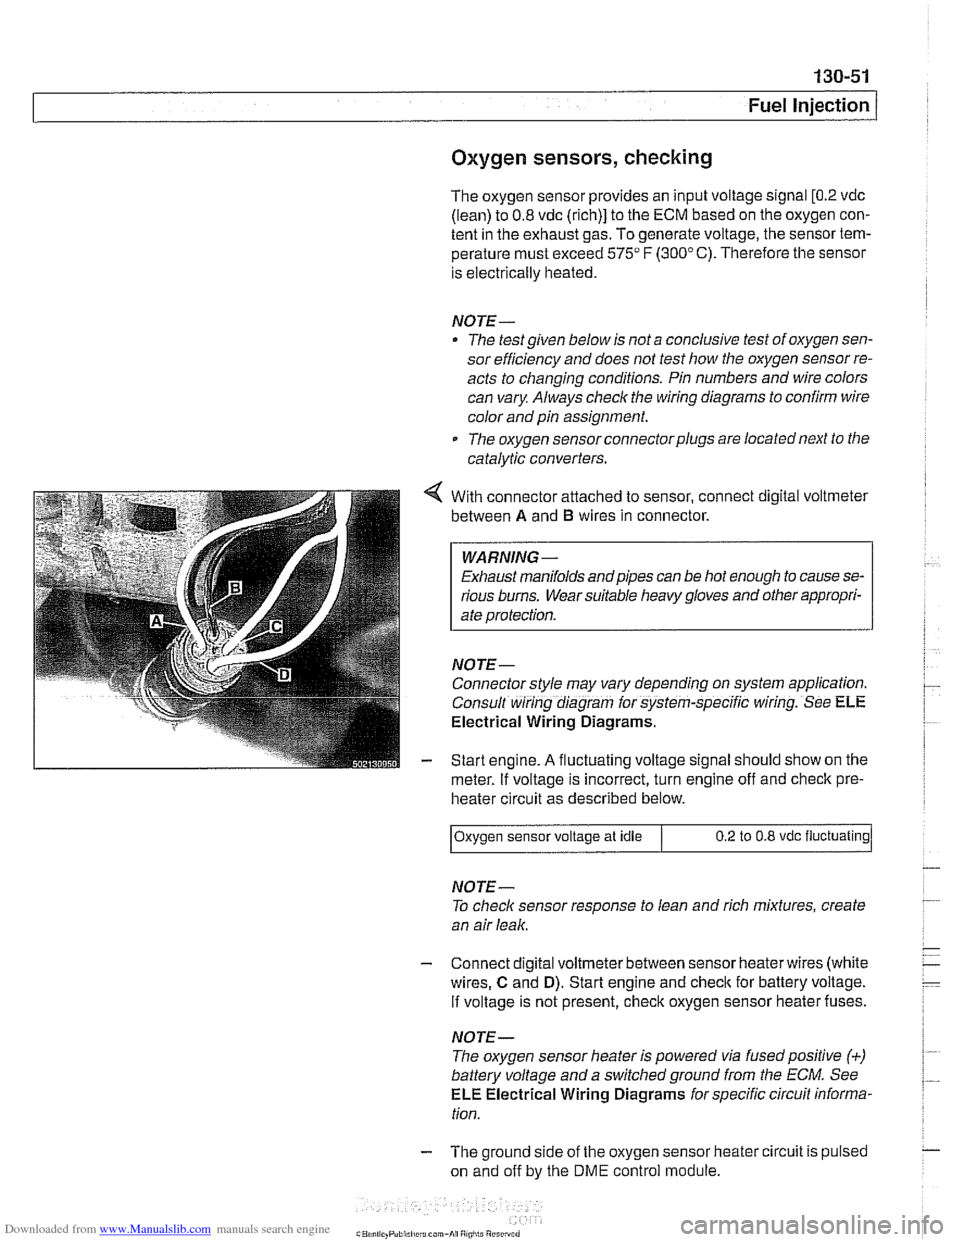
With connector attached to sensor, connect digital voltmeter
between
A and B wires in connector.
WARNING -
Exhaust manifolds andpipes can be hot enough to cause se-
rious burns. Wear suitable heavy gloves and other appropri-
ate protection.
NOJE-
Connector style may vary depending on system application.
Consult wiring diagram for system-specific wiring. See
ELE
Electrical Wiring Diagrams.
Start engine.
A fluctuating voltage signal should show on the
meter.
If voltage is incorrect, turn engine off and check pre-
heater circuit as described below.
NOJE-
To check sensor response to lean and rich mixtures, create
an air leak.
Oxygen sensor
voltage at idle
- Connect digital voltmeterbetween sensor heaterwires (white
wires,
C and D). Start engine and check for battery voltage.
If voltage is not present, check oxygen sensor heater fuses.
0.2 to 0.8 vdc fluctuating
NOJE-
The oxygen sensor heater is powered via fusedpositive (+)
battery voltage and a switchedground from the ECM. See
ELE Electrical Wiring Diagrams for specific circuit informa-
tion.
- The ground side of the oxygen sensor heater circuit is pulsed
on and off by the
DME control module.
Page 442 of 1002
Downloaded from www.Manualslib.com manuals search engine
.. .-
/Fuel lnjeciion
NOJE-
With engine oft disconnect harness connector and checlc
heating element resistance between white wires on the sen-
sor side of harness. If the element is electrically open (no
continuity), replace sensor.
- If oxygen sensor does not produce a fluctuating voltage and
preheater circuit is
OK, replace sensor.
NOJE-
If not already applied, coat oxygen sensor threads w~th anti-
seize compound before installat~on. Do not get the com-
pound on the sensor tip.
Tightening torque Oxygen sensor to exhaust system
55 Nm (41 ft-lb)
Fuel injectors, checking and replacing
The fuel iniectors are switched on and off (oaened and
closed)
by'the ECM. The injectors are connkcted to acom-
mon power source. A ground signal from the ECM is used to
open and close the injectors.
CA U JIOG
Use only a digital multimeter or an LED injector tester when
testing injectors or wiring. Use of an analog
VOM or incan-
descent test light may damaqe the engine controlmodule.
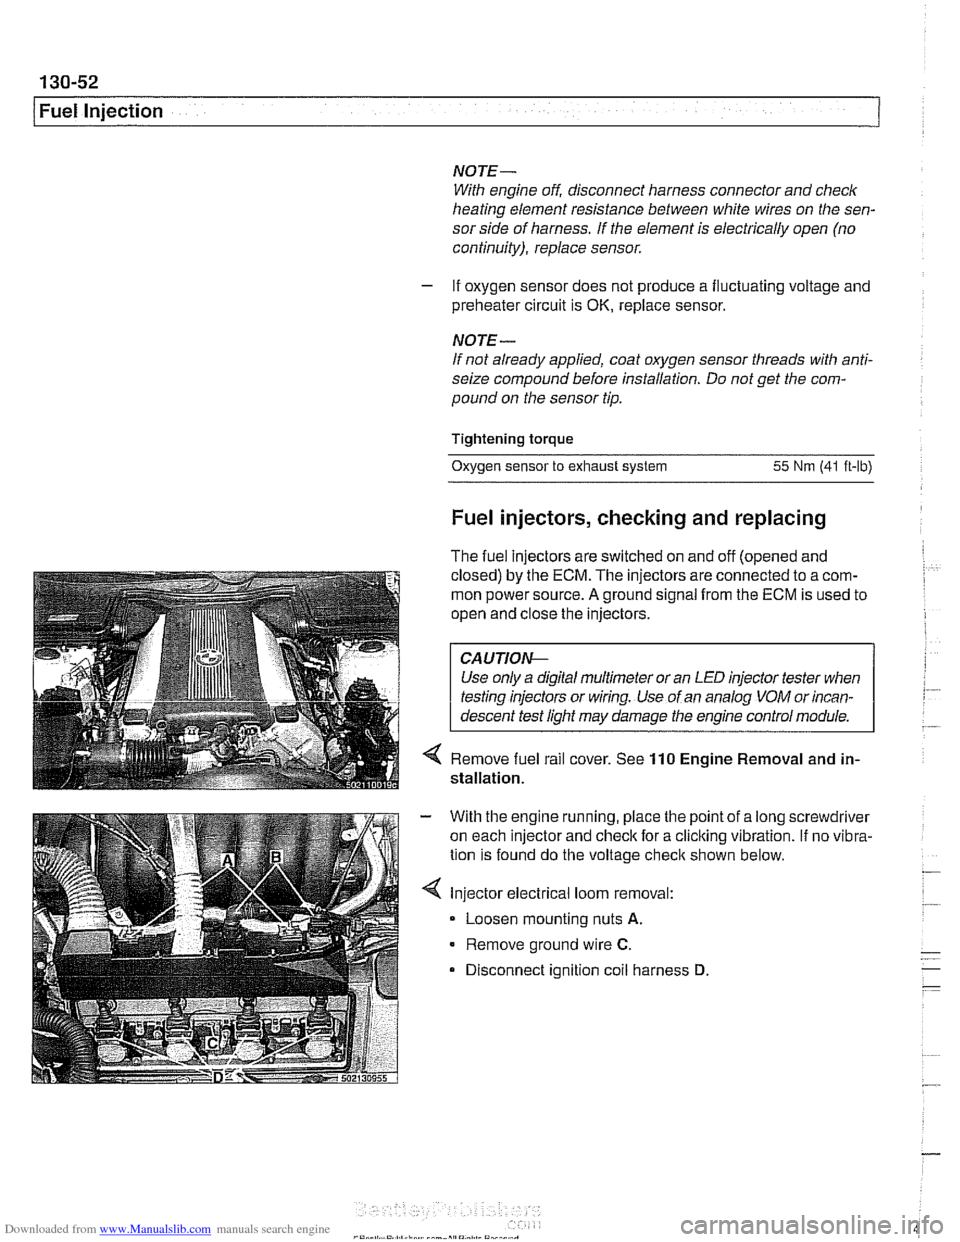
4 Remove fuel rail cover. See 110 Engine Removal and in-
stallation.
With the engine running, place the point of a long screwdriver
on each injector and check for a cliclting vibration.
If no vibra-
tion is found do the voltage
checit shown below.
Injector electrical loom removal:
- Loosen mounting nuts A.
Remove ground wire C.
Disconnect ignition coil harness D
Page 449 of 1002
Downloaded from www.Manualslib.com manuals search engine
130-59
Fuel Injection
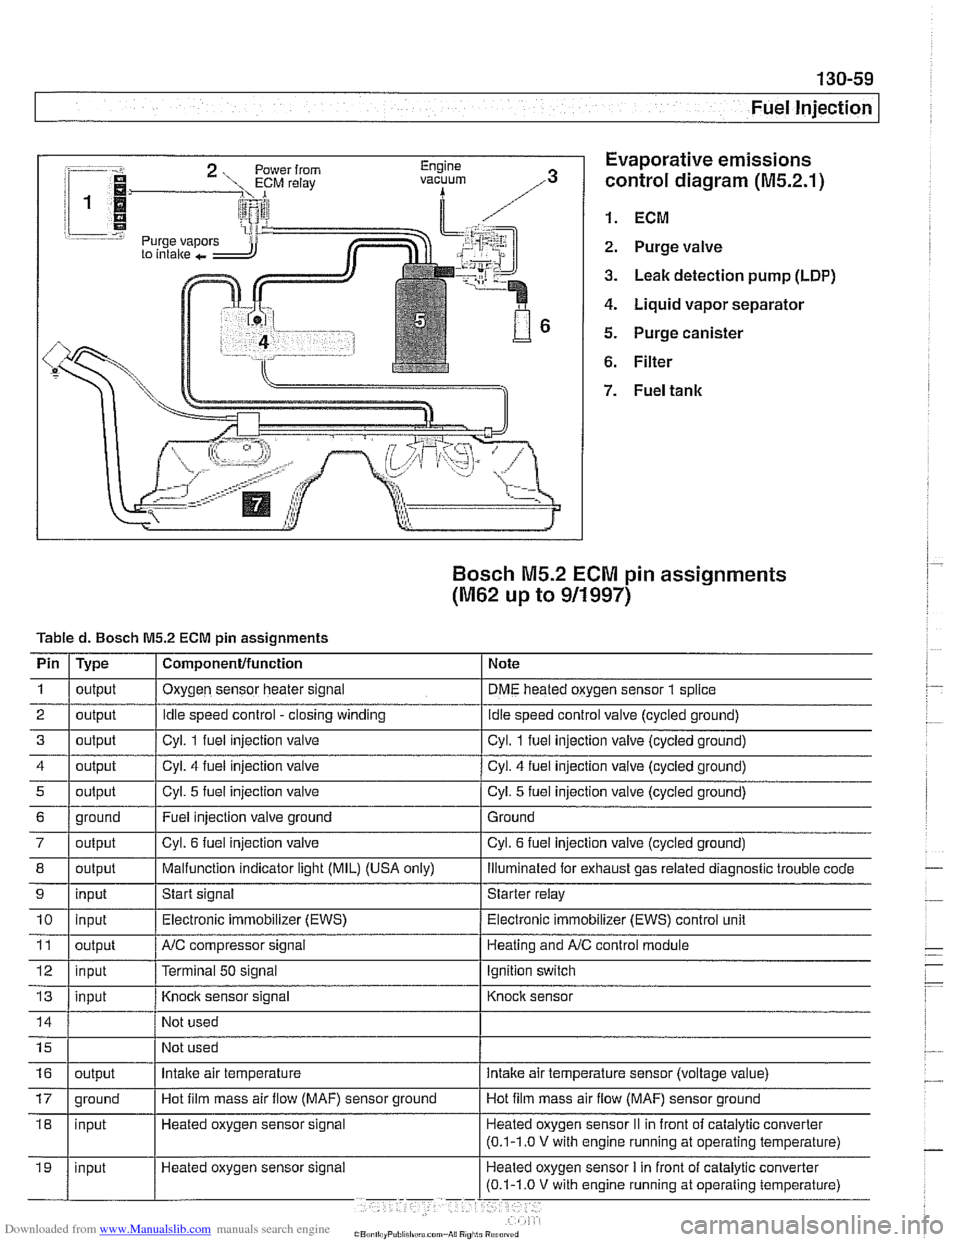
:-- -i. Evaporative emissions
1.
control diagram (M5.2.1)
i 1
i I @ 1. ECM r.=.:-:, 2. Purge valve
3. Leak detection pump (LDP)
4. Liquid vapor separator
5. Purge canister
6. Filter
Bosch M5.2 ECM pin assignments
(M62 up to 911997)
Tabled. Bosch M5.2 ECM pin assignments
I' 1- 1. . . -
4 1 output / Cyl. 4 fuel injection valve I Cyl. 4 fuel injection valve (cycled ground)
Pin
1
2
3
i I
I
7 / output I Cyl. 6 fuel injection valve I Cyl. 6 fuel injection valve (cycled ground)
Type
output
output
output
I I ,
8 1 output I Malfunction indicator light (MIL) (USA only) I lliumlnated for exhaust gas related diagnostic trouble code
5
Component/function
Oxygen sensor heater signal
Idle speed control -closing winding
Cvl. 1 fuel iniection valve Note
DME heated oxygen sensor
1 splice
idle speed control valve (cycled ground)
Cvl. 1 fuel iniection valve lcvcled around)
6 1 ground I Fuel injection valve ground 1 Ground
output
9
Not
used
Not used
11
12
13
Cyl. 5 fuel injection valve
10 1 input I Electronic immobilizer (EWS) / Electronic immobilizer (EWS) control unit
input
Heated oxygen sensor signal Cyl.
5 fuel injection
valve (cycled ground)
output
input
input
16
Start signal Starter relay
NC compressor signal
Terminal
50 signal
Knock sensor signal
17 1 ground I Hot film mass air flow (MAF) sensor ground I Hot film mass air flow (MAF) sensor ground
output Heating and
A/C control module
Ignition switch
Knock sensor
Intake air temperature intake air temperature sensor (voltage value)
Page 450 of 1002
Downloaded from www.Manualslib.com manuals search engine
130-60
/Fuel lniection
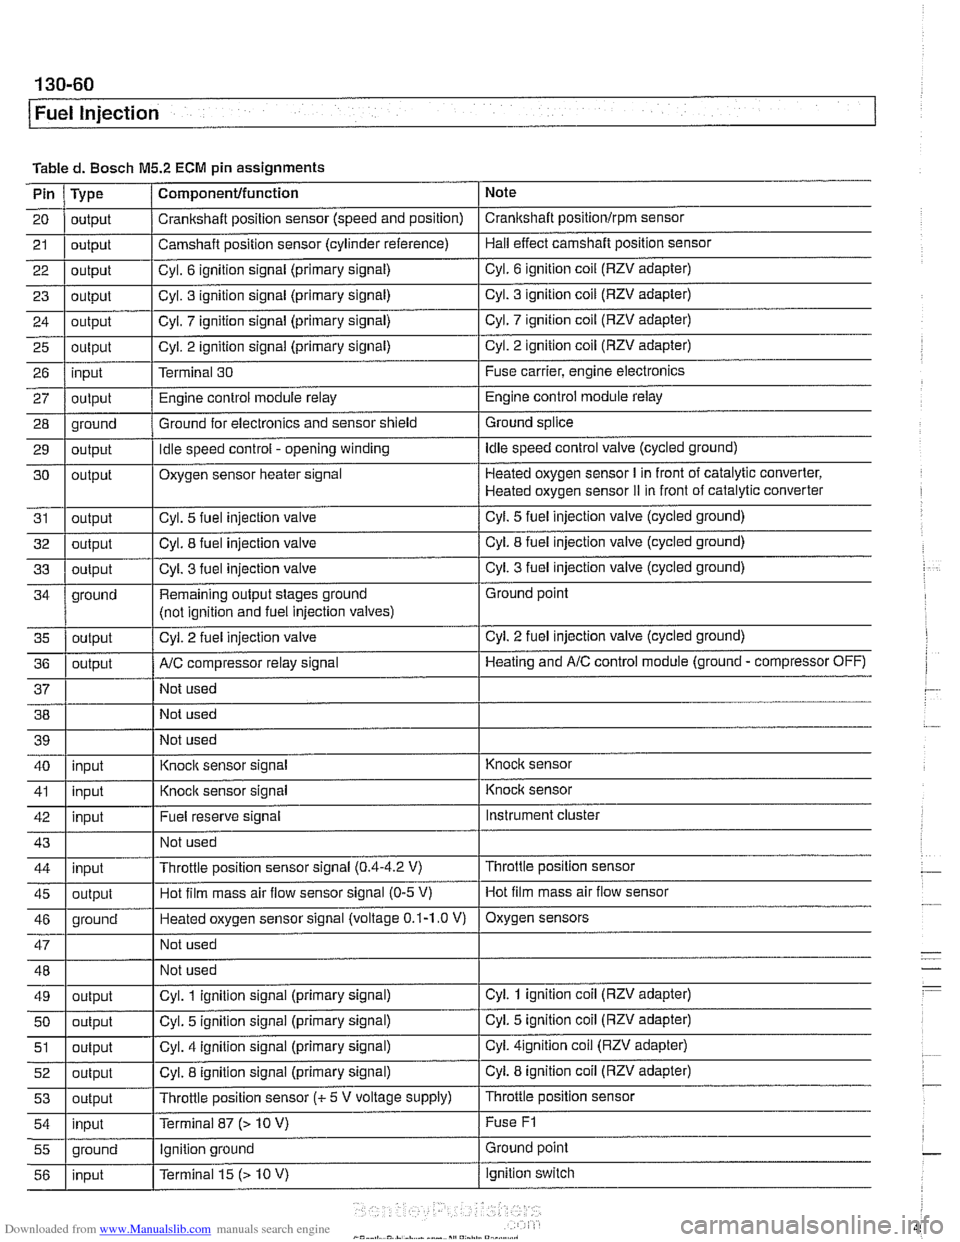
Tabled. Bosch M5.2 ECM pin assignments
Note
Pin
21
20 I output / Crankshaft position sensor (speed and position) I Crankshaft positionlrpm sensor
23
I - I I 29 1 output I Idle speed control - opening winding I Idle speed control valve (cycled ground)
Type
22
1 output I Cvl. 6 ignition signal (primary signal) I Cyl. 6 ignition coil (RZV adapter)
output
25
26
27
28
Component/function
24 1 outout I Cvl. 7 iqnition siqnal (primary signal) I Cyl. 7 ignition coil (RZV adapter)
output
4 outbut I' I - I Cyl. 3
fuel injection valve I Cyl. 3 fuel injection valve (cycled ground)
Camshaft position
sensor (cylinder reference)
output input
output
oround
30
31
32
ground Hall effect camshaft position sensor
Cyl. 3 ignition signal (primary signal)
output
I
Cyl. 3 ignition coil (RZV adapter)
. - . .. . .
Cyl. 2 ignition signal (primary signal)
Terminal 30
Engine control module relay
Ground for electronics and sensor shield
output
output
outout
Remaining output stages ground
(not iclnition and fuel iniection valves) Cyl.
2 ignition coil (RZV adapter)
Fuse carrier, engine electronics
Engine control module relay
Ground splice ,
Cyl. 2 fuel injection valve
Oxygen sensor heater signal
Cyl. 5
fuel injection valve
Cvl. 8 fuel iniection valve
AIC comuressor relav sianal
Heated oxygen sensor I in front of catalytic converter,
Heated oxygen sensor
iI in front of catalytic converter
Cyl.
5 fuel injection valve (cycled ground)
Cvl. 8 fuel iniection valve (cycled ground)
. -
Not used Ground point
Cyl.
2 fuel injection valve (cycled ground)
Heatinq and AIC control module (ground - compressor OFF)
38 Not used
40 39
1 I Not used
I'
I . I
I' I -. I
46 1 ground I Heated oxygen sensor signal (voltage 0.1-1.0 V) I Oxygen sensors
41
1 inuut I Knock
sensor signal I Knock sensor
input
I
I I
Instrument cluster
I' I I 55 1 ground I Ignition ground I Ground point
Knock sensor signal
43
1 I Not used I
Fuel reserve signal
42
Throttle position sensor
47
48
49
50
51
52
53
54
Knoclc sensor
input
45
1 outout I Hot film mass air flow sensor signal (0-5 V) I Hot film mass air flow sensor
Throttle position sensor signal
(0.4-4.2 V) 44
input
output
output
output
output
output
inout
I - I
Not used
Not used
Cyl. 1 ignition signal (primary signal)
Cyl. 5 ignition signal (primary signal)
Cyl. 4 ignition signal (primary signal)
Cyl. 8 ignition signal (primary signal)
Throttle position sensor
(c 5 V voltage supply)
Terminal 87
f> 10 V)
ignition switch
56
Cyl. 1 ignition coil (RZV adapter)
Cyi. 5 ignition coil (RZV adapter)
Cyi.
4ignition coil (RZV adapter)
Cyl. 8 ignition coil (RZV adapter)
Throttle position sensor
Fuse
F1
input Terminal 15 (> 10 V)
Page 452 of 1002
Downloaded from www.Manualslib.com manuals search engine
130-62
Fuel Injection
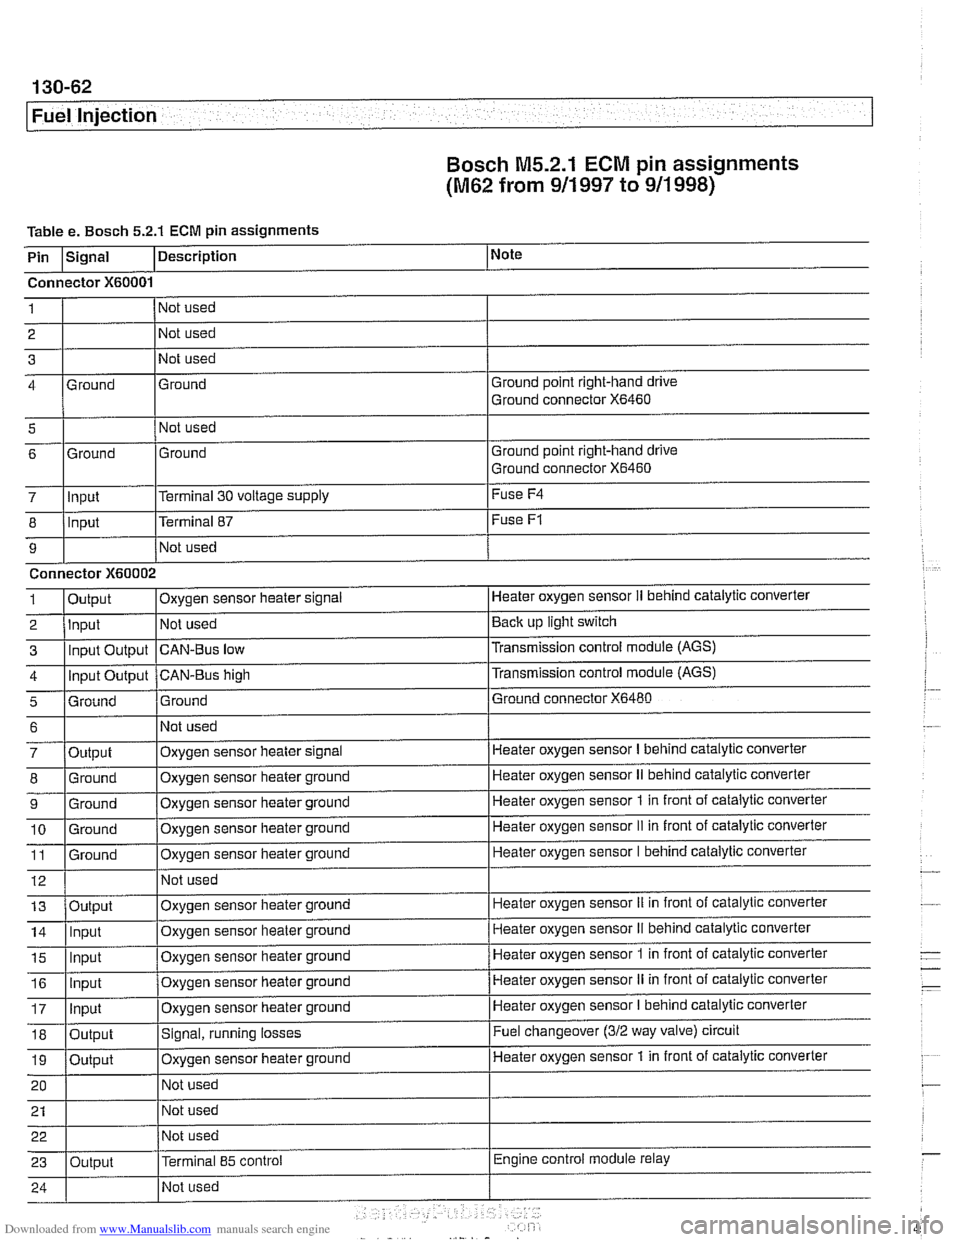
Bosch M5.2.1
ECM pin assignments
(M62 from 911 997 to 911 998)
Table e. Bosch 5.2.1 ECM pin assignments
i I I
5 1 I Not used
I
I I
Note
I I I
7 lln~ut l~erminal 30 voltage supply I Fuse
F4
Description
Pin
Ground point right-hand drive
Ground connector
X6460
I I I
Signal
Connector
X60001
Ground 4 1
2
3 Ground
Ground point right-hand drive
Ground connector
X6460 6
8
9 1
2
3
4
5
Not used
Not used
Not used
-
6
7
8
9
10 11
12
Ground
Input
Connector
X60002
Output Input Input Output
Input Output
Grniind
. -
13
14
15
Ground
- .- -
Output
Ground
Ground
Ground
Ground
16
17
18
19
20
21 22
23
.
Terminal 87
Not used
Oxygen sensor heater
slgnal
Not used
CAN-Bus low
CAN-BUS high
Ground
Output Input
ln~ut
Fuse F1
Heater oxygen sensor II behind cataiytic converter
Back up light switch
Transmission control module (AGS)
Transmission control module
(AGS)
Ground connector X6480
Not used
Oxygen sensor heater signal
Oxygen sensor heater ground
Oxygen sensor heater ground
Oxygen sensor heater ground
Oxygen sensor heater ground
Not used
Input
Input
Output
Output
Output Heater oxygen sensor
I behind catalytic converter
Heater oxygen sensor
II behind catalytic converter
Heater oxygen sensor
1 in front of catalytic converter
Heater oxygen sensor
II in front of catalytic converter
Heater oxygen sensor I behind catalytic converter
Oxygen sensor heater ground
Oxygen sensor heater ground
Oxvqen sensor heater ground Heater oxygen sensor
iI in front
of catalytic converter
Heater oxygen sensor
II behind catalytic converter
Heater oxygen sensor
1 in front of catalytic converter . -
Oxygen sensor heater ground
Oxygen sensor heater ground
Signal, running losses
Oxygen sensor iieater ground
Not used
Not used
Not used
Terminal
85 control
Heater oxygen sensor II in front of catalytic converter
Heater oxygen sensor
I behind catalytic converter
Fuel changeover
(312 way valve) circuit
Heater oxygen sensor 1 in front of catalytic converter
Engine control module relay
Page 463 of 1002
Downloaded from www.Manualslib.com manuals search engine
( Mass Air Flow Sensor
1" Intake air temp. (NTC)
Sensor qround
Reference voltage . . . -., f fitr mass signal I
Fuel Injection I
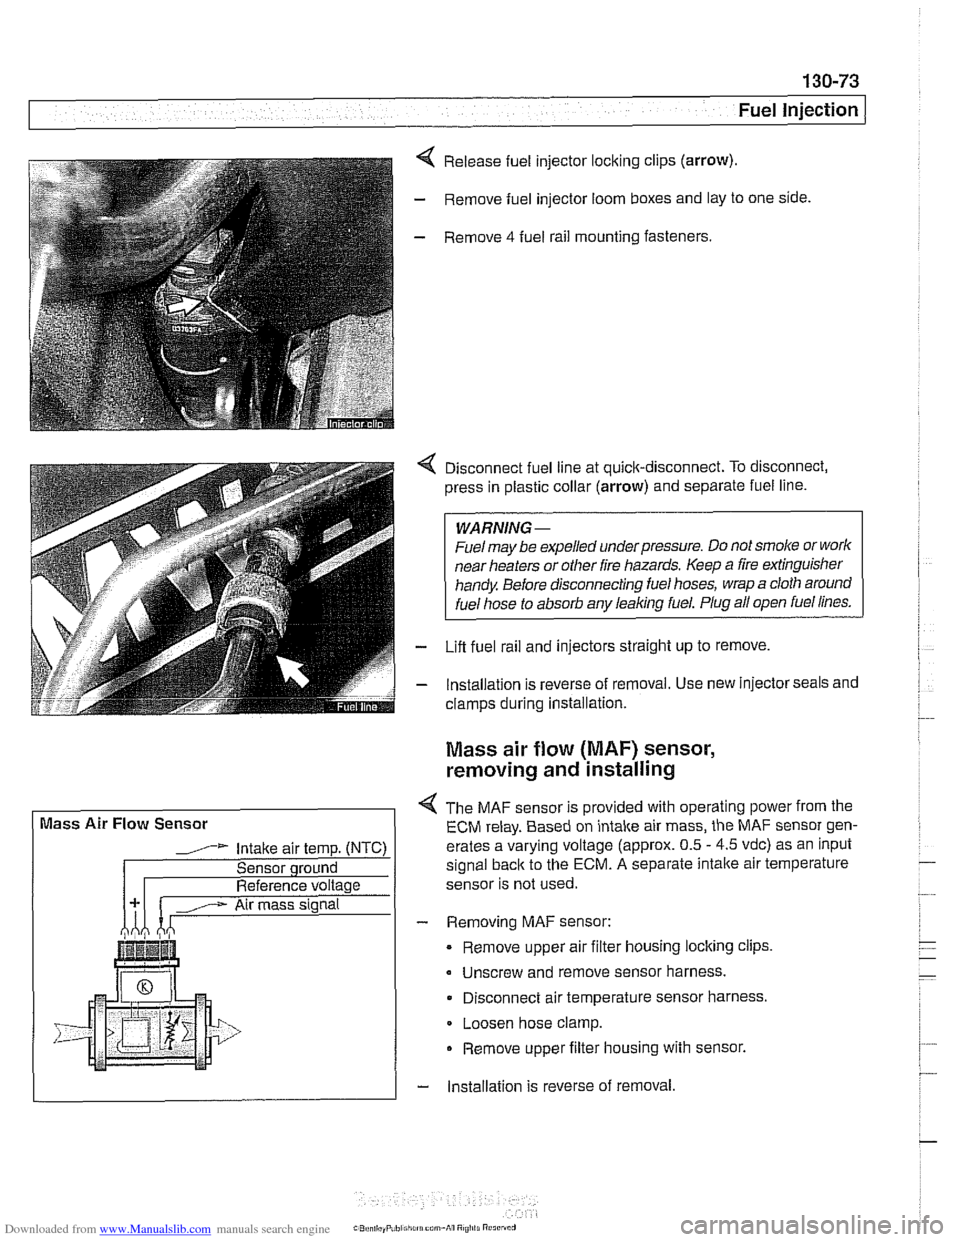
Release fuel injector locking clips (arrow).
- Remove fuel injector loom boxes and lay to one side.
- Remove 4 fuel rail mounting fasteners.
4 Disconnect fuel line at quick-disconnect. To disconnect,
press in plastic collar (arrow) and separate fuel line.
WARNING -
Fuel may be expelled underpressure. Do not srnol(e or work
near heaters or
other fire hazards. Keep a fire extinguisher
handy. Before disconnecting fuel hoses, wrap a cloth around
fuel hose
to absorb anv leakinq fuel. Plug all open fuel lines.
- Lifl fuel rail and injectors straight up to remove.
- lnstallation is reverse of removal. Use new injector seals and
clamps during installation.
Mass air flow (MAF) sensor,
removing and installing
4 The MAF sensor is provided with operating power from the
ECM relay. Based on intake air mass, the MAF sensor gen-
erates a varying voltage (approx. 0.5
- 4.5 vdc) as an input
signal
back to the ECM. A separate intalte air temperature
sensor is not used.
- Removing MAF sensor:
Remove upper air filter housing locking clips
Unscrew and remove sensor harness.
Disconnect air temperature sensor harness.
Loosen hose clamp.
Remove upper filter housing with sensor.
- lnstallation is reverse of removal
Page 466 of 1002
Downloaded from www.Manualslib.com manuals search engine
130-76
Fuel Injection
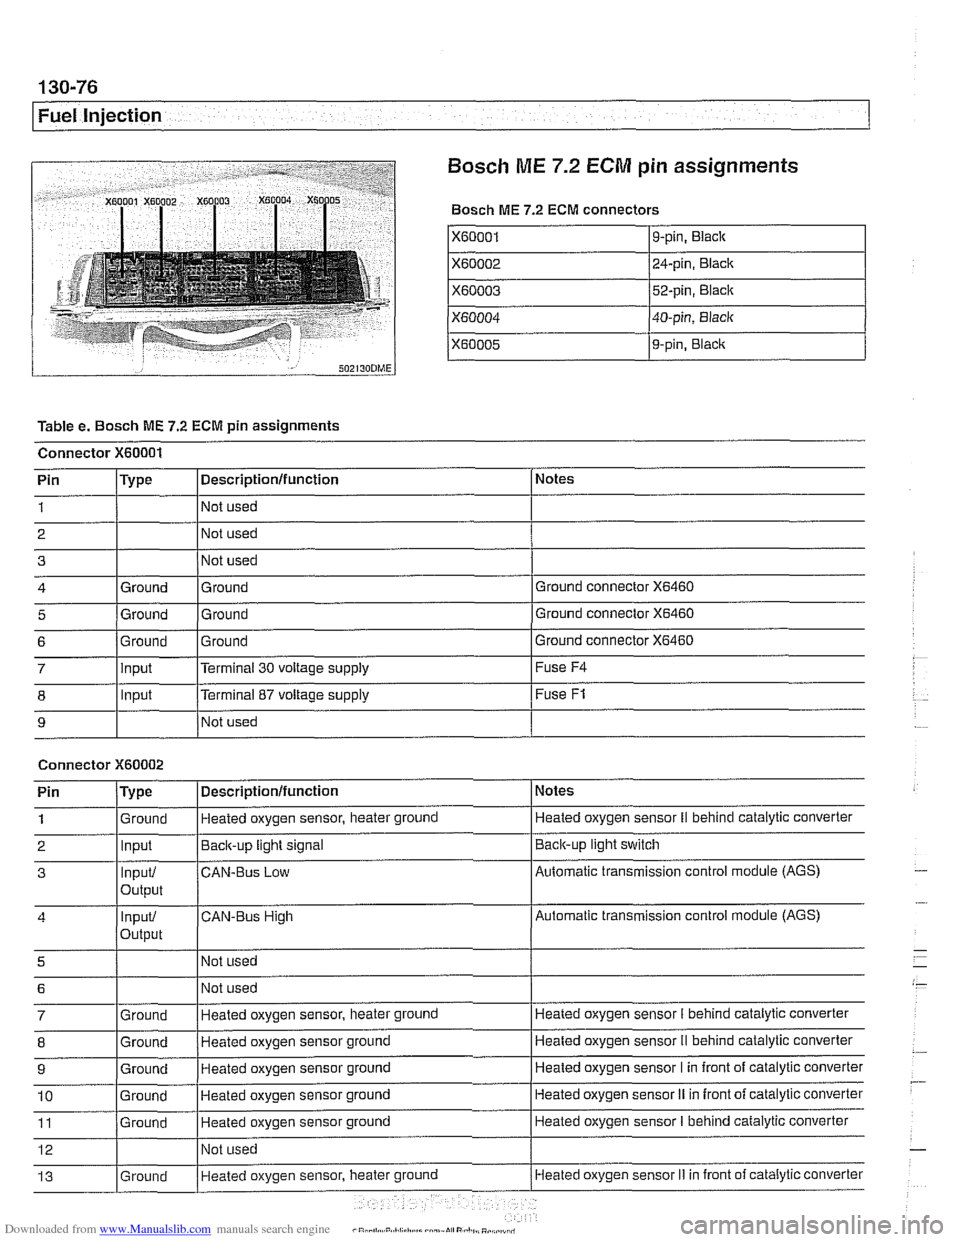
Bosch
ME 7.2 ECM pin assignments
Bosch ME 7.2 ECM connectors
X60001
X60002
X60003
X60004
X60005
Table e. Bosch ME 7.2 ECM pin assignments
Connector
X60001
I I I
8 1 lnput [Terminal 87 voltage supply I Fuse F1
9-pin, Black
24-pin, Black
52-pin, Black
40-pin, Black
9-pin,
Blaclc
I I I
9 I NO^ used I
Notes
Ground connector
X6460
Ground connector X6460
Pin 1
2 3
4
5
Connector X60002
Ground connector X6460 6
Pin
/Type I Descriptionlfunction 1 Notes
Type
Ground
Ground
7 llnput l~errninai 30 voltage supply I Fuse F4
Descriptionlfunction
Not used
Not used
Not used
Ground Ground
Ground Ground
1
2
3
4
5
6
7
8
9
10
11
12
13
. . - Ground Input
Input/
output
input/
Output
Ground
Ground
Ground
Ground
Ground
Ground Heated oxygen sensor, heater ground
Back-up
light signal
CAN-BUS Low
CAN-Bus High
Not used Not used
Heated oxygen sensor, heater ground
Heated oxygen sensor ground
Heated oxygen sensor ground
Heated oxygen sensor ground
Heated oxygen sensor ground
Not used
Heated oxvaen sensor, heater
ground
Heated oxygen sensor II behind catalylic converter
Baclcup light switch
Automatic transmission control module (AGS)
Automatic transmission control module (AGS)
Heated oxygen sensor
I behind catalytic converter
Heated oxygen sensor
II behind catalytic converter
Heated oxygen sensor I in front of catalytic converter
Heated oxygen sensor
II in front of catalytic converter
Heated oxygen sensor
I behind catalytic converter
Heated oxygen sensor
Ii in front of catalytic converter
Page 467 of 1002
Downloaded from www.Manualslib.com manuals search engine
Fuel lnjection
I 1- I
4 /output l~em~erature signal. E-box fan I E-box fan
Connector
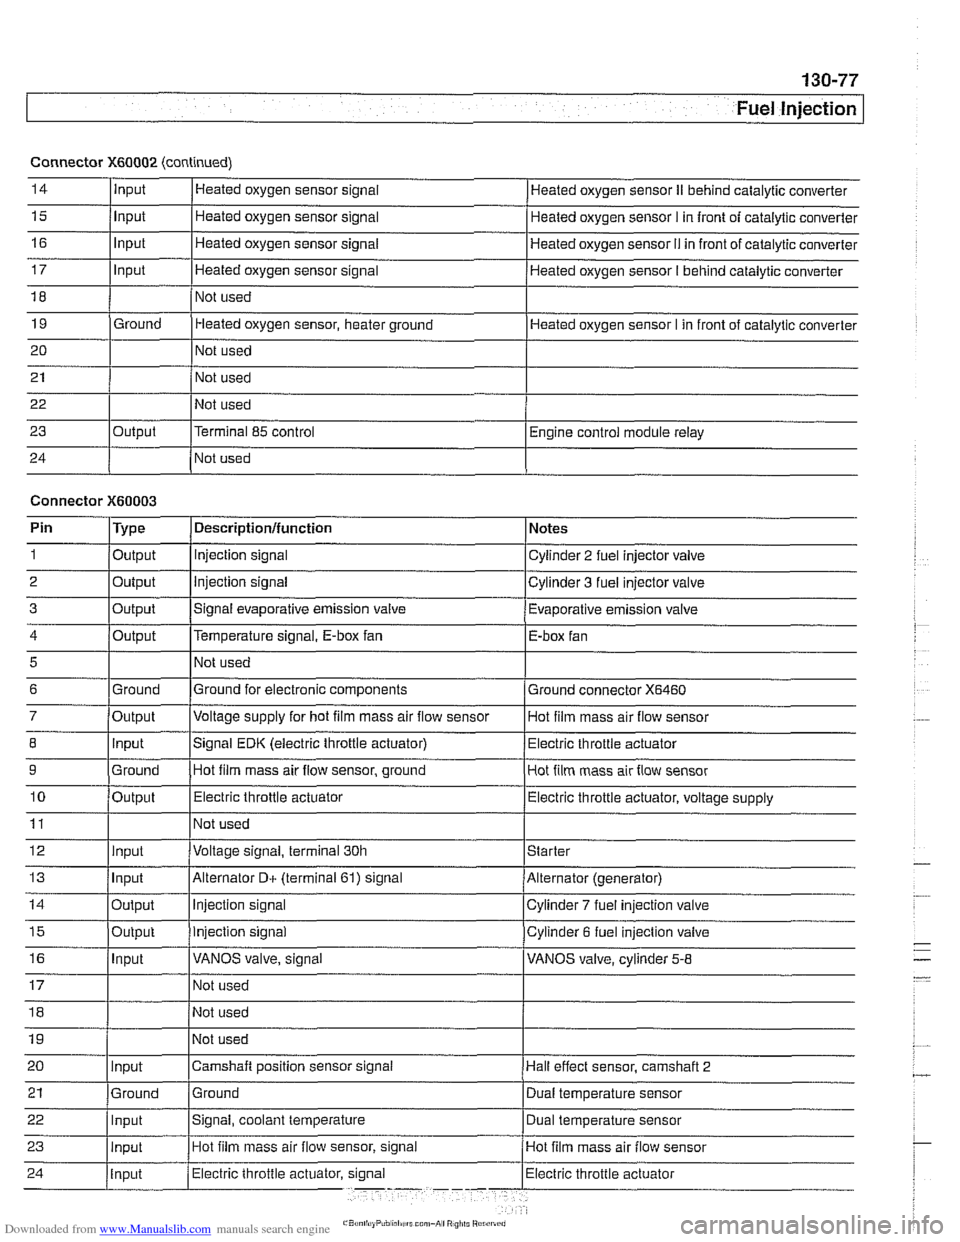
X60002 (continued)
14
15
16
17
18
19
20
21
22
23
24
5
6
7
8
9
10
11
12
13
14
15
16
Input
Input
Input
Input
Ground
Output Heated
oxygen sensor signal
Heated oxygen sensor signal
Heated oxygen sensor signal
Heated oxygen sensor signal
Not used
Heated oxygen sensor, heater ground
Not used
Not used
Not used
Terminal 85 control
Not used Heated oxygen sensor
II behind catalytic converter
Heated oxygen sensor
I in front of catalytic converter
Heated oxygen sensor
I1 in front of catalytic converter
Heated oxygen sensor
I behind catalytic converter
Heated oxygen sensor I in front of catalytic converter
Engine control module relay
Connector
X60003
Ground
Output Input
Ground
Output
Input
Input
Output
Output
Input
Pin 1
2
3
Not used
Ground for electronic components
Voltage supply for hot
film mass air flow sensor
Signal EDK (electric throttle actuator) Hot film mass air flow sensor, ground
Electric throttle actuator
Not used
Voltage signal, terminal 30h
Alternator
D+ (terminal 61) signal
Injection signal
Injection signal
VANOS valve, signal
Type
Output
Output
Output
Ground connector
X6460
Hot film mass air flow sensor
Electric throttle actuator
Hot film mass air flow sensor
Electric throttle actuator, voltage supply
Starter
Alternator (generator)
Cylinder
7 fuel injection valve
Cylinder 6 fuel injection valve
VANOS valve, cylinder
5-8
Descriptionlfunction
Injection signal
Injection signal
Signal evaporative emission valve Notes
Cylinder 2 fuel injector valve
Cylinder 3 fuel injector valve
Evaporative emission valve
Page 475 of 1002
Downloaded from www.Manualslib.com manuals search engine
Fuel Tank and Fuel Pump
Warnings and cautions
Observe the following warnings and cautions when servicing
the fuel system.
WARNING-
* The fuel system is designed to retain pressure even when
the ignition is off. When working with the fuelsystem, loos-
en the fuel lines slowly to allow residual
fuel pressure to
dissipate. Avoid spraying fuel. Use shop rags to capture
leaking fuel.
Before beginning any work on the fuel system, place a
fire extinguisher in the vicinity of the work area.
Fuel is highly flammable. When working around fuel, do
not disconnect any wires that could cause electrical
sparks. Do not smoke or worknearheaters or other fire
hazards.
* Always unscrew the fuel tank cap to release pressure
in the
tanlc before working on the tank or lines.
When disconnecting a fuel hose, wrap shop rag around
end of hose to prevent spray of fuel under pressure.
Do not use a work light with an incandescent bulb near
any fuel. Fuel may spray on the hot bulb causing a fire.
0 Make sure the worlc area is properly ventilated.
CAUTION-
- Prior to disconnecting the battery, read the battery discon-
nection cautions given in
001 General Cautions an4
Warnings.
Before
making any electrical tests with the ignition
turned on, disable the ignition system as described in
120 Ignition System. Be sure the battery is discon-
nected when replacing components.
To prevent damage to the ignition system or other DME
components, including the engine control module
(ECM), always connect and disconnect wires and test
equipment with the ignition off.
Cleanliness is essential when
worl~ing with the fuel sys-
tem. Thoroughly clean the fuel line unions before dis-
connecting any of the lines.
Use only clean tools. Keep removed parts clean and
sealed or covered with a clean, lint-free cloth, especial-
ly if completion of the repair is delayed.
Do not move the car while the fuel system is open.
Avoid using high pressure compressed air to blow out
lines and components. High pressure can rupture inter-
nal seals and gaskets.
Always replace seals, O-rings and hose clamps.
Page 480 of 1002
Downloaded from www.Manualslib.com manuals search engine
I Fuel Tank and Fuel Pump --
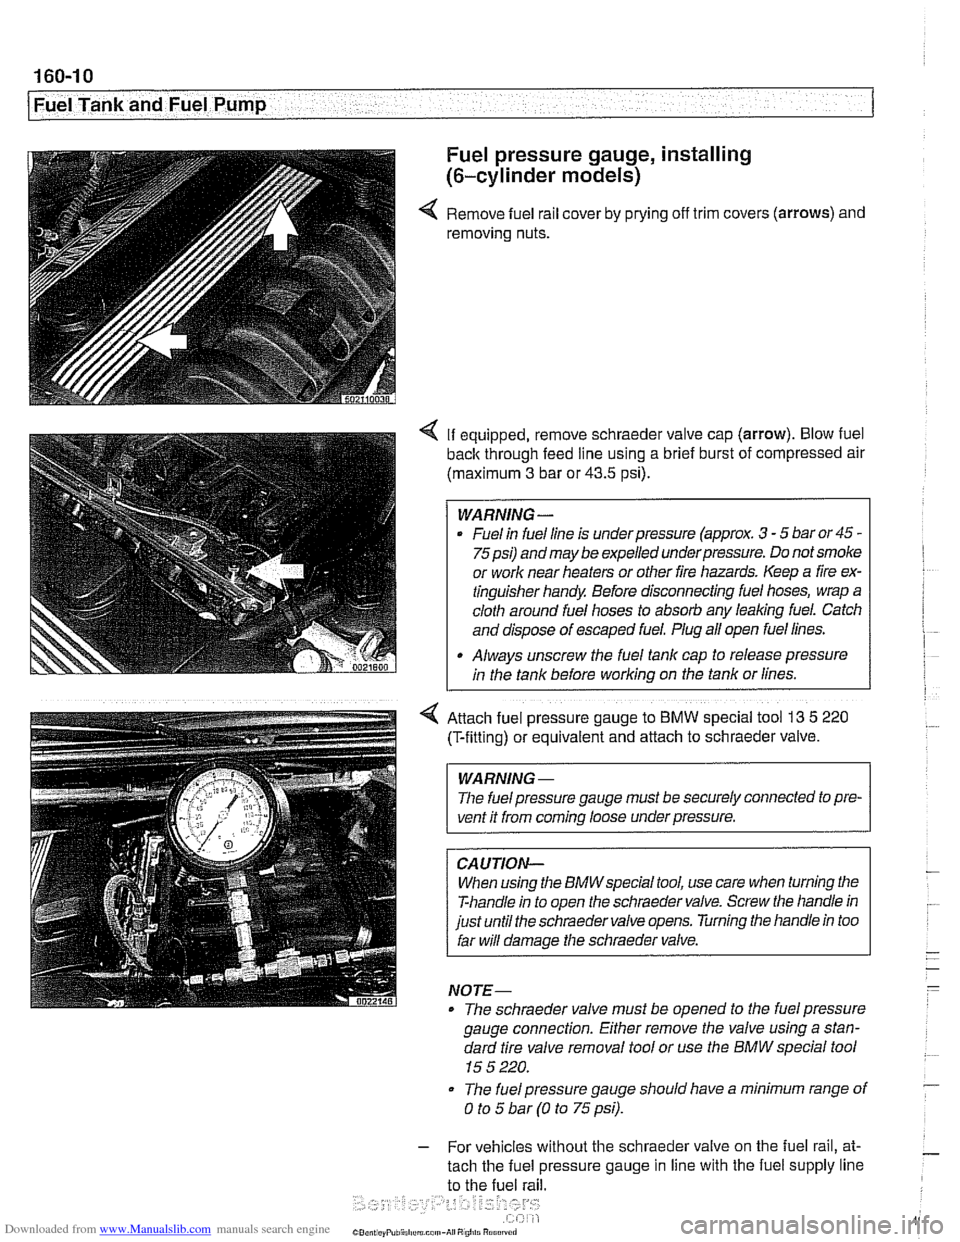
Fuel pressure gauge, installing
(6-cylinder models)
4 Remove fuel rail cover by prying off trim covers (arrows) and
removing nuts.
4 If equipped, remove schraeder valve cap (arrow). Blow fuel
back through feed line using a brief burst of compressed air
(maximum
3 bar or 43.5 psi).
WARNING -
Fuel in fuel line is underpressure (approx. 3 - 5 bar or 45 -
75psi) andmay be expelled underpressure. Do not smoke
or work near heaters or other fire hazards. Keep a fire ex-
tinguisher handy Before disconnecting fuel hoses, wrap a
cloth around fuel hoses to absorb any leaking fuel. Catch
and dispose of escaped fuel. Plug all open fuel lines.
Always unscrew the fuel tank cap to release pressure
in the tank before working on the tank or lines.
4 Attach fuel pressure gauge to BMW special tool 13 5 220
(T-fittlng) or equivalent and attach to schraeder valve.
WARNING -
The fuel pressure gauge must be securely connected to pre-
vent it from
coming loose underpressure.
CAUTION-
When using the BMWspecial tool, use care when turning the
T-handle in to open the schraeder valve. Screw the handle in
just until the schraeder valve opens. Turning the handle in too
far will damage the schraeder valve.
NOTE-
* The schraeder valve must be opened to the fuel pressure
gauge connection. Either remove the valve using a stan-
dard tire valve removal tool or use the BMW special tool
15 5 220.
* The fuel pressure gauge should have a minimum range of
0 to 5 bar (0 to 75 psi).
- For vehicles without the schraeder valve on the fuel rail, at-
tach the fuel pressure gauge in line with the fuel supply line
to the fuel rail.