arm rest BMW 550I 2011 F10 Owner's Manual
[x] Cancel search | Manufacturer: BMW, Model Year: 2011, Model line: 550I, Model: BMW 550I 2011 F10Pages: 304, PDF Size: 10.18 MB
Page 28 of 304
Opening and closing
Remote control/key
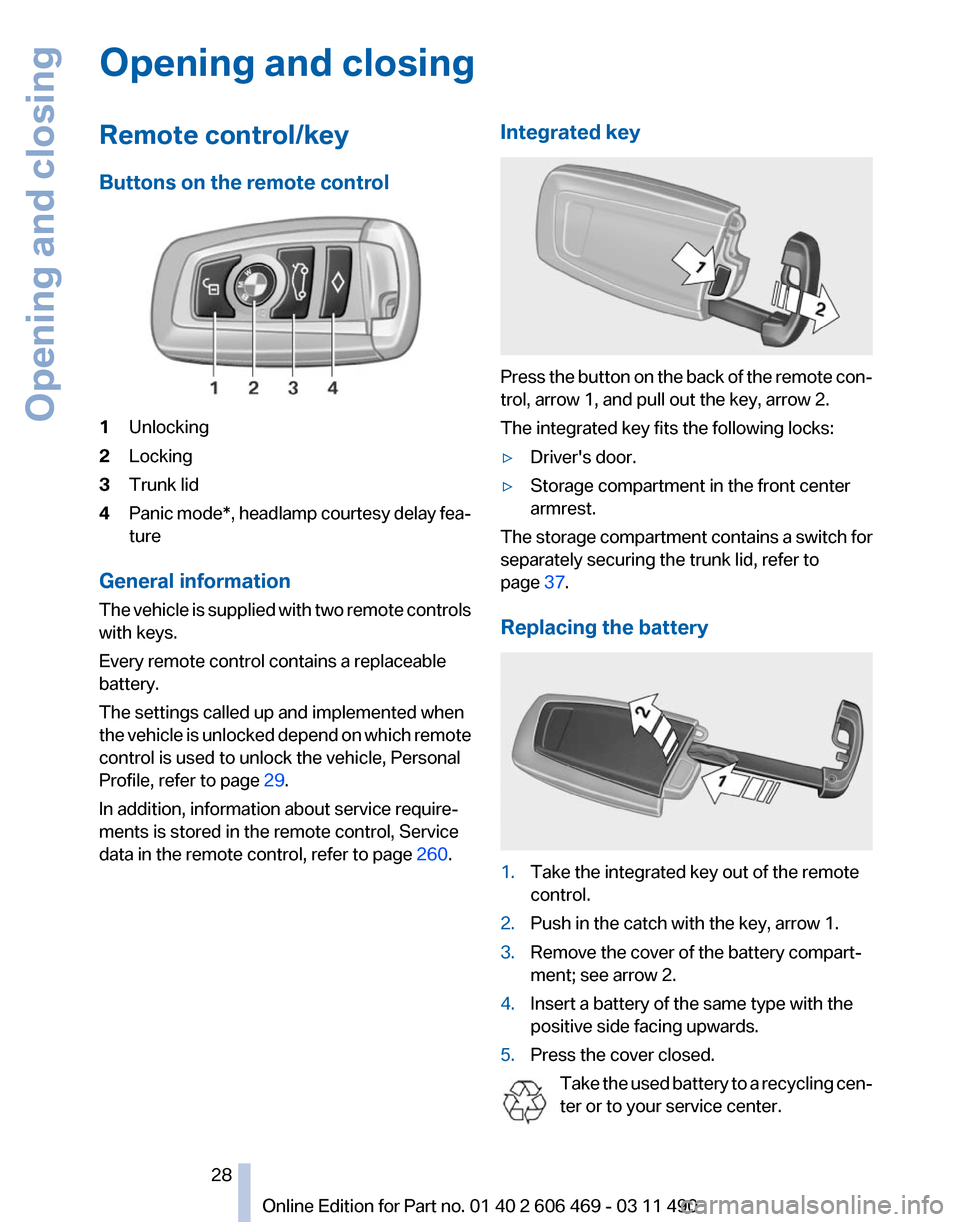
Buttons on the remote control
1
Unlocking
2 Locking
3 Trunk lid
4 Panic mode*, headlamp courtesy delay fea‐
ture
General information
The vehicle is supplied with two remote controls
with keys.
Every remote control contains a replaceable
battery.
The settings called up and implemented when
the vehicle is unlocked depend on which remote
control is used to unlock the vehicle, Personal
Profile, refer to page 29.
In addition, information about service require‐
ments is stored in the remote control, Service
data in the remote control, refer to page 260.Integrated key Press the button on the back of the remote con‐
trol, arrow 1, and pull out the key, arrow 2.
The integrated key fits the following locks:
▷
Driver's door.
▷ Storage compartment in the front center
armrest.
The storage compartment contains a switch for
separately securing the trunk lid, refer to
page 37.
Replacing the battery 1.
Take the integrated key out of the remote
control.
2. Push in the catch with the key, arrow 1.
3. Remove the cover of the battery compart‐
ment; see arrow 2.
4. Insert a battery of the same type with the
positive side facing upwards.
5. Press the cover closed.
Take the used battery to a recycling cen‐
ter or to your service center. Seite 28
28 Online Edition for Part no. 01 40 2 606 469 - 03 11 490
Opening and closing
Page 35 of 304
Opening and closing: from the
inside
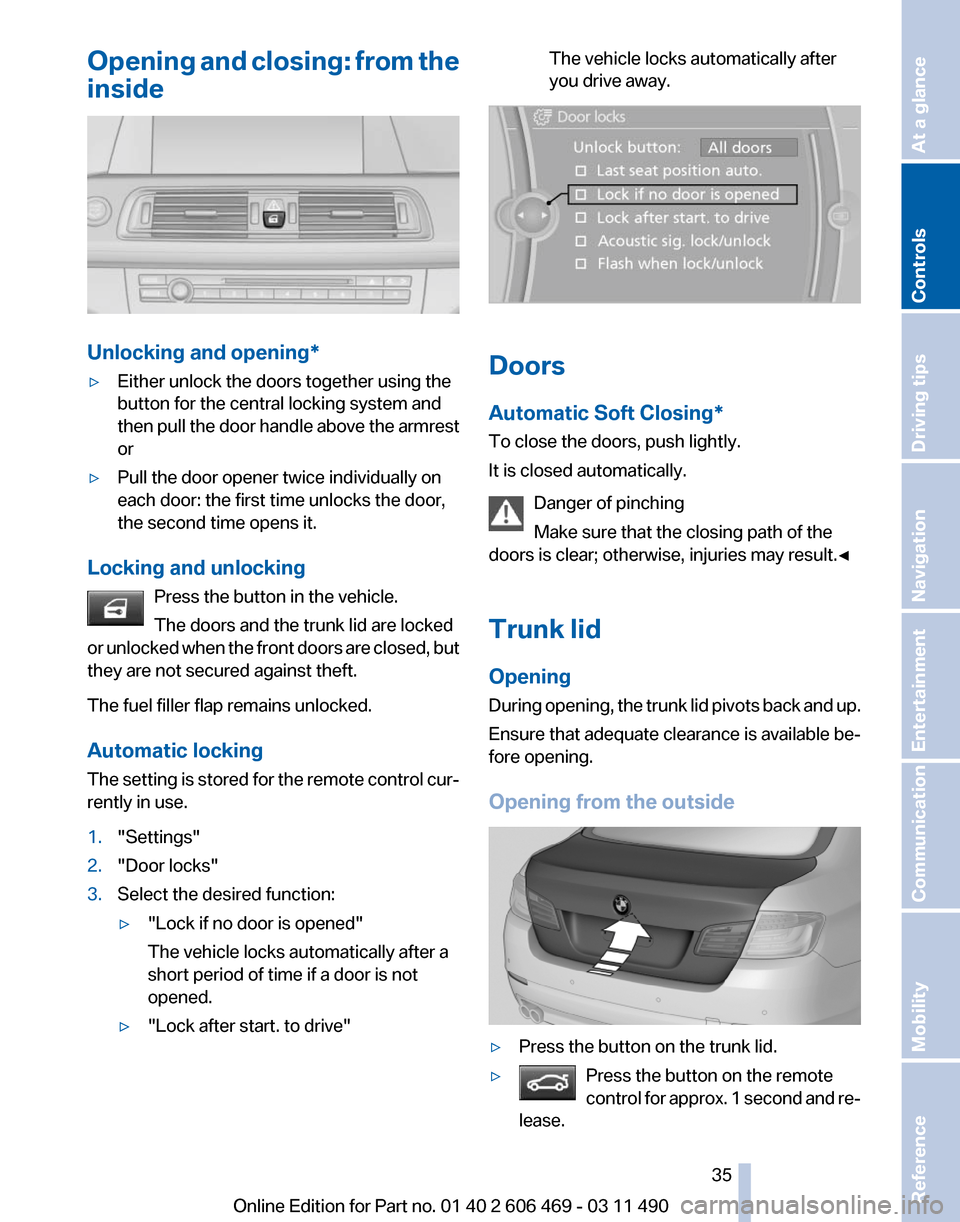
Unlocking and opening*
▷
Either unlock the doors together using the
button for the central locking system and
then
pull the door handle above the armrest
or
▷ Pull the door opener twice individually on
each door: the first time unlocks the door,
the second time opens it.
Locking and unlocking Press the button in the vehicle.
The doors and the trunk lid are locked
or
unlocked when the front doors are closed, but
they are not secured against theft.
The fuel filler flap remains unlocked.
Automatic locking
The setting is stored for the remote control cur‐
rently in use.
1. "Settings"
2. "Door locks"
3. Select the desired function:
▷"Lock if no door is opened"
The vehicle locks automatically after a
short period of time if a door is not
opened.
▷ "Lock after start. to drive" The vehicle locks automatically after
you drive away.
Doors
Automatic Soft Closing*
To close the doors, push lightly.
It is closed automatically.
Danger of pinching
Make sure that the closing path of the
doors is clear; otherwise, injuries may result.◀
Trunk lid
Opening
During
opening, the trunk lid pivots back and up.
Ensure that adequate clearance is available be‐
fore opening.
Opening from the outside ▷
Press the button on the trunk lid.
▷ Press the button on the remote
control
for approx. 1 second and re‐
lease. Seite 35
35Online Edition for Part no. 01 40 2 606 469 - 03 11 490
Reference Mobility Communication Entertainment Navigation Driving tips
Controls At a glance
Page 37 of 304
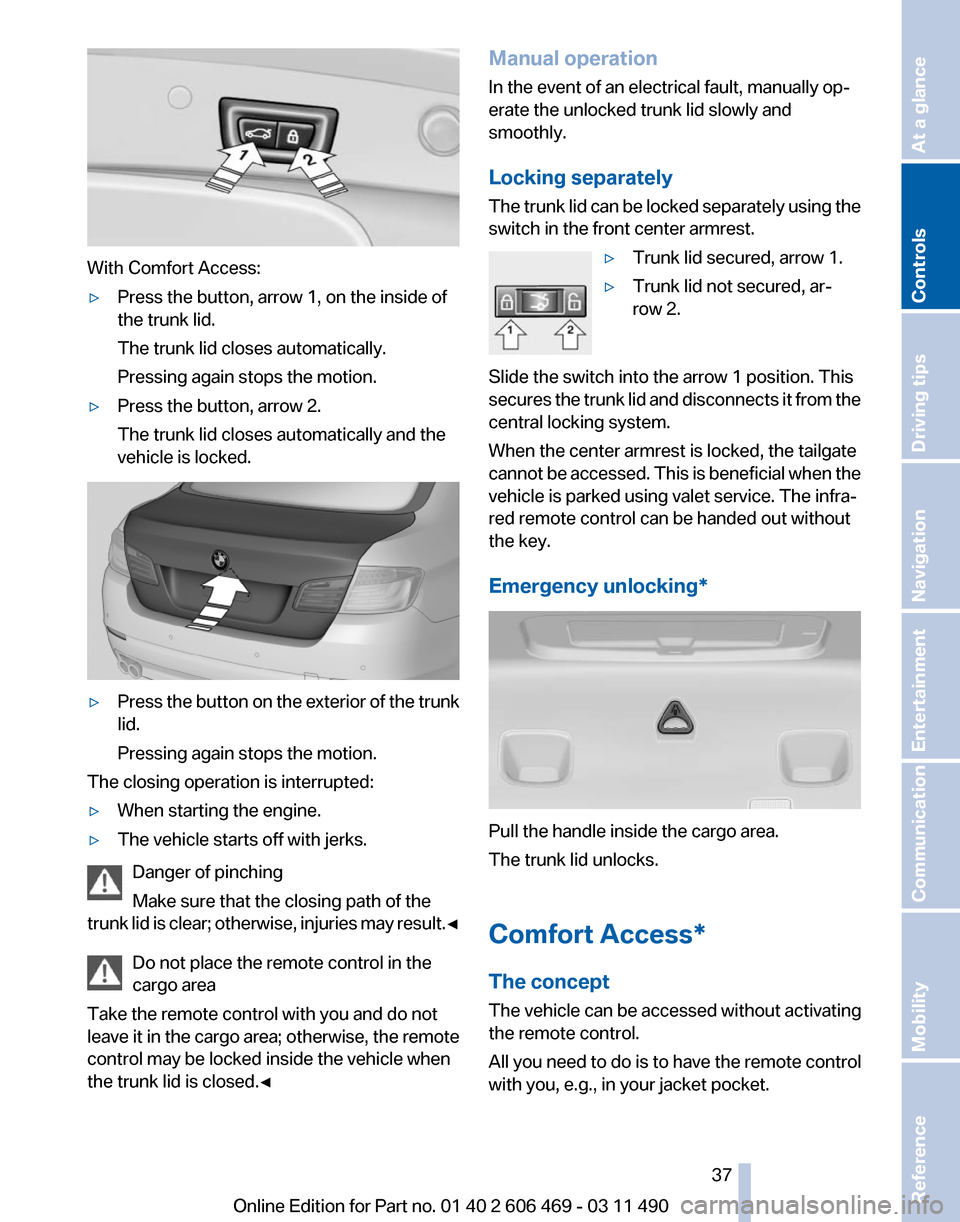
With Comfort Access:
▷
Press the button, arrow 1, on the inside of
the trunk lid.
The trunk lid closes automatically.
Pressing again stops the motion.
▷ Press the button, arrow 2.
The trunk lid closes automatically and the
vehicle is locked. ▷
Press the button on the exterior of the trunk
lid.
Pressing again stops the motion.
The closing operation is interrupted:
▷ When starting the engine.
▷ The vehicle starts off with jerks.
Danger of pinching
Make sure that the closing path of the
trunk
lid is clear; otherwise, injuries may result.◀ Do not place the remote control in the
cargo area
Take the remote control with you and do not
leave it in the cargo area; otherwise, the remote
control may be locked inside the vehicle when
the trunk lid is closed.◀ Manual operation
In the event of an electrical fault, manually op‐
erate the unlocked trunk lid slowly and
smoothly.
Locking separately
The
trunk lid can be locked separately using the
switch in the front center armrest.
▷Trunk lid secured, arrow 1.
▷ Trunk lid not secured, ar‐
row 2.
Slide the switch into the arrow 1 position. This
secures
the trunk lid and disconnects it from the
central locking system.
When the center armrest is locked, the tailgate
cannot be accessed. This is beneficial when the
vehicle is parked using valet service. The infra‐
red remote control can be handed out without
the key.
Emergency unlocking* Pull the handle inside the cargo area.
The trunk lid unlocks.
Comfort Access*
The concept
The vehicle can be accessed without activating
the remote control.
All you need to do is to have the remote control
with you, e.g., in your jacket pocket. Seite 37
37Online Edition for Part no. 01 40 2 606 469 - 03 11 490
Reference Mobility Communication Entertainment Navigation Driving tips
Controls At a glance
Page 39 of 304
If this occurs, open or close the vehicle using the
buttons
on the remote control or use a key in the
door lock.
To subsequently start the engine, hold the re‐
mote control against the marked area on the
steering column, refer to page 29.
Alarm system*
The concept
The vehicle alarm system responds to:
▷ Opening of a door, the hood or the trunk lid.
▷ Movements in the vehicle: interior motion
sensor, refer to page 40.
▷ Changes in the vehicle tilt, e.g., during at‐
tempts to steal a wheel or when towing the
car.
▷ Interruptions in battery voltage.
The alarm system briefly indicates tampering:
▷ By sounding an acoustic alarm.
▷ By switching on the hazard warning system.
▷ By flashing the high beams.
Arming and disarming the alarm
system
General information
When
you lock or unlock the vehicle, either with
the remote control or at the door lock*, the alarm
system is armed or disarmed at the same time.
Door lock and armed alarm system
Unlocking via the door lock will trigger the alarm
on some country-specific versions.
Trunk lid and armed alarm system
The trunk lid can be opened using the remote
control, even if the alarm system is armed.
Press the button on the remote control
for approx. 1 second and release.
After the trunk lid is closed, it is locked and
monitored again by the alarm system. The haz‐
ard warning system flashes once. In some vehicle equipment variants, the trunk lid
can only be opened using the remote control if
the vehicle was unlocked first.
Panic mode*
Press
the button on the remote control
for at least 3 seconds.
Switching off the alarm
▷ Unlock the vehicle using the remote control.
▷ With Comfort Access: If you are carrying the
remote control with you, pull on the door
handle.
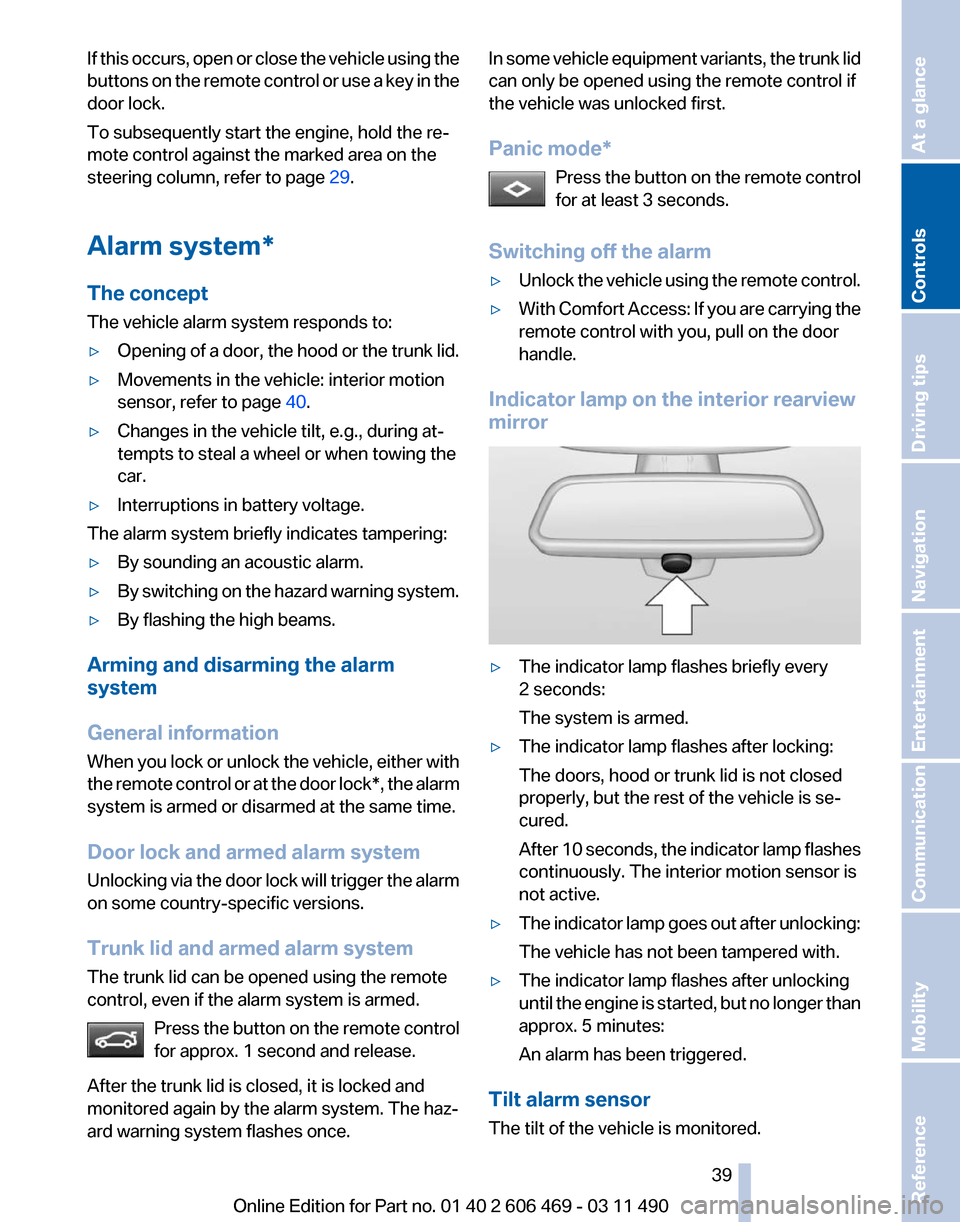
Indicator lamp on the interior rearview
mirror ▷
The indicator lamp flashes briefly every
2 seconds:
The system is armed.
▷ The indicator lamp flashes after locking:
The doors, hood or trunk lid is not closed
properly, but the rest of the vehicle is se‐
cured.
After
10 seconds, the indicator lamp flashes
continuously. The interior motion sensor is
not active.
▷ The indicator lamp goes out after unlocking:
The vehicle has not been tampered with.
▷ The indicator lamp flashes after unlocking
until
the engine is started, but no longer than
approx. 5 minutes:
An alarm has been triggered.
Tilt alarm sensor
The tilt of the vehicle is monitored. Seite 39
39Online Edition for Part no. 01 40 2 606 469 - 03 11 490
Reference Mobility Communication Entertainment Navigation Driving tips
Controls At a glance
Page 85 of 304
Safety
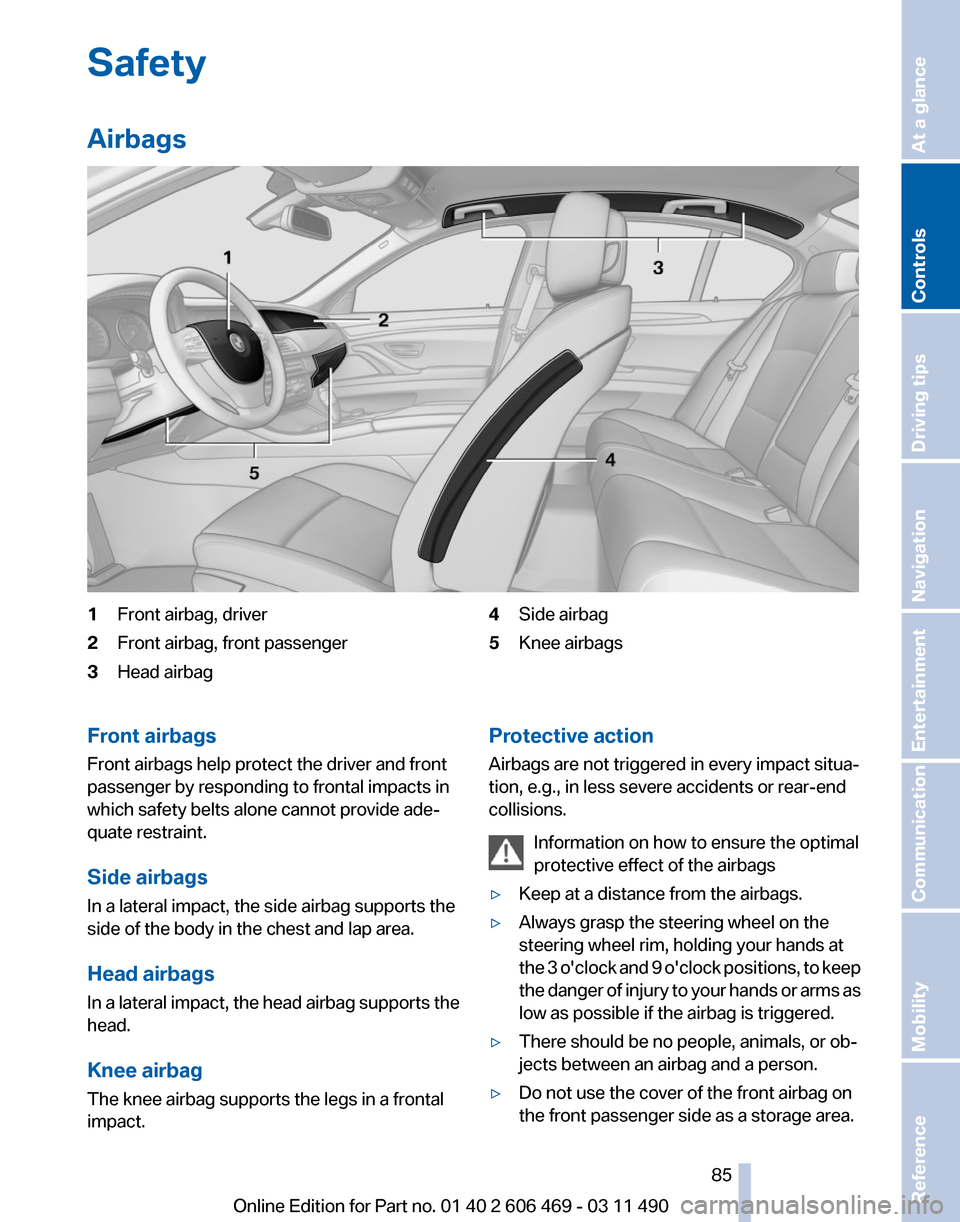
Airbags
1
Front airbag, driver
2 Front airbag, front passenger
3 Head airbag 4
Side airbag
5 Knee airbags
Front airbags
Front airbags help protect the driver and front
passenger by responding to frontal impacts in
which safety belts alone cannot provide ade‐
quate restraint.
Side airbags
In a lateral impact, the side airbag supports the
side of the body in the chest and lap area.
Head airbags
In
a lateral impact, the head airbag supports the
head.
Knee airbag
The knee airbag supports the legs in a frontal
impact. Protective action
Airbags are not triggered in every impact situa‐
tion, e.g., in less severe accidents or rear-end
collisions.
Information on how to ensure the optimal
protective effect of the airbags
▷ Keep at a distance from the airbags.
▷ Always grasp the steering wheel on the
steering wheel rim, holding your hands at
the
3 o'clock and 9 o'clock positions, to keep
the danger of injury to your hands or arms as
low as possible if the airbag is triggered.
▷ There should be no people, animals, or ob‐
jects between an airbag and a person.
▷ Do not use the cover of the front airbag on
the front passenger side as a storage area. Seite 85
85Online Edition for Part no. 01 40 2 606 469 - 03 11 490
Reference Mobility Communication Entertainment Navigation Driving tips
Controls At a glance
Page 135 of 304
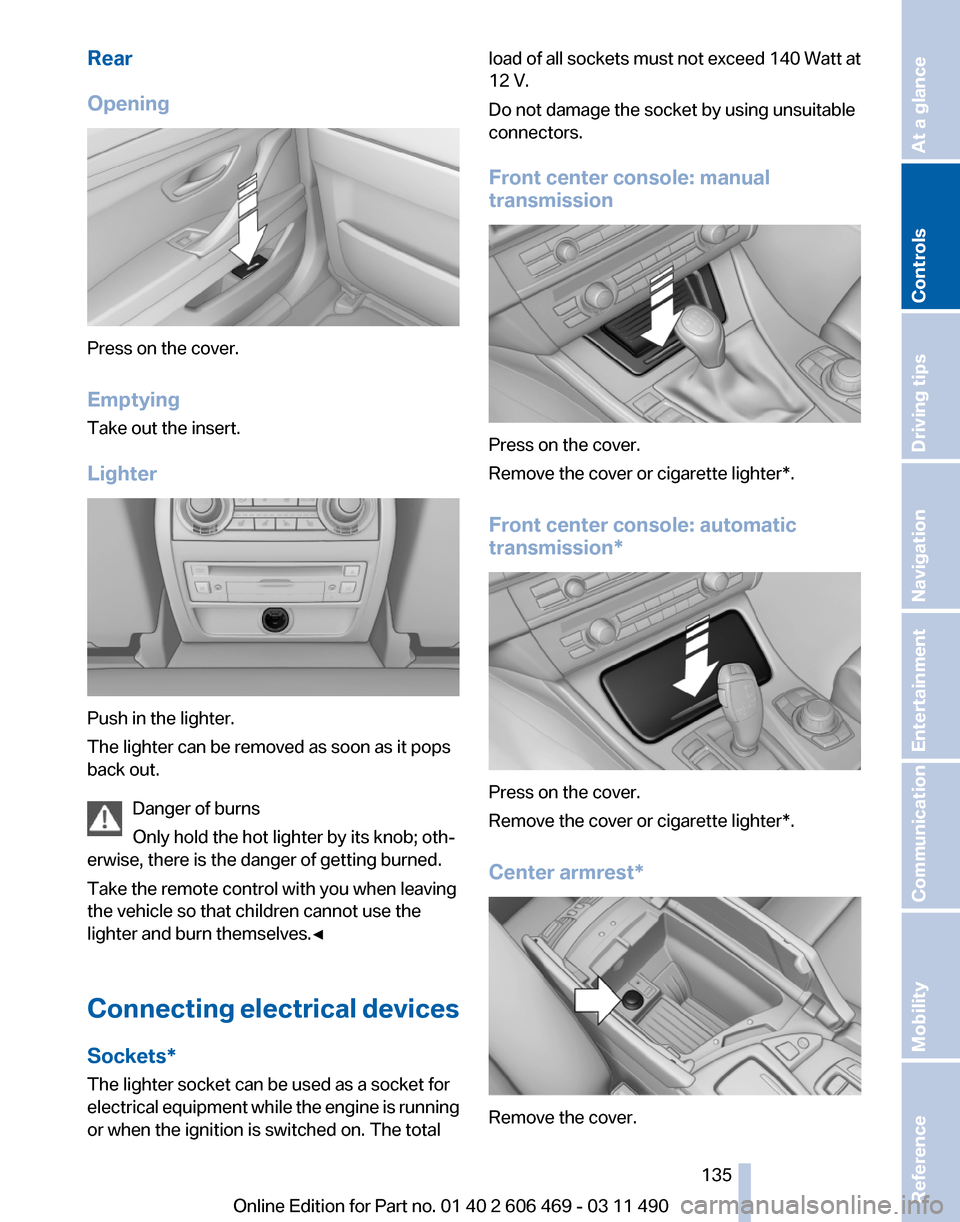
Rear
Opening
Press on the cover.
Emptying
Take out the insert.
Lighter
Push in the lighter.
The lighter can be removed as soon as it pops
back out.
Danger of burns
Only hold the hot lighter by its knob; oth‐
erwise, there is the danger of getting burned.
Take the remote control with you when leaving
the vehicle so that children cannot use the
lighter and burn themselves.◀
Connecting
electrical devices
Sockets*
The lighter socket can be used as a socket for
electrical equipment while the engine is running
or when the ignition is switched on. The total load of all sockets must not exceed 140 Watt at
12 V.
Do not damage the socket by using unsuitable
connectors.
Front center console: manual
transmission
Press on the cover.
Remove the cover or cigarette lighter*.
Front center console:
automatic
transmission* Press on the cover.
Remove the cover or cigarette lighter*.
Center armrest*
Remove the cover.
Seite 135
135Online Edition for Part no. 01 40 2 606 469 - 03 11 490
Reference Mobility Communication Entertainment Navigation Driving tips
Controls At a glance
Page 137 of 304
Ensure that the lock is securely en‐
gaged
When
folding back the backrest, be sure that
it locks in place securely. If it is not properly
engaged, transported cargo could enter the
passenger compartment during braking or
evasive maneuvers and endanger the vehi‐
cle occupants.◀ 2.
Release the latch plate from the fixture on
the rear window shelf and insert it into the
belt
lock of the center safety belt. Make sure
you hear the latch plate engage.
To secure cargo, refer to page 149,
with nets or
draw straps, the cargo area is fitted with lashing
eyes.
Ski bag*
Capacity
The ski bag can be used to transport up to four
pairs of skis with a length of up to 6 ft/2.10 m or,
depending on the binding, up to two snow‐
boards with a length of up to 5 ft/1.60 m.
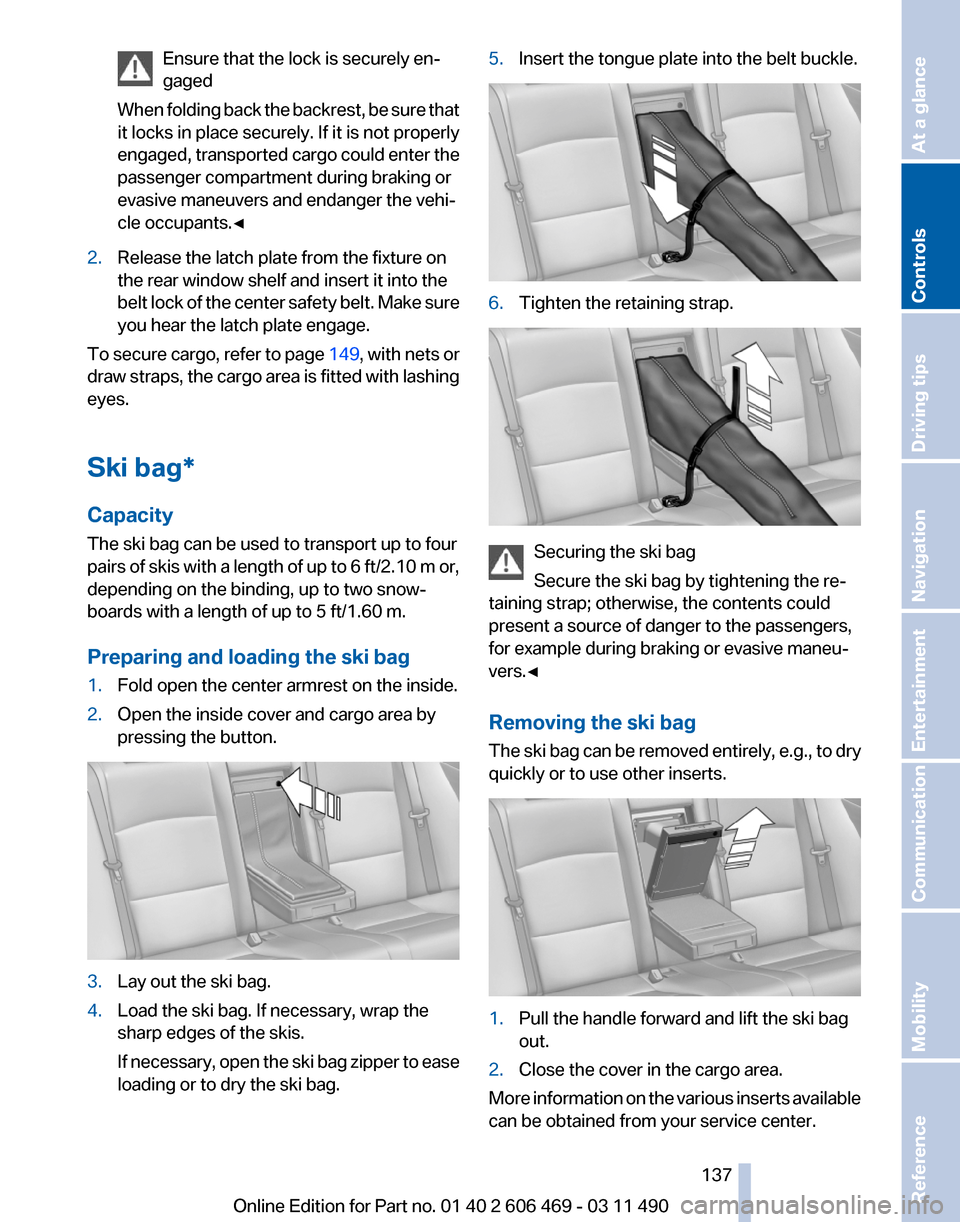
Preparing and loading the ski bag
1. Fold open the center armrest on the inside.
2. Open the inside cover and cargo area by
pressing the button. 3.
Lay out the ski bag.
4. Load the ski bag. If necessary, wrap the
sharp edges of the skis.
If
necessary, open the ski bag zipper to ease
loading or to dry the ski bag. 5.
Insert the tongue plate into the belt buckle. 6.
Tighten the retaining strap. Securing the ski bag
Secure the ski bag by tightening the re‐
taining strap; otherwise, the contents could
present a source of danger to the passengers,
for example during braking or evasive maneu‐
vers.◀
Removing the ski bag
The
ski bag can be removed entirely, e.g., to dry
quickly or to use other inserts. 1.
Pull the handle forward and lift the ski bag
out.
2. Close the cover in the cargo area.
More information on the various inserts available
can be obtained from your service center. Seite 137
137Online Edition for Part no. 01 40 2 606 469 - 03 11 490
Reference Mobility Communication Entertainment Navigation Driving tips
Controls At a glance
Page 138 of 304
Storage compartments
Storage compartments
The following storage compartments are avail‐
able in the vehicle interior:
▷
Glove compartment on the driver's and front
passenger side, refer to page 138.
▷ Storage compartment on the center con‐
sole: manual transmission.
▷ Storage compartment*, refer to page 141,
in the center console for remote control: au‐
tomatic transmission*.
▷ Storage compartment in the center armrest,
refer to page 139, in the front and rear.
▷ Compartments in the doors.
▷ Pockets*
on the backrests of the front seats.
▷ Net* in the front passenger footwell.
Glove compartment
Front passenger side
Opening Pull the handle.
The
light in the glove compartment switches on.
Close the glove compartment again im‐
mediately
Close the glove compartment immediately after
use while driving; otherwise, injury may occur
during accidents.◀ Closing
Fold up the cover.
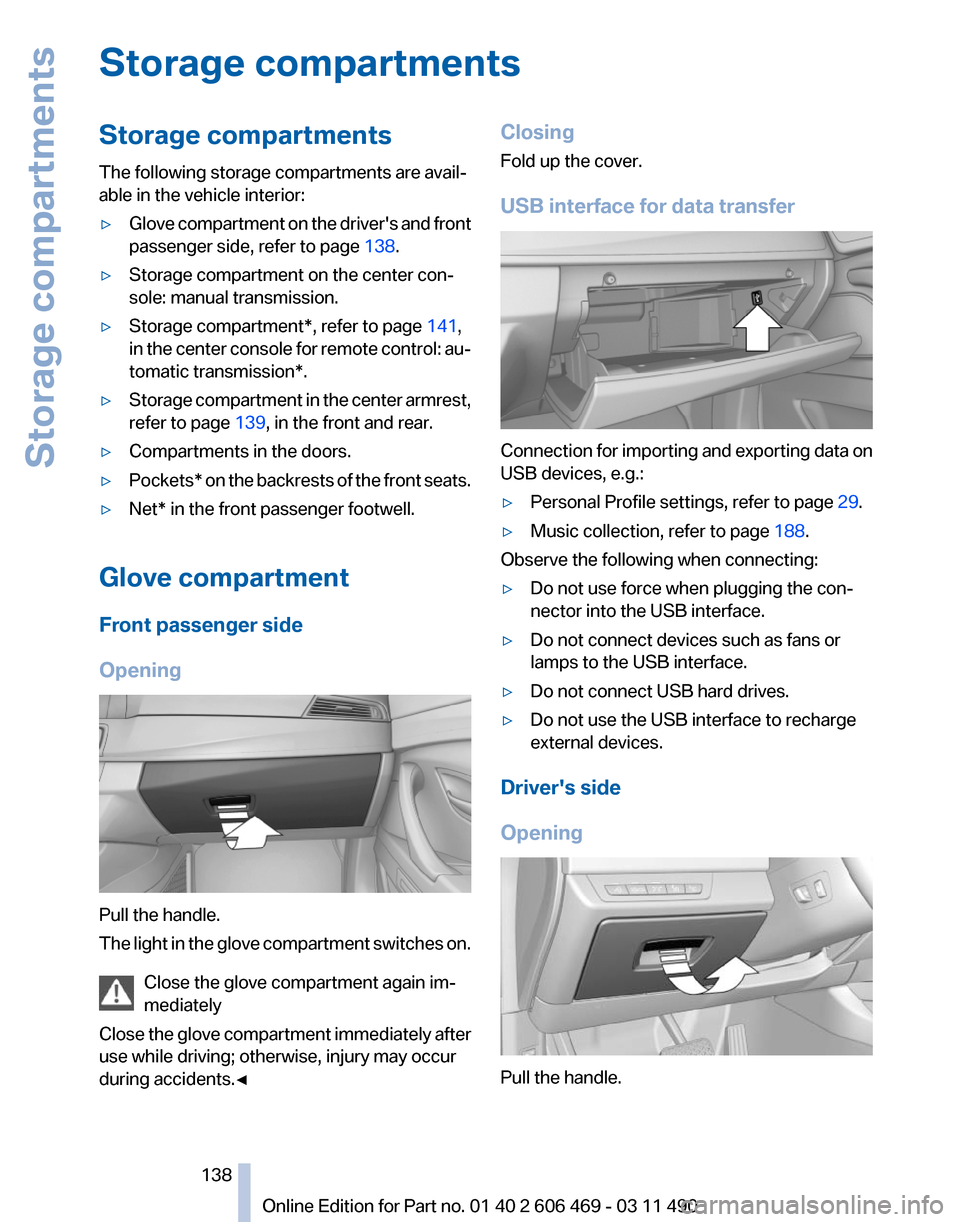
USB interface for data transfer
Connection for importing and exporting data on
USB devices, e.g.:
▷
Personal Profile settings, refer to page 29.
▷ Music collection, refer to page 188.
Observe the following when connecting:
▷ Do not use force when plugging the con‐
nector into the USB interface.
▷ Do not connect devices such as fans or
lamps to the USB interface.
▷ Do not connect USB hard drives.
▷ Do not use the USB interface to recharge
external devices.
Driver's side
Opening Pull the handle.
Seite 138
138 Online Edition for Part no. 01 40 2 606 469 - 03 11 490
Storage compartments
Page 139 of 304
Close the glove compartment again im‐
mediately
Close
the glove compartment immediately after
use while driving; otherwise, injury may occur
during accidents.◀
Closing
Fold up the cover.
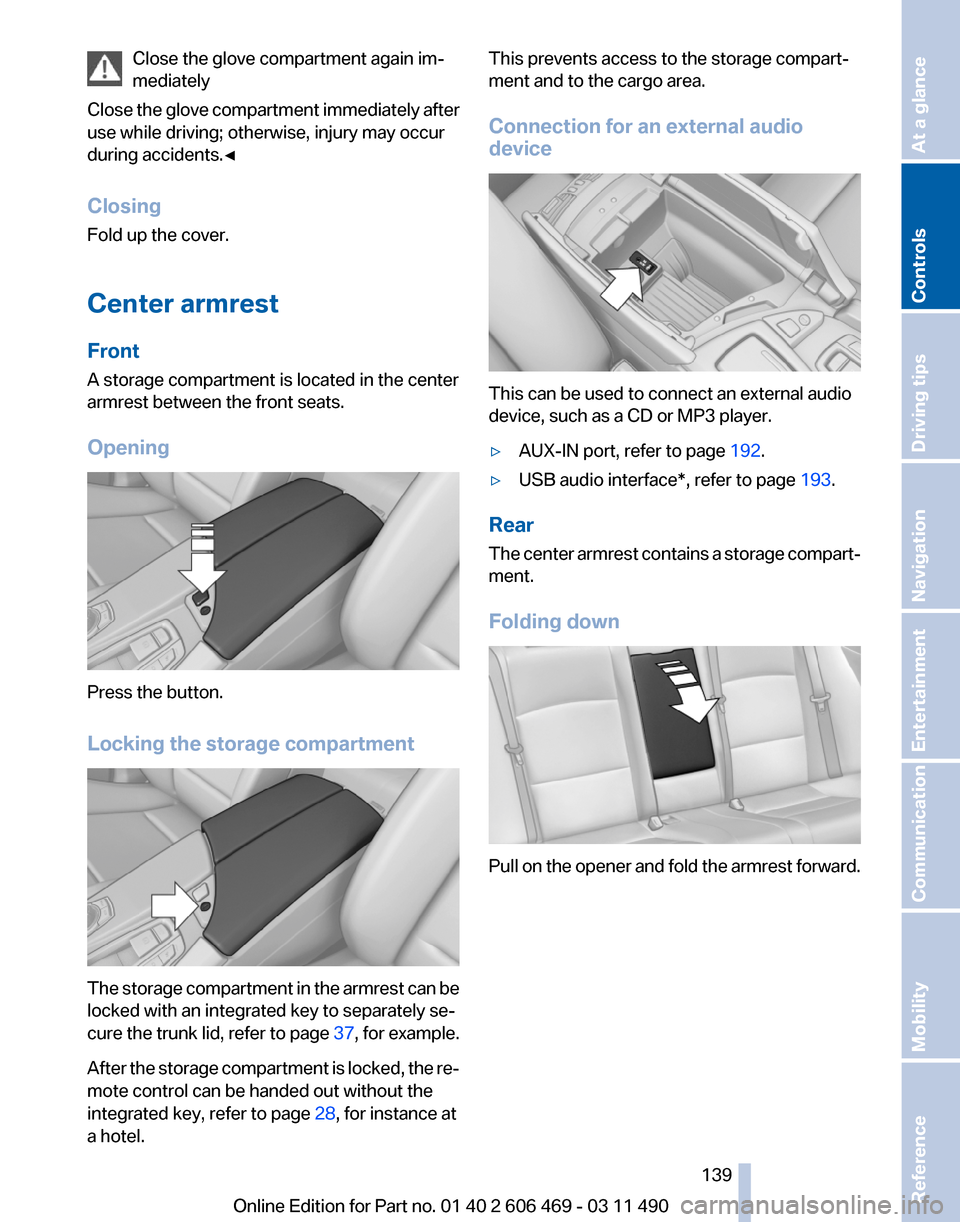
Center armrest
Front
A storage compartment is located in the center
armrest between the front seats.
Opening Press the button.
Locking the storage compartment
The storage compartment in the armrest can be
locked with an integrated key to separately se‐
cure
the trunk lid, refer to page 37, for example.
After the storage compartment is locked, the re‐
mote control can be handed out without the
integrated key, refer to page 28, for instance at
a hotel. This prevents access to the storage compart‐
ment and to the cargo area.
Connection for an external audio
device
This can be used to connect an external audio
device, such as a CD or MP3 player.
▷
AUX-IN port, refer to page 192.
▷ USB audio interface*, refer to page 193.
Rear
The
center armrest contains a storage compart‐
ment.
Folding down Pull on the opener and fold the armrest forward.
Seite 139
139Online Edition for Part no. 01 40 2 606 469 - 03 11 490
Reference Mobility Communication Entertainment Navigation Driving tips
Controls At a glance
Page 140 of 304
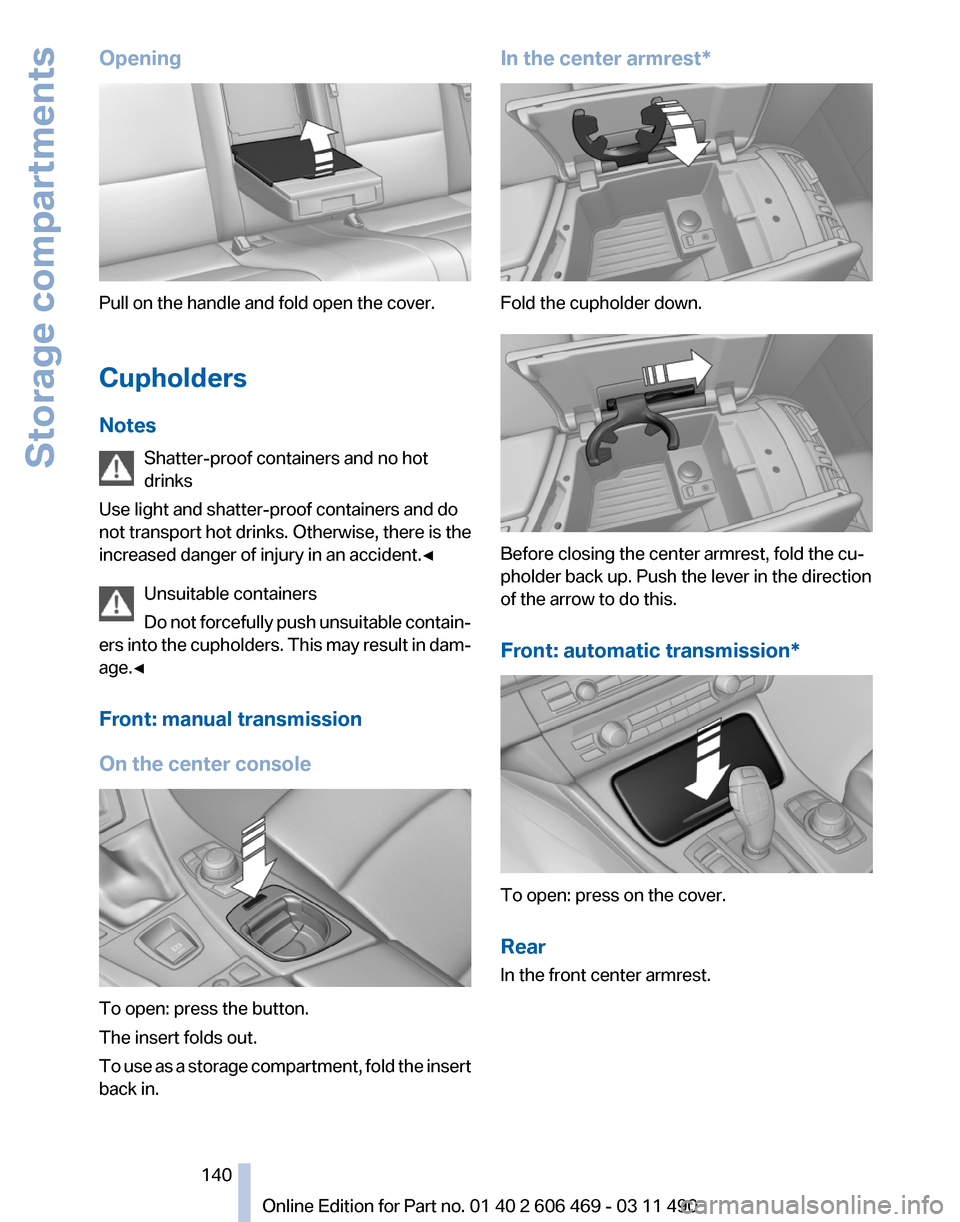
Opening
Pull on the handle and fold open the cover.
Cupholders
Notes
Shatter-proof containers and no hot
drinks
Use light and shatter-proof containers and do
not
transport hot drinks. Otherwise, there is the
increased danger of injury in an accident.◀
Unsuitable containers
Do not forcefully push unsuitable contain‐
ers into the cupholders. This may result in dam‐
age.◀
Front: manual transmission
On the center console To open: press the button.
The insert folds out.
To
use as a storage compartment, fold the insert
back in. In the center armrest*
Fold the cupholder down.
Before closing the center armrest, fold the cu‐
pholder back up. Push the lever in the direction
of the arrow to do this.
Front: automatic transmission
* To open: press on the cover.
Rear
In the front center armrest.
Seite 140
140 Online Edition for Part no. 01 40 2 606 469 - 03 11 490
Storage compartments